Eric N. Posted April 26, 2013 Posted April 26, 2013 The stance is perfict on this one. Tell me how you did it-and chassis pics please!
tyrone Posted April 28, 2013 Author Posted April 28, 2013 (edited) Thanks fellas for the kind words... well yesterday I got a lot of work done on this one... I've got the engine assembled, I added a dist. and wires from detail master and ued the kit coil,, I added heater hoses, and made an oil dipstick..I added brake lines to the master cyliner and battery cables to the battery.... I painted the engine bay and interior semi-gloss black, but it looks a little to shiny to me,,, So I'll mist on a little dull coat to tone it down a little here's a few pics... thanks for looking and comments welcome.... Edited April 28, 2013 by tyrone
tyrone Posted April 28, 2013 Author Posted April 28, 2013 (edited) Here's a few more.... If you look closely you can see the oil dipstick in this picture.. Edited April 28, 2013 by tyrone
freakshow12 Posted April 28, 2013 Posted April 28, 2013 that looks great. I do agree with you that you could knock down the shine some.
Raskoraz Posted April 28, 2013 Posted April 28, 2013 What do you use to hold the pieces in place when dry fitting?
mikemodeler Posted April 28, 2013 Posted April 28, 2013 another awesome build Tyrone! I have several of these kits (68 & 69) and need to get started on building them like yours! Any idea what color you are going with?
RANDY L Posted April 28, 2013 Posted April 28, 2013 hi Thanks for the info This was a conversion i was going to do in the near future.The color i will use is butternut yellow and a black vinyl top in the rs version again thanks Randy Ludi
tyrone Posted April 29, 2013 Author Posted April 29, 2013 What do you use to hold the pieces in place when dry fitting? Patrick I use a light dab of testors, glue in the orange and white tube... just a small tab and they come apart pretty easy,,,
tyrone Posted April 29, 2013 Author Posted April 29, 2013 another awesome build Tyrone! I have several of these kits (68 & 69) and need to get started on building them like yours! Any idea what color you are going with? Not sure on the color yet Mike ... but I'm leaning towards a nice deep red.. unless something else jumps out at me.... I've been looking at pics on the computer for ideas,.....
tyrone Posted April 29, 2013 Author Posted April 29, 2013 hi Thanks for the info This was a conversion i was going to do in the near future.The color i will use is butternut yellow and a black vinyl top in the rs version again thanks Randy Ludi I was thinking about a vinyl top on this one too Randy.. But I'm gonna do a 69 Camaro when this one is finished, and I'll do the vinyl top on that one....I like your color choice...
tyrone Posted April 29, 2013 Author Posted April 29, 2013 I Love the stance on this one ... Camaros are my favorite cars.... especially 67/68..... but I'll take a 69 too...lol...
my80malibu Posted May 1, 2013 Posted May 1, 2013 (edited) Nice build. are you going to open the doors? In post #18 it shows the firewall fitted flush with the body, in post #28 it shows the firewall moved forward some with styrene across the top. Kind of a large gap what happened? what were those Nubs sanded off from were they part of the AMT kit or the Revell? By the way the Stance ,wheels, grille,engine detail, and all that under hood detail is CHA Ching. Edited May 1, 2013 by my80malibu
Jim Whalen Posted May 1, 2013 Posted May 1, 2013 Hi, This Camaro is coming along great! Looking forward to seeing more. Cheers, Jim
gtx6970 Posted May 1, 2013 Posted May 1, 2013 (edited) Now ya got me thinking. I have an old AMT 1968 kit around here that was planned for a Dave Strickler car, now I think I need to come up with a chassis from the revell kit and get going here soon Edited May 1, 2013 by gtx6970
tyrone Posted May 1, 2013 Author Posted May 1, 2013 Nice build. are you going to open the doors? In post #18 it shows the firewall fitted flush with the body, in post #28 it shows the firewall moved forward some with styrene across the top. Kind of a large gap what happened? what were those Nubs sanded off from were they part of the AMT kit or the Revell? By the way the Stance ,wheels, grille,engine detail, and all that under hood detail is CHA Ching. Hey Gabriel.... I used the firewall from the r/m 69 camaro... and when I put the engine in for mock ups.... there was to much of a gap between the engine and firewall, and the steering gear box shaft had a gap there also.. so when I positioned the firewall where it would work I had a gap that needed to be filled in... that's where the styrene on the top came from.. the nubs on the firewall was from the r/m kit and those notches were already there..
Eric N. Posted May 1, 2013 Posted May 1, 2013 I'v got some idea's for a 68 camaro-This helped spark more!
tyrone Posted May 6, 2013 Author Posted May 6, 2013 Thanks alot fellas for the kind words fellas...I've made some progress on this one... the interior is pretty much done, I added flocking, and seatbelts, the guage, radio and heat decals are from various decal sheets, I used the amt 68 camaro dash, the steering coulm and steerng wheel , and the shifter are from the r/m 69 kit... I've also got the engine area almost done, and I've been working on the exhaust.. I used the r/m 69 camaro exhaust, and cut it off in front of the mufflers, and added some mufflers from the parts box... thanks for looking and comments welcome...
nhra1625 Posted May 10, 2013 Posted May 10, 2013 This makes me want to redo my 69 Camaro Yenko that I built a few years back...Just the detail is enough to male me redo it...problem is that I have yet to see another kit in the stores as a donor haha Love the way this thing sits!
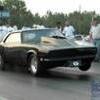
tyrone Posted May 18, 2013 Author Posted May 18, 2013 What's up fellas.... I pulled this one back out this week... and I've got the paint on it....here's a few pics.... thanks for looking and comments welcome......
John Pol Posted May 18, 2013 Posted May 18, 2013 Great job tyrone what kind of paint did you use for master? John Pol
Modlbldr Posted May 18, 2013 Posted May 18, 2013 That is looking great. Going to be a nice addition to the shelf. Later-
surfjunke Posted May 18, 2013 Posted May 18, 2013 Great work on this Camaro! Really like the details you added. The die cast grill really made a big difference.
Recommended Posts
Create an account or sign in to comment
You need to be a member in order to leave a comment
Create an account
Sign up for a new account in our community. It's easy!
Register a new accountSign in
Already have an account? Sign in here.
Sign In Now