gtx6970 Posted May 2, 2013 Posted May 2, 2013 Here is one you don't see much. Original issue MPC kit I bought this many years ago as an old builtup from a friend of mine. All I did was strip and repaint the body, made some of the side lettering using an ink jet printer and clear address labels ( decals to redo it weren't avail back then ) and put it in the case and called it done. The chassis was unpainted, so I left it that way, nothing added but plug wires to give it some bling looking thru the window openings . To this day this is one of my favorite kits and cars.
Jantrix Posted May 2, 2013 Posted May 2, 2013 I would LOVE to see this re-released. A great build up. Nice work.
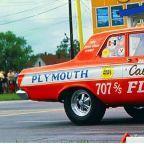
Draggon Posted May 2, 2013 Posted May 2, 2013 Very clean! Those 67 Chargers sure look good as funny cars.
gtx6970 Posted May 2, 2013 Author Posted May 2, 2013 Anyone got any body up pics.? All I can find are the 68 CMG Charger shots The blue tube I have on it I think was just a ballast weight and I want to see if or how a fuel tank was mounted I decided to go ahead and add some details to the ft of the engine ( LONG overdue ) while it's out of the case for a dusting
am73grand Posted May 3, 2013 Posted May 3, 2013 Awesome build. I love seeing classic kits built up!!!
bondo bill Posted May 3, 2013 Posted May 3, 2013 very cool -can you further explain the decal process
gtx6970 Posted May 3, 2013 Author Posted May 3, 2013 (edited) I did some tinkering with it last night and added a fuel tank and pump , and ran some fuel lines , it looked kind of nakid without it. I thought about taking it apart to spray the chassis black like the 1/1, but decided to just leave it as is till I no longer have any projects to do ( that'll be a while ) very cool -can you further explain the decal process It's basically just open windows office and using return address labels ( pick your size using test prints) and print them out on Avery clear address labels . Are they perfect? absolutely not. but at the time it was all I could do to replicate this car. The name on the ft fender and the dealership lettering on the quarter panel was done this way well over 10 years ago. Name on the door and the smaller sponser decals are fred cady i think. The body was cleared with testors enamel so the white is beginning to show signs of yellowing My plan in the near future is to redo the body and use modern decals . There is no clear over the decals . I am actually missing the engine cover portion of the interior tin in case anyone has an extra they want to part with Edited May 3, 2013 by gtx6970
Draggon Posted May 3, 2013 Posted May 3, 2013 I picked up a lot of engine cover tins awhile back. Bill, if you, or anyone, has some pics, I'll send you one if it matches.
gtx6970 Posted May 3, 2013 Author Posted May 3, 2013 A picture of the interior tin itself work ?,,,, I don't have a engine cover at all. Only thing I have are the later versions and such as the 1968 Color Me Gone tin shown on the top in this picture
ToyLvr Posted May 5, 2013 Posted May 5, 2013 Nice resto! Definiely a worthy subject. I built one of these when I was a kid, but don't remember what happened to it (maybe another victim of July 4th firecrackers). Bill - did you get the little jar of paint with it??? ;-) Got to get another one....once I figure out how to come up with $150.00 to buy one on EvilBay.
gtx6970 Posted May 6, 2013 Author Posted May 6, 2013 Back when I bought it ( over 10 , probably closer to 15 years ago ) all I got was the loosely assembled chassis , what was left of the int tins, body and rear bumper. I used the glass and ft grille/bumper from the old mpc 67 charger kit ( the one molded in black ) I didn't get any paint, box or instructions You would probably hate me if I said how much I paid for it back then ( it was WAAAAAAAY less then $150 ) Bill - did you get the little jar of paint with it??? ;-)
gtx6970 Posted May 6, 2013 Author Posted May 6, 2013 I did manage to tinker with it a bit last week . I finally added , and long overdue crank dampner, fuel pump and lines and a tank. I am almost positive the tank is 100% wrong but it was all I had in the parts box. It's done and back in the case till I decide to finally take it apart to make it a bit more correct. ( someday)
Recommended Posts
Create an account or sign in to comment
You need to be a member in order to leave a comment
Create an account
Sign up for a new account in our community. It's easy!
Register a new accountSign in
Already have an account? Sign in here.
Sign In Now