Skypower Posted January 16, 2014 Share Posted January 16, 2014 Looks just like the back half of your avitar. Oh it's just a model my bad. Great job looks like the real thing. Link to comment Share on other sites More sharing options...
slusher Posted January 16, 2014 Share Posted January 16, 2014 Color and finish look great... Link to comment Share on other sites More sharing options...
FASTBACK340 Posted January 17, 2014 Author Share Posted January 17, 2014 Thanks gang…. more to follow later, foiling & decals today. Link to comment Share on other sites More sharing options...
om617 Posted January 18, 2014 Share Posted January 18, 2014 The paint turned out great and will look really good with the black steelies. Do you know if this color was avaliable for the 69 Charger? Link to comment Share on other sites More sharing options...
FASTBACK340 Posted January 18, 2014 Author Share Posted January 18, 2014 Do you know if this color was avaliable for the 69 Charger? The color on my car L1 Surf Turquoise Metallic, and it was a one-year only color. I'm including a file with the `69 paint chart. http://www.moparts.org/Tech/Archive/paint/1.html Link to comment Share on other sites More sharing options...
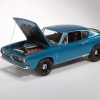
FASTBACK340 Posted January 18, 2014 Author Share Posted January 18, 2014 OK … updates on the "Quick Build" Today we spent the better part of a dreary Saturday morning trying not to destroy the marginal paint job I applied. Believe me, it looks much better in photographs….. and the bare metal was trying to lift the clear in some spots. I fought with it until I was tired and hungry and managed to make it presentable. But remember - Experience: this is where it comes from, our mistakes. On with todays updates. If I wasn't so busy this weekend I'd probably have it done. Let's see how things roll…. I still have to install the headlight buckets, but here's the modified grilles. The foiling is done. The rear window was split into pieces as on the actual car. The overlapping edges look realistic. I have to work on making this overlap more pronounced as on a real car it does NOT have one continuous piece of trim. I did the front windshield one piece and the rear looks better. I also foiled and painted/detailed the rear trunk lid trim. This was a major league PIA! It's the worst aspect of the build and I now know what NOT to do. Again…. experience. All you young/new builders pay attention. There's good and bad side by side on this build. We (hopefully….) learn from every build. Here's a shot or two of those Keith Marks decals. They are thin. I mean so thin theres only one side….. BE CAREFUL! Use one that has an extra on the sheet for your first attempt. He thoughtfully includes extra graphics, thank you very much. Just have to cut glass, install it and the headlights, mount bumpers, and stuff it all together. It's getting there….. Link to comment Share on other sites More sharing options...
FASTBACK340 Posted January 31, 2014 Author Share Posted January 31, 2014 Wow, after a brief kick in the shorts from life, I got a chance to hit the workbench again…. I made templates for all the glass and cut them from clear packaging I saved. I don't remember if it was from Holiday cards or something else. Then we polished and installed the body "glass". While this is a little more tricky to install, the realism is worth it. I used this neat little tool I think I got from MCM… if not, my apologies, but it does work good! 5 minute epoxy is key…. Once installed it looks sweet! The vent windows and rear side glass are in. I still have to add the chrome divider strip on the rear side windows. The headlamp buckets will go in next. Shells are foiled brass tube w/ plastic buckets holding MV Lense's. I know this build is taking way longer than I expected. I wonder how long the full-detail build will last? This WILL be done this weekend. I'm fussing with the high mount third brake light now…… Link to comment Share on other sites More sharing options...
Skypower Posted January 31, 2014 Share Posted January 31, 2014 Was wondering where you got off to John, Cuda looks great. Thanks for showing the tools, awesome job. Link to comment Share on other sites More sharing options...
Tom Geiger Posted January 31, 2014 Share Posted January 31, 2014 Looks great John! Per your comment on making the BMF edges of the window trim stand out, I found if I went two layers thick on one of the matching edges, maybe on the side pieces, the edge becomes more visible. Hope to see you in April! Link to comment Share on other sites More sharing options...
FASTBACK340 Posted January 31, 2014 Author Share Posted January 31, 2014 Thanks Bob. I had a few issues recently that kept me from the bench. Sister…Father in Law….Job….etc…. And as for seeing me in April, there's no way I'll willingly miss NNL East. All those years I wasn't building, I was still attending and buying. So far the `68 will be done this weekend. The `70 is coming along and since this years sub-theme is wagons, I bought a `69 Barracuda resin Phanthom wagon 2 yrs. ago. 68-69-70…. That's the plan. Link to comment Share on other sites More sharing options...
Skypower Posted January 31, 2014 Share Posted January 31, 2014 That wagon is gonna be cool, and I sure know how the life in the way thing goes, hope all is well with everything now. Looking forward to more updates of your builds. Link to comment Share on other sites More sharing options...
FASTBACK340 Posted January 31, 2014 Author Share Posted January 31, 2014 Here's a teaser shot…… Link to comment Share on other sites More sharing options...
wrecker388 Posted January 31, 2014 Share Posted January 31, 2014 Looks great John! Love the 1:1 too. Link to comment Share on other sites More sharing options...
Mopar - D Posted February 1, 2014 Share Posted February 1, 2014 John, Your quick build has really come a long ways. Your front grill looks spot on. Looking forward to seeing this one under glass. Link to comment Share on other sites More sharing options...
FASTBACK340 Posted February 1, 2014 Author Share Posted February 1, 2014 Yeah, the grilles are a huge improvement. But believe me, it photographs well. I just got home from rehearsal and figured I'd stop in a see what's up. When I come home from work tomorrow afternoon I'm on a mission. I have 1 headlight, 1 door handle, 1 door mirror, both wipers, stuff the shell over the interior and chassis and put the plates on. So close… Link to comment Share on other sites More sharing options...
Custom Mike Posted February 2, 2014 Share Posted February 2, 2014 (edited) John, the front end looks great, and the glass is perfect! Hurry up and finish this baby! I used this neat little tool I think I got from MCM… if not, my apologies, but it does work good! 5 minute epoxy is key…. You've got to show me some more of that tool, I need something like that...BAD!!! Edited February 2, 2014 by Custom Mike Link to comment Share on other sites More sharing options...
FASTBACK340 Posted February 2, 2014 Author Share Posted February 2, 2014 Google Model Cars Windshield Tool and the page will be listed. It's an article I read in MCM it works sweet. Check it out! Link to comment Share on other sites More sharing options...
FASTBACK340 Posted February 2, 2014 Author Share Posted February 2, 2014 I really don't want to talk about it right now……. Link to comment Share on other sites More sharing options...
Jantrix Posted February 2, 2014 Share Posted February 2, 2014 Oh man.......................what happened? Link to comment Share on other sites More sharing options...
FASTBACK340 Posted February 2, 2014 Author Share Posted February 2, 2014 OK…. the medication has kicked in and Amy has untied me. In previous posts I was kind of embarrassed as to how bad my Cuda was turning out, yet how fantastic it looked in pictures. Really…. I was doubting the outcome as... The right side of the car (which I never showed…) had a HUGE clear coat run I was hopping I could polish out a bit. Then the sanding scratches started showing through on the roof, trunk, and again, the entire right side….. There was always a dog hair in the hood I pulled out and left a shadow….and again, I was hoping to polish out. The tail panel looked like I used a crayon to detail it…. Then I got a smudge of epoxy on the left front fender just over the tire. Clear coat ruined... Then I installed the rear view mirror (I was thinking I'd throw this together and never take it out & show….) when the mounting pin was longer than the recess I carefully added. It came right through the roof; dead center above the windshield frame. Well, I carefully removed all the handles, mirrors, and those beautiful grilles I fabricated…… and I stepped on the SOB OK, just above the wheel opening and the center of the roof. That was the last straw. OK, this build has been officially killed, buried, and will be resurrected with attempt #2. I haven't stepped on one in YEARS…… Link to comment Share on other sites More sharing options...
Lovefordgalaxie Posted February 2, 2014 Share Posted February 2, 2014 Well, I beat you feel better now. The best thing to do is to start a new one, and don't give up on the original idea. After all, it's just plastic isn't it? Link to comment Share on other sites More sharing options...
FASTBACK340 Posted February 2, 2014 Author Share Posted February 2, 2014 I could have stripped it and saved it but I was just soooooooo P-O'ed it was that or kick the dog. And I would NEVER kick ANY dog….. <sigh….> I'm off to the workbench to re-scribe some panel lines and fabricate some vent windows. Link to comment Share on other sites More sharing options...
jeffs396 Posted February 2, 2014 Share Posted February 2, 2014 Sorry to hear John... At least with #2 you'll be able to catch things you missed on #1. Keep at it, you'll get a better version that you'll be proud of! Link to comment Share on other sites More sharing options...
Ramfins59 Posted February 2, 2014 Share Posted February 2, 2014 John, that really BITES THE BIG ONE...!!! Sorry to hear it. Calm down for awhile......play some cool tunes......thump out a few angry notes on one of your bass's......have a libation "& such"......and come back to the workbench with a fresh mood and outlook. Link to comment Share on other sites More sharing options...
freakshow12 Posted February 2, 2014 Share Posted February 2, 2014 I have been there brother! I think you should just jump right in to the detailed build of this sweet ride... Link to comment Share on other sites More sharing options...
Recommended Posts