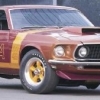
bogger44 Posted January 1, 2014 Posted January 1, 2014 I've decided to kick off the new year of model building with the Monogram Pro Modeler Torino GT. I haven't posted a WIP in a long time, but here it goes...... I'm building it in the likes of a day-2 car. The 429 will be receiving drag headers and chrome goodies included in the kit, and will be plumbed. I got the block assembled and painted Dupli-Color Ford Engine Blue today. All mold lines were removed from the body and then I slapped on some white Krylon primer. Colors will be a white exterior with red laser stripes, and a red interior. I'm ditching the stock tires for some AMT pad printed Polyglas GT's. The smaller F60's up front, and meatier L60's out back. I raided the AMT 66 Galaxie of it's Cragars and they fit the Goodyears perfectly, just will probably need to file down the backsides a little on the fronts to allow proper fitment of the wheelbacks. These Torinos sit low in back, so I'll also give it a little lift to get it's butt off the ground for a more aggressive stance. Did a quick mock-up with the tires and took a couple pics. Hope to have more soon.......
MyBradKeselowski Posted January 1, 2014 Posted January 1, 2014 Your off to a great start, those tires and wheels make the Torino look super. I really like your engine..
disabled modeler Posted January 1, 2014 Posted January 1, 2014 I always thought the 70 to 72s looked the best....nice project Tony!
cobraman Posted January 1, 2014 Posted January 1, 2014 I really like that car so I will be watching this one for sure.
slusher Posted January 1, 2014 Posted January 1, 2014 Love the wheels and tires too. Looking forward to your build...
bogger44 Posted January 5, 2014 Author Posted January 5, 2014 Thanks for all your interest guys. I haven't made a whole lot of progress over the last few days, but did manage to get a good deal done on the 429, plumbed it as far as I wanted to take this one. I will be adding heater hoses and battery cables later on down the road. The dizzy is a Prestons pre-wired unit with a added vacuum booster(?) taken from the kit distributor. The interior has been painted as well. I went with Rustoleum Regal Red as it is a fairly close match to the red on the 1:1 interiors. It is gloss, so I have sprayed the carpet with a flat clear, and will spray some semi-gloss over the other interior bits.
hjracing Posted January 6, 2014 Posted January 6, 2014 It's come along nicely! I'll keep an eye on this one!
slusher Posted January 6, 2014 Posted January 6, 2014 Engine looks great Tony and real nice color for the interior...
smellyfatdude Posted January 6, 2014 Posted January 6, 2014 Having just done one of the old AMT annual ' 70 Torino kits, I know this will be of interest. It's looking good!
bogger44 Posted January 17, 2014 Author Posted January 17, 2014 (edited) Thanks everyone. I finished up the interior a few days ago and just now got the chance to snap a few pics. These Torinos had a goofy horizontal tach on the bottom left of the dash.....what serious gear-jammer would use that? So I took the tach from the Revell '68 Charger and mounted it on the steering column. BMF for the chrome trim and door handles/window cranks. All paint detail on the dash. I didn't use the speedo and gauge decals after the experience with the woodgrain decals on the door panels. While applying those, even with liberal amounts of micro set used, they kept curling up along the edges in various spots. The only way I was able to get them to lay down properly was after they dried awhile, I applied a tiny amount of Testors glue from the tube underneath and pressed them down. Kinda has me worried about the laser stripes for the body........ Last night I laid down the black in the engine bay. Testors flat black with semi-gloss clear. Making a little progress on the chassis, too. I used Krylon Ruddy Brown primer to simulate Red Oxide, works pretty convincingly IMO. Edited January 17, 2014 by bogger44
JTalmage Posted January 17, 2014 Posted January 17, 2014 That looks fantastic! I need to finish my '70 Torino that I have.. I lost a few parts and put it away... its 98% done too...
blunc Posted January 17, 2014 Posted January 17, 2014 the engine would be a little more correct looking if you paint the distributor vacuum advance unit silver and move the vacuum hose that you have running to the carb to a spot on the front below the fuel bowl. but other than that, it's a great looking engine.
bogger44 Posted January 17, 2014 Author Posted January 17, 2014 Thanks guys. Jesse, that's too bad about loosing some parts, hope you get to finish it someday and post it here. Mike, call it a brain fart on painting the vacuum advance black. I'll get it painted silver, and re-route the line to the proper location on the carb. Thanks for the heads-up!
johnbuzzed Posted January 17, 2014 Posted January 17, 2014 Your Torino is looking good. Next time you have problems with decals like that, try Future floor finish or thinned white (Elmer's) glue instead of any type of plastic cement.
bryan_m Posted January 17, 2014 Posted January 17, 2014 nice work so far! the engine is lookin nice, and i love the interior, looks really clean cheers bryan
slusher Posted January 18, 2014 Posted January 18, 2014 Interior looks great Tony. I am guilty of using model glue on inside decals but I will try the elmers next time....
bogger44 Posted February 15, 2014 Author Posted February 15, 2014 (edited) Slow but steady progress is the name of the game here, a common theme with most of my builds. Lol. Finally got the body into paint and polished out. In the process of polishing I proceeded to burn through a couple spots on the drivers side fender top. So a little careful sanding brought the fender top down to the primer level again, masked the rest of the car off, and shot another coat of primer followed by paint. Once gassed out, I attempted polishing and low and behold it came out good this time around. I also turned my attention to installing the 429 and front suspension. Nearly everything was straight forward as far as assembly. The only issues were the headers were a little fussy to install, and I had to delete the oil filter as it was in the way of the headers. Don't know if this is a common issue with this kit or just my usual dumb luck. Thanks to Mike's advice earlier, I did paint the vac advance silver, and re-routed the line to the carb. Edited February 15, 2014 by bogger44
Recommended Posts
Create an account or sign in to comment
You need to be a member in order to leave a comment
Create an account
Sign up for a new account in our community. It's easy!
Register a new accountSign in
Already have an account? Sign in here.
Sign In Now