FASTBACK340 Posted March 9, 2014 Author Share Posted March 9, 2014 Many thanks for allowing me to sideswipe your thread a bit. Michael Hey, it's all on-topic as far as I'm concerned! Although I am building a model, I'm also showing, explaining, and learning from the forum. At the moment I'm waiting on a contractor to show up. Once I'm done doing the dance with him I'm locking myself in the hobby room until I have enough material to make the next post worthwhile!! I've never seen so many things "pop-up" and kill my spare time lately. It almost seems deliberate….. Quote Link to comment Share on other sites More sharing options...
1 bad55 stan Posted March 9, 2014 Share Posted March 9, 2014 I'm loving this build John,Your detail work is impressive,carn't wait for more... Quote Link to comment Share on other sites More sharing options...
FASTBACK340 Posted March 10, 2014 Author Share Posted March 10, 2014 Sometimes the shortest path takes the longest to cross….. I spent 2 **** hours messing with the fuel line from the sump to the pump. I dropped, and found….the same fitting THREE TIMES!!! After getting as far as I did tonight I decided to take a break. I'm tired and in a generally lazy mood and it's showing in how I'm working. Maybe I just spend some time getting the next few steps in order. Braided steel lines can flatten and kink if not installed with some help. I run a thin piece of bendable wire close to the size of the hardline inside the braid. If you push it back like finger-cuffs you can see it's hollow. Now I carefully thread a fitting over the braided line before inserting the wire inside the braid. Once I get the fittings on I carefully slip in the wire By slipping it back & forth you can estimate how much braid you'll need. Slip it off the end of the wire JUST ENOUGH to trim the braid with a pair of sharp manicure scissors. Do this on both ends and carefully add the bends and test fit I cut down a RB Motion.062 bolt head to replicate the tank drain I have next to my fuel feed on my tank. The finish on the tank has to be addressed still, but here you can see by using the wire I have one continuous piece instead of several fiddly little pieces. A little Tamiya clear red & blue and these will look nice. This is all for tonight and I feel like such a slacker. The contractor never showed up. I was half-expecting to be involved and interrupted, so I held off on getting started but it never happened. Oh well, there's always tomorrow. Quote Link to comment Share on other sites More sharing options...
FASTBACK340 Posted March 10, 2014 Author Share Posted March 10, 2014 BTW: I dug out the compressor & air brush and got everything cleaned up and ready to go today. I thinned down and sprayed some Infiniti touch-up paint on my work-fridge. I don't remember where I got them, but I found a box of mini-mayanaise jars in the basement. Drilled a hole in the lid and I have a nice stash of large spray bottles. Remember, free and yes are GOOD words…. Quote Link to comment Share on other sites More sharing options...
FASTBACK340 Posted March 13, 2014 Author Share Posted March 13, 2014 Good MORNING ! Since I'm technically "un-employeed" until Monday (yesterday was my last day w/Infiniti, Monday I start the new job…) I'm going to have some quality time to build. I'll run out for a few hours this afternoon moving my tool chest, which requires a flatbed. And opening the wallet wide….. But, I did get something done last night and this morning. I was so embarrassed by those pictures of the HORRIBLE finish on the fuel tank I had to fix, prime, & re-paint it. While it's not as nice as I'd like, at least it's not as bad as it was. I also painted the AN fittings and made the fuel tank straps. The plate behind the R/R wheel well is the shield for my yet to be fabricated fuel pump. That was the only sensible place to mount the fuel pump & pre-pump filter, but it had to be protected. Happy to report that after many miles, years, and burn-outs all is well. More to come….. Quote Link to comment Share on other sites More sharing options...
Belugawrx Posted March 13, 2014 Share Posted March 13, 2014 Excellent detailing there!! Looking really nice Quote Link to comment Share on other sites More sharing options...
crazyrichard Posted March 13, 2014 Share Posted March 13, 2014 very nice ! Quote Link to comment Share on other sites More sharing options...
FASTBACK340 Posted March 13, 2014 Author Share Posted March 13, 2014 Good News: Toolbox made it to my new employer Bad News: I have to be at work tomorrow…. Nah, just kidding about the shocked-smiley, but I do have to go in for a few hours. Although I met almost everyone today, tomorrow the owner wants to formally introduce me to the "family", situate my work bay, and do the paperwork thing. Awesome group of people. Compared to the old job, this looks like early retirement! But enough of that…. Today we are going to finish the fuel pump & filter, install the straps w/J-hooks, and weld in, er…glue in the sub-frame connectors. The chassis is just about done. The wheels and suspension I'll fiddle with on final assembly. I don't want to hack something apart, and then together, because it didn't have to be there. I'll be back…… Quote Link to comment Share on other sites More sharing options...
FASTBACK340 Posted March 13, 2014 Author Share Posted March 13, 2014 Why do I do this to myself….. Here's the Holley fuel pump I made complete with harness and connector. Yes…. I'm nuts. Here's the fuel filter added to the braided feed line And here's two shots of the tnk straps and the J hooks. More later…. dinner time. Quote Link to comment Share on other sites More sharing options...
om617 Posted March 13, 2014 Share Posted March 13, 2014 Awsome details. I hope some day to be as "nuts" as this Quote Link to comment Share on other sites More sharing options...
Mopar - D Posted March 13, 2014 Share Posted March 13, 2014 John I really enjoy checking in on your progress and leaning how you make it look great. Quote Link to comment Share on other sites More sharing options...
FASTBACK340 Posted March 16, 2014 Author Share Posted March 16, 2014 (edited) Today we start by finishing up the fuel system and install the sub-frame connectors. I'll just give 4 views and let the pictures speak. Next up is assembling the engine compartment and installing the engine. While I'm preparing the body for paint I can assembly the exhaust and some suspension. Today we're having Amy's Mom over for dinner, then there's drag racing from Gainesville tonight. Might be a bad night for the bench….. but we're getting there! Edited March 16, 2014 by FASTBACK340 Quote Link to comment Share on other sites More sharing options...
1 bad55 stan Posted March 16, 2014 Share Posted March 16, 2014 I just love your work John,super cool... Quote Link to comment Share on other sites More sharing options...
FASTBACK340 Posted March 16, 2014 Author Share Posted March 16, 2014 Thanks Stan! I think we all feed off of each other. When everyone is rolling, it gets interesting! I finally assembled the wheels, tires, and mounted the dog dishes. The hub caps are from Arrowhead Machine. The best I could find and they really don't look too bad. The front tires are from the Revell Hemi Dart kit and the rears are those beautiful M-T drag radials made by Chief Joseph at Fireball Models. Quote Link to comment Share on other sites More sharing options...
FASTBACK340 Posted March 16, 2014 Author Share Posted March 16, 2014 Every make a starter relay in 1/25th? Quote Link to comment Share on other sites More sharing options...
cobraman Posted March 16, 2014 Share Posted March 16, 2014 Your doing some very fine work here. Will be a killer model when finished. Keep er' goin'. Quote Link to comment Share on other sites More sharing options...
FASTBACK340 Posted March 22, 2014 Author Share Posted March 22, 2014 Geeez… the week has been long. Today the wife is out for the day so me & the dog will have the house to ourselves. I plan on hitting the bench. I've been soooo bad with completing this build. And the Pink one…. More to come. Quote Link to comment Share on other sites More sharing options...
Mopar - D Posted March 22, 2014 Share Posted March 22, 2014 John I'm glad your taking the time to put this amount of detail into your build and sharing your skills with us here. I've been learning a lot from your posts. Thanks good luck on your bench time today will be checking later for today's progress / teaching update. Quote Link to comment Share on other sites More sharing options...
Skypower Posted March 22, 2014 Share Posted March 22, 2014 Good luck on the bench today, I also will be checking in later for my next lesson on detailing. I need some more tricks for my 32 sedan build its kinda getting out of control. Quote Link to comment Share on other sites More sharing options...
Ira Posted March 22, 2014 Share Posted March 22, 2014 Looks Great! Real Nice Detailing... Quote Link to comment Share on other sites More sharing options...
FASTBACK340 Posted March 22, 2014 Author Share Posted March 22, 2014 Thanks guys! The new job has me working an hour later than I'm accustomed to so I get home a little later…. which has the domino effect of shifting everything off of our normal routine. Some nights by the time Amy makes it home from Manhattan we're having dinner at 8:00 PM! Clean up, feed the dog, etc. and who has time. I have to get a new routine! So far we got the engine compartment installed, some harnesses routed, I fab'ed up a heat shield for my master cylinder, which gets installed and plumbed next. I made the MSD 6AL ignition box, but botched the decal job. That's getting done over. I also have to make an aluminum radiator cap and coolant recovery tank. Then we drop in the engine….. Here's a few shots from earlier Quote Link to comment Share on other sites More sharing options...
freakshow12 Posted March 22, 2014 Share Posted March 22, 2014 Looking real good. Did you cut the engine bay from the dart as well?How is the new job btw? What are you working on? Quote Link to comment Share on other sites More sharing options...
FASTBACK340 Posted March 23, 2014 Author Share Posted March 23, 2014 Looking real good. Did you cut the engine bay from the dart as well? How is the new job btw? What are you working on? Yes, the engine compartment was removed from the Dart donor kit, as will the wipers and door handles. The Revell Dart kit is essential in doing an early Mopar annual upgrade from those crude AMT offering from the 60's. Yesterday my plans changed at the last minute, but after I get back from food shopping this morning we get back to the `68 `Cuda. The new job is uber-cool. In the 1:1 Car Reference section I have a few posts on the shop projects I'm involved with. Quote Link to comment Share on other sites More sharing options...
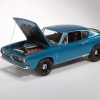
FASTBACK340 Posted March 26, 2014 Author Share Posted March 26, 2014 Hi, remember this build? I'm back… Tonight I tested the fitment of the interior, chassis, and body. Sweet. Kinda set-up the suspension to check the ride height and half-heartedly installed the engine. I love it. Quote Link to comment Share on other sites More sharing options...
Skypower Posted March 26, 2014 Share Posted March 26, 2014 Looking good, looking real good. Quote Link to comment Share on other sites More sharing options...
Recommended Posts
Join the conversation
You can post now and register later. If you have an account, sign in now to post with your account.
Note: Your post will require moderator approval before it will be visible.