vintagedragfan Posted April 19, 2014 Share Posted April 19, 2014 hey John, I have been following this build, sorry for not commenting sooner, this is some super nice work man, it is turning out just awesome, you should be very happy with it! p.s. I went for a ride in the GTX gasser a couple weeks ago, way cool! talk about a head turner lol, and thanx for keeping interest in the Cuda! Quote Link to comment Share on other sites More sharing options...
Mopar - D Posted April 19, 2014 Share Posted April 19, 2014 John I'll be checking later today to see the color. Best of luck in spraying today. Quote Link to comment Share on other sites More sharing options...
FASTBACK340 Posted April 19, 2014 Author Share Posted April 19, 2014 OH NO !!!!!!!!!!!!!! IT SHRUNK !!!!!!!!!!!! I'm plugging in the compressor now. Wish me luck! Quote Link to comment Share on other sites More sharing options...
freakshow12 Posted April 19, 2014 Share Posted April 19, 2014 Shrink rates on Tamiya products are incredible!!!! Lol. Good luck can't wait to see it Quote Link to comment Share on other sites More sharing options...
Ramfins59 Posted April 19, 2014 Share Posted April 19, 2014 Drum roll in progress...... We're all waiting John...!!! Quote Link to comment Share on other sites More sharing options...
FASTBACK340 Posted April 19, 2014 Author Share Posted April 19, 2014 First of all, anyone who thinks airbrushing is magic or requires the same power and stamina as running the 4 minute mile can drop that argument NOW. I dusted off a 20 yr. old compressor, found an old Pasche air brush, cleaned it out, loaded it, and dropped on a nice finish with little effort or exertion. It took all of 47 seconds to clean the brush…. add another 5 minutes to un-screw the needle and sink it in a small jar of thinners. And the paint….. If anyone that is a forum member is connected to Scale Finishes, nice product! I had bought a 2oz. bottle of the L1 Turquoise last year at NNL East. Found it on a shelf, shook it for about 20 minutes, and blew it on the car over white primer. Wow…. appears to match my 1:1 exactly. Beautiful. Once it's cleared it's going to be sweet. Yeah…. we got pictures. Quote Link to comment Share on other sites More sharing options...
FASTBACK340 Posted April 19, 2014 Author Share Posted April 19, 2014 hey John, I have been following this build, sorry for not commenting sooner, this is some super nice work man, it is turning out just awesome, you should be very happy with it! p.s. I went for a ride in the GTX gasser a couple weeks ago, way cool! talk about a head turner lol, and thanx for keeping interest in the Cuda! Thank you for your compliment Bill. Coming from a talented builder as yourself I appreciate it very much. It's guys like YOU that push modelers to try a little harder. As I figure it out I'm trying to share so other builders will try. I know I inspired another `68 `Cuda build and the thread has 10K+ views. Wow…. thank you everyone for the interest. Now let me go get some better pictures. The ones I have are meh…. Quote Link to comment Share on other sites More sharing options...
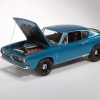
FASTBACK340 Posted April 19, 2014 Author Share Posted April 19, 2014 SEM etching primer, Tamiya white fine surfacer, 4 coats of Scale Finishes L1 Surf Turquoise Metallic. Clear maybe tomorrow night, Monday THE LATEST. Here's a few shots. This shot almost shows the true shade, as it's more a greenish Turquoise over Blue, and not BLUE blue as the color photographs most times. I'm VERY pleased! Quote Link to comment Share on other sites More sharing options...
charlie8575 Posted April 19, 2014 Share Posted April 19, 2014 Beautiful, John. This car has been a labor of love (mostly,) and it shows. Finished or not, bring it next week, I'm really looking forward to seeing it. Charlie Larkin Quote Link to comment Share on other sites More sharing options...
Ramfins59 Posted April 19, 2014 Share Posted April 19, 2014 That paint looks gorgeous John. Looks like you're just about to hit the "home stretch" on this project. Great work buddy. Quote Link to comment Share on other sites More sharing options...
Mopar - D Posted April 20, 2014 Share Posted April 20, 2014 Looks great John. Quote Link to comment Share on other sites More sharing options...
slusher Posted April 20, 2014 Share Posted April 20, 2014 Great color and finish.. Quote Link to comment Share on other sites More sharing options...
FASTBACK340 Posted April 20, 2014 Author Share Posted April 20, 2014 Thanks guys! I came home from work and sat in the recliner and said to myself "I gotta paint that thing" and got up, went upstairs, and just did it. I haven't air brushed a car in 15 yrs. It went on perfectly, like using a magic marker. I'm so please with the results I may just hit it with Future and call it done. Clear would give it too much gloss for the scale finish to be "right". It's not a custom, it don't need mile-deep paint….. Here's a few shots standing in my bathroom in sunlight. Quote Link to comment Share on other sites More sharing options...
FASTBACK340 Posted April 20, 2014 Author Share Posted April 20, 2014 These are the initial pictures I didn't post. Although they are a bit out of focus, you can see how the finish reflects light. I can't wait to foil it and drop in the glass, add the side markers and emblems. Quote Link to comment Share on other sites More sharing options...
1 bad55 stan Posted April 20, 2014 Share Posted April 20, 2014 John your work is so darn cool it has me trying that little bit harder to get more details that i normally wouldn't try.This is 1 of the best builds in a long time.I for 1 carnt wait to see your progress.looking forward to see more.Thanks for sharing it with us.. Quote Link to comment Share on other sites More sharing options...
crazyrichard Posted April 20, 2014 Share Posted April 20, 2014 very nice paint @@!! Quote Link to comment Share on other sites More sharing options...
FASTBACK340 Posted April 20, 2014 Author Share Posted April 20, 2014 That paint looks gorgeous John. Looks like you're just about to hit the "home stretch" on this project. Great work buddy. Last night at about 11:30 I had a sudden realization that made the bottom of my stomach drop: I used MCW rattle can paint for the engine compartment, and Scale Finishes for the body through the air brush. Is it going to match when assembled? Yes….. it does. <whew!> Imagine THAT happening this close to NNL East!?!?!?!?!? Quote Link to comment Share on other sites More sharing options...
John Goschke Posted April 20, 2014 Share Posted April 20, 2014 John, just spent the last hour and a half going through this thread page by page and am just blown away by your stellar workmanship and commitment to scale fidelity, not only under the car and under the hood, but on all the exterior body details like all the panel lines that the kit makers leave out and the thickness of panel edges. The articulate and amusing narrative makes it a pleasure to read! The paint looks stunning and the work you did rescribing the panels and blocking really paid off. Looking forward to seeing it in clear – completely agree on not wanting to make it too shiny. You don't want that "dipped in syrup" look that so many otherwise well done models seem to have. Quote Link to comment Share on other sites More sharing options...
FASTBACK340 Posted April 20, 2014 Author Share Posted April 20, 2014 John, just spent the last hour and a half going through this thread page by page and am just blown away by your stellar workmanship and commitment to scale fidelity, not only under the car and under the hood, but on all the exterior body details like all the panel lines that the kit makers leave out and the thickness of panel edges. The articulate and amusing narrative makes it a pleasure to read! The paint looks stunning and the work you did rescribing the panels and blocking really paid off. Looking forward to seeing it in clear – completely agree on not wanting to make it too shiny. You don't want that "dipped in syrup" look that so many otherwise well done models seem to have. Thank you for the compliment John. Being a mechanic by trade and a car guy in general gives me an edge on accurate detailing. My day job surrounds me with inspiration (check out my work link at the bottom for Pauls) and replicating my actual Hot Rod makes it even more special. I too have seen models get built "too far" just as some 1:1 cars get "over-restored". I constantly take jabs at certain builders whom are well know cover-car candy builders that produce jokes as far as reality. Biggest pet-peeve are the panel lines buried in 800 coats of clear. But boy does it SHINE! The more I look at it, I might just apply some Future and leave the finish as-is. As nice as the real one shines, I don't want to kill it in scale. Quote Link to comment Share on other sites More sharing options...
Mopar - D Posted April 20, 2014 Share Posted April 20, 2014 John what are you using for the side emblems and where did you get them from? Thanks for your support. Quote Link to comment Share on other sites More sharing options...
FASTBACK340 Posted April 20, 2014 Author Share Posted April 20, 2014 (edited) Keith Marks does an outstanding set of reproduction emblems for all the badging, emblems, scripts, even the side marker light. If you do a search you'll easily find his Fotki Album page where he does business. Here's a picture taken of the first attempt at building my car using Keith's decals. EDIT: Here's the link for Keith Marks Decals http://public.fotki.com/mofobow/ Here's the page in particular your looking for….. http://public.fotki.com/mofobow/plymouth/barracuda/68_barracuda/ His page has color pictures of actual cars for proper placement and alignment. Edited April 20, 2014 by FASTBACK340 Quote Link to comment Share on other sites More sharing options...
FASTBACK340 Posted April 21, 2014 Author Share Posted April 21, 2014 While waiting for the paint to gas out, I had to do SOMETHING tonight. After entertaining my Mother-in-Law for dinner this afternoon I managed to hit the bench. Tonight I'll show you how I replicated the side marker lights on 1968 Chrysler products. A,B,C bodies all had them, so this applies to Road Runners, GTX's, Dart's, etc. It's rather simple, but it's small pieces to manipulate. I started by drilling out the cast-in side marker lights using a 3/32" drill bit. Use a hand-operated pin vise and use the kit cast-in lights as pilots. Go back a few pages to see how I almost roached the body using a Dremel for this procedure. Don't do it. It's slow and tedious, but safe. Not to mention you don't want to egg-out the hole causing a loose fit of the tubing. Then I slice short lengths of 3/32" aluminum tube and insert in the Dremel to polish. Then I took a length of clear acrylic rod I had. I fits inside the 3/32" tubing. Might be 5/64"…. All I know is I had it and it fits snuggly. I place it too in the Dremel and polish the tip to a slightly rounded surface, like the actual piece. If your going to do it, do it right. Half hearted attempts don't cut it. By gently beveling the inside and outside of the tubing using a 800 grit sanding stick you get a nice soft metal appearance. Here the full set has been assembled. A dot of CA on the side of the rod near the tip is all it needs. When assembled, they'll all be cut down to about half a grain of rice….. But first I hit the two rear marker lights with Tamiya clear red, and the two fronts with clear yellow, like the actual car. Just the way if you want to shave a pound off a race car you look for 16 one ounce items to delete, if you want to step-up detailing, each item has to become an assembly. If attention is paid to the little things it all stands out in the end. I have a neat tip on bare metal foil that no one gets "right". When I show you it's going to be obvious, yet simple to do correctly. Stay tuned, more to come. Deadline is Saturday…… Quote Link to comment Share on other sites More sharing options...
freakshow12 Posted April 21, 2014 Share Posted April 21, 2014 Those look good. That's much how I made the courtesy lights in the headliner of my mach 1. What is this foil tip you speak of? Quote Link to comment Share on other sites More sharing options...
FASTBACK340 Posted April 21, 2014 Author Share Posted April 21, 2014 Windshield trim isn't one piece on most cars..... I'll explain when we foil this week. Quote Link to comment Share on other sites More sharing options...
freakshow12 Posted April 21, 2014 Share Posted April 21, 2014 Can I guess? : ). I run my foil in pieces that overlap where the pieces on the 1:1 subject overlap or butt together... I think we build much the same John! Nothing wrong with that though as I admire your work. And your new job!... Quote Link to comment Share on other sites More sharing options...
Recommended Posts
Join the conversation
You can post now and register later. If you have an account, sign in now to post with your account.
Note: Your post will require moderator approval before it will be visible.