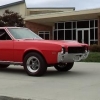
johnbuzzed Posted June 5, 2014 Posted June 5, 2014 (edited) "This one is pretty cool, looks like a resto going on with the guy dumping all his money into everything but the paint... maybe. 30.jpg Let me know which one you guys like most.. I like the resto one and the yellow and dark silver... Advice/recommendations welcome! -Glenn" Glenn, go easy with the putty. A lot of modelers (myself included) will use strip styrene to fill in gaps, lines, etc. It won't shrink -EVER- and it's as workable as the original parts. Did you fill the bumper location with anything other than putty? That primered Nomad is running on NYS Rte 109 back in my old stomping grounds- Lindenhurst, NY, on Long Island . S&K Speed is still there, as far as I know. Cool picture! That's what I would go with. Edited June 5, 2014 by johnbuzzed
DynoMight Posted June 5, 2014 Author Posted June 5, 2014 Glenn, go easy with the putty. A lot of modelers (myself included) will use strip styrene to fill in gaps, lines, etc. It won't shrink -EVER- and it's as workable as the original parts. Did you fill the bumper location with anything other than putty? That primered Nomad is running on NYS Rte 109 back in my old stomping grounds- Lindenhurst, NY, on Long Island . S&K Speed is still there, as far as I know. Cool picture! That's what I would go with. I have a styrene stripe in there, I read about that in a magazine I saw in a hobby store.. Thanks for the advice.. Also that is really cool that the Nomad in that picture is where you lived at one point, that's cool... I might do the yellow one with darksilver or that one.. not sure... Thanks -Glenn
DynoMight Posted June 5, 2014 Author Posted June 5, 2014 I just primed the body for the last time, hopefully... I'm going to start painting tomorrow... I'm still torn over the paint though, Should I paint it yellow with a dark silver top Or primer gray with accents of color, to look like a resto prostreet??? Please help. -Glenn
1930fordpickup Posted June 5, 2014 Posted June 5, 2014 (edited) White top with Forest Green on the lower portion. Just to be different. Like the Red and Gray one on the other page. Edited June 5, 2014 by 1930fordpickup
DynoMight Posted June 6, 2014 Author Posted June 6, 2014 White top with Forest Green on the lower portion. Just to be different. Like the Red and Gray one on the other page. Good idea, I'll have to keep looking at Nomad paint schemes and hopefully I'll pick one and paint it tomorrow... -Glenn
DynoMight Posted June 6, 2014 Author Posted June 6, 2014 I have decided. I am going to paint it red. Just kidding, I'm going to paint it a light primer and go over certain areas with a different color, probably a yellow or metallic green and make it look like a resto prostreet. I hope this comes out good. Pictures tonight or tomorrow morning.... Thanks for looking! -Glenn
DynoMight Posted June 6, 2014 Author Posted June 6, 2014 Well there's no going back now! I sprayed it. The color is Israeli Gray by Floquil, (I think they are no longer in business, but them made paint and it was sprayable out of the bottle, no thinning, anything, just shake it up and it went on sooo good. Sucks they went out of business...) at around 35 PSI. The paint went on excellent, no runs, drips or spiders. Started with a light dusting, 2 coats of that, 1 coat of a heavier dusting. The sanding still showed through, but that's okay, it's a resto car paint doesn't have to be perfect or absolute garbage. I think this'll turn out good.. Thanks for looking Advice/recommendations welcome! -Glenn John Buzzerio, do you happen to have any more pictures of that Nomad? I am kind of going off of that.. Hope your Road Runner agrees with you like how mine did.
DynoMight Posted June 6, 2014 Author Posted June 6, 2014 (edited) What happened earlier today and a sneak peek at the paint! (it's suppose to look like that!) I wanted to use the headers from the Hemi, but to fit them, I had to cut holes in to the fenders to fit them.. now they come out of the back of the wheel well, which is, if I say so myself, AWESOME. First, I realized that the headers don't fit... So I cut a hole in the wheel wells, because Prostreet. Next I made the axle longer so the wheels would be close the wheel wells in the rear. First, I got a rod, this case a clear rod. I stuck it in the inner rim and then trimmed it. Then I superglued the inner rim to the axle. I'm good. After that, I successfully had a lengthened axle. I'm in love with this stance though.... The front wheels are off of the 1970 (?) Coronet Super Bee by AMT, rear are from my parts box, I think they're from the Shelby 350gt, the blue one... I think.. The base paint is Israeli Gray from Floquil. I sprayed it at around 35 PSI. Here is a sneak peek of the almost finished paint on the body. I'm going back with Israeli Gray tomorrow and redefining some lines and also throwing new colors in there... Thanks for looking! Advice and recommendations welcome! -Glenn Edited June 6, 2014 by DynoMight
W-409 Posted June 7, 2014 Posted June 7, 2014 I like the idea of the paint. It's just very hard to do and that's why I've never actually painted anything that way. It looks like you did a great job with the painting, but we need more pictures of the body ! Fenderwell Headers are really cool and they were really popular in the '60s as these Nomads (or regular Bel Airs) didn't have too much space in the engine bay. I like them.
DeeCee Posted June 7, 2014 Posted June 7, 2014 This is a cool build mate, nice score on the SWC parts too, look forward to the finished product.
DynoMight Posted June 7, 2014 Author Posted June 7, 2014 (edited) I'm posting pictures later tonight. I made a dent in the passenger side door with a lighter and I kind of put a hole through the door, so I am currently fixing that I have wired the engine and also started gathering pieces for the rear suspension and front Thanks! Advice and recommendations welcome! -Glenn Edited June 7, 2014 by DynoMight
DynoMight Posted June 8, 2014 Author Posted June 8, 2014 Probably won't be able to pick up this project today or tomorrow, yesterday I was busy all day and I didn't feel like getting involved with painting it again at 9:30, so I put it down for today... Once I finish the paint, start on the chassis, I will post pictures probably tomorrow or Tuesday (hopefully Monday) Thanks for looking, even though I don't have a update with pictures Advice and recommendations welcome -Glenn
Danno Posted June 8, 2014 Posted June 8, 2014 Good progress. Looking forward to seeing the finished product.
mikevillena Posted June 8, 2014 Posted June 8, 2014 Great work so far. One small suggestion is to not be in a hurry to slap some color on. Take the time to finish off the bodywork. Just my 2 cents.
DynoMight Posted June 11, 2014 Author Posted June 11, 2014 (edited) I've finished the paint, but I cannot post pictures yet, hopefully I'll post pictures tomorrow. It's a lot different than the picture I posted... It has been dull coated, I am making way on the interior and the suspension, and the front frame. Hopefully (keyword: hopefully) this will be done in the next month or two... PLUS: A Ferrari 80s Indy Car topic is being made tomorrow, just in case I ever need a break from this build... -Glenn Edited June 16, 2014 by DynoMight
johnbuzzed Posted June 11, 2014 Posted June 11, 2014 Glenn, if I had any pictures I would be happy to share them, but I don't have any... try skspeed.com, look at their customer rides; you might be able to get a larger picture of that Nomad. Whatever you do, don't rush things. My Road Runner is coming along, s l o w l y... but I am making a lot of mental progress on it that will be practically applied ASAP. Maybe some chassis paint this weekend.
DynoMight Posted June 11, 2014 Author Posted June 11, 2014 Glenn, if I had any pictures I would be happy to share them, but I don't have any... try skspeed.com, look at their customer rides; you might be able to get a larger picture of that Nomad. Whatever you do, don't rush things. Yea I searched them up and saw all their customer rides, some of them are really cool... I've finished the paint and now I just have to sort out the interior and the chassis and figured out how to mount the engine in the small engine compartment.. Hope your Road Runner comes along good, -Glenn
DynoMight Posted June 12, 2014 Author Posted June 12, 2014 Finally! A update with pictures! I've been working on the paint since Thursday on last week (??) First, I wanted to make it really look like a resto car that needs work so I sanded off the trim on the passenger side door. I also drilled holes to look like where you would mount the trim, you can't really see them... I need a better camera than my phone haha. Then I painted the car. After that, I went back with rust to make it look like, well, rust. Here's a overlook of the whole painted car. But that changed when I wanted to put a dent in the passenger side door. I'm still kicking myself over this and it happened Friday or Saturday. I heated up the door and it got a little too soft. Since the plastic had the consistency of molten lava, my tool pushed right through the plastic with little or no effort at all. I had to set it down and walk away until the next day. Next I placed some styrene behind the hole and puttied over the horrible, horrible mistake. I have since painted over it and tried to make it look like the original. Then I started work on the chassis and interior. I superglued the tub to the interior so it'll never ever come apart again The original front chassis did not agree with the Hemi, the crossmember was touching the oilpan and so were the headers, you just couldn't get around it. So I cut it out. Then I scratch built a simple front chassis based off of a gasser chassis, which seems to work. I just have to add motor mounts and figure out a way to mount a front suspension on it. Thanks for looking, since I haven't had a real update since Wednesday or something like that haha... Advice and recommendations are welcome! -Glenn
DynoMight Posted June 12, 2014 Author Posted June 12, 2014 Thanks James, I tried something new with this build as far as the paint, I think it came out okay, but I don't think I'm going to be doing it again soon... -Glenn
1 bad55 stan Posted June 12, 2014 Posted June 12, 2014 Stick with it glen your getting there,I always start with the chassis,mock up everything including engine,rear end and tires,check that the wheels are sitting in the wheel openings and go from there.For dents in the body i use a candle an carefully heat up the inside of the panel you want to add dents,trying to keep away from the edges wheel openings etc.Its great you are trying things and it is the only way to learn.We all lean from our mistakes,I hope this will help you..
DynoMight Posted June 12, 2014 Author Posted June 12, 2014 Thanks Stan, your Impala build came out amazing...
DynoMight Posted June 13, 2014 Author Posted June 13, 2014 I'm going to try to finish up the interior today.. Hopefully...
Wonderbread Kustomz Posted June 13, 2014 Posted June 13, 2014 I think you did good with it... Definitely keep at it...
Recommended Posts
Create an account or sign in to comment
You need to be a member in order to leave a comment
Create an account
Sign up for a new account in our community. It's easy!
Register a new accountSign in
Already have an account? Sign in here.
Sign In Now