slusher Posted July 16, 2014 Share Posted July 16, 2014 Great work on the wheelie bars and cage. Quote Link to comment Share on other sites More sharing options...
1 bad55 stan Posted July 16, 2014 Share Posted July 16, 2014 That cage looks great,as do the wheelie bars.keep up the good work... Quote Link to comment Share on other sites More sharing options...
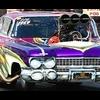
am73grand Posted July 19, 2014 Author Share Posted July 19, 2014 (edited) Thanks for all the comments!!! I am having a lot of fun with this build. I got to work on it today. The dash, steering column, pedals and shifter are in. I've also made the seat belts and installed the seat. (I need to glue the belts down) My next project will be adding the plug wires. Then I can install the blower and cut the hole in the hood. Once the hood is cut I can get to painting it! Thanks for looking!!! Edited July 19, 2014 by am73grand Quote Link to comment Share on other sites More sharing options...
Mooneyzs Posted July 19, 2014 Share Posted July 19, 2014 This build us looking great. Nice work so far. Quote Link to comment Share on other sites More sharing options...
1 bad55 stan Posted July 20, 2014 Share Posted July 20, 2014 Looking good Ron,I like them rocker covers, where did you get them? Quote Link to comment Share on other sites More sharing options...
am73grand Posted July 20, 2014 Author Share Posted July 20, 2014 Looking good Ron,I like them rocker covers, where did you get them? Thanks Stan! They are the ones from the "Christine" Pro Mod with the lettering sanded off and Slixx decals. Quote Link to comment Share on other sites More sharing options...
MitchP Posted July 20, 2014 Share Posted July 20, 2014 Excellent Ron! I've finally met my match with posting pics here. I've got to go Fotki or something. I tried to attach some pics of my Hays T-Bird following your advice and everything fit so far including the Hemi with the blankets and safety straps. Just can't attach it to a post any more with MCM's upload. I need to grill you on your standard steering wheel mount with the flat screen Data Tech (or whatever) readout. Outstanding work and thanks for sharing your tips on the wheelie bar, cage and Revell chassis scores! Quote Link to comment Share on other sites More sharing options...
am73grand Posted July 21, 2014 Author Share Posted July 21, 2014 Small update. The blower is installed as is the motor plate and idler pulley. Plug wires are in and the hole has also been cut in the hood. I'll be using those wrinkle wall slicks on the rear. I'm waiting on the injector hat and some other parts. I think I'll move to the rear end. I'll finish the rear end, add the fire bottles in the trunk and the batteries. I can also start on wiring the interior. Hopefully I will update in a couple more days. Thanks for looking!!! Quote Link to comment Share on other sites More sharing options...
Dragfreak Posted July 21, 2014 Share Posted July 21, 2014 The engine and chassis look great! Quote Link to comment Share on other sites More sharing options...
MitchP Posted July 22, 2014 Share Posted July 22, 2014 Familiar looking slicks, Ron Never could figure out why this year/body became so popular with radial drag racers and turbo classes. It doesn't look too areo, but must have some good f/r balance. Props on using an "outlaw" type hood as it looks really nice. I'd almost swear that chassis paint is Tamiya #42, light gun metal! Looking great bro! Quote Link to comment Share on other sites More sharing options...
slusher Posted July 23, 2014 Share Posted July 23, 2014 The engine and chassis look great! I agree, very nice progress Ron, impressive work on this build. Quote Link to comment Share on other sites More sharing options...
Danno Posted July 23, 2014 Share Posted July 23, 2014 Looking good! Quote Link to comment Share on other sites More sharing options...
futurattraction Posted July 23, 2014 Share Posted July 23, 2014 I love your updates, Ron! Looking forward to more... Quote Link to comment Share on other sites More sharing options...
S. Svendsen Posted July 23, 2014 Share Posted July 23, 2014 Very cool! Quote Link to comment Share on other sites More sharing options...
am73grand Posted July 23, 2014 Author Share Posted July 23, 2014 You guys make it easy to stay on track! Thanks for all the comments. I got a lot of wiring run today. Next up are the rear batteries and engine detailing. As always thanks for looking!!!! Quote Link to comment Share on other sites More sharing options...
1 bad55 stan Posted July 23, 2014 Share Posted July 23, 2014 Just Awesome Ron,I'm loven it! Quote Link to comment Share on other sites More sharing options...
jasoncamaro Posted July 24, 2014 Share Posted July 24, 2014 Ron your getting good at this improving each build I love how clean your work is it right up there with the best of them Quote Link to comment Share on other sites More sharing options...
am73grand Posted July 24, 2014 Author Share Posted July 24, 2014 Ron your getting good at this improving each build I love how clean your work is it right up there with the best of them Thanks Jason! That is exactly what I strive for......make each build better than the last! Quote Link to comment Share on other sites More sharing options...
am73grand Posted July 26, 2014 Author Share Posted July 26, 2014 I spent A LOT of time on this today. The body is in the last stage of primer before paint. I will paint it on the next non-humid day. Today I built the Optima batteries: I also installed the engine for good. The headers are on the small side but they fit so I'm going with them. Next up is the blower blanket and hold down straps, Get the body on and finish plumbing the fuel system. As always thanks for looking!!! Quote Link to comment Share on other sites More sharing options...
Mooneyzs Posted July 26, 2014 Share Posted July 26, 2014 Ron.... This build is looking great. Love the detailing going into this one. Nice work Quote Link to comment Share on other sites More sharing options...
am73grand Posted July 30, 2014 Author Share Posted July 30, 2014 I did a little more on this one tonight. The body is drying so I mounted the front wheels (Notice the valve stem). I also added the front brake lines and I started on the fuel pump. I am using a modern unit out of a Revell funny car. I had to re-position the main fuel line to the rear. I'll start adding lines later this week. This will be my first time using this kind of pump. I hope it looks OK. Quote Link to comment Share on other sites More sharing options...
LittleDrummerBoy Aka LDB Posted July 30, 2014 Share Posted July 30, 2014 Great build so far, your wiring job is very well done! Quote Link to comment Share on other sites More sharing options...
Dragfreak Posted July 30, 2014 Share Posted July 30, 2014 Looking good Ron, what did you make the valve stem from? Quote Link to comment Share on other sites More sharing options...
am73grand Posted July 30, 2014 Author Share Posted July 30, 2014 (edited) Looking good Ron, what did you make the valve stem from? Thanks Jason, it's just a piece of black ignition wire. I drilled a hole in the wheel and then glued the wire in place. Thanks Cody, I appreciate it! Edited July 30, 2014 by am73grand Quote Link to comment Share on other sites More sharing options...
slusher Posted July 30, 2014 Share Posted July 30, 2014 Impressive detail Ron, your really doing some great work.... Quote Link to comment Share on other sites More sharing options...
Recommended Posts
Join the conversation
You can post now and register later. If you have an account, sign in now to post with your account.
Note: Your post will require moderator approval before it will be visible.