MitchP Posted August 13, 2014 Posted August 13, 2014 How do you bend the styrene? A lil heat? Ron is right - "a little candle power LOL". My first couple of tries bent so quickly the styrene just slurred off like an old McD's straw lit with a lighter. It bends quick for me so I guess I keep getting too close. However, after a couple of tries with some old stock, I figured it out. Ron's the man for these cages. Mine wasn't perfect the 1st time but I got close.
am73grand Posted August 25, 2014 Author Posted August 25, 2014 Ok this one has been stalled because I was waiting on the blower pulley's and belt. I finally have enough progress to show. Engine is painted and permanently installed. I added the two lower blower pulleys. The distributors are scratch built. I still need to add the caps. Spindles are a combination of kit parts and scratch building. The steering rack is from the Revell '55 Sportsman kit. MSD boxes are installed just need to add a little more wiring: The tops of the struts look rough but they are not visible with the body in place. Next up is seat belts and paint on the body. Now that I am sure I'm finished cutting on the hood I can finally paint. I just need to wait for the humidity to break. Also the front tires are just shy of the ground. I may have to re-do the struts..... Thanks for looking!
Mister Twister Posted August 26, 2014 Posted August 26, 2014 Nice and clean with great details....Keep at it!
1 bad55 stan Posted August 26, 2014 Posted August 26, 2014 Those plug wires look impressive Ron,The struts don't look rough from here,Another top glass build coming up...
Dragline Posted August 26, 2014 Posted August 26, 2014 Wow, more wire than R2D2 during a strip search.... This is coming along quite nicely. Bob
MitchP Posted August 27, 2014 Posted August 27, 2014 Dragline: like your signature, but... I've gotten a couple of snoot-fulls of nitro fumes during JFR's clutch seating procedures and it's no wonder most of the crew (including John) use masks now in the pits. I cried & choked like a baby on my first mouthful of solid food! I do love alky in the Comp classes though. Man, that is sweet! Btw, great progress as usual Ron. I'm still waiting for TDR to make a 1/25 scale MSD twin mag kit like their 1/16th. Yours are totally mint!
David@MinidreamsInc. Posted August 31, 2014 Posted August 31, 2014 Wow Ron this thing is a beast . I have a few items i plan to do a few builds as drag cars but after seeing this i got to step up my game LOL !
frozono Posted September 7, 2014 Posted September 7, 2014 Great work....... the engine looks awesome!
am73grand Posted September 8, 2014 Author Posted September 8, 2014 Any updates. Bob, I had sinus surgery a week ago. I cannot paint because I don't want to inhale paint with open wounds in my nose and wearing my mask hurts. The car is ready for final bodywork. Then I can paint it. I'm hoping to get back to it next week. Thanks for your interest!
bobthehobbyguy Posted September 9, 2014 Posted September 9, 2014 Health always comes first. Take care of yourself. Looking forward to when you can continue.
am73grand Posted September 18, 2014 Author Posted September 18, 2014 Here is a teaser. I spent around two hours putting the major decals on this thing. LOTS of decal setting solution and I still have some wrinkles. Hopefully once I bury the decals in clear coat they will disappear. Lots more decals to add but I'm gonna clear it before I go any further. Thanks for looking!
DrKerry Posted September 18, 2014 Posted September 18, 2014 UUummmmmm..... OH HECK YEAH!!!!!!!!!!!!!!!!!! Can't wait for more.......
am73grand Posted February 5, 2015 Author Posted February 5, 2015 It's BACK!!!! After a pretty long hiatus this one's back on the bench. Installed the computers and wiring and shifter buttons. I also made a new switch box because I was out of kit pieces. Notice the laptop on the floor. It's hiding a nasty glue mark. Still need to detail and install the batteries. I still need to install the upper seatbelts and then I can install the body for good. Lots more to do but it's coming along. Thanks for looking!
bobthehobbyguy Posted February 5, 2015 Posted February 5, 2015 Glad to see this one back on the bench. Great idea using the laptop to hide the glue mark.
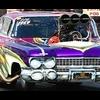
am73grand Posted February 7, 2015 Author Posted February 7, 2015 Finally wrapped this one up. I ran into a few problems during final assembly. First the doors will not close all the way. Second I had to trim the tops of the front tires to get them to fit. I also didn't add wheelie bars because I didn't want to hack up the rear bumper. Also this is a shelf model, the bottom of the car is not finished. This was a fun build and I learned a lot. Hopefully the next one will be better.
DrKerry Posted February 7, 2015 Posted February 7, 2015 Man that is one SICK AMC!!!!!!!! Looks good Ron!!!!!
Recommended Posts
Create an account or sign in to comment
You need to be a member in order to leave a comment
Create an account
Sign up for a new account in our community. It's easy!
Register a new accountSign in
Already have an account? Sign in here.
Sign In Now