Chris D Posted December 21, 2014 Posted December 21, 2014 I am trying my hand on a larger scale model this time. It is a Minicraft, 1931 Model A. I bought the kit at a model show as the cover art looked good, however, I didn't inspect the parts trees to see what the quality was like. Some of it is great, some of it, not so much. It is molded in both black and gray plastic and I personally don't like black plastic as it seems too soft and rubbery. The Chrome is good in some places, but missing in other places - bad plating job. I am not building to the box art or to be factory original etc. I am building this one in the colors and things I like. My current idea for the paint will be Gunmetal gray for the bottom half (fenders etc.) and dark blue for the upper half - could change though. Here are some pictures in the current state. Chassis assembled and painted gloss black and semi-gloss black. Wheels (which are poorly molded with a lot of flashing) are painted a cream color (custom mix). Engine is painted Royal blue with Semi-gloss black accessories. Bolt heads are silver, spark plugs are white and silver - very hard to paint as they are small. The engine will be plumbed and wired. I have holes drilled here and there for wires but plan to add those later in the build. Wiring the distributor to the plugs will be a bit of a challenge as it needs flat-bare-braided wires. Never seen in real life but plenty of picture on the net will be my guide. Plastic dipstick broke so I made a replacement with wire. The lower half of the body is painted Gunmetal (tamiya acrylic) and this is the first coat. The floor pan is in place as I have been attempting to mock up this thing to figure out how everything fits. The cabin is in place - sort of. There were suppose to be registration pins on the bottom of the fire-wall section but they are not there. This makes it difficult to get the spacing right between that section and the back half of the cabin. The two pieces join in two small areas - the front roof supports. If I just glue those two pieces together without a lot more planning, the doors will never fit. I have a lot of figuring out on this cabin area so it may take a while before the next post. Thanks for taking a look, comments always welcome. Chris D
bob terry Posted December 22, 2014 Posted December 22, 2014 I don't have this kit, nor have I seen it before. That said, looking at your last pic, It looks like the cowl assembly needs to move forward a bit.
jbwelda Posted December 22, 2014 Posted December 22, 2014 looks like it is coming along well. for your cabin spacing I would try to tape together the whole cabin including the doors, lined up and square, as well as you can, then putting it in place on the fenders and feeding some glue into the areas you want to be stationary (eg: not the doors), let it dry up a bit and then remove the doors and you should have a cavity that fits them. jb
Chris D Posted December 23, 2014 Author Posted December 23, 2014 Hi Guys, Thanks for the comments and suggestions. Regarding the cowl location, yes as it sits in the photo above it is WAY too close. I have asked Stephen (he just posted a finished version of this model) for a bit of advice too. I suspect in the end I am going to have to make a "jig" of some sort to get everything to work out. Chris D.
clovis Posted December 24, 2014 Posted December 24, 2014 Having built this kit, the doors are crazy difficult.The cab on our kit was warped, as was the frame, the hood, and just about everything else made of plastic...all of it warped.We had a hard time getting the cab to line up, just like you. We had to glue the doors in place.
Twokidsnosleep Posted December 25, 2014 Posted December 25, 2014 Your build looks good so far, I agree the 1/16 scale is fun and a bit easier on the old eyes This looks like a good kit; I might get one, chop the roofline and hot rod it up........or not as I have dug a huge hole of kits to make Cheers
1930fordpickup Posted December 25, 2014 Posted December 25, 2014 The doors on a real Model A Truck do not fit flush with the back of the cab,unlike a modern car . They overlap just a little bit when closed. About a quarter inch in the real world.
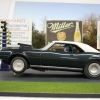
Chris D Posted January 20, 2015 Author Posted January 20, 2015 Hi all, I finally finished this "disappointment". When I bought the kit I really had high hopes for all the cool detail it offered, however, warped components, excessive flash, etc. made it a not so fun project. I will be the first to admit, my lack of skills and patience didn't bode well. I am sure you guys could have done a much better job with this kit. Here are a few photos of the completed car.. Thanks for taking a look Chris D.
landman Posted January 20, 2015 Posted January 20, 2015 Nothing wrong with your job. However frustrating it was.
Harry P. Posted January 20, 2015 Posted January 20, 2015 I don't see anything wrong with that (other than the engine block color). Beautiful!
Twokidsnosleep Posted January 20, 2015 Posted January 20, 2015 Often we are our own worst critics It is a great looking truck!
Jim3 Posted January 20, 2015 Posted January 20, 2015 I think it looks awesome...I was so disappointed in the sedan kit I turned mine into a rat rod..
jbwelda Posted January 21, 2015 Posted January 21, 2015 I think you did a great job on this, congratulations! right now you see and know all the little defects, but it certainly looks great in the photos. and I see where the front fender overhang comes from on another, more street rod version, that was posted here recently. it looks good and balanced in yours whereas if you shrunk the wheel diameter significantly it really starts to look odd from some angles. yours looks great and looks like the paint came out excellent too jb
clovis Posted January 21, 2015 Posted January 21, 2015 Skills???You did a fantastic job on that build!!!!It is beautiful!!!!! Nicer job than I could have done!
Art Anderson Posted January 21, 2015 Posted January 21, 2015 Nice build though! In a way, it would have been cool if that engine had an orange cylinder head--that's the way Jasper Engine painted their rebuilds of Ford flathead engines that were sold through Sears & Roebuck back when I was a kid. Art
Chris D Posted January 23, 2015 Author Posted January 23, 2015 Thanks for the kind words everyone! I think part of what made it so disappointing is that the model could have been so much better. The kit offered a lot of little detail parts, many of which has so much flash I nearly destroyed them cleaning it off. The warped body and other panels was enough to drive me insane. Eventually I just gave up on the hood assembly. Again, thank you for the kind words, it certainly has taken the sting out of this build. Chris D.
Twokidsnosleep Posted January 23, 2015 Posted January 23, 2015 Sorry to hear you had a rough time with the kit That is really the way with most manufactures, just a starting point for your imagination and skill...often stuff just doesn't fit and you need to customize parts Some suggestions: During the build, do some in work photos and post them so others can offer help and suggestions...I have got a ton of help and resources for my MG that way Try heating the cowlings in hot water and bend to unwarp them? Duplicate them in flat stock styrene sheets and make the cowling? How about try a little brass and make a new panel? You have nothing to lose but time. You have really made a fantastic truck here, hate to think it puts you off modelling
DumpyDan Posted February 11, 2015 Posted February 11, 2015 Well it looks good, I know this kit is a pain. I did this same kit a couple months back, but build as a Rat Rod, it was a still a pain. Hey we got them done and that's all that matters. Good Job!
Recommended Posts
Create an account or sign in to comment
You need to be a member in order to leave a comment
Create an account
Sign up for a new account in our community. It's easy!
Register a new accountSign in
Already have an account? Sign in here.
Sign In Now