Tom Geiger Posted February 8, 2015 Share Posted February 8, 2015 Glass- I seldom break or crack glass. My beaters are usually legal drivers. All I usually do is NOT clean and shine the glass. It will already have some residue on it from handling. Just make sure it doesn't have large fingerprints. Also if you want to simulate a dirty windshield, tape off the wiper pattern on the outside of the glass and spray a little Dullcote from a distance. Quote Link to comment Share on other sites More sharing options...
fun9c1 Posted February 9, 2015 Author Share Posted February 9, 2015 Thank you guys for the compliments! This is alot of fun straying from my usual builds where I try to make it like it just rolled out of the factory. Wayne- I agree it wouldn't hurt to make the glass look "older". I don't want to do any permanent damage though. So far there is nothing on any part of this that can't be fixed with Purple Power. I would probably never redo this as a "shiny" car, but I like to know I can if I want. Especially since this particular kit is getting pricey. Believe me, it was very difficult to mess up that nice new blue paint job (first time I ever did THAT on purpose!) but I'm glad I did now. Tom + Steven + Wayne- I like the simulating a dirty windshield idea. I will probably do that. Tom- You're "new wipers on an old truck" reminded me of Christine- "He's got new wipers on a busted windshield... Good hands, bad taste in cars..." Quote Link to comment Share on other sites More sharing options...
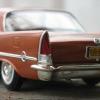
fun9c1 Posted February 14, 2015 Author Share Posted February 14, 2015 OK, I tried the same thing on the windshield that I did to the wheels and I'm very happy with it. What I did was commandeered my daughter's Crayola sidewalk chalk (she's 12- she doesn't need it anymore! ) and scraped up some white and gray into some water, mixed it up, and basically "drybrushed" that onto the windshield and back window until it had the look I wanted. Then I took a .080 or so styrene strip, cut it same length as the wipers from the pivot point to the inside end of the wiper, wrapped a little paper towel where the wiper would be, and made the wiper motion with that against the windshield. I love the way it looks. It's not permanant which could be good or bad- good if you change your mind, but bad if someone touches it. But it can always be done over again. I also did the front wheels with the chalk so now all four are done. I'm hoping to get some more done this weekend as another foot of snow is coming down on top of the 3 or 4 feet already on the ground... Quote Link to comment Share on other sites More sharing options...
Can-Con Posted February 14, 2015 Share Posted February 14, 2015 look'n ,,um ,, good? Rob. I'm glad to see those headlights being put to use instead of just sitting in one of my parts boxes forever. Quote Link to comment Share on other sites More sharing options...
StevenGuthmiller Posted February 15, 2015 Share Posted February 15, 2015 Very nice Rob! Although I will say it makes my heart ache a little not to see a beautiful, shiny 300! But when it's done this well.......what can I say! Looks terrific! Steve Quote Link to comment Share on other sites More sharing options...
72 Charger Posted February 15, 2015 Share Posted February 15, 2015 (edited) This is cool I think I will have to try your new idea with the chalk . Is this going to be a driver or resting for the next owner? If its resting you could do white streaks down from the letters on your tyres to look like the rain had washed out the white . Edited February 15, 2015 by Doobie Quote Link to comment Share on other sites More sharing options...
Tom Geiger Posted February 15, 2015 Share Posted February 15, 2015 Windshield lookin good! It's coming along! Quote Link to comment Share on other sites More sharing options...
tbill Posted February 15, 2015 Share Posted February 15, 2015 blown away by this, looks fantastic, great weathering/rust on the paint, windows look incredible as well. Quote Link to comment Share on other sites More sharing options...
fun9c1 Posted February 15, 2015 Author Share Posted February 15, 2015 Thanks for the comments, guys. Dave, that sounds like a great idea and a good challenge for one that's sitting, but this is a daily driver, circa '83ish. Quote Link to comment Share on other sites More sharing options...
fun9c1 Posted March 2, 2015 Author Share Posted March 2, 2015 Well this thing is getting pretty close to being done. Some things left to do still include painting/foiling the steering wheel and some chrome in the interior, adding a mesh behind the grill, license plate, maybe plug wires. Since the last post, I've got the interior mostly painted and foiled (and grimed up), added the battery and radiator, weathered the headlight bezels and got those glued on, and got the front wheels spaced apart a little more realistically than JoHan would have you do it. For the battery, I printed out an image of a battery in 1/25 and stuck it on the battery while the black paint was wet. Then grimed up the image a litte by drybrushing. Quote Link to comment Share on other sites More sharing options...
StevenGuthmiller Posted March 2, 2015 Share Posted March 2, 2015 Very cool Rob! Looking really nice! Steve Quote Link to comment Share on other sites More sharing options...
Greg Pugh Posted March 2, 2015 Share Posted March 2, 2015 That's pretty cool! Quote Link to comment Share on other sites More sharing options...
crazyrichard Posted March 2, 2015 Share Posted March 2, 2015 cool ! Quote Link to comment Share on other sites More sharing options...
Tom Geiger Posted March 2, 2015 Share Posted March 2, 2015 Great job Rob! I'm a real pill about weathering and you've got my seal of approval! A few things of note... 1. Your rust patterns are just right. It's so easy to over do it. You've got the eye. 2. Although you didn't photo it, your description of adding a battery label is the way I do it. An older car like this won't have a factory battery, so I copied a Pep Boys battery label. I may do a Walmart brand battery for the next one I do. A lot of guys skip this because they think they need a decal, but you got it by gluing on paper. The label on a lot of batteries is a sticker anyway. 3. I love your under hood pad! It looks right. 4. The only suggestion I could add is that you left the screw posts in the engine bay. I usually cut those out, you still could if desired. Otherwise, a great job. I have a Johan 1960 Desoto that I have sanded all the trim off because it was damaged in an earlier mishap. I will be building it primer gray to match a photo I found. You're giving me inspiration to pull it out! Quote Link to comment Share on other sites More sharing options...
bobthehobbyguy Posted March 2, 2015 Share Posted March 2, 2015 Looks great. Very nice job on the rust. Are you planning to tone down the chrome headlights? Quote Link to comment Share on other sites More sharing options...
fun9c1 Posted March 3, 2015 Author Share Posted March 3, 2015 Thanks for the comments, guys, I appreciate it! Bob- yes I do need to do something with the headlights, I forgot to mention that. Any suggestions? Is there a way to make them look reasonably realistic without drilling them out and adding clear lenses? Tom- my thoughts exactly on the battery. If this were a 1:1, it would have a cheapo newer battery in it. The first good image I came across was an EverStart so I printed it. I figured if it wrinkles up a little, all the better since some 1:1 labels end up doing that or half-peeling off anyway. The hood insulation is just black felt with some dry-brushing with brown, white, and gray oil paint. I really like the way it came out. First time trying that. More soon I hope. Won't be long till it's under glass. Quote Link to comment Share on other sites More sharing options...
fun9c1 Posted March 3, 2015 Author Share Posted March 3, 2015 Figured I'd post some better pics of the underside, interior and the battery. These pics show me a couple things I need to address. And the carpet needs to be messed up a little. Quote Link to comment Share on other sites More sharing options...
Recommended Posts
Join the conversation
You can post now and register later. If you have an account, sign in now to post with your account.
Note: Your post will require moderator approval before it will be visible.