DrewC Posted March 1, 2008 Share Posted March 1, 2008 Great '32 Andy. It has that "Bad Attitude" I love. The colors from your chopper will look killer on it. Keep us up to date! Great job Andy! Keep at it.... This site is such a motivational tool, everytime I log back on, my motivation goes fromm one project to another..... DrewC Quote Link to comment Share on other sites More sharing options...
Ajay Posted March 2, 2008 Author Share Posted March 2, 2008 I am liking the way this one is going.I am planning a truck build soon.Where did you get that vintage blower? Thanks Hi Jody It's a resin S.CO.T blower from Norm @ Replicas & Minatures - part number is FH-90 - as with all Norms stuff it's very nicely done. Cheers Andy Quote Link to comment Share on other sites More sharing options...
Smart-Resins Posted March 2, 2008 Share Posted March 2, 2008 Thank you. Looks like I will have to get a list together in the future for him. Quote Link to comment Share on other sites More sharing options...
Ajay Posted March 2, 2008 Author Share Posted March 2, 2008 One thing that bothered me when I was building up the engine was the lack of a generator so I went back to Norm's instruction leaflet for the blower and found the following "A third option would be to use a generator mounted on the driver's side head as an idler pulley". Had a look in the spares box for something suitable and came up with the one pictured which I think is from the R-M 50 Ford pick-up. Luckily it includes a moulded in mounting bracket which saves me having to scratchbuildi one - sometimes (but not often) things just drop into place !. I'll have to make a blanking plate for the hole where the "spare" pulley is. Anyway here's some pics of the engine primered and tacked together - should look cool once the dual drive belts are added. Thanks for looking Andy Quote Link to comment Share on other sites More sharing options...
Raul_Perez Posted March 2, 2008 Share Posted March 2, 2008 Looking good, Andy!! Can't wait to see it painted and detailed! Quote Link to comment Share on other sites More sharing options...
Smart-Resins Posted March 2, 2008 Share Posted March 2, 2008 Thats looking really good. I want to get one of those blowers and use it for reference to scratch build on in 1/16 scale to go on a flatty.With the detail, that should make a great build.Keep it up!. Quote Link to comment Share on other sites More sharing options...
kasteer Posted March 4, 2008 Share Posted March 4, 2008 Fricked COOL Looking!!!!!!! Can you build me a 1:1 next? Quote Link to comment Share on other sites More sharing options...
MojaveRacer208 Posted March 5, 2008 Share Posted March 5, 2008 One thing that bothered me when I was building up the engine was the lack of a generator so I went back to Norm's instruction leaflet for the blower and found the following "A third option would be to use a generator mounted on the driver's side head as an idler pulley". Had a look in the spares box for something suitable and came up with the one pictured which I think is from the R-M 50 Ford pick-up. Luckily it includes a moulded in mounting bracket which saves me having to scratchbuildi one - sometimes (but not often) things just drop into place !. I'll have to make a blanking plate for the hole where the "spare" pulley is. Anyway here's some pics of the engine primered and tacked together - should look cool once the dual drive belts are added. Thanks for looking Andy Wayyy cool Andy! The only problem I see with where you're going is that the "spare idler pulley" on the left front of the block which you have deleted in favor of the generator...is the left water pump. This will leave the left bank of cylinders running more than a little hot! The idler next to the distributor and the blower snout is pointless with the generator where it is, but the water pump and the generator fight a bit over drive belts. BTW...the double groove pulleys on the water pumps are an old hot rodders trick. Passenger cars only had single groove pulleys on the water pumps, but trucks had double groove pulleys. I suppose they felt this improved the assurance that the water pumps would turn under heavy duty use. Quote Link to comment Share on other sites More sharing options...
Ajay Posted March 5, 2008 Author Share Posted March 5, 2008 (edited) Hi Richard You're quite right of course - I hadn't thought things through properly - I'll reinstate the water pump pulley and try and find a suitable one for the generator. Appreciate the info. Thanks Andy Edited March 8, 2008 by Ajay Quote Link to comment Share on other sites More sharing options...
Mal.au Posted March 7, 2008 Share Posted March 7, 2008 After seeing the bike I don't see any other choice for the colors on the rat rod Quote Link to comment Share on other sites More sharing options...
Ajay Posted March 10, 2008 Author Share Posted March 10, 2008 Spent some frustrating time over the weekend tying to figure out a way to overcome the problem of the radiator hoses. On a normal height radiator the water hose outlets on the rad are higher then the ones on the heads which means that the hoses clear the fan belts. With the chopped grill the difference in height is reduced significantly so the hoses foul the fanbelts - try as I might I just couldn't get the proposed set up to work. So I've had to change the heads to front outlet ones and move the radiator outlets outwards in an attempt to get the required clearance. I've roughly mocked it up in the attached pics, as I want to be absolutley sure that everything fits before painting, and it seems to work - the fanbelts will be "tighter" when they're finally assembled. There may still be a problem with clearance on the distributor but I can fix that by extending the distributor shaft slightly so it clears the hoses. I've still got to figure out where & how to mount the generator. Thanks for the interest guys - it's keeping me going with trying to iron out the problems. Cheers Andy Quote Link to comment Share on other sites More sharing options...
Kenny Posted March 10, 2008 Share Posted March 10, 2008 Andy, you've got some other modern parts on that rod (transmission, rear end). I don't think you are stuck running a generator. I'm sure you could add a small alternator somewhere and even run a serpentine belt if you absolutely had to. Quote Link to comment Share on other sites More sharing options...
dub Posted March 10, 2008 Share Posted March 10, 2008 Looking good Andy! I agree with Kenny about more modern parts. To solve the fan problem you could use one of the electric fans from the Revell 32 Ford kits. Rods didn't all have fans in the 60s either. (those did have overheating problems in standing traffic though) Your decision, just suggesting other possibilities you might not have considered. I will like the outcome no matter how you solve the issues. Quote Link to comment Share on other sites More sharing options...
Darrell Gwinn Posted March 11, 2008 Share Posted March 11, 2008 The flathead looks awesome, Im loving this car! Its probably my favorite car on this forum so far and its not even done! Great work!! Quote Link to comment Share on other sites More sharing options...
MikeMc Posted March 11, 2008 Share Posted March 11, 2008 Put the generator under the car and run it off the driveshaft!!! Quote Link to comment Share on other sites More sharing options...
Mal.au Posted March 11, 2008 Share Posted March 11, 2008 Looks cool enough to be a 1:1 rod Way to cool Regards Mal Quote Link to comment Share on other sites More sharing options...
MojaveRacer208 Posted March 12, 2008 Share Posted March 12, 2008 Put the generator under the car and run it off the driveshaft!!! I'm agreeing with Mike! I've seen it on race cars, either at the back of the trans or at the yoke at the pinion bearing on the rear axle. And like Kenny said, more modern parts like the auto trans allow for an alternator there or low on the side of the engine, maybe driven off an xtra-row pulley on the crank. This project is going together much like a real hotrod! A lot of 1:1 hot rods these days have become like off-the-shelf model kits. But in the day...everything was very dependent on the imagination, knowledge and skill of the individual builder. There were no "Lokar" shifter cables and serpentine belt kits. A lot of aftermarket hop-up parts needed modifications to other parts to allow the new piece to fit. Quote Link to comment Share on other sites More sharing options...
Ajay Posted March 16, 2008 Author Share Posted March 16, 2008 (edited) Thanks for the suggestions on the fan & generator guys. I haven't made much progess although I've now solved the fan problem. Although Norm includes an option for a fan belt pulley in the blower kit it became apparent from mocking up the engine that due to the chanelling & chopped grille the fan sat way too high above the grille so an electric fan it is. I've used a MCG p/e one as it's a bit more detailed than the kit fan. Hopefully I'll be able to make a bit more progress over the Easter holiday. Thanks for looking Andy Edited March 16, 2008 by Ajay Quote Link to comment Share on other sites More sharing options...
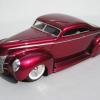
Ajay Posted March 21, 2008 Author Share Posted March 21, 2008 As the weather forecast for the Easter break over here is pretty dire (snow tomorrow) I've spent today working on the engine. I had considered using Alclad chrome for the blower, heads and pulleys but have had problems in the past with the paint rubbing off when the parts are handled. In the end I decided to use Zero fine metallic silver base instead. The recesses in the blower & heads were painted with Humrol enamel No 56 to try & give a polished effect to the raised areas. I need to add a coil and the fuel lines to the carbs- not sure if I'll add throttle linkages as they'll be a bit fiddly and I'm not sure my eyes are up to it !. Anyway here's the pics : Thanks for looking Andy Quote Link to comment Share on other sites More sharing options...
Smart-Resins Posted March 21, 2008 Share Posted March 21, 2008 That motor is the cats meow!! I love it! The current stance on the car though makes it look like the horns could be shortened just a tad. But I still love where it is going! Very nice. Jody Quote Link to comment Share on other sites More sharing options...
Ajay Posted March 21, 2008 Author Share Posted March 21, 2008 That motor is the cats meow!! I love it! The current stance on the car though makes it look like the horns could be shortened just a tad. But I still love where it is going! Very nice. Jody Thanks Jodie In the last one I just took a quick pic with the body & frame losely placed together so I didn't bother adding the suspension - in reality it will sit a bit higher. Cheers Andy Quote Link to comment Share on other sites More sharing options...
Raul_Perez Posted March 21, 2008 Share Posted March 21, 2008 Very nice, Ajay, very nice!! One comment: You absolutely have to add the throttle linkages to the carbs! That engine looks too good not to add all the details! One question: Where did you get the machined pulleys? Thanks, Quote Link to comment Share on other sites More sharing options...
Ajay Posted March 21, 2008 Author Share Posted March 21, 2008 Very nice, Ajay, very nice!! One comment: You absolutely have to add the throttle linkages to the carbs! That engine looks too good not to add all the details! One question: Where did you get the machined pulleys? Thanks, Thanks Raul The pulley's are actually the resin ones included with the R&M blower. As for the throttle linkage - I'm a bit reluctant as the last time I tried to add linkages I ended up with a blob of superglue and the carbs are pretty small (excuses excuses) Cheers Andy Quote Link to comment Share on other sites More sharing options...
Smart-Resins Posted March 21, 2008 Share Posted March 21, 2008 Got ya! As for the carbs, I can understand completely. I am used to 1/16 and one of my current builds includes the Revell parts pack caddy mill. Talk about tiny carbs! That green is inspiring though. I was thinking rat rod on my tanker truck, but I just may go with that color! That color, chrome and white are all befiting colors! jody Quote Link to comment Share on other sites More sharing options...
Nick F40 Posted March 22, 2008 Share Posted March 22, 2008 LIME GREEN! Quote Link to comment Share on other sites More sharing options...
Recommended Posts
Join the conversation
You can post now and register later. If you have an account, sign in now to post with your account.
Note: Your post will require moderator approval before it will be visible.