kelson Posted March 5, 2015 Posted March 5, 2015 This is my 2nd WIP,my first some may remember was the ROG Volkswagen Corrado G60,it was the kit from hell,so back in the box it went!.I'm now working on the Aoshima Mazda Miata:
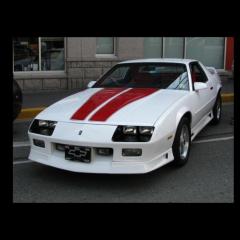
kelson Posted March 5, 2015 Author Posted March 5, 2015 The chassis was painted Duplicolor Grey Hot Rod Primer,the suspension parts and exhaust were painted in various Tamiya and testors paint.Miata's in 99' were offered in a color called Evolution Orange,so I found a color pretty close,Nissan Orange mist.
kelson Posted March 5, 2015 Author Posted March 5, 2015 The color is dull right now,because I haven't put on the clear coats yet,i'm thinking of a tan interior,cuz an all black interior is not to interesting.
Eric Macleod Posted March 6, 2015 Posted March 6, 2015 Love the Miatas. This will be a nice model done!
darthsideous Posted March 6, 2015 Posted March 6, 2015 Looks great Curtis. I like the work you did on the undercarriage so far. It's great to see a more current car to mix it up
slusher Posted March 6, 2015 Posted March 6, 2015 Looks super so far Curtis. i bet that color will pop with clear coat..
bobthehobbyguy Posted March 6, 2015 Posted March 6, 2015 Nice work chassis. The paint looks great. Good choice on color.
Miatatom Posted March 7, 2015 Posted March 7, 2015 The color you've chosen is very close to the Evolution Gold color they used on the 2000 Miata. Only 646 were built.
kelson Posted March 8, 2015 Author Posted March 8, 2015 Thanks for the comments everyone! ,Miatatom,I rechecked my Road and Track from 2000 and in the article the author called it evolution Orange,guess he could have been wrong. Update:Clear coats went on today,camera doesn't quite capture the shine like I hoped.
Miatatom Posted March 8, 2015 Posted March 8, 2015 Miatatom,I rechecked my Road and Track from 2000 and in the article the author called it evolution Orange,guess he could have been wrong. Actually, it is called Evolution Orange. That's the first time I've ever seen it called Gold.
kelson Posted April 12, 2015 Author Posted April 12, 2015 After some delay's,i'm back with some updates:the completed dash,painted dark tan and flat black,then given a couple coats of semi gloss clear.In pictures I've seen on the net the steering wheel had a emblem/decal in the center,but the kit had none,so i found a decal similar and cut it to fit,think it looks ok.
kelson Posted April 12, 2015 Author Posted April 12, 2015 Next up some pictures of the completed interior,the tub was painted sand beige,then given a couple coats of dullcoat to kill the gloss,the door panels were again painted dark tan with flat black and given a couple coats of semi gloss clear.
kelson Posted April 12, 2015 Author Posted April 12, 2015 Finally,most of the black trim painted on the body,i used flat black paint again with a couple light coats of semi gloss clear,the front is taped up as I'm trying to mask the area where the headlight buckets need to be paint chrome.Any comments or questions feel free to ask!
Model Brain Posted April 12, 2015 Posted April 12, 2015 Great job Curtis. My buddy is building a V8 conversion Miata, Your's is an inspiration! keep it up!
Kennyboy Posted April 12, 2015 Posted April 12, 2015 You are doing a wonderful job on this Curtis! Love your choice of colors and the Nardi emblem on the steering wheel is quite convincing!
Phildaupho Posted April 13, 2015 Posted April 13, 2015 Extremely nice job on the interior. This is going to a gorgeous model when it is under glass!!
kelson Posted April 15, 2015 Author Posted April 15, 2015 Thanks guy's for the compliment's! ,a few updates for today:put on most of the decals on the body,it's hard to see them as they are pretty small,i,used BMF for backing on the front and rear marker lights as well as the third brake light,instead of the decals,then painted them with Tamiya clear orange and clear red then covered them with a dab of future floor polish,thought it looked more realistic.
kelson Posted April 15, 2015 Author Posted April 15, 2015 The windshield is masked and painted,i'm trying out dipping it in future for more a cleaner look,hopefully it will turn out and be dry for tomorrow.Here are a couple pictures of the body glued to the chassis:
slusher Posted April 15, 2015 Posted April 15, 2015 Great looking interior and real nice work on the headlights and marker lights...
kelson Posted May 19, 2015 Author Posted May 19, 2015 Well after 4 repaints of the taillights and 2 repaints of the hardtop,i'm calling it done!photo's will be posted in the Under glass section next.i just want to thank everyone for their comments and for looking in on my build.
Recommended Posts
Create an account or sign in to comment
You need to be a member in order to leave a comment
Create an account
Sign up for a new account in our community. It's easy!
Register a new accountSign in
Already have an account? Sign in here.
Sign In Now