RodneyBad Posted January 3, 2010 Share Posted January 3, 2010 WOW!!! That is One Awesome looking Lincoln. Could never tell it was that bad lindberg kit. Excellent work.. Quote Link to comment Share on other sites More sharing options...
RacinRay88 Posted January 3, 2010 Share Posted January 3, 2010 wow this is an awesome build!! very clean and detailed i love it! cool topless option also! Quote Link to comment Share on other sites More sharing options...
Tony T Posted January 4, 2010 Share Posted January 4, 2010 Exceptional build! I saw some of your earlier WIP posts, and some of the difficulties you overcame to finish! Just flat out awesome, even if it has a non-Ford sourced engine! Now I have the song "Hot Rod Lincoln" stuck in my head!! Quote Link to comment Share on other sites More sharing options...
jbwelda Posted January 5, 2010 Share Posted January 5, 2010 man, that is UNBELIEVABLE! i never would have imagined from a pyro kit, something like that could emerge. that needs to go to some IPMS shows to show them whats up with car models! seriously, that is sweet. Quote Link to comment Share on other sites More sharing options...
PatRedmond Posted January 5, 2010 Share Posted January 5, 2010 Fantastic results from a BEAR of a kit to look good. Quote Link to comment Share on other sites More sharing options...
Railfreak78 Posted January 5, 2010 Share Posted January 5, 2010 WOW! This will be for sure one of the best of class 2010. I love all the details you can't stop finding something else. I'm glad you didn't give up on this and once again... WoW. Happy Hobby'n Quote Link to comment Share on other sites More sharing options...
Harold Posted January 5, 2010 Share Posted January 5, 2010 Man, talk about turning a sow's ear into a silk purse. Absolutely killer job. . Quote Link to comment Share on other sites More sharing options...
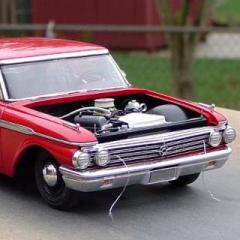
Jeff Sauber Posted January 5, 2010 Author Share Posted January 5, 2010 I got around to taking a few outdoor pics. I usually try to take both indooor and outdoor images. Sometimes the outdoor shots are better at showing the true color of the paints and details..... Quote Link to comment Share on other sites More sharing options...
Nick Winter Posted January 5, 2010 Share Posted January 5, 2010 Not my style of build, but very nice. Quote Link to comment Share on other sites More sharing options...
RodBurNeR Posted January 6, 2010 Share Posted January 6, 2010 Actually thats a good question, Bob.....I'm not really sure myself what exactly makes it a true mild custom. I did update the engine as well as smooth out the factory body creases on the sides of the fenders, and I also elected to get rid of the external hinges on the doors and trunk. I guess one could say that the car is sort of stuck between stock and mild custom, so perhaps "mildly modfied" would be a better description?.....Either way, I just wish I could blow this thing up to 1:1 size and head on down the road in it for a while and see what that Lt-5 can do......... I hear ya, I didn't know ya did those things. I have the kit but have not started on it yet. yours looks nice! Quote Link to comment Share on other sites More sharing options...
RatRod Posted January 6, 2010 Share Posted January 6, 2010 Holy cow, that is a wonderful display of talent!!! Very nice interior work, and attention to detail throughout. This looks like a high dollar kit!! Quote Link to comment Share on other sites More sharing options...
frozono Posted January 7, 2010 Share Posted January 7, 2010 you are the man..... excellent job..... look so real, peaceful and powerful at the same time... Quote Link to comment Share on other sites More sharing options...
Greg Cullinan Posted January 8, 2010 Share Posted January 8, 2010 I can picture Truman riding to his inauguration in this bad boy.Looks sweet.Thanks Quote Link to comment Share on other sites More sharing options...
Dave Darby Posted January 9, 2010 Share Posted January 9, 2010 (edited) I started to build one of those about 15 years ago, and finally gave up on it. Yours is just gorgeous. Do tell me the details on that roof tho! Edited January 9, 2010 by Dave Darby Quote Link to comment Share on other sites More sharing options...
Fisher61 Posted January 9, 2010 Share Posted January 9, 2010 All I can say is "WOW"! This is like a 1/25th scale version of "Overhaulin"! Only better! Great job, she's a beauty! Quote Link to comment Share on other sites More sharing options...
Jeff Sauber Posted January 10, 2010 Author Share Posted January 10, 2010 I started to build one of those about 15 years ago, and finally gave up on it. Yours is just gorgeous. Do tell me the details on that roof tho! Dave, The kit roof was pretty bare and toylike as is, so I looked up a few 1:1 cars to see what I needed to do in order to add on some details, and spice things up a little. The "seams" I added on the roof are just small styrene strip, and the button snaps are photoetched parts....It's not 100% accurate, but it's similar to the 1:1, and looks alot better than just doing nothing. The inner bracing details are from the kit, but have been thinned out and reworked along with some photoetched bolts, screws, and rivets. The Roof's inner bracing was very thick and out of scale a needed alot of attention. The "top down" boot, was partially kit bashed from a revell 48 ford covertible kit, and partially scratchbuilt with sheet plastic. Quote Link to comment Share on other sites More sharing options...
lordairgtar Posted January 10, 2010 Share Posted January 10, 2010 That car is awesome! I have an original Pyro version that I want to deal with. I want to do some work on the grille. It bothers me in some way because of it's "flatness" or lack of texture. You did a wonderful job of this one. Quote Link to comment Share on other sites More sharing options...
Chuck Most Posted January 11, 2010 Share Posted January 11, 2010 (edited) I remember buying this kit in 1999 and being impressed by it's awfulness. I never finished that one. Now that my skills are up, I picked one up about a year and a half ago to try and improve it. Then along comes Jeff, who no doubt has one-upped (no... upped a thousand fold) the best possible end result I could've gotten out of mine. Thanks! Thanks a lot Jeff! You crushed my spirit and ruined my whole day! In the best way possible, of course! Edited January 11, 2010 by Chuck Most Quote Link to comment Share on other sites More sharing options...
crazyjim Posted January 11, 2010 Share Posted January 11, 2010 Not my kind of car but I can apprecite your work Very nice. Quote Link to comment Share on other sites More sharing options...
jeffs396 Posted January 12, 2010 Share Posted January 12, 2010 Infartincredible!!! Do tell about the brake lines running to the master cylinder... Quote Link to comment Share on other sites More sharing options...
Jeff Sauber Posted January 13, 2010 Author Share Posted January 13, 2010 (edited) Infartincredible!!! Do tell about the brake lines running to the master cylinder... I just coiled up some 26 or 28 gauge craft wire, added a couple of small scratchbuilt fittings, and tucked it under the brake vaccuum booster. It's just some simple brake plumbing, nothing too fancy. I think the master cylinders all look so bare without any lines comming from them. You don't have to plumb the whole car from front to back if you don't want to, but I always try to at least add a couple lines to the fluid resevior for good measure. Edited January 13, 2010 by J. Sauber Quote Link to comment Share on other sites More sharing options...
mikeD1 Posted January 14, 2010 Share Posted January 14, 2010 what blue is that!!! that is one pretty sweet ride!!! thanks mike Quote Link to comment Share on other sites More sharing options...
Rob Hall Posted January 14, 2010 Share Posted January 14, 2010 Sweet build. Very nice to see a buildup of a kit I'd heard was 'unbuildable'. Quote Link to comment Share on other sites More sharing options...
Chuck Most Posted January 15, 2010 Share Posted January 15, 2010 Sweet build. Very nice to see a buildup of a kit I'd heard was 'unbuildable'. I wouldn't say that about it. More like "ratherbuildsomethingelseable". Does have potential, though! Quote Link to comment Share on other sites More sharing options...
doug2013 Posted January 21, 2010 Share Posted January 21, 2010 i love the classic old car with that modern engine what a beauty Quote Link to comment Share on other sites More sharing options...
Recommended Posts
Join the conversation
You can post now and register later. If you have an account, sign in now to post with your account.
Note: Your post will require moderator approval before it will be visible.