KJ790 Posted July 7, 2019 Share Posted July 7, 2019 This started as a partially built glue-bomb that I bought off of ebay. It seems like I will never learn my lesson with these partial builds, they are never assembled correctly. This one had the frame, suspension, axles, and engine assembled. The engine was so bad that I just threw it out. The frame is very warped and crooked, but there is no fixing it, so everything has to be build around it to make it seem straight. I am using a set of 5-spoke drive wheels that I used to cast with a set of Doug Wagner's aluminum front rims. The battery boxes, quarter fenders, and fuel tanks are scratch built. I filled in the foglights that were built into the bumper and added a set below the bumper. Here is where the mock-up stands right now. I think that the frame is a tad too long without the long fuel tanks beneath the sleeper. I may shorten the frame up a little bit. Quote Link to comment Share on other sites More sharing options...
Force Posted July 7, 2019 Share Posted July 7, 2019 Interesting, this I will follow. Quote Link to comment Share on other sites More sharing options...
iamsuperdan Posted July 7, 2019 Share Posted July 7, 2019 If you hadn't mentioned it, I'd have never guessed you were dealing with a warped frame. WHatever you've done to hide it, great job! Quote Link to comment Share on other sites More sharing options...
KJ790 Posted July 7, 2019 Author Share Posted July 7, 2019 Thanks guys! Let's just say that if this were a real truck, the tires would wear out pretty quickly! I have had to custom shim everything to get it to somewhat line up. It won't be a show winner, but I hope it will look nice on a shelf. This morning I cut 12 (scale) inches out of the frame and it looks a lot better to me now. Now I just need to repaint the frame to hide the splice marks. Quote Link to comment Share on other sites More sharing options...
DRIPTROIT 71 Posted July 7, 2019 Share Posted July 7, 2019 Very nice project!! I'll be watching!! Quote Link to comment Share on other sites More sharing options...
Jim B Posted July 7, 2019 Share Posted July 7, 2019 Good looking General so far. Quote Link to comment Share on other sites More sharing options...
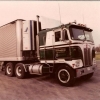
KJ790 Posted July 8, 2019 Author Share Posted July 8, 2019 (edited) Thanks guys! Like most of my builds, this one is based on a truck that my family had when I was a kid. I only have 2 pictures of it (1-1/2 really). We bought this truck new in 1984. It was red with a Detroit 8V92T engine, aluminum steer wheels and spoke drive wheels. We sold it to a guy named Bob Owens in the early 90's, he was an owner operator that pulled for us. Shortly thereafter he unfortunately passed away and it was purchased by Jeff Schaller. Schaller repainted it black and used it to haul pool water for quite a few years. This is the only (half) picture I have of the truck as it was originally. This is actually in the background of one of my childhood photos, I zoomed and cropped the picture. I can see that the foglights were below the bumper originally. This picture is from Eric Sweet of dailydieseldose.com. He took this in 2011 in front of Schaller's shop. From this I was able to gather some extra details like the location of the battery boxes. Edited July 8, 2019 by KJ790 Quote Link to comment Share on other sites More sharing options...
vincen47 Posted July 8, 2019 Share Posted July 8, 2019 Neat project! What’s noteworthy to me is your ability to trace the history of the truck. Makes the build more meaningful, especially as childhood nostalgia. The real truck in 2011 looks like a good candidate for a model too. Looks like they replaced the aluminum front wheels with 2 hole steels, and maybe the rears too. They also cut holes in the bumper for fog lights. Even looks like they’ve got a set of mismatched (drive?!?) tires on the front too. With the dented tanker in grey primer, it’s a cool, somewhat-of-a beater rig, still earning its keep. Quote Link to comment Share on other sites More sharing options...
Tesla Posted July 8, 2019 Share Posted July 8, 2019 Neat project! What’s noteworthy to me is your ability to trace the history of the truck. Makes the build more meaningful, especially as childhood nostalgia. X2! Quote Link to comment Share on other sites More sharing options...
KJ790 Posted July 9, 2019 Author Share Posted July 9, 2019 8V92T from the parts box with updated valve covers. Even these 1/25 scale Detroits seem to leak oil... Quote Link to comment Share on other sites More sharing options...
Jim B Posted July 9, 2019 Share Posted July 9, 2019 Nice job on the engine. Quote Link to comment Share on other sites More sharing options...
DrKerry Posted July 9, 2019 Share Posted July 9, 2019 On 7/8/2019 at 2:30 AM, Tesla said: Neat project! What’s noteworthy to me is your ability to trace the history of the truck. Makes the build more meaningful, especially as childhood nostalgia. X2! X's thrice!!!! Kool back story on it!!! Quote Link to comment Share on other sites More sharing options...
DRIPTROIT 71 Posted July 9, 2019 Share Posted July 9, 2019 That Detroit looks Awesome!! Quote Link to comment Share on other sites More sharing options...
Force Posted July 9, 2019 Share Posted July 9, 2019 I agree with that. Quote Link to comment Share on other sites More sharing options...
clayton Posted July 9, 2019 Share Posted July 9, 2019 Some times the old glue booms are not bad and some times fun. Quote Link to comment Share on other sites More sharing options...
KJ790 Posted July 10, 2019 Author Share Posted July 10, 2019 I was able to put some paint and decals on the cab. It is good to take pictures along the way, so the lighting in the picture shows me that I need another coat of paint on the sleeper. I am glad it is not on a part that already has decals! The engine and radiator are in the frame. I still have to finish up the details like radiator hoses, etc. For the interior I went with 50 shades of gray (actually just 4 shades). It is pretty plain Jane, but these Generals were not very flashy on the inside. Once the paint dries some more, I can tape it up and spray the grille surround and other accents with Molotow chrome. Quote Link to comment Share on other sites More sharing options...
DRIPTROIT 71 Posted July 11, 2019 Share Posted July 11, 2019 Awesome work!! Quote Link to comment Share on other sites More sharing options...
Truck parts Posted July 11, 2019 Share Posted July 11, 2019 Great looking work and thank you for posting your work Quote Link to comment Share on other sites More sharing options...
Vince66 Posted July 11, 2019 Share Posted July 11, 2019 Coming along nicely. Quote Link to comment Share on other sites More sharing options...
KJ790 Posted July 13, 2019 Author Share Posted July 13, 2019 Made some more headway on this one. I have have the hood pretty much finished. I had a company make me some dry transfer emblems for the sides of the hood. I am glad that they sent me a lot of the, as I went through about 20 of them to get them on the hood. The interior is in the cab and the exhaust is mounted. I made a 3D printed exhaust heat shield to match the one from a real General. I think I need to make another upper standpipe for the exhaust, as I guessed on the length and this one seems a bit short. The air filter straps were detailed using aluminum heating duct tape. I still need to finish up the "fiddly bits", the mirrors, wipers, steps, intake plumbing, etc. A few lessons I have learned so far for the next time I build one of these kits: 1. I will assemble my own chassis 2. I will not assemble the chrome pieces onto the hood before paint. It was a major paint to try to paint them with Molotow on the assembled and painted hood and I am not super happy with how they came out. 3. test fit the hood and radiator before final assembly, I had interference issues and had to shorten the radiator slightly. Quote Link to comment Share on other sites More sharing options...
Force Posted July 13, 2019 Share Posted July 13, 2019 looking real good there KJ, Quote Link to comment Share on other sites More sharing options...
Vince66 Posted July 13, 2019 Share Posted July 13, 2019 Quote Link to comment Share on other sites More sharing options...
TECHMAN Posted July 15, 2019 Share Posted July 15, 2019 Even with the "issues", that really turned out to be a SHARP lookin' GMC!!!! DJ Quote Link to comment Share on other sites More sharing options...
SpreadAxle Posted July 15, 2019 Share Posted July 15, 2019 Outstanding! Quote Link to comment Share on other sites More sharing options...
tbill Posted July 16, 2019 Share Posted July 16, 2019 Looking good KJ! That truck didn’t come from Utica general truck when new did it? Quote Link to comment Share on other sites More sharing options...
Recommended Posts
Join the conversation
You can post now and register later. If you have an account, sign in now to post with your account.
Note: Your post will require moderator approval before it will be visible.