customline
-
Posts
3,794 -
Joined
-
Last visited
Content Type
Profiles
Forums
Events
Gallery
Everything posted by customline
-
Looks like a barn find already ?....just add mouse droppings!
-
Looking at all this super nice work on the roof got me wondering if the '64s had the glass window. I learned to drive on a '65 (Chevy) and the rear window was glass. I think that was fairly new then. Have you thought about it yet? I remember not having to unzip it, just pop the latches and push the button. The plastic one on our previous family car, a '59 Ford, had to be unzipped first (Dad told me.) I just wondered when GM started with glass. It must have been around that time. This may or may not affect what you do with this roof since you are dedicated to authenticity ?.
-
I love a fat-fendered forty...(especially with a rocket under the hood)....proceed with extreme prejudice!
-

1933 Cadillac Fleetwood All Weather Phaeton
customline replied to ModelcarJR's topic in WIP: Model Cars
OK, now I want one ? -
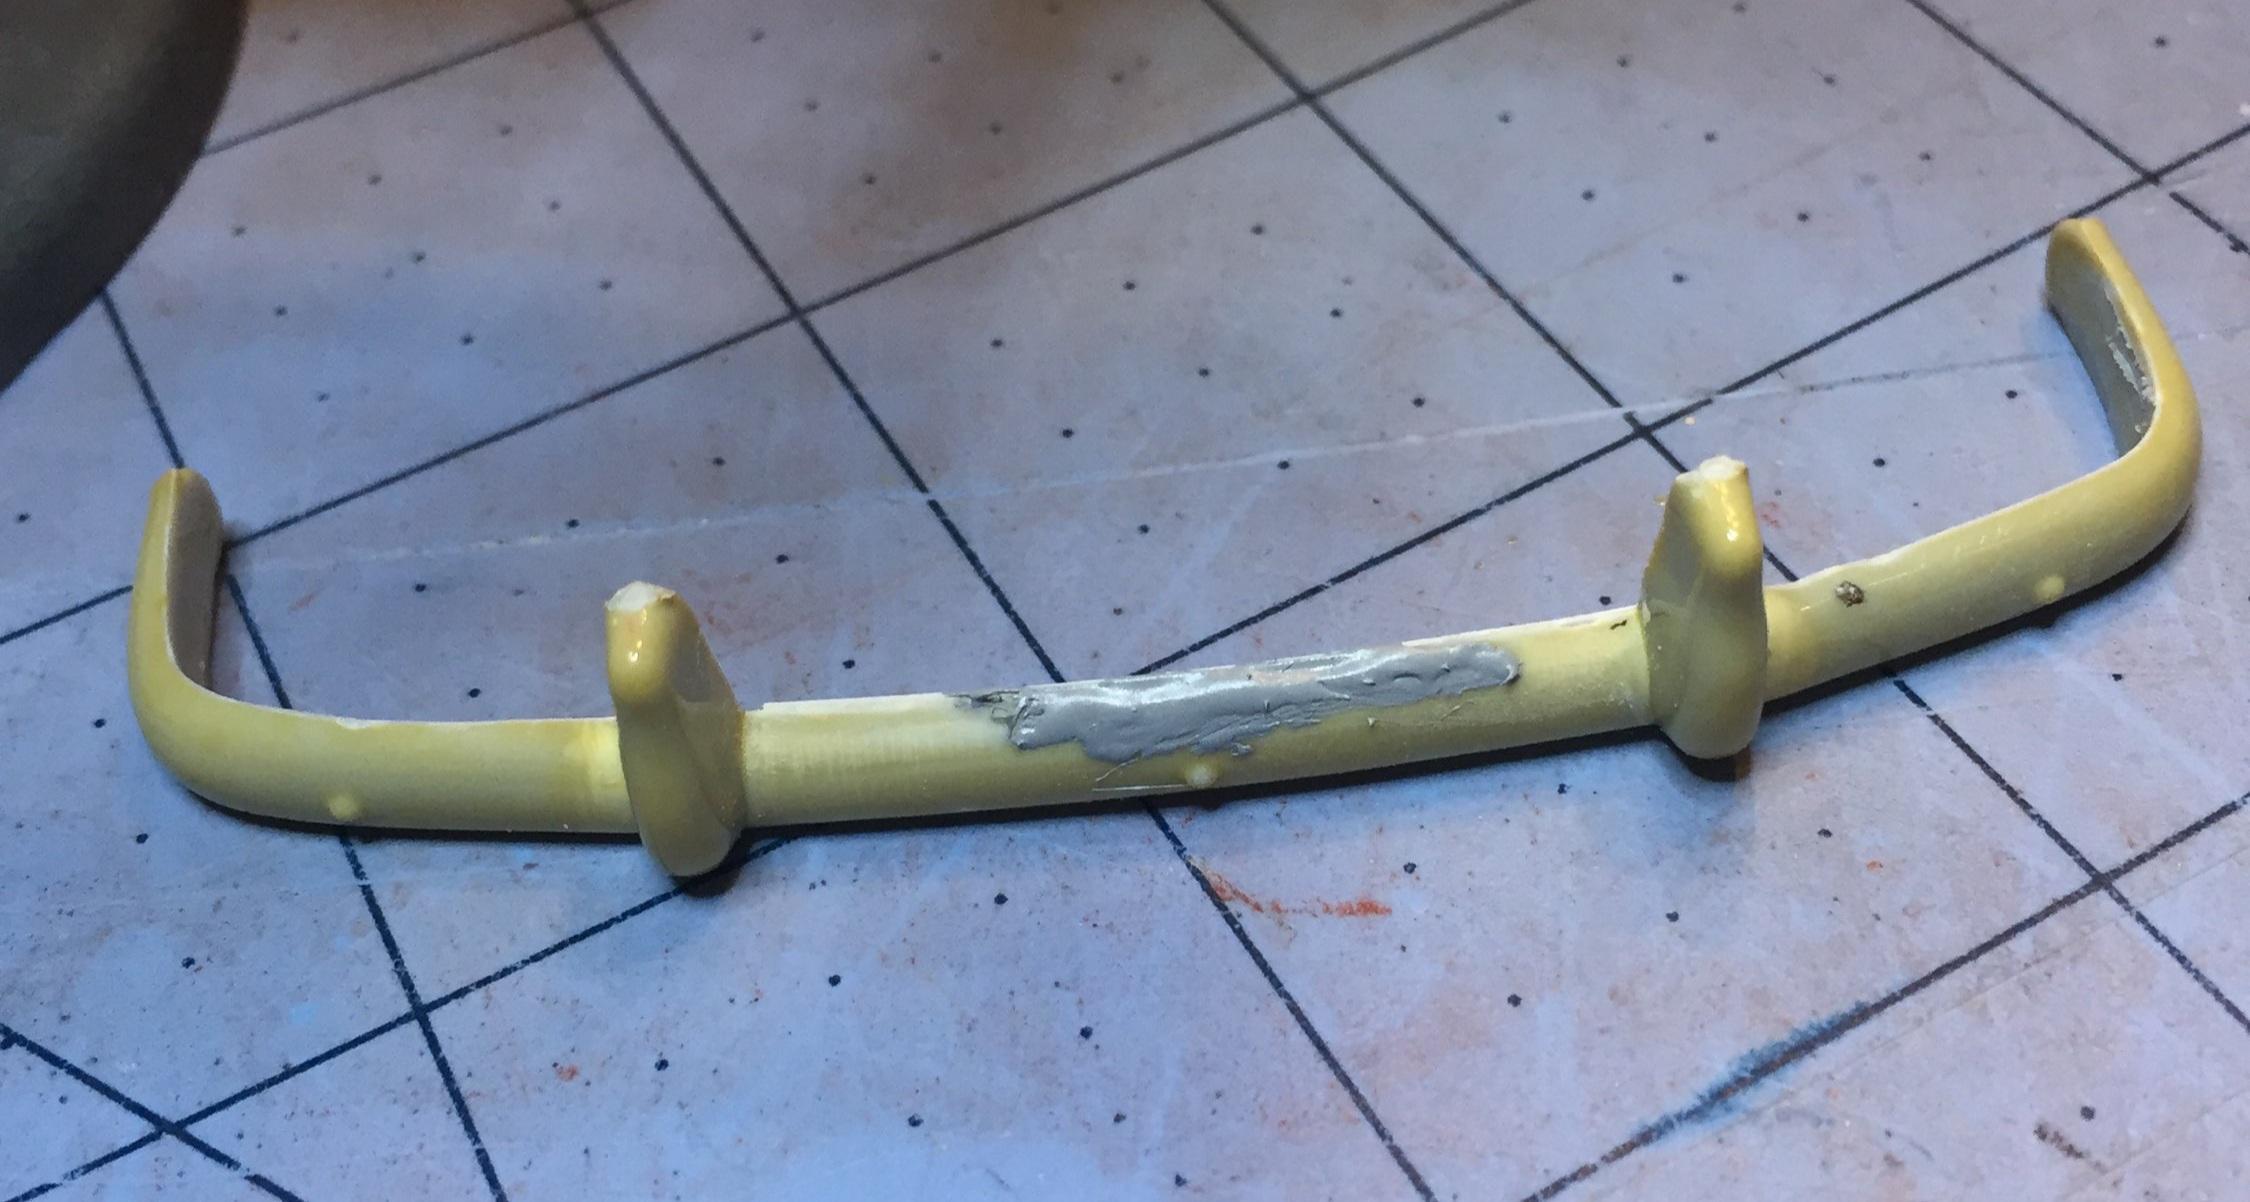
Lets be clear.....I didn't want to do this. It was just to fix the issues and then put it back in the box, put the T-Birds together, get some paint on the other four and oh...the Boss 302....and only then bring the Fleetline back to the table. The best laid plans of mice and men....I got primer on it yesterday so I could put some Mr. Surfacer on the other minor issues. The original plan was to build a stock, shiny example of this iconic Chevy but then I started thinking about doing a patina job on it and....well... as you can guess, once that thought landed in my head, everything else got pushed out and.....well....here we go ?. this is the rear bumper that was in the box. It appeared to have been removed from some other build so I scraped off the glue and stripped the chrome. I added a piece of .010 to the back side to facilitate filling the chunks missing on the top edge. If I go the patina route I will, no doubt, want a little rust on this along with well-worn chrome. (Anyone out there use that Revell chrome stuff? Fill me in please ?) Thanks for looking!

-
Bob, if you are referencing the ķit glass, this kit came with the front and back separate. I am not using the kit glass now. I had to go with acetate.
-
1933 Cadillac Fleetwood All Weather Phaeton
customline replied to ModelcarJR's topic in WIP: Model Cars
Yup. Totally get you on the airbrush. I have a detached garage for painting. Not the best situation. Winter is almost here. The Caddy looks fantastic, JR! -
Thin Tape That Will Stay Put.
customline replied to StevenGuthmiller's topic in Model Building Questions and Answers
Yes it's pretty slick but it's pretty darn sticky. It's 2" wide and it's thin like Scotch tape. I can't attest to its ability to hold paint. One would need to experiment. I've only used it to tape seams on Tyvek sheeting (some sort of plastic.) And I put a cardboard spray booth together with a half a roll that's been out in the garage for about ten years. Still like new. Great stuff. It was just a suggestion. I suppose if it was me, I would use a primer made for plastic to test it. -
1933 Cadillac Fleetwood All Weather Phaeton
customline replied to ModelcarJR's topic in WIP: Model Cars
John, are you decanting or spraying from the can? Your paint jobs look great and I wondered if you are using an airbrush. Also, why not go ahead and use some plastic or aluminum tubing and make a distributor that you can fill with 17 wires? Nobody really knows what a '33 Caddy distributor looks like anyway so why not fake one? The look of a wired engine has some wow factor and however you can fake the distributor is better than a sixteen cylinder engine with no ignition wires! ? -
Got a bit more done today. I added some short pieces of rod to the inside of the A posts to "catch" the thin acetate that I cut from Wifey's card-making supplies or stamping nonsense or scrapbooking junk( ? )packaging (well, she is good about saving the stuff for me. I have much more than I will ever use). Did the same for the backlight. This gets the "glass" in a more natural location as seen from the outside. Once satisfied with all this, I finished up by replacing the windshield center divider with .040 square strip and added some little pieces of .030 sheet to the bottom corners of the new windshield molding to be formed into the corner radii with the help of a little filler and some sanding. That's it for now. Gotta try to finish up some other stuff and then I'll get on with this one next year ?.
-
Thin Tape That Will Stay Put.
customline replied to StevenGuthmiller's topic in Model Building Questions and Answers
Late to the dance again ?....thin tape, extremely sticky? Tyvek tape. Thin like scotch tape, sticky like forever.....too late I guess ?. -
Yeah, Bob, the kit glass was not planned to be used from the start but, when I tried it earlier, it didn't look too bad. After narrowing the A posts further, it's passable but not looking great. I'll need to put in some strips on the inside of the posts to "trap" an acetate replacement. I've used the "trap" method on some other projects and it will probably work here.
-
OK, the A pillars were too wide and it needed adjustment. So I did. Thanks, Andy. I was chicken but I swallowed hard and picked up my knife and emery board and here it is. The kit glass is in there and if I want to settle for this it will fly....but I'm going to cut an acetate WS and see if I can get a much better look. I'm hopeful. this should make most of us happier. I know I am ?
-
I recently bought some PE saws and find them useful for cutting fragile parts from the trees instead of a sprue cutter. Beautiful work on a favorite body style of mine. Congrats!
-
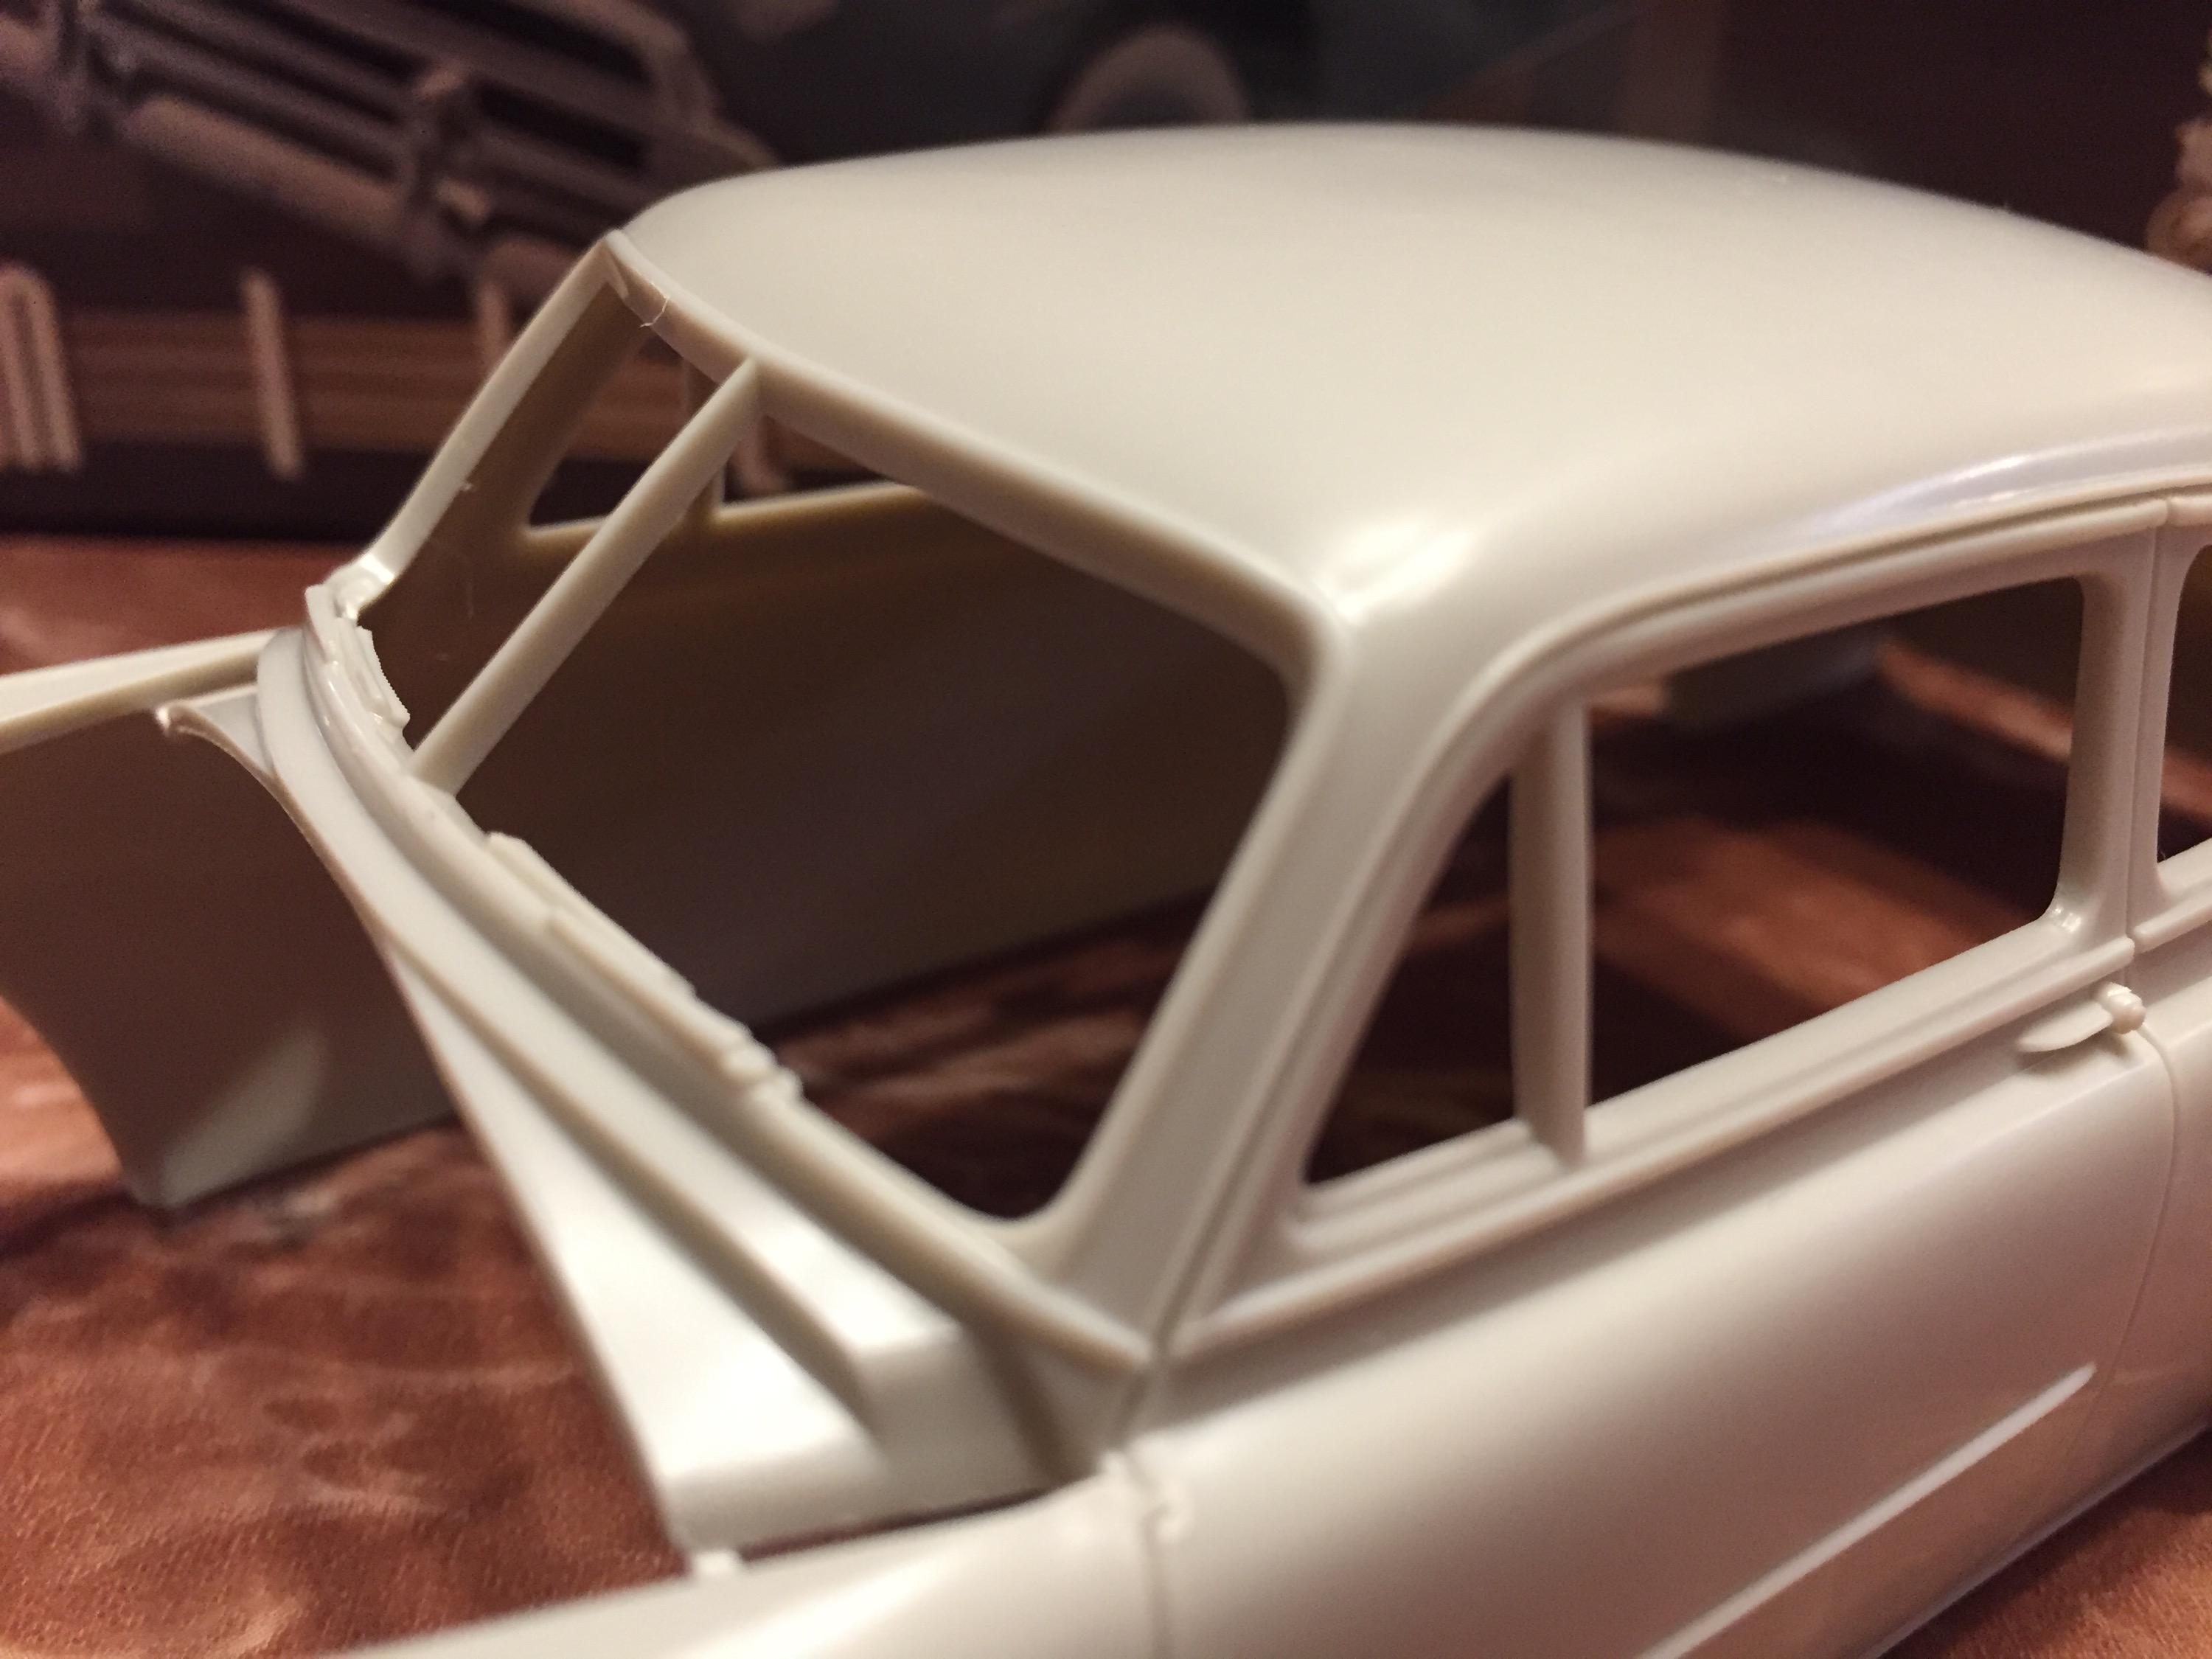
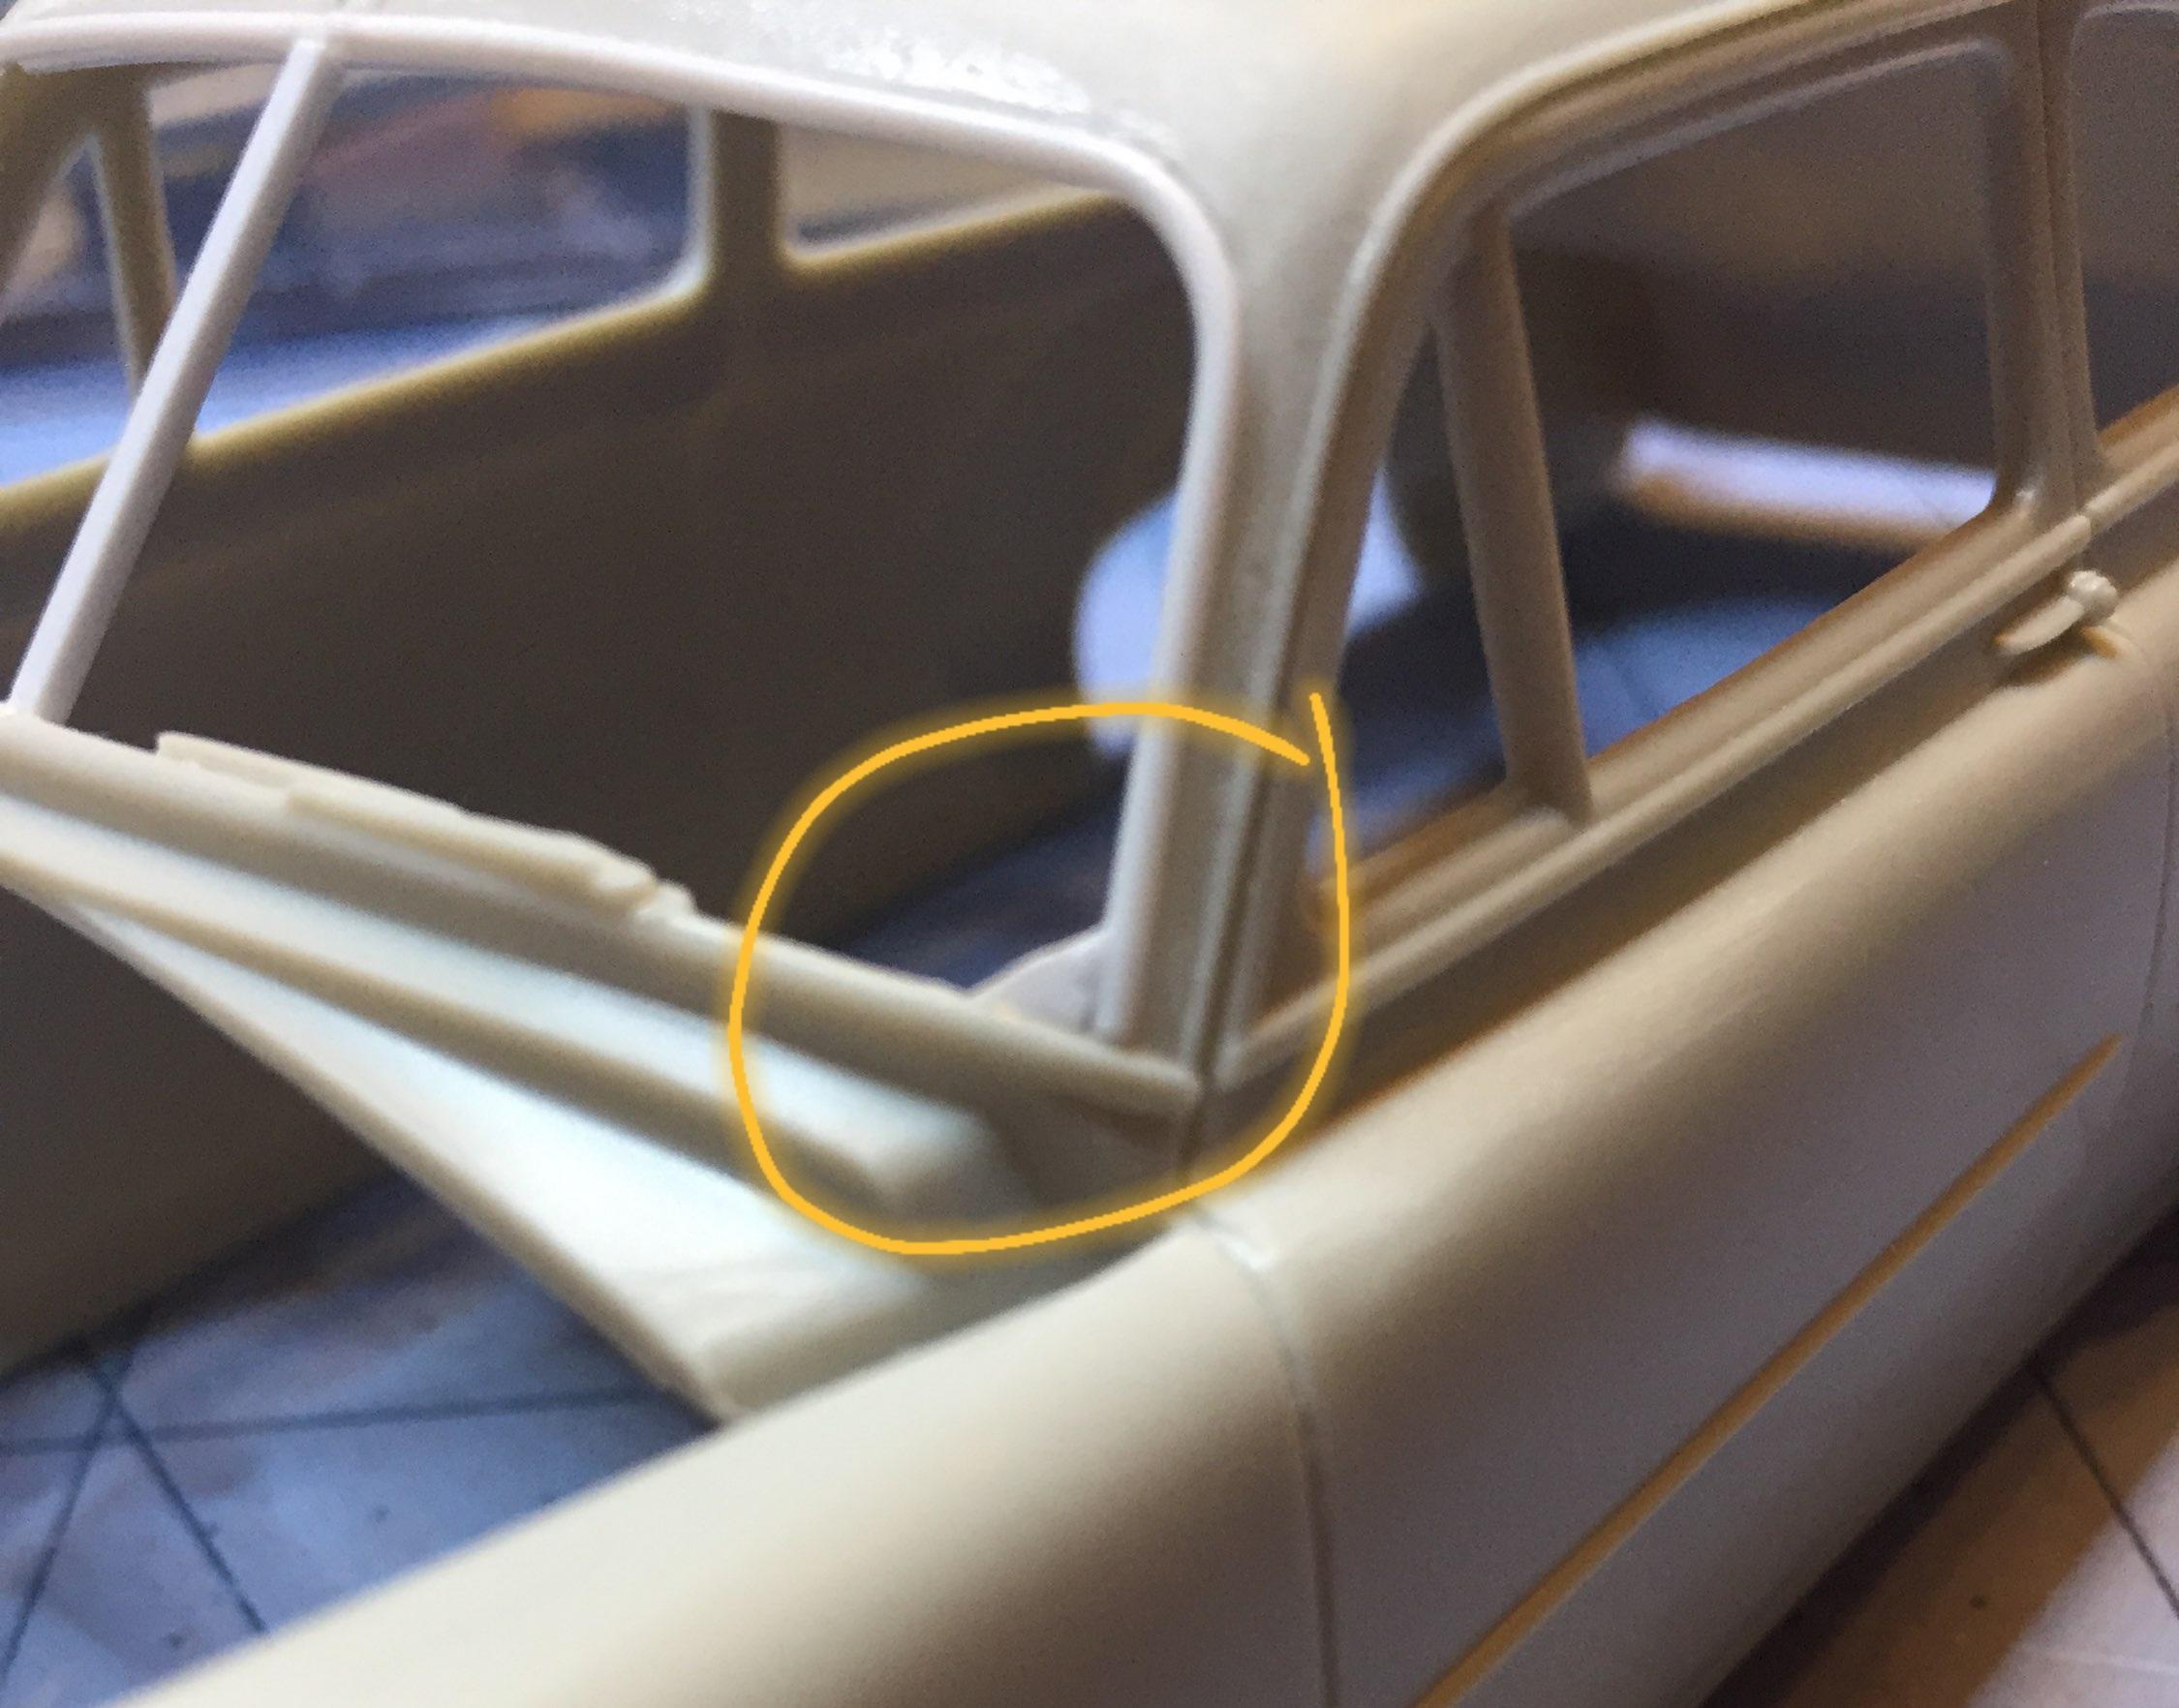
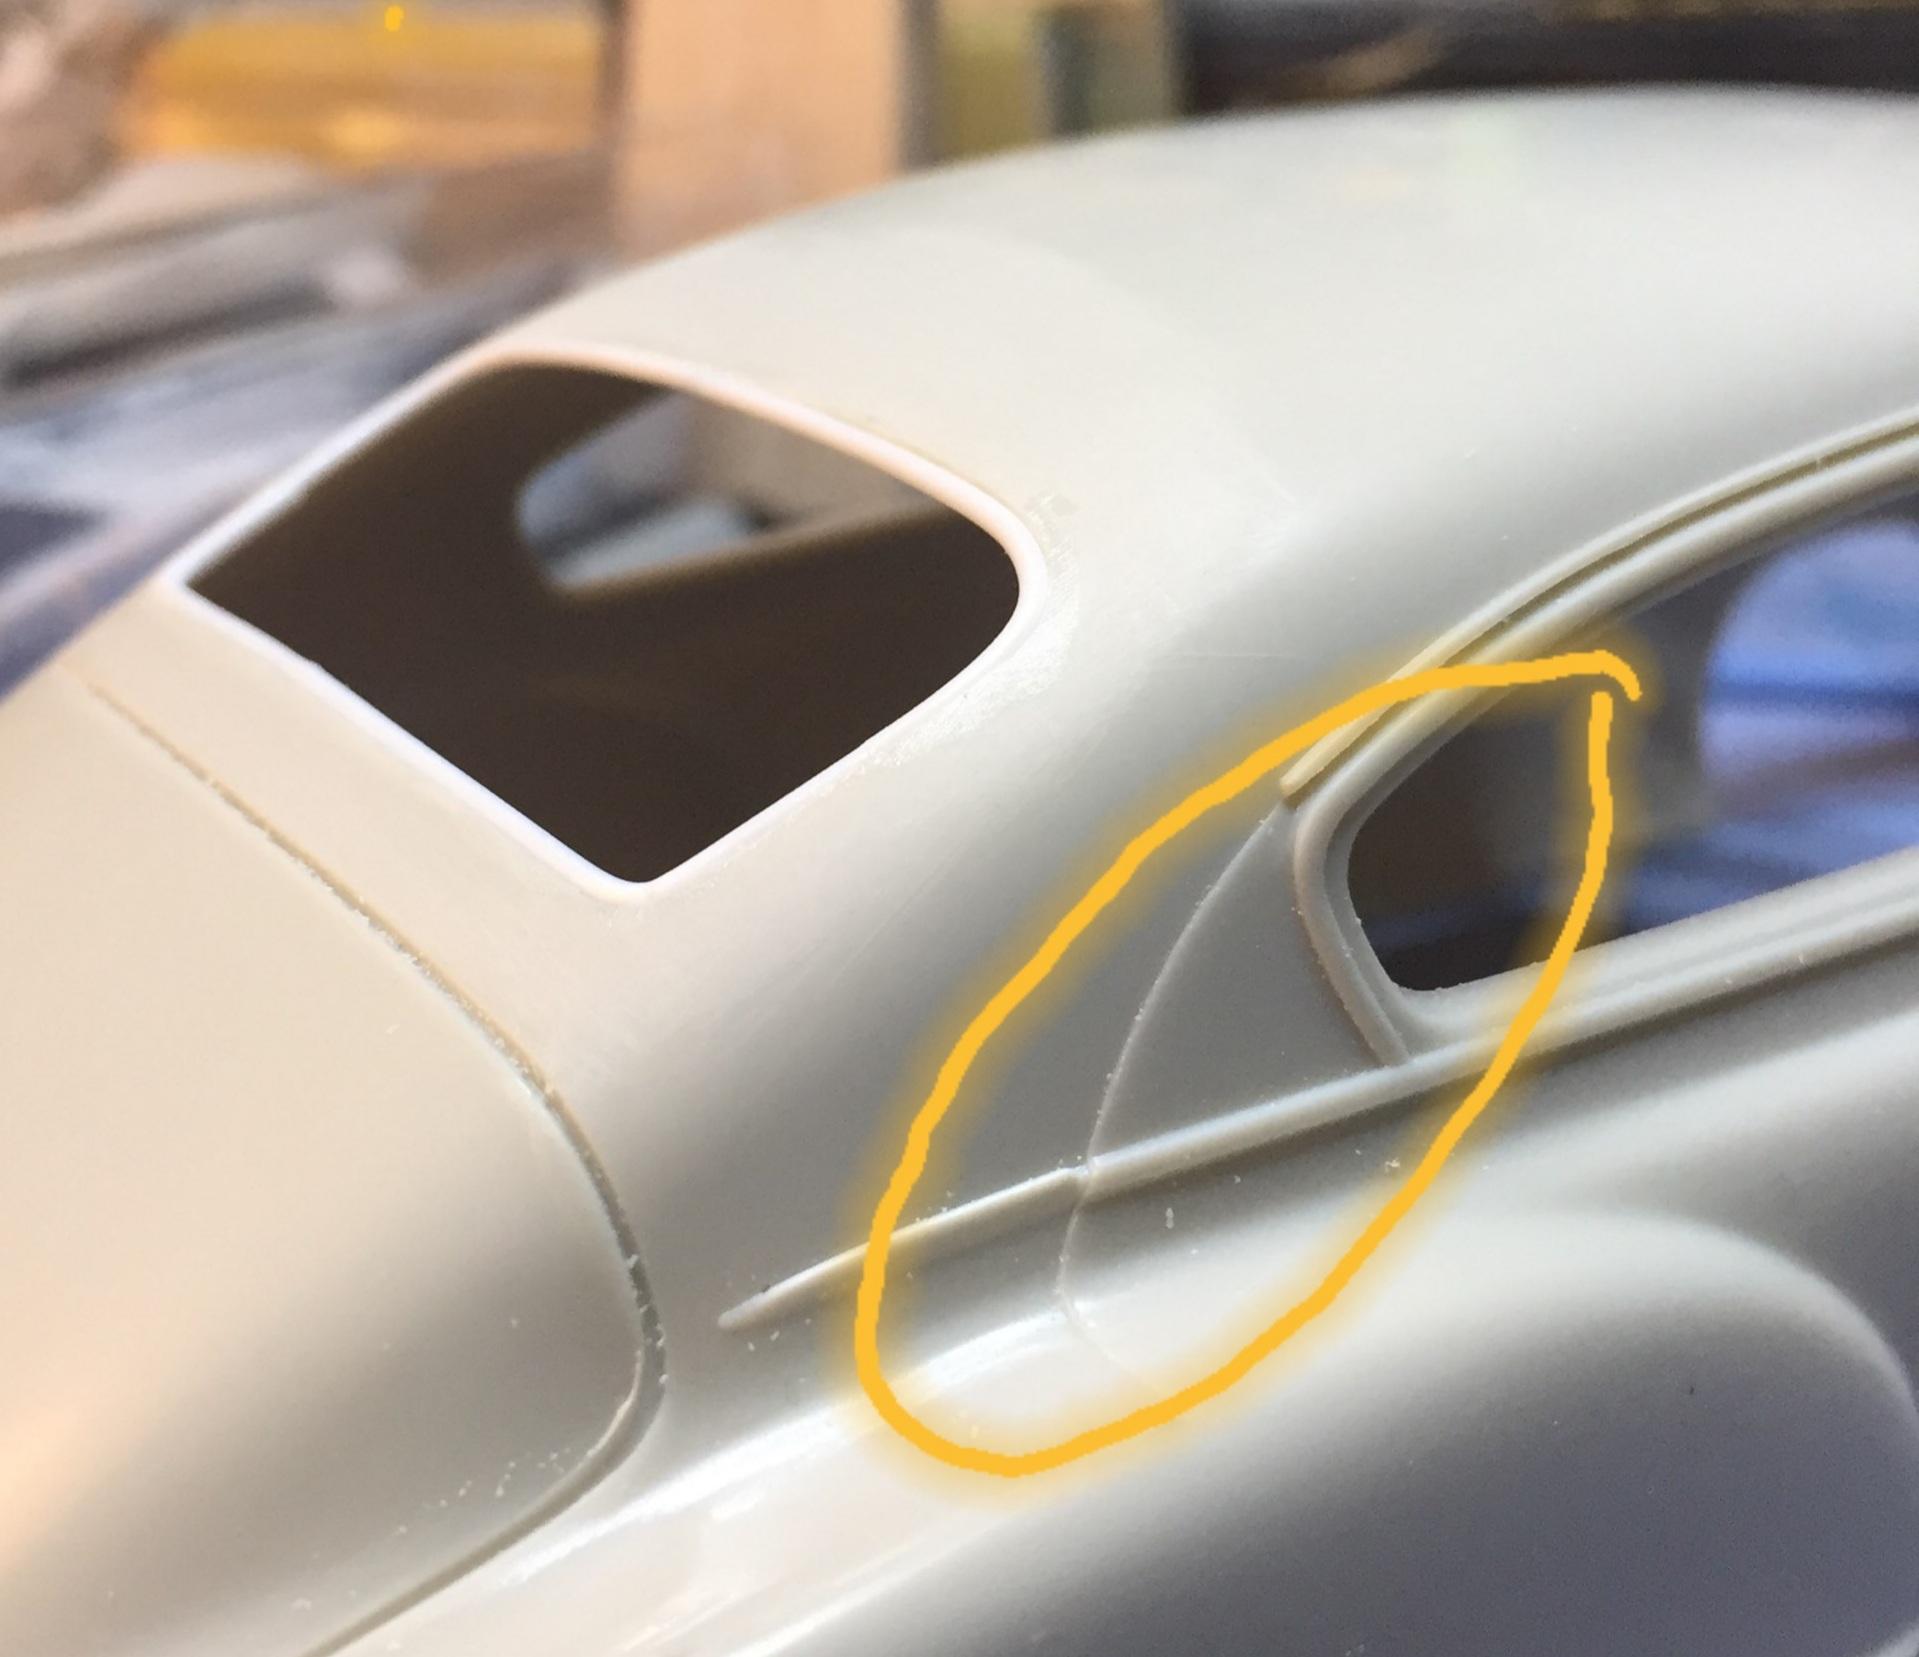
Not only do we have design deficiencies but manufacturing issues too (see circled areas - there's quite a step I've gotta fix ?.) I tweaked the backlight opening a bit more and wrapped the .040 rod around the inside in four pieces - the only way I could do this. I've tried to do this operation using one length of rod and it ends up as a waste of material as you can imagine. This experiment may or may not work out well but I feel like I did what I could to get it more correct looking than if I had just did it OOB. (I think it should be "BUILT OUT OF the BOX or "BOOB")
-
I agree the A pillars need to be thinner but I didn't want to create a problem for the chrome moldings that, on the 1:1, are very close together and, on the model, the pillars seem to be angled wrong maybe....I dunno. I'm just trying to get things better, not perfect.
-
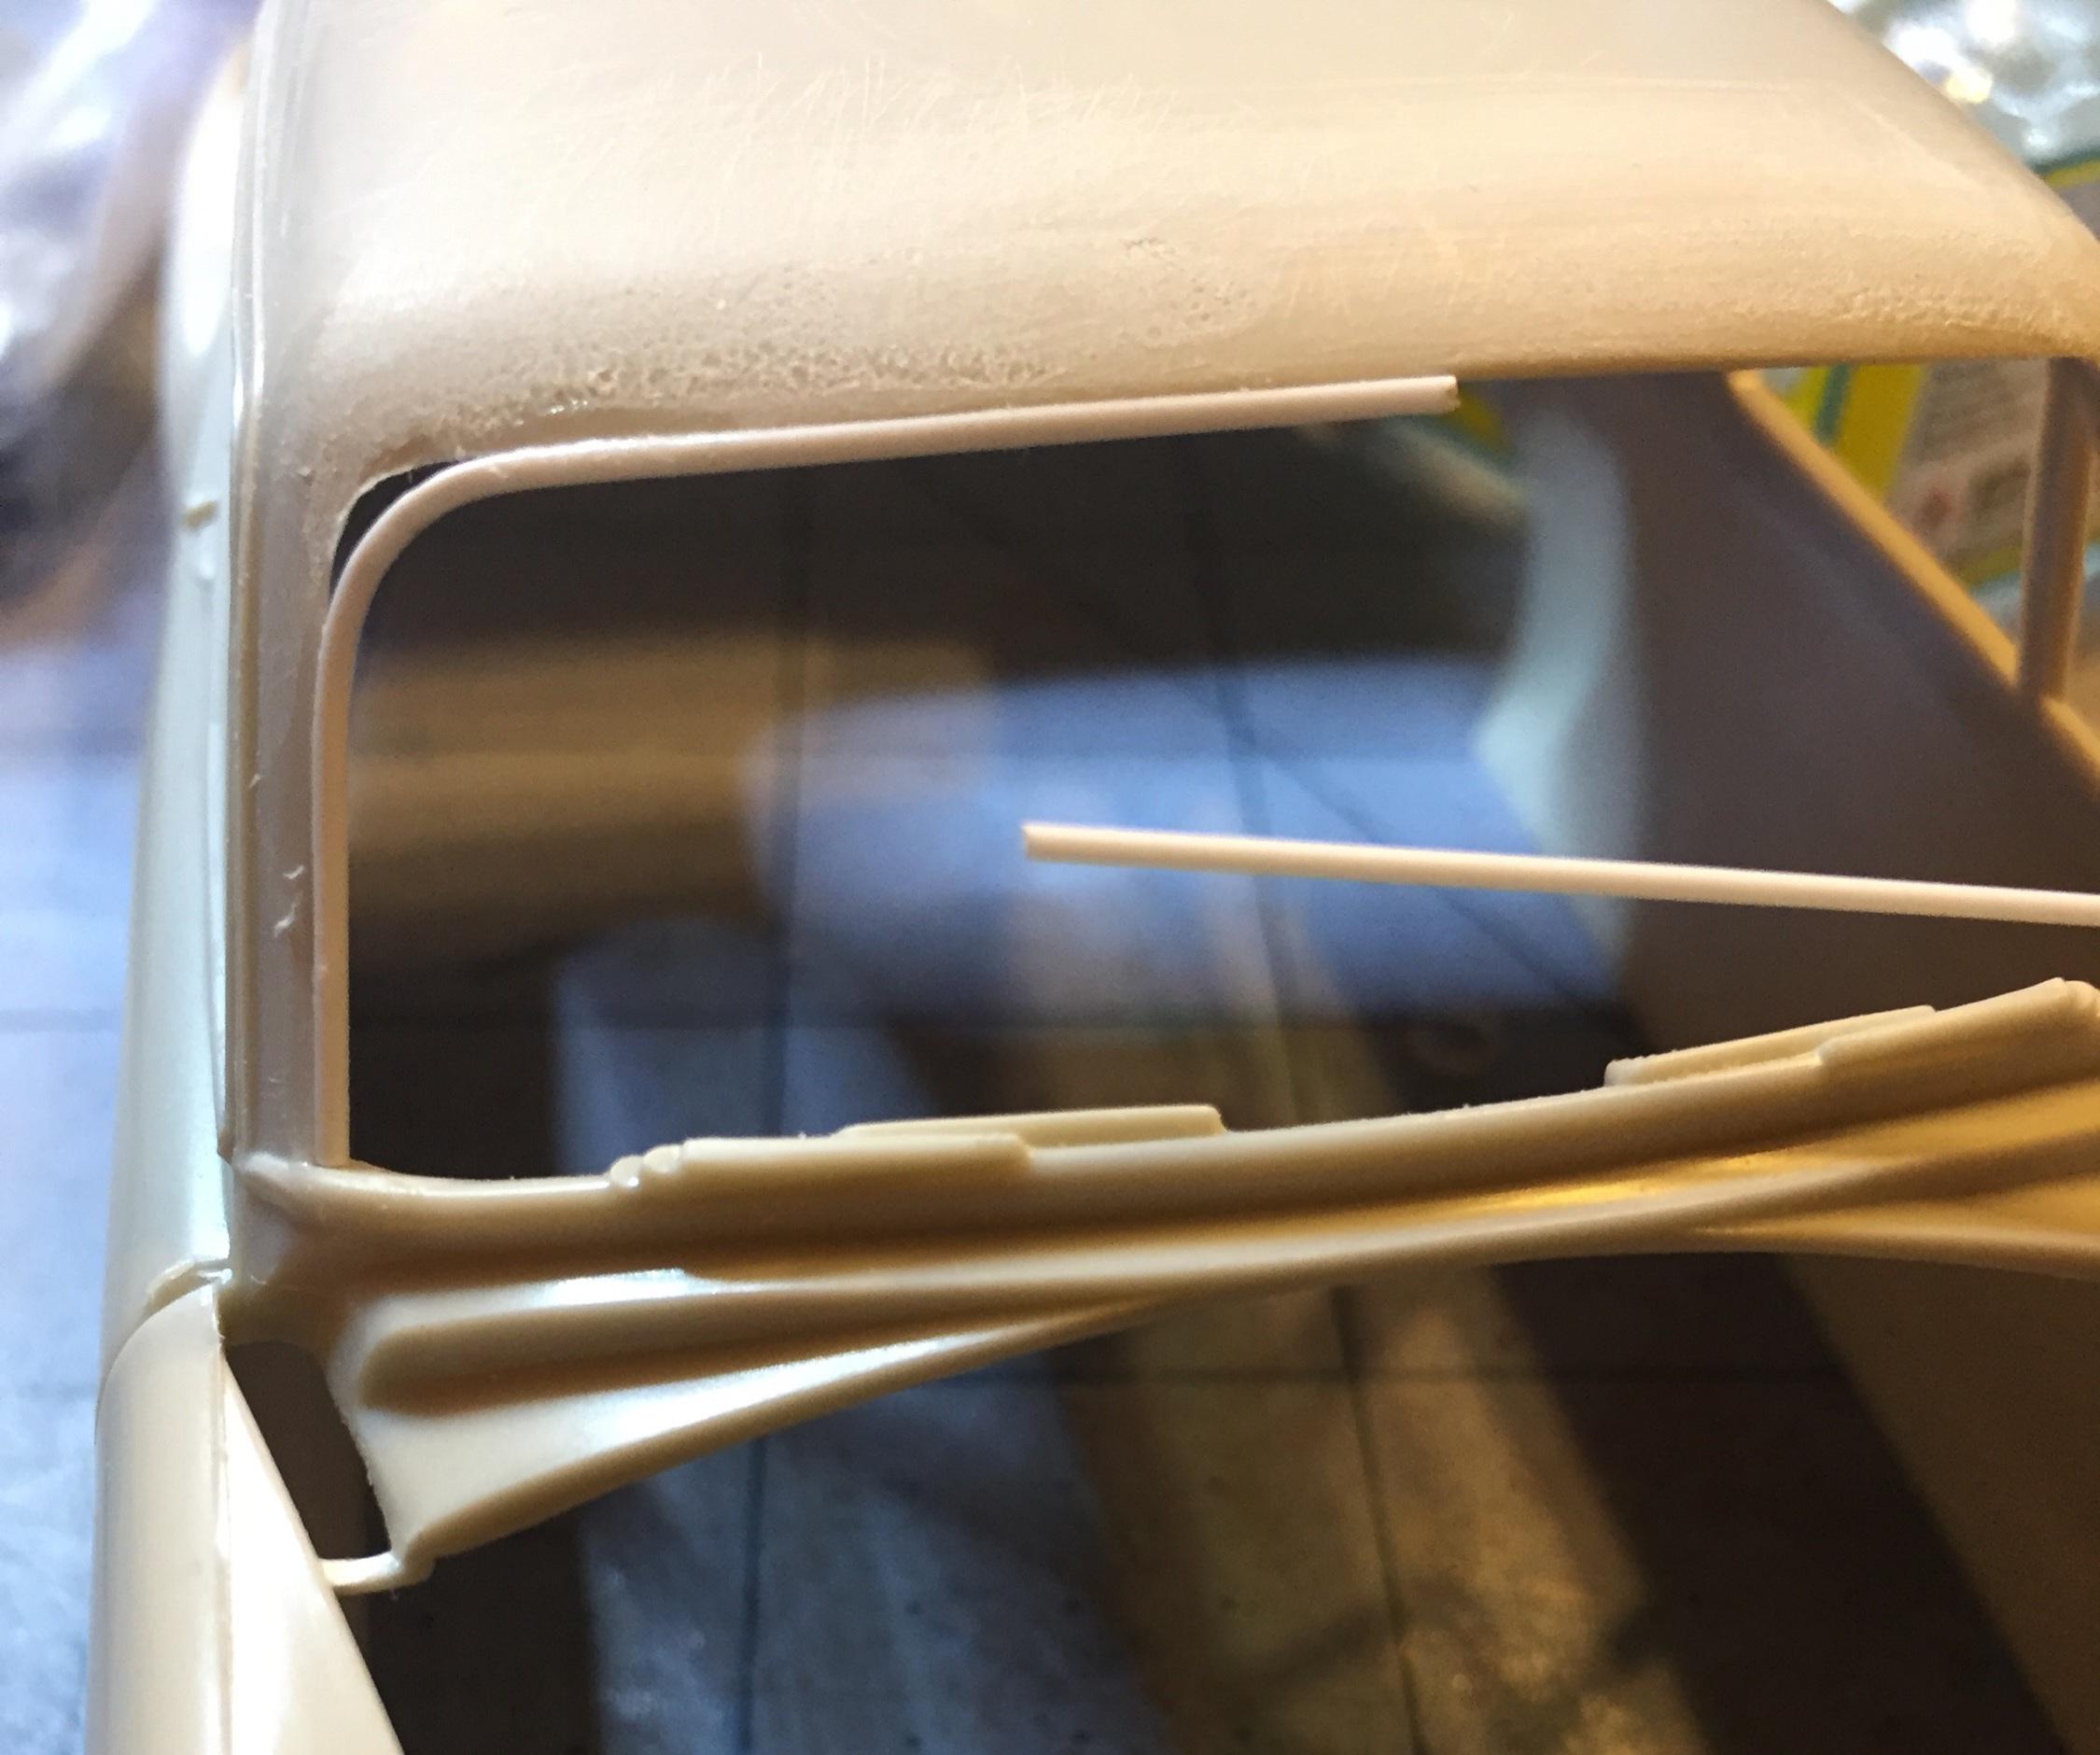
I squared off the opening on the straight sections, leaving the radii for the Dremel.then I realized I needed to open it up to allow for the thickness of the .040 rod that will simulate the chrome trim molding and establish the new improved radii (radiusses ☺️). it still needs some tweeking but there's no way to get this right, as far as I'm concerned, other than by eyeball. If I can get it somewhere close, I'm good with it. Thanks for looking.
-
? ummm......no......gotta look at that, Dave (as if this ? isn't bad enough)......ok .....you're welcome....just don't follow me too closely...I'm feeling my way in the darkness ? Edit: hey Dave, I think I have the cure for the hood issue....see below ? build it like this ?
-
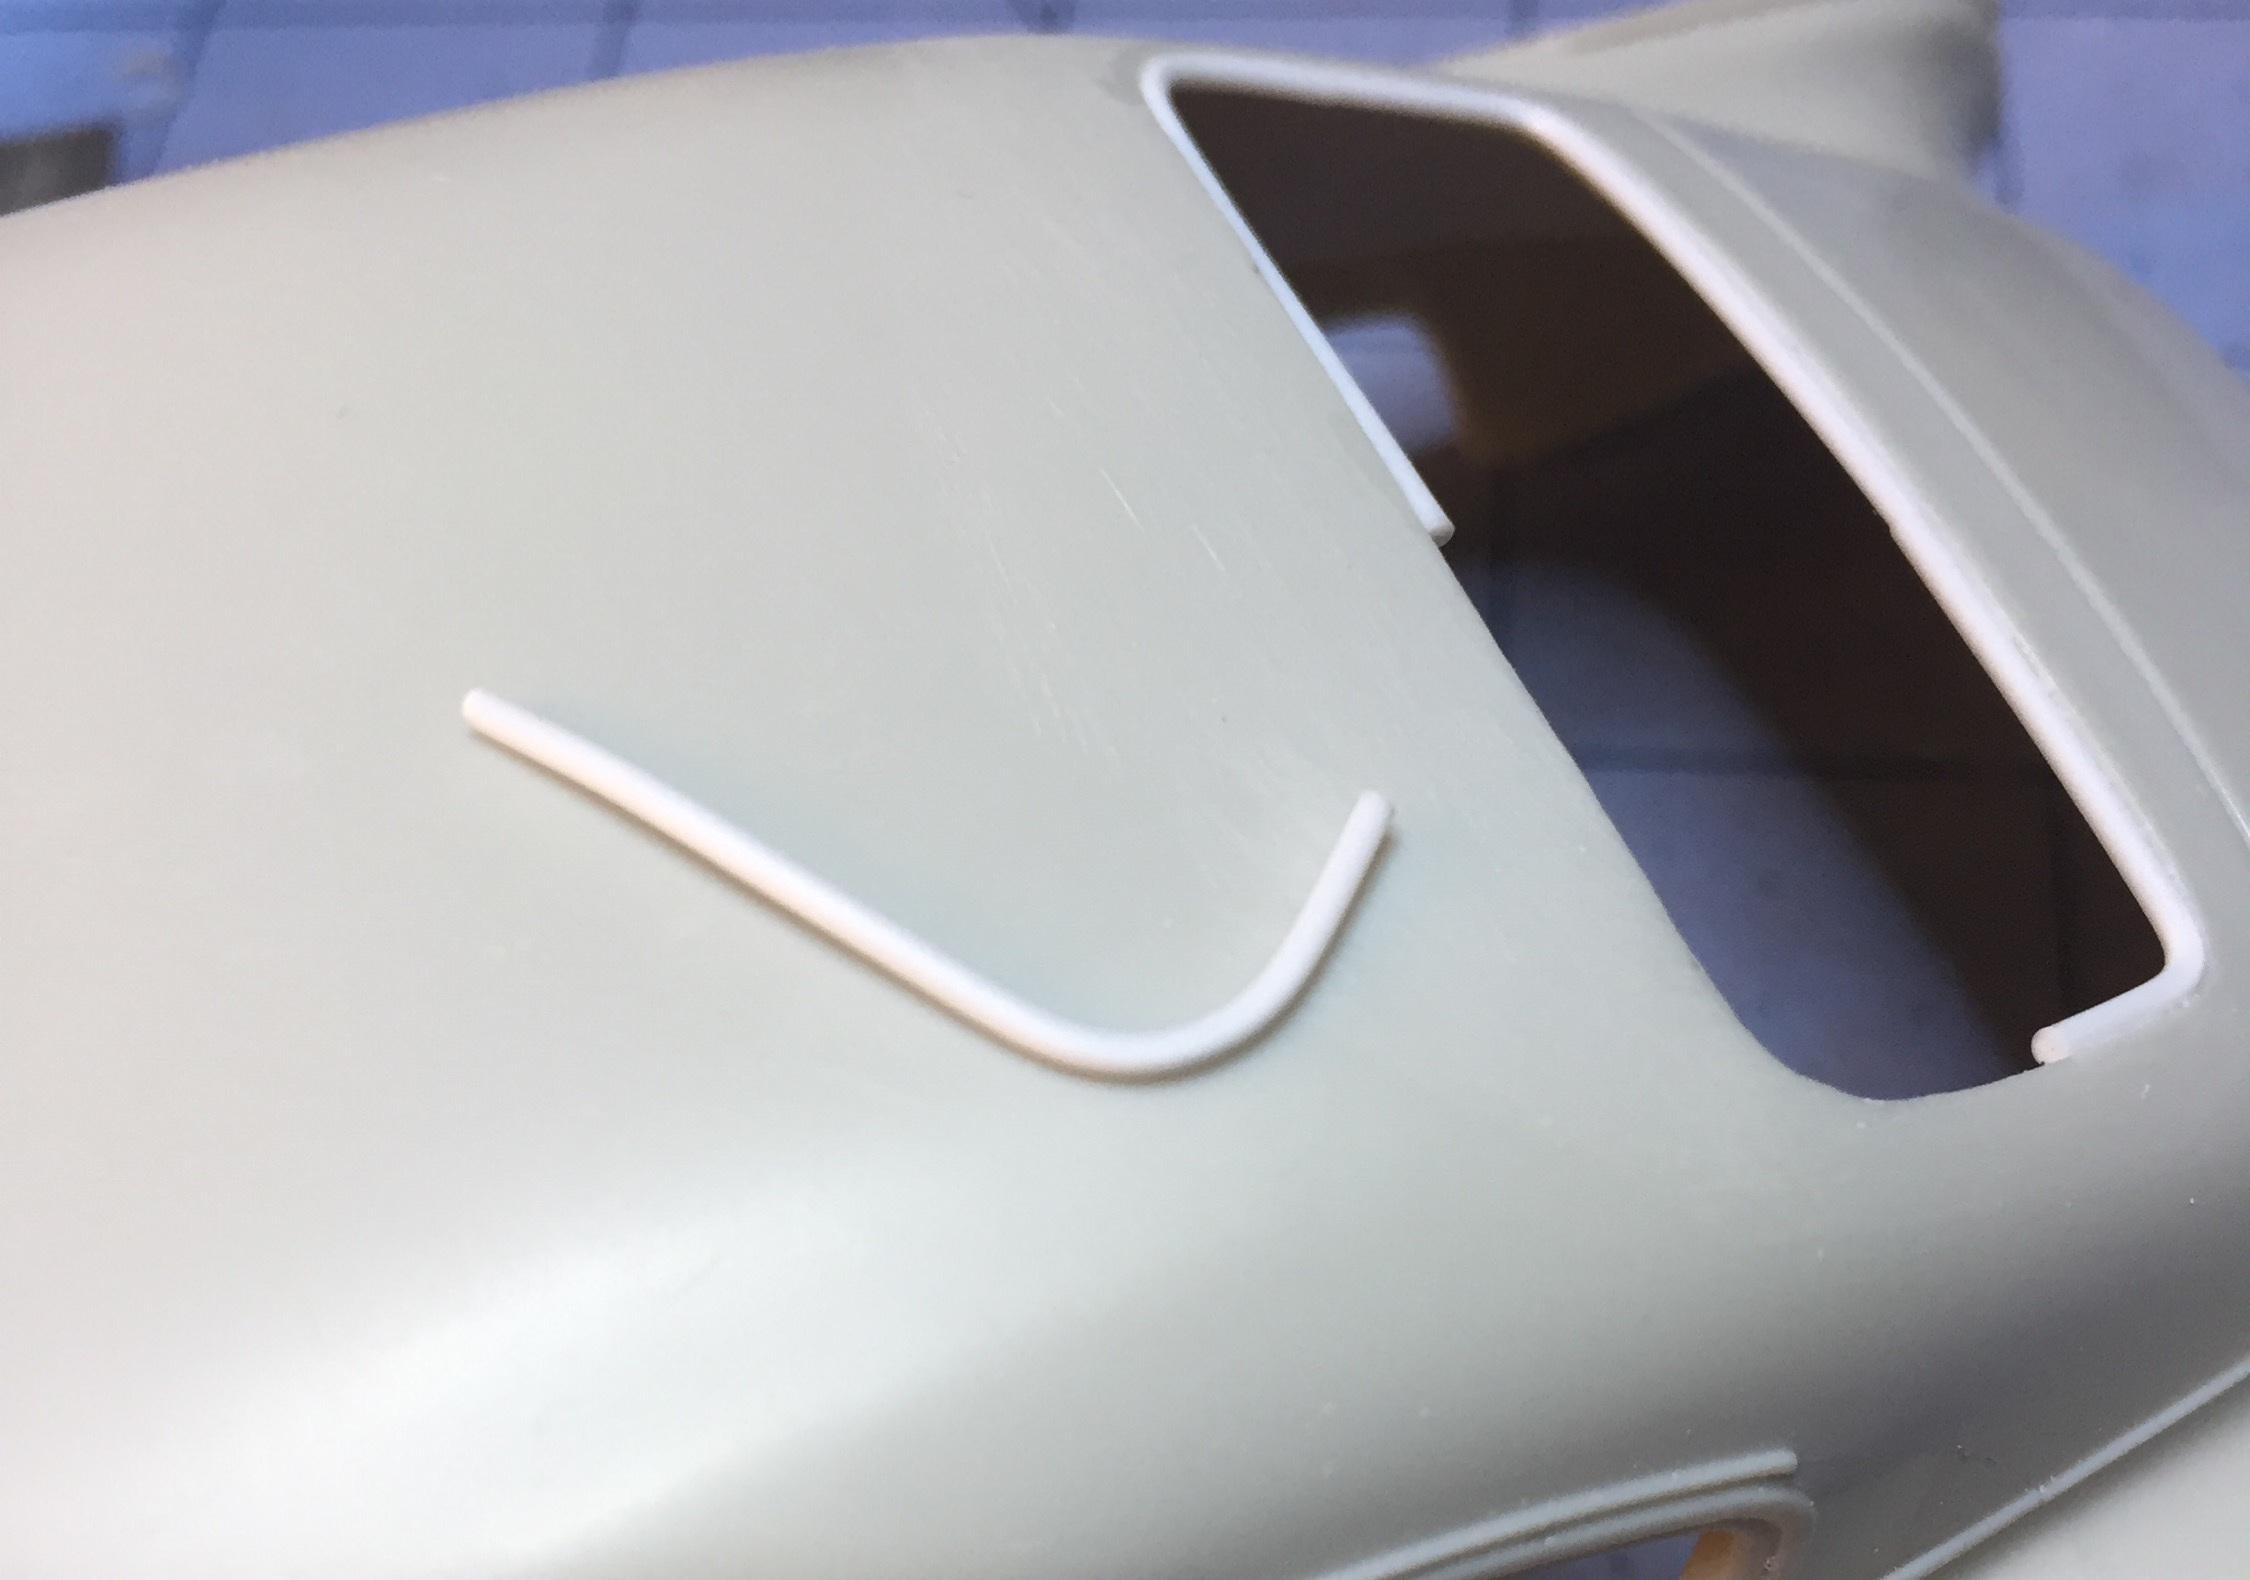
That's a great idea, Greg. The re-shaping of the backlight opening has me using almost the same method as the windshield. I started by scraping off the molding around the opening. Next, I squared off the material to reduce the look of thickness. I adjusted the top of the opening to a shape more like what I see on the 1:1. Then I opened the rest of it up so I can add the .035 or .040 rod on the inside, all the way around. Hopefully,after some filling and sanding, this will look more like it should. Wish me luck ?.
-
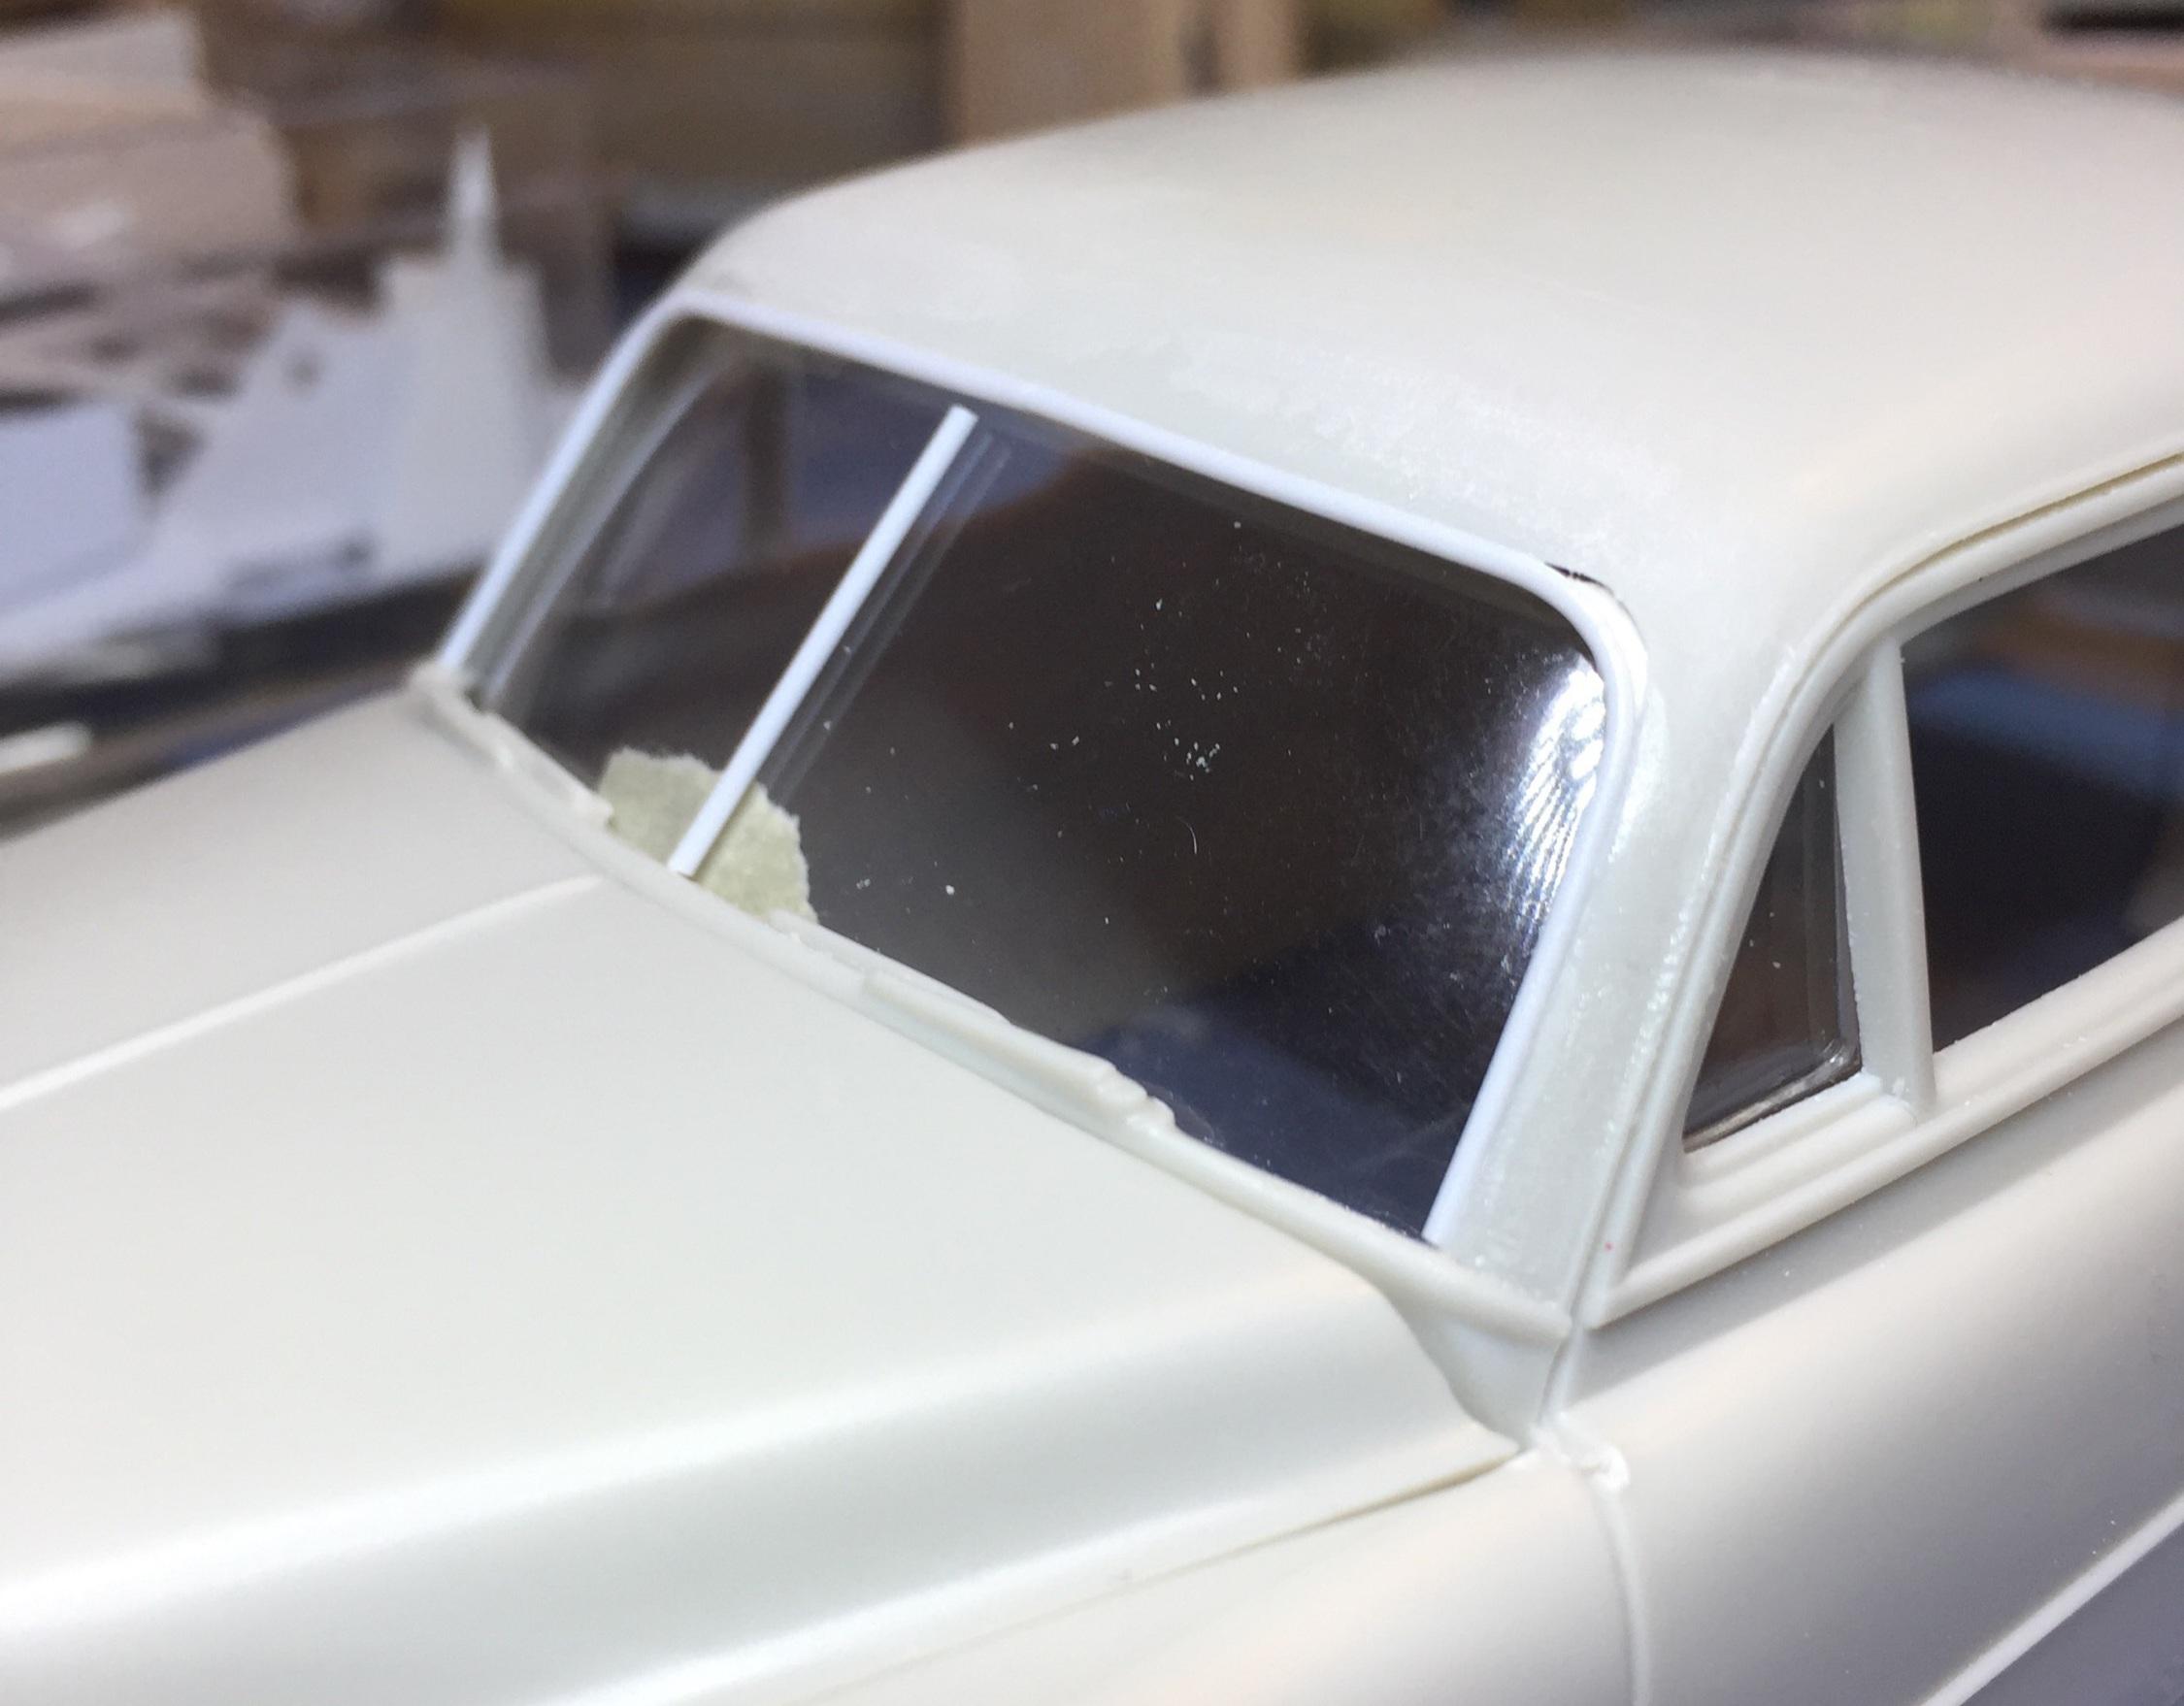
Thank you gents, I got a bit flummoxed after the first attempt. Once the body was modified I had nowhere to go but forward. I keep a pretty good supply of Evergreen handy for just this reason ?. I kept thinking I would need to provide a means of "capturing" a windshield made from acetate and couldn't get anywhere with it. Steve Guthmiller got me going in that direction and it seemed like a good one but I couldn't make it work (I'm certain he could) and anxiety set in. I had not considered using the kit glass and didn't realize it was possible until I tried it after adding the .035 rod. What a nice surprise. Two birds: one stone. Yay! Now I need to make sure I don't have issues with dash/glass fit and such. The key here is removing material from the inside of the A pillars and the bottom of the front edge of the roof. This allows the kit glass to move forward and it re-curved the roof edge slightly as I was trying to shape it more like the 1:1. I used one of the thin solvents to attach the rod I held in place against the opening. Attaching the pre-bent rod is awkward but if I can do it, anybody can. This was a case of forcing my will upon inanimate objects with a fairly positive result. There is probably a better way but I'm happy with this. It's better than that awful ? that AMT/ ERTL came up with. Thanks for your support, guys, now it's on to the backlight......later.....?
-
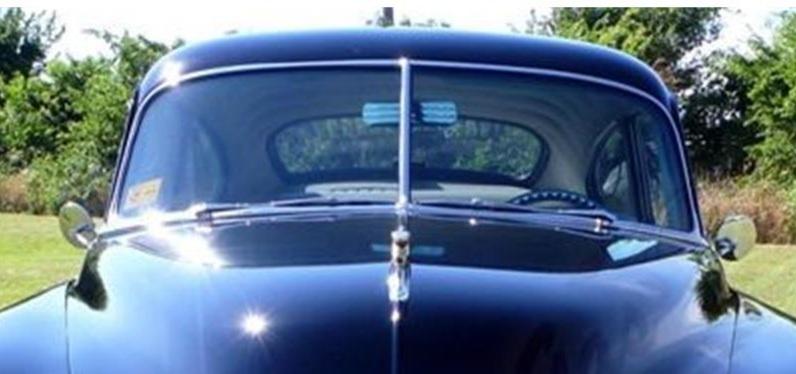
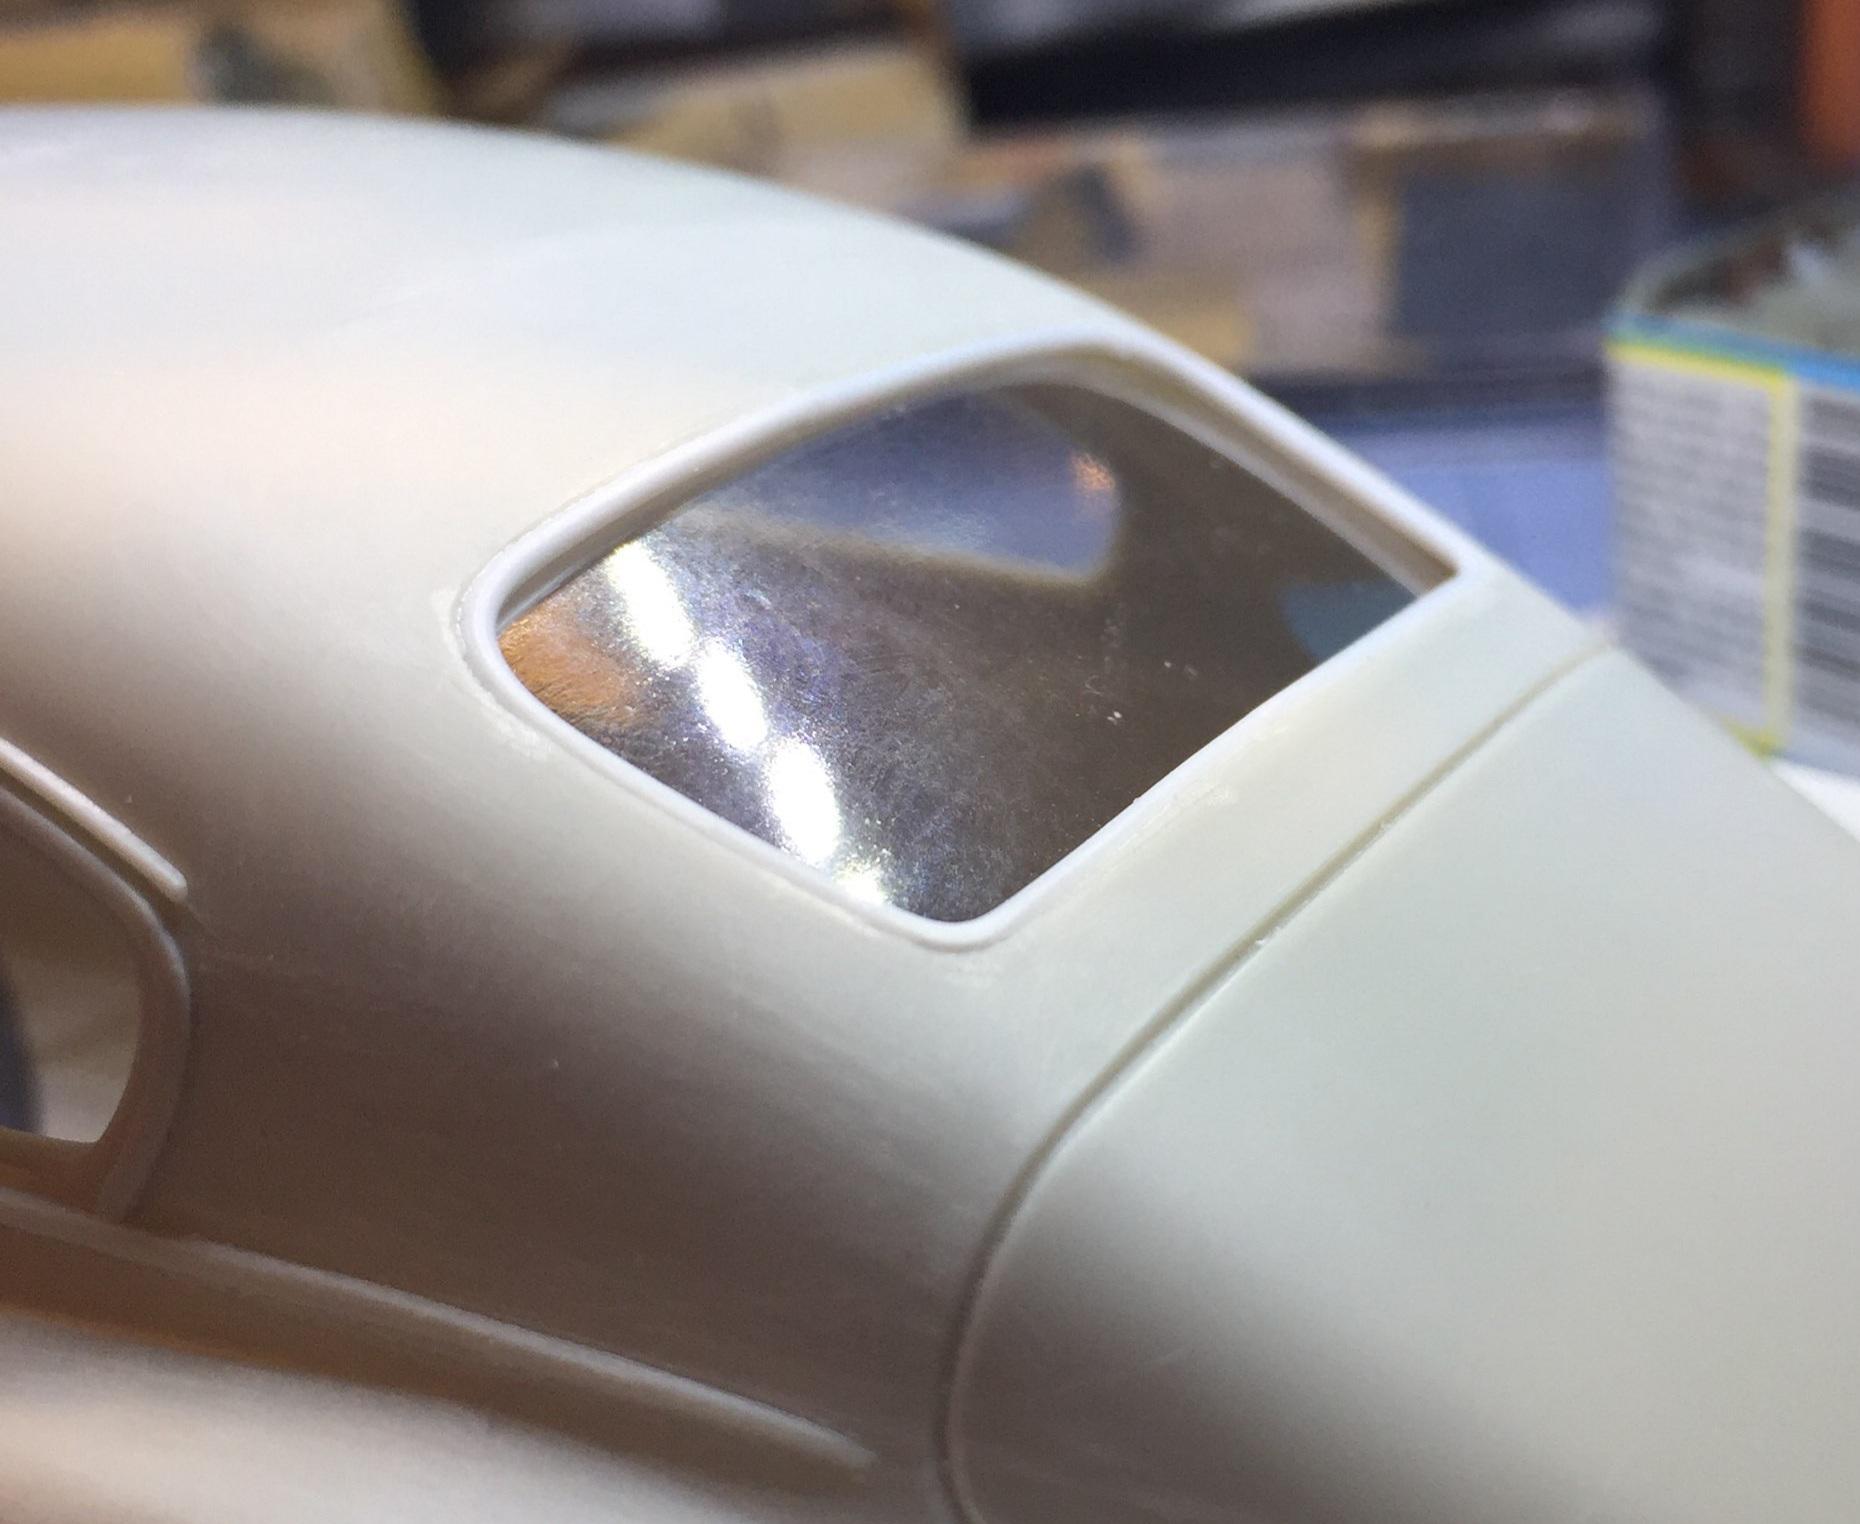
To all involved with offering solutions to this issue over in the Q&A thread I thank you all (you know who you are). If you are not familiar with this kit, this won't be all that fascinating. If you are, hang out for a while. You will know about the windshield and backlight inaccuracies. The thing is....once I started actually making changes to the windshield opening it took on a life of its own. I found that I couldn't make things work the way I thought they would. I came up with this instead. It ain't great but it addresses the two issues enough to my liking that it will serve for a solution for my stock build of this kit or the basis for further improvement by another more skilled than me (I?) First I removed the windshield molding with my trusty single edge razor blade and followed up with sanding sticks. This simplified the picture and left me with the idea that I needed to open it up by removing material on the inside....so I did - with a very sharp #11 surgical blade around the inside of the A pillars and the roof's front edge and I followed up with an emery board. I flattened the roof edge parallel with the roof plane and the A pillars were sanded sorta parallel with the side glass. The effect is a thinning of the A pillars looking from the front. After much trial and error with other ideas I arrived at what seemed to be somewhat workable, even for my hands (having a third would have been awesome). I settled on .035 Evergreen rod which I found to be very pliable and I decided to attach it just to the inside of the opening using solvent, very carefully. It was easier to do this in two pieces. The bottom of the A pillar needed trimming away the radius so the rod could bottom out at the bottom molding. The radius will be restored later. I noticed on the 1:1 front view that the radii of the roof "corners" sorta match the radii of the windshield top corners. I think I may have come fairly close.the gaps at the top corners were filled on the inside with some sheet scrap. The outside will be dealt with later.and it looks like the kit glass will be located in a slightly forward location since the work on the inside of the opening allows it, solving the problem of the glass looking unnaturally recessed. The center divider will be replaced with a piece of Plastruct .030 triangular rod or maybe half-round coated in Molotow. It's not perfect, but it's better than what AMT gave us. Similar work will be done on the backlight to get that looking more the way it should. Till then, thanks for your attention! By the way....this is what AMT gave us....
-
'51 Fleetline windshield issue
customline replied to customline's topic in Model Building Questions and Answers
I think sometimes it might be better to turn a blind eye to these things. For the sake of your sanity. I'm already nuts so, for me, it doesn't matter. -
I have had mixed results with Testor's rattle cans. Beautiful paint colors but the flake size is kinda big and out of scale but it's great for a show custom or a gasser type. It sparkles like crazy in the sun and it looks like you had a good time of it, Erock! Nice job!
-
After having had several discussions with Steve, I just want to say that I really appreciate that he treats everyone like a friend. I recently had a question I posted and (some of you may have seen it in the Q&A section -'51 Fleetline) Steve actually took the time to pull out a Fleetline body and figured out a really great way to fix the windshield issue on that thing, with photos and a clear explanation of how to do it. This guy is a great TEACHER and we're lucky to be able to access his brain. Thank you Steven!
-
'51 Fleetline windshield issue
customline replied to customline's topic in Model Building Questions and Answers
I believe you are both correct, gentlemen. AMT took a shortcut.


.jpg.11d9d435b1a62d40efab963cceaf312e.jpg)
.jpg.2e7efafde04ef4ac67ccb34dad32872e.jpg)