

ModelcarJR
-
Posts
1,648 -
Joined
-
Last visited
7 Followers


Recent Profile Visitors
8,137 profile views


ModelcarJR's Achievements
MCM Ohana (6/6)
-
1953 Ford Pickup Truck
ModelcarJR replied to ModelcarJR's topic in Model Trucks: Pickups, Vans, SUVs, Light Commercial
Thanks, everyone! I appreciate your comments and I am sorry that I haven't posted but I have been unable to reach Modelcarsmag. for about two months except intermittently. I am at a Best Buy store right now accessing the website. I am getting a new modem tomorrow at home so I hope that fixes the problem. I'll be back! 😎 t -
Thanks, everyone! I am so sorry I haven't responded and haven't been able to post for about 2 months except intermittently. I have a new modem coming tomorrow and hopefully I will rejoin all of you soon. Right now I am at Best Buy using there system. I'll be back! 😎
-
Is there any reason I am blocked on my home computer on this website? Either way please contact me at rossio@sbcglobal.net to let me know. I have a new modem coming from AT&T tomorrow that I hope will solve the problem, if in fact, I am not being blocked by the Modelcarsmag.com website. I am at a Best Buy store now and I am not being blocked on their network so I think it is my modem. Thanks! John Rossio
-
1934 Ford Stake Bed Truck
ModelcarJR replied to ModelcarJR's topic in Model Trucks: Pickups, Vans, SUVs, Light Commercial
Thanks, David, Jim, Alan, Carl, Chris, and Larry! I appreciate your comments and I certainly have missed seeing everyone's work on this website! I was on the phone with the Geek Squad again this morning trying to get access to this website! Its getting to be a bit annoying. I hope it is the last of that frustration! Thanks again! -
1953 Ford Pickup Truck
ModelcarJR replied to ModelcarJR's topic in Model Trucks: Pickups, Vans, SUVs, Light Commercial
Thanks, David, Larry, Dennis and Bob! I appreciate your comments! 😎 -
Jack Brabham's 1970 BT 33
ModelcarJR replied to ModelcarJR's topic in Other Racing: Road Racing, Salt Flat Racers
Thanks, everyone! I appreciate your comments! -
I have been on the phone and computer with the Geek Squad getting access to this website today. Don't know what is going on with this computer or this website but its getting pretty exasperating. Here is the latest model car I've built over the last few weeks when I thought the website was down for transition to new servers. Its painted with Dupli-Color Dark Toreador Metallic, which is not close to any Chevy color for 1969. So its a Day 2 or retro-mod. Engine is wired and plumbed with heater hoses and a fuel line, I also added a photo of my fleet of 3 69 Chevelles. One in Daytona Yellow and another in Bahama blue metallic. Thanks for looking! 😎
- 17 replies
-
- 17
-

-

-
I haven't been on this forum for about a month because on or about November 20th, I received a message from this website that it had been hacked and the forum was moving to new servers. Ever since then I have been trying to log on with no result other than timing out. I got in touch with someone else on the site and he said it was working. So, I had to call the Geek Squad to get me back on this website. Strange to say the least. But I still have been busy building and here is a Heller kit that I have had for at least 35 years, unsealed in the closet. I was concerned with the decals and if they would work but I gave them a coat of clear lacquer and although they were a bit yellowed they worked fine for the most part. Its built box stock and the paint is Tamiya Light Blue and Yellow. Fairly complicated instructions but I got through them and it built up fine despite its lack of pins, etc. Thanks for looking! 😎
-
I haven't been on this forum for about a month because on or about November 20th, I received a message from this website that it had been hacked and the forum was moving to new servers. Ever since then I have been trying to log on with no result other than timing out. I got in touch with someone else on the site and he said it was working. So, I had to call the Geek Squad to get me back on this website. Strange to say the least. But I still have been busy building and here is a Lindberg 1934 Ford Pickup, built as a Stake Bed truck. Its built box stock except for the taillights, backup lights added to the end plate on the floor of the truck and the gas filler tube that I substituted because the original piece was gone. The paint is Dupli-Color Bright Red over a dark gray primer to darken it a bit. The stake bed was painted with a base of Krylon Brown Boots followed by a blackwash and various shades of brown dabbed it with a brush. It turned out pretty nice and the hood closure is the best I have seen in one of these 30s kits. Not bad for a very basic kit that was marked down years ago to $8.39. Thanks for looking! 😎
-
I haven't been on this forum for about a month because on or about November 20th, I received a message from this website that it had been hacked and the forum was moving to new servers. Ever since then I have been trying to log on with no result other than timing out. I got in touch with someone else on the site and he said it was working. So, I had to call the Geek Squad to get me back on this website. Strange to say the least. But I still have been busy building and here is an AMT 1953 Ford Pickuap that I don't think was posted before, at least I can't find it. Basically built box stock except for the tires and wheels, plus I added Mexican blanket seat covers. I use these Halibrand style big wheels because they had plenty of surface to glue the wheels to the hups where I thought they should go, not necessarily where the axles are. Other than that, it went together pretty well. Paint is Tamiya Coral Blue. Thanks for looking! 😎
-
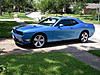
This is the Revell Hertz kit that I originally painted a Dupli-Color Silver Blue that wasn't blue enough so I added a mist coat of Dupli-color Bahama Blue Metallic and now I guess its a lighter, light blue metallic. The interior is black. No detailing and I sanded off the V8 emblem and Mustang lettering on the front fenders as they were faint and would be hard to foil. I don't have a decal for them. Other than that build box stock. The last photo shows 3 different shades of blue for the Mustangs I recently built. The 71 351 in Tamiya Light blue, that I call Grabber Blue, the 71 Mach 1 in Bahama Blue Metallic, a light metallic blue and this one that I call a lighter, light blue metallic. Thanks for looking! ?
-
Thanks, Andy, Carl, and Len! I appreciate your comments! I must admit that I know very little about Mustangs. In fact, I have never owned a Ford, let alone a Mustang. But my wife has a 66 Mustang in the garage, a coupe, and it has a wood grain dash and glove box panels in it and no pony interior. Maybe it was aftermarket. She might have even added it. I know she bought a new steering wheel and had it installed but that was 20 years ago so I'll ask her but she probably doesn't remember either. Or maybe coupes were different from fastbacks? I don't know or as my Grandson's would say, IDK. This one is done! I didn't add the V8 emblem on the front fender or the pony badge with Mustang lettering. Both were very faintly molded so I sanded them off and don't have a decal for them. Went together OK and is just another to add to the collection. The last photo is a comparison of paint for recently built Mustangs. The 71 351 is Tamiya light blue that I call Grabber Blue and it must have been pretty convincing because it received a theme award for Best Mustang in Show in Houston. The Mach 1 is Bahama Blue Metallic which is a light blue metallic in my estimation. And then there is this build, which I guess is lighter light blue metallic built mostly box stock. Thanks for looking! ?
-
Interior is done, engine is done and in the chassis, interior and chassis have met the body. Now I just need to find some wheels. I used the ones in this kit for the AMT 71 Mustang Mach 1 that I recently built. But it shouldn't be a problem. I have plenty in the parts box. Thanks for looking! ?
-
Thanks, Len! that's what I was shooting for. In my camera it looks more blue. And thanks, Carl and Bob! I appreciate your comments too!
-
Thanks again, everyone! I appreciate your comments! ?