ModelcarJR
-
Posts
1,648 -
Joined
-
Last visited
Content Type
Profiles
Forums
Events
Gallery
Everything posted by ModelcarJR
-
I'm gonna give this old Prestige kit a try. Lots of mold lines and flash on the body and other parts but I think I have that all taken care of. I've painted all the parts and painted the body and related parts today with Dupli-Color Bright Red, interior and exterior. My Hygrometer let me down today. it said 40% humidity but the body and parts blushed in spots. I'm going to rub it out a bit and then wait for a better day and add a light coat of paint before clear. I also painted and used some flocking on the interior floor and rear tray. It might be a little lumpy but it will do for me. Thanks for looking!
-
Thanks, Mike! I didn't do it the kit came that way. Its not a bad for an old Monogram kit. Its fairly simple without a lot of parts.
-
Thanks, Carl and Larry! I appreciate your comments! ?
-
Thanks, Bob, Michael, and Carl! I appreciate your comments! This one is done and posted in "Under Glass" but here are a couple of photos to finish off this thread. Thanks for looking! ?
-
Looking good, Dan! I hope you can bring it to the HAMS contest! ??
-
Thanks, All! I appreciate your comments! This is an update to the build. I wasn't satisfied with the way the hood sat and noticed that the top of the cabin (multi-piece bodies are always an issue for me) wasn't back far enough. I noticed a gap between the end of the window sill and the door jam. So I took the top off again, dash and steering wheel. This allowed me to shorten the steering column as well so I could put the wheel more in the middle of the seat. I adjusted the dash to be more of an angle leaning back and then remounted the top, holding it in place while the glue dried and making sure it was all the way back to the door jam on both sides. Before all of that, I had re-built the hood, hood sides and grill assembly but I probably didn't need to do that. Anyway, everything fits a lot better now and I managed not to damage any paint. Looks a lot better to me now! Thanks for looking! ?
-
Bob, have you tried rubbing out the chrome pen? I would use 4000 grit, wet. I find that another benefit of clear is that BMF (even today's BMF) sticks better to a cleared and polished body than not. I would rub it out as well as possible then give it another coat of paint. You might be able to do it only on those areas that have the BMF. For example, if it is the side of the body just repaint the side with bronze and clear orange. Rub it out again. Then, try mixing Elmers glue and acrylic thinner or even water and apply it to the trim before you apply your foil and it should stick better. I don't use chrome pen for any long length of trim because even if you can get it on straight, once you touch it, it dulls very quickly. Its like Testors Chrome Silver, it never dries! I only use it on small stuff like door handles, steering wheels, etc.
-
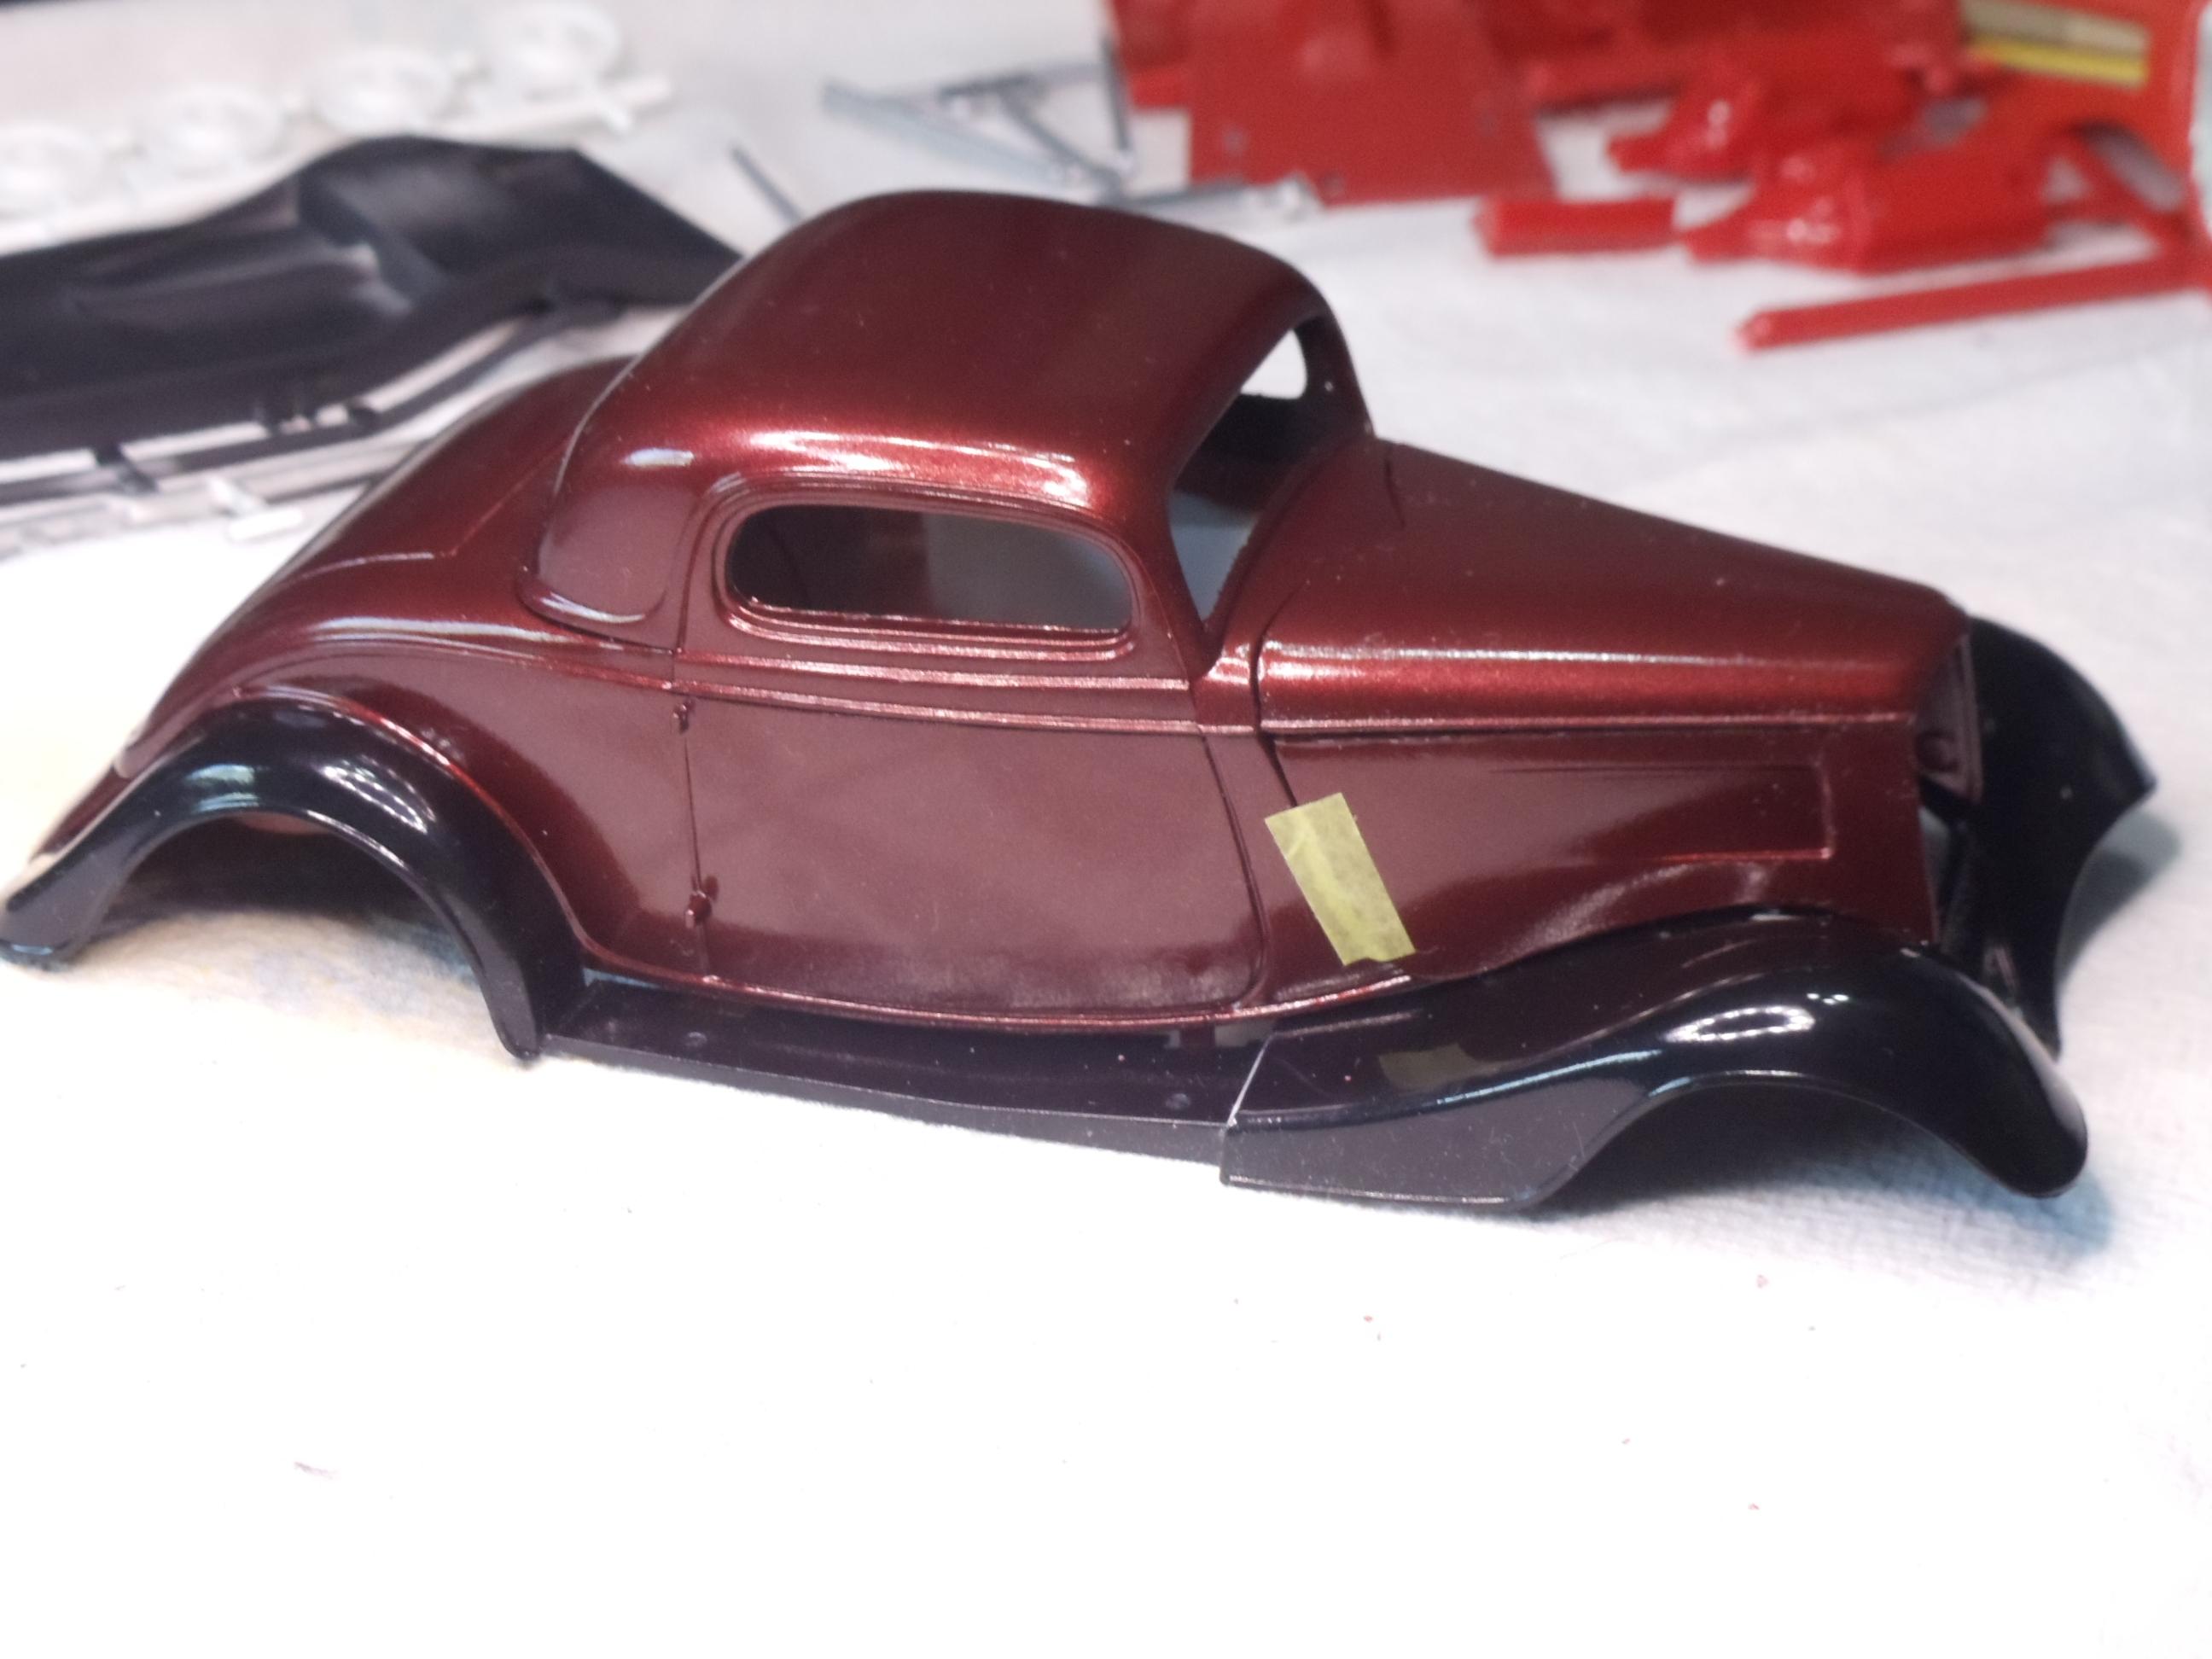
This one is done! Its not the ZZ Top version, just a plain out of the box 33 Ford. Paint is Dupli-Color black on the fenders and Dark Toredor Metallic on the body. Interior is Satin Almond. I used the wheels and tires from the parts box that originally came from the Revell 32 Ford Sedan. I glued the grill, hood, and hood sides together as one assembly. It fits pretty well but I wish the hood sides were a little tighter on the cowl sides of the body. I must not have the tilt of the grill just right. I'm not going to try to fix it as I don't want to mess up the paint. Thanks for looking! ?
-
Thanks, All! I appreciate your comments! Michael, it goes together pretty well, that is, if you don't get the transaxle installed upside down like I did initially! It was harder taking it apart after installing it incorrectly but somehow I managed to do it. The struts etc. can be a little confusing but the instructions are good if you follow them! Thanks for looking! ?
-
Thanks, Bob and Dan! Dan, I'll look forward to seeing you at HAMS. Its almost done. Finished the interior. Nothing fancy - Satin Almond paint, some foil, chrome pen and black paint and its done. I didn't bother trying to align the steering column with the tire rod, I just cut the steering column down some and glued it to the floor. It might be a little too tall but I'll have to live with it. I glued the top down and have fitted the grill and sides of the hood as one assembly and the top of the hood separate. So now I can display it one of three ways. Here are the pics. Thanks for looking! ?
-
Thanks, Mike and Carl! I appreciate your comments! The engine and chassis are done and the body and fender unit are glued down. I used wheels and tires from the parts box that were originally were in the Revell 32 Ford Sedan kit. Interior is next but here's a mock-up for now. Thanks for looking! ?
-
Looks good, Bob! The Tamiya paint is great and I use it almost exclusively now for bodies. The only reason I use a clear is to protect the painted edges while I am rubbing out the paints. But since you have successfully rubbed it out you don't need it! Good work! ?
-
Thanks, All! I appreciate your comments! The black paint on the fender unit had more orange peel than I would like but it rubbed out pretty easily. I've done a mock-up of the body and fender unit and the hood sides were too wide or not at the right angle for the fenders and body so I had to break the glue joints and hopefully will be able to better align them as I complete the build. I'm working on rubbing out the body now. Thanks for looking! ?

-
Thanks, Bob and Vintage! I appreciate your comments! Yes, Two coats of paint and 1 coat of Tamiya TS-13 Clear. I normally would do two coats of clear but sometimes I don't want to push my luck. I don't think it will take a lot of rubbing out so hopefully I can do it without rubbing out any edges with just 1 coat. Thanks for looking! ?
-
Very interesting project, Dan! I'll be watching!
-
I've built the ZZ Top version of this coupe before. I opened the suicide doors and added wiring on the engine (See below). This time I will build it differently. This kit does not have the same ZZ Top equipment and decals. My first step was to remove the red paint from the hood pieces that I was going to use on the ZZ Top version, and glue in the trunk. Unfortunately, the method used in the kit instructions does not work well. The trunk lid doesn't really sit in the opening right. So I used some Evergreen plastic strips to install the trunk lid correctly. Then, after some primer, I painted the fenders Dupli-Color Black and the body my new favorite color, Dupli-color Dark Toreador metallic. Thanks for looking! ?
-
Thanks, Craig! I appreciate your comment!
-
Thanks, All! I appreciate your comments! ?
-
I forgot to post this in Under Glass. Its an AMT Snap Fast Plus kit that I git in a raffle at a model contest. Painted it Tamiya Light Blue as a substitute for Sky Blue although its not exactly a match. I added elastomeric bumpers from the 70 Plymouth Cuda kit, headlights that I fashioned from carb stacks and parts box lenses, Cragar mags for metal axles from the parts box, as well as exterior mirrors that I painted black because I was out of light blue paint. Thanks for looking! ?
-
Thanks, All! I appreciate your comments! ?
-
This is the AMT kit and it is done! Paint is Tamiya Lavender and the interior is Tamiya Gunmetal flatted out a bit. I hinged the hood and the top of the trailer with brass rod and tubing. It went together well other than my mistakes. Thanks for looking!
-
Thanks, Andy! I appreciate your comment! This one is done! I forgot to foil the emblem on the nose of the hood but I'll get that done. The top has just been painted so as soon as it dries I'll add it. Went together pretty well except for my stupid errors. The hinged hood and trailer worked out well and I enjoyed the build. Thanks for looking! ?
-
I'm making some progress now but it took me awhile to get here. I had the rear suspension assembled with the transaxle and all the struts, uprights, etc. when I realized I had the transaxle in upside down! Don't know how I did that as I was looking right at the instructions. Anyway, I took my Z 7 Debonder since I build with superglue and took a lot of the transaxle assembly apart. I lost a few pins but was able to remove the transaxle without disturbing the struts and unrights. I only had to remove the A-arms, axle and drive shaft. Then tun it around and glue everything back together again. I have the body on the frame and interior now. The hood hinge still works but the hood will not close all the way with the hood in the hinge. So if I take the hood off the hinge via the keepers in the top of the hood that are not glued to the hinge I can close the hood. That's good enough for me. Now I am working on the front suspension which is another long slog. Thanks for looking! ?
-
Thanks, Dan, Carl, and David! I appreciate your comments! Yeah, I don't know what it is about the Testors paint but it always seems to bubble up on me. I don't think I get it on to thick and I never have that problem with Tamiya paints, even metallics. But their metallics are much smaller flakes. I am not going to use any of the Extreme Lacquers from now on. Rust-oleum just doesn't make good paint in my opinion. Rubbed out the body, assembled the engine, wheels and tires, and the interior. I used Tamiya Gunmetal on the interior and I didn't like it at first as it was too bright. I painted the interior Semi-gloss black and I didn't like that either. So I repainted it with the Gunmetal and finally got the shade of dark gray I was looking for. Notice that the dash is a little lighter since I didn't repaint it as it was already complete. I didn't have any white decals for gauges but had one black one that fit the center so I used it and just painted the small ones black. I know they should be white but I didn't like how the white looked when I painted them the first time. Here's a mock-up of body and interior. Thanks for looking! ?
-
Thanks, John, Carl and David! I appreciate your comments! As my son used to say when he was young- "I've changed up my mind"! I looked at the Testors spray can and it says use at room temp, 70 F. It won't be 70 around here again until about November. I tired to paint the front fenders with it and here were a couple of problems. First, the metallic in it looked too big to me and as it was drying it bubbled up like there was sand in it. I figured it was either because the weather was too hot or the paint was too old or both. So I had bought a Tamiya color, Lavender with the thought that I might use it on this build. The spray can says to use at temp above 50 F and not high humidity. So I waited until the the humidity came down to about 50% and temps at 95 F according to my Temp gauge with Hygrometer and went for it. I spent about an hour painting and watching paint and clear dry, to monitor whether or not it would blush. When I was younger, this would be a perfect day to go to a swimming pool, get a little tan (or sunburn), swim, and keep an eye on all the young ladies. But now, I watch paint dry. Anyway, it turned out pretty well. The Lavender color is a little lighter and not metallic but it looks purple to me and I won't spend much time rubbing this out or re-painting because I used the wrong paint. Thanks for looking! ?