
vc273
-
Posts
270 -
Joined
-
Last visited
Content Type
Profiles
Forums
Events
Gallery
Everything posted by vc273
-
Very nice build with what this kit has to offer or lack of I should say.
-
Very nice build cant wait to get one of these kits
-
Awesome build will be following this one till the end.
-
Very nice build
-
Very nice clean build
-
Very well done, always follow your builds.
-
Have always been inspired by your builds especially your drag builds. Very well done
-
Very nice builds, wish I could get one completed well done
-
Very neat build
-
hi dug this one out to hopefully get done by the end of the year. I had painted this kit a couple of years ago but when getting it out found where I filled in the bonnet the putty had decided to shrink on me. Back to the shop to buy some more duplicolor cyan blue removed the bog and decided to use my trusty super glue. Resprayed the bonnet and all is good now. Opened up the trunk and will have a fuel cell and battery in there. Using testors red for interior but using a combo of flat,satin and gloss finishes. Using the hemi but using a parts box manifold and twin carbs. Using old school rims that I got out of an old dodge daytona kit amt I think and the rear rubber out of the pro street superbee kit. Cheers and thanks for looking
-
Hi been playing with this one for quite a while now but didnt really know what direction I was going to take but have decided to go this route instead of pro street. Have modified a pro stock thunderbird to fit but still have some filling to do to mate it to the body. Using the kits hemi and have removed the trans from the thunderbird kit and have mated it to the hemi. Have opened up the trunk so I can give it a full detail when I manage to start building it. Have got some colour on the bonnet and trunk lid which is duplicolor regency red pearl rattle can. Still have to wet sand and clear coat them but think the colour will suit the build as this time around as im going for a stock body look no decals. Cheers and thanks for looking
-
Hi finished off the belt line and now have evened up the panel gaps and got it in primer. Found the paint im going to use and couldnt help myself to get a bit of colour on it so gave it a quick coat on the bonnet. The colour is duplicolor bright sapphire pearl rattle can. Cheers and thanks for looking.
-
Hi thanks for your comments. Have been working on making the bosses for the tunnel ram to accept the fuel rails and have made the throttle body more of an oval shape. Next will be trying to find or make up an air filter and hope to have some pics up soon. Cheers and thanks for looking
-
Hi this was an old build that I started about 20 or so years ago that I was never really happy with. Originally built with a cross rammed 440 and solid mounted rear end, glued up rear doors and ill fitting front clip with decals all over it, it finally got the better of me and decided to strip it down. Was able to get the rear doors apart although it removed some of the rear panel with it so I had to clean it up with styrene which now makes the rear body a lot more solid. Had to repair the rear doors where I had holes for the parachute bracket and the rear light with styrene and super glue which I use a lot now instead of body filler, find it doesnt shrink bit more work sanding down but end result is better. Was originally painted with duplicolor rattle can and suprisingly came off nicely with oven cleaner. Noticed the belt line trim was thicker in some places than others so decided to sand it down and make a new one up with half round styrene so it will look a lot better when I bmf. Had to do a lot of sanding and scraping on the front clip and where it meets the body but now sits straight and even. Now using an injected and tunnel rammed 340 small block that Im currently working on at the moment for a more modern streetable effect with scratch built injection and rocker covers. Cheers and thanks for looking, any comments welcome
-
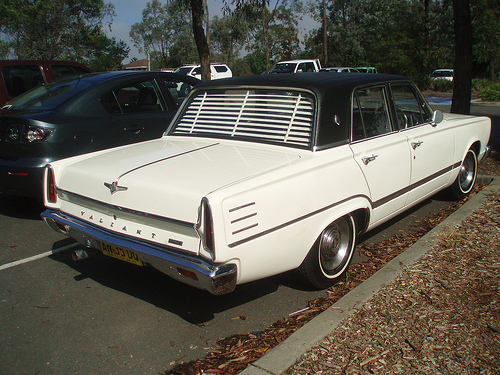
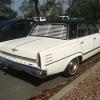
Hi got this one out on the weekend since it was nice weather and give it a coat of paint. Used duplicolor grey primer then duplicolor ford alpine blue from a rattle can, will polish it in the next couple of weeks bmf it then give it a clear coat. Was going to use the decals from the kit but unfortunately they have little bubbles and are cracking so wont be able to use them. Have also decided to go a little old school and put centrelines on it to give it that earlier prostreet feel. Cheers and thanks for looking
-
Hi havent been able to get much done lately but have finished off the rear rims and detailed the slicks. Hope to have some updates soon. Gary was more level but ended up changing the rear slicks and had smaller front tyres hence it ended up being a bit higher than I had hoped but didnt want to strip the the front end off. Cheers and thanks for looking
-
Wynnscharger FE dragster, 7-27-15. engine is in.
vc273 replied to Petetrucker07's topic in WIP: Drag Racing Models
Hi Clayton I feel your pain as I'm close to finishing mpc jawbreaker and what a nightmare think they are the same kit with different bodies but in saying this if you can overcome the faults these kits have they can turn out really nice as is yours. Looking forward to seeing the end result. -
Hi thanks for all your comments. Wasnt a bad kit to build but the front end was a nightmare trying to figure out and modify it to fit and being patient with the chassis making sure everything stays true. Again thanks for looking.
-
Looking real good in my books and being a wagon is even better. Only wish I could stick to a project long enough to finish it. Looking forward to seeing more of it.
-
Hi started this one a while ago and not far off from finishing now. Built mainly box stock apart from some wiring and plumbing to the motor and some parts box decals. Need to clear the main body, detail the rear slicks and set up a parachute with cables. Used later model dragster headers which I drilled out and a different scoop from the parts box. Cheers and thanks for looking.
-
Hi thanks for all the comments and hope to have some updates soon. Just stripped down a motor and soaking it in mr muscle oven cleaner. Gene I first sprayed it in the blue which is actually sapphire blue then masked up for the titanium silver and used the dupli-color also for the primer just wish i caught that flash line under the tail-light. Will the use their clear coat once the weather is better here winter now. Stan yes I do have the rear tail lights thanks for your offer but have them in the oven cleaner stripping the chrome so I can spray them the titanium silver to go with the rest of the car.
-
Hi thanks for all your comments. Have made a few changes to the front changing the front headlamps for some parts box items. Think it gives it a better look and have detailed the rear slicks for it. Have decided to stick with the blue rims but unfortunately when gluing the rim backings on the outer rim section broke into a few pieces but have found replacements in the way of the ramchargers dodge 330 rear rims. Not as deep but think they will do the job and have them in the oven cleaner stripping the chrome. Cheers and thanks for looking.
-
Hi found this body that I had left over after using its chassis in another kit that I have on the go at the moment and a lapd pro stock chassis that was picked up as a glue bomb off ebay. This was meant to be a quick build but ended up scratch building most of the roll cage the chassis needed more work than I thought. Have sprayed the body in duplicolor sattelite blue and titanium silver and decals from the parts box. Made up my own rear wing and parachute set up. Wing painted in flat black and will do the same with the rims as they are only stripped to bare plastic. Sanded down the slicks and added the goodyear/eagle decals and painted the front tyres lettering. Cheers and thanks for looking
-
Hi this one has gone through a few different ideas than what I originally set out but now I think its on its way. Started off with the idea of a relatively mild looking pro stock with the lapd pro stock chassis and tunnel rammed hemi but now has progressed to what I have mocked up now. Found a pro stock chassis from the stp pro stock that I got as a glue bomb from ebay. Found this kit was an excellent fit within the duster body with very minor mods. Now using an injected and supercharged twin plug hemi that i cut the trans off and installed a lenco trans that I will be detailed. Made up my own wheelie bars as the originals where bent and broken and made up the rear wing with the original stp kit one with the ends from a revell dragster kit. Found the parachutes in the parts box and made up a mounting for them and also the chutes main cables. Still yet to decide on paint and decals but its winter here so only good for building not painting.Cheers and thanks for looking.
-
Hi been working on this for a while now and have it in mock up stage, just trying to decide if I will use the blue steel rims or the five spoke rims on the rear. Have installed a supercharged and injected 426 hemi that still needs finishing off topped of with the scoop from the 33 willys panel gasser. Used the wheelie bar set up from the willys kit aswell with a few mods. Painted in duplicolor diamond white and used part box decals that I had then clear coated.Made up my own roll cage and going to modify front bench seat for shift clearance. Still deciding whether to use the original head lights or to put blanks in. Still a way to go and will update as I go along. Any comments welcolme, cheers and thanks for looking.