scalemodelworld
-
Posts
161 -
Joined
-
Last visited
Content Type
Profiles
Forums
Events
Gallery
Everything posted by scalemodelworld
-
 Looks like an awesome build.
 -
After my post the other day, I got a bit excited about the magnitude of this build, so I knuckled down and got started. I'd already cut out the headlights, so I set about filling the T-panel lines in the roof, removing the front grille (just one for now so there's a comparison) and then marking and removing the doors. I got one done last night, so thought I'd post photos of my progress. By the way - if anyone has ideas on hinges for headlights, please let me know!
-
So I managed to pick up this little gem for the grand sum of $10. Given it's a snap-kit, I wanted to challenge myself to see if I could make it into something worthwhile. The parts have been sitting on my bench for a couple of weeks, while I've been cleaning up the body (it was atrocious!), and trying to work out what to do. At first I was just going to try and make the lights pop-up and wire up the engine, but last night I came up with something slightly more adventurous. The plan AT THIS STAGE is to: Wire the engine; Make pop-up headlights (using a lever underneath so they raise and lower together); Remove the "grilles" on either side of the license plate and use mesh instead; Lower it and give it larger wheels; Give it some funky pin-striping (inspired by Chris Thobe's work - although mine will be basic); and Give it working, gullwing doors! So it's going to be slow going, and I'm only half convinced I can pull it off with any real semblance of quality. But hey, it cost me 10 bucks, so who cares if I fail. Right?

-
As usual, you guys make me want to throw myself through a window. I thought I was being clever wiring up an engine and building some door hinges. When I see the talent on this forum, I don't know whether to throw my hands in the air and give it all away, or knuckle down and try to replicate what I see. This paintwork is some awe-inspiring stuff. I have to give it a go, but I'll never embarrass myself by posting my results, lol.
-
Converting the Red Barron to the Black Knight
scalemodelworld replied to Pete J.'s topic in WIP: Model Cars
Looks amazing. But to play the Devil's advocate... how do you stop the brass from tarnishing once you've polished it? -
It really is a nice build. I've never seen a Futura that ISN'T a Batmobile, so it's a cool change for me. I built the Polar Lights Batmobile a little while back (pics HERE along with my other recent builds), and even though the body was still multi-piece, it fit together perfectly. I'm sure that with some mods, you could do the opposite to the norm: buy a Batmobile and build it as a "normal" car!
-
Finally done. Lots of mods for me: scratch built battery and pedals; wired engine; hinged doors; polished paintwork; lots of BMF and a hood support rod (way out of scale, I know). Love to hear what y'all think.
-
Awesome looking build. Your detailing is amazing. I agree with Bill about the brakes, and the interior detail is the best I've ever seen.
-
Coming along nicely. I'm keeping my eye on this one!
-
Looks like a nice build, but I'm not a fan of building curbside models. Looking forward to seeing how it turns out.
-
For me, if I'm going to spray pieces, I remove them from the tree first. For things like the engine, I build all the pieces that will be the same colour, then prep it as one piece. Pieces that are going to be brush painted depend on how big they are and where they go or how they fit. If they're small, individual pieces (like the gearstick, seats or radiator hoses), I'll often remove them from the tree, use blue-tak to hold them and brush paint them prior to assembly. Some pieces attach to another piece that will be the same colour, so I'll glue first, paint second. It's pretty rare I'll paint anything at all while it's still on the tree - but that's just me. For the body, I usually test-fit things like the front and rear end to see if they can be attached prior to the interior tub and/or chassis being attached. If so, I'll glue them on and then I can paint the body as a single piece. Where I live in Australia, its quite humid, so if I don't paint all the same coloured pieces at the same time, they will have slightly different hues when they're put together. So I always paint the body, front and rear ends, hood, etc at the same time. Lately, I've taken to attaching the mirrors to the body, masking the chrome "mirror" and painting it all while attached. You can check out some of my builds at my blog to see what my results are like.
-
Mad Max Interceptor Build
scalemodelworld replied to Inteceptor4ever's topic in Model Building Questions and Answers
Try my friend Jim at www.jimnohio.com. He gets some interesting pieces in and may be able to find - or hold - one for you. Kits are pretty darn cheap. I think the most I've ever paid is about $22. -
Car undercarriage
scalemodelworld replied to scalemodelworld's topic in Model Building Questions and Answers
Thanks to everyone for all the advice. I have a friend from work who's a bit of an expert on dry-brushing, so I'll get in touch with him in a few weeks and maybe get some lessons. In the meantime, I decided to go with Flat Black as the main colour, with Metallic Black highlights, not to mention the Aluminium exhaust. I know it's not awesome, but I'd be interested to hear what people think.
-
So here's my latest dilemma. I'm about to polish my first paint job, but I need to add a couple of decals as well. Naturally, the polishing process would wear away the decals, so what's the bog standard process? Do I just polish and wax, and then add the decals after - leaving them untreated? Do I add the decals then some thin clear coats and then polish, or is that pointless?
-
37 Chevy pickup
scalemodelworld replied to The Modeling Hermit's topic in Model Trucks: Pickups, Vans, SUVs, Light Commercial
Awesome! Some of the best work I think I've seen -
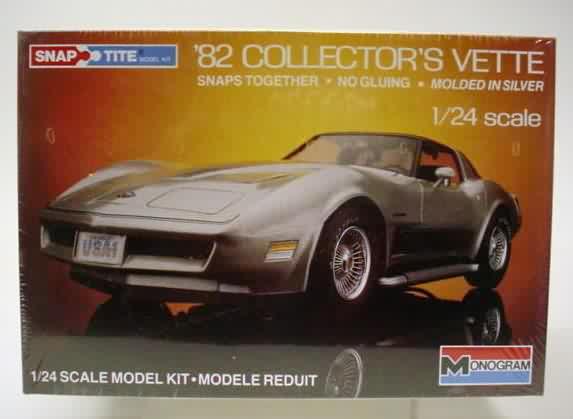
Looks fantastic. I love the detail in the dash. Mind giving some info on how you did the colouring? I just got myself an '82 snap-kit Vette, so your build has given me some great inspiration.
-
Looking amazing so far. Love the way you've built the trailer. Can't wait to see more!
-
Fifth Element was an awesome movie Chris. Can't wait to see what your mods look like!
-
Welcome back Wayne. I'm sure you're going to love working on this project. Looking forward to seeing some photos of your progress
-
1970 Mustang Boss 429 - update
scalemodelworld replied to scalemodelworld's topic in WIP: Model Cars
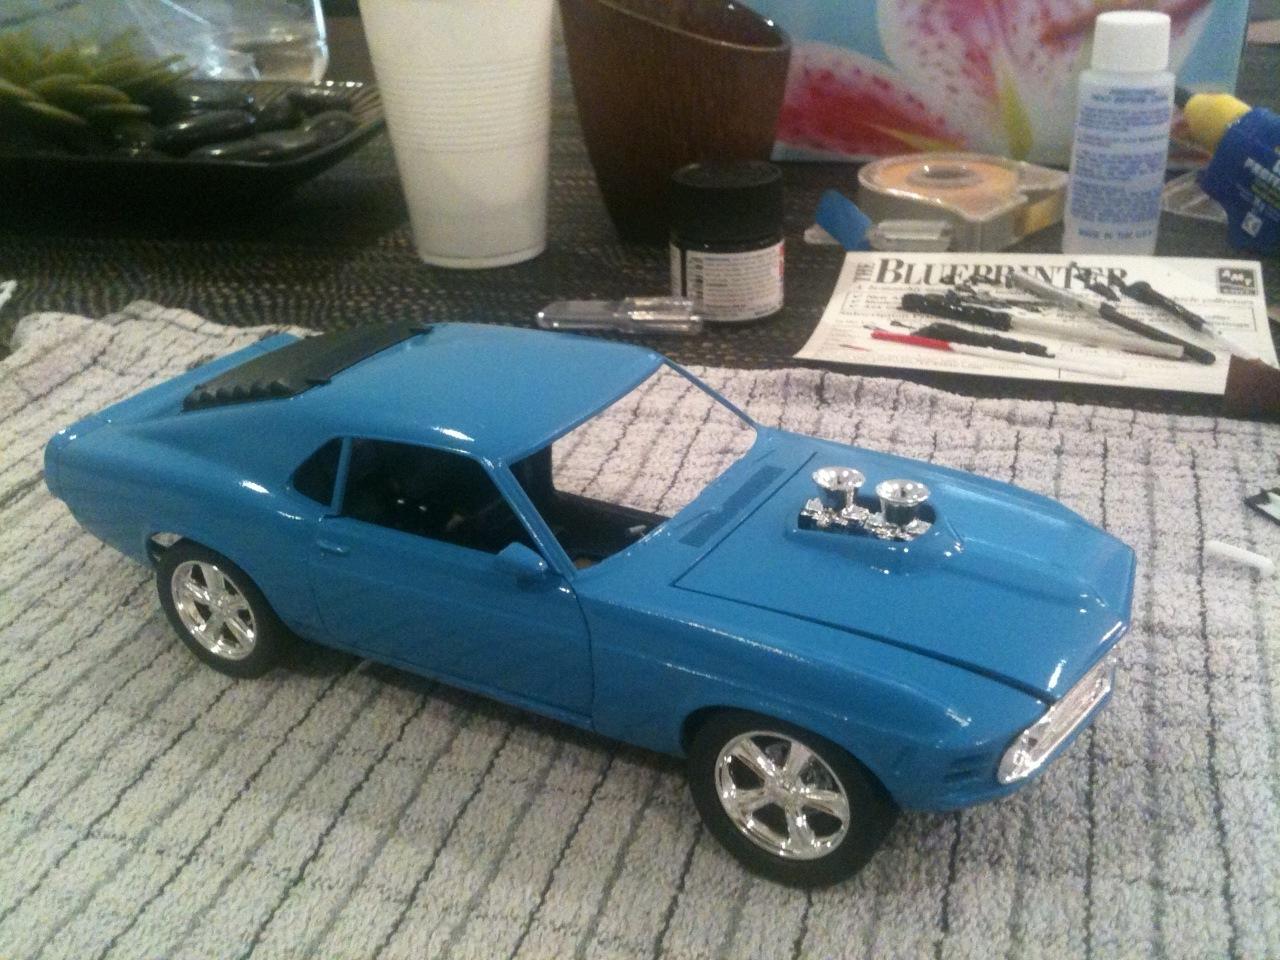
Another small thing that annoyed me about this kit, is that the hood won't stay open unless it's at a full 90 degree angle which just looks horrible. So I had a play around with some brass rod and built myself a little support rod, which is permanently fixed to engine bay. It hinges from the left and is bent about a thousand times so it works it's way around all the in-car components and can stay inside the car with the hood closed. -
t-bucket hotrod , touring model > t-bucket conversion
scalemodelworld replied to crazyrichard's topic in WIP: Model Cars
Looking very very cool. I love how you've changed it to be so short. Can't wait to see more! -
Absolutely gorgeous
-
1970 Mustang Boss 429 - update
scalemodelworld replied to scalemodelworld's topic in WIP: Model Cars
Wow, two weeks over Christmas with no building? I was going out of my mind! But I'm home now and have been working feverishly on The Boss. Yesterday I managed to get colour on the body, so this morning I got all excited like a school boy and had to mock up what I've completed so far. Parts were primed with Dupli-Color automotive grey primer and then coloured with Tamiya French Blue (TS-10), which is the same as the engine colour. I know, the hood doesn't sit right when it's closed, but I'm working on that I know, the door isn't perfectly straight when it's open. I'm putting that down as "practice for the next model"! Use of Ye Olde Toothpick to hold up the hood! The engine bay isn't complete yet Thanks for looking. Hope ya'll like it
-
Car undercarriage
scalemodelworld replied to scalemodelworld's topic in Model Building Questions and Answers
Wow, thanks everyone. I'd heard of dry brushing, but like all "new" techniques, it looked like something I could never do. I'll get researching and by the looks of things, I'm about to improve my finishing! -
Car undercarriage
scalemodelworld replied to scalemodelworld's topic in Model Building Questions and Answers
Thanks for the tips. I still don't own an airbrush, so things like highlighting and using the pastel dust seem a little out of reach for me. I do like the concept of colouring bolts and features, and I've tried doing that on my current model - a 1970 Mustang Boss.