Stuntman Mike
-
Posts
152 -
Joined
-
Last visited
Content Type
Profiles
Forums
Events
Gallery
Everything posted by Stuntman Mike
-
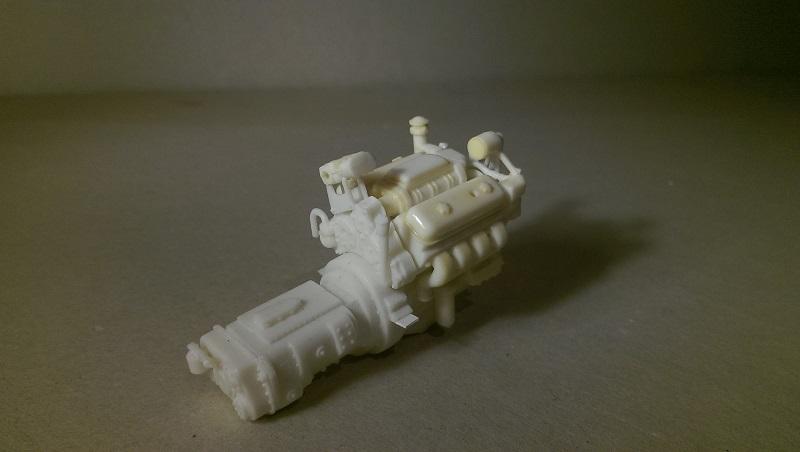
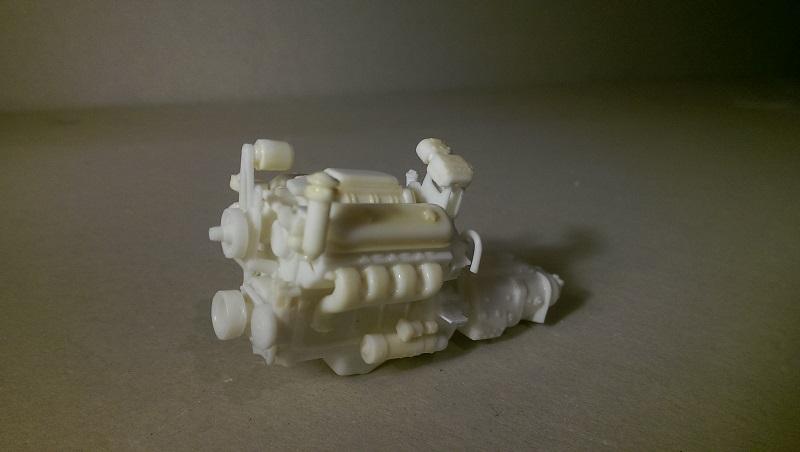
Really nice job so far and a cool subject. As the AMT Nascar Smallblock was mentioned, here´s a 358ci Pontiac engine from this kit: The following pic shows the intake manifold and carburator from the engine above. This is currently in progress of becoming the powerplant for my current ´70 Yenko Deuce Nova build. Not factory stock, but I think it´s a realistic upgrade for a 350 LT/1. The AMT Nascars are great as parts donors. A lot of crisp detailed parts and other useful stuff. The headers with the simulated heat wrap are pretty cool. However, hope this was useful for future projects. I´m looking forward to see this evolve. I really like Novas.

-
Triangle air cleaners
Stuntman Mike replied to IceMan Collections's topic in Model Building Questions and Answers
I think that the air cleaners you are looking for were included in AMT's '69 Plymouth GTX. It has an optional Hemi with a cross-ram intake manifold and I'm 87,3% sure that these triangular air cleaners came as chrome plated parts. -
Was a 250 Chevy six ever in a kit
Stuntman Mike replied to junkyardjeff's topic in Model Building Questions and Answers
AMT's '69 Firebird has a straight six included if I remember correctly. -
Any good painting tutorial?
Stuntman Mike replied to leon_s's topic in Model Building Questions and Answers
My procedure is pretty much the same. I currently use Tamiya spray exclusively. Primer, base color and clear coat. Careful wet sanding of every layer of the paintjob will improve your results significantly. For this step you may want to look for Micro Mesh abrasives. Great stuff. -
Yenko Deuce Engine & Exhaust Donor?
Stuntman Mike replied to Stuntman Mike's topic in Model Building Questions and Answers
Thanks for the information guys. I´ll modify the 302 engine that I have and will use the stock exhaust from the Nova kit. Decals from Keith Marks are on their way to me, too. @Casey I went for the AMT Nova on purpose as I´ve already had my hands on all three versions of the Revell Nova. I just don´t wanted another one. Another reason is the weird body lines of the Revell kit. The AMT Nova sure is a mess of an old kit, but it´s on spot with the proportions and it has tons of potential for detailing. The separate front fenders are a challenge to align and to blend into the body. But from there it´s just a fun kit to work on. Scratchbuilt side window trim, rocker panel trim removed and there is a detail upgrade on the suspension in progress. Paint is Tamiya rattle can TS-7 Racing White over Tamiya White Primer. I think it looks a little more classic than a in-your-face-yellow, especially when the wild black striping is done. Real Yenko Deuces were available in Gobi Beige and TS-7 is very close to the factory color.
-
My personal thumb rule is to start with the large decals and then place the small ones around the big ones. And I do the area where I grab the body while working on it at the end to avoid damaging the decals accidentally.
-
Hi I´m converting a ´72 Nova from AMT into a ´70 Yenko Deuce and need some input on the drive train. I have a ´69 Z/28 Camaro from Revell that has the exhaust with the unique mufflers. Was this exhaust style used on the Deuce aswell? I remember that I´ve read that this type of exhaust was needed to build something that has written Yenko on it. My fading memory has lead me to the conclusion that it probably wasn´t the Corvair Stinger... ...any ideas regarding the mentioned exhaust? And what about the 302 from the Z/28? Is that block with the heads and valve covers a good starting point to make a 350 LT1 out of it?
-
Thanks. Out of sheer curiosity, what is your next project?
-
It´s this kit There´s a different version available with a stock Tall T, but I wanted this because of the chopped body and because I just need the wheels, chassis, engine and radiator from the stock version for the vintage racer. The body will be built from scratch with the driver´s seat above the differential. Inspiration to build myself a neat vintage racer came from HERE
-
Best things come in threes.... I´m doing the side window trim for the third time. I realized the b-pillar was too narrow and while I´m at it I´ve also improved the top of the door panels. I have also started work on the c-pillars by sanding my way into it to bring it into shape. I think the correction of the rear window will be less work than anticipated. I´m also building with more reference now to avoid such no-brainer mistakes like the too narrow pillars. I´m actually starting to count rivets. I also think that the rear end of the body may be a little bit too long. Looks like it could be five millimeters shorter. What do you guys think? Does anyone of you actually own a 4-door Valiant? It would be awesome to get some measurements of different parts of the body. This is how the chassis plate of AMT´s ´71 Duster fits into the body. I just needed to do some minor trimming behind the rear inner fenders. It´s almost a drop-in. And this is the result on the trunk lid after a few minutes of sanding. That´s it for now. Next update will probably cover further work on the new pillar situation. Wish you all a great christmas and at least one new kit. Cheers Kevin
-
The Duel Project
Stuntman Mike replied to Stuntman Mike's topic in WIP: Model Trucks: Big Rigs and Heavy Equipment
Great job on your truck and trailer, Scott. I wish I was that far with my build I´ve stripped the chrome off of some parts and assembled the engine. This is where I run into the unknown. Is there any wiring and plumbing that should be done before painting the engine? Is diesel injected into the blower on these engines? I know it´s a two stroke, so there are probably no fuel lines to each cylinder. Is that correct? Pretty hard to find the reference I am looking for. Mainly because I don´t know what to look for. And what about that air compressor thing behind the blower? Is that for the brake system and looking forward to get connected to the air tanks? In case someone likes to share a link to a WIP that includes a superdetailed 8V71, I´d be a happy bloke Cheers
-
The Secret to Building a Better Model
Stuntman Mike replied to afx's topic in Tips, Tricks, and Tutorials
I started late to use the net and it took me a very long time to build halfway decent models. I remember that I was looking at pictures of built models on kit boxes and how impressed I was by them when I was a kid. There was no scale modeler around who could actually teach me how to put a kit together, how to clean up parts or how to paint properly. It was a long, dirty and expensive road until I was a "competitive" modeler. BMF and sheet styrene were discovered accidentaly in a shop a few years before my internet entry. I was glad to realize that I wasn´t the only freak on earth who did bodywork on scale models when I stumbled across a modeling forum for the first time. Today, when somebody is really interested to become a modeler, it´s very easy to gain knowledge. There are tutorials for everything on the Tube and the answer to any question is just a few minutes away. I´ve seen "first builds" that were way better than anything I could come up with after being ten years in the hobby. I´ve learned it the hard way and I´m proud my 28 years of experience. I´m happy with my results and I still use my prehistoric tools that have turned out to be useful and that´s it....I´m having fun. The secret to building a better model is easy to answer. It´s not about aftermarket stuff, tools from space or the amount of scratchbuilding. It´s about taste and craftmanship. One does not only need to apply a paintjob properly, one does also need to have a good hand at chosing a color that suits the subject and thus makes it stand out of the crowd. It´s about making the best with what you have and improve it where ever you can. Photography could be mentioned, but I doubt that a camera can improve the result of a build. -
Last week I´ve ordered a ´25 Model T 3in1 double kit primarily I´d like to turn the stock version into a single seat vintage style custom racer. So there will be plenty parts for me to turn the second kit into a rat rod. Count me in with a chopped ´25 Tall T. And if this CBP is renamed into "Race´n`Rad Rods", I´m in with the other one, too.
-
I´m in love with the Satellite
-
Vinegar And Water-Decal Setting Solution
Stuntman Mike replied to 69NovaYenko's topic in Model Building Questions and Answers
Haven't used this method yet, but I've heard about it, too. I read it either in a kit instruction or in an old Revell booklet that shows how to customize models. It's probably one of those early days techniques that have gotten lost in the ever growing universe of modeling supplies. It's most definately worth a try. -
What kit can this motor be found in?
Stuntman Mike replied to Ridge Rider's topic in Model Building Questions and Answers
AMT's '72 Chevelle has a blower setup that looks a lot like this. The air intake has a different rib pattern on top, though. I must have at least four of them in my stash, all still on the sprue in new condition. Let me know if you need some of them. -
The Valiant will be underpowered by a Slant-6 from Lindberg's '64 Dodge 330 kit. It has a healthy amount of parts and crisp details. I think it's going to look cool in that engine bay.
-
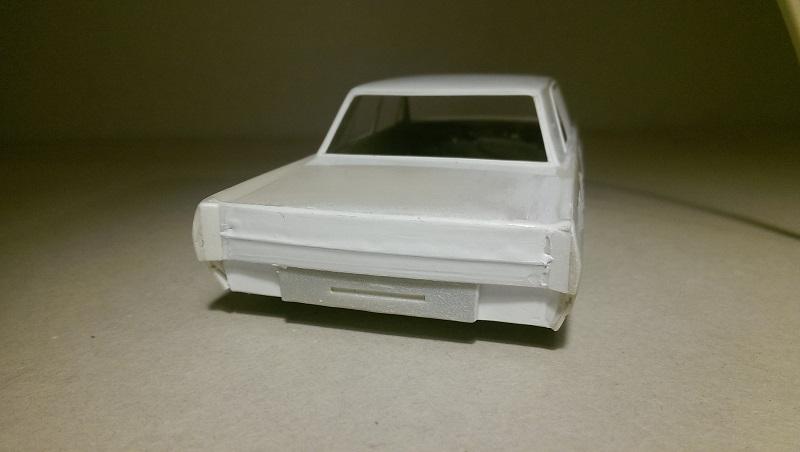
Hey! Thanks for all the nice comments and for the links guys. It´s motivating and made me go on with the bodywork. A strip of triangle styrene was glued to the vertical surface of the trunk lid. This will help me to bring this area into shape. The sheet below is just flat and follows the shape of the rear bumper. But there has to be an edge in the panel and this is where the triangular styrene strip comes into play. In 1:1 it´s a very subtle and barely noticable line, but it´s tricky to duplicate in scale. I added a layer of putty after the strip was glued to the body. It looks kinda sloppy, but now there´s enough meat to sand this area into shape. When I´ll be done with sanding, the egde in the panel will be solid styrene instead of putty. It also will help during the sanding process as I can better see what I´m actually doing while approaching the desired result. Just gotta let this cure before I´ll start sanding. As you can see, I tend to work rather careful with putty to reduce the sanding process to a minimum. It also helps to keep the surrounding surfaces clean and unharmed. I have a ´72 Nova from AMT in progress that I´m turning into a Yenko Deuce. This kit has horrible side window trim and I´m redoing it with the same technique that I used on the Valiant. The refurbishment will include the drip rail trim aswell. It´s just a little work, but fairly easy and manageable by pretty much anyone who has already worked with sheet. I think I´m going to make a tutorial as there are a lot of kits out there that need a little improvement in this area. Cheers Kevin
-
The Duel Project
Stuntman Mike replied to Stuntman Mike's topic in WIP: Model Trucks: Big Rigs and Heavy Equipment
I realized there is too much attention on the Valiant to keep it here in the Trcuk´s section. I made a separate WIP in the model car´s workbench so this truck WIP won´t get spammed with car related stuff. Duel Valiant A little update on the Peterbilt will follow in a few hours. Cheers Kevin -
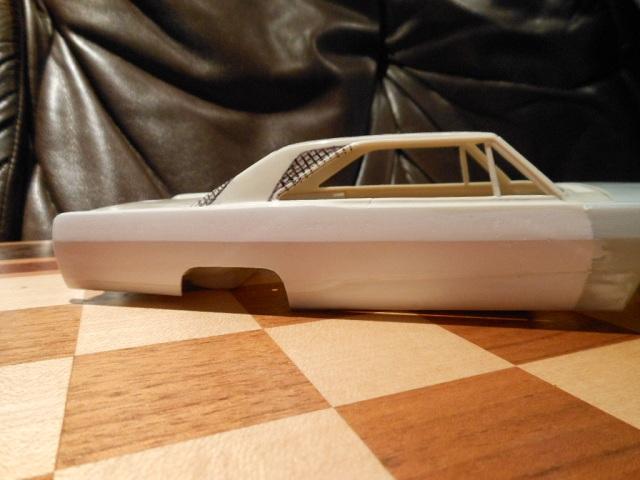
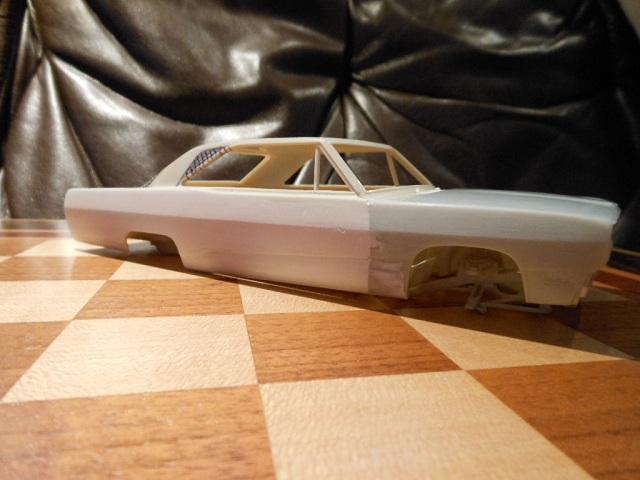
Hey dudes I´ve started posting pics of this build in the WIP of my Duel truck and since it has caught quite some attention, I thought it´d be better to post it here instead of spamming a truck WIP with car stuff. Some information on this conversion can be found here: The Duel Project. Everything else will be posted in here from now. I´ve also found a few more pics of the earlier stages of this build. As mentioned in the other thread, this Valiant will be made from a Dart body that was mated with a Duster front end. While the Dart body is totally inappropriate to resemble a Valiant, it´s still a useful foundation for extensive bodywork. It actually helps a lot to have more than a chassis plate and two fenders with a hood to work with. I could already write a book about what has been done yet. But I´ll just add some minor information to the picture as the whole process is kinda self explanatory. If questions come up, don´t hesitate to ask and in case you find major inaccuracies, sport a pointer and provide some helpful critics, please. I don´t care when this will be finished. If I need to change something, I´ll gladly do it for the sake of self-flaggeration and accuracy... Well then...here´s all the pics I could find on my hard drive. I´ve marked what needed to be removed from the Dart´s c-pillars The trailing edge of the hood needed just some minor trimming to fit to the contours of the "thing" (whatever it is called...) between the hood and the windscreen. This is how the engine bay looks after the Duster´s and Dart´s parts were mated. After the body pieces were mated, this view made my toenails fold up. This was when I realized that I loaded myself with tons of work. This was when someone made me realize that the roof height was incorrect for a sedan. It looked kinda weird, just like a top chop. The roof was then cut off of the body and the roof height was adjusted. It also forced me to completely re-do the side window trim that I already did earlier. After the anti-top-chop was done, I´ve had an extremely fragile body to work with. The side window trim brings back a lot of the strength. I simply glued a full sheet of styrene into the hole and drew the trim with a pencil onto the sheet. Then I cut the windows out with an x-acto knife. The result is a lot stronger than just some posts out of strip styrene. And as a benefit there´s no messing around with alignment. There´s now a nice even surface for adding clear sheet for the windows. And that´s where I´m at right now. Still lots of unpredictable work. I´m actually curious which stick will be thrown between my legs next. I´m sure the Valiant has already planned something to make me curse the day I was born... As mentioned, critics are very welcome and most appreciated. Maybe I can get this body good enough to be casted in resin. But be patient, I´m not rushing this and slow progress is to be expected. Cheers Kevin
-
The Duel Project
Stuntman Mike replied to Stuntman Mike's topic in WIP: Model Trucks: Big Rigs and Heavy Equipment
The rear window will be completely redone later. I´m still thinking about how to do it. I´m actually not looking forward to re-do this but....well... I think when everything else on the body is done I have a good motivation to do it. It is indeed a very ambitious conversion. I thought it would be easier before I started. But I actually enjoy the challenge and I think the effort will be worth it in the end. I´ve just found a pic from an earlier stage of the build. This was before the roof height had been corrected. In the picture you see the roof height of Revell´s Dart body. I have also red-marked the position of the Dart´s original c-pillars. Just to give you an idea on how the pillars were modified. The roof was cut off of the body shortly after this picture was done.
-
The Duel Project
Stuntman Mike replied to Stuntman Mike's topic in WIP: Model Trucks: Big Rigs and Heavy Equipment
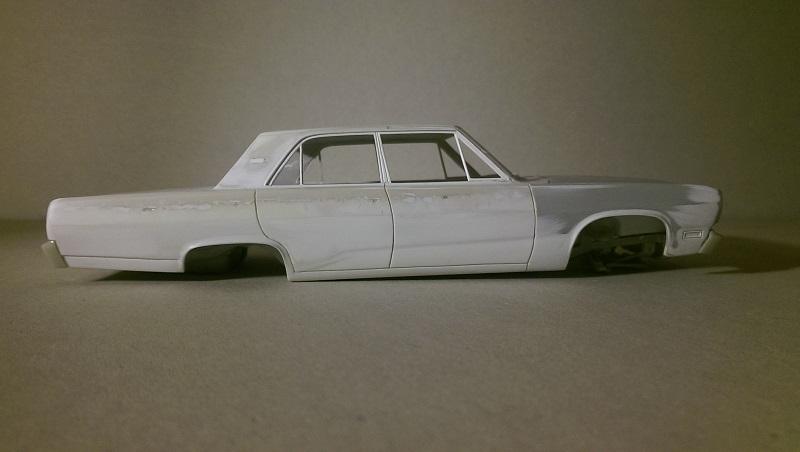
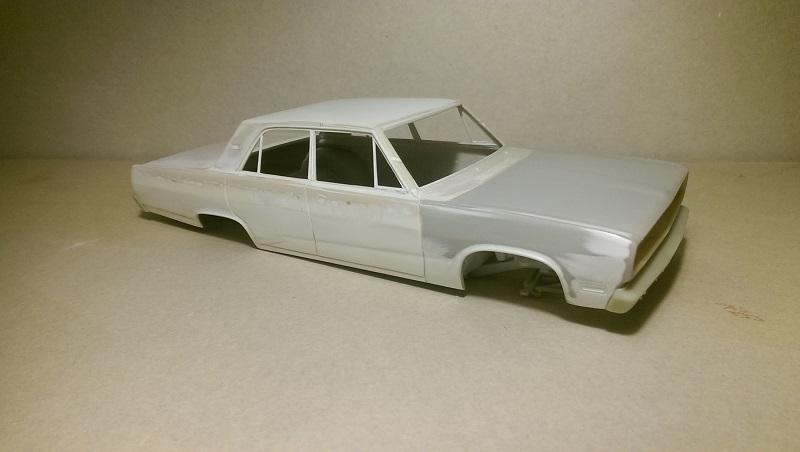
Well, it´s been a busy weekend but I finally managed to take some pictures. Sorry for the dark pictures. I really need to make some sort of a photo box... The parts have been mocked up with some tape. The fenders are coming along nicely and there´s little left to do. A few things here and a few things there and I´m ready for gluing parts together and scribing new panel lines on the cowl. And here´s the promised walkaround of the Valiant body. As you can see, still tons of work in some areas. The car is probably the last thing that will be finished in this project. It really is a task when you have to make sure that everything is symmetrical and follows the lines of the real deal. As I only have pictures for reference, I can just try to pull something off that has the right proportions. That´s it again. Hope to get some more done during the next week. Thanks for looking, critics are very welcome. Cheers Kevin
-
The Duel Project
Stuntman Mike replied to Stuntman Mike's topic in WIP: Model Trucks: Big Rigs and Heavy Equipment
Hi there Thanks for the huge feedback on this. I´ll try my best to do your interest justice. Now that I´m a few days into the semi build, I´ve thought about where I want to go with this build. I think this is going to be a compromise of appearance and accuracy. There is stuff that will be totally wrong from an accuracy point of view. From the appearance point of view, the result will without a doubt be a Duel Peterbilt. The rear suspension and the tag axle for example....changes on what came from the box are not going to happen. As soon as the trailer is scratchbuilt, the wrong rear end situation will be mostly covered. And even if the axles are wrong it´ll still be pleasing to look at them after plumbing and wiring is done. Correcting the frame to the needed length is a different story as this affects the appearance a lot more. Considering the amount of work that is involved, I´m totally fine with appearance over accuracy. Stuff like the wrong 8v71 will still get lots of attention when it comes to adding details. And that´s where I´m a noob. I have actually no clue how a diesel engine or a semi should be detailed. Someone should make a tutorial for semi beginners to teach how air pressure lines and hydraulic lines have to be installed to the frame and what the lines are connected with. I can superdetail a stock Hemi with closed eyes but I have no freaking idea about superdetailing a big rig. The cab will be an accurate replica and from lots of reference pictures I have a pretty good idea of what needs to be done. As a car modeler I start with checking panel lines when I have a body in my hands for the first time. I´m currently working on the front fenders and have the grille narrowed to fit the modified hood. Adding the panel lines and cutting out the pieces from the butterfly hoods will follow as soon as everything is lined up properly. I´ll post some progress pics tomorrow. As the Valiant seems to be of interest, here´s a little more information. First thing to say...if I had known what I got myself into, I wouldn´t even have considered to try it. That thing has fought me like a bear and I´ve spent countless hours with bodywork. The firewall and everything ahead is from the AMT Duster kit. Everything behind the firewall is (or was) the Revell Dart. The Duster was about 4 Millimeters wider than the Dart. That meant adding sheet to 2/3´s of the sides of the body and freaking out from a neverending sanding nightmare. I modified the c-pillars and added all the trim on the windows. I posted a pic somewhere and someone came along and told me that the roof height is wrong. Sedans are taller than hardtops. So I went ahead and ripped all the trim off of the body and cut the roof off. Don´t know if there´s a term for such a modification...I´ll call it the opposite of a top chop. Scratchbuilt trim was added again and it looked a lot more accurate. It was a chunk of work but it was worth it for me. By now the sides of the body are close to being done. The rear end of the body still needs work. I´ve only brought it into a general shape yet and need to work out all the details. The tail lights will probably be just a structured surface that needs to be finished with BMF and clear red paint. And I´m not yet happy with the shape of the rear window opening and the surrounding surfaces. I´ll add a walkaround of the Valiant body with my next reply. You´re all welcome to point out inaccuracies that I may not have noticed. A resin cast has already been taken into consideration. But I need a decent result before that thought will be intensified. Alrighty then...pics will follow tomorrow. Cheers Kevin -
Hi Big Riggers After finishing the Blue Mule, I couldn´t help myself and got my California Hauler out of the stash. It´s going to be converted into the big ol´ dirty Pete from the movie "Duel". I have started assembling a few parts and cut a wedge out of the hood to make it line up with the narrower grille that is seen on the movie truck. Lots of scratchbuilding is to be expected and I hope to profit from the massive knowledge of you guys. It´s only my second semi build and I pretty much know nothing about trucks. Alrighty then...let the mess evolve... Here´s the cab on the frame. The hood was modified so that the sides are in line with the doors on the cab. The grille from the kit will be modified as soon as the hood is done. The truck will be powered by an 8V-71 Detroit Diesel engine. Don´t know if it´s the correct engine, but I like the idea to install a V8 instead of an inline six. Posable steering is a nice little addition. Brings a bit more life to the finished build. I loaded myself with work on this project. It´s not only the truck that I´m doing. The tanker trailer will be built from scratch and for the past four years I have been occasionally doing massive bodywork on the combination of a Dodge Dart from Revell and a Plymouth Duster from AMT. It´s been a PITA to convert this abomination into a Valiant....but somehow it proved to be successful. Still lots of work to be done, but it already looks the part. That´s all for now. Hope to have an update soon. Thanks for looking. Cheers Kevin
-
Some Rubber Duck questions
Stuntman Mike replied to Stuntman Mike's topic in General Automotive Talk (Trucks and Cars)
Of course. It´s a very well done resin kit as far as I can tell from the pictures that I´ve seen. But it still is resin, it is curbside and it is less detailed in comparison to the mentioned styrene kits. In my opinion, the resin kit has a right to exist for collectors and stuff. But from my peronal scale modeler´s point of view, it is a lot more satisfying to tackle this by myself. The journey is the destination. I´m not looking for the quick result.