Russell C
-
Posts
1,931 -
Joined
-
Last visited
Content Type
Profiles
Forums
Events
Gallery
Everything posted by Russell C
-
Well, 'shriek' is a somewhat subjective term, the Ferraris & Lambos no doubt had that, while others had whatever folks would say V8s sounded like, but the MP4/5 V10s had what I'd describe as a distinctive combo of bass noise that could be felt in the feet along with a really piercing shriek. Just the nature of that cylinder arrangement, I suppose. Whatever caused it, it hooked me.
-
I was living in Albuquerque in 1989 when F1 came to Phoenix, my brother invited me over to see the free-to-the-public practice sessions. I was strictly an Indycar fan at the time, but the bass/shriek of the V10s hooked me to F1 for that era. What a sound. Then there was the entertaining scene within the skyscraper walkway area where we knew the cars were leaving a block or so away from the pits and would soon come around to our spot. There was some homeless guy staggering around wondering why he couldn't cross the street with all the temp fencing in the way, then he was even more bewildered when Senna came around the corner and flew by making all that concentrated noise, with his $16 million or so salary. Heckuva contrast. I'm a lousy sports photographer, this was the only decent shot out of the whole roll.
-
 Spiffy ol' Dodge, but in dire need of some kind of bumper, so I stole one off the Ford & pasted it there.
 -
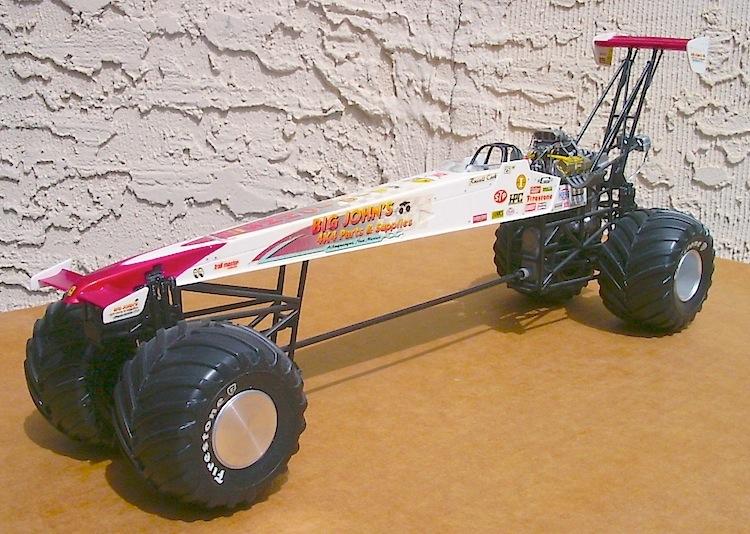
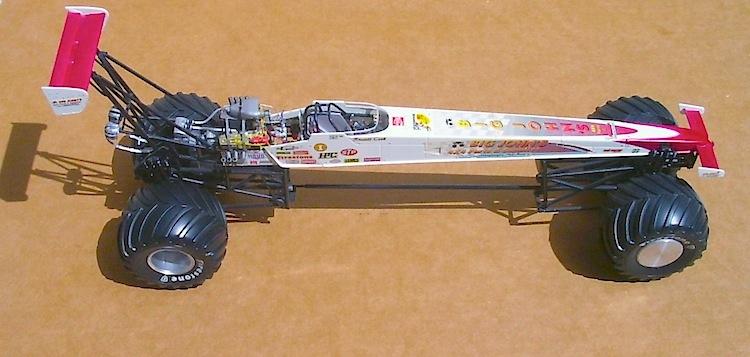
Stumbling upon "Cobraman's" 8 wheel top fuel dragster just recently, it reminded me that I needed to dig out a TFD of my own that I built back in 1998. It's not a model type that I'd normally build, but I knew the upcoming contest that summer by the White Mountain Plastic Modelers had a special theme category of "build us a 4x4", but they never specified what kind of 4x4. Knowing that one of the Albuquerque Model Car Clubs's regular attendees at the contest was Big John Pattison, famous for all his drag racing models, I thought I'd do up some fictional main sponsor decals and put them on something that was a cross between Revell's Pennzoil TFD and an AMT Snake Bite monster truck, just to mess with his mind. Ferrari decal on the nose, of course. If I remember right, the front driveshaft scales out to around 16 feet in length. Midship bearing? Naw, just extra spinning mass to slow a guy down. Who needs that? Oh, wait. How many cylinders does the engine have? Well, not 8 anymore. Such an alteration would leave an unsightly forward gap on the head, and we can't have that. Just turn the magnetos 90°, that'll solve the problem. It was quite a load of fun filling in the details for the driver's area and the engine, despite not knowing exactly what I was replicating in various spots. If anyone complains that the oscillation overthruster is missing its fuse link harness or something like that, all I have to do is say this is a top fuel monster truck dragster.

-
What's the story behind your user name/avatar?
Russell C replied to JollySipper's topic in The Off-Topic Lounge
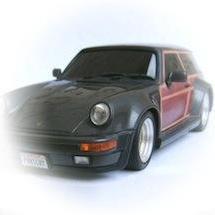
Sheer laziness for the failure to spell out my last name in the user name part. Or something. The car might be the one most notoriously tied to my building career, but I don't know for sure. What inspired it is beyond my sorry excuse of recollection, it started out to be a factory replica stock of a 930 cabriolet and I had gotten as far as a fully detailed engine (which is now buried, a few details can be seen when it is upside down), but somehow it turned into a woody wagon. I guess I decided to go for more 'gotcha' appeal midway through the build process..... -
Tuning in a bit late here, but while searching for something else, I ran across your WIP thread for it, then had to see how it turned out. Fabulous, and as folks who know me somewhat well will say, I have a particular weakness for demented thinking. Hey, I resemble that remark!
-
I was impressed, a second room needed for vendors. Got a good deal on a kit I was looking for, and there were some mighty good models on the contest tables. Had to take a good long look at the factory stock yellow '69 Camaro. And in just the 10:50-ish-to-noon time that I had before my weekly 'parental care obligation' required me to leave, I got to at least say 'hi' to Dale Mickley and Tim Pentecost. One of these years I'll have time enough to spend the whole day there.....
-
Rockford Files '74 Pontiac Firebird UPDATED 4-28
Russell C replied to am73grand's topic in WIP: Model Cars
Starting at the :32 spot of this vid, seven of James Garner's famous bat turns in a row. I read in the TV Guide back in the day how he used to practice doing those: -
Got a brainbuster for you guys
Russell C replied to Quick GMC's topic in General Automotive Talk (Trucks and Cars)
Dis one? From Hemmings? http://blog.hemmings.com/index.php/2013/06/19/luniverselle-is-that-you/ -
Yep, me and a pure ordinary box stock are like two opposing face magnets.
-
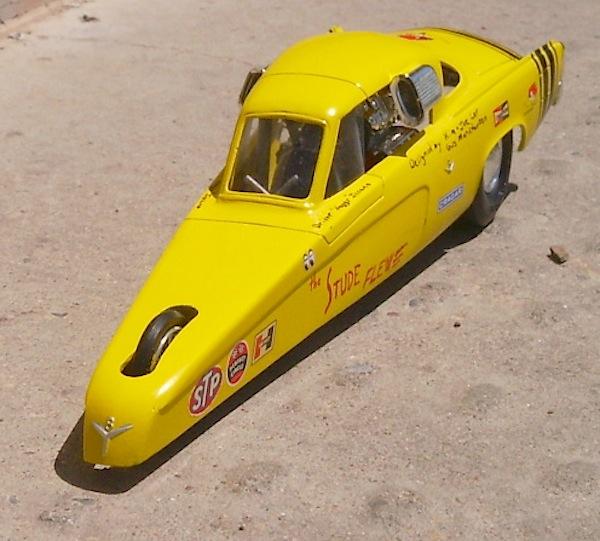
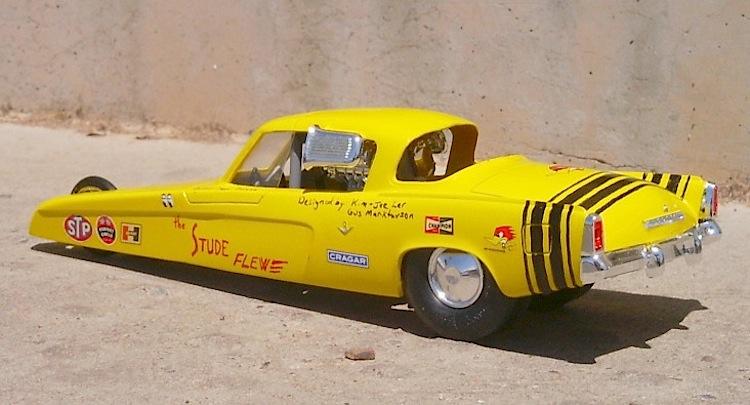
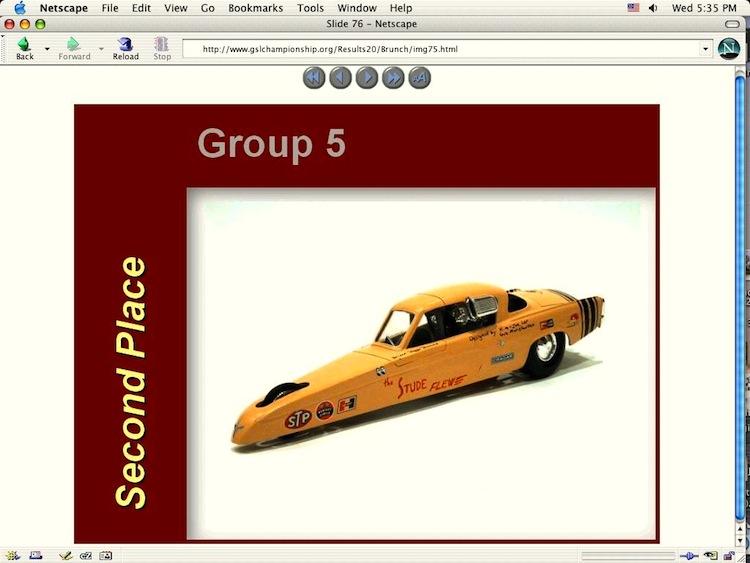
Thanks gents. To avoid any potential confusion, I added a line in my first paragraph above to note that the top photo is mine of Jim's original Dodge model, taken at the International Model Car Museum during the 2005 GSL contest.*** Senility being what it is, I had to rummage through my photos to make doubly sure it was one I took, as opposed to the ones I gleaned off the internet as reference photos when I was building my Stude tribute. Regrettably, when I donated the Stude to the Museum to go alongside several of my other 3-wheelers I'd already donated, it got misplaced. It's there somewhere still, I hope. I'll be at the Desert Scale Classic, but my weekend obligation to take care of my elderly parents prevents me from staying long, an hour or two at most. *** 4/24/20 Edit - put in a photo link instead of Jim Keeler's original Dodge Fever, from the official GSL web page collection. My "Stude Flew" model was found, and is on display at the museum.
-
Since ol' Jim Keeler has popped out of the woodwork, I thought I'd drop in a few pics of a tribute model I sorta did to mess with his mind at the 2005 Greater Salt Lake contest. Jim is a legendary figure in the model car industry, with his famous Dodge Fever models being among his many claims to fame - photo link for his Dodge Fever 1 here. Long story really short, the GSL contest has long had a special "Group" category where Mark Gustavson and his associate contest organizers choose a particular model in advance and builders are restricted to building that vehicle as though it was 20 years ago. In 2005, I had already built up a minor reputation for a running gag of models for that category that were always yellow 3 wheelers*, usually blaming their design shortcomings on a fictional guy named Gus Marktavson, while referring to other dyslexic misspellings of folks at the contest. With the "Group 5" model being the AMT '53 Studebaker Starliner, I was at first stumped on what to do with it, but when I ran across Jim's yellow Dodge Fever, it all fell into place. Designed by Marktavson and some mysterious Korean fellow named Kim-Jee Ler, with its driver being "Hoggy" Iscano. And what a perfect excuse to have that AMT kit's twin blowers sticking out the sides of the car. Here's a photo link for the lineup of the other Group 5 Studebakers. This particular class is unusual for being a popular choice aware, and despite the other models being better than mine, the humor of it must have carried it to its 2nd place award. Precious to me was the standing ovation Jim gave it at the awards brunch when it was announced, an honor I'll always cherish. * (I later became a lampooning victim of this myself, when "Hollywood" Fernandez pointed to my 3-wheel mayhem at the next contest in 2007, speculating on what became of all those '4th wheels.' He came up with his own answer that was his entry in the category - have a look at his photo gallery of his truck here. Yep, this hobby is full of nutcases, but that's a whole other story. Btw, my Group 7 backwards '40 Ford pickup lampooned Ken Hamilton's Bonneville suicide bike seen in Scale Auto's August 1990 coverage of GSL.)
-
(psst: Jim would be just fine if he wasn't completely nuts)
-
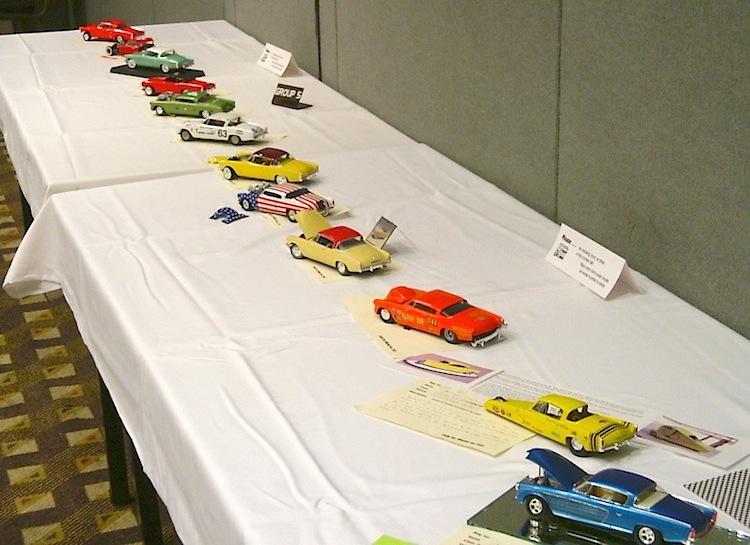
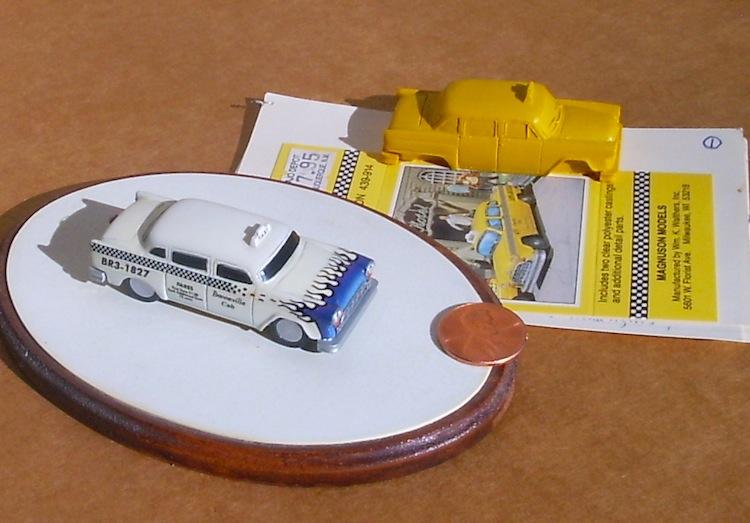
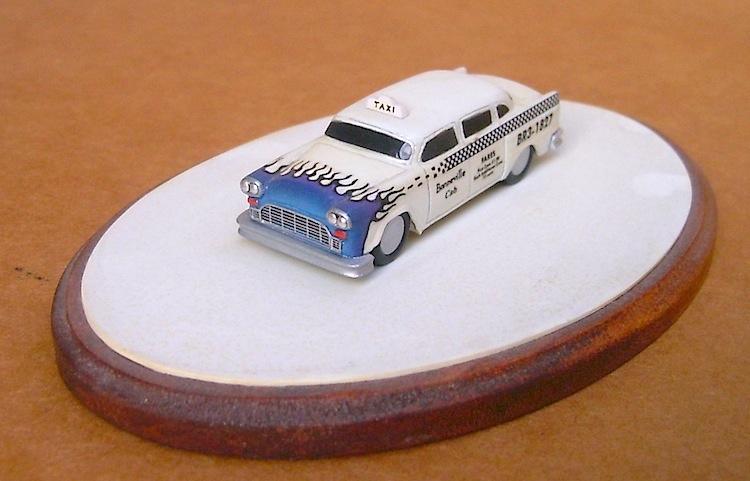
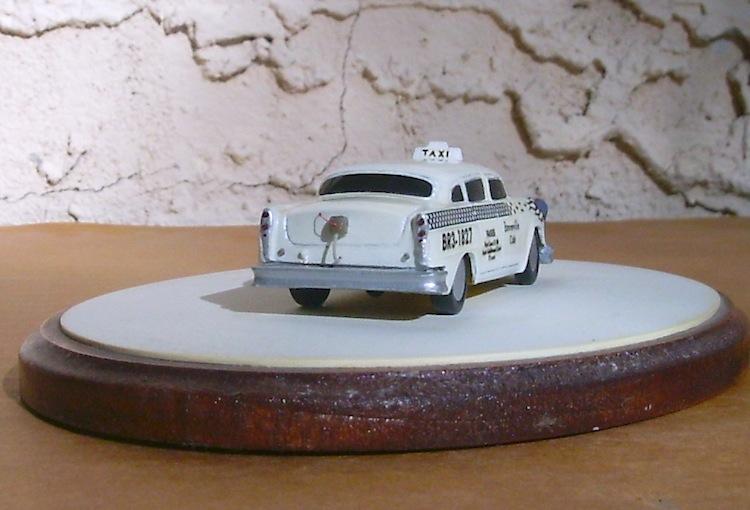
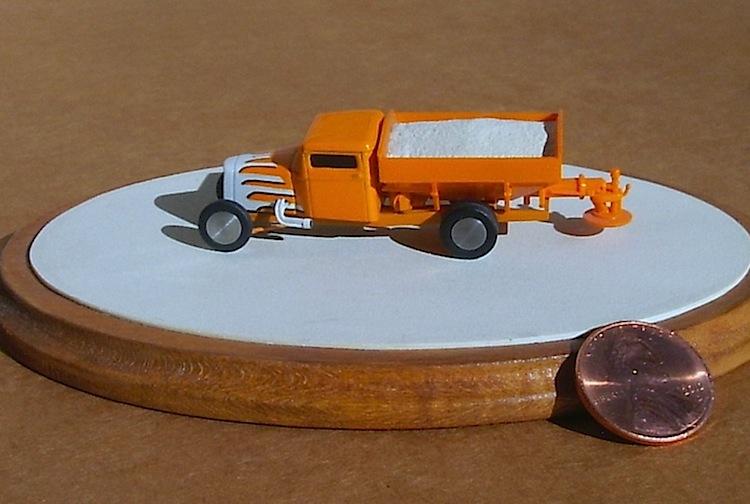
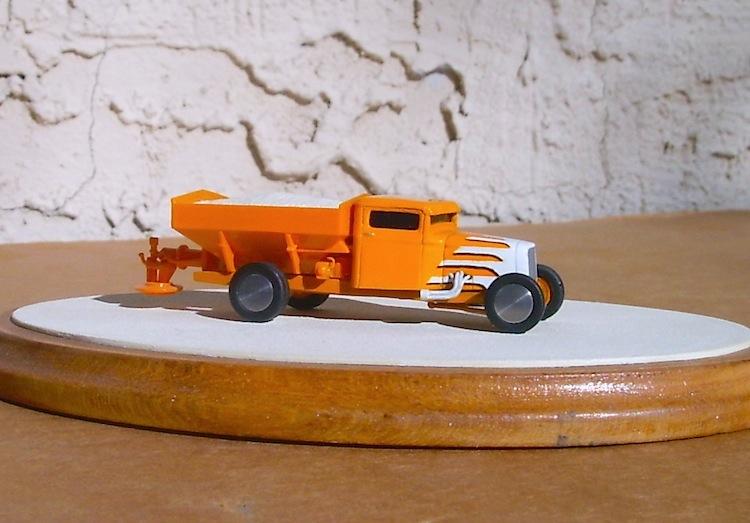
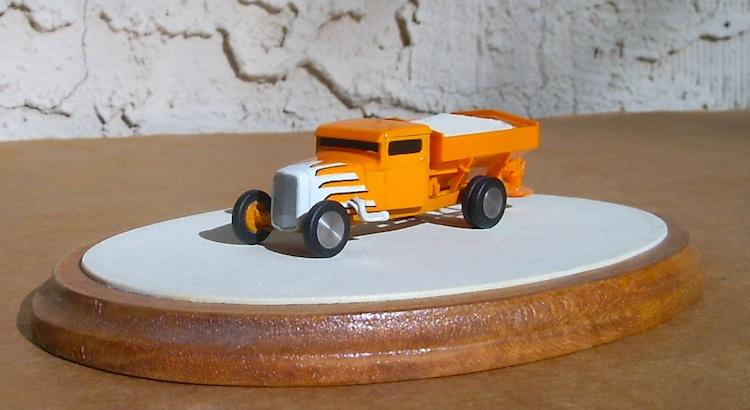
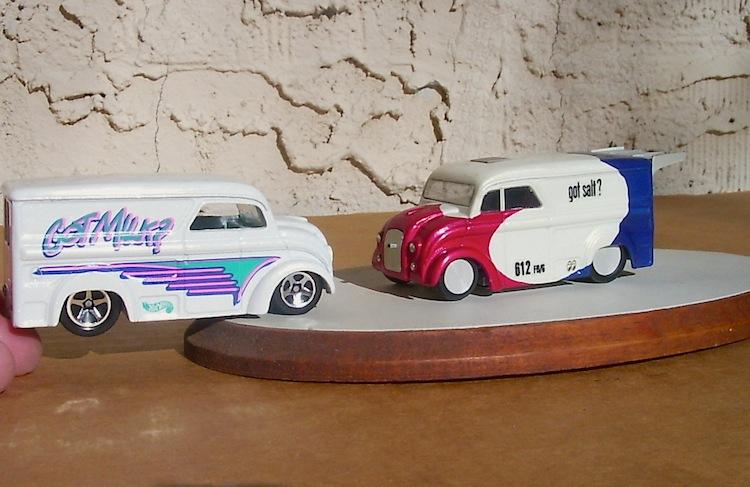
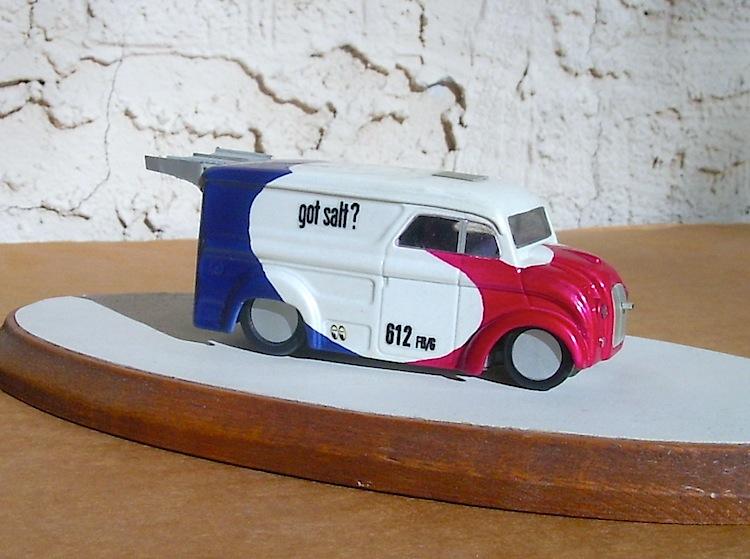
Story on these is that back when I first started attending the GSL contest in Salt Lake City, the special Bonneville / Dry Lakes class tended not to have many models in it. I figured I could at least fill it in with one more model each year, and mess with folks' minds a bit with small scale deliberately brick-shaped vehicles. My first entry in 1992 was a Magnuson models Checker cab. It's a bit on the rough side considering the primitiveness of the resin body. I chopped the top by slicing off the entire 'greenhouse', grinding about an 1/16th inch from the bottom and then lengthening it by adding a cross section in the middle. The windows are bits of black exposed film negative material, the headlight covers are dish-shape pin ends, the grille is bits of model ship photoetched railings, and the tires / wheel covers are plastic 'lathe-turned' on my motor tool (a method I explained in my post over here). I drew the black parts of the flames and the words "Bonneville" in a computer program and printed them out on clear laser print decal material (the "5 piece kit" - 4 wheels and a resin body - came with the other decal lettering & checkerboard stripes). The colors are air brushed nail polish pearl white / purple-to-light blue flame area. The next one is one of my favorites in my whole collection, built for the '93 GSL contest. It's a combo of the Wheel Works '34 Ford with a Roco salt spreader unit (out-of-production, I think, it's the same as the accessory in the dump body of this other guy's truck). I shortened up the salter body and made the load by forming the basic shape out of aluminum foil over a cardboard frame, which was then heavily sprayed with white paint, followed by a sprinkling of flour and several dry mist coats of off-white. I chopped the cab of course, and the windows are bits of black exposed film negative material. The headers are brass wire formed to shape and capped with a metal ring I found that happened to be the right diameter. I 'lathe-turned' the plastic tires and aluminum wheel covers on my motor tool. What could be more unaerodynamic than a van? Hot Wheels had a nice chopped top Divco milk truck out in 1999 when I made this one, so I just removed its silkscreen stuff and painted over its pearl white with some nice nail polish pearl blue & magenta-ish red to mimic the Pierson Brothers' 1934 Ford Coupe. All three of these models sit on cheapo craft shop stained pine bases that have "salt" made from dinged-up, slightly dirtied sheet styrene.
-
I have two small but permanent bump scars on the back of my fingers from one of those incidents. Gruesome how far the skin stretches during the pull....
-
x 2. From living here as long as I have, the dust storms that folks elsewhere in the country go ga-ga over lately never have been anything out of the ordinary ever since the landscape from here to Tucson got churned up from agriculture, roads, and residential living. Drop a giant cold air downburst from a thunderstorm and dust flies, big deal. Folks around here are annoyed by the dust but ignore it otherwise, while out-of-towners turn the photos & videos into viral sensations as though such dust had never been seen before. Blame the interweb for that. 'Through the roof' humidity would be the 80-90% stuff back east which I really dislike, but it never really gets that bad here even during the rainy time. As for the 'looking Hispanic' thing, I'd have to say that's an overhyped item elsewhere, none of my Hispanic friends or co-workers ever brought it up in any way.
-
This one, correct? http://www.youtube.com/watch?v=5a1__niLIAQ#t=133
-
Felt sorry for this li'l guy: '50-'53 MG TD
Russell C replied to Russell C's topic in WIP: Model Cars
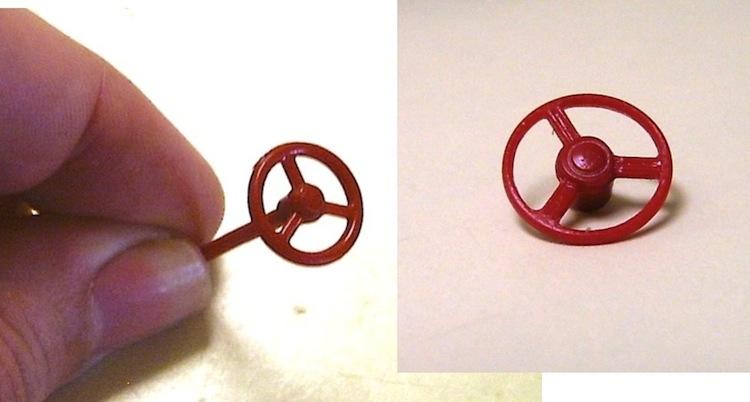
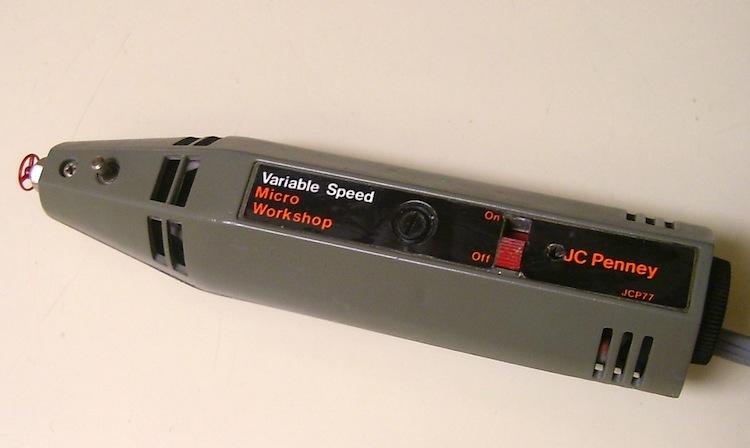
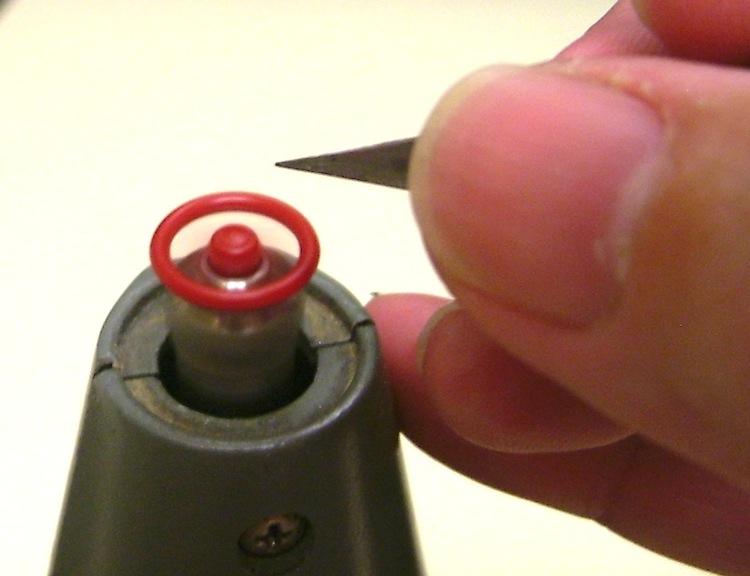
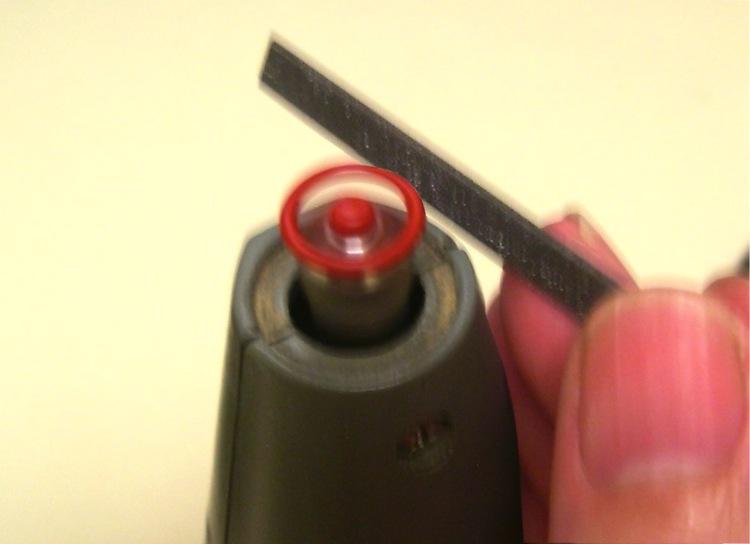
When it comes to paint removal, it turns out this is more of a hit-or-miss for me with 409 cleaner and spray-on Easy Off. The 409 reduced the flat black & silver on this old model to the point where it was easily and completely removable with an old toothbrush. The Easy Off loosened up the white the same way. But neither worked all that well on a couple of old flat and gloss black scrap parts I had in my own scrap parts box, while the Easy Off did loosen up a gloss orange part I had and the 409 finished that off. Chemists will have to explain how such degreasers work on various kinds of paint….. Meanwhile, I solved some of the steering wheel problem. By the eyeball engineering standards I'll be applying to this rebuild, it looks like the steering wheel is the right diameter, but the rim is way too thick. My dad is an expert machinist with his own lathe, and for many years I've been using the elemental lathe-turning concept on my hand-held motor tool. So, I cut the wheel off the shaft and chucked it in my motor tool (not a Dremel, but an old JC Penny version with a speed dial built into the end), and used a small file and x-acto blade to knock down the thickness of the rim and make the horn button more round and defined. For photo purposes only, I put the motor tool in a vice and held the file or blade near it to give you-all an idea of what it looks like from my perspective when I hold the motor tool in my left and and the 'cutting tools' in my right hand. If you guys haven't tried this before, you can lathe-turn little parts on Dremels and such quite nicely, it just takes a bit of practice….. but as all the lawyers and concerned parents would say, wear safety glasses and BE CAREFUL! I'm most of the way there with the wheel now, but it will probably get a bit thinner still before I declare it to be good. My dad gave me a miniature lathe a long time ago, but sometimes it's easier to bash something out using this method, especially when super precision is not all that important. I'll probably make the front fender running lights using this method, too, out of thick aluminum wire rod. It's a handy method to turn small pieces into really crisp circles. For example, the silver door lock buttons on the door handles of my Porsche woodie wagon are not mere imprecise dots of silver paint, they are perfectly circular bits of polished aluminum wire that really sharpens up that little detail while also acting as an anchor securing the handles to the body. Same method for the itty-bitty circular parts and wheels/tires for my 1:160 Ford tank truck.
-
Well, not all the time, today was quite nice. A person can get used to the fierce sun enough to feel the need to roll down the long sleeves when the temp dips below 80°. Some days can be on the annoying side, though.
-
Over extended time, cardboard will dry out, any masking tape sealing up something will lose its adhesive eventually and turn to powder, and rubber bands will turn hard and fall apart, if you use any to wrap up something. Bottle paint will turn into bottles containing colored rocks. Say goodbye to the water & solvent content in stuff, basically.
-
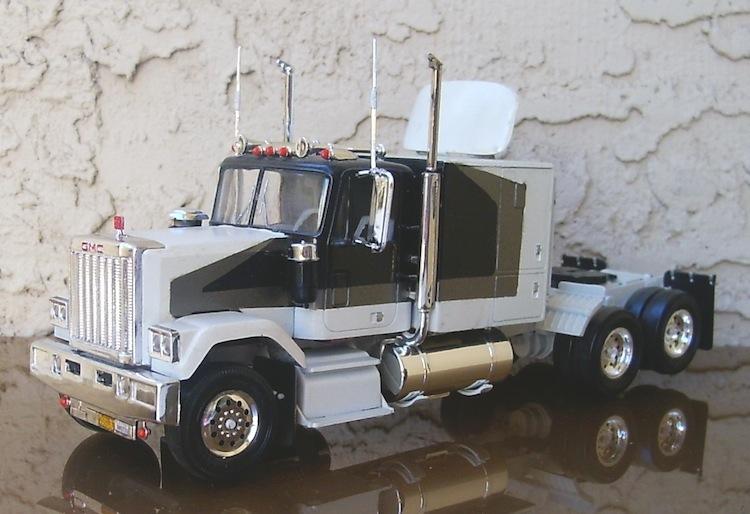
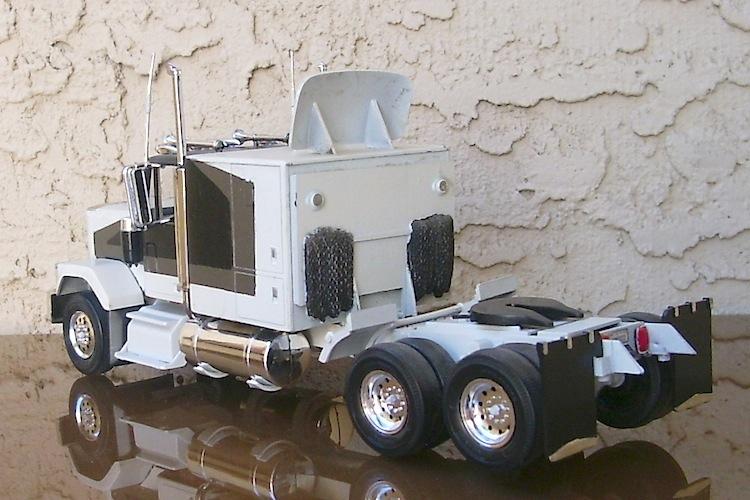
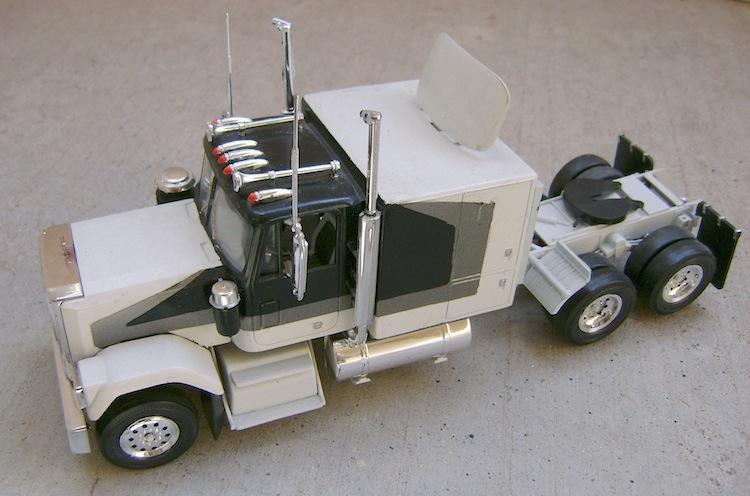
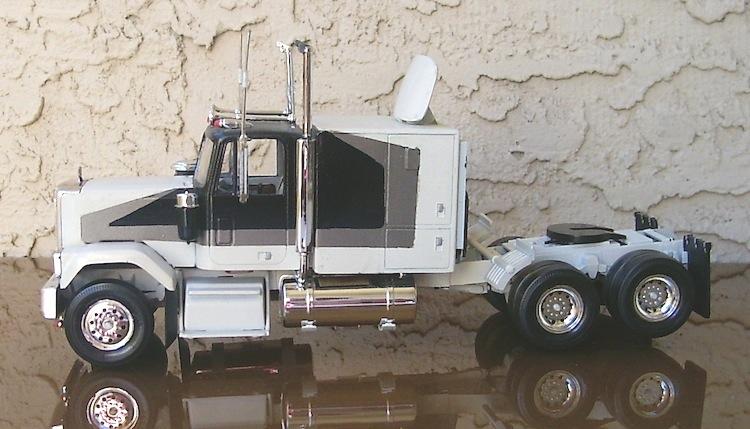
I combined the two Monogram 32nd scale Bison / General kits onto one model way back in 1981, thread over here, where sometime later I'll have a chance to clean and fix it up a bit.
-
Let's see your geegaws!
Russell C replied to Lunajammer's topic in General Automotive Talk (Trucks and Cars)
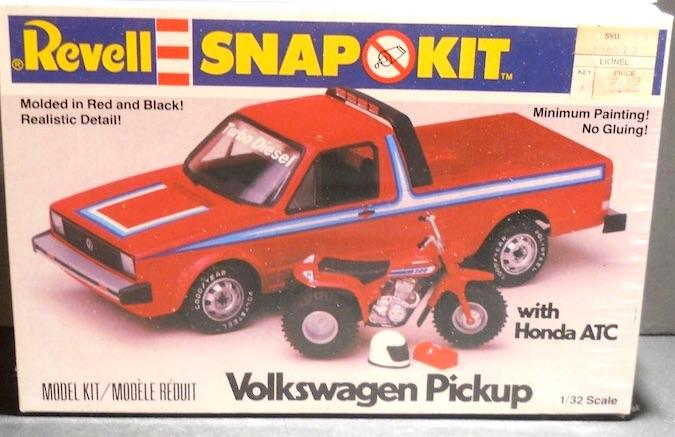
The Revell Carrera RS also had a clipboard, with a flashlight molded into its surface, if I remember right. The AMT T police car had a long flashlight and a few other weapons and apparel. The Revell 32nd scale VW pickup had a 3-wheeled ATV.
-
Felt sorry for this li'l guy: '50-'53 MG TD
Russell C replied to Russell C's topic in WIP: Model Cars
When being "back in the red" is a good thing. 409 cleaner made the silver & black paint brush-offable overnight but didn't make a dent in the white paint. Since my really old Easy-Off had evaporated to powder from years of neglect, I had to try a new yellow spray can version. It reduced the white to almost nothing in ten minutes or so. Friction-fit together here just for laughs. Next up will be how I fix the steering wheel, assuming that turns out ok.
-
While I feel somewhat sorry for other people's ancient builds, I feel sorry for a few of my own, too. A decals wanted thread here at MCM prompted me to fish out another of my ancient history builds just to see how it was holding together in storage, and to see if it was salvageable for display again. Not too bad, had to pop a couple of pieces back on temporarily with Elmer's glue just so they'd stay put for the photos. I built it in late 1981, an effort to combine what I preferred from the Monogram Bison & General kits, with an excuse to indulge in my liking of double sleepers. From the Chevy, I chose its quarter fenders, capped straight stacks, air deflector & bumper (minus some lights), and I used the General's grille and headache rack. The 'tag-axle-in-the-air' appearance is not intentional, but is instead an indicator that my frame extension ended up not being all that happy over time. Fun exercise in a simple original paint design, but built with rather inexperienced teenage model building skills. I'd say it is worthy of some restoration / cleanup work: polishing out the orange peel, ditching the air deflector, blackwash for the grille, fixing / lengthening the frame a bit more, substituting some better wheels and tires, plus some other tweaks to punch up its appearance. Wouldn't take a whole lot to get it looking really nice and sharp.
-
Jealous of the craftsmanship, very well done!