Speedfreak
-
Posts
2,647 -
Joined
-
Last visited
Content Type
Profiles
Forums
Events
Gallery
Everything posted by Speedfreak
-

AMT Mustang-GT Funny Car Update 02/27/16 Livery Restored
Speedfreak replied to Speedfreak's topic in WIP: Model Cars
That's what I've done Ray, I've got one side complete. It's just that I haven't worked with decals for 16-17yrs , and , it's been a struggle, but , it's very slowly improving. T Kevin thanks for checking in man. I actually taped off those lines and used a red Sharpie! We'll see how visible they are in photos, it doesn't really show 1:1. I'll post a photo with a full mock-up showing the one side I've got done some time today. -
AMT Mustang-GT Funny Car Update 02/27/16 Livery Restored
Speedfreak replied to Speedfreak's topic in WIP: Model Cars
Nothing seems to be working for the livery on this car, at least nothing I have. I put the Pony Express stuff on the passenger side and it looks ok, but just ok. The problem is the snorting/helmeted horse in the center, only way out I see is to replace that with a five pointed star, I'll see what I can do. -
That looks great Matt! I know it fought you, but , thanks for hanging in there, I don't think I've ever seen this kit, much less seen one built, very cool. When was this originally released, do you know?
-
Very nice, that interior is incredible! The dash face is as good as I've seen. The rear three quarter shot almost looks 1:1, the exhaust tips are cool too, great job Stefan! That's a keeper!
-
Great looking 'vette Charlie! Those are the best looking wheels I think I've seen on this forum.
-
That's a lot of models, when did you start building those?
-
Looking good Richard, nice job on the dash! . Yes, the design, and , construction of the roll cage in a real race car is 'very' important for driver safety.
-
Dash looks great Richard, I can see 'some' of the detail in the photo. How is the front clip lining up?
-
You'll get there Cody. Good to hear the bad spots are fixed. You can paint the inside of the body any color you like, a lot of people use a darker shade, some leave it the same color as the body , many use black , it's up to you. Depends too on what kind of car it represents, stock, drag, etc,...
-
AMT Mustang-GT Funny Car Update 02/27/16 Livery Restored
Speedfreak replied to Speedfreak's topic in WIP: Model Cars
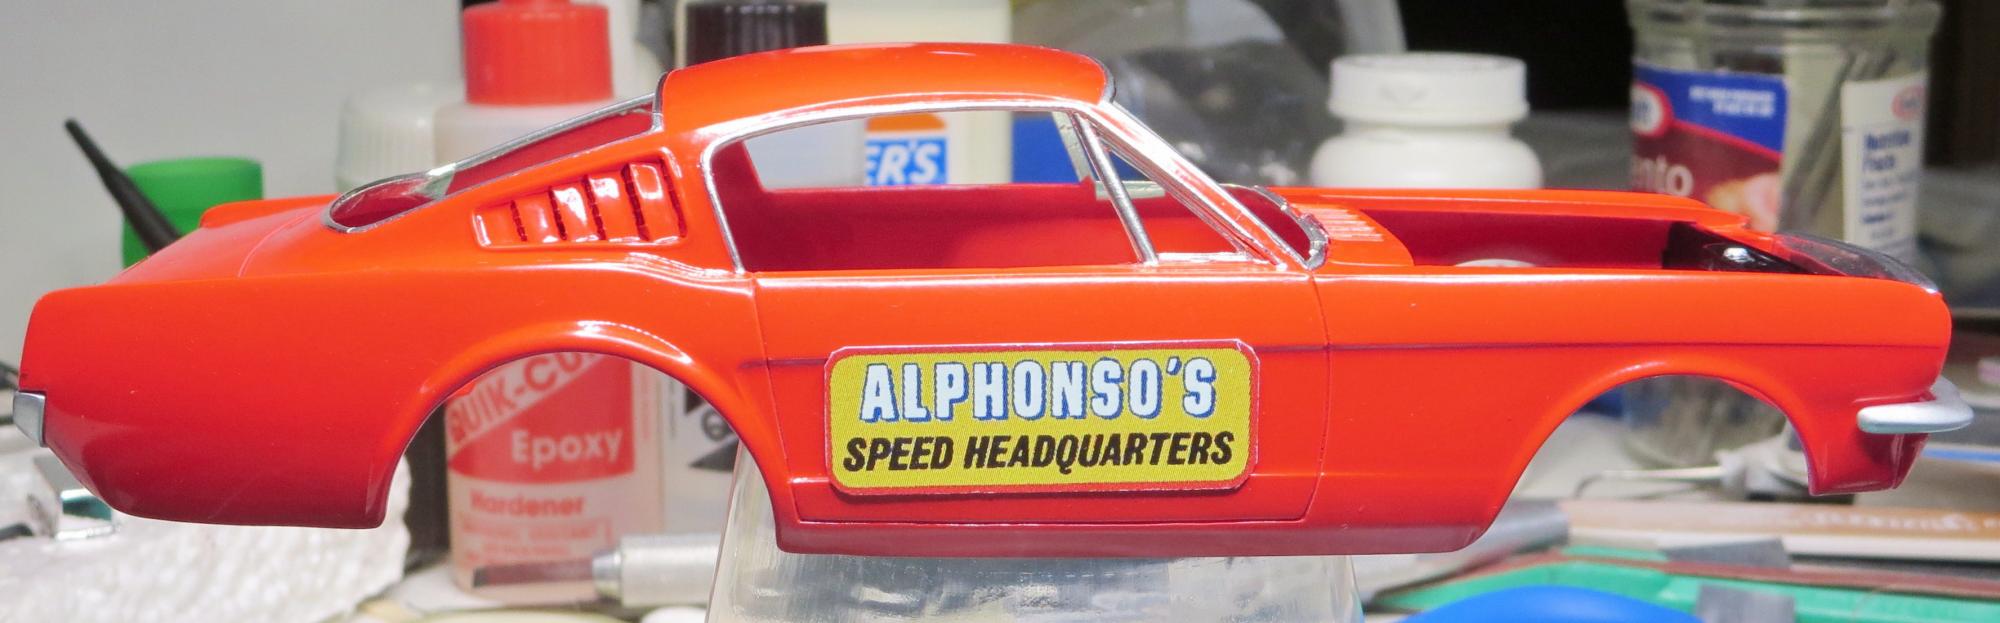
I can hear the applause for Alphonso's from here. It kind of does look like a sign board. Back to the drawing board(?)
-
Nice job Mitchell, like the color you choose, and , the engine bay looks almost 1:1 in that photo.
-
AMT Mustang-GT Funny Car Update 02/27/16 Livery Restored
Speedfreak replied to Speedfreak's topic in WIP: Model Cars
Ok man, I think I'm gonna try this. No paint weather until next week so I have plenty of time to work out all this. The styrene body shop. In the mean time I can try the other livery on the other side, that should be fun Funny thing, most of the old photos of A/FX cars, (which this car is really not) , were rather rough looking as far as the bodies went, working cars , not show pieces. -
AMT Mustang-GT Funny Car Update 02/27/16 Livery Restored
Speedfreak replied to Speedfreak's topic in WIP: Model Cars
Ace, So mask off 'before' cleaning? You mean after right? Because if I'm going to fix this thing I might as well try to do it right. Weather permitting I'll go for this method, I'm not afraid of painting. Believe it or not there are still a couple of very small bumps of decal adhesive that I could not get off, they aren't even visible in the photo, maybe some more polish? I have some milder model car polish I can use. the only down side I see to this is if I don't get the polish off good enough then it messes up the paint fix, then the whole things a wash. -
I'm inclined to agree with Dan.
-
AMT Mustang-GT Funny Car Update 02/27/16 Livery Restored
Speedfreak replied to Speedfreak's topic in WIP: Model Cars
Thanks JC, wow, wow. I first have to clean off the polish, before I can apply the Sharpie I would think, I've never been in this place before so this is new territory for me, got any great ways to do that? Since i can't really wash it. A soft cloth with mild soap? -
Can you post a photo(s) of the bad spots? That would help in diagnosing the problem(s) and how to fix them . There are people on this forum far more knowledgeable about painting than I, maybe someone will post something if they know where the problem areas are, because from the photo you posted it doesn't really look bad.
-
Steve, I used MM Custom Lacquer (Hemi Orange) recently to paint some dragster parts, sprayed right out of the can , (with no clear over them) , I just now ran my finger nail along the sharp edge of one of the flat parts rather firmly, nothing happened , part edge is fine.
-
Is this curbside or is that an actual engine I see in there?
-
Nice work for a seven year old!
-
Can't wait to see this in final form, like the green and the livery!
-
AMT Mustang-GT Funny Car Update 02/27/16 Livery Restored
Speedfreak replied to Speedfreak's topic in WIP: Model Cars
Total meltdown, I put one of the Mustang 427 decals on the drivers side and didn't let it get loose enough from the backing, as a result it set up in about 3 seconds and was slightly croaked. Me and my infinte wisdom then started some micro set to loosen it and it would not budge. Then came the real drama, I decided to remove it, and in that process really screwed things up, lol. Then came 3M Scratch Remover, then came the thin white lines from the white primer under the red on the bottom and top edge of the cove. I hated the yellow 427 Mustang decal once it was on the car anyway. I'll put the Pony Express decals on later today and show it for what it is. I'm actually going to try and somehow cover the white lines with Sharpie, wish me luck! Here's a photo:
-
Cody, the body looks real nice in the photo, love the color , be careful putting on another coat of paint. I've made similar mistakes forgetting body parts, it's all part of the deal.
-
Mike, your old car was cool! The promo body looks 'much' more accurate than the resin body, great project!
-
Just spray it out of the rattle can next time, make life easier.
-
AMT Mustang-GT Funny Car Update 02/27/16 Livery Restored
Speedfreak replied to Speedfreak's topic in WIP: Model Cars
The BMF is finished, I'll post pics after I get the main decals on, which should be today I hope! . Man, that stuff (BMF) is a killer, but , it sure looks good. Hint: where some kind of rubber gloves when you do this, or , your paint job will suffer.