
Arnd
-
Posts
112 -
Joined
-
Last visited
Content Type
Profiles
Forums
Events
Gallery
Everything posted by Arnd
-
hey landman I am not 100% sure but I suppose that number 18 and 16are the fuel filter and the water separator. Number 116 could be something like a cold weather starting unit.
-
1988 Ford L-9000 Aeromax
Arnd replied to Arnd's topic in WIP: Model Trucks: Big Rigs and Heavy Equipment
Hallo all Just a little update. I added the front parts for the frame to make it a bit longer. The cab holder on the frame were reworked. I did the same with the cab and the interior so that everything fits a bit better and is easier to work with. As far as I want to use a Cummins I reworked the firewall and made the doghouse a bit wider. The steering system and the linkage were reworked and added to the frame and front axel. The masters fort he resin parts are originally from Revell I reworked and changed them so that I can cast them for my own trucks. I have a question for you guys out there, I want to use cast spoke rims on that truck. Can I use rims with six spokes on the front axel and rims with only five spokes on the rear? Or do I have to use the same number of spokes on the front and on the rear axel? Thanks for your efforts. So long Arnd -
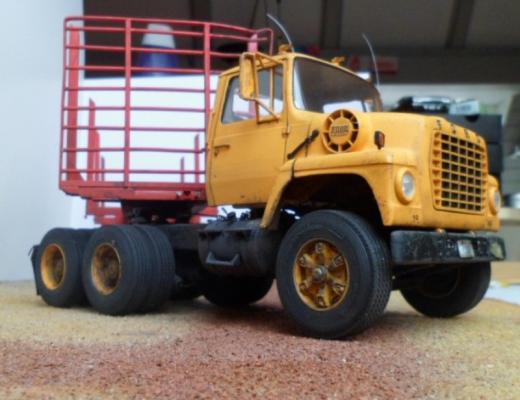
Hallo all After a longer brake I started again with modeling. I decided to pick up an older project. It is my1988 Ford L9000 Aeromax. It will be a tandem axel truck used for pulling logging trailers. Most of the parts are from some old trucks and from the spare boxes. The hood is from Italerie and I cut so that it fits to the AMT cab. There is still a lot of work to be done, filling and sanding but for the moment to see how it fits is it ok. The frame was shorted and reworked to fit with the tandem rear axel. The axel which is from AMT was updated with resin brake parts and some bolts and nuts. Just have a look, pictures say more than words. Still a lot of work to be done but it is a lot of fun. So long Arnd
-
Hallo Mark I think this is what you are looking for , if you do not have it allready. http://public.fotki.com/modeltrucks25thscale/model_magazine_articles/car_modeller/cm04_nov_1990_cater/ so Long A.
-
Hallo all I will rework an old project that I started long time a go an IHC Paystar but I do not know exactly how the hood is hinged? Is it a piano hinge in the middle? Perhaps one of you has some pics. I searchsed the internet but no luck , many pictures but not from an open Hood. thanks for your help and so Long Arnd
-
Hallo all After a long brake I start again with my hobby, building model trucks. While I put all my model kits in my new room, I found a box with a Mack Junkyard Dog that I started long a go as a single axel tractor and newer finished it. Seeing all the parts in the box I decided to change the truck into a tractor pulling a 40 feet log trailer. The Junkyard Dog cab is perfect for reproducing an old working truck from the woods. If we belief what AMT says than this truck should be a R685ST model. Is this right? Or could it be an RD685ST? Or an R785ST? Or would it be totally the wrong truck with a wrong frame, engine and transmission for pulling a log trailer? I hope the Mack specialists who are here can give a helping hand with all that questions. I added some resin parts to the front axel to make it steerable and to fit with some Revell rims and tires. The frame was stretch again to the standard length and the old camel back rear axel was replaced so that it would fit with a wheel base of 178inch on 1:1 truck. I will have to rework the frame a bit on the place where the two parts are glued together. I am not sure about the rims I will use. They will be 20inch but cast spoke or two holes bud wheels or five holes, I am not sure about this in the moment. I started with a cab protector which will be over the top of the cab too. The big challenge will be the hood. Mack used fiberglass hoods on this models and fiberglass do not have dents. Well this will be a lot of filling and sanding. So long Arnd
-
Hayes Clipper offroad truck
Arnd replied to Arnd's topic in WIP: Model Trucks: Big Rigs and Heavy Equipment
Hallo guys I have some problems with the steering system of this truck. I did find some pics and technical information on the steering system for Hayes HD and HDX but not for the Clipper. Does anyone of you know if they have the same steering system or if they are different? So long Arnd -
20' EU Container trailer 1:24
Arnd replied to truckmodell's topic in WIP: Model Trucks: Big Rigs and Heavy Equipment
hi David this work is really impressive. all this posibilities are incredibel. so mutch details just grate. are you planing to produce such smal parts like this electric plug as a kit ist self or only in combination with the Trailer kit? so Long Arnd -
Hayes Clipper offroad truck
Arnd replied to Arnd's topic in WIP: Model Trucks: Big Rigs and Heavy Equipment
Hallo all @Gator the pit fenders are as the frame is from the AMT Autocar kit. I just sanded them to make them look a bit different. I did some research for the engine. It looks like that the most used engine, was the Rolls Royce 6 cylinder inline diesel engine. It looks like these engines didn’t have a long life most of them were replaced with Detroits, Cummins and Caterpillars. I think that the choice of a DD 8V-71 would be grate for repowering. By the way does one of you know what type of trailer this one is? I find it while I was searching for pics in the internet. For what type of wood is it build? So long Arnd
-
Dodge Bighorn "Shortnose"
Arnd replied to Mopar - D's topic in WIP: Model Trucks: Big Rigs and Heavy Equipment
nice subject. the littel one looks very special for me. I think that would have been a grate truck if they had produced it. where do you have the cab from? how i the quality? so long Arnd -
Hayes Clipper offroad truck
Arnd replied to Arnd's topic in WIP: Model Trucks: Big Rigs and Heavy Equipment
Hallo all I cast the rear axel from my Mack DM600, I think this one is much more authentically for a truck of this size. I think I will use the bigger Revell tires too. The rims have to be reworked to fit with the axels I use and I have to build some new front tire rims because the Revell Hanomag trailer has only rear tire rims. It will be some work but it will make it special. The truck looks “harder” this way. I think that will not make the whole truck trailer combination look strange when the trailer will have smaller tires then the truck. Here the start with the production for the resin parts I need and the first test with the new rear axel. Everything fits quite well. There is still some reworking needed here and there but it looks already grate. @Sean I don’t think that I will use a V8 for this truck but I am not sure jet. I think a Cummins 6 cylinder fits quite well under the long hood. so long arnd -
Hayes Clipper offroad truck
Arnd replied to Arnd's topic in WIP: Model Trucks: Big Rigs and Heavy Equipment
And the tires I am not sure about the size And the front That is the way I want to go on with this project Still a lot of work to be done but a lot of fun. The rear axel is the next step. I camel back is a bit to high way style, I think the 55.000 lb is a better choice. So long arnd -
Hayes Clipper offroad truck
Arnd replied to Arnd's topic in WIP: Model Trucks: Big Rigs and Heavy Equipment
-
Hallo all That is a project I am working on it for a longer time now and I think it is time to share it with all of you. I was looking thru the internet searching for pics for hours. Hayes trucks are special, not a mass production strictly concentrated on the customer who ordered them. Engine, frame, and axels every brand is possible just like the customer needs it. A Hayes is build for ever no way to rust around with out being used. It is the reproduction of a fun build but very realistic and 100% possible, based on a 1965 Hayes Clipper 100 off road logger. An old logger being put together after an accident with different parts to be used again for moving logging trailer around the loading place. Most parts are from the junk yard box, some are self made resin parts and the cab is from AITM. Frame and fenders from AMT`s Autocar, front axel from Italeri, rear axel MPC`s Mack. Cab, hood and radiator from the AITM Hayes Clipper 200 with some changes. The base is the first generation of the Clipper series with some off road fenders. Here the start
-
hallo Alain grate work on this unit. all the details make it very realistic. the rear tires what Dimension do they have? are made of normal resin or rubber? so long arnd
-
New Brush Truck Started
Arnd replied to Chariots of Fire's topic in WIP: Model Trucks: Big Rigs and Heavy Equipment
hallo charles grate project you have picked up here. Verry interesting. By the way what is the size of the tires you are useing for this truck? so long arnd -
hey pat first off all you are doing an amaizing work on this. all the details make this model very realistic and unique. kepp on that grate work. so long Arnd
-
Hi guys Thanks a lot for all this onformation. All that details help a lot. I will drop the waste gate valve this evening. And driptroit that is not critic all this advices help me a lot to make this modell as real as possible. I do have a question abaout the water tubes for the cabin heater. Where are they mounted on the engine? Thanks for all your help So long Arnd
-
Hallo driptroit I think I have a mistake with that waste gate valve. I was so deep in my work that I did not pay attention absut this. Ihad the turbo from the International I have in the shop and this one looks leike the one I used. I had a look at my reference pictures I have but I am not sure how the turbo presure is gouverned. Perhaps someone knows more and can gives us helping hand about this. So long Arnd
-
White Freightliner daycab
Arnd replied to SpreadAxle's topic in WIP: Model Trucks: Big Rigs and Heavy Equipment
Nice work on that littel one. Are this 20 or 22 inc. rims? So long Arnd -
Hi all I worked a bit on the engine. I did some plumbing and detailing. The turbo is on its place and the exhaust tubing for the turbo is done. The belts for the pulleys are ready, too. Need some paint to look like real ones. The exhaust pipe will be the next challenge but we will see. A Jesse about the exhaust pipes, I am not sure in the moment how it will look like and what type it will be. I thought to use a in frame muffler and to leave the exit under the truck. Let us see what will happen. I made the mirrors ready with some from the spare part box. This type looks much more correct the other which I tried. And some shots from under the hood and inside the cab. Thanks Sam for that info with the transmission. So long Arnd
-
Hi guys I went on with the work on the GMC. I not sure if I need a transmission holder or not? I have in the shop an International school bus, we work on ant it has an Allison automatic transmission with out a transmission holder to the frame. The transmission is just fixed to the engine, and the engine is fixed to the frame. Is this normal? Is this a special think for automatic transmissions? Thanks for your help. So long Arnd
-
And some shots with the cab on the frame That’s all for now folks. There is lot more work to be done and many many little ideas to be turned in to reality. So long Arnd
-
Hallo Guys First of all I want to say THANKS A LOT Jesse for this grate story and all that information. That is exactly that way I like this forum and all you guys so much all this history just grate. As I decided to use a DD 6v92t I started to cast all the parts I need for the engine. The cylinder valve covers were reworked and casted. There are not perfect, I think the proportions do not match but it is like it is. I am not so good in reworking things by just using a photo as an example. And that casting and casting and casting The nest step was the engine assembly. All the parts were cleaned up and glued together. I used the transmission from the alskan hauler, as it is Spicer 5 speed it should be ok for that engine. Perhaps I will rework the rear axel to a two speed unit. The power train was fixed to the frame with some self made brackets. It was a bit tricky to find the right place between the firewall and the radiator. The engine is quite long. But it works. The think that the air compressor and the steering pump will be placed on the back of the engine and the alternator on the right side of the engine. The belt pulleys were reworked and installed to the engine.
-
Reissued Pete 359 California Hauler
Arnd replied to truckabilly's topic in WIP: Model Trucks: Big Rigs and Heavy Equipment
Hei Jarda Grate work on all of your detailing. All this littel things make a modell special unique and give it the real and authentique look. Just impressive all this work. So long Arnd
