fun9c1
-
Posts
165 -
Joined
-
Last visited
Content Type
Profiles
Forums
Events
Gallery
Everything posted by fun9c1
-
Looking forward to seeing this one. I have a couple of those I can't wait to build someday. The '62 Catalina 421SD is one of the first things I will buy after winning powerball.
-
I don't get the house to myself too often, but tonight I was alone for about 3hours so I cranked up the Jerry Reed station on Pandora as loud as it would go (mine goes to 11), cracked open a "couple" Sam Adams and got to work. Got some more done on the roof and this is the first time I ever took a drill to a plastic motor. The PCV hose came out pretty good I think.

-
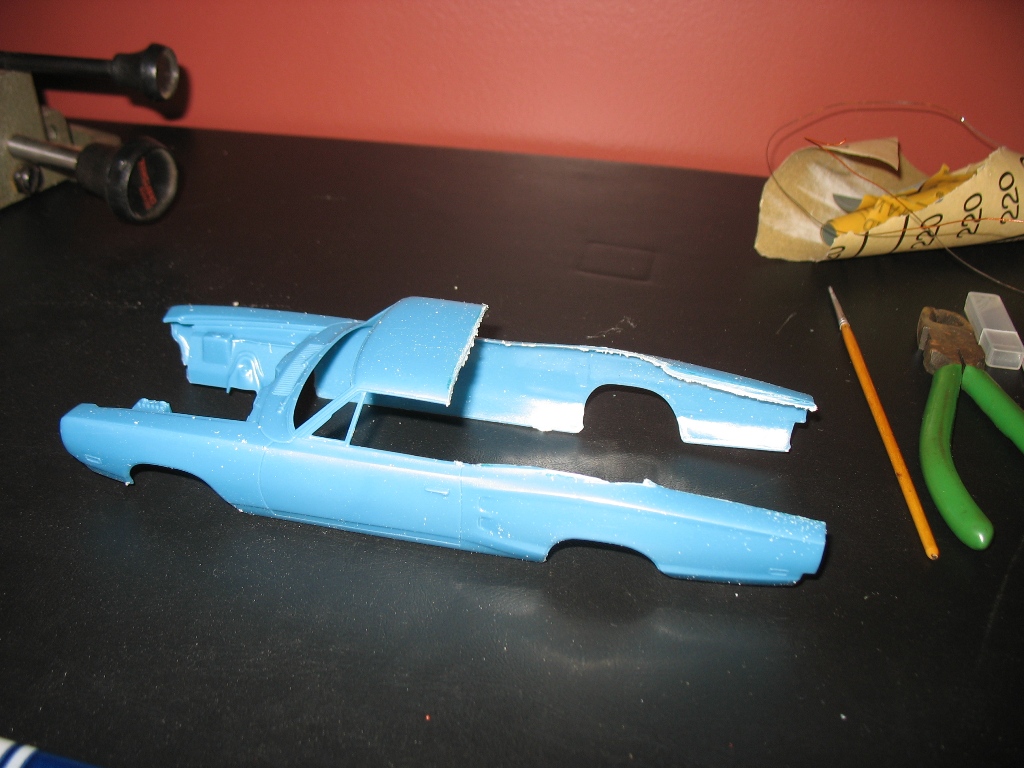
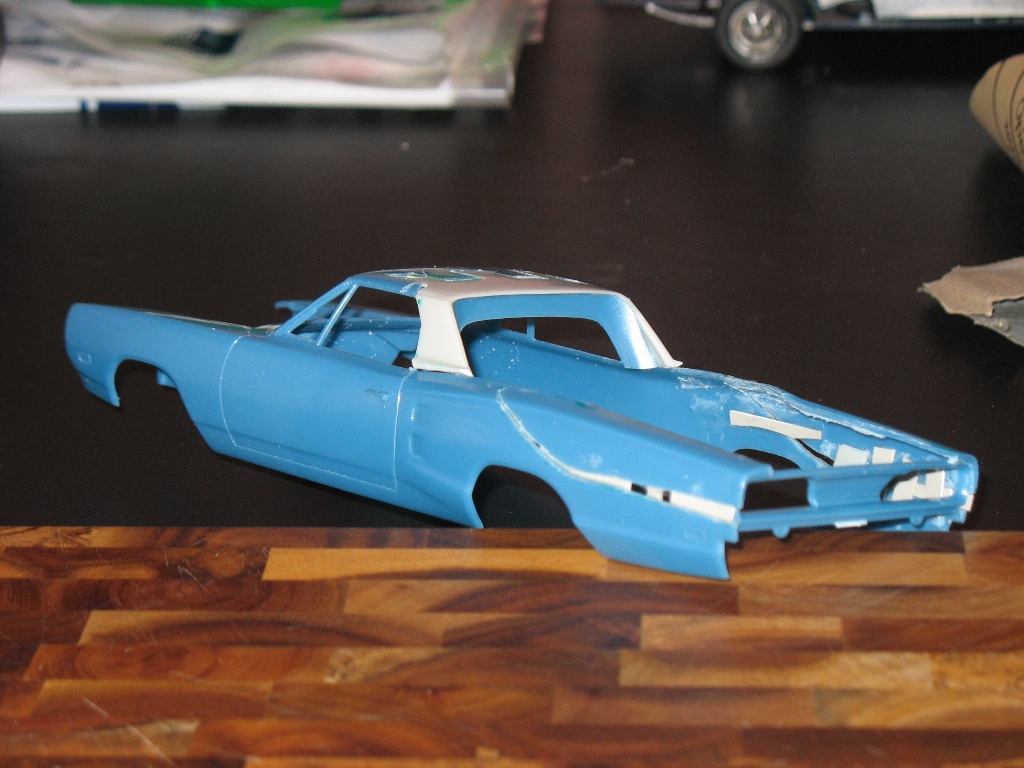
I thought I'd post a couple more pics after taking the tape off and getting ready to glue the back half of the roof on. Still a little work to do before gluing it on, but getting closer. The back, concave part of the roof around where the back window will be is cut from around the back window of this kit, flipped backwards. Still racking my brain on the tailgate. I think I'm going to have to build the tailgate and install last, after the chassis is in the body, otherwise I'll crack the rear 1/4s where I cut and filled. Anyone know of a kit that would have plain steel wheels that are 1:24 of 15" (.625")?
-
10 years old and no rust- HA! No such thing up here in New England! I can't imagine walking through a Dodge dealer's lot among a sea of brand new musclecars. Of course at the time it was probably just normal. My goal with this build is to make it easy to picture this thing sitting on the Dodge dealer's lot in '69.
-
I've heard of a Ute but never knew that's what it was! Cool! Pretty neat that Australia has a whole 'nother world of muscle cars. Looking at them is like hearing a new version of an old song. Thanks!
-
I hear ya! It was very hard to make that first cut- but if it makes you feel better, this kit is not an accurate A12- wrong wheels and wrong # of leafs in the springs. I envy you having had the chance to own an actual A12 before anyone knew it was worth anything. I'd kill to have been born about 20 years earlier....
-
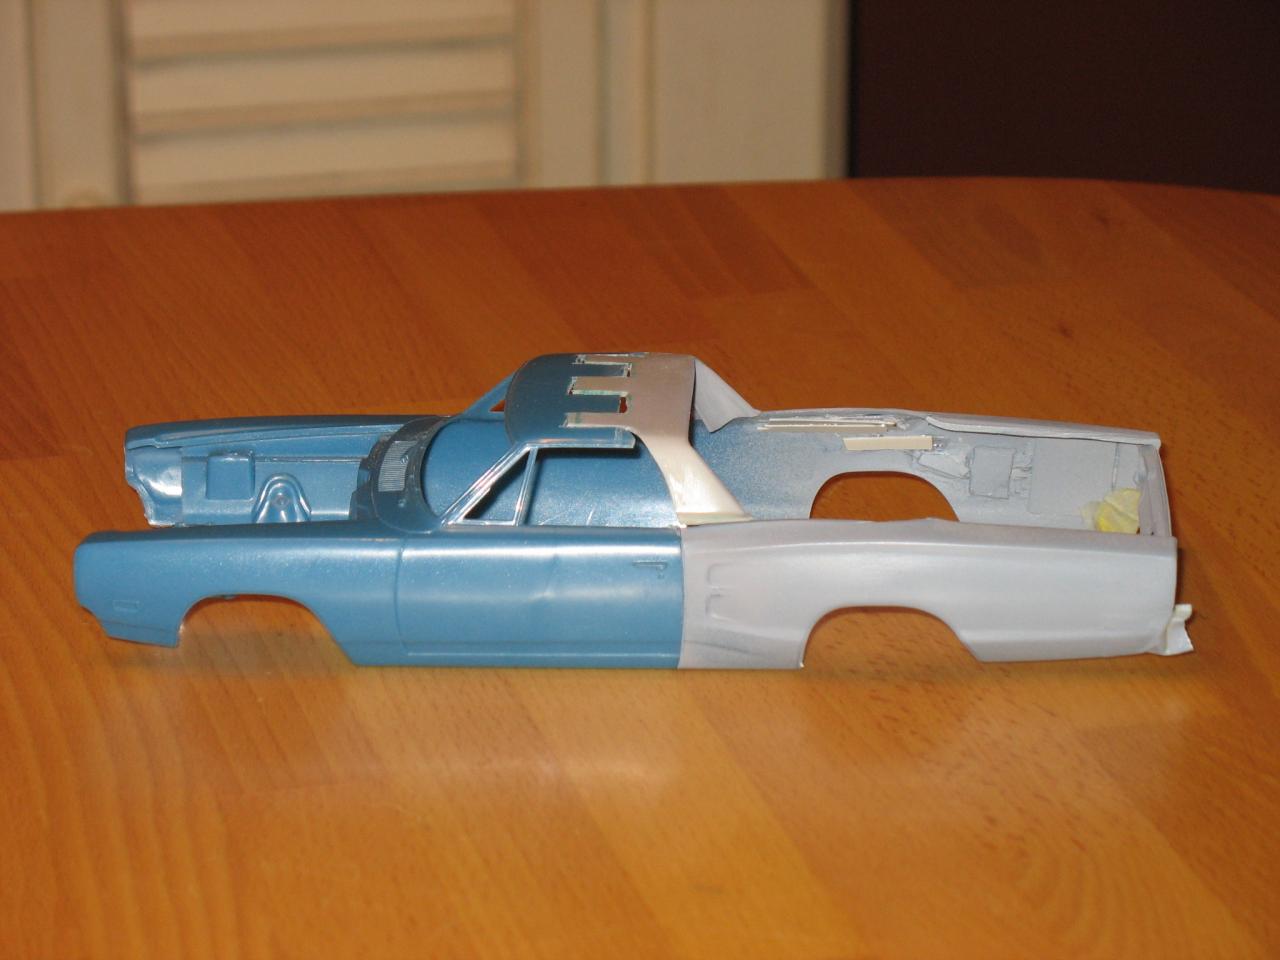
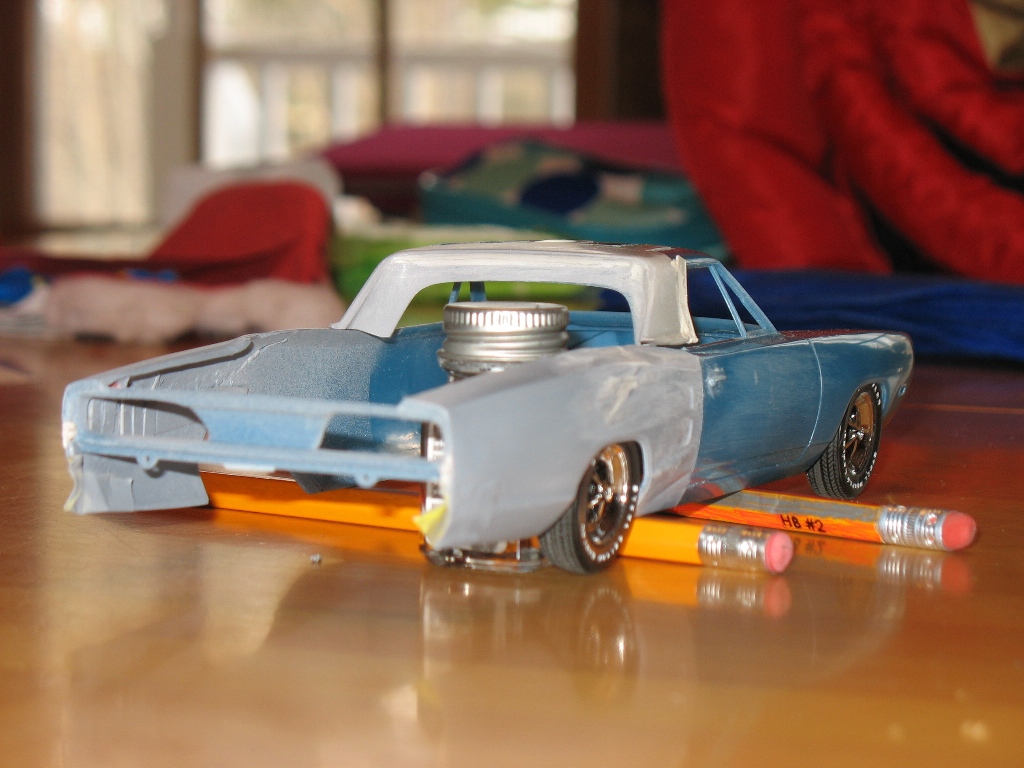
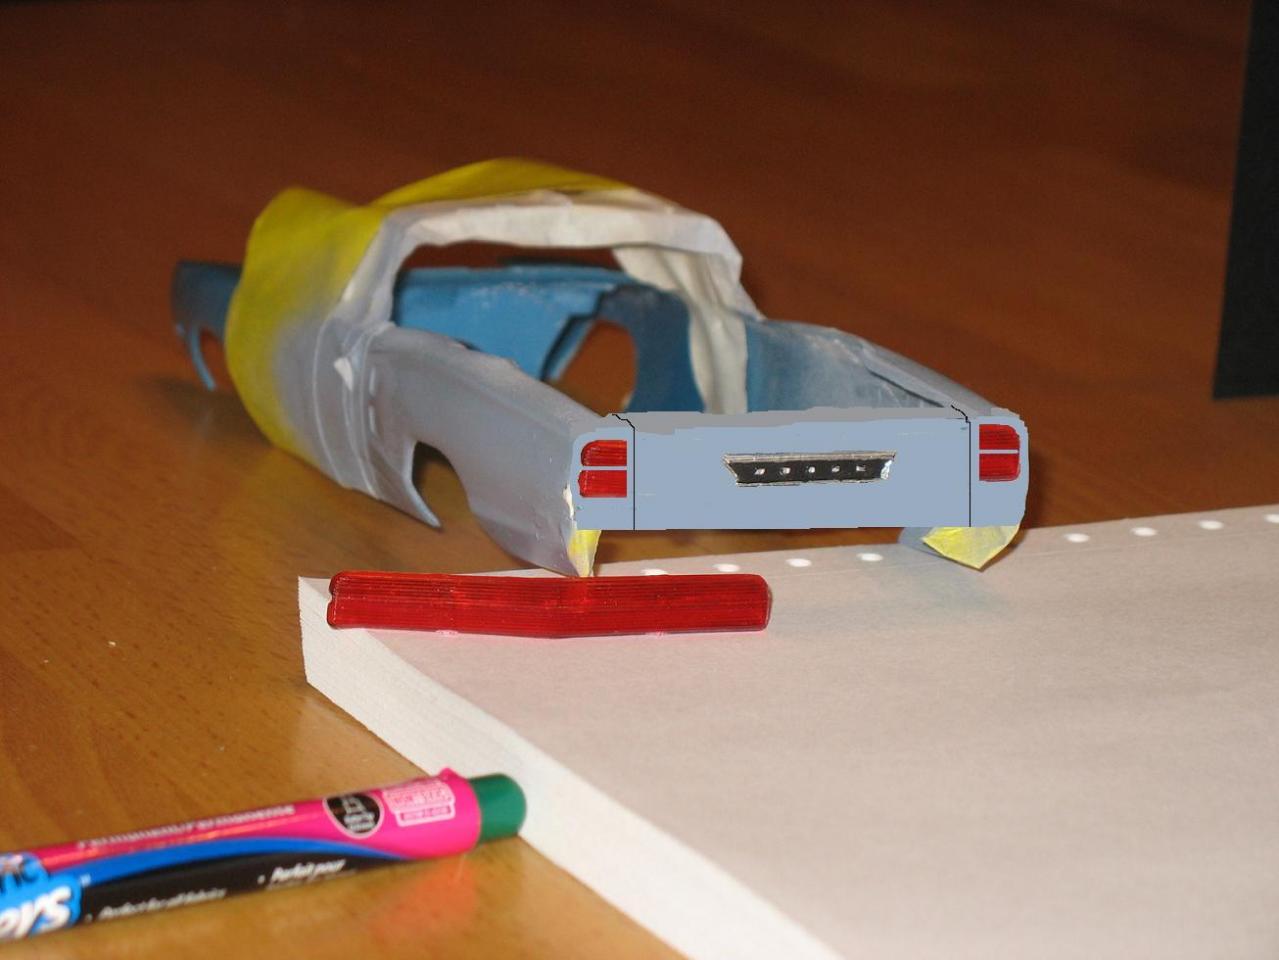
I don’t remember if I was trying to fall asleep or if I was lying there waiting for the alarm to go off, but a couple months ago it came to me while lying in bed- Nothing from Chrysler ever made an “El Camino” version of anything, and I thought a ’69 Super Bee would look perfect with a bed behind it. So I bought this on ebay- And proceeded to cut it up. This is the most aggressive modeling project I’ve taken on, and at first I wasn’t sure if I should post knowing it may be beyond my capability. I’ve chopped some tops and done some lowering, but I’ve never taken on something like this. I decided I will finish it and finish it well, so I’m posting it! I bought a Dodge Deora to use the bed, but the bed won’t fit right, so the only thing I’m taking from it is the back half of the roof and C pillars, with some modification. The rear quarters had a pretty good down slope to them- too much for a normal looking bed, so I cut lengthwise and opened them up to make the top of the bed more horizontal. The back and tailgate is the most challenging part so far and I’m only at the conception stage. Not 100% sure how to do it. It would help if I could draw like Chip Foose but I can’t. I can do some really half-assed Microsoft Paint work, however. Not decided on this, but this is my 1st idea, using tailamps from the Deora and the middle of the tailamp piece (The "Dodge" part) from the Super Bee kit- The following image gives me wood and keeps me going when I get discouraged. I have bare-metal foil from the back of the doors to under the masking tape to keep the door handles from getting built up with paint. However these wheels and tires that came with the kit are not correct for an A12 so I need to find some steelies to paint black and make some redline tires for it. More to come! Full time job and a kid, but chipping away at it a little at a time.
-
Awesome! I think that's my favorite part of the build process, especially with a custom job- when you get to the point where you can put it together just enough to see how it's gonna look. I like what you're doing with it. I like the wheel choice and the tire choice and the color choice.
-
cutting and splicing roofs/panels help needed
fun9c1 replied to fun9c1's topic in Model Building Questions and Answers
Thanks Art! -
cutting and splicing roofs/panels help needed
fun9c1 replied to fun9c1's topic in Model Building Questions and Answers
Thank you all for the very detailed advice. That's alot to chew on! Bill if you woudn't mind, I wouid be very interested to check out the links you mentioned. Art, so you don't use ANY filler? Or do you mean you just fill in as much as posstible with styrene and then fill the cracks? I would think no matter how good a job is done using styrene that SOME filler would need to be used. Also, what does "CA" stand for? -
My current project requires cutting and repositioning body panels. I've chopped a few tops before but never messed with changing body panels. Basically I'm doing three types of joints here- one is I cut a rear 1/4 and I want to separate the two resulting pieces a little and fill the gap with filler. The other type would be one panel to another at an angle, the other is a regular butt joint between two panels. What I've been doing to butt two panels together, I put a "backing plate" behind them, using regular ol' Testors cement but that doesn't always seem to hold too well. I'm thinking there may be a better way to butt two panels together that I just don't know about yet. Any suggestions? I'll try to post a pic tonight of the type of joint I'm working on if that would help. Thanks!
-
You have EXCELLENT taste in cars....
-
Very nice! I'm sure that meant alot to him! I just bought the Lindberg '53 Ford Victoria to do the same thing for my dad. Unfortunately he does not have any pics and I would like this to be a suprise, so I'll have to get info out of him without being suspicious... I love the subtle weathering you did. Looks very real. Two questions: are the wipers seperate pieces? If not, how did you get them to look like they are? Also, How were the gages and speedo done? Are they decals? Or did you make a deal with the devil? Super nice detail work all around. Congrats!
-
Thanks man. Yup, 6° here right now and dropping. With a 15-20 mph wind. It's freakin cold.... At least the ice is gone off most of the roads now.
-
Thank you. I'm not sure what most people do for reverse lights, but I mixed a tiny bit of silver in with flat white. I'd say maybe 15:1 just guessing. Or another way to put it- maybe 1/8tsp or a little more of flat white with a drop or two of silver.
-
I looked at alot of pics before I started! That's some flocking I got like 20 years ago. I couldn't tell you what kind/brand, etc. Same stuff I used for the carpet. All I remember about it is that I got it in a hobby shop. Thanks for all the compliments!
-
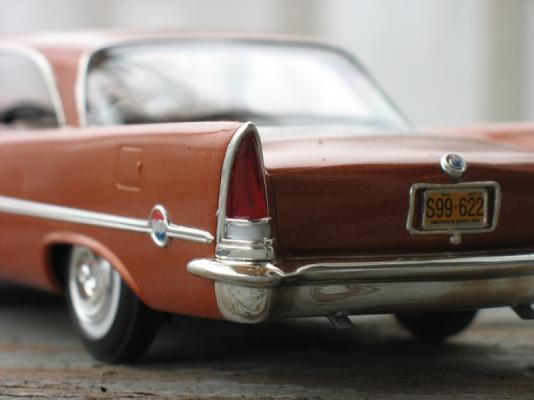
Has anyone compared the two AMT '57 Chrysler 300C kits?
fun9c1 replied to JollySipper's topic in Car Kit News & Reviews
Overall I thought this was a good quality kit, but there were (like most kits) a couple issues I had: the interior door panels and the back seat were way too high such that the back dash stuck out the back window and you saw close to 1/8" of the inside door panels from outside. I shaved that off from the bottom of the panels, bottom of the back seat and I needed to open up some clearance between the driveshaft hump and the bottom of the back seat and shaved material off both of those areas. The license plate decal was too big for the plate, but you can trim enough off to make it fit and still look good which is what I did. The back window is not a great fit. I ended up with a very small gap between the roof and the top of the window on the pass side. The frame was warped the long way such that with the car upside down, pushing on the front and back of the frame would rock it back and forth. Pushing down on one end would make the other end about 1/4" off the body. I glued the front, let that dry, then glued the middle and back "clamping" as shown. The tailight lenses were a little too big for the bezels. I shaved the front (the "glue" side) a little bit, keeping the same profile, to make them fit right. The rear bumper was on the tree on the top of the bumper instead of the bottom. Luckily there is a lip that runs the length of the top of the bumper, so I foiled that lip to cover the bare spots left from breaking it off the tree after sanding it smooth. Same deal with both mirrors. I had to sand the faces smooth and foil them. The hubcaps were very loose in the tires and have to be positioned. It would have been nice if they snapped in or at least fit snug. The wheels were very loose on the spindles and will all have a wicked camber if you don't do something about it. I put a few coats of paint on the spindles to make them fit snug and straight. I think that's about all the "bad" stuff. Overall though most things fit together very nicely and I'm happy with it! Actually other than what I mentioned, I was amazed at how well everything fit together, and the detail was excellent.
-
Well since everything is a sheet of ice here, I did not go to work today and was able to take some better pics.
-
Thank you guys for the advice. We'll give that a shot.
-
Man, I wish Ben Franklins and Micheals had 1/100th of what some of you guys have! I'll post a pic of my meager collection. I also just bought a Moebius '55 Chrysler 300M and a Johan '62 300M that haven't arrived yet. The '62 is open with a couple missing pieces. I got it on ebay- probably from one of you guys! If these things were $10 instead of $20 - $30 each I'd have a hell of alot more. Prices are ridiculous now so I have to REALLY want one to buy it these days. Somebody asked why so many. For me and my "teeny tiny" collection, it's a matter of having plenty of choices when it's time to build another one without having to go out and find one, because it depends on what mood I'm in when it's time to start one. Plus I enjoy looking at all hte boxes almost as much as the finished ones. the ones on the upper shelf are all 100% complete and not started. Most are still wrapped. The ones on the lower shelf are either done or have parts cars or parts, not necessarily what's on the cover. In the Dexter shoe box is a 1/16 T-bird in need of restoration.
-
Thanks for the compliments. I never thought about it before, but now that you mention it, that's very true on the skirts. No skirts it is!
-
She's done! I've attached the best pix I can get at the moment. I'll need to go out into the daylight to get good pics which ain't gonna happen now until Saturday unfortunately. I'm no photographer... I'll start another thread with my experience and helpful hints within the next few days. I'm pretty psyched about how this turned out. Probably my personal best. I'll post better pics next weekend. Cameras really show the dust, don't they......
-
My daughter (11 yrs old in a week) is working on the Revell '69 COPO Nova (her second model) and is trying to put green paint in the recesses of the seats (which she painted black) to match the exterior. What are our options on ways to do this? She's tried a steady hand with a toothpick and filling it and wiping off the excess. Neither is working that great. Appreciate any help. Thanks.
-
Glad you put your WIP link there. Somehow I had not seen that before. Awesome work. I assume WIP is "work in progress". What is the difference between a thread link and a WIP link? On my email notifications I get a link to the thread, and a WIP link.
-
GORGEOUS color combo- love the green w/ the white top. You could not do any better than those Pegasus wheels IMO. Awesome job! Being new here, I have to say- you guys are an inspiration! Some of the craftsmanship here is unreal. I've seen those wheels before and wondered where they came from. I love those things. Do the tires come with them or do you buy those seperately?