
fun9c1
-
Posts
165 -
Joined
-
Last visited
Content Type
Profiles
Forums
Events
Gallery
Everything posted by fun9c1
-
'32 ford 5-window coupe , top chopped rebuild
fun9c1 replied to crazyrichard's topic in WIP: Model Cars
I love it! Can't wait to see the rest. What method did you use for the rusty surface? -
Very nice! I am not even into VWs or Nissans but I love this one! I like to see customizing in progress and I love cars that "lay frame". Looking good!
-
Thanks Tom, yeah I'm going for the "left outside in Arizona" look. My 1:1 cars are rust belt cars just as you described complete with rust through the floor! I have to take pics outside sometime soon. There is a little more blue on the car than shows in these pics, I guess because of the flash.
-
I finally got what I think is just enough done to post another.........post. I scratchbuilt the carbs since none came with the kit. Nothing fancy just something. Did some weathering on the firewall, glued that on and did a little weathering to the whatever you call that part on the same plane as the radiator. What i really like is how the hood insulation came out. It's some black felt with alot of drybrushing. And thanks to Steve Millberry for the headlights!!!! They will get detailed in the near future... Still trying to decide what wheels to use. I'm still thinkg old-school slotted mags for the '80s look but not 100% decided... Thanks for looking!
-
Gorgeous. Nice work!
-
Man as much as I loved looking at this with a nice coat of paint.... I grabbed myself by the nuts and stuck with the plan (sort of). I may nix the black primer idea. I shot some red primer (rust) over the top of it (left the sides pretty much alone as nature would do) and I'm lovin the look. After the primer was dry I hit it with one of those 3M "SandBlaster" 180 grit things (like a thin sponge but sandpaper) to bring back some of the "original" paint, and it's just the look I was looking for. In the beginning I messed up the roof and hood a little, but the beauty of this type of look is I can shoot a little more primer on it and try again. Now I'm thinking this body is almost done because I love this look. I may tinker with it a little more, though. I'm also liking these torquethruster type wheels. I stole these wheels from a 1/24 Monogram Talledaga I built 20 years ago and don't have much interest in (except as a junker- it looks pretty cool with no wheels and a ton of dust on it). I've also done some weathering on the chassis, firewall, and exhaust. She ain't done yet but my work is closed tomorrow due to the nor'easter here and some more will get done tomorrow. It's 2am and I want to keep working on it. Do I have a mental problem? Oh yeah, by "body almost done", I mean the paint part. It will be BMF'd and emblems painted and weathered also. More tomorrow!
-
Just laid down the original factory Sapphire Blue Poly that in about 15 years (later tonight or tomorrow in our world) some high school kid is going to not like and is going to cover up with black primer from rattle cans. Then a few years after that, his primer will be wearing off and some of the original paint and some rust wil be showing... At least that's what I've been planning. I do really like this color, though. It's gonna be hard to mess it up! But I'm gonna try to stick to the plan.... Keeping it a safe distance from the woodstove.
-
Very nice! I love the story to go with it!
-
Did this one probably about 20+ years ago. I just got an urge to post some of my older builds and picked this one first. I hadn't discovered BMF yet. I think this may have been my first chop job. Pretty sure I lowered the front a little, too. I have no idea what happened to the back bumper... Not the most incredible work in the world but something new to look at.
-
Thanks guys. That interior is not mine, though. I wish it was! I haven't really started my interior yet. I did start it but it looks like *** so I'm going to strip it and start over. Wish I still had all that old brake fluid... I'm having fun trying to make this look old and worn. Thanks Steve, for the push to do the engine and not make it a curbside model!
-
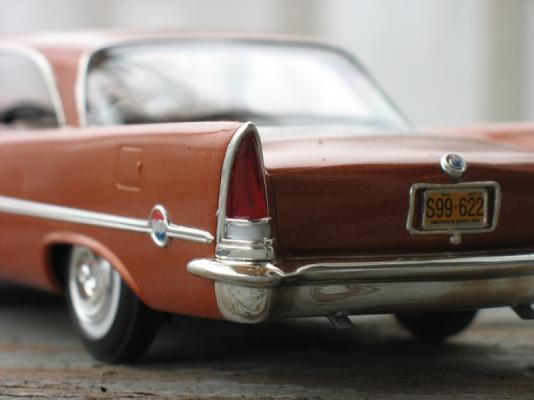
So I figured I can't do the usual testors silver for the exhaust manifolds on a daily beater. This is my first time ever attempting other than just painting them silver and I couldn't be happier with the way they turned out. What I did was make a paste out of salt and water, and after trying different methods to get it on there, ended up just taking a pinch and dabbing some on with my fingers. Then once dry, painted them good ol' Rustoleum brown primer. When that was dry, I drybrushed a little testors flat tan on it, then when that was dry, drybrushed just a little Artist's Loft "lamp black" oil paint. Hopefully tonight or tomorrow I'll have some pics of the body of a well used 15-20 year old '62 Chrysler. I've washed it in preparation for paint and have it sitting by the woodstove to dry off thoroughly before painting.
-
Per Steve's suggestion, I added a little more turquoise to the motor, and did it by a method I've never tried before which is drybrushing. I also tried adding a little grime by drybrushing also. And tried adding a little "chipped paint" to the breathers by dabbing a little silver and patting it with a paper towel then a little drybrush with black. This is fun trying to make it look a little used!
-
Just PM'd you. Thank you!
-
Looks awesome so far! I built that AMT kit about a year ago. It's the one in my avatar actually! Only two issues I had was the frame was not straight (convex lengthwise in relation to the car) so I had to work that, and I had to cut quite a bit off the bottom of the interior side panels to get the tops of them even with the tops of the doors. Other than that I thought it was a nice kit. I'll be curious to see if you have the same two issues I had. Nice detail, I can't wait to see more!
-
Paint Strippers - What to Use?
fun9c1 replied to pbj59's topic in Model Building Questions and Answers
Figures, I had over a gallon of used brake fluid sitting in my garage for a year or more. I just took it to the dump a couple weeks ago and now I discover this and I want it back! lol -
OK, I got enough done tonight to post an update. J My plan for this one is to make it a high-mileage '80s period correct low-income owner slightly suped up (as funds would allow, meaning a little jacked up in the back with mags) daily driver. I had no light blue on hand, so I mixed blue and white in an effort to achieve the Dodge light blue engine color. Came out a little dark but I’m banking on not being caught by the 1/25 engine color police. The two air cleaners were cast as one piece- I cut them in two for more realism. The front bumper and grill was cast as one piece but did not fit well as such, so I cut those little bastards in two as well for a better fit. I painted the radiator, after scratching up the "fins", with a combination of flat black, silver, gold, and patted/rubbed with a paper towel trying to achieve some high mileage realism. I think it worked pretty well. J And… for the first time ever… I made my own wipers from scratch. I plan to locate them up a little ways up on the windshield and get rid of the molded in ones. And make one side a little higher than the other for more high-mileage realism. With a minimal amount of glue in one corner, I glued the axle locator blocks in place, thinking temporarily, to get an idea for what the stance would be. I think I may make my own blocks to slightly lower the front and slightly raise the rear. I plan on buying some old school mags for it. I’m thinking “slotted mags” and adding a little rust to them. Comments and suggestions welcome!
-
It doesn't get much better than that. If I didn't know any better I'd think that was a real motor. I would love to know how you did the grime. I'd like to do the same thing to my current project (Johan 62 Chrysler 300). Nice work!
-
Thanks for the offer! I'll PM you. Those wheels are absolutely gorgeous!! They REALLY work on that 300. Do you have a link or a name so I can get some? Probably not for this project (not ratty enough!) but I MUST use those on something! Of course you do that to me right after I say I don't like big wheels on old cars... But they have an old school look. I love 'em!
-
Wow, when I first saw your yellow one I thought you'd done a little weathering, but it came like that? I bet there were some disappointed kids that didn't have paint on hand if they got one of those babies! lol I kinda like that turquoise color..... Hey is that a '73 Impala in the background? I had a 1:1 '73 4-door in excellent shape that I bought off my 80 year old study hall teacher in '88 for $100! Tailights look the same. OK, I'm off to get busy on that 300. This will be the first model I've ever done that I did not try to make look like a show car. This is going to be fun!
-
Ahhh, that makes sense now on the pins, thanks Steven. Well now that I know it's not an "original", I won't feel bad modifying the body if I decide to go that route. The chrome on the bumpers is worn through in spots and is red underneath, so must be I have parts from two or more '80s kits. The hubcaps I have, I noticed after looking at your shot of your bezels/hubcaps, are not correct, either. I was going to use different wheels anyway, and I have no shortage of big wheels from all the recent 2n1 kits I've bought. I can appreciate the pro-touring look but I'm not a fan of big wheels on old cars. As I'm typing this, I'm thinking since the bumpers are already ratty-looking and it's missing parts and not an original anyway, I'm going for the day 2/rat rod look, and build the motor as well. Thanks for the feedback!
-
Wow, that is a pretty sweet looking engine bay! That is a pretty convincing argument to build the motor. Thanks for the feedback! Mine seems to have two full length axles, as well as four short ones, but the instructions don't mention the short ones. Is that common with these old ones? This is the first one I've ever built that was made prior to the mid seventies.
-
So I was going to make myself finish the "SuperBee ElCamino" before I started another one, but I'm itchin to have another one to work on as I'm sure most of you can understand! This not-quite-complete kit that I bought on ebay a few months ago was calling my name- I'm thinking Rat-Rod curbside model since it's missing all mirrors, headlight bezels + headlights, and although the detail is nice on the outside of the body, inside the engine bay and the engine itself, and chassis is not realistic. The engine has a big cutout for an axle to go through, there are cylinders for screws to go into that would not be there on the real thing, etc. I'd like to look more into that salt water trick and try some of that on this. I'm thinking some surface rust, some primer, some "faded original" paint, some cragers (maybe a little rusty), jacked up a little in the back.... I might try my hand at removing trim and adding the holes that would be left, although I'm a little reluctant to do permanent damage to the body. What are your views on that? Don't wreck it or don't worry about it? Thoughts on curbside? Any good pics or vids of a 1:1 '62 that looks ratty?
-
That thing is gorgeous. Nice work, nice colors, nice stance. I have this kit although I haven't opened it yet. I plan to build it with the same "personality" as yours although I might do a little more of a "taildragger" stance. I can't wait to see this with the wheels on it! I love it.
-
Thanks Tim, those look great! And I thought I was the first one to think of it! I don't have that issue so I tried on line but no luck. Is there a way? So it is decided- the tailights from the '68 Dart will work perfect! After cutting the lights off the bumper just to give a basic idea what it will look like: Now since I've expanded the height of the quarter panels, I need to drop the locating holes for the bumper, so a filler piece is made. These two pieces will be laminated together. The notched piece goes directly under the current tabs and the other piece will be used as a backing to "sister" the notched piece to the supplied one. Now I need to drill holes in the bottom of this piece for the bumper to locate on.
-
uploading pics from my PC- is there a cumulative limit?
fun9c1 replied to fun9c1's topic in The Off-Topic Lounge
got it! You're right, that IS pretty easy, even for a technological numbskull like me!