LeadFred
-
Posts
99 -
Joined
-
Last visited
Content Type
Profiles
Forums
Events
Gallery
Everything posted by LeadFred
-
Datsun 510 Pro/Stock "SWEET PAIN" COMPLETED BUILD
LeadFred replied to LeadFred's topic in WIP: Drag Racing Models
Some more pictures when the body is on the chassi. One thing about this body is that it was not symmetric , and I discovered it too late, so I pulled out the stripes from the roof position , so they came not in the middle of the rear panel , so that's why it is a compromise of the stripes on the rearpanel.. But fortunately, there will be more details that will focus later in the build, so this will probably be pretty good in the end. You can see that the right stripe is a little bit thinner than the left side Some test fits on the chassi. Ok guys, this is it,for the moment, strange that i have to do 3 updates to get all photos upploaded that i want do show you, Comments are welcome, Fred.
-
Datsun 510 Pro/Stock "SWEET PAIN" COMPLETED BUILD
LeadFred replied to LeadFred's topic in WIP: Drag Racing Models
Here you see the uncut body that i use for the impression. Now,i can polish the fragile body,without worry to broke anything. I do not want to sand to deep on the first layer of gloss as you see, Here you see the third layer if gloss and it is sanded down to a smooth flat finish, Here is the final layer (4) of gloss, a little bit moore polish,just little,and the finish is ok.
-
Datsun 510 Pro/Stock "SWEET PAIN" COMPLETED BUILD
LeadFred replied to LeadFred's topic in WIP: Drag Racing Models
Hi guys, Thanks you for comments,Leonard,John and Edgar. No one has a proposal in which class this car can fit into ? , Anyway, we'll go ahead with some new pictures of the painting and assembly of the bodywork. The first picture shows the primed body,tamiya white fine surface primer is used. The taillights lenses are masked off so i still have them clear. Here is the body painted and also decaled and the red stripe with the thin white line over the hole body is painted. it is also one layer of clear over the body, only for decals should stay in good condition. As you can see , the surface is a little rough so far, but after a little sanding between clearcote layers as you build up a nice and smooth varnish that ultimately did not need much polishing , because the paint is already very smooth . I have done a impression from a uncut body and making a support/stand for the body,that i will polish now. This is a must,because the body is so fragile when it is cut open like this,and when you do the polish and want to rub up the shine you have to rub a little harder and the body would just get broken if it does not have the support.
-
Datsun 510 Pro/Stock "SWEET PAIN" COMPLETED BUILD
LeadFred replied to LeadFred's topic in WIP: Drag Racing Models
Scott,Niko, Thank you,for watching this. I am glad that you like it. Regarding Datsun and Pro Stock class, so yes, I know they did not drive Datsun in Pro Stock, I buried myself a little bit in the Pro Stock rules before I started building this Datsun and then realized that the engine manufacturers must be the same as the body manufacturers. I see that they called the Pro Stock class for ”Factory Hot Rods” ,,thats cool. Then I checked the Sox and Martin's Colt that has a Chrysler Hemi, (I think) and ... it's a Imported car from Japan.To me that is not a Chrysler.But Rules are rules.. And because I like the 70's Pro Stock cars very much and I would rather build my concept of Revell Datsun 510 and, Datsun engine in Drag racing is not possible for me. So the choice fell on Ford small block, partly because I would get the room with a V8. And Ford is sacred to me. My sense of this build is to equip this small car with so much drag racing dimensions as possible without making it look unreal out. So really I do not know exact what class a car like this would compete, the only thing I know is that I build it inspired by the 70's P / S cars. A "Drag car" might be more accurate in the title of the topic, but it will also become a fictitious car, so "what if" …, if the rules had been different? So if you guys have any suggests of what class this car can compete in,tell me and i will change the Topic Title.. If this little wild thing can fit in,in a correct class it would be better. Comments are welcome.. Fred -
Datsun 510 Pro/Stock "SWEET PAIN" COMPLETED BUILD
LeadFred replied to LeadFred's topic in WIP: Drag Racing Models
Paul,Rob, thanks for your support. I have finished building interior nitro assembly and even mounted some electronic boxes on plates mounted inside the interior. Even a fire extinguisher that is made of aluminum painted red with a decal and some photo etch detail. Finally, the devices were also wired. OK , this is the interior, the steeringwheel assembly will be at a later time,because the doors are opened so i can mount it later. So the next move on this build is to paint and mount the body on this chassi/interior. I have already begin with the body,but i will polish the clear coated body and do some more tests and sorted out some photos. So you have to hold on with these interior photos for now. Hope you like it so far.... Happy modeling , Fred
-
Datsun 510 Pro/Stock "SWEET PAIN" COMPLETED BUILD
LeadFred replied to LeadFred's topic in WIP: Drag Racing Models
John,Dave, thanks for your kind words. I have some pictures of the Nitro bottle. First you see when i have mocked-up the bottle with the mounting hardware and the aluminum plate that i will mount in the cage, it is only mocked-up with adeshive clay just to secure that is going to fit. second picture shows the Nitrobottle painted in clear blue, and i have also made two pumps on my lathe that i will connect the fuel system and the nitro bottle with. I will after this put on some decals on the bottle and the pumps and the install and glue it in place,and detail it alittle bit more. to be countinued. Fred
-
66 Chevy ll outlaw style..(update 12/23/16)..
LeadFred replied to tyrone's topic in WIP: Drag Racing Models
So Nice, I really like it, -
Datsun 510 Pro/Stock "SWEET PAIN" COMPLETED BUILD
LeadFred replied to LeadFred's topic in WIP: Drag Racing Models
Dan,Thank you, glad you like the Datsun project. Anyhow, I have a good picture of the headers after the assembly that I forgot to show the last. Ok , back to the interior construction. Building belts can be difficult to get to a natural "hang". . They may not see to stiff out, then it takes away the realistic feeling,i think. Seat belt hardware comes from the Model Car Garage .... I think ??? I'm not sure. And the belt is made of Tamiay masking tape . The belts are brush -painted with Humbrol paint. Here are the belts mounted in their brackets and the seat from the Firebird kit that i have made holes in order to pull through the belts . I have also detailed the mounts for the seat with some boltheads and washers. The padding in the seat are the original pattern from the Firebird kit and i have brushpainted it. Next update will be about the nitro bottle and some electronic boxes. Opinions and comments are welcome. Opinions and comments are welcome. Opinions and comments are welcome.
-
Datsun 510 Pro/Stock "SWEET PAIN" COMPLETED BUILD
LeadFred replied to LeadFred's topic in WIP: Drag Racing Models
Tim, Paul,Dave ,Chuck,Carl, Thank you so much for your kind words . The biggest challenge of this build is , that i want to put in so much components and details in this small car, and it is very tricky to get the right proportions. but soon the interior are complete, and that makes a lot in the hole process, Fred -
Datsun 510 Pro/Stock "SWEET PAIN" COMPLETED BUILD
LeadFred replied to LeadFred's topic in WIP: Drag Racing Models
Henry,Scott,Kerry,Michel, Thank you for your appreciation, I appreciate myself many posts on the forum that gives me a lot of inspiration to get on with my projects. So it just feels good if I can give something back. This building is a bit different from the traditional model-car building, The body is in many parts. Therefore, the interior construction has to be completed and the body is fixed to the chassis, and then you can build with doors and front. why?.... to get the doors to sit well, you need the body to sit in their firm position and then fit in the doors. The body is very fragile and it is so small margins that make sure it is in different positions every time I'm testing on the chassis. Therefore, it is better to readjust the doors if needed. so now the focus of the interior,thereafter painting the body, and then mount it. the dashboard, I have used a flat plastic card piece that is painted black. I detail it with knobs and rivets from Model factory Hiro and gauges from Model Car Garage. it is only the upper dash that is from the kit. pedals is from futurattraction, (thanks Scott for your wonderful details), and also a floor plate is attached to the floor. Skratch built mounts for the seat in aluminum. The seat comes from Revell Pro Stock Firebird. The steering column are made of aluminum tubes. The knobs on the shifters are Epoxy glue spots,and painted black. I have polished a little on some eyecatching areas and some of the tubeframe. Next uppdate will be about the electronic boxes and the nitro bottle and seatbelts. Until next time, have a good time and enjoy model building. Fred.
-
Datsun 510 Pro/Stock "SWEET PAIN" COMPLETED BUILD
LeadFred replied to LeadFred's topic in WIP: Drag Racing Models
The lenco shifters are mounted. But not the strut to the reverse gear. This is the engine mounted , Here you can see some scratch built pulleys made on my lathe and the belt are made of Tamiya masking tape and painted black. You can also see the headers are installed. Fred
-
Datsun 510 Pro/Stock "SWEET PAIN" COMPLETED BUILD
LeadFred replied to LeadFred's topic in WIP: Drag Racing Models
Ok now I think I've found the images with the details of some interior construction and some chassis parts that have been installed. This is the power plant with lenco transmission,it is painted and i will install the engine in the chassie before i start to detail it. I find it easier to detail the engine when it is fixed in the frame just that the paint lightly rubbed off from the corner when you have to hold it in your fingers all the time. Here you can see the rear end mounted on the chassis, wheel tub are not particularly attractive from below but it will not be seen then when the rear tires are mounted. I have also mount rod ends in the tabs that will hold the front wheels.Also a rack and pinion steering are mounted,its made of a aluminum tube with the ends from the Revell 1/24 Pro stock Firebird kit They have been alclad before mounted. And Here we have the headers been alclad. ready to be istalled. here we have the lenco shifter kit,that where I have put brass tubes into the holes in the tunnel and then a stainless steel tube with a sawed groove in it....sitting in the brass tube. There I then attached the photo-etched detail of the struts that will go up to the levers. The sides of the brass tube are painted black, and only the top are brass.
-
Datsun 510 Pro/Stock "SWEET PAIN" COMPLETED BUILD
LeadFred replied to LeadFred's topic in WIP: Drag Racing Models
Thanks Paul, I see that the last picture had a little more details applied to the chassie, i can see the Lenco shifters and a bit of the steering. I Will be updating more of these details and how i did it and what type of aftermarket or scratch build items i have used. Hope that you guy's can find som inspiration to your builds. Fred -
Datsun 510 Pro/Stock "SWEET PAIN" COMPLETED BUILD
LeadFred replied to LeadFred's topic in WIP: Drag Racing Models
More Pictures, The color of the car will be blue with two red stripes and i want to use the same colors on the firewall/floor and also the red color on the tube front/ rollcage. This is just painted and also a layer of clear.. I have also put on decal on the rear wheeltubs and the tunnel at the floor with some carbon fiber decals Here is my scratch built headers. they are made of evergreen plastic rod, Here they are painted gloss black before i will do the alclad effect. To say about that, is that it was very tricky to get these headers to fit in this small car. and also get the right feeling of proportions when they are mounted on the engine, The space i have in the front of this little car is very limited. and when i check the chassie with the engine in place and with a front tire in the jig i´ll think the headers will fit properly. Fred
-
Datsun 510 Pro/Stock "SWEET PAIN" COMPLETED BUILD
LeadFred replied to LeadFred's topic in WIP: Drag Racing Models
OK, This is the first pictures of the painted rearend with components.
-
Datsun 510 Pro/Stock "SWEET PAIN" COMPLETED BUILD
LeadFred replied to LeadFred's topic in WIP: Drag Racing Models
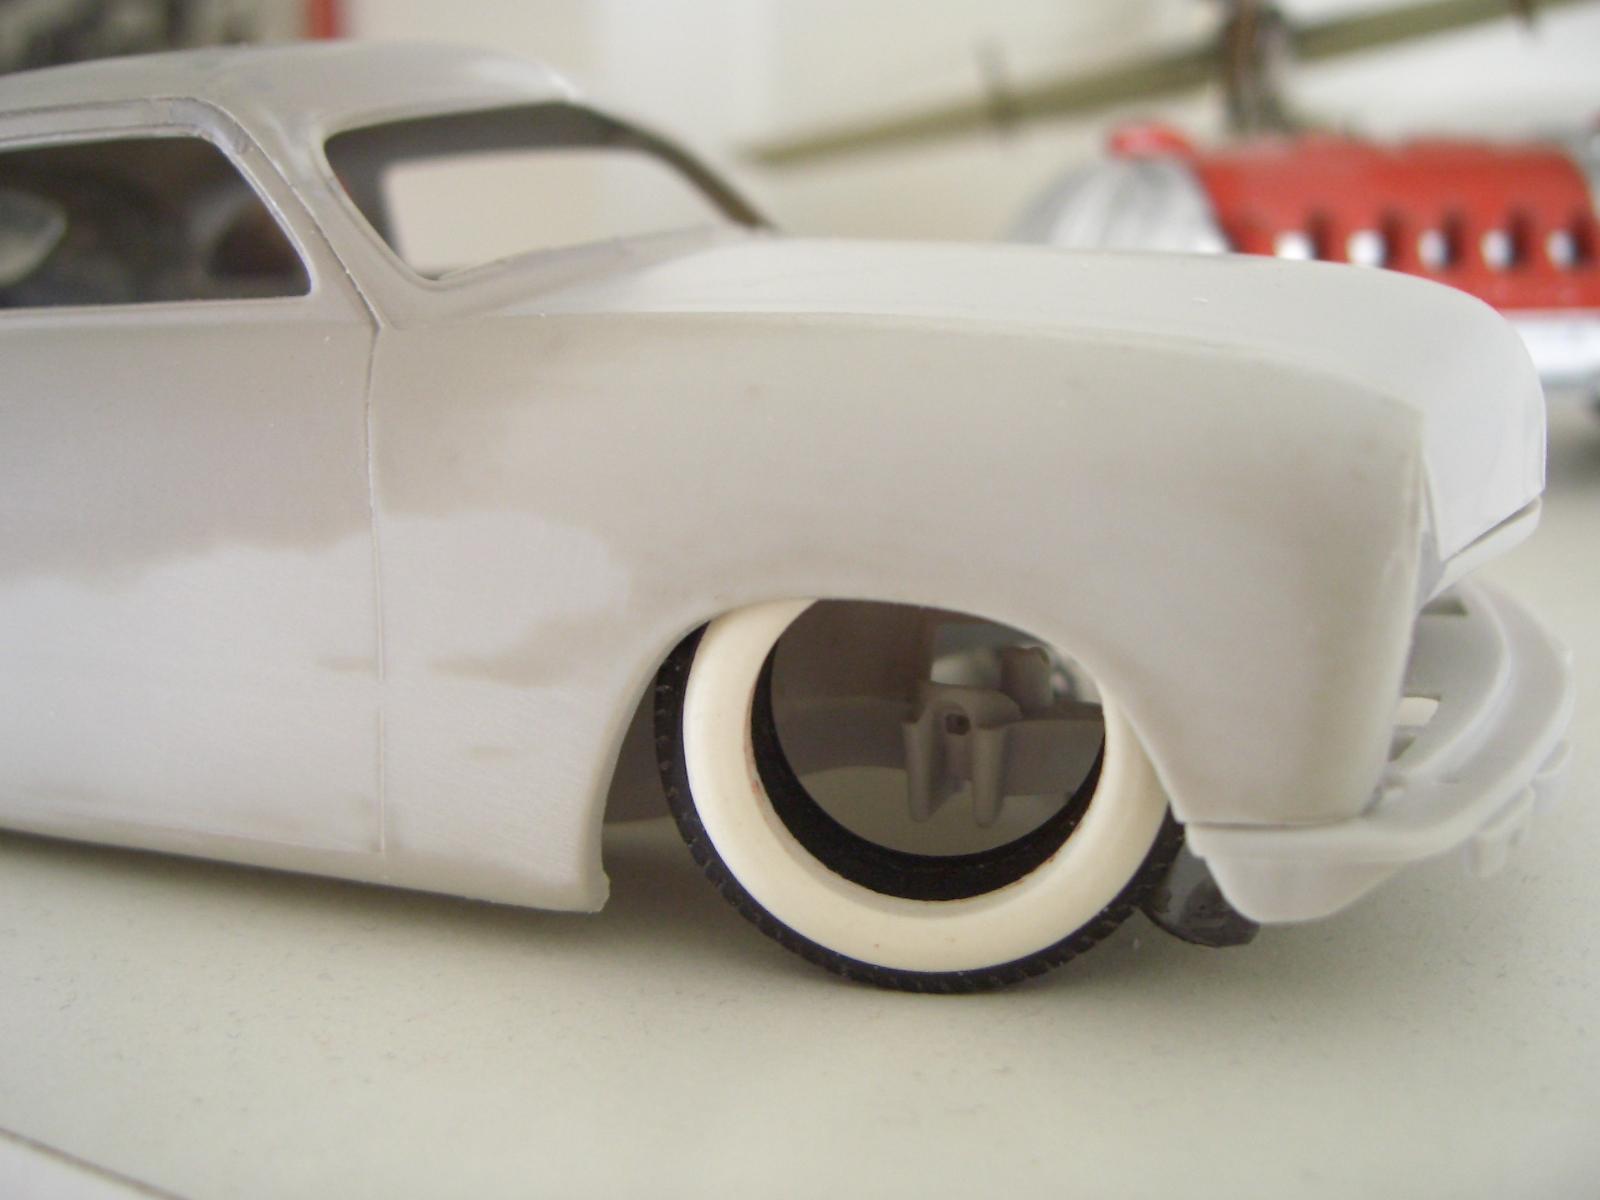
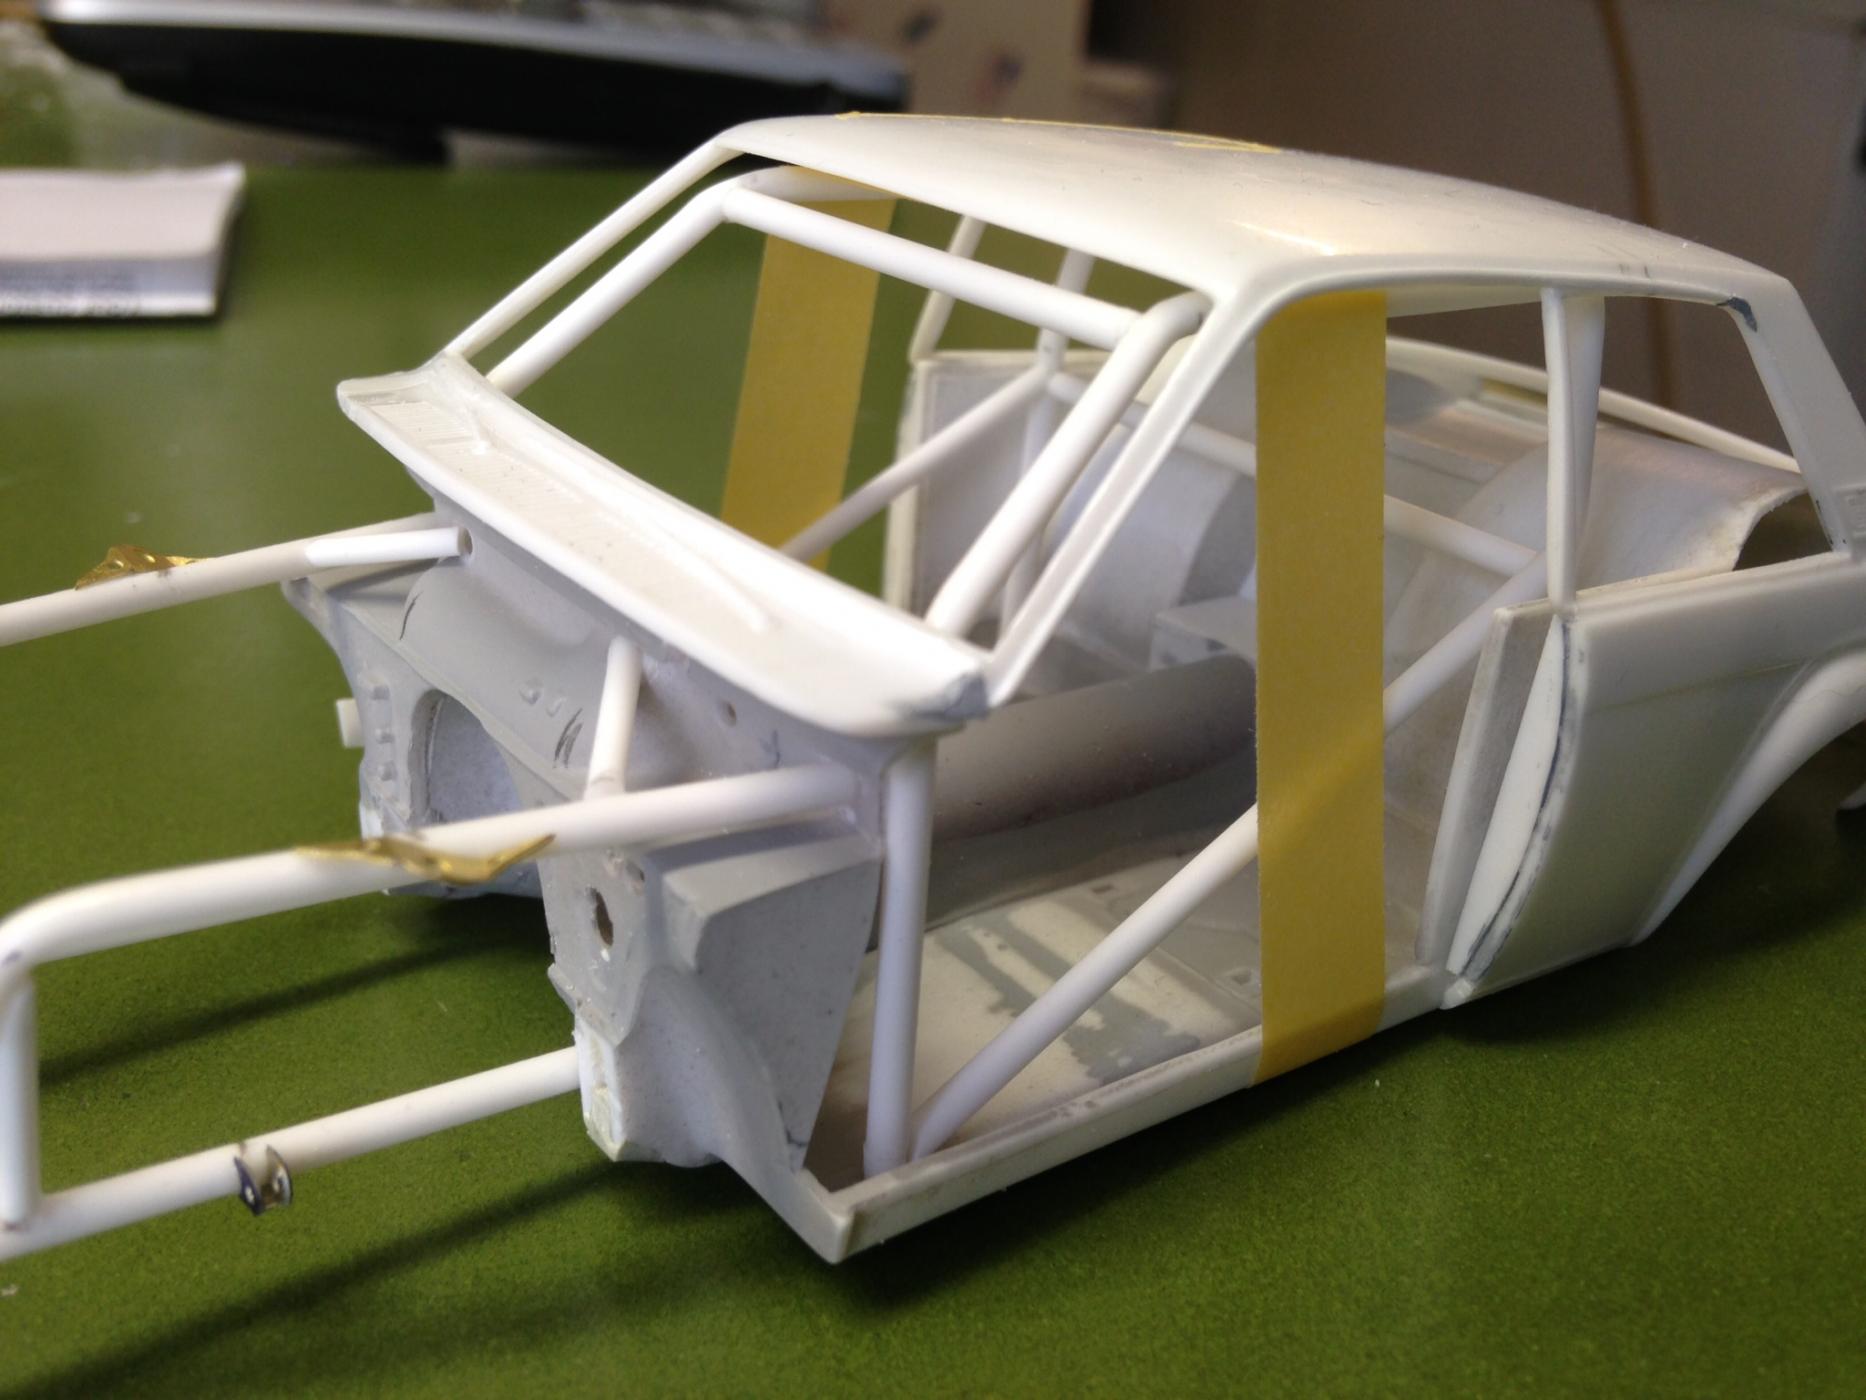
Hi from Sweden, This pictures are the last pictures before i started painting, and what i have done is that the chassie has now a god fit in the body, i have also checked the mounting of the engine. The rollcage is lose so it will be more easy to paint, the picture shows just the rollcage taped in place with the body on,just to make sure that all components will fit after i have start painting,because if it dont fit well after the paint is on,it going to be far more work than it already is. And i think this is the critical stage in this build,whats come after this is more of the paint and details. and i have pictures of painted parts but i will sort them out before i will uppload them. Hope you enjoy this. The trunk area,i will build a fuel cell and batteries with some details here. After i have masked of the shock absorber legs it will be pimed and then the color. Body on in a early stage of the rollcage building. Just to check the corners of the rollcage "inside" the body. Here is more testing,and the rollcage is fitting well with the body on. Soon i will upload more of this build, to be continued...... Fred
-
Very nice work, very happy to see that you are back. You have a very good fit on the doors, the hole build is outstanding. Its going to be exiting to see the next move from you. Keep up the great work, it's keep me up, for sure !
-
Thanks for all the positive feedback you have given My 49 Ford Coupe. The build was very fun, and the style i tried to catch was the earlier period from the fifties. AMT's Classic Model kit of this 49 Ford is in My opinion,one of the best kits ever made. ........so many Versions to build. Thanks Fred
-
Datsun 510 Pro/Stock "SWEET PAIN" COMPLETED BUILD
LeadFred replied to LeadFred's topic in WIP: Drag Racing Models
OK,I have some more photos to give you. This is the new tube front, The tabs that holds the frontwheels to the frame are glued in place, And also the plates that the engine is connected to. The small pipe end in the front are mountings for the radiator. The tabs are from Dirtmodeler. Here we see how the engine is mounted with an adhesive clay,just to be able to say that everything will fit and that the engine should not touch ground when the chassis is in the jig. because that is that height the chassis will have when the front is on wheels. This is a piece of the rollcage that will be difficult to get in place unless i mount it in advance. I have chosen to join together the rest of the rollcage in the drilled holes of the upper side of the dashboard , Then it is not obvious when the final assembly is made. Moreover,it is easier to paint the rollcage if it is loose. And this is the rollcage. Here it is mocked up in the chassi,and you can see what i mean about the holes in the dashboard. Comments are welcome . Fred
-
What predictions can we make for new kit releases in 2017?
LeadFred replied to GMP440's topic in Car Kit News & Reviews
My wishes are: 38 Ford COUPE/ tudor. 35 Ford COUPE/ tudor/convertible. Updated "stock" parts for Revells 32 Ford. / B400 Body. 49-53 Buick Modern updated Pro Mod/Pro stock drag car, example Stratus or GXP. 65 Plymouth Valiant 65 Dodge Dart 54 Mercury 72 Ford Pinto Wagon Thanks Fred. -
Datsun 510 Pro/Stock "SWEET PAIN" COMPLETED BUILD
LeadFred replied to LeadFred's topic in WIP: Drag Racing Models
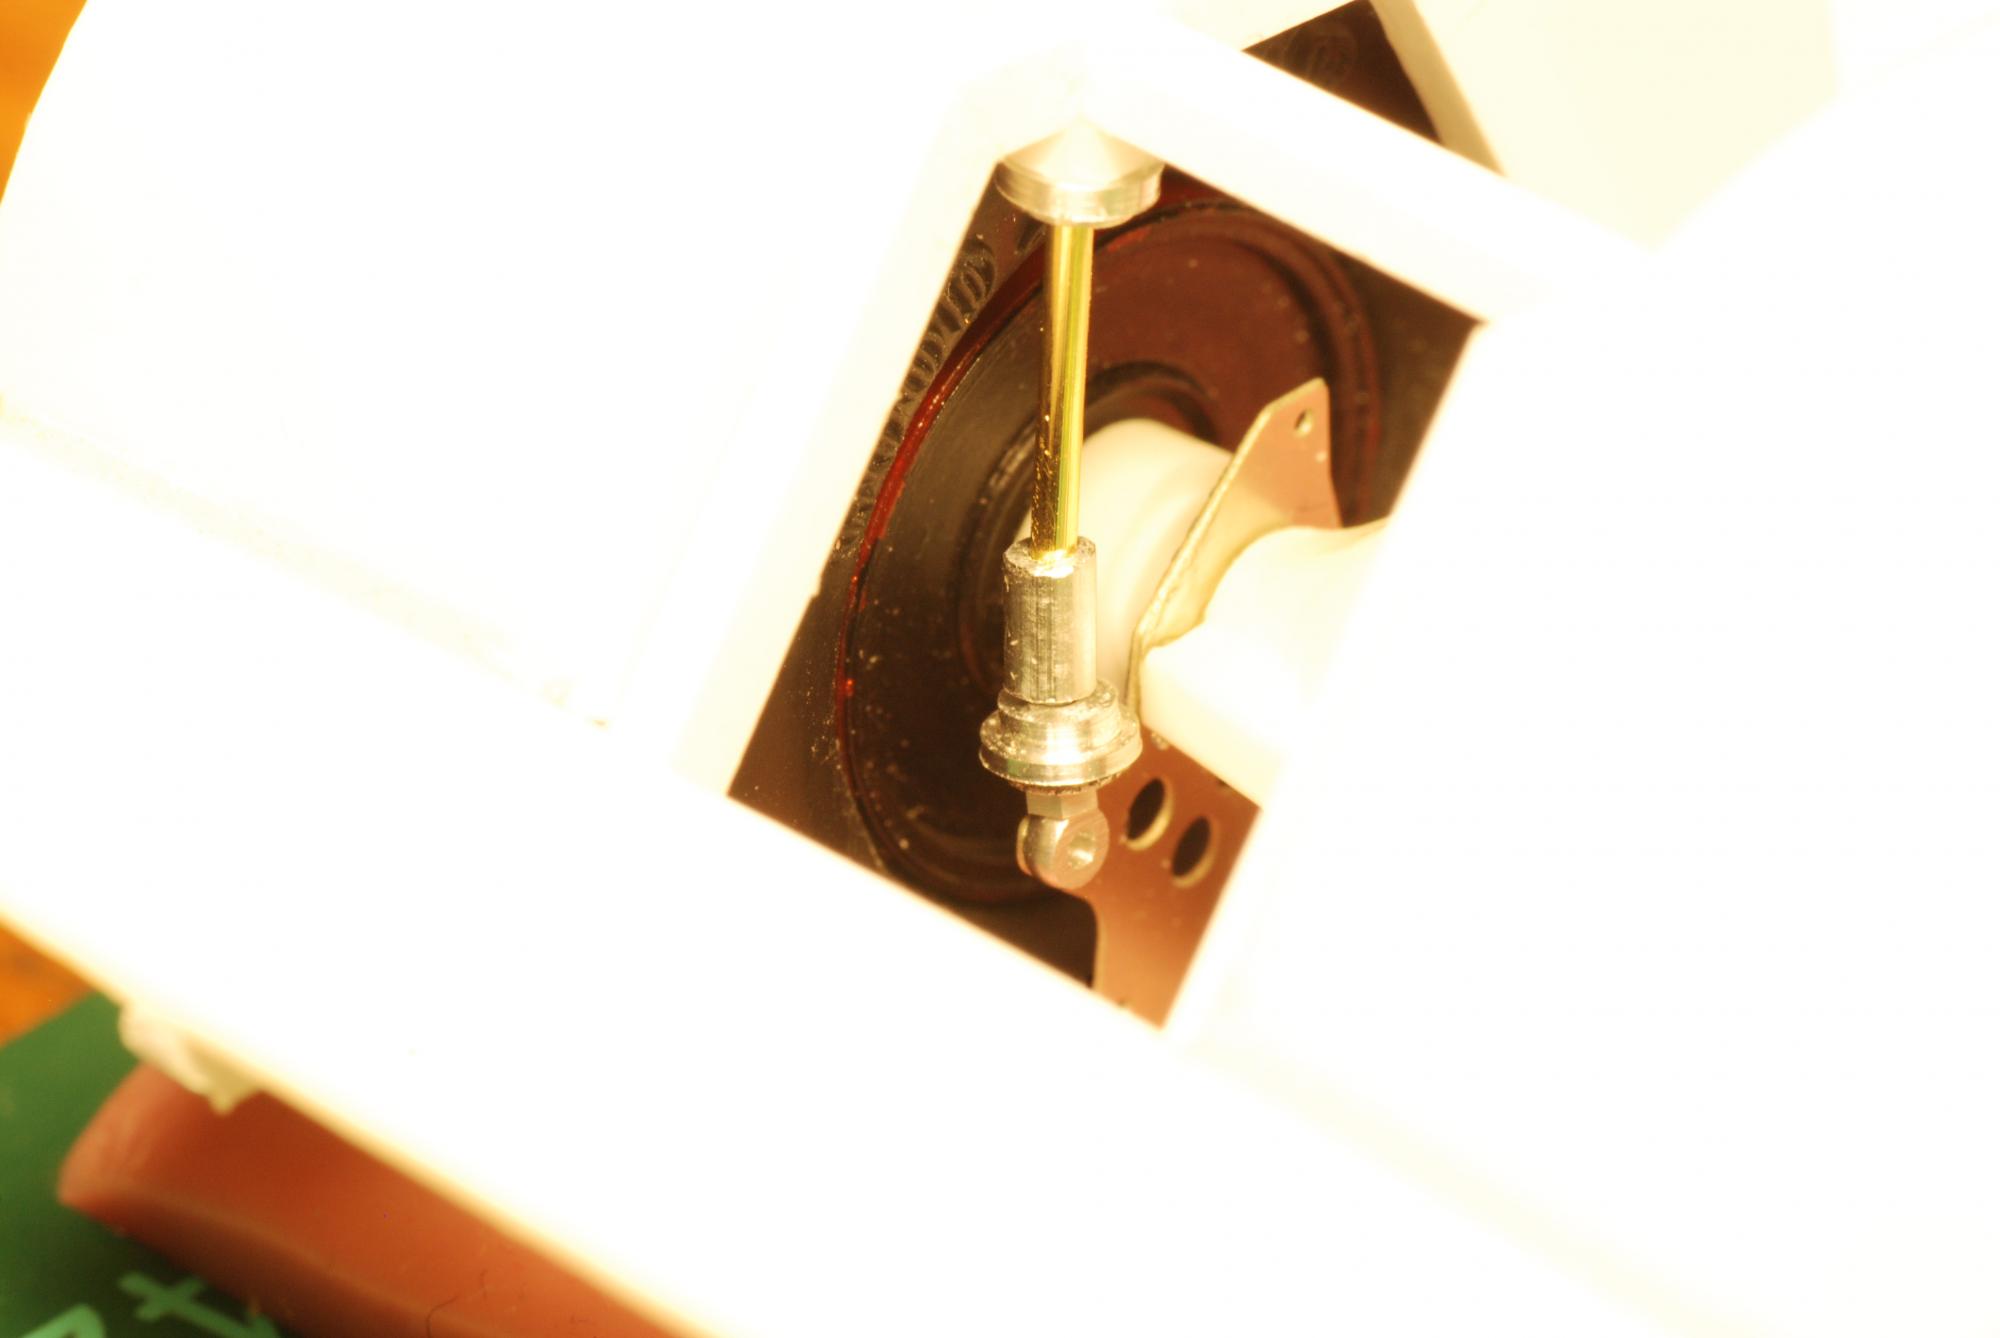
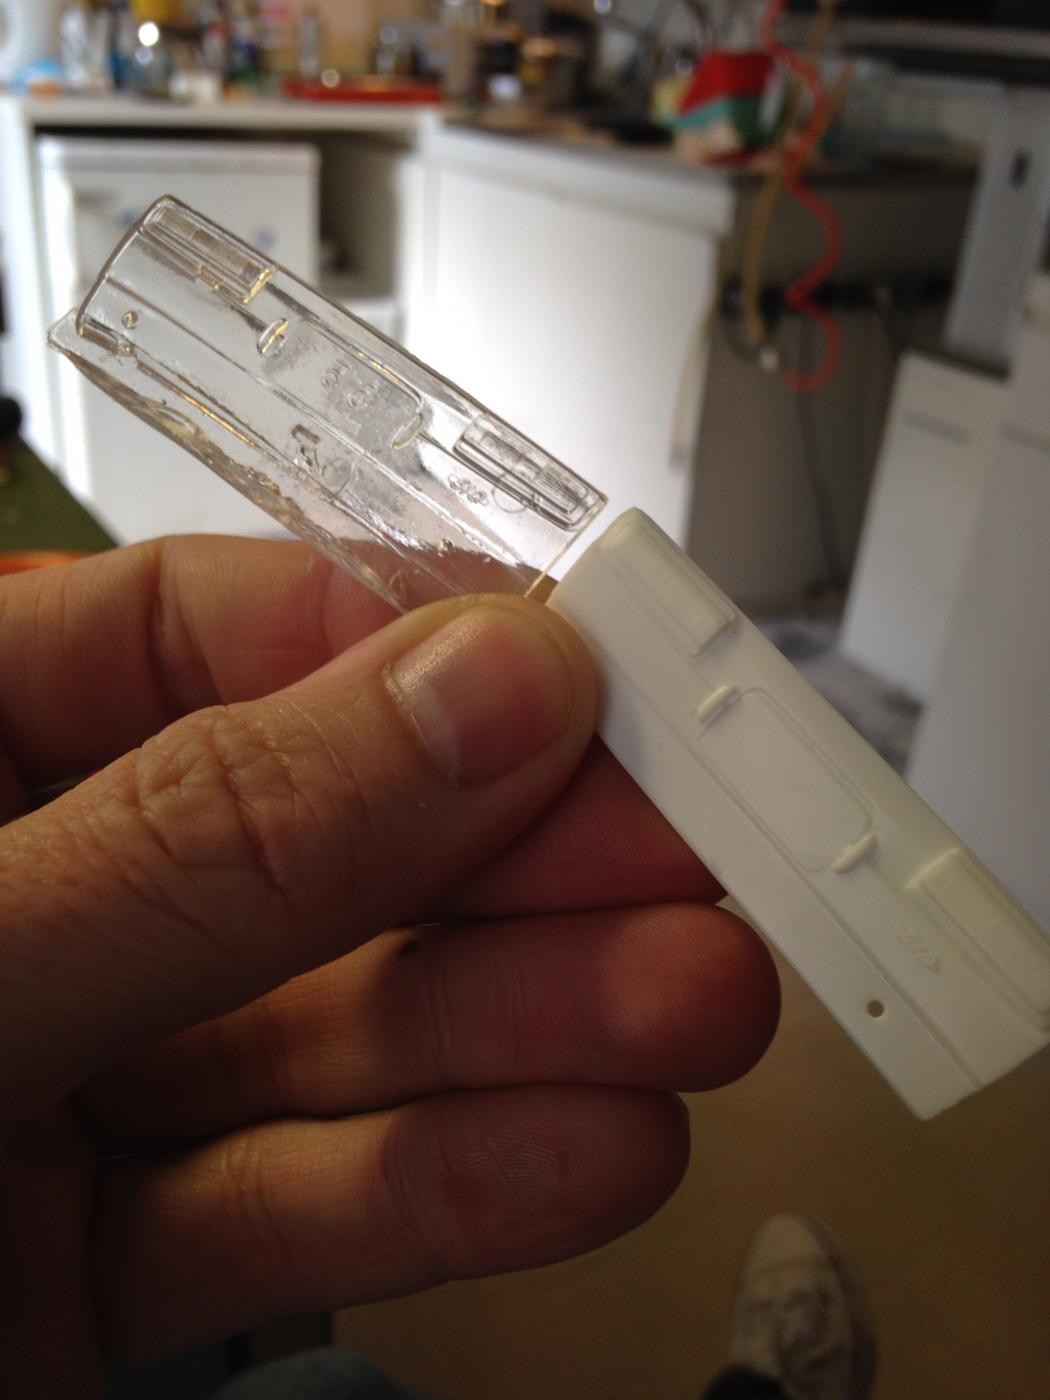
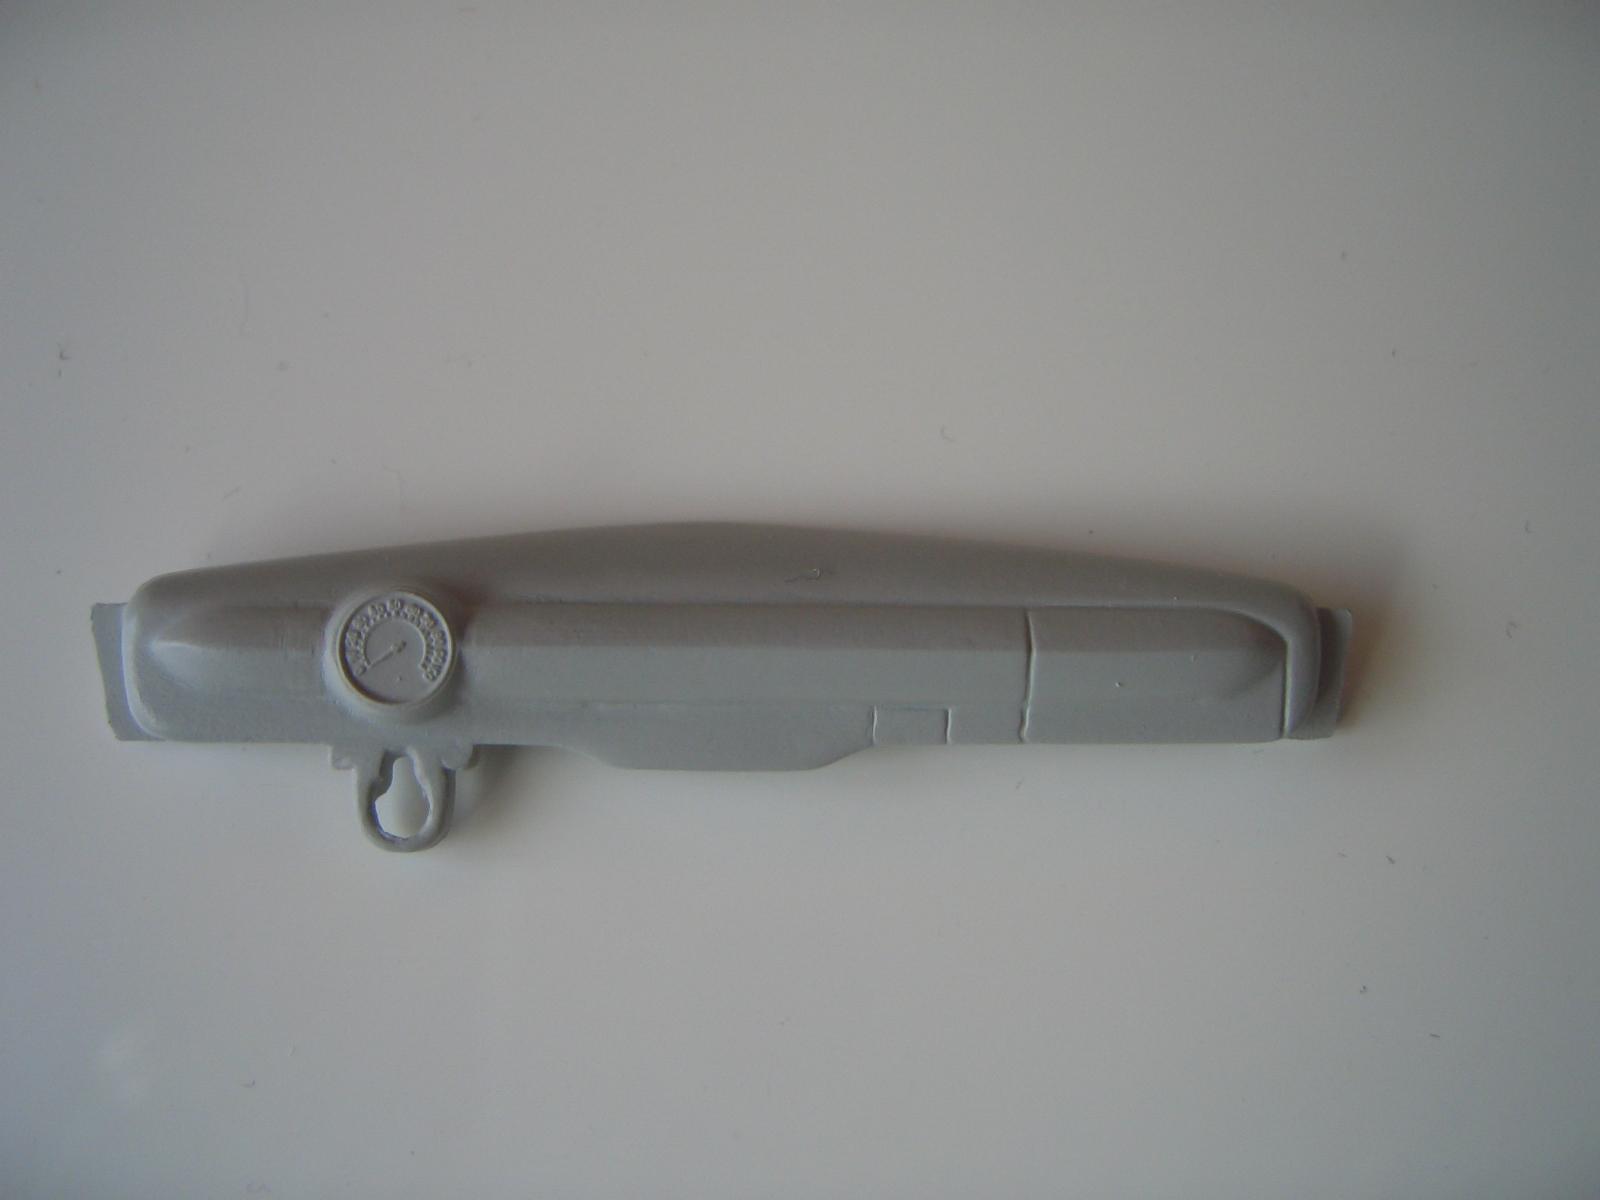
The rear axle is a bit tricky to assemble. Anyway, so I put the rear wheels in the markings of the jig, then I mocked-up the rear axle between the inner wheels in their natural position. The rear axle had then 4-linked plates mounted.(From Futurattraction) Then I had silicone putty on top of the rear axle and pressed gently the chassis in to the jig at the appointed place, waiting to Siliconet would harden. (About 10 minutes). Unfortunately I have no picture of that moment, but I have a picture of a different chassis where I do the same thing, as you will see instead. Now I can lift the entire chassis with axle,wheels up from the jig and measuring the distance of the springs located in the 4-link's plates and the frame. trim the silicon impression may be needed because some things need to be able to go freely in the jig. (Picture Obove,is not the Datsun,but the same building technique) The height of the springs determines how high or low the rear sits in relation to the ground. Then mount the struts in the frame and the rear axle and wheels and put the body on the chassis, then the moment of truth, IF...the rear suspension is too high then disassemble and shorten the strut. it is better to start with a too long spring than too short, because it's easier to see how much to short than vice versa.The mounts for the springs is made on my lathe. The plastic pieces between the 4-link plates are just to be correct spacing between the plates when fixing them on the rear end. The screws are "building screws". After painting and final assembly I will changed them out to RB-motion bolts in scale. This was the rear end chapter and i´ll hope you enjoy and understand my explanation. Explain technical construction description in English can be a bit difficult, Fred. I found a picture of my rear panel that i cast in clear because of the taillights.
-
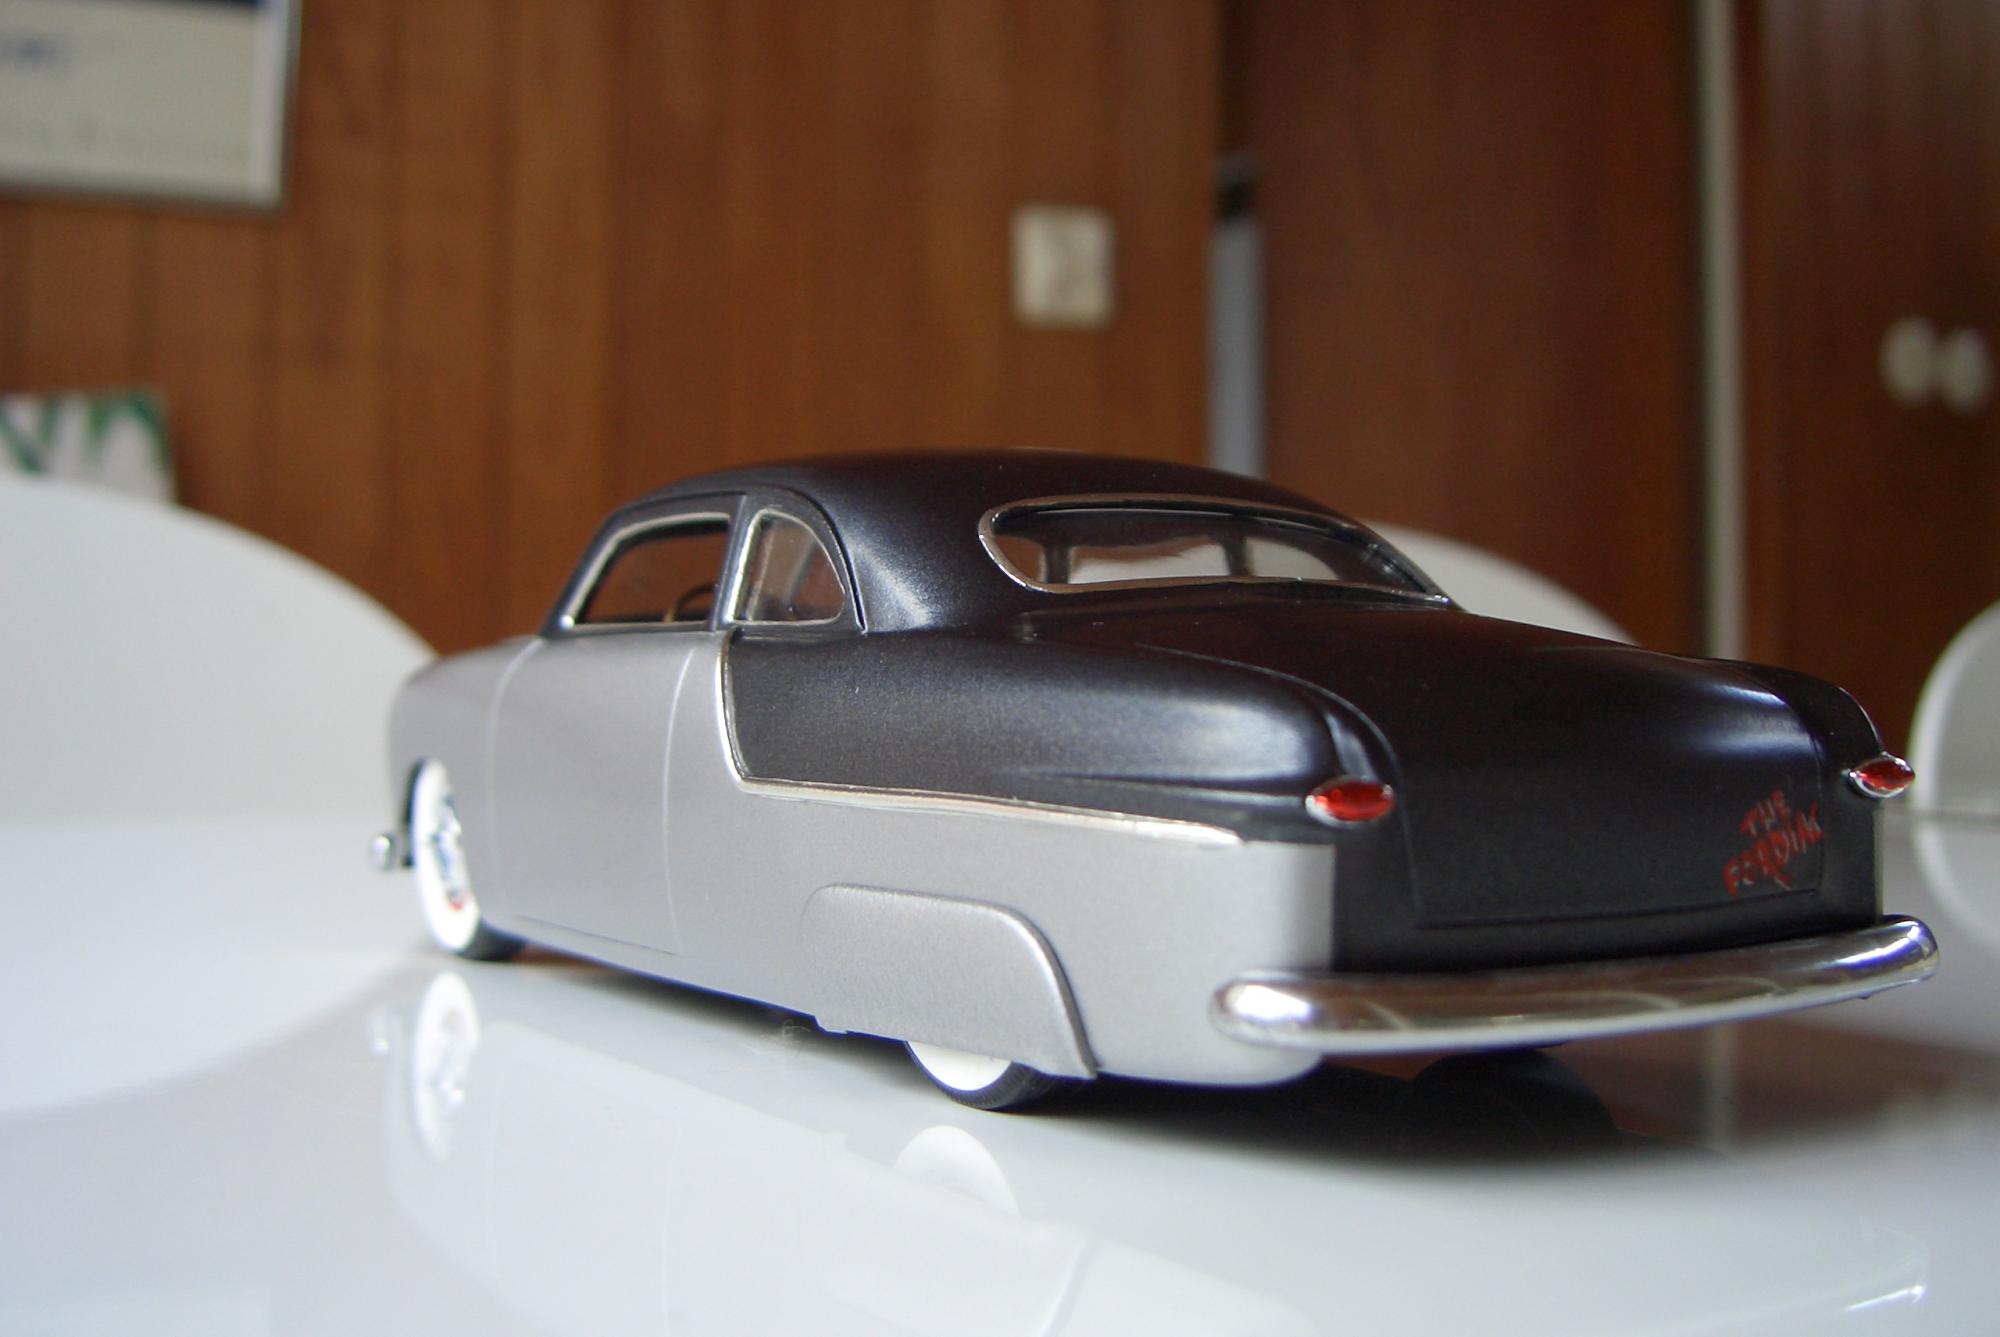
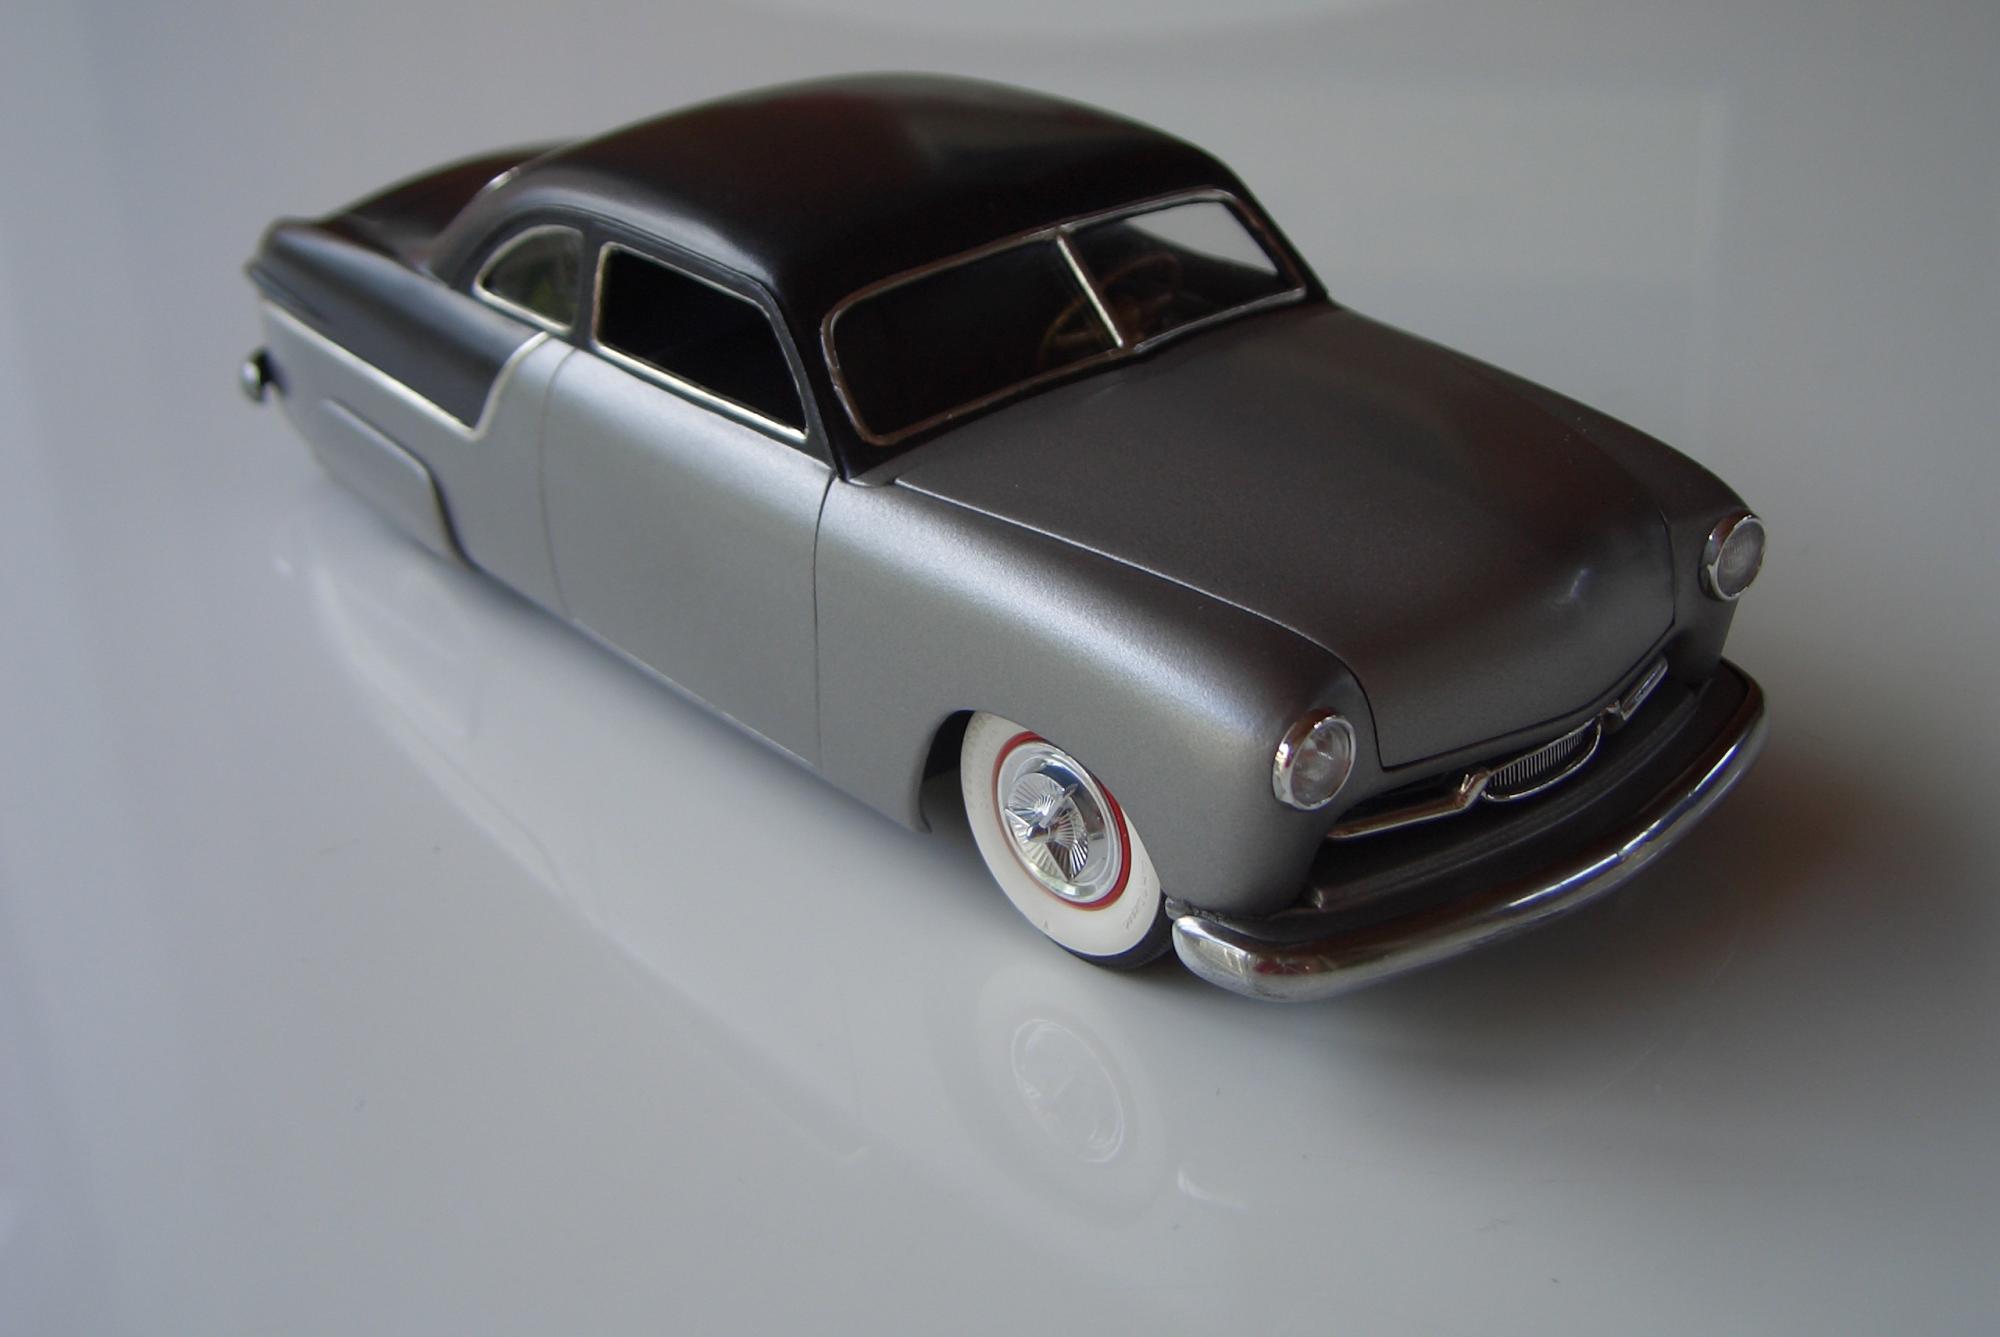
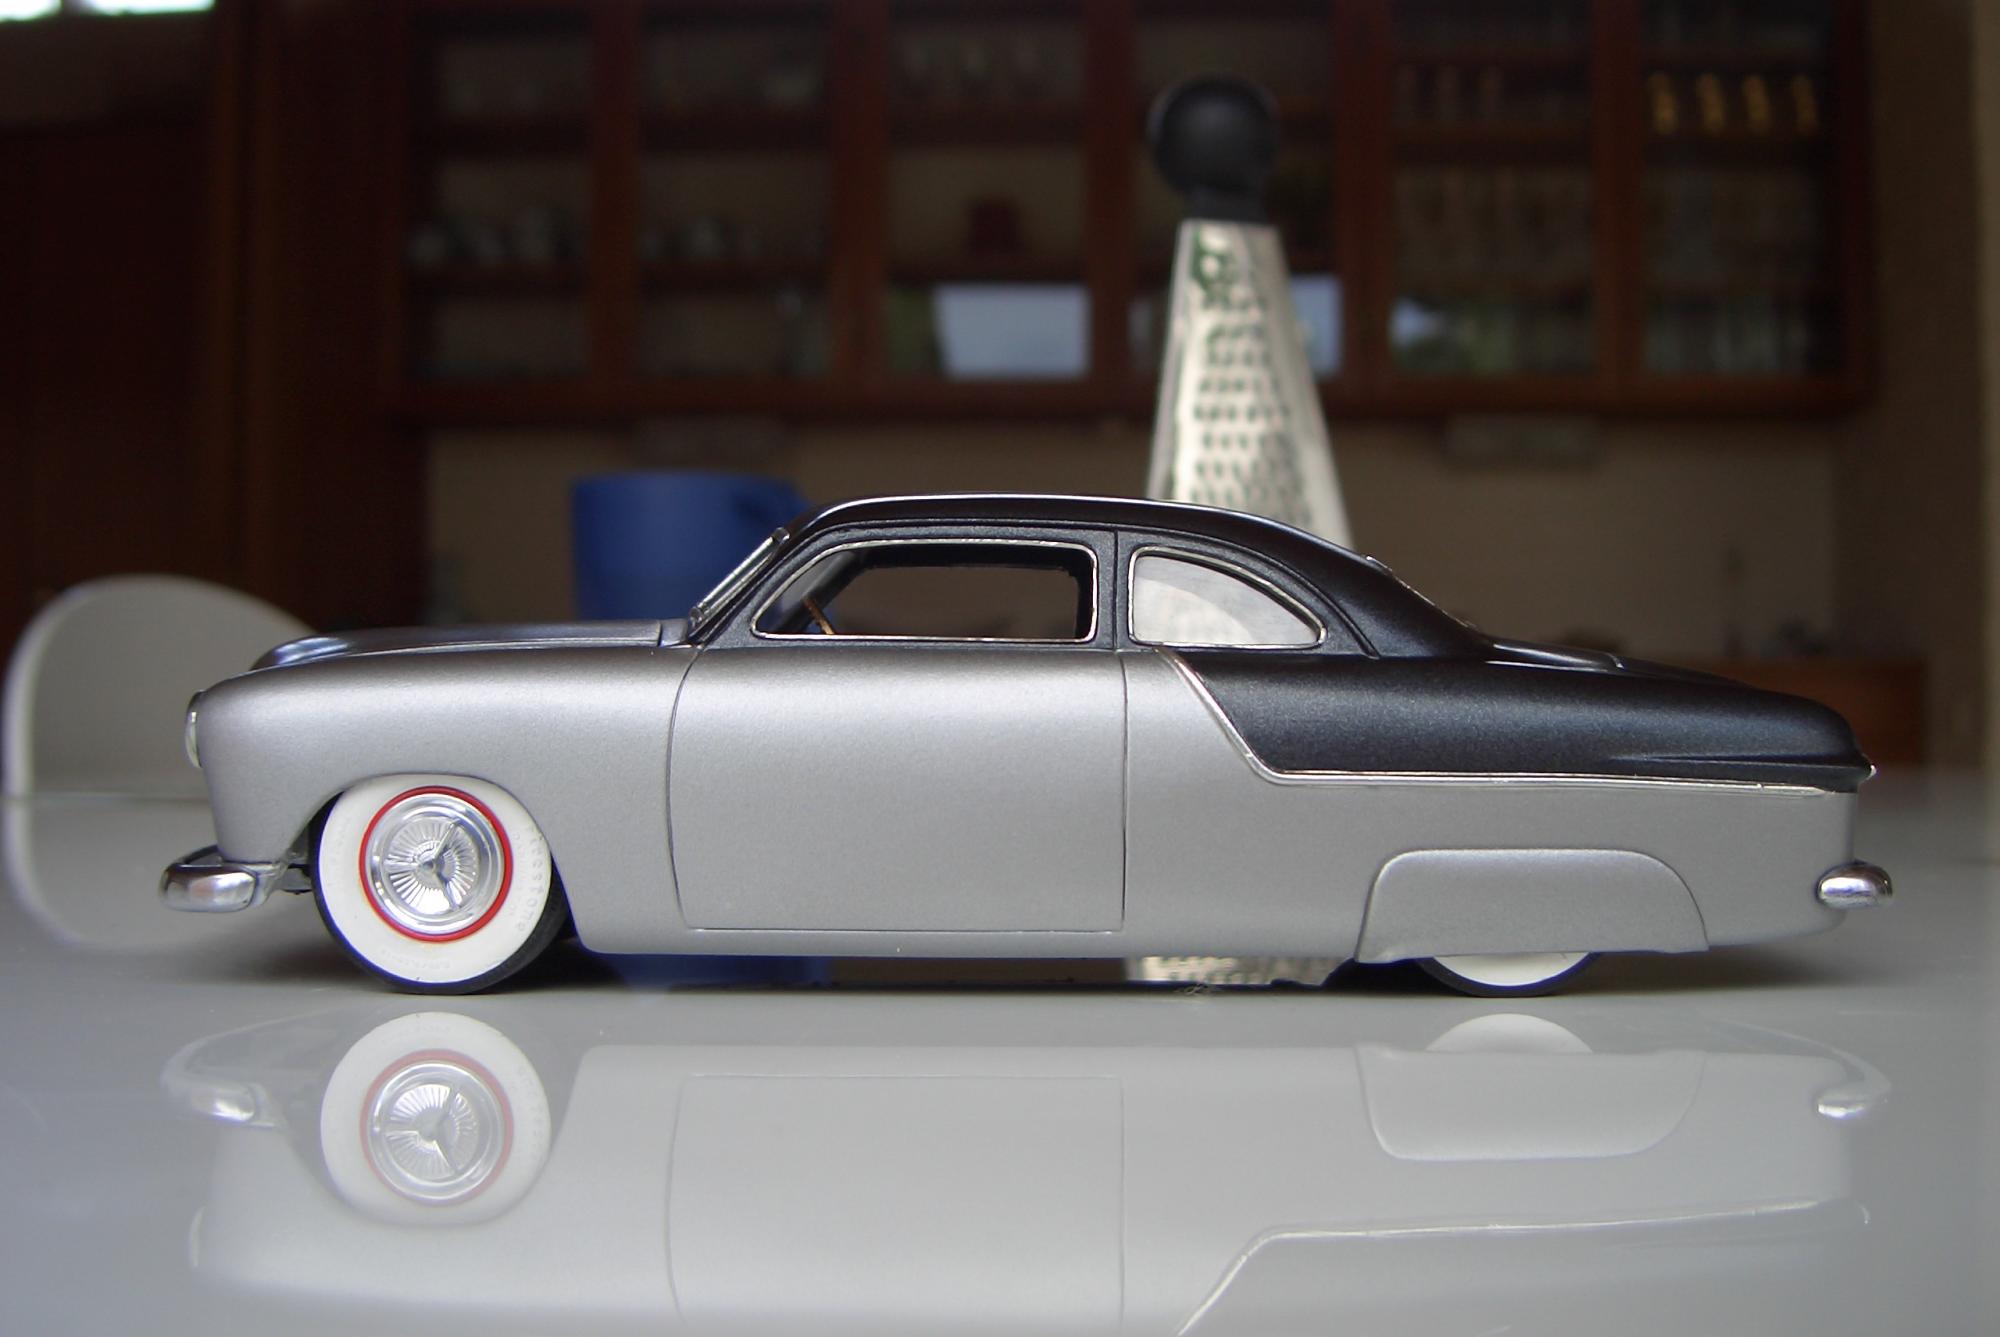
Ready for display. Do you like it ? The Name of the car on the trunklid. This is how it came out, and it is still a curbside build without no engine, i have a plan to install a engine in it,but it was ten years ago i built it and it still missing her engine. The Bumpers are painted with alclad. Comments are welcome, Fred
-
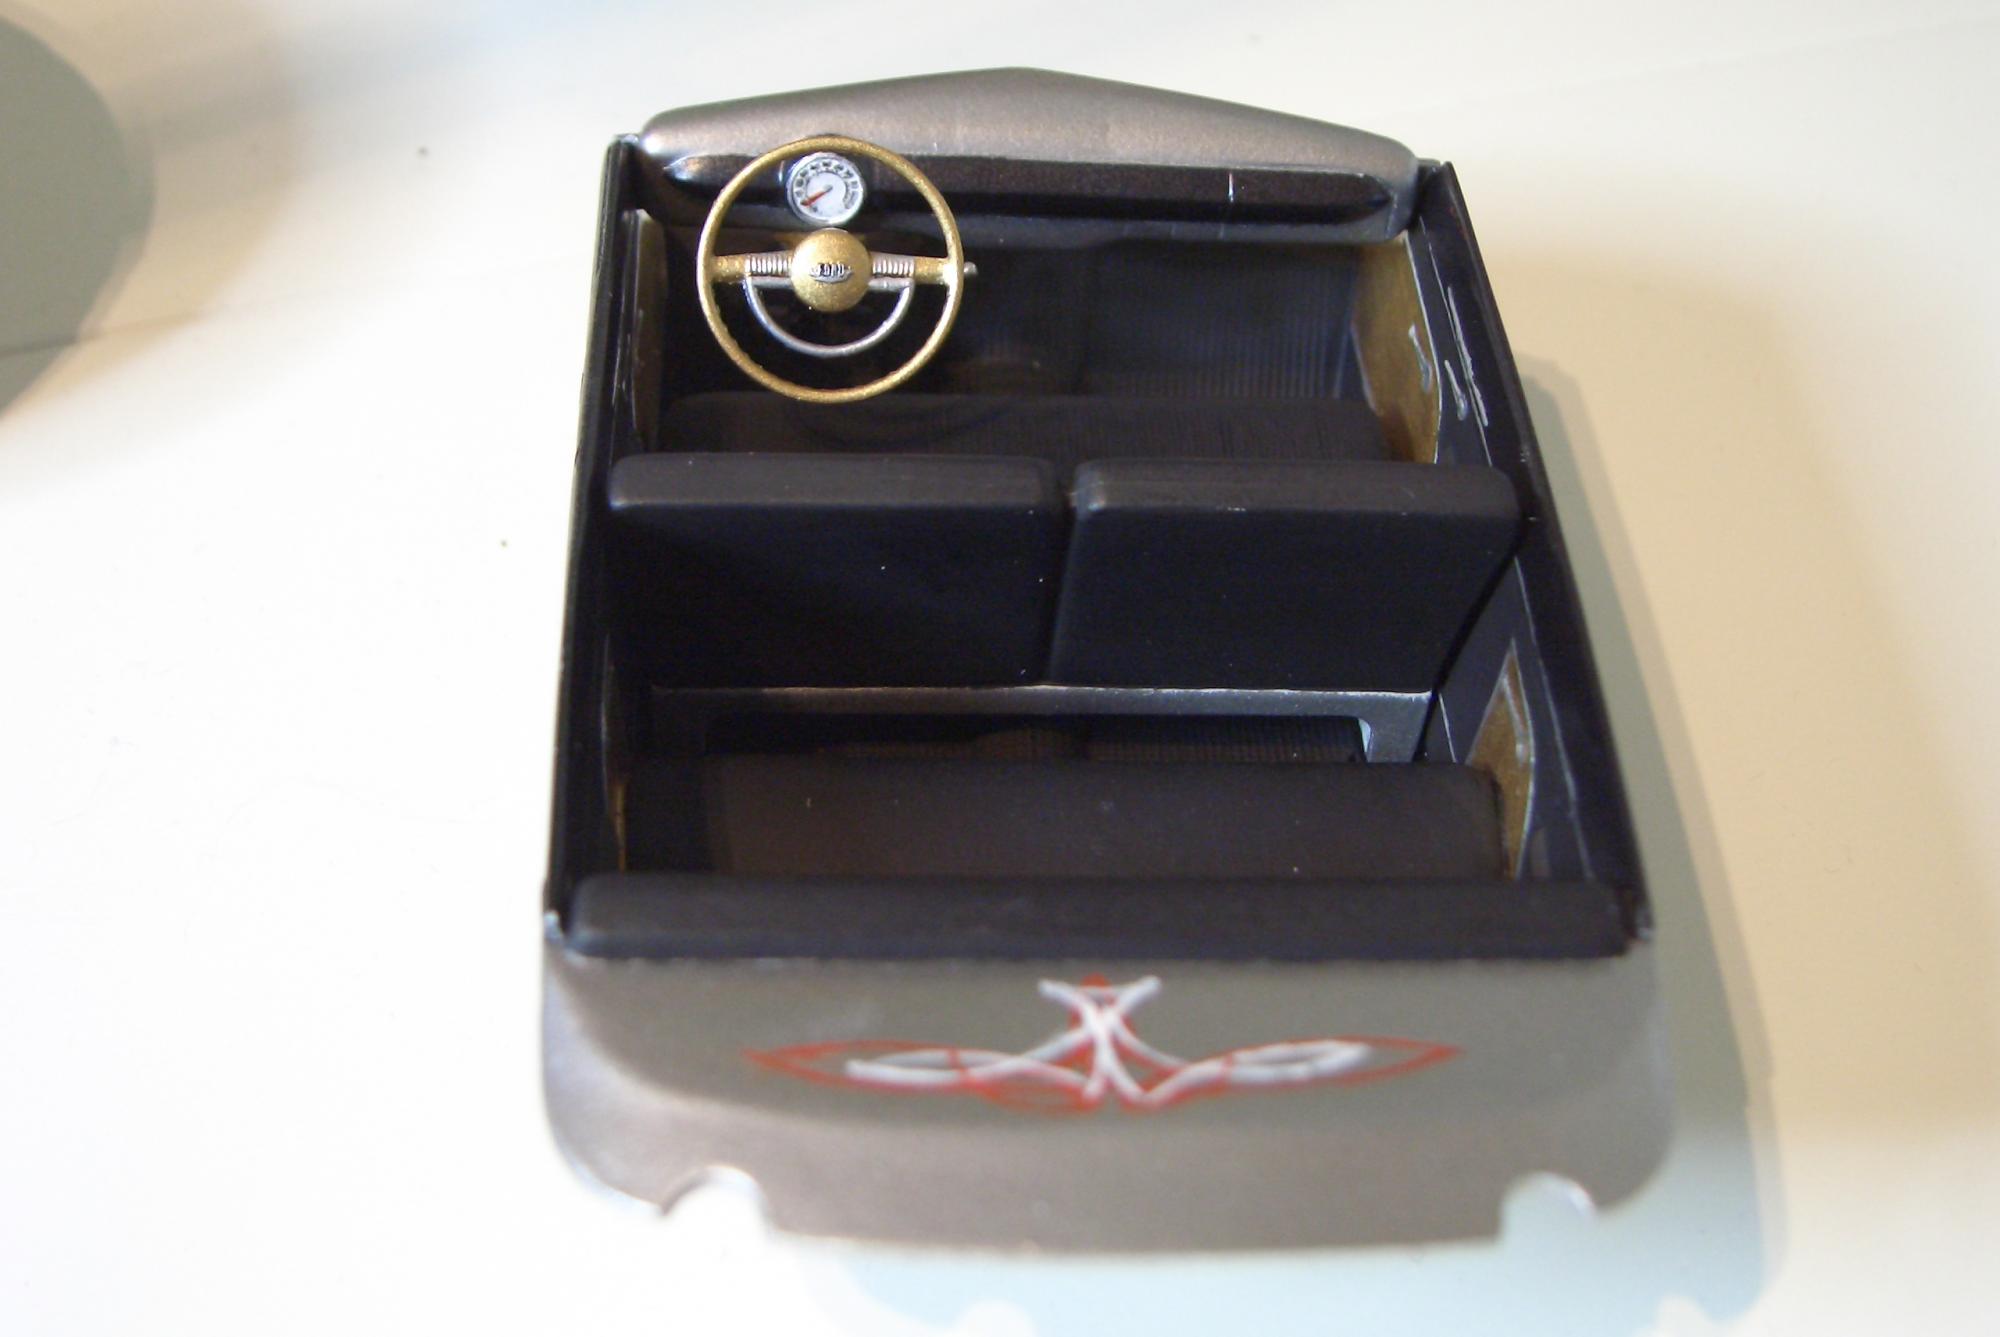
paint on ! Its not high gloss,its more like semi gloss. the color is grey silver and dark grey metallic. this is a simple mock-up just to check. side view. the rear. paint on the dash,same color as the rear/roof color. The Interior. Steering wheel. and more interior.
-
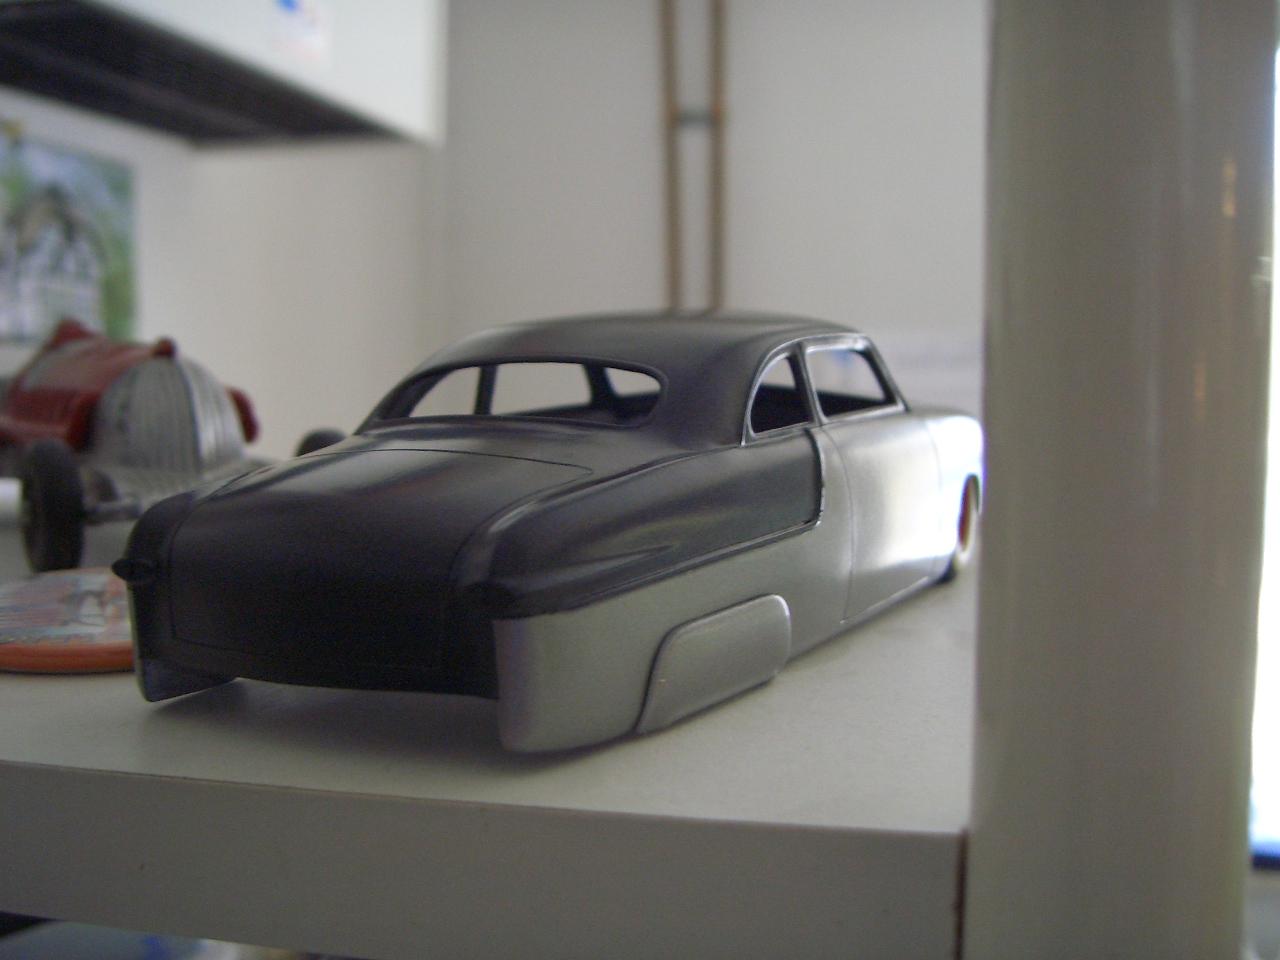
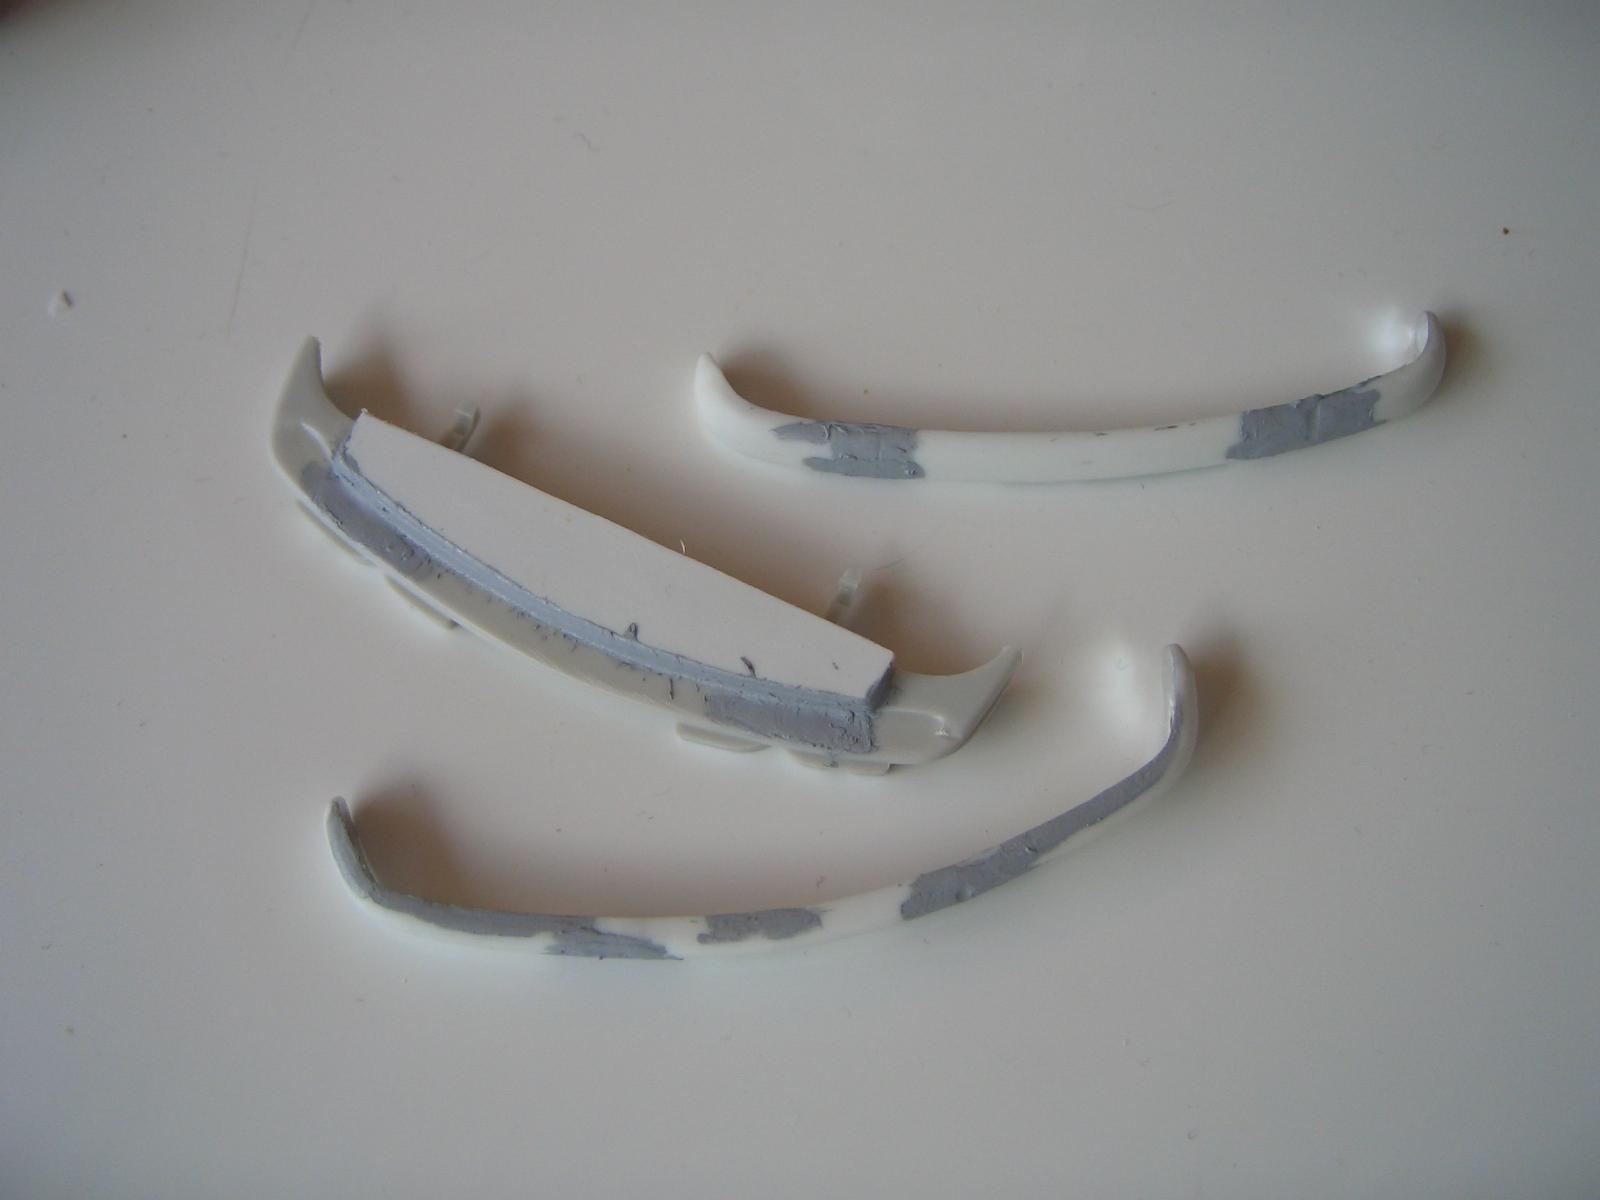
primer on ! Cut off the bumper guards to make smooth bumbers. Also a custom designed dash.
-
Hi all modelbuilders. I want to show you an old build that i have done for about ten years ago, it is not on my workbench,but i think the pictures fit in here. i have some building pictures,how the model was created.The Kit.chopped it and shaved it.Modelhaus tires.Ready for primer.


.JPG.4ec3cd3f23d56fc8153e1f0a5b204a28.JPG)
.JPG.ace688f43c37a9679404d691554dc775.JPG)
.JPG.1551eeaeee02df749f2b0b621c5be593.JPG)

.JPG.a684c26641467bf32f6dc75a619e44b7.JPG)
.JPG.ce7ec6ac1f74f7a5c52c7c154032c51f.JPG)
.JPG.312a516a9ac2948ea38648f7c7816a33.JPG)
.JPG.ef1ab8ce054a9e4ff01a531f0b547f09.JPG)