Pete J.
-
Posts
3,981 -
Joined
-
Last visited
Content Type
Profiles
Forums
Events
Gallery
Everything posted by Pete J.
-

Are Some Models Just Cursed?
Pete J. replied to Snake45's topic in General Automotive Talk (Trucks and Cars)
Oh, heck yes(expletive a bit more forceful)!! I have a model that has become my absolute nemesis! It is a Tamiya World Rally Ford Focus. I started it a little over 3 years ago. I am now on the 5th or 6th repaint(not sure which)! Chassis has been done for a long time. The body has just given me fits. First it was panel lines showing through the mica blue as white, then it was the mica coming out in the panel lines when I clear coated it. Then it was a sand through on one of the decals after clear coat. Latest is a bubbling of the clear in the panel lines. This thing has a real complex decal job and I have been through at least 4 sheets of decals and am on my second body. Lucky, Tamiya has spare decals availble and I bought a bunch of them. Every failure just strengthens my resolve to not be defeated by the POS! -
Whoa! It's a Bumbel!
-
Oh, yes, forgot about the spare, 'cause you get a flat at 200 mph on the Mulsanne Straight, your going to just jump right out and change the tire! Now, what did I do with that lug wrench and jack?
-
The luggage space was one of the weird requirement the the Gran Touring class. Touring ment just that. Taking a trip. Also the reason for two seats instead of one. Hubby and wife on a leisurely drive down to Monte Carlo for the weekend. Yup, that's just what a GT40 was good at!
-
Have to agree with all about metal flake. For years I have added pearlescent powders to my clears to get a more accurate flake size. Now I find that the Tamiya "Mica" paints do an excellent job of replicating a scale metal flake.
-
I rarely think a model is "too glossy". One of the things I learned a long time ago from my paint guy was that the excessively glossy look has more to do with the paint not being level. Now this is going to take a little explaining. A lot of paints, lacquers in particular, tend to pull back from a sharp edge and create a slightly rounded edge that is not crisp. When the light plays over that edge it shows up as a distortion in the reflection. This puddling or rising can show up on flat surfaces as well. This plays with our eyes in such a subtle way that if you don't know about it, you will not notice it except "something doesn't look right". This is why I insist on sanding and polishing every glossy paint job I do. If the surface is first leveled and then polished it will look correct. The 53 Ford above is a good example of this. As the light plays over the panel lines it is not distorted so it looks right. The "dipped" look occurs for a similar reason. The reflections of the paint do not come crisply to the edge and give the impression of a rounded edge. Now in all fairness this happens on real cars but because of the scale you never see it. The paint should come to the edge crisply.
-
I have to agree. On most modern engines, the intake and exhaust valves are different sizes not to mention the ports. Switching them around would definitely change the air flow into and out of the engine. This really looks like shade tree engineering to me. My guess is a few beers and a bet to bring this one to this end.
-
I haven't heard from ebay seller and it is driving me nuts.
Pete J. replied to LDO's topic in The Off-Topic Lounge
Yea, I have done my fair share of eBaying and only got stung once. Sometimes it took a while, but generally had good experiences. Have had items never shown as ship and no tracking numbers, just show up. I generally will ding the seller one point for poor communication and let it go at that and long as I get it in a timely fashion and it is as advertised. Lots of safety nets on ebay to fall back on and they don't put up with seller or buyer shenanigans for long. If it gets close to the time to file a claim, I would go ahead. Often times that get the sellers attention because they will take the money back. -
New Tamiya Lacquers for Airbrushing?
Pete J. replied to Snake45's topic in Car Aftermarket / Resin / 3D Printed
Well, yes and no. The initial concept was that all painting is a chemistry experiment. If everything is the same, then the result will be the same. I kept track of paint type(including color) thinning rate, which airbrush, psi, temperature and humidity, and any weird techniques I may have used and the result. So when I go out to paint, I know what paint I am using, temperature and humidity. From that I can go into the diary and get thinning rates and psi and bingo, same results. It has always been surprising to me how much a single change in one of the variables can impact the outcome. The worst thing that ever happened was when my cheap thermometer/hygrometer died and the new one gave slightly different readings. Now I have another problem and am starting over again. I am trying to use automotive urethanes as auto lacquers are band in SoCal and they is an entirely different kettle of fish. You can't just thin the heck out of them like you could the old lacquers and I really don't have a good handle on them. I see just spectacular results that others are getting with them and I keep on experimenting. Just don't have it down yet. -
New Tamiya Lacquers for Airbrushing?
Pete J. replied to Snake45's topic in Car Aftermarket / Resin / 3D Printed
Jonathan, glad you found it interesting. I suppose that is the pilot in me being methodical. Initially keeping all the data was a real pain, but after a while, it gave me a real appreciation for what was going on. There were many failures, but understanding how the chemistry of the paint interacts with atmospheric conditions helped reduce those failures to a very manageable level. It is not something that many have the patience to do at a hobby level. Thanks for looking. -
New Tamiya Lacquers for Airbrushing?
Pete J. replied to Snake45's topic in Car Aftermarket / Resin / 3D Printed
Art, as I said you can't argue with results. I too have been at this a long time. I bought my first airbrush in 1972 when I was in Air Force Pilot training and the each class had a model contest. The results were hung from the squadron room ceiling for decorations. I did a Revell 1:32 scale F-4D with a cheap badger siphon feed, canned air and pacta enamels. In the intervening years, I too have accumulated my fair share of trophies including Best of's from Tamiya/con, IPMS nat's and GSL just to mention a few. I have also done contract work(display and advertising pieces) for Tamiya. I must give credit where credit is due. A large part of my painting knowledge came from a good friend who spent his life as a paint jobber and factory rep. He knew more about paint than I will ever know, but he did give me good advise when I screwed up a good paint job. He also taught me that paint is science. I carefully measure paint to thinner based on temperature and humidity, and on a diary I have kept for the last 30 years. I find this necessary because I paint in an unheated/un-air conditioned garage and in SoCal and we get temperature swings of 60+ degrees and humidity variations from 10% to 90%. I also have 4 different airbrushes that each have their own specification on paint viscosity. Some would view this as over the top but it works for me. As to Klean Strip thinner you may find this interesting. This is the link to the MSDS sheet for the California and 49 state mix of their lacquer thinner. http://www.kleanstrip.com/product/lacquer-thinner-for-california On page three you will see the general conposition. It lists acetone as 60% to 100% and Ethylene glycol n-butyl as 1% to 5%. I find this interesting, because that tells me that sometimes their lacquer thinner can be nothing but relabled acetone with a drop or two of Ethylene glycol. I strongly suspect that varies from state to state. Because of the controlled chemicals in California I suspect that we get the mostly acetone version, because acetone is not regulated in paint. It is the other VOC that they get all crazy about. If you can find the MSDS sheets for other lacquer thinners there are as many as 18 other chemicals listed. Each company formulates their thinners specifically for their products and for different reasons. As you said in your first sentence, I also don't wish to make this an online argument. Your results are certainly impressive and your experience is by far the best way to go for you. However, lacquer thinner is a lot like gasoline. There are different grades and they run differently in different cars but it is all called gasoline. My car knocks like heck with anything less that 91 octane. That doesn't mean that everyone should run 91 octane. Same way with lacquer thinner. My methods work well for me where my experience teaches me I need to recognize the difference in mixes. Your methods teach you differently. I want to finish with an old saying that applies to each of us equally, "The magic is in the magician, not in the wand." -
New Tamiya Lacquers for Airbrushing?
Pete J. replied to Snake45's topic in Car Aftermarket / Resin / 3D Printed
Art, all lacquer thinners are not created equal and there is a reason. I learned this years ago when I started using automotive lacquers on models. Here is an article on what makes up lacquer thinners. It really does a good job of explaining the differences. https://thefinishingstore.com/blogs/news/127175747-understanding-solvents-part-iii-laquer-thinner The stuff you get at Wallyworld is mostly just acetone, especially if you live in California. It may work well in many cases but not so much in others. I have several cans of old style lacquer thinners that I hord and use only for thinning. I use the cheap stuff as brush cleaner. I decant a lot of Tamiya TS paints, which I suspect are very similar chemically to the new LP's and I thin them with Tamiya lacquer thinners when needed and they seem(Mark I eyeball only) to self level a little better than if I use other thinners. The automotives lacquers seem to flash and harden faster. The Klean Strip seem to require more finish polishing. I did learn a long time ago not to use different thinners if I spray more than one coat. Always use the same thinner for all coats. More than once, I have had severe wrinkling because of different cure rates. Now for the disclaimer, Your results may vary...... If you have a system and it works for you, stick with it! Experience in mix rates and types of thinners and paints trumps everything. -
New Tamiya Lacquers for Airbrushing?
Pete J. replied to Snake45's topic in Car Aftermarket / Resin / 3D Printed
Make sure you get tamiya lacquer thinner as well. I understand that you need to thin LP paints 1:1 for airbrush use. I am sure any lacquer thinner would work, but it is always best to use the same company. That way there is never even the slightest incompatibility issue. -
How important are panel lines to you?
Pete J. replied to edward smith's topic in General Automotive Talk (Trucks and Cars)
I've been using this one for a long time and it's a really nice tool. For me it it easier to control and has a nice feel in the hand. There are two different sizes. This is the smaller of the two. I find the hook end is great for following curves and the straight follows a straight line very well. The hook pulls a nice curl of plastic out of panel lines The other nice thing about this tool is that it is easy to resharpen. I can get it up to a razors edge very easily. http://umm-usa.com/onlinestore/product_info.php?cPath=21_105&products_id=4798 -
Could you kids educate me on rattle can paint jobs?
Pete J. replied to tygr1's topic in Model Building Questions and Answers
Here is an article I did right after Tamiya came out with rattle can lacquers. It is old but still applicable. https://www.tamiyausa.com/articles/painting-with-tamiya-synthetic-lacquers-35?article-id=35#.WpSj4-jwaMo -
I'm going to follow this closely. I am lucky and have the Tamiya clear bodied version and both Perfect parts set's. I bought them many years ago when you didn't have to go to the secondary market. I love the nuts and bolts set that they offered up at the same time. Every time nuts and bolts sets show up on e-bay I bid on them. Like all the PP set, they have gotten really expensive. I didn't buy the last set when they went over $50. Not going to pay that, even though their screw heads are the best out there.
-
Just an FYI, Tamiya also did the sedan version of this car.
-
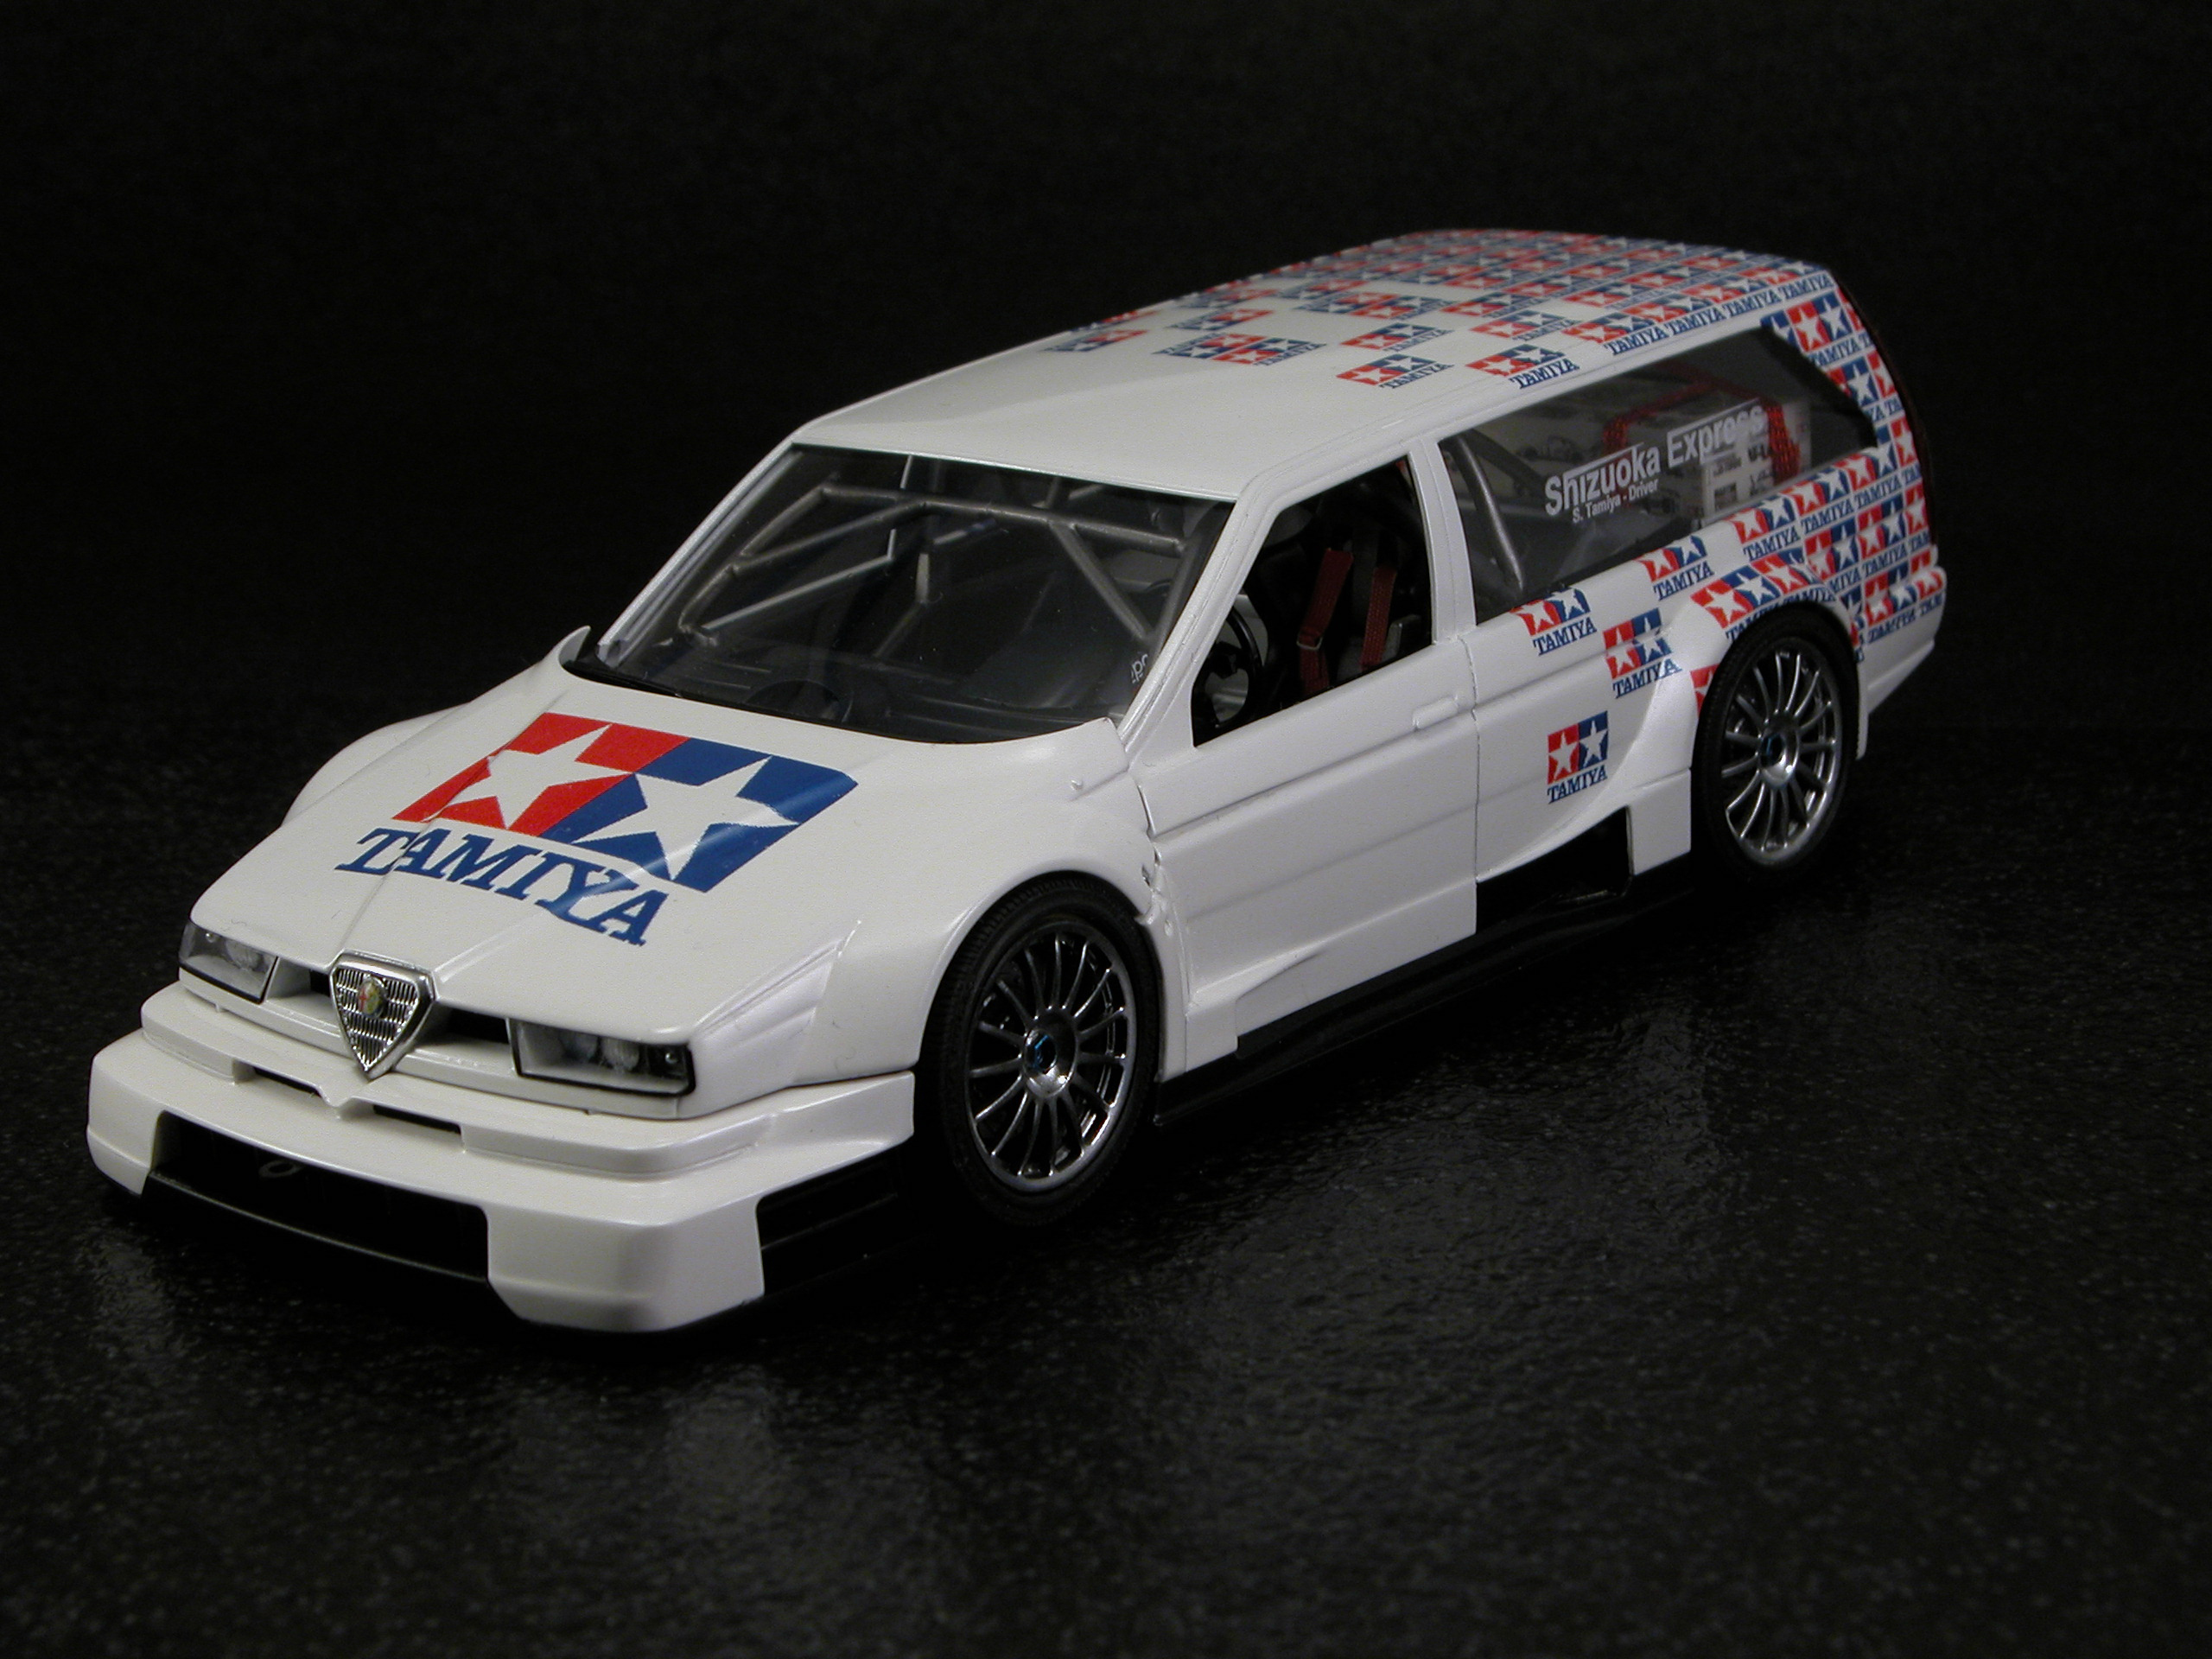
I've used this kit three times. This was the last one. I grafted the rear of the Volve estate to the front of an Alfa 155. Kind of an odd cross of two BTCC cars. The other two, I can't find photos of but I chopped the roof by a scale 6" and took another 6 inches out of the belt line. I tucked the fenders in front and rear as well. The hood looks misaligned but isn't. It is just loose as this car has a full engine and the hood comes off for display. Probably not what you were looking for but great fun with what are now somewhat rare kits.

-
I don't do trucks but I do like to take my time with a build. Why? Because building is the fun for me. I don't get any great kick out of finishing a model. Competing with one is some fun but that is only good for a one competitive season as far as I am concerned. I just love creating something from a kit or sometimes nothing. Longest build was 5 years of continuous building. Just the way it is. If you are enjoying building then your doing the right thing. How long it takes means nothing.
-
Best?? Wow is that a relative term. If you are talking about longest lasting with the least repair issues then I have to go with almost any of the Toyota or Honda family cars we have owned. Always reliable, minimal cost to keep on the road and good drivers. Worst in that respect would have been my 74 911 Porsche. Within a month of owning it, it tried to kill me my bursting a fuel line in the engine compartment. Luckily it happened on startup and the car didn't catch fire. In 4 years of ownership, the electronic fuel injection went our and I had to tow it 50 miles to the nearest Porsche dealer to get it fixed, the heat exchangers rusted out and cost $1,000 for parts alone. In Northern Michigan you don't want to be without heat, and tuneups were ridiculously expensive. The darned thing required 10 quarts of oil to change the oil. Oh and chain tensioners needed replacement every couple of years. But it was the most fun to drive in my early years! Nothing else like it. My first sports car was as new 72 240Z. It introduced me to the true fun of sporting cars. Durable, easy to drive and fun. Up pretty good car. All time best though has to be my current car. A 1993 MR2 Turbo. I am the second owner had have personally put 100K miles on it. Never had any major issues with it. I am currently having it rebuilt with as many OEM parts as I can find, so I can enjoy it for another 20 years. It is fast, handles like a gokart and really is a looker. Yup, that is my best choice.
-
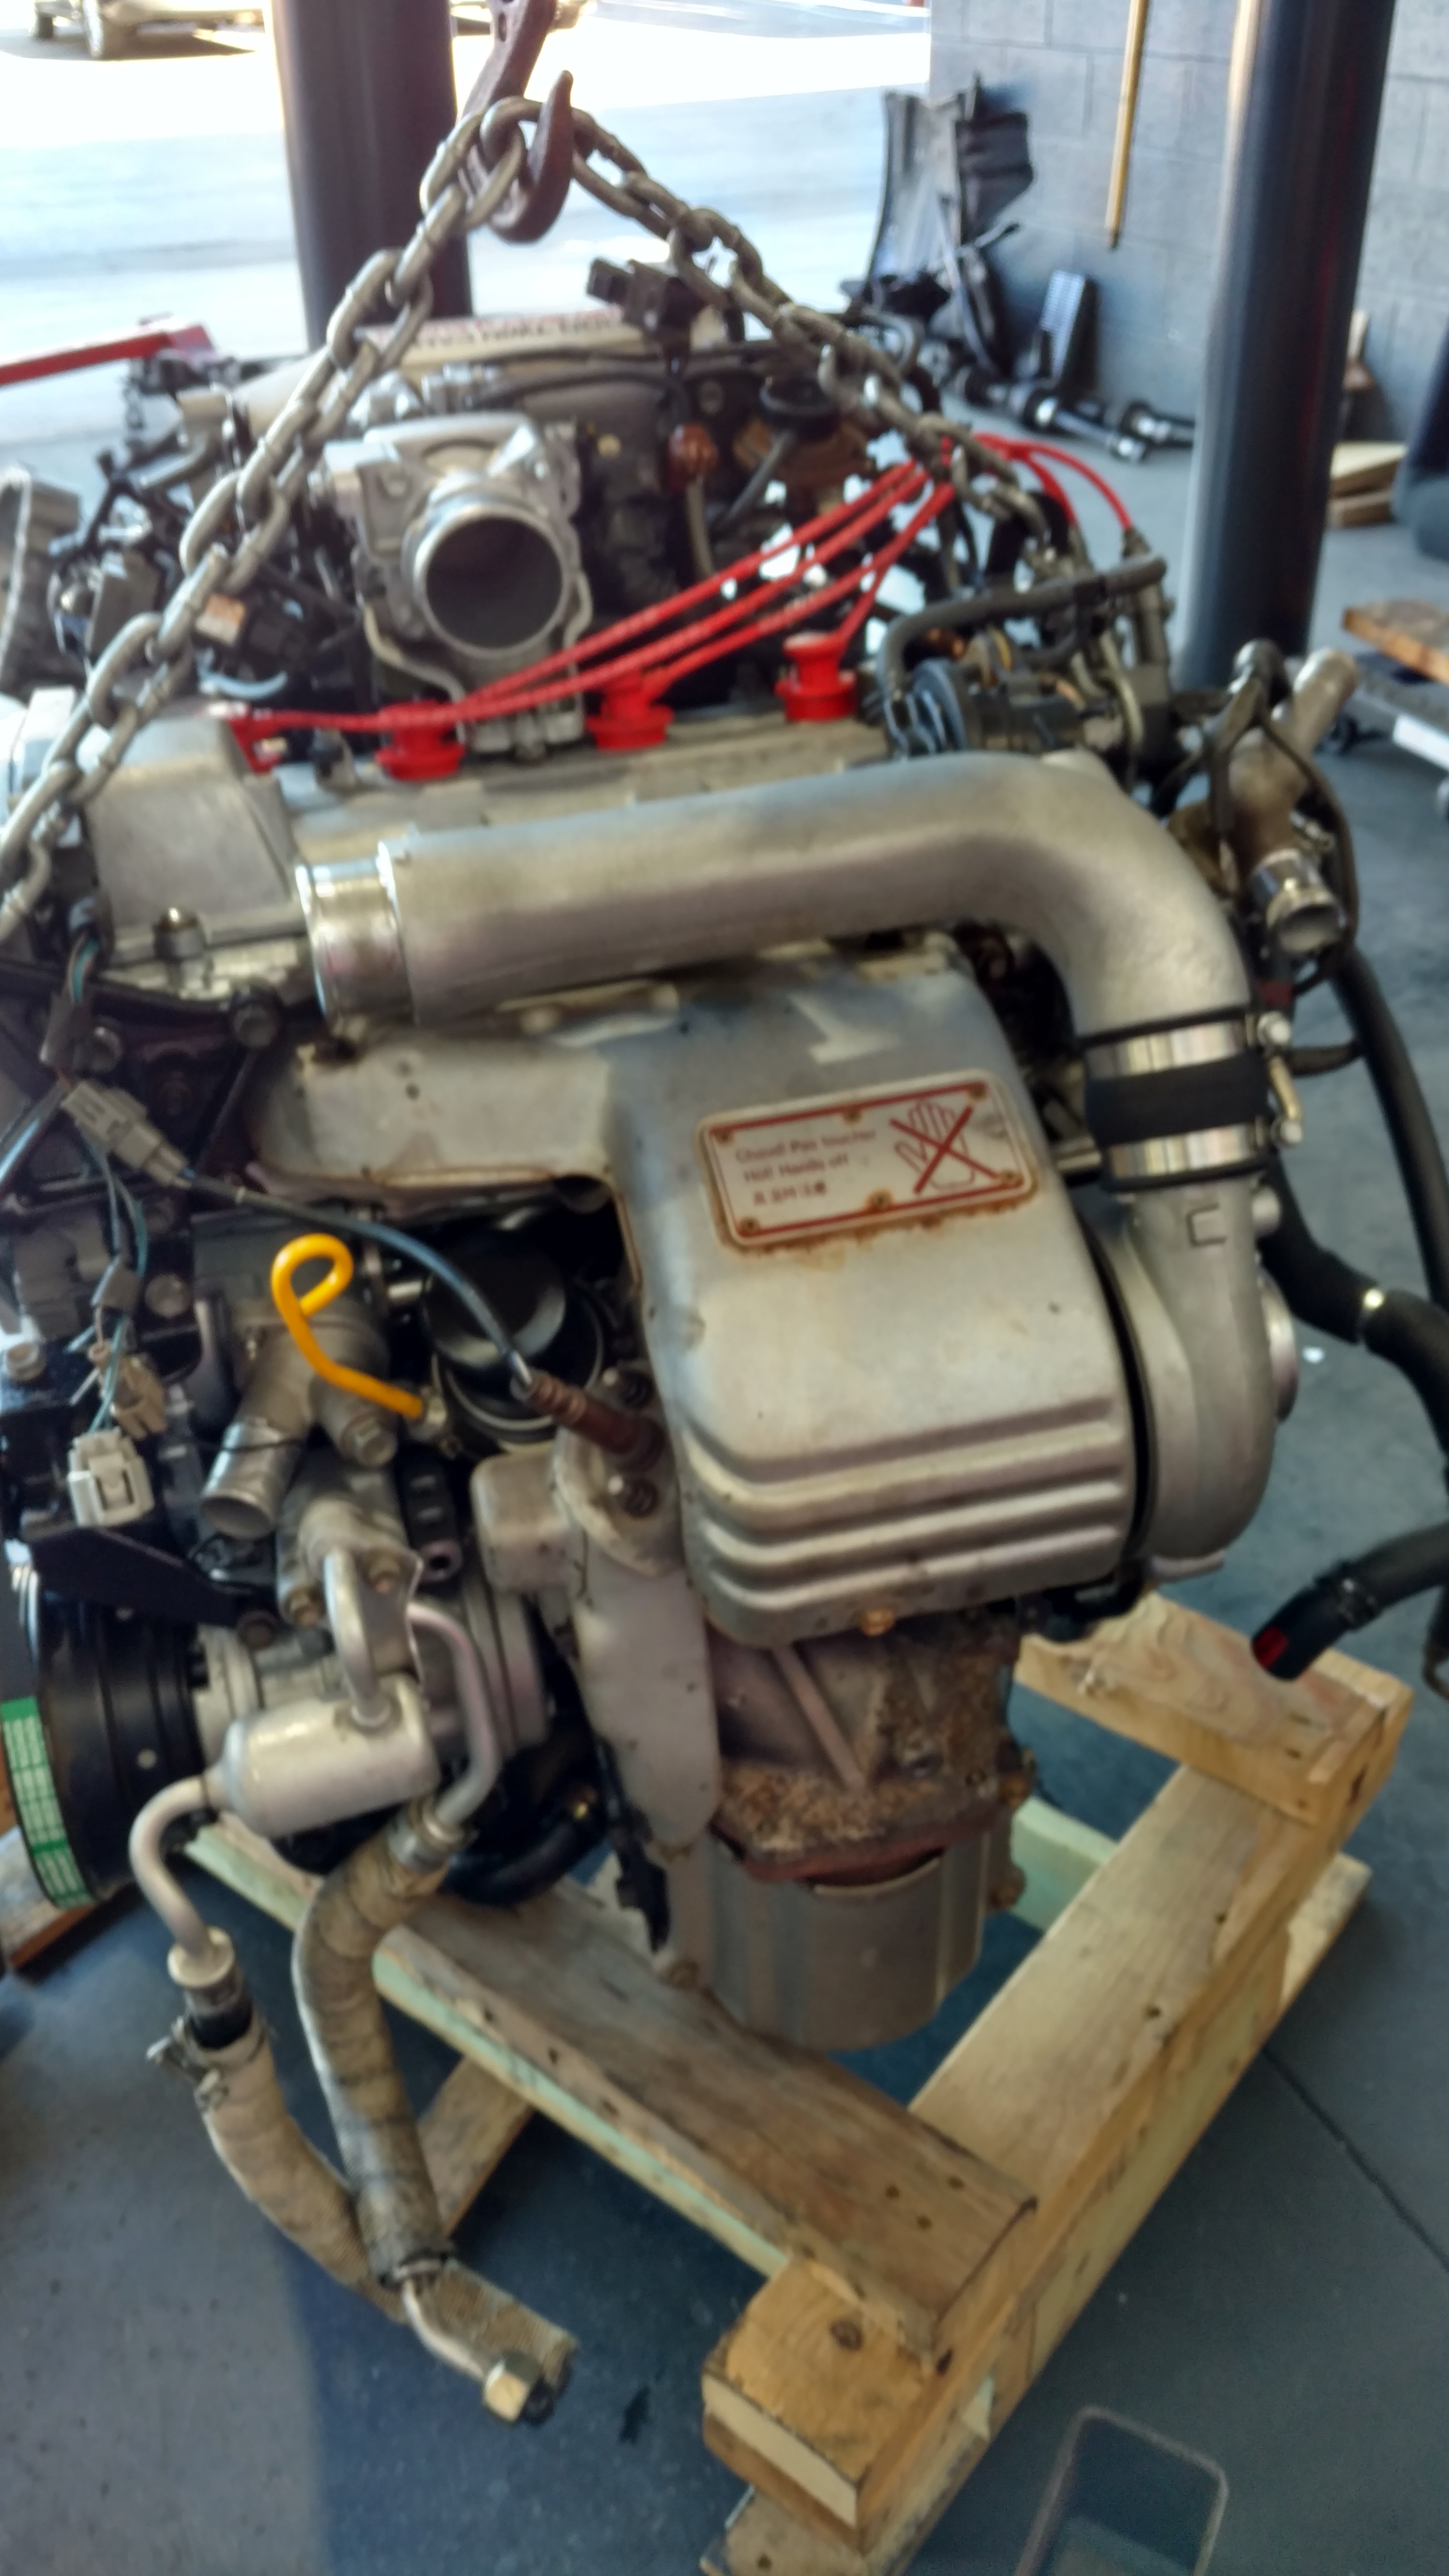
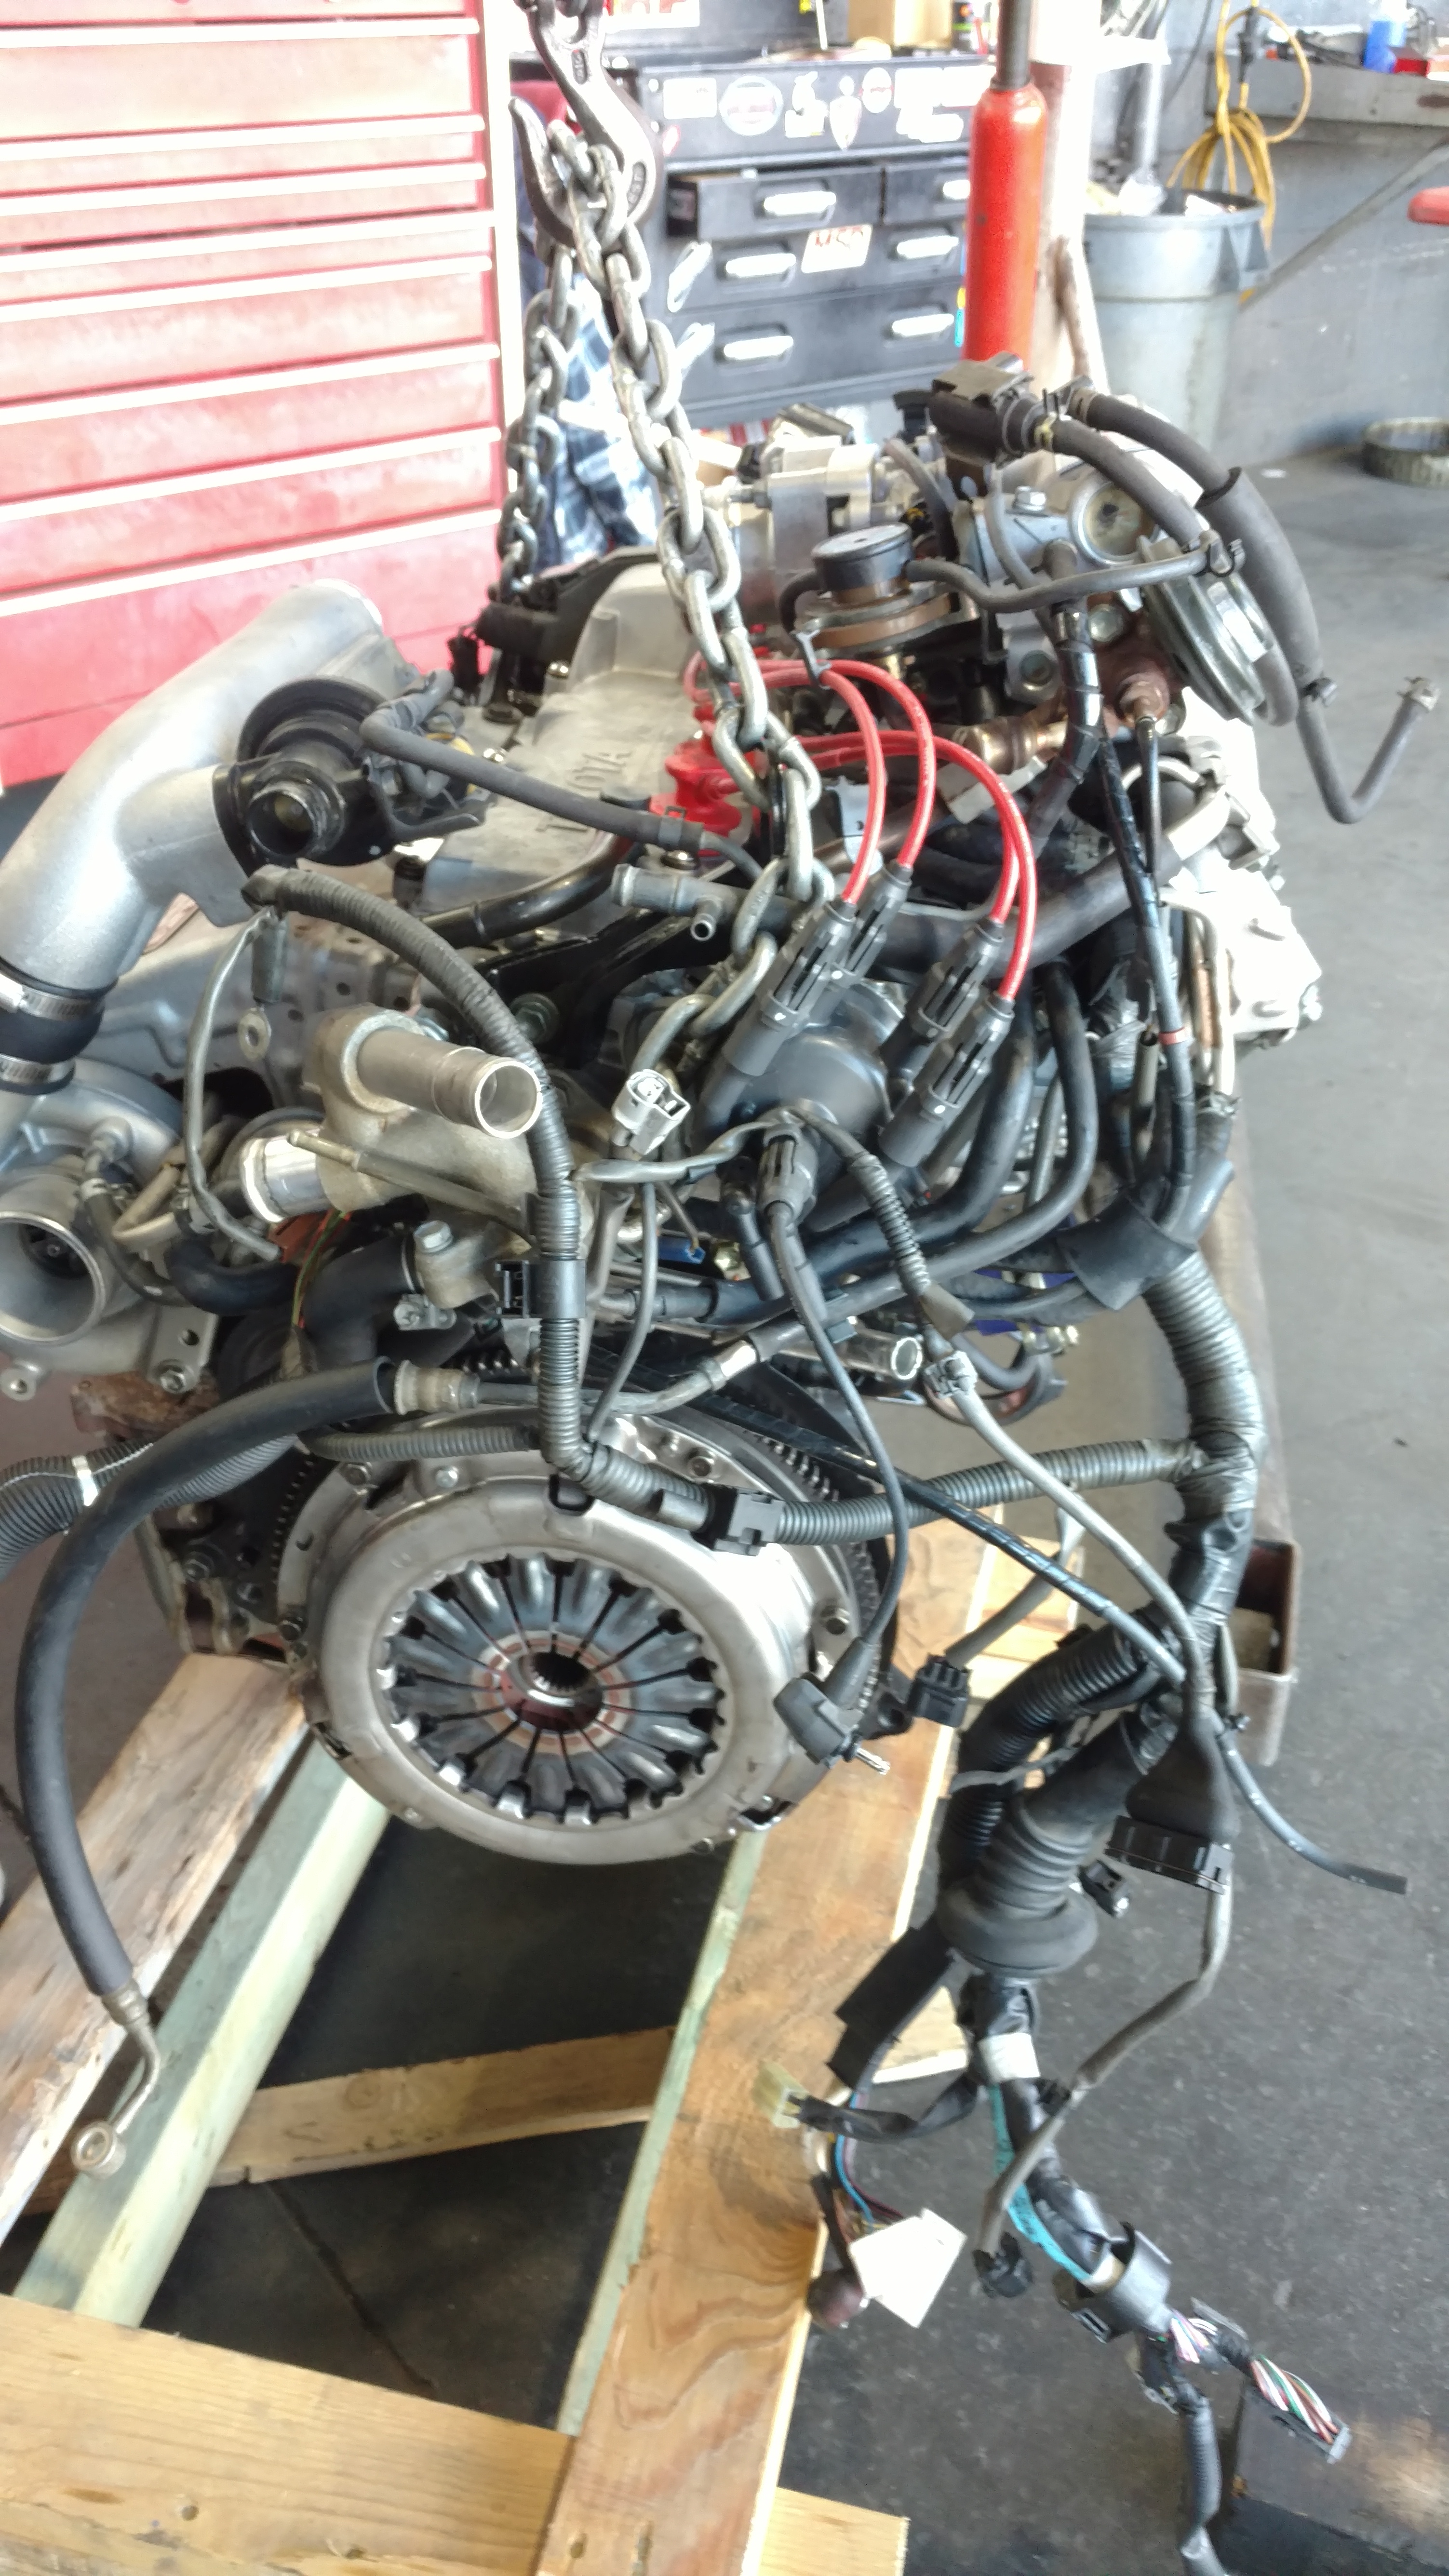
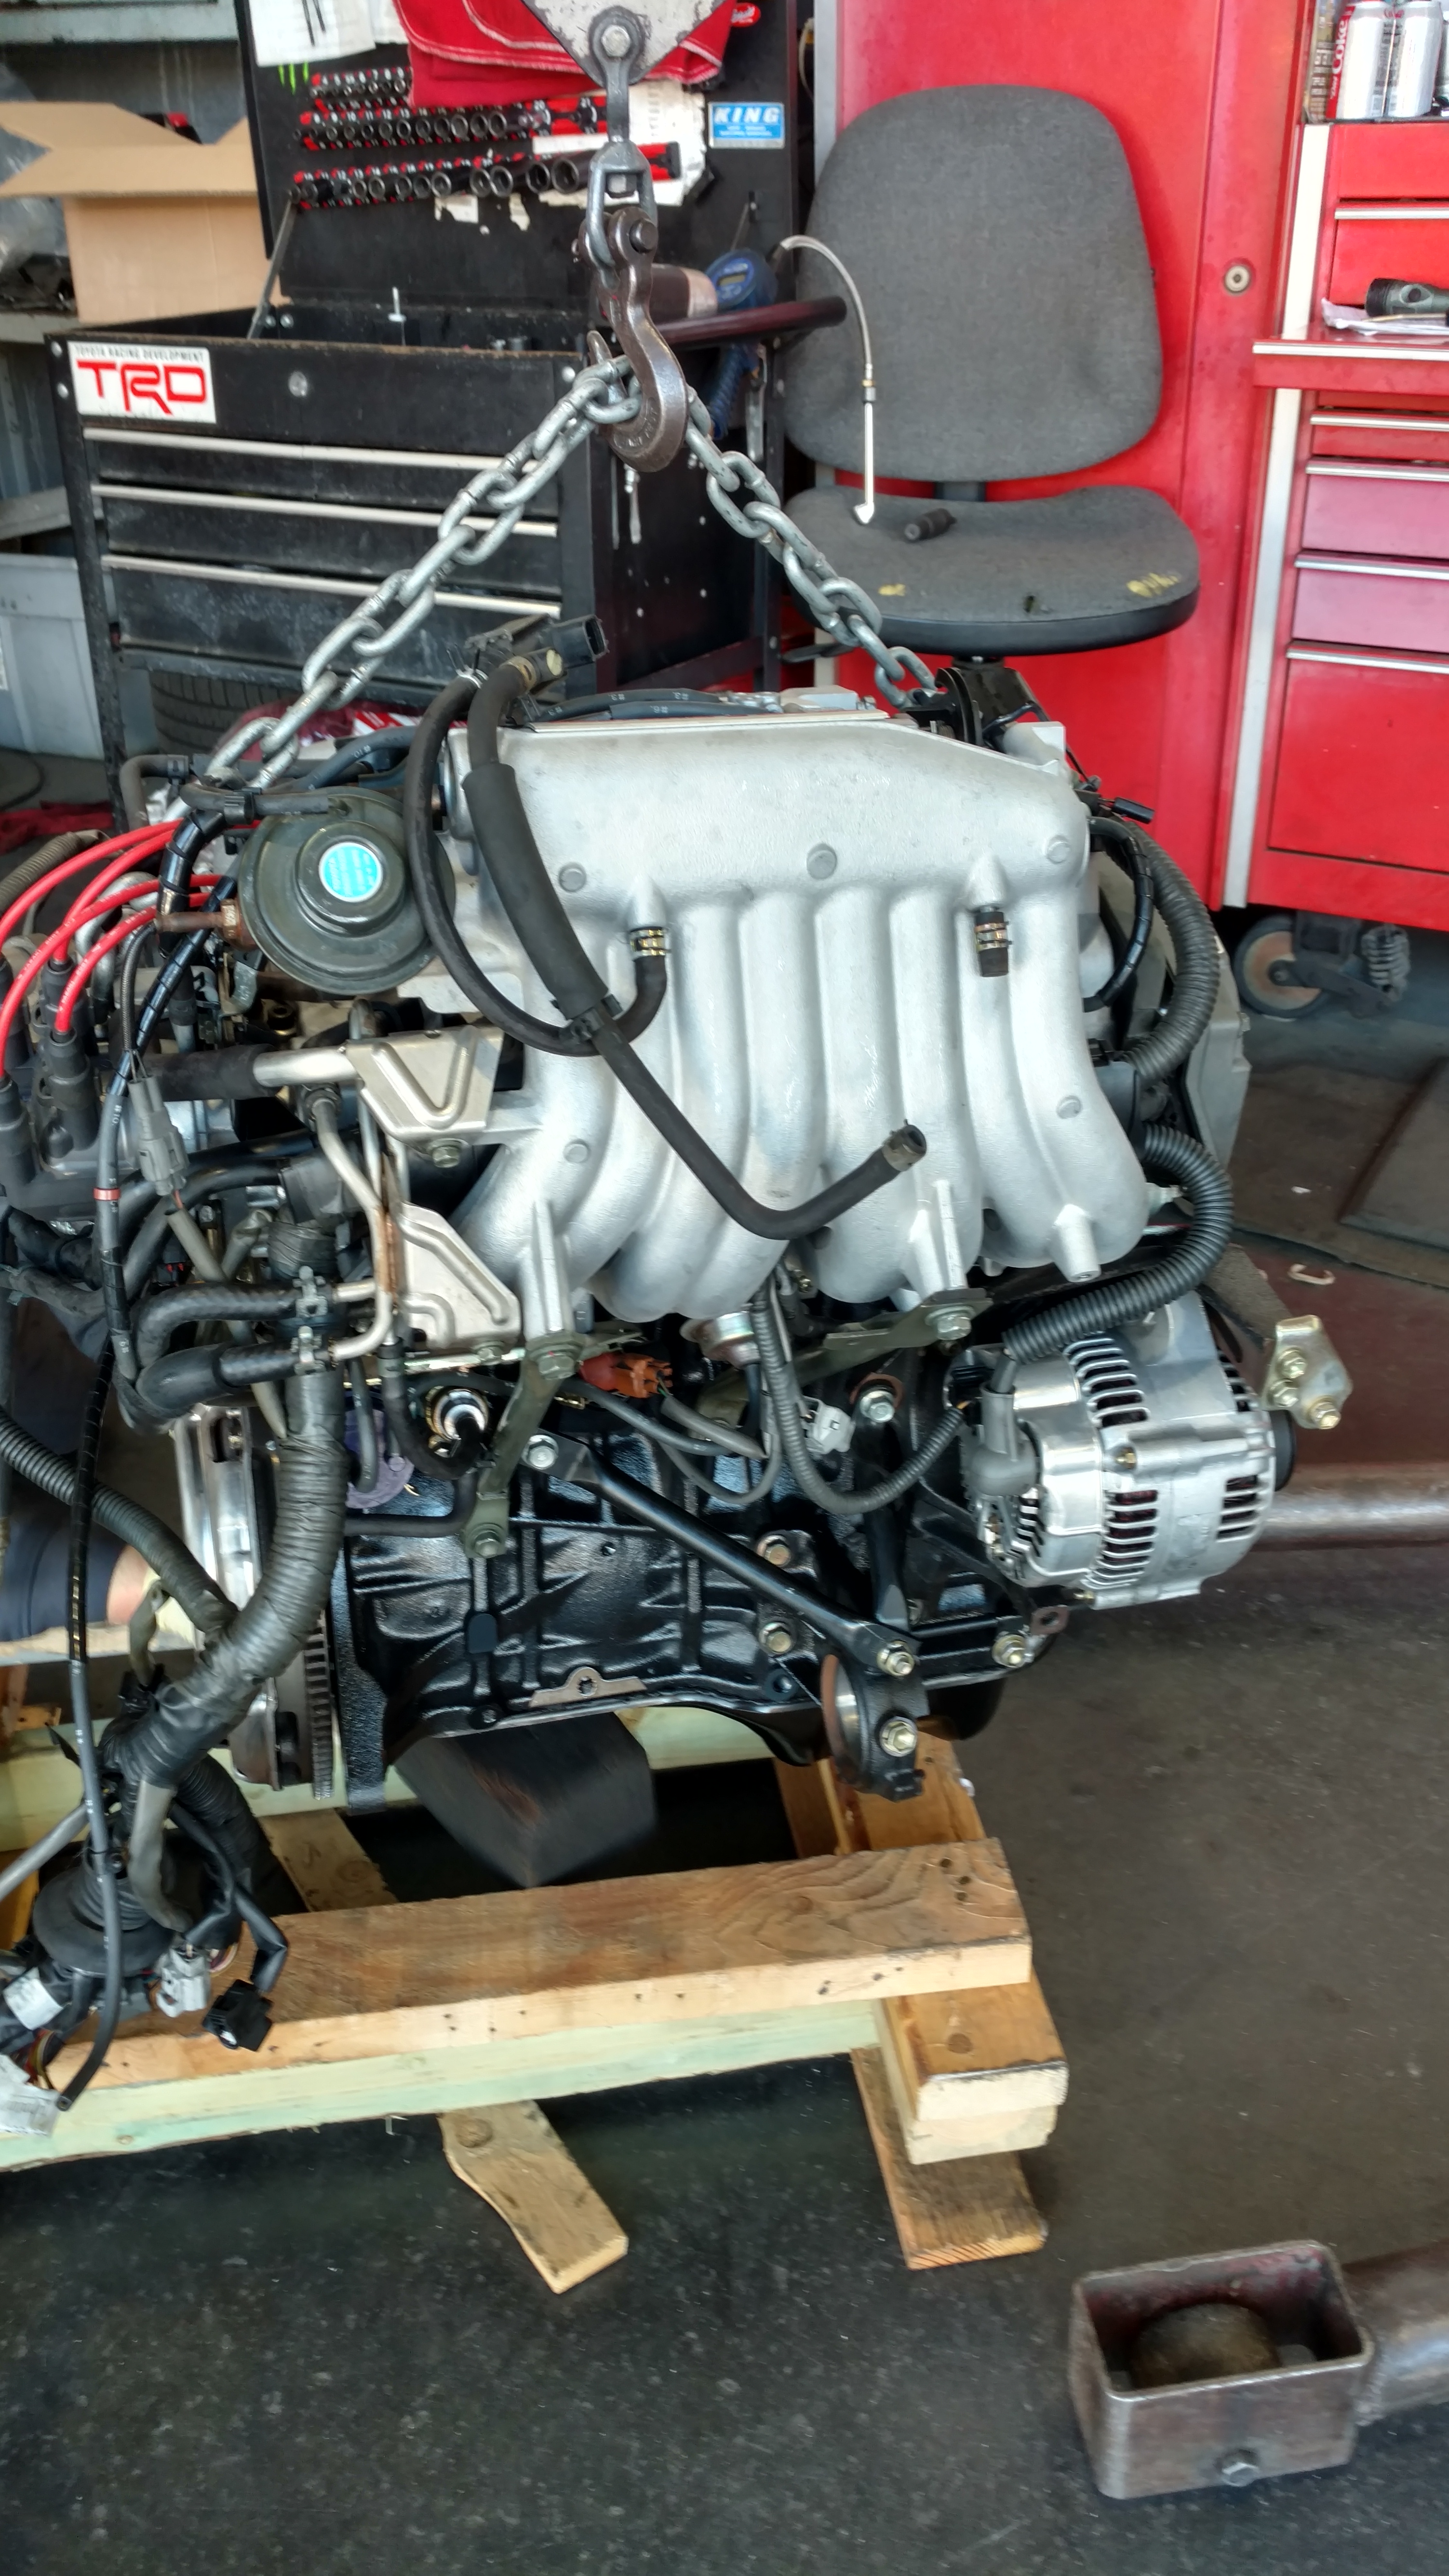
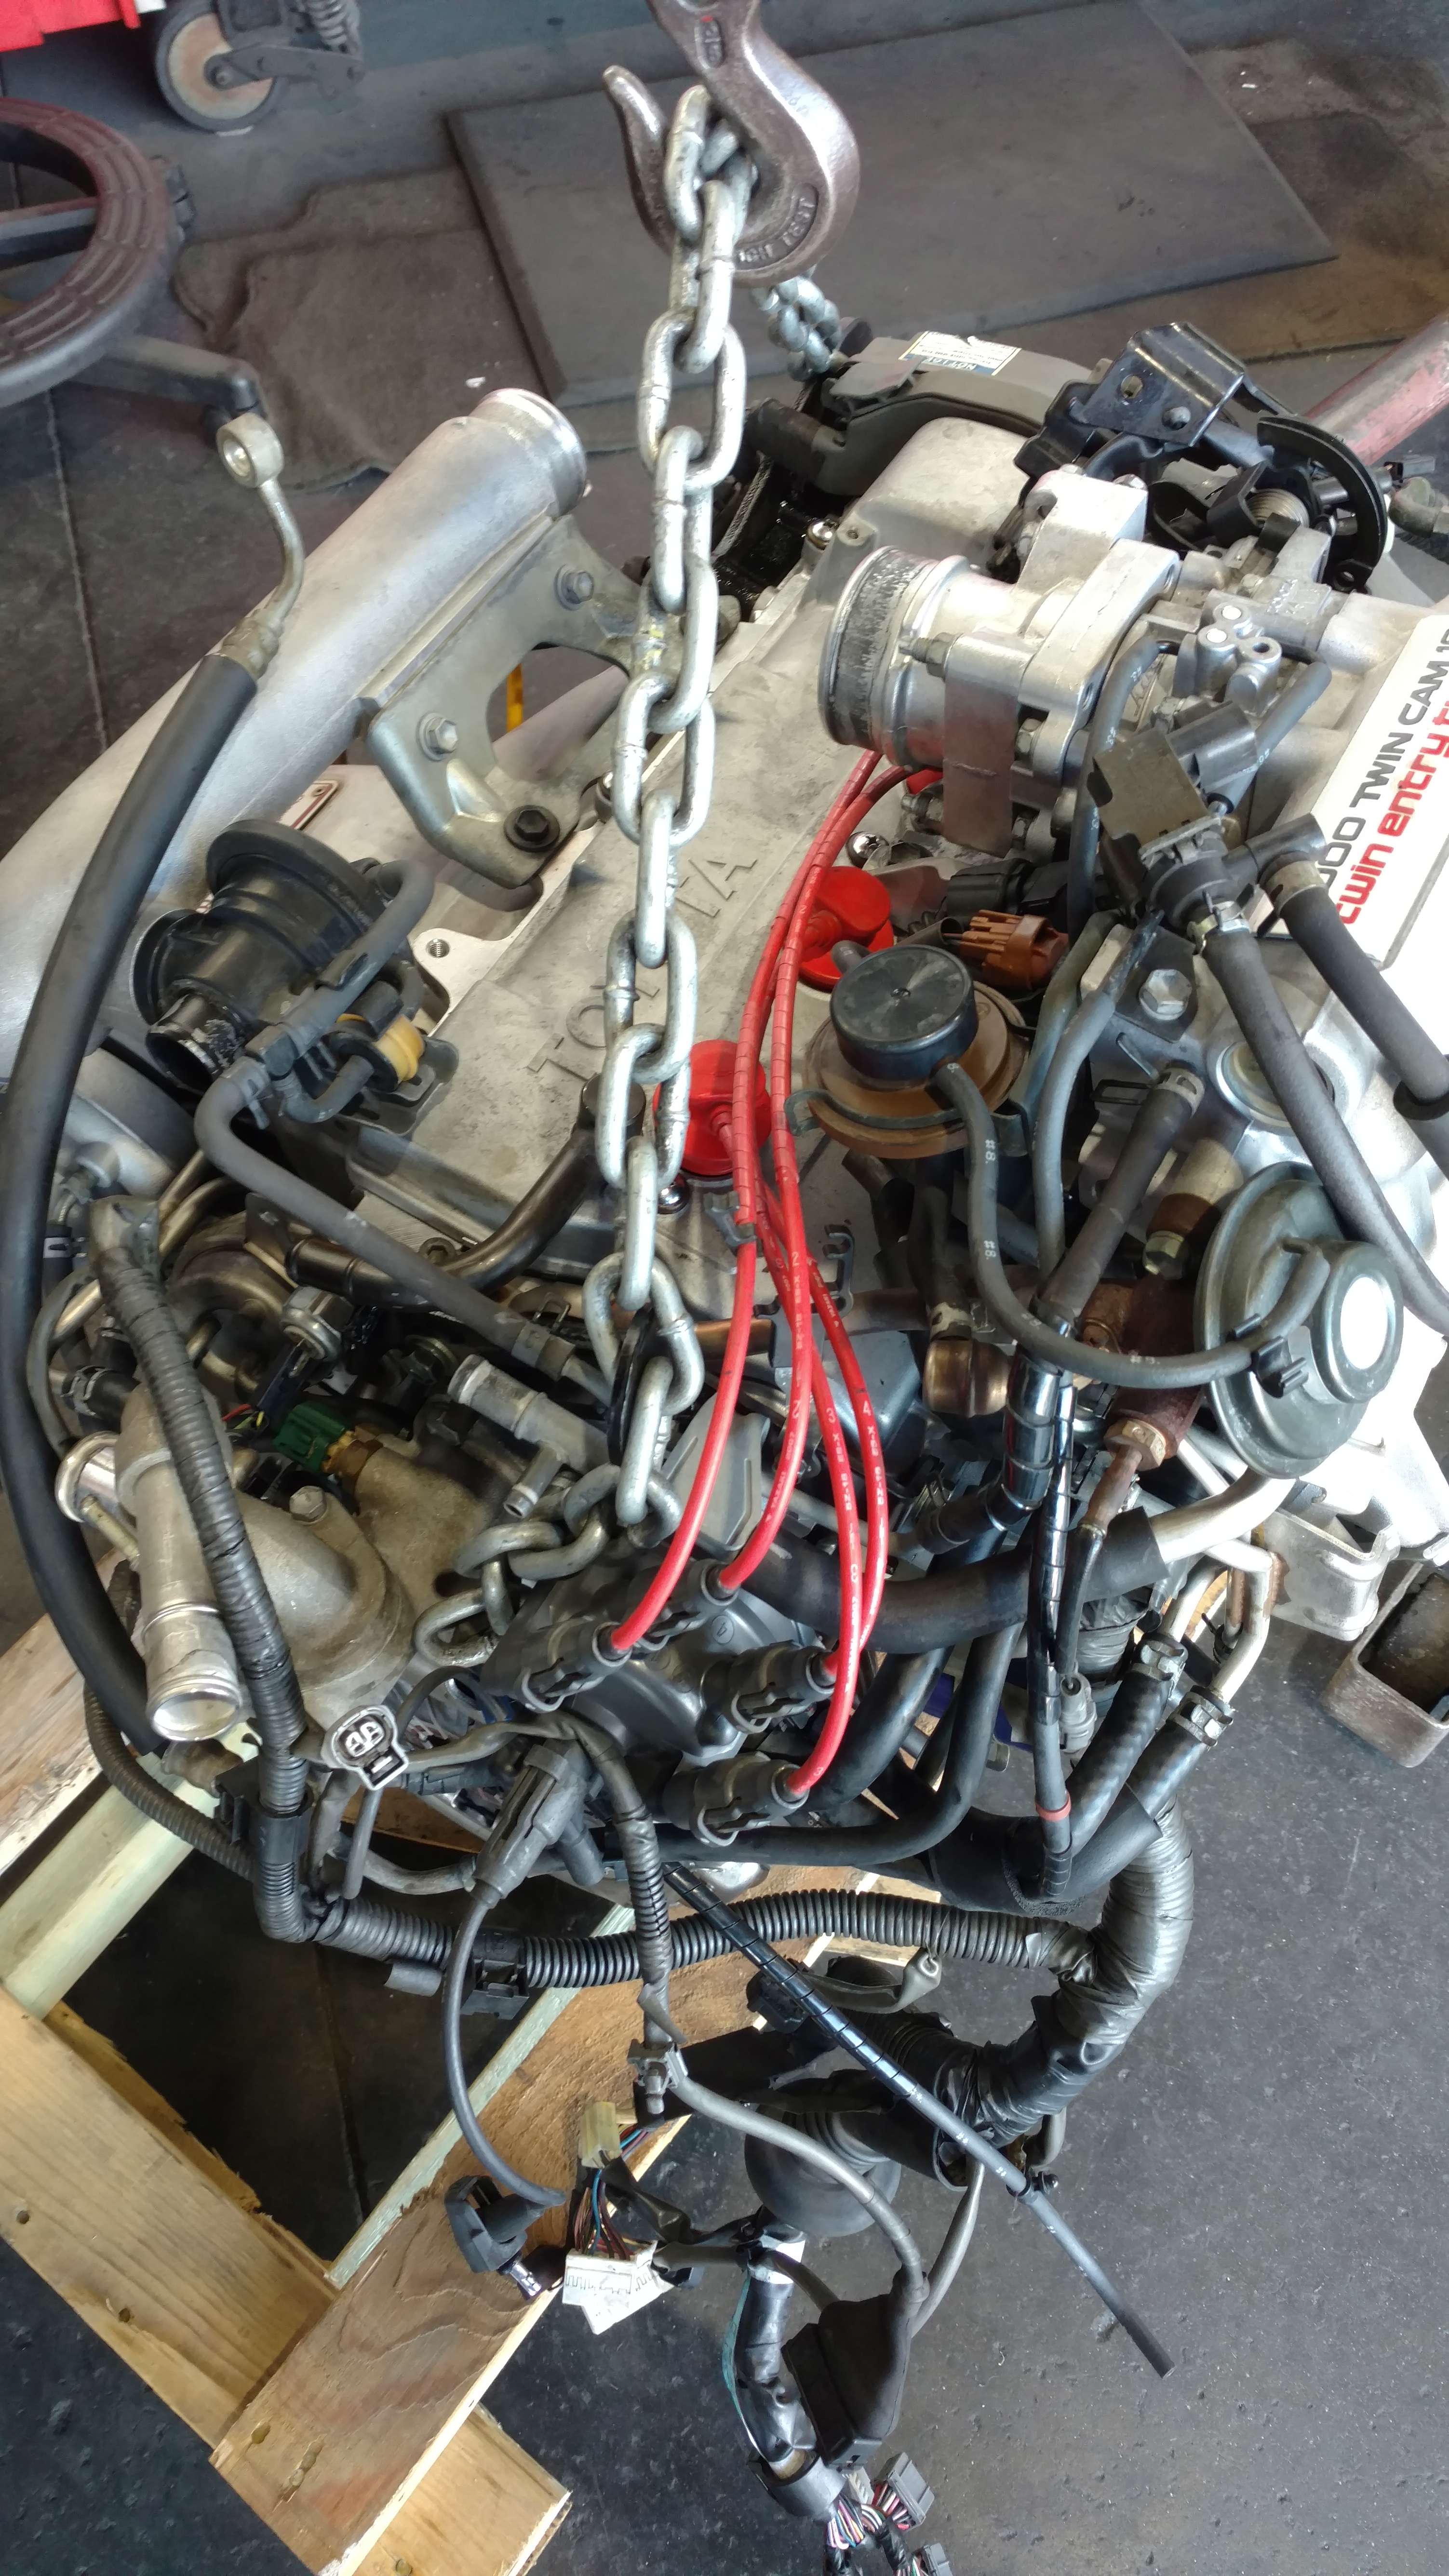
Ok, I promised someone(sorry I don't remember who) that I would post these photos of my engine as it was completed. It is out of ,my MR2 Turbo and is the same engine used in the Celica GT4. Not sure if they will help anyone but here they are. This is the engine in stock trim. The only non OEM parts I used are internal and can't be seen.
-
This is not the usual story, lamenting to passing of another local hobby shop. After 17 years Hobby Town in San Marcos, Ca. is closing up shop this week end. They have been in this location for 17 years and are really good people but at 70 years old, just can't do the work full time anymore. I will most certainly miss them as they are great people. I could always go in and engage them in converstion and get the latest news. That is the bad news. Good news. No, they are not putting in a tavern to replace them. Another large local hobby shop(not Hobby lobby) from south San Diego is looking to open a location here in the north county! Like the old shop, they are primarily plastic, R/C and rocketry. So we could be getting a new hobby shop! Yahoo!
-
Tamiya metallic blue paint acrylic
Pete J. replied to Modeldude428's topic in Model Building Questions and Answers
I would really like to see a photo of your use of it. The area I have the most problem is not the bottom of the panel line but at each edge because the sharp edges on either side of the grove that don't give enough coverage on kits that are molded in white. I have tried thinned paints and other methods to hide that this without much success until I started using black as a base coat. Would love to see anything that works. -
Tamiya metallic blue paint acrylic
Pete J. replied to Modeldude428's topic in Model Building Questions and Answers
I have been using TS-50 mica blue a lot. I'm doing WRC cars and I have found that this paint is really very transparent. Using a white primer or a light base exaggerates the panel lines by making them very light. Flat black seems to give a better finish to my eye. Granted it will be a darker shade of blue but the panel lines are much less prominent. -
And that is the reason to pay a little more for these. The cheap versions are lucky if the end it flat, much less has a real and proper taper. Quality control costs money!