Pete J.
-
Posts
3,981 -
Joined
-
Last visited
Content Type
Profiles
Forums
Events
Gallery
Everything posted by Pete J.
-

New forum format changed the way I view the comments
Pete J. replied to Pete J.'s topic in The Off-Topic Lounge
Just out of curiosity, have you played with the "condensed/expanded" button in the upper right yet? I found the very same thing until I hit on that. I like the condensed version. Much easier to follow. -
New forum format changed the way I view the comments
Pete J. replied to Pete J.'s topic in The Off-Topic Lounge
Peteski, thanks for the tip. I didn't notice how easy it was to pick the topics in the new software. Yes, that is a great way to do it. Not a fan to slogging through stuff that has little or no interest for me. -
They really look nice and I have one but frankly, it use it primarily as a light source rather than a magnifier for me. I found that having to constantly move it around to get it just right annoying. I much prefer an Optivisor. It is always where I need it and easy to use. I don't have to keep moving it around and I have multiple lenses to suit the level of magnification I need. I would then just get a good goose neck light or the attachable LED lighting package for the Optivisor. By the way, the reason I got and Optivisor brand is that the lenses are ground glass and impervious to the solvents that we use as model builders.
-
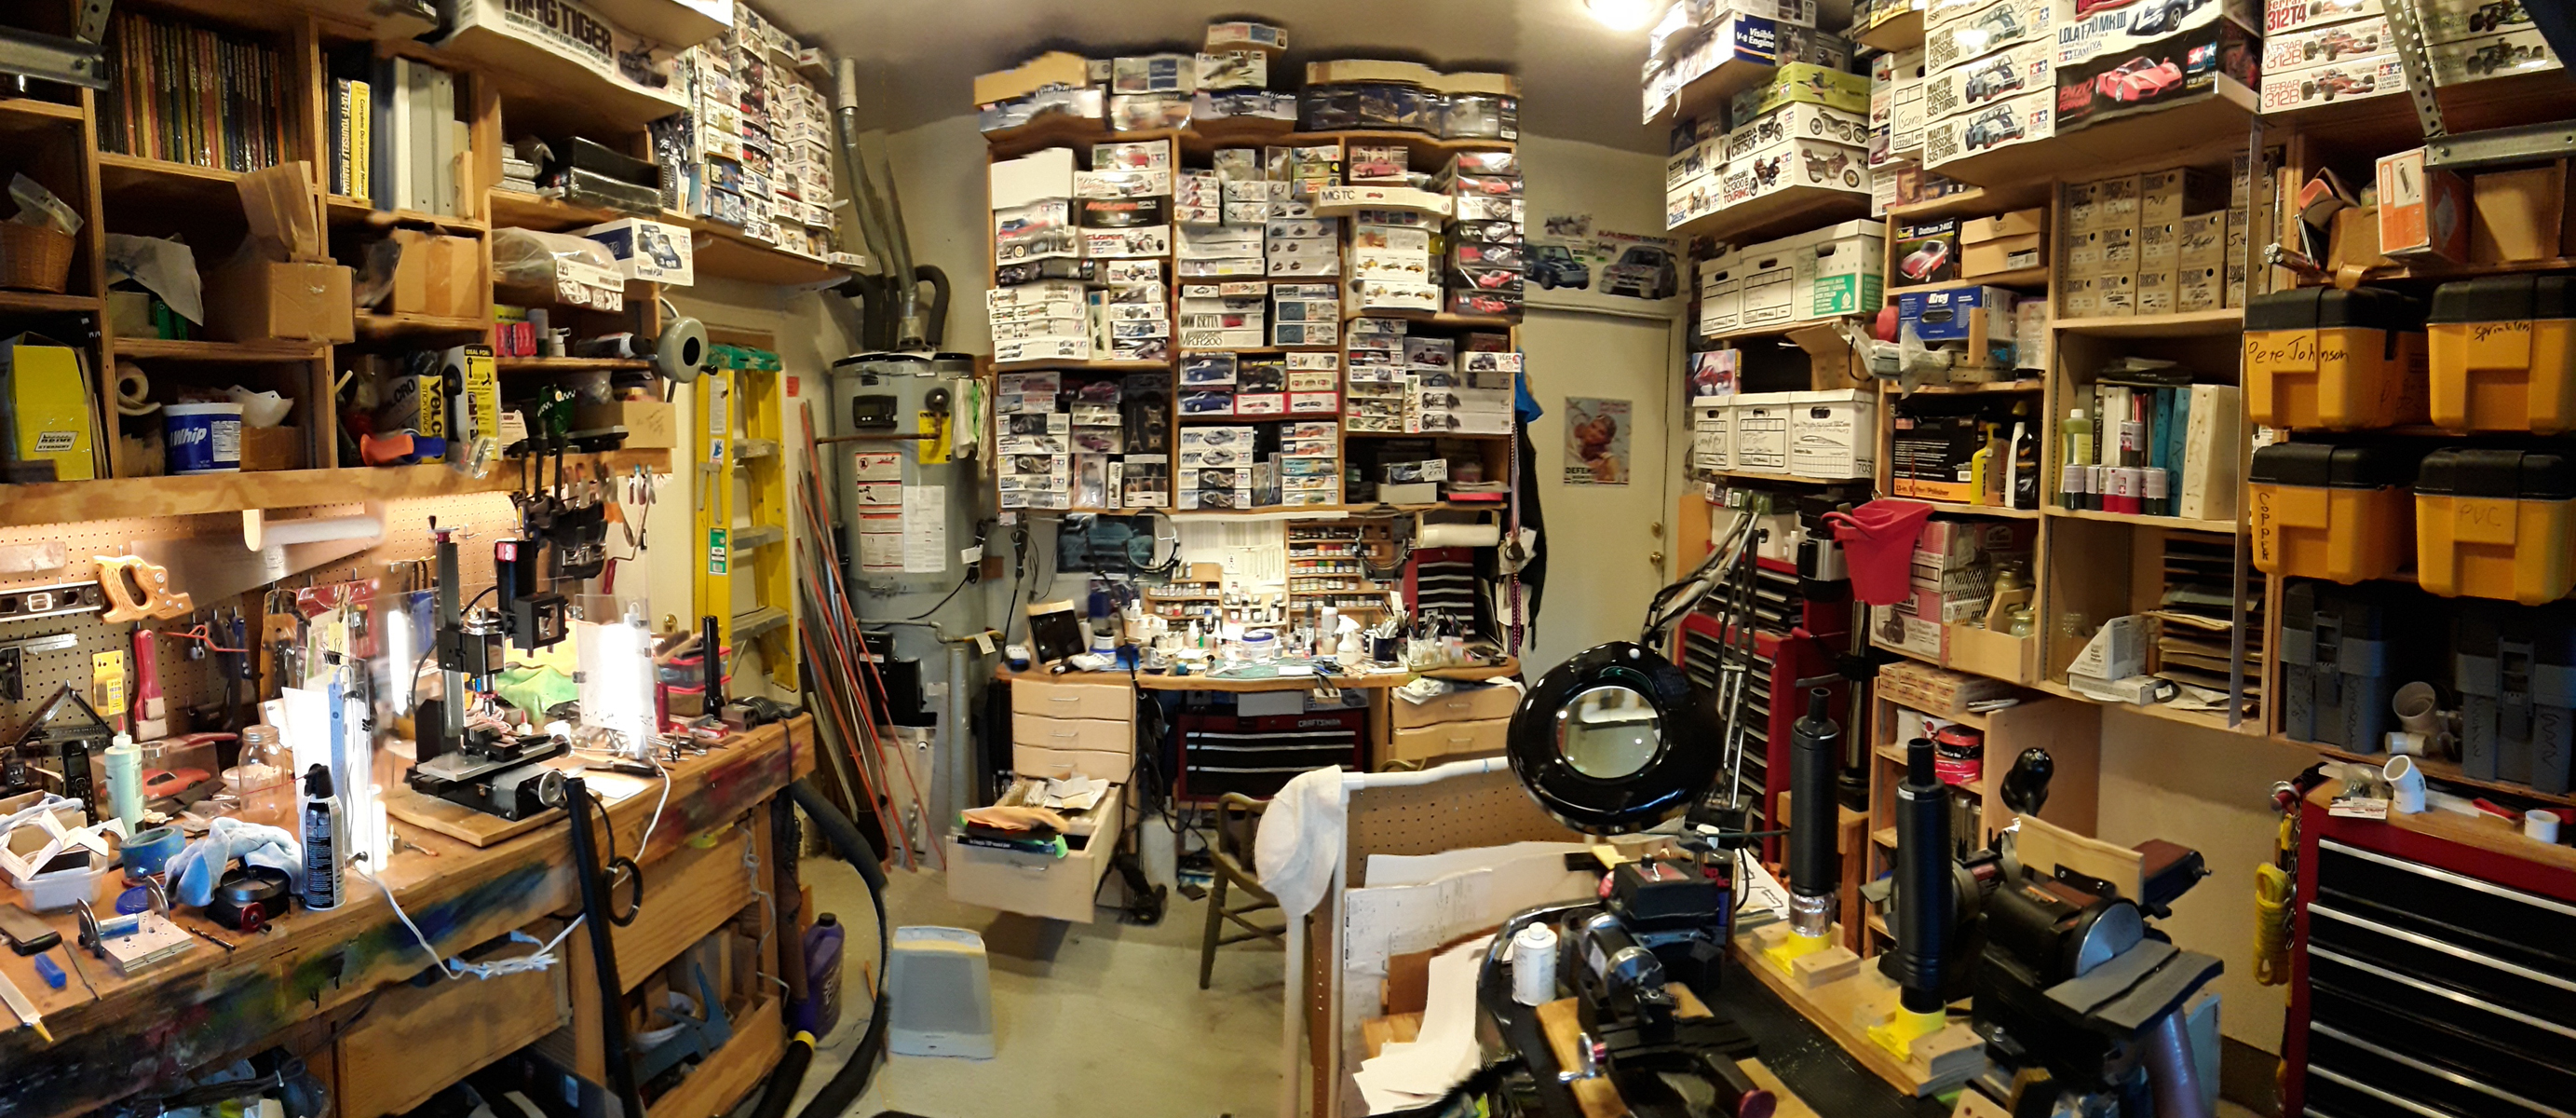
A bit of advise on workbenches. I would suggest you sit down with a piece of graph paper and a pencil and sketch out what you need. Keep in mind the actual space you need to accommodate the models that you build. Most of us actually use a space that is about 1 foot by 2 foot square. The rest is for clutter and a place to loose stuff. Really it isn't. That is for you to organize and store the stuff you use to build with and need close at hand. Then go for the tools you don't use as often but need to have organized for quick access. These should be drawers that are close and hand. Then the long term storage stuff like extra paints, glues, scratch building supply's etc in shelving or tool cabinets. Finally, model storage. Shelves up high work well. I scratch built my own shop this way and still find things I would have done differently, but a few minutes of thinking your way through it will make building much more pleasurable.
-
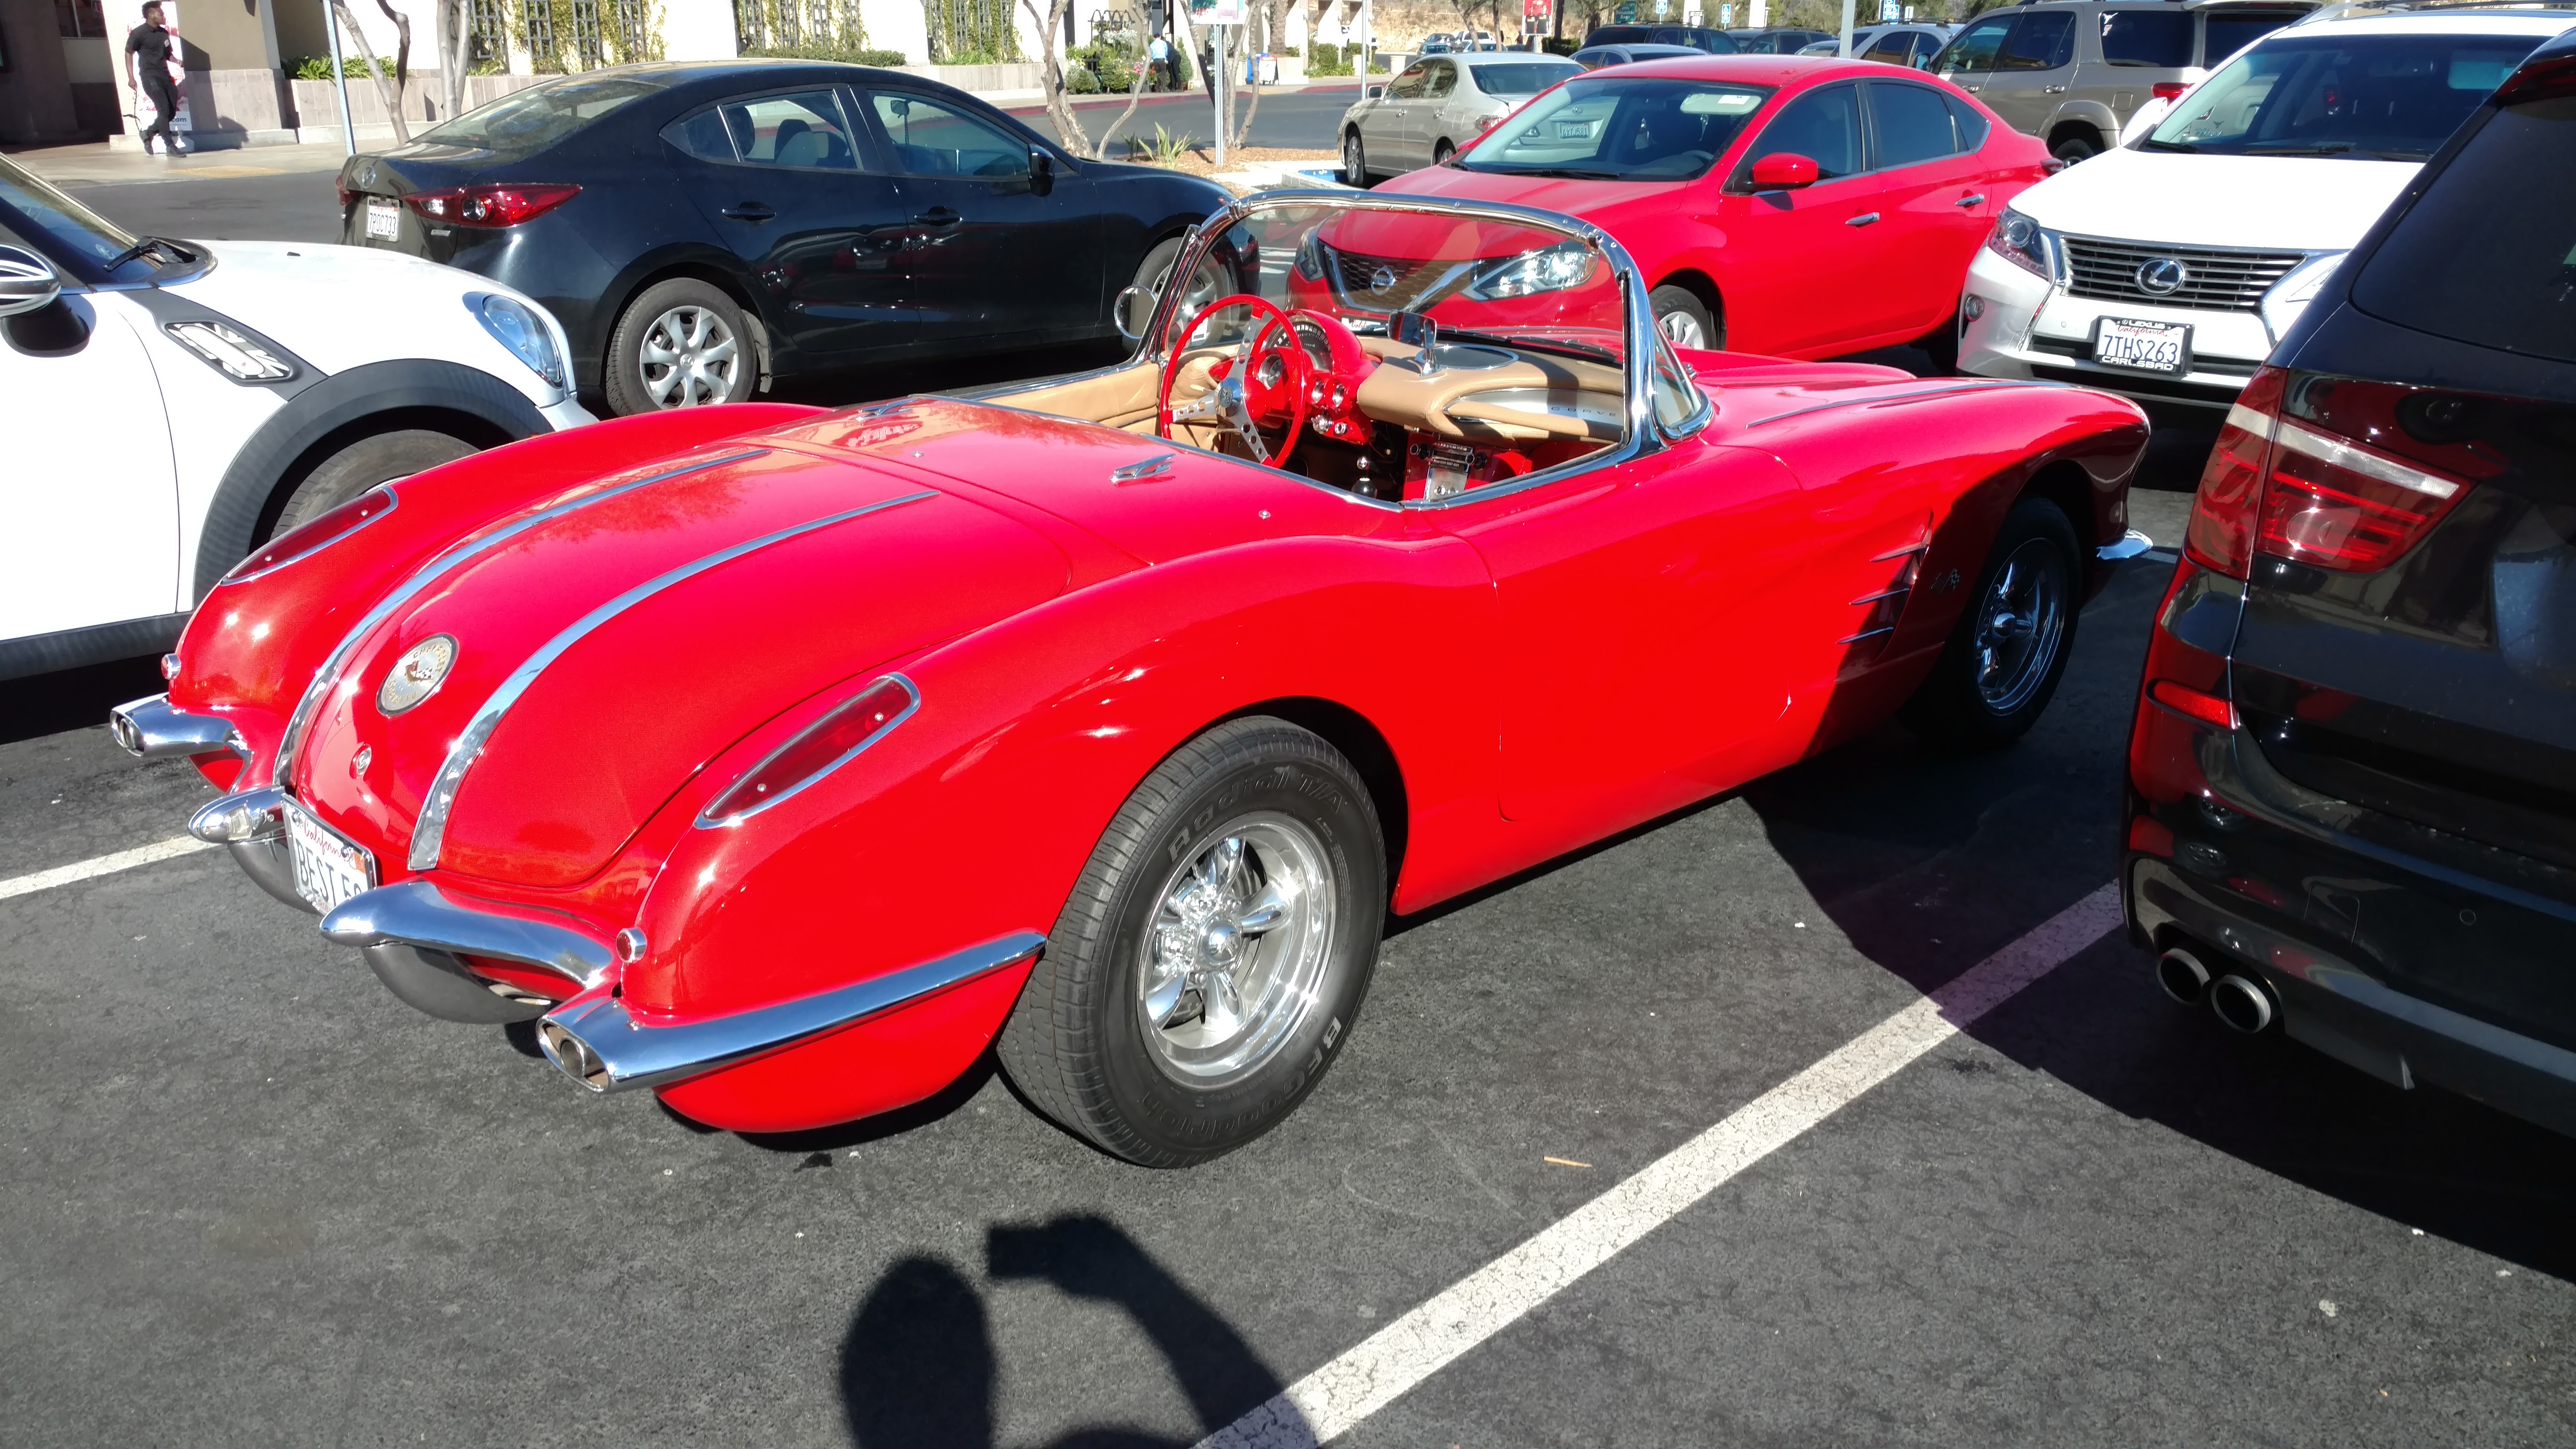
...and it was there for a while. It was there when I went in and still there when I came out and I had a fair amount of shopping to do. Stunning car. It was contest condition!
-
I was at Ralph's this morning picking up supplies to start work on our Christmas dinner and saw this in the parking lot. All I could think of was this has to be Santa's ride!

-
At first I was not a real fan of the new format then I discovered a little trick that I have been using. Then I first bring up the forum, which I have me show only stuff I haven't read, I go straight to the bottom and "load more" until it gets to the "no more to load" and then work my way back up the list. Just seems a little easier and quicker for me. Wondered if any one else does this?
-
Jim, I was very lucky. The vast majority of my stash was the result of work I did for Tamiya USA and other modeling companies over the years. They paid in product, so the stash just sort of grew!
-
Yup, I am starting to get a great "patina". Graying beard and a few more wrinkles. I retired 4 years ago and to my suprise, my modeling slowed down a lot!
-
Jim, I fear that we are the exception. I see many builders who are thankful for having a desk in the basement. I do appreciate the luxury that I have. This is a single car garage that I have converted to my purposes. I am grateful for the space I have but even then, I would like a bit more. I know it probably doesn't look like it, but there are well over 500 kits in this space. Most are stacked two deep. Or should that be too deep! My wife thinks it is the latter!
-
I would do that, but you probably don't have room!
-
You are both right. I assure you I am having fun. I have said many times, the fun is in the building, not the finishing, but generally I manage to get something done to throw on the table. It just didn't happen this year and I was surprised when I realized that. I suppose it was inevitable as I am not a fast builder. I have builds that have taken as long as five years. I do like to have something to contribute at contests, just for conversations sake and because I didn't have it, I didn't go to many shows this year either. Perhaps next year will make up for that.
-
Okay, it is time for me to own up to something. For the first time in probably 25 years, I did not complete a single model in 2017! How the heck did that happen! Started a few. Got a lot done on others, but absolutely nothing completed!
-
What did you see on the road today?
Pete J. replied to Harry P.'s topic in General Automotive Talk (Trucks and Cars)
Maybe not exactly the intent of this thread, but I did see it on the road and it was very moving. Sunday we were going to visit our grand son and were driving from San Diego north to Ventura. We started noticing fire equipment on every over pass over the 405. With the fires going on, I was initially very concerned that the fires were spreading south. Then it occurred to me, the remains of San Diego fireman Cory Iverson, who died fighting the Thomas fire in Ventura were being transported to his family in San Diego. It was very moving to see thousands of fireman lining the overpasses all the way on the three hour drive. I was also very please to see another thing happen. As the procession passed us going south, everyone in the northbound lanes stopped on the busiest freeway in California in deference to the fallen fire fighter.
-
Cleaning lacquer from an airbrush
Pete J. replied to Jaguar man 21's topic in Model Building Questions and Answers
One other interesting thing that should be done with all airbrushes that I would bet almost no one does. The needle should be lubricated. Yup, lubed up after every cleaning. I helps the seal last longer and makes the needle slide without sticking. Ok, so what do you use? Airbrush needle lubricant of course! Yes, it actually exists and is not a muffler bearing grease or the like. Any airbrush dealer should have a small tube of it. There are several makers but Iwata is the one I am familiar with. Just a touch on the needle just behind the taper before you slide it in. This stuff does not interact with paint or cause any problems that I have ever encountered and I have sprayed just about every kind of paint I can think of through my brushes. -
Cleaning lacquer from an airbrush
Pete J. replied to Jaguar man 21's topic in Model Building Questions and Answers
Ok, here's the deal. Flush it with lacquer thinner and then spend the twenty or thirty cents to get a teflon bearing, change it out and never worry about it again. The large airbrush online shops like Coast Airbrush have them. A quick phone call and you are on the way! -
Ok, I'm going to be the cranky old guy here and point something out. It would be a good thing to know the actual history of the 1:1 event so here it is. Although Brock Yates and Car and Driver were behind the whole shebang, the true name of the event was The Cannonball Baker Sea to Sea Memorial Trophy Dash. It was held first in 1971 and had very humble beginnings. All the movies and other stuff that came after did not do justice to what amounted to a bunch of gear-head anarchists sitting around and more than likely alcohol was involved, having a discussion about what the best car and best route to drive from New York to California was. Remember, this was pre GPS days when a good map and some knowledge was king. For those who are interested, here from the dusty archives it the C&D article of the original run. https://www.caranddriver.com/features/the-cannonball-baker-sea-to-shining-sea-memorial-trophy-dash-archived-feature. Incidentally the original race had only 9 participants of which there was a Ferrari Daytona(winner) , MGB-GT, AMC AMX, several vans and a motorhome(last place).
-
Yup, that wing is a nice piece of jewelry for that end of the car. Definitely belongs!
-
Well, the top two look like the Heller type 50 Bugatti coupe kit. My first thought on the middle was a Tamiya Jaguar saloon, but Tamiya always has there logo on the sprue along with a sprue ID letter or number so I still think the Jag is right but a different company. The bottom one I am clueless on.
-
Killer idea! I would bet that every hot rodder on the planet would love to have one of these on the tree! You could probably keep busy all year pin stripping to deal with the Christmas demand if you ever decided to sell them!
-
PLEEEEEEEZ! Just go back to Flyoverlandia!
Pete J. replied to SfanGoch's topic in The Off-Topic Lounge
Wow, kind of a Sturgess in costume and without the bikes! That is strange! -
Boy Tim, it just keeps getting better and better. When you are done, I want to know what shows you are taking it to. I want to see it in person but I also will not bother bring any of my models.
-
Spray paint = throwing paint away?
Pete J. replied to Lovefordgalaxie's topic in General Automotive Talk (Trucks and Cars)
I have my own methods of decanting Tamiya paint which involves a jig the safely punches two holes in the can and lets the propellant escape. It is a saddle valve setup so I can do it in a very controlled fashion. When I am done, I have some Tamiya glass jars that I keep the paint in. They are the tall 50ml jars and a rattle can will fill one nicely. 50ml is really a lot of paint. You are very right to be concerned about the over spray. An airbrush generally has a much tighter pattern so it is much better controlled and depending on the paint and brush, it has a much finer atomization(smaller drops of paint). For the frugal among us a good airbrush may cost a couple of hundred bucks with compressor, but at $10 a can, if you waste half of it using the rattle can, it doesn't take long to pay for an airbrush! Not to mention the ability to lay down more complex paint jobs. Now don't get me wrong. I still use rattle cans for simple quick sprays like a bunch of small parts on a sprue that are all the same color(often flat black) because a quick squirt with a rattle can takes far less time than setting up the airbrush and cleaning it. But for a real spraying session on a complete body, yea, I get the air brush out. By the way, Tamiya is going to be releasing their lacquers in small jars later this month! I am interested to see the price. I would bet good money that a decanted rattle can will still be the most economical way to go. If current pricing is any indication, decanting your own will probably still be about half the price. -
They pop up on E bay from time to time. Just did a search and there are two on there now for $150 to $175 but that is just someone being hopeful. A search of them for sale shows they are about $35 to $65. I may get another one just to have one to keep and one to build. Oh, and the original store displays go for a couple of hundred. Strong money for what was basically a joke! Perhaps we should build them for "anything but a car" night. What do you think? By the way, if you know what parts are missing, perhaps I could machine them for you using my kit as a pattern.
-
Hey Jesse, I've got and origninal Flap Jack in the box. They were really fun to build. Years ago, I painted one in Vietnam Camo, bobbed the wings and added Sparrow missiles from an old 1:32 scale F-4. Thing was a hoot, but with the added weight on the wings, it to a little push to get the motor to run. Added a second battery pack to double the juice and burnt the motor up!