Pete J.
-
Posts
3,981 -
Joined
-
Last visited
Content Type
Profiles
Forums
Events
Gallery
Everything posted by Pete J.
-
Thank you Tim! You and Randy give me the drive to keep after it. Much appreciated!
-
Randy, thanks for the comment. I decided to do the nut and stud this evening. That seems to be the way it is on the real aircraft, as near as I can tell from very fuzzy old B&W photos. Your concurrence just cemented the deal! The last photo shows all the scrap bits of brass that just didn't work. That doesn't include the pieces that were hurled at the trash can in disgust! I would guess I used about two and a half feet of brass strip to get 20+ pieces .160" long. I was so frustrated early on, that I had to walk away and let the old brain consider other ways to make this part. Sometimes it is the littlest stuff that drives you nuts! Thanks again for your comment.
-
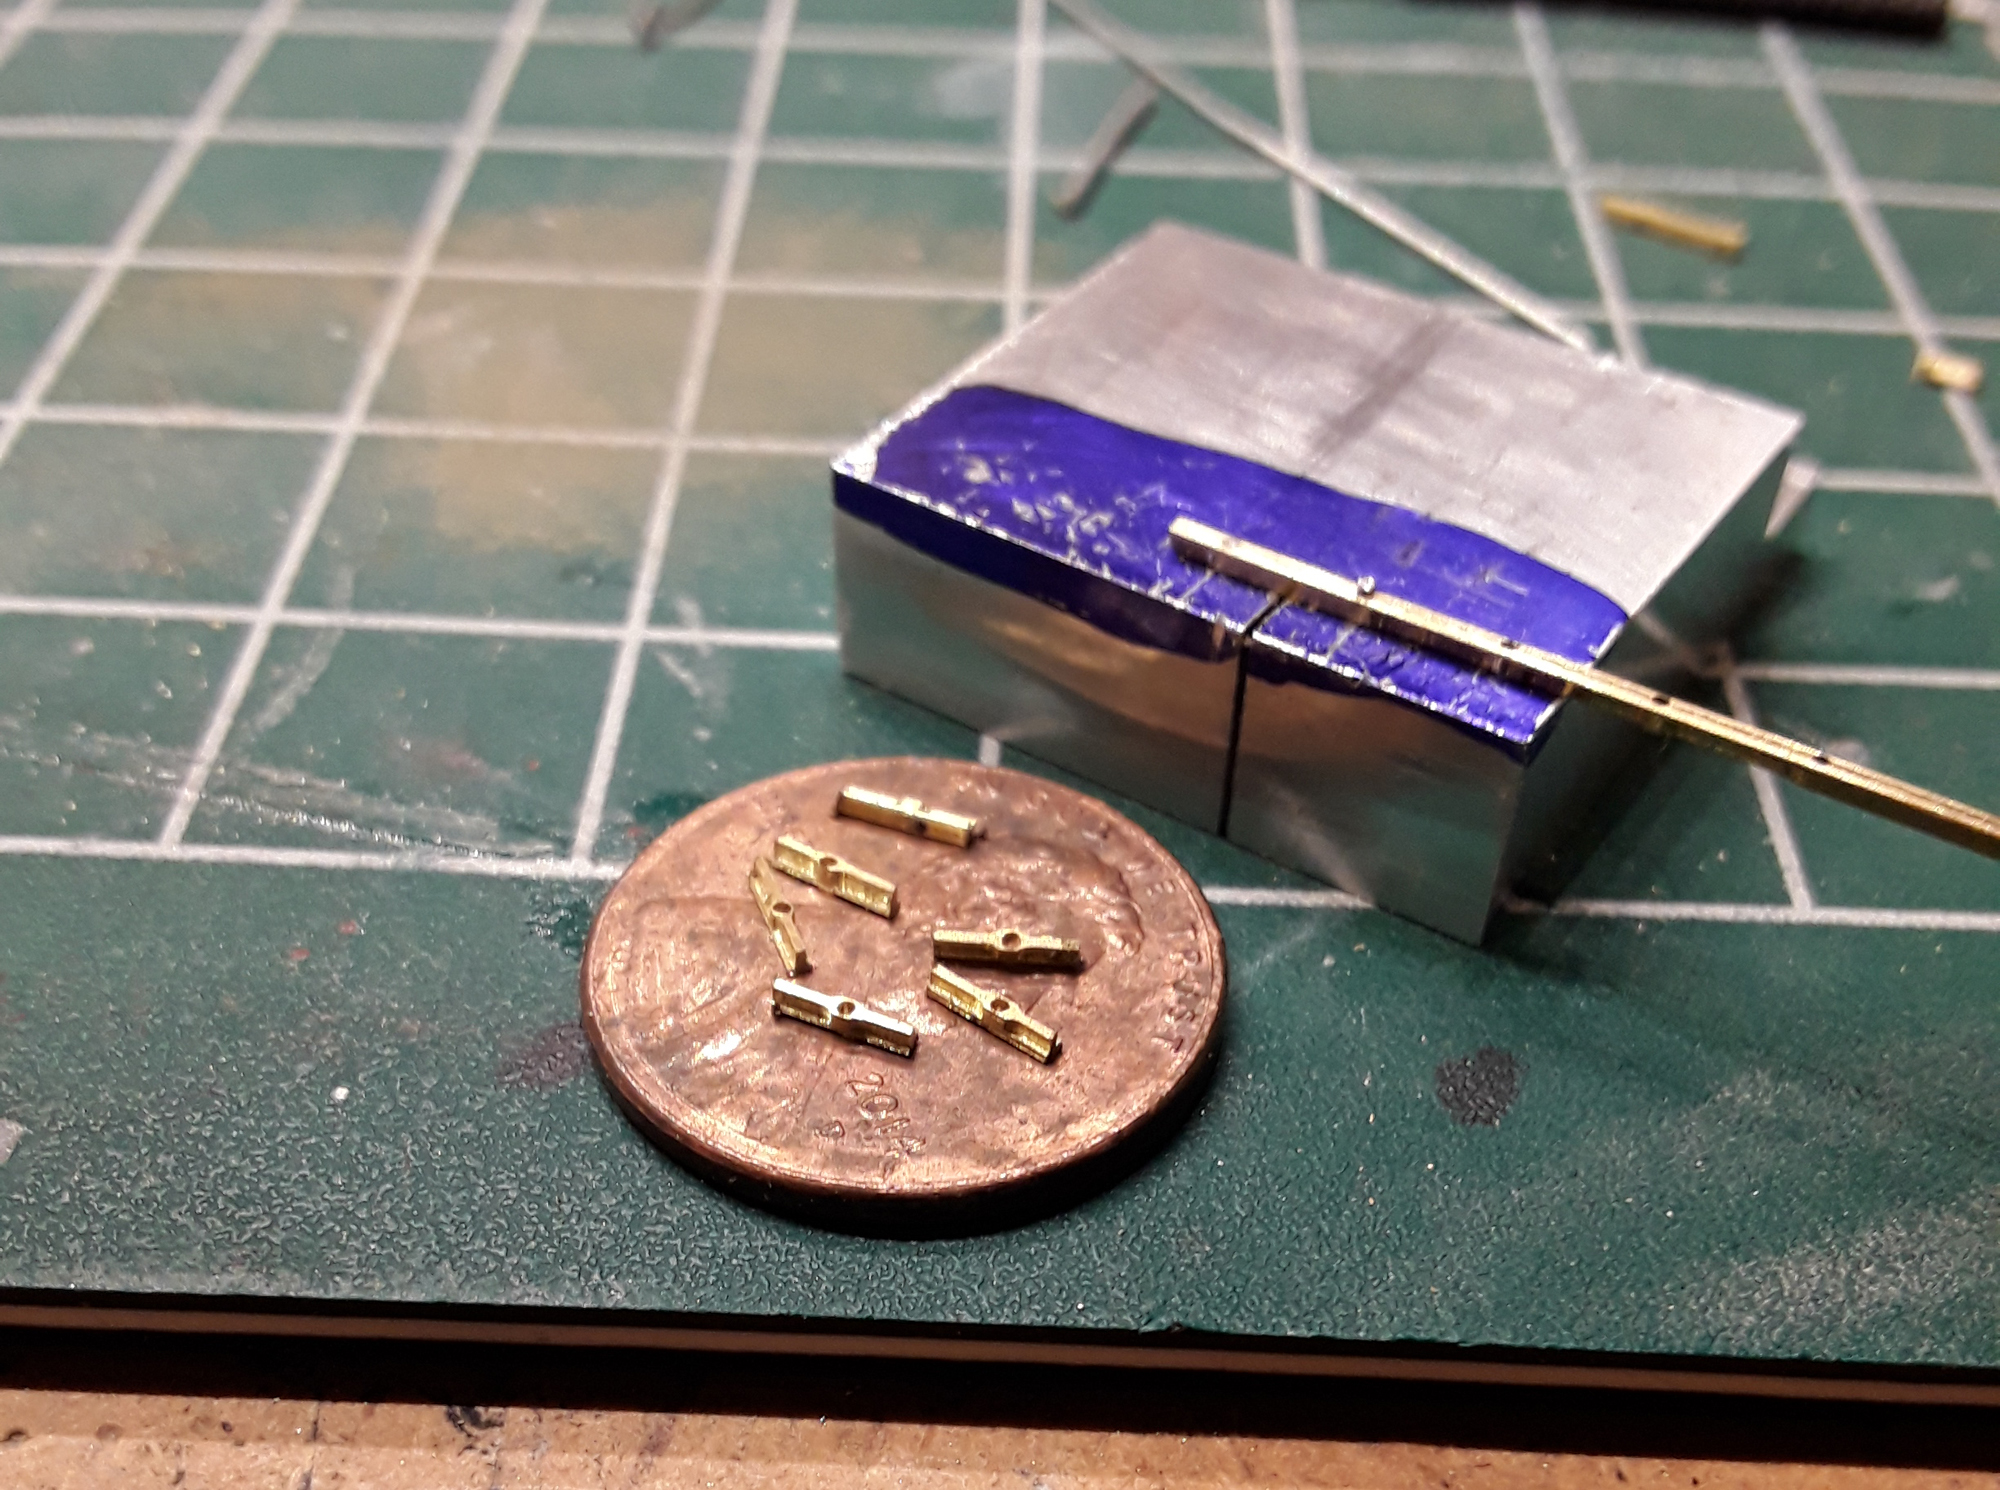
Ok, finally got the valve cover clips done! All 20 of them. Well I wound up with 26 because I know I will loose one or two of them. This is them with the bolt in place. I still have to decide if that should be a nut or bolt. They are made with a strip of .032" brass. Making this was a real chore! I started by gluing the brass strip to a block of 7075 aluminum that I milled square and then drilled the holes. That is a .020 carbide drill bit. I soon discovered that super glue was not strong enough to hold for the milling. So I pinned each hole with wire. This is after milling the fillet. If you look carefully you can see some of the holes are off and some of the fillets are not quite right. This is because of bit deflection(taking to deep of a cut) and sometimes just me screwing up the measuring. I would loose count of how much I turned the hand wheel. After the bar was milled and separated from the aluminum block the clips needed to be cut to length. This shows the cutting jig I made to guide my jewelers saw that I cut them to length. The last process was to file the fillets at a taper. This last photo is my education file. This is all the scrap I made trying to figure out exactly how to do this. Learning can be painful! Thanks for looking.

-
Tamiya paint is lacquer based so all the above suggestions are spot on(sorry for the pun). As a lacquer base it will dissolve the paint around it slightly and blend in with no noticeable separation lines. If you are feeling skilled, you can build up the spot and then sand an polish it down to make it go away completely. Just take your time and use very fine grit papers. Do not try this with enamels or acrylics. You will get a layering effect that will be visible most of the time.
-

Only 18 Percent Of Americans Can Drive Manual. :(
Pete J. replied to MrObsessive's topic in The Off-Topic Lounge
See my above picture- If you are on the 405 on a Friday night, it is easy to use a cell phone and text. When the car is stopped in traffic, out of gear, with the parking brake set, I can text or play with the WiFi all I want. No sweat! -
Thank you Tim! I love the fact that you choose to make your jigs as polished and what you are making. Am I correct in assuming that you used a mill to set the 12 degree caster and drilled the holes? Getting everything square and then setting it 12 degrees off and keeping it all aligned had to be a challenge. I made a drop axle several years ago and just cheated and made it all plumb and square. It was just easier to align it.
-
Only 18 Percent Of Americans Can Drive Manual. :(
Pete J. replied to MrObsessive's topic in The Off-Topic Lounge
I only mentioned Friday because this when it is at it's worst. This is what is looks like on most Fridays from Irvine through Van Nuys. The 5 is not much better through Anaheim. When I go to Anaheim it takes me an 45 minutes to go the first 57 miles and an hour to go the last 15 miles. Some of the worst traffic in the world. I've done my share of congested driving weekdays and a manual doesn't make it any easier, but I still like having one.
-
Only 18 Percent Of Americans Can Drive Manual. :(
Pete J. replied to MrObsessive's topic in The Off-Topic Lounge
25 Minutes?? An Hour?? Try the 405 from Irvine to Huntington beach on a Friday in a MR2! A 5 lane parking lot both ways. I still love the 5 speed and I'm 67. -
Who deletes the various Threads every day??
Pete J. replied to Ramfins59's topic in General Automotive Talk (Trucks and Cars)
One thing that I have been doing is deleting my own threads. The originator has the power to do that. I don't do it often, but sometimes others just get out of hand or way off topic and I decide that enough is enough so "poof" gone. I also like to clean up my own activity. If I take photos off of Photobucket I will try to remember to delete the old threads. Just a courtesy to the site. The more disused old threads out there, the slower it is. -
Only 18 Percent Of Americans Can Drive Manual. :(
Pete J. replied to MrObsessive's topic in The Off-Topic Lounge
I was about 6 or 7 when I learned to drive our farm Jeep CJ2A. That was so rugged and durable that all three of the children learned to drive it. I doubt you could have burned the clutch out on that. Been driving a mix of automatics and manuals since. Here is a list of some of the manual transmission cars I have owned. 69 Mustang(200 cube six), 72 240Z, 74 911, 78 Toyota PU, 80 Toyota PU, 87 Corolla FX-16, 93 MR2 turbo. There is a certain satisfaction in slapping a perfect down shift at the entry of a turn that you just can't get with an automatic. By the way, surprise surprise, there are a few new cars out there that you can't get with an automatic. Subaru WRX base and STI models are manual only! Learn to shift or go home! -
I am off to my 50th anniversary in July! Frankly, I am just glad to be able to do this. Some times 1967 seems a couple of days ago and others a century. A lot has happened in 50 years and I look forward to renewing old friendships. It was a small class by many standards as it was from a school in the western panhandle of Nebraska so not a huge number of people. For all you young whippersnappers, don't be depressed about how long ago it was. Be glad you made it this far and that you still have time ahead of you.
-
Not a problem Tim. Seems I have been making a lot of scrap metal lately. I am working on the valve cover clips and have made 40 or so and have 5 usable. I need twenty. Will post when I have them done!
-
Same here! I have a brass hot rod that has been on the back burner for a while, trying to figure that out.
-
Tim, any pictures of the jig you used to get the uprights parallel. I would be very interested to see it if you have it. Very clean front end! Love the solder work!
-
Saw a Stradale version the other day in matt black and it looked killer with the stripe down the middle of the hood.
-
Tamiya 1/12 Porsche 935
Pete J. replied to Dirtracer22's topic in WIP: Other Racing: Road Racing, Land Speed Racers
I have four sets. Not sure if they are good or not as they are over 5 years old. They have been stored in file protectors in my office. You are welcome to a set. Send me an address and I will drop them in the mail. By the way, they are a bitch to get down especially where they make the curve at the bottom of the fender flair to the straight piece on the running boards. I wound up cutting them up and piecing them together. Frankly, the next time I do one I am going to mask it off and spray them with Zero paints Martini lacquer set. I almost think that would work better. -
..or get a bottle of Tamiya X21 flat base and mix your own.
-
Tamiya 1/12 Porsche 935
Pete J. replied to Dirtracer22's topic in WIP: Other Racing: Road Racing, Land Speed Racers
Can you shoot a photo of the ones you need? I may have some around here somewhere. I know I have several extra sets at one time. -
One of my favorite models and model car stories. I have two friends who are skilled builders and one year we decided to each build the same model using the same exterior paint(DuPont Corso Rosso). We did them box stock and put all three of them on the table next to each other and then stood back and watched. There was a lot of head scratching going on by judges and spectators alike. Great fun. By the way it builds up into a beautiful model. Before you lavish a lot of time on engine detail, take a good look at photos of the real deal. There is a lot that you can't see once it is in the body. Good luck!
-
Tamiya 1/12 Porsche 935
Pete J. replied to Dirtracer22's topic in WIP: Other Racing: Road Racing, Land Speed Racers
Very nice! As I recall the black on the rear wing was a real bear to get down. Your going to have an excellent piece when you are done! -
Me too! Randy, I am excited to see what you do with this!
-
Anyone Tried Preval Sprayers?
Pete J. replied to Nells250's topic in Model Building Questions and Answers
Bob, I will share a little research with you and perhaps this will help. First of all, lacquer thinners are not all the same. Lacquer thinner is a cocktail of about 10 different chemicals that are added in different proportions for a multiple of reasons. They mix them so the paint arrives at the surface with enough solvent to flow out or self level and then drys at a consistent rate and adhears to the surface. Some of the chemicals that are added also dissolve the pigments and binders. Often times the solvents that do this are also the most expensive. It follows that those chemicals are the ones that appear in smaller quantities in cheaper thinners. The single cheapest chemical that appears in lacquer thinner is acetone so the cheap stuff you get at Walmart is mostly acetone. So, why would you care about this? Why would you not just by the cheapest stuff you can get your hands on? Well, here is the issue. For cleaning cheap is not a bad idea. In fact I use just straight acetone to clean. It is cheap and works well. For thinning, I use the good stuff. I do this because dissolving the pigments and binders completely makes for a smoother and harder finish, but you have to tailor the thinner to the paint you are using. Automotive paints like Duplicolor and touchup paints have pigments and binders that need the stronger solvents to work properly when exposed to outdoor conditions such as weather and sun. Hobby paints do not need to hold up under those conditions so they are mixed in a different manner. Cheap thinner leads to orange peel and flat surfaces because the pigments and binders of the paint are coming out of the brush not completely dissolved. This means that they don't flow out as intended to give a hard glossy finish. So this is what I mean when I say tailor the thinner to the paint. The easiest way to do this is use the thinner manufactured by the paint maker. It is intended to balance the paint. -
Anyone Tried Preval Sprayers?
Pete J. replied to Nells250's topic in Model Building Questions and Answers
Ah, once again we go in search of a non-airbrush paint applicator. I will say again what I have always said. The magic is in the magician, not the magic wand. If you practice and experiement you can get a great paint job using just about any method. Early man used a very crude form of an airbrush by putting pigment in his mouth and blowing it at cave walls. Now I don't suggest this but with time and effort any method of transferring paint to a surface can work. The airbrush has certain advantages that other methods don't. The main advantage is control and cost. The control allows you to adjust the brush to various paint viscosity, drying rates and pigment sizes. It also gives you control over spray patterns and densities. You can adjust it to account for variations in temperature and humidity. In short it is a precised instrument if you know how to use it. Like many tools, it has a down side. It has a relatively high upfront cost, but long term costs almost nothing to operate other than a few cents of electricity to run a compressor. It has a relatively flat learning curve because with adjustable comes the need to learn how to do make it work. In short this is like using a high end DSLR camera. Lots of control. Having said all of that, a lot of modelers just want a perfect paint job with little or know effort. Kind of a shoot is and you get a perfect result. That just isn't going to happen with anything, but rattle cans are pretty close, but you still have to know how to use it to get a great finish. This would be like the smartphone camera. Still have to know what you are doing to get a good picture, but it will work for a lot of people. In short, master a tool and it will work well no matter what you use, but a proper tool will challenge you to learn it, but you will get results with less work once you do. -
Oh, ok. I have not heard of them but I will most certainly take a look. I will add, that I could easily see you doing that with the other bits you have done so far. Keep it coming Tim. Looking better all the time!
-
Tim, I was looking at what I assume is a clutch pedal(on the left side of the transmission). I don't know squat about drag cars so I will refer to it that way. Did you photoetch the shaft or machine it? Either way that little piece is a work of art. The tapered lightening holes look great! Another head scratchier for me.