Pete J.
-
Posts
3,981 -
Joined
-
Last visited
Content Type
Profiles
Forums
Events
Gallery
Everything posted by Pete J.
-

what paasche H spray head size to use??
Pete J. replied to foxbat426's topic in Model Building Questions and Answers
I still use one that I started 20 years ago. It keeps me on track. -
what paasche H spray head size to use??
Pete J. replied to foxbat426's topic in Model Building Questions and Answers
These guys are spot on. Nozzle size is dependent on the size and density of the in dissolved solids in your paint. This varies from manufacture and type of paint. The only way to know for sure is to start with the largest nozzle and work you way down. Smaller nozzles give you a finer spray but also a more even, if smaller paint pattern. The best way to see how it is spraying is to get a flat surface(I use a left over piece of dry wall but any thing will work) and load up your brush and hold it perpendicular to the surface about 12 inches away and give it a short burst. If you look at the circle of paint you just made, you can see density across the circle and any spattering. Spattering is a symptom of air pressure and paint thinning. Play with those until you get it the way you want. Then do the same thing at the distance you normally use. Looking at that circle will tell you how much you need to over lap each pass to get an even amount of paint on the surface. Last, if you want to get consistency with your air brush, get a small note book and start a journal. Include, paint information like manufacture, paint line, type of paint and most importantly, how much you thinned it. Then write down the temperature and relative humidity and pressure you used. Finally any remarks that you think you might like to remember. Do this every time you paint and you will be able to avoid doing a lot of trial and error each time you paint. It will make a better painter out of you because now you will start to see patterns in the settings and you will be able to adjust for variations. -
Can't get around the curves without the knife going astray. Do you use a #11 blade or something else. Lately I have been trying a #23 scalpel. It works great as long as the panel line is straight but it is like a drag racer. I just can't get around the curves without it getting out of the groove or making a ragged cut.
-
When the door line is relatively straight that works, but often the doors I work with have a moderate radius at the bottom that the blade will not follow easily. That scares the hell out me to do that because by that point the model is almost done.
-
I don't know how many decals I have screwed up that way, especially a curved line like the bottom of a door panel. The line almost always comes out uneven and then I try to run some dilute paint or something else in there to clean it up and it looks like ...well, you know. I have another model and I am working on the sixth or seventh paint job because the decals or the paint has defeated me. I am not proud to admit it, but for me, if it ain't right, it ain't right. Now to be fair, I have been experimenting with new paints, but it is a very complex decal job.
-
Dann, with some modification that could easily be a model building mantra, "Build what you see, not what you know is there" We often forget that this is an art. .
-
I would suggest that this is more a function of the way I shot the photo. On the model, there is a definite recessed panel line across the decal. From the angle it was shot and the very diffused light that I used, that line does not show and I agree it is very jarring. I know many people use graphics pens and other methods to highlight panel and shut lines. To my eye that just doesn't look right. In the real world, these lines are extraordinarily thin and present a fade line rather than the sharp black like the some modelers favor. The builders are really trying to mask these lines as much as possible as they disrupt eye as it flows over the body lines. I appreciate what you are saying. As I said, this model is "flawed" in many ways.
-
ummm, not necessarily true.

-
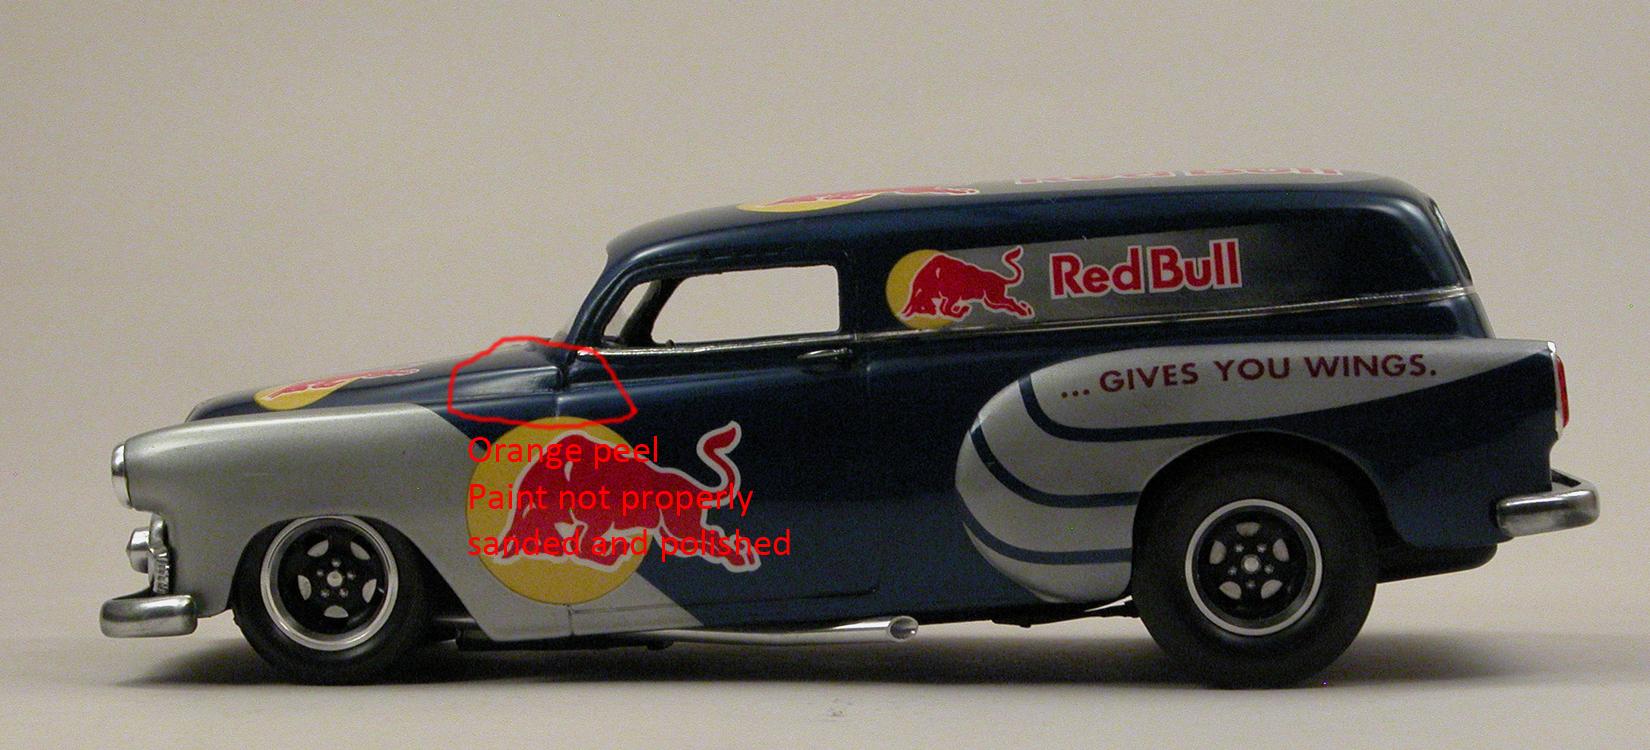
Ok, since no one took me up on critiquing the paint on my model, in a effort to help people look a little more critically at their own work, here is what I see. Frankly, this model has some nice things, but as I said it will never make it off my shelf. It is not to a standard that I prefer. I hope this helps others look critically at their models and learn how to make them better.
-
paint thinner ratios and odorless paint thinner
Pete J. replied to foxbat426's topic in Model Building Questions and Answers
Here is an article that probably goes into much more detail than you want to know about thinners, but it is a relatively quick read and explains how thinners work and the difference between cheap and expensive thinner. http://news.thefinishingstore.com/index.php/understanding-solvents-part-iii-laquer-thinner/ -
paint thinner ratios and odorless paint thinner
Pete J. replied to foxbat426's topic in Model Building Questions and Answers
I would say this is an experiment. I would say that because different paint manufacturers make their paints and thinners differently. When it comes to thinners, they all have different levels of certain chemicals which cause them to react differently. Example: The lacquer thinner that you buy at home depot doesn't contain enough of the right chemical to completely dissolve the binders in true automotive lacquers but it is still "lacquer thinner". On top of that, automotive lacquer thinners come in a verity of mixes or "tempuratures". You have to take what you have and try it. The mix you suggest would not be a bad place to start, but get yourself some plastic spoons and try it on the back of the spoons and adjust the mix until it works with your painting technique. That way you don't screw up a model. -
I'm with Steve on the cleaning. If I am changing from one dark color to another, without any delay, like a brown to green camo, I will spray thinner through after the first and carry on spraying with a new color. Having said that, most auto paint jobs I do, I won't risk a tiny flake of another color that is left over coming out an messing up the paint. Once I am done with a color, I break it down all the way and clean it. I use a set of tiny brushes to clean everything out. It only takes a few minutes for me to do it. Oh, an one thing I learned not too long ago, I lubricate the needle every time. There are several manufactures of airbrush lube. The easiest for me to find is Iwata's lube. A tube seems to last forever. Just a tiny bit on the needle before reinsertion lubes the seal and keeps it tight. I don't know what is in the lube, but it doesn't interact with any paint I have ever used and that includes solvent base lacquers and enamels, two and three part urethanes and water based acrylics.
-
Steve, I get were you are coming from and can't disagree but there are some reasons I decant paint. I really like shooting Tamiya lacquer through an air brush, but I also admit that I am cheap in many ways. Rattle cans annoy me in that you leave 1/2 to 3/4 of an ounce in the can if you just toss it when it is done and that annoys me. Second, when I screw up and need to fix something in a paint job, I like the control I get with an air brush so that I can spot paint little areas. I have also discovered that I get almost twice the coverage with my air brush. There is far less overspray than with a rattle can, especially Tamiya's cans. They really put out a lot of volume. Finally, I use a lot of their red's, yellows, and mica paints. In each case, they are either translucent or transparent. Controlling that paint to get even colors is much easier for me. It is also easier to get the undercuts on bodies with an air brush without putting too much paint on the body. Yeah, I don't like the extra minute or two it takes to clean the air brush and I am going to say something that is going to raise and eyebrow. I like being able to put my brush down and walk away with it loaded for as much as over night, if I am going to recoat. I just clean off the tip with a Q-tip and thinner and walk away. Most people don't think of this, but a properly adjusted airbrush is sealed and the paint will not dry in it as long as it is full. So, perhaps this doesn't convince you to decant, but it is some of the reasons I do it. Oh and yes, I can mix it to change colors but you already mentioned that.
-
While we are on the subject of paint job, I am going to start a little side bar here and say something that some may be offended by. When I look at these pictures there are some great paint jobs here. Now here comes the bad part. Some are mediocre paint jobs also. In the interest of not calling anyone out I will not suggest which ones. Instead, I will go into what makes a great paint job. The easiest way to critique a paint job is to look at the reflections in the paint. The perfect glossy paint job will reflect light very evenly and the reflections will have perfectly straight lines that follow the flow of the body panels. Reflections will be very clean in line. This is a result of an absolutely level top coat. Often this is accomplished by sanding it level and polishing it to get rid of all scratches. You can also see unevenness or ripples in the reflections where paint may accumulate, such as build up at panel lines or edges. The reflection should not distort around these areas. Orange peel is the worst of the distortions. You can have a high gloss finish that looks really shiny but the bumps in the paint will distort the reflection. None of this is a result of air brush or rattle can, but lack of technique in painting period. My point is that if we are going to talk about paint, it is a good idea to know what makes a paint job great. Because I was willing to open my mouth on this subject and I will not call anyone else out, I am going to post a couple of photos of a build I just did. It was a club build project and a quick build. This will never see a contest table because of the problems with the paint job that I just don't choose to correct. See if you can see what I do that makes it unacceptable. I have a thick skin so I will take no offence and any of the comment unless you get personal!
-
Steve in two rather long posts that is exactly my point. An airbrush and a rattle can are both just tools. The magic is in the magician, not the wand. Like any tool though, there are pros and cons. I felt I gave that a fair go in my first post. Not all the advantages are in the outcome. Some involve ease of use and cost, both long term and short term. I think I mentioned that I have four airbrushes and several hundred rattle cans. Four airbrushes because each is designed to do a different thing from wide swaths of paint to very thin lines. Rattle cans because they can be very quick and efficient. I can do everything I do with a rattle can, with an air brush. I can not do everything I do with an airbrush with a rattle can. There are subtle techniques that just require an airbrush, mostly involving very thin paint and very little paint sprayed. The picture I posted with it's shadowing and depth is an excellent example of this. Now a painting of this type could be done on the side of a building with rattle cans but it would be very difficult to replicate on a small canvas without an air brush. It could also be done with pencils in very small scale. As a builder you choose the skills and tools that suit your ends. I would never suggest that every builder should own and use an air brush any more that I would suggest every home would be incomplete without a full complement of fine wood working tools. My point was at some point if a modeler wants to do certain things like subtle shading and very fine painting, an air brush is necessary. Building in that style is a choice and having the tools that go along with it is part of that choice.
-
There is always a next level! You just have to seek it out. By the way I think even Harry will admit, there is no such thing as a perfect paint job!
-
Bill, I think most of us older modelers started out with either brush and bottle or rattle cans. My first airbrush was an old blue plastic Badger with aerosol cans of air. It was crude but for flat aircraft finished it was da' bomb. I've been through several other cheap airbrushes(Aztek comes to mind) over the years and I think you are like me, as your skill improves, you come to understand the need for better tools. I once explained my purchase of tools(woodworking and otherwise)to my wife, that I am capable of building a house with a Swiss army knife, the question was, why would I want to? An air brush is part of that. If someone wants to progress, at some point an air brush will be the tool to take paint to the next level. When that happens is up to the individual. I have also learned that doing things the hard way, helps you understand how to handle a quality tool properly. I would never suggest that a beginner drop a grand on air bush and accessories to start with. You have to understand paint to get the best out of any airbrush and you get that by experience. Rattle cans are a part of that experience. Budget and desire become another issue. Not everyone wants or needs to do the things an airbrush is capable of. I sometimes forget that in my personal drive to improve what I do. I am driven by getting to a higher skill level in this hobby, but that is just me. I am also lucky to be a point in my life that I have the disposable income to do these things. When you have tiny mouths to feed, hobby never comes first! Make the best of what brings you happiness.
-
This topic seems to come up with frequency and I have trouble understanding why. Air brushes and rattle cans are tools. Nothing more, nothing less. Each has it's advantages and disadvantages. But with any tool, the magic isn't in the tool it is in the magician and you see the work of some very skilled painters here. I think of this a little like comparing a sledge hammer to a claw hammer. Both are hammers. Both to essentially the same thing. They both hammer but are different in what they do best. Here is my opinion on the discussion: Rattle can: Advantages: Quick and simple to use. Point and shoot. With skilled masking and experience they can be effective tools. I use them when I have a few parts that are all the same color like engine parts. Easy to clean. Invert the can to clear the dip tube and wipe the nozzle of with Q-tip and a bit of thinner, done. Disadvantages: Relatively expensive per ounce of paint. I find that if I decant the paint and spray it through an air brush it goes almost twice as far. This is due to a more controlled spray. Less is lost through over spray. Also, no matter how you use the can, there will always be paint left that just won't come out. In my experience it can be as much as an ounce. It is also much more of a touch thing with a rattle can to get an even coat. Some cans spray like a fire hose, others put out a fine mist. They are also much more bulky and hard to get into close quarters when you need it. Air Brush: Advantages: Much better control over the spray. You have the ability to vary the pressure and flow to get exactly the best pattern for the job. Generally, paint is cheaper. If you buy it in quarts, the cost per ounce drops dramatically. You can also control the mix if the paint to solvent, to get thinner coats for things like fades and more coats as you need them. At low pressures you get much less over spray and waste less paint but also put the paint exactly where you want it. You can custom mix paints to get any color or gloss that you may want. The main advantage of air brushes is that they give you control that you just can't get with a rattle can. Disadvantages: Initial cost can be quite high, with the need for a compressor, pressure regulator and moisture trap on top of the cost of the airbrush. Air brushes can be quite specialized with different nozzles and needles. It really isn't a one size fits all, though you can buy them with multiple nozzles and needles to do different things. The on advantage that an air brush gives you can all be very intimidating to the uninitiated. What I mean is that you have so many variables that you as a painter can control, combining them to get the outcome you want can be intimidating. Thinning rates, air pressure, needle and nozzle size can be frustrating to those who are not willing to pay attention to them. Airbrushes require cleaning and maintenance. Like any tool, if it is not maintained, you can have issues. They are a precision instrument and require disassembly, cleaning and lubrication to work properly. Cleaning is critical. If you are spraying white and a little flake of paint left over from a different color comes out of the gun, I will pretty much guarantee it will land in the middle of a highly visible panel. I own and use four different airbrushes. I also have hundreds of rattle cans. Over the years, I have developed my own procedures for using both and do so on every build I ever do. I never build a model exclusively with an air brush or rattle can. The point is, no matter what you use, you must commit to learning how best to use it and when best to use it. I will leave you with one final thought. Although rattle cans are a useful tool, I know that I can use a airbrush to do things that just can't be done with a rattle can such as very fine lines and light weathering. A proper airbrush will do everything a rattle can will, but a rattle can will not do everything an airbrush can. Use your tools well!
-
I actually like the painted trim better. Not sure why, but I do.
-
Is it just me, or has the site slowed down again?
Pete J. replied to russosborne's topic in How To Use This Board
I've had some issues with both speed and content lately. This morning the pictures didn't load and some of my posts hard to get processed. -
-
Tim, probably way the heck to late for this now, but if you are going to paint them, I really like the look of brass tubing after it has been heated. You know, like after you annealed them. Makes them look use. Kind of has a nice patina to it. As with any metal of this type, it is really sad to put paint over it and hide the real craftsmanship that went into it. Stunning piece of work! I need to do two eight cylinder sets for a Bugatti straight 8 I am working on. I would like to know how you bent them if you have the time. Perhaps a pm tutorial if you have the time.
-
Most people know Wynton Marsalis as a great jazz trumpeter, but before he was known for that he was one of the worlds greatest classical trumpeters. His album Gabrial's Garden is one of my favorites. Great music to build with!
-
I've got that one in my vinyl library!
-
Bingo!