Pete J.
-
Posts
3,981 -
Joined
-
Last visited
Content Type
Profiles
Forums
Events
Gallery
Everything posted by Pete J.
-
Wow, very nice work Tim! I assume that you used a end mill to cut the angle holes. They look great. I have used a free CAD program to divine angles. It is called Google Sketchup and there is a free version. Not a difficult program to learn and it does yield angle measurements. You might want to play with it. A few hours of learning it can reduce the scrap at the bench. I also assume that you are using a rotary table mounted on an angle plate. The last time I was at Sherline(they are less than 5 miles from me) I discovered something. I had an issue with the rotary table mounted on the angle plate. When I did items that required a close to vertical mount the angle plate and table would not let me lower the milling head close enough to the work piece. The angle plate bumped into the motor mount on the head. Well, I was discussing that with them and they will custom machine a rotary table with the crank on the opposite side. Same price. If you are going to do a lot of this type of work, you might consider getting one.
-
Welcome back Mike. It's not the speed with which you build but the amount of fun you have along the way.
-

PHOTOGRAPHY HELP PLEASE
Pete J. replied to bauercrew's topic in Model Building Questions and Answers
It is one of the more difficult backgrounds to use but I prefer gray to black or white. White cars look a lot more natural to my eye on gray that. Black cars stand out without the harsh contrast. Personal preference. Everyone chooses their own. -
Body Fillers - what do you use?
Pete J. replied to BDSchindler's topic in Model Building Questions and Answers
Ok, I have seen that everyone has already mentioned what I use with one exception. I will start with a little discussion on purpose. I like Eurosoft and Bondo as fillers because they go on thin, set quickly and grip plastic well. I mention thin, because there is a difference in filling and building something up. Filling to me, means covering scratches, gouges and seams. The filler will work into all the small places and "fill" everything. It should be thin so you can feather it out and not show a seam under paint. They are somewhat porous, so once I am done with filling I use a little thin CA to seal them. It helps them grip the plastic and harden them. Building something up, like a hood scoop or Frenching lights, or flaring fenders is a different matter. Because it is thicker, the chances of it shirking and cracking is much higher. For that I like an AB putty aka epoxy putty. Figure sculptors use it all the time to make their pieces. It is a very much like clay to work with and has a fairly long open time to allow you to work it to shape. Because it is epoxy, it cures very hard and can be sanded afterwards. It also grips like crazy. I use this stuff. It takes some trial and error to learn how to use it, but the results are excellent. Look up figure modeling on YouTube to see how it is used.
-
PHOTOGRAPHY HELP PLEASE
Pete J. replied to bauercrew's topic in Model Building Questions and Answers
You are the absolute first person that I have come across that would give a real reason for having a DSLR. That makes sense. I wonder how good the digital view finders have gotten in recent years. I know that there have been claims that they are HD and all. I am thinking about retiring my old Coolpix 5700 but have been very resistant to the DSLR. I do shoot outside, but not with the old Minolta any more. I guess I have more research to do. -
PHOTOGRAPHY HELP PLEASE
Pete J. replied to bauercrew's topic in Model Building Questions and Answers
Peter, I have to agree but for a different reason. In the old days(like 40 years ago) the SLR was the best camera on the market. This is because you actually got to see through the lens. Other cameras(called viewfinders) had a separate peep hole that had it's own lenses. The SLR let you see what was actually going to be exposed on the film. That was then. Now we have "D"SLR's because of the old days. The SLR portion still does the same thing, but in my opinion is a redundant mechanism that is left over from the old days, kind of like your appendix. Why? Well with a modern digital display you are actually looking at what the CMOS sensor is seeing which is what you will get for a picture. Why would putting a mirror in front of the CMOS sensor and looking at that be in any way better than just looking at the video display and the actual picture you will record? It wouldn't. The top quality mirrorless cameras are every bit as good as the DSLR's and weight much less and are much more compact and generally cost less. So, let me review. I have two cameras. A DSLR and a mirrorless camera. Both have the same CMOS sensor with the same pixel density and speed. Both have the same selection of lens's and accessories. Both use the same memory cards. Thus each take the same quality of photo. The DLSR is more expensive because of the extra mechanicals required for the mirror operation. They are also heavier(same reason) and bulkier. It is also more likely to fail because it has extra mechanical bits to break and the batteries won't last as long because the SLR portion need some power to operate. All of this so you can look through the lens and see what? Well, it is a nice view, but that isn't the picture you will be saving. That you have to look at the video display to see. So why do we even have DSLR's. Because years ago, a SLR was the camera to have. All the professional photographers used them. Just like at one time the flathead V-8 was the engine to have. All the great race teams used them. But time moves on. Forget the SLR portion. We don't need it. Other opinions welcomed. -
PHOTOGRAPHY HELP PLEASE
Pete J. replied to bauercrew's topic in Model Building Questions and Answers
Peter, Mine is an even older 5700 and as I have said many times on other posts, the magic is in the photographer not the camera. If you have one that allows aperture or shutter priority and manual white balance adjustment then you can shoot great photos. Balancing the focal lengths, depth of field and shadows is a matter of artistry and understanding of the shooting environment. Bill mentioned in his opening statement that he was not a pro but had invested in some good equipment. With some technique he can easily produce some great photos. As I mentioned, I dislike using the macro feature on my camera because is reduces the depth of field. Shooting models you get a bit better photo by backing up and zooming in. It improves the depth of field and reduces lens distortion. If the lens is too close to the subject you get a fish eye effect. This also happens when you have a large aperture opening. Here is an example: You may not notice it when you first look at the photo, but the jaws of the hemostat holding the pin are straight, but because of the proximity of the lens, they appear to be slightly bowed out. For this reason, my preferred shooting distance is about 2 to 3 feet and use the zoom to get in close. On particularly small items such as this is just isn't possible, but most of the time it is. I am not trying to be critical, just passing on some information I have gained over the years. -
I don't think it will quite fit the category, but I have tried bending worse rules. Perhaps I could say I misunderstood because I never thought of a rod as a car?? Any way, it is for my club up in Anaheim. It's a group build.
-
PHOTOGRAPHY HELP PLEASE
Pete J. replied to bauercrew's topic in Model Building Questions and Answers
Bill, I wouldn't set the DSLR aside. It has some very useful features that point and shoots don't. The main ones are white balance and shutter speed. Your DSLR should give you the option to have several setups stored. This is handy. You can have one for what you normally do and one for models. Once you get a model setup that you like, it works much better. I have a very old Minolta digital camera and it works very well but also very slowly. My set up is done as follows. I set up my photo shoot area and set the white balance. I set up my shooting area and use a sheet of bright white printer paper. Get the whitest that you can. Most papers will have a grade of white on them. Do not use photo paper with a glossy finish. You want a flat finish. Once this is set I store it in one of the optional settings. When I shoot, I used the camera in aperture priority(you set the aperture and the camera sets the shutter speed) and cranked it down to the smallest aperture(longest shutter opening). This gives you maximum depth of field. I then set the camera up about 3 feet from the subject on a tripod and uses a remote shutter so I didn't cause the camera to shutter when I fired it. This gives you the sharpest photo and least distorted. From there it is a matter of composition and angles to get the best photo. Remember, a low angle gives you the most realistic, but the high angle gets the most detail. Low angle High angle -
PHOTOGRAPHY HELP PLEASE
Pete J. replied to bauercrew's topic in Model Building Questions and Answers
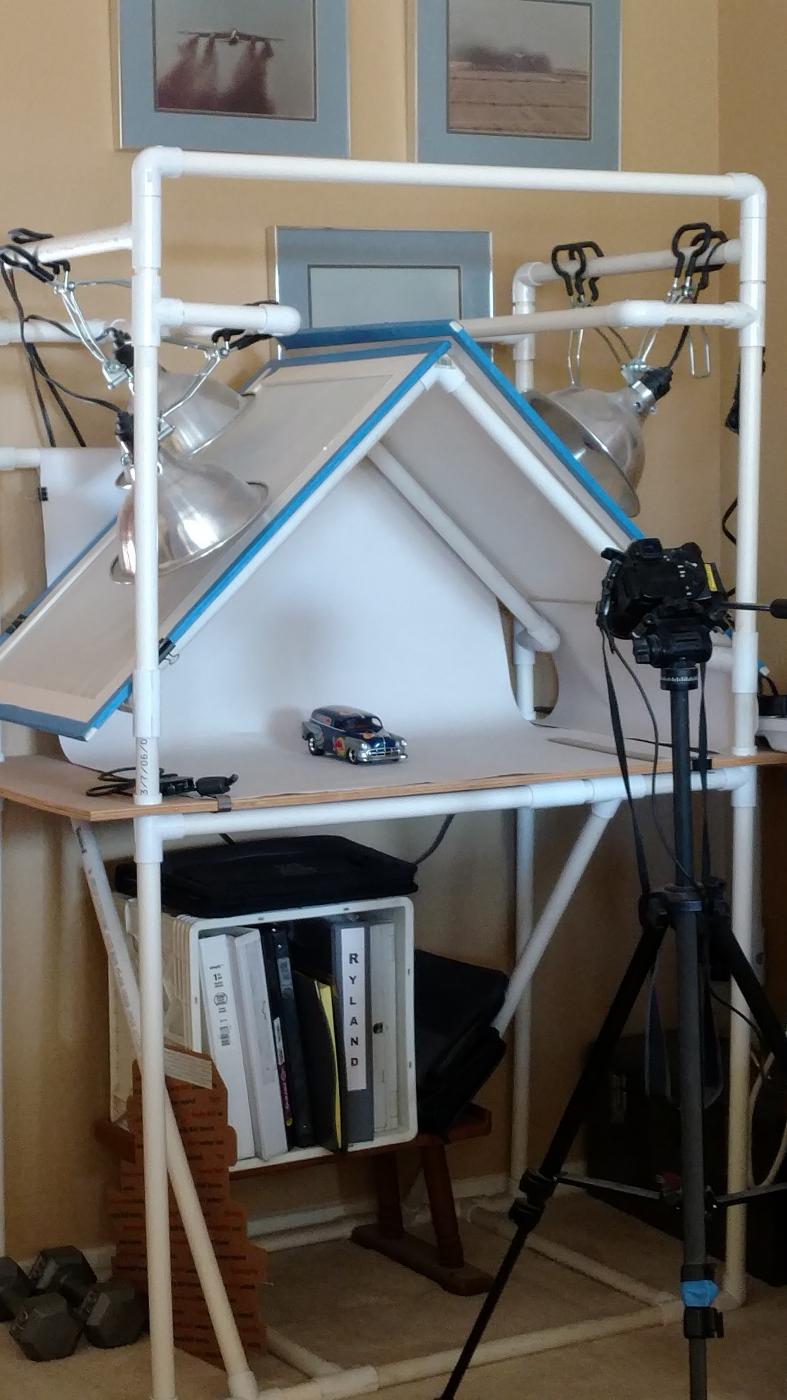
Photographing models is all about lighting and depth of field. As a serious amature photographer I assume that you are familiar with both terms so I won't go into detailed explanations. When photographing models diffused light from multilple angles works best. I went cheap on my diffusers. I made two frames from foam core board and inserted sheets of velum(available at art stores). I use 4 different clip on lights on a frame made of PVC pipe to hold them at different angles. This still gives a solid shadow but it is very soft. Second is depth of field. The biggest mistake I see is that people want to shoot with a macro setting and get very close to the model. This reduces the depth of field and distorts the model. I prefer to shoot with a mild telephoto lens from a distance of about 3 feet. That way the model is in clear focus and you don't get the "fisheye" distortion. Here are a couple of examples. As and after thought I decided to add a shot of my set up. If you have space, it is quite convenient, however it is also made to be taken down. Press fit on the PVC only. You could also make a table top version of this quite easily.
-
Espo, I appreciate all those who followed this build. A lot of little challenges that were gratifying to get through Thanks for your comments. It was a fun build and some of it is good, some is not so good, but it was all fun. I had some paint issued. I am not sure what happened but apparently DuPont clear lacquer doesn't like Tamiya Mica Blue. The paint in the panel lines went a little wonky in some places, changing the metal flake and bubbling up. I had the same thing happen on another model I am working on. Since this was a club build, I didn't worry about it all that much. Thanks again for looking.
-
This was really just a side project and as the title may suggest, street rods are not my cup of tea. I decided that I would have some fun with it. It is really an old and not very well engineered kit. I decided to go curbside when the hood had such a poor fit that it would have taken a ton of work to get it right. Solution to the problem? Glue the sucker shut, sand it and rescribe a panel line. The rest of it was just an exercise in imagination. I hadn't chopped a top in years and wanted to see if I could still pull it off. I have been playing around with making rims and wanted to play with some Delron I go my hands on. By the way, that stuff is amazing to machine. I have friends who are big fans of Red Bull and I have some extra decals so it seemed a natural fit. Thanks for looking.
-
Ok, it is finally done. Additional work, turned a set of headlight bezels and a plug for the license plate hole. Redid all the chrome parts. I had to because I cut 1/8" out of the center of the bumpers to suck them in. Added some BMF accents and polished the paint out. Not crazy about the a couple of the panel lines, but it is a curbside for a club project due in November. Done, finished kaput!
-
Ok, it is finally done. Turned rims from aluminum with milled Delron centers. Turned headlight bezels. Stripped all the chrome parts and redid them. I had to do that to take 1/8th inch out of the middle to tighten them up. I chopped the top by a good 1/4". Windscreen is thermoplastic. Suspension was lowered and stance changed. rear wheel arches radiused and tubbed. This is curbside model so the engine is just painted and put in place to hold the exhaust. This is a club project so when I have pics of the other builds(November meeting) I will post them.
-
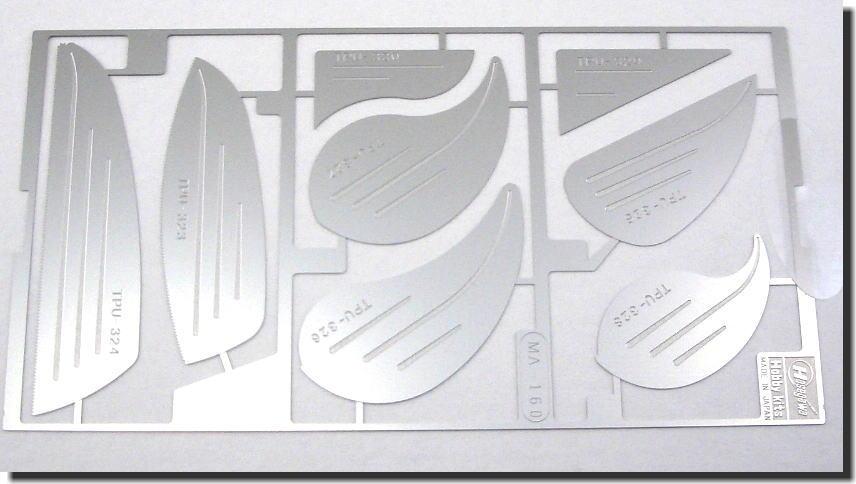
These are my preferred weapons of mass distruction. The first is made by Hasegawa Tri-Tool and are finger saws. The cut so fine you can actually glue a panel back in place and you won't know it was ever cut out. They also bend around slight corners for delect cuts. The next tool is a Tamiya razor saw and is for those really big cuts. I use it for chopping and sectioning bodies. With the long pull stroke cut you can get really straight cuts the length or width of the body. Both are tools that I would not be happy to not have in my tool box. They are both available from Hobby Link Japan or any domestic model on line service that carries Hasegawa and Tamiya. Good luck!
-
I have a 93 MR 2 Turbo that I bought from a friend who had similar problems. He fitted it with a set of Maserati air horns. They will get the attention of inattentive drivers. It is also great fun to watch the carwash guys when they are done with the car. When they hit the horn to alert me they are done, it always brings a smile to their face!
-
Constant paint can bulges, what to do?
Pete J. replied to aurfalien's topic in Model Building Questions and Answers
Wow, I just viewed your video and am still stunned. I tried everything and couldn't get a dent in the bottom of a Tamiya can. I even tried slamming it down on the bench top thinking that the sudden deceleration may have cause it. No luck! You got some serious moves there man! -
Darn't and I though it was the Jabba the Huts desert cruiser from Star Wars!
-
Holy BLAH_BLAH_BLAH_BLAH, your at it again! Oh my a birdcage. You are one to take on the challenge. You know what I would like to see at some point is a tutorial from you on panel beating. Perhaps a YouTube video. I am more of a visual learner than a taker of instructions. Well, I will definitely be following this one. Also time for me to get back to some metal work. You do inspire me Randy!
-
Tim, I don't know how I missed this one! Great build you have going on here. I love to see someone who stretches their skills to the limit and is willing to work at making them better. I will be following from here on!
-
Randy, thanks for looking in. It was kind of an evolving paint job and now that it is polished out it looks far better.
-
Hey guys, thanks a lot. I am getting down to the end of this build. I have been experimenting with other paint (urethane) on another model and that has distracted me from this build but the body is polished out and the pipes are done. Still working on the interior but it is getting there rather quickly. I should have some "under glass" photos shortly.
-
Ok, this is a tough one. By actors are you talking about someone who could play a wide diversity of characters? Many great actors got type cast and could only play one type of character and this to me meant they may have starred in numerous great movies but always played the same type of character. One of my favorites is Humphry Bogart. Great actor for the tough guy with a heart of gold character but that was about the depth of his ability. Same with Clint Eastwood. Same type of character. If we are talking about someone who has played a diverse group of characters here is my list. 1. Dustin Hoffman – From the Graduate to Little Big man to Tootsie to Rainman about as diverse an actor as you could want. 2. Robin Williams – Dead poet’s society, Mrs. Doubtfire, Mork and Mindy. An incredible comedic genius. 3. Sidney Greenstreet – the perfect foil to create diversity for Bogart 4. Henry Fonda – Wow, what more could I say. From Grapes of Wrath to On Golden Pond to Mister Roberts to the many westerns. 5. Will Smith- Great actor in the middle of his career. Comedy to drama. Got a great one going on with the promise of more to come. 6. James Earl Jones - I really doesn’t get much better than Field of Dreams to Darth Vader. That distinctive voice is a wonder to behold. 7. Kathrine Hepburn - Oh this is another great actor with a broad range and long career. The perfect person to play opposite both Henry Fonda (On Golden Pond) and Humphrey Bogart (African Queen). Played everything from the sexy vamp to the tough old lady. Nice broad range of acting abilities.
-
What's the story behind your user name/avatar?
Pete J. replied to JollySipper's topic in The Off-Topic Lounge
The glass is empty. That is why I'm grumpy!