StevenGuthmiller
-
Posts
15,081 -
Joined
-
Last visited
Content Type
Profiles
Forums
Events
Gallery
Everything posted by StevenGuthmiller
-
All excellent advice, although I will add that most Rustoleum paints that people are using for models are simple enamels, and should be relatively safe to use on any plastic. The problem is the paint itself. There are a number of problems that are frequent and inherent with Rustoleum that are virtually nonexistent with other products. Most of that can be attributed to the formulation of the paint, the delivery system, and unreliable re-coat recommendations. In other words, most of the problems that Rustoleum users experience don’t have anything to do with incompatibility with the plastic, but everything to do with the properties of the paint itself, the horrible application system, and the incompatibility with a great number of other products, as well as a lot of other Rustoleum products. It makes the whole concept of using Rustoleum paint for models a gamble. Steve
-
Yeah, I agree. Just not worth the aggravation. There are so many other paints that don’t cause so many issues. There’s no question that Rustoleum paints are one of the most problematic paints available. All one has to do is look around on the various boards and groups and that becomes quite evident very quickly. Steve
-
 Revell also has, “had. Don’t know if it’s available at the moment” a very nice convertible with an optional up top and continental kit. I built the “newer” AMT version many years ago, and the detail is very good, but I do recall a couple of fit issues. Nothing major, but it did require a little forethought. Steve
-
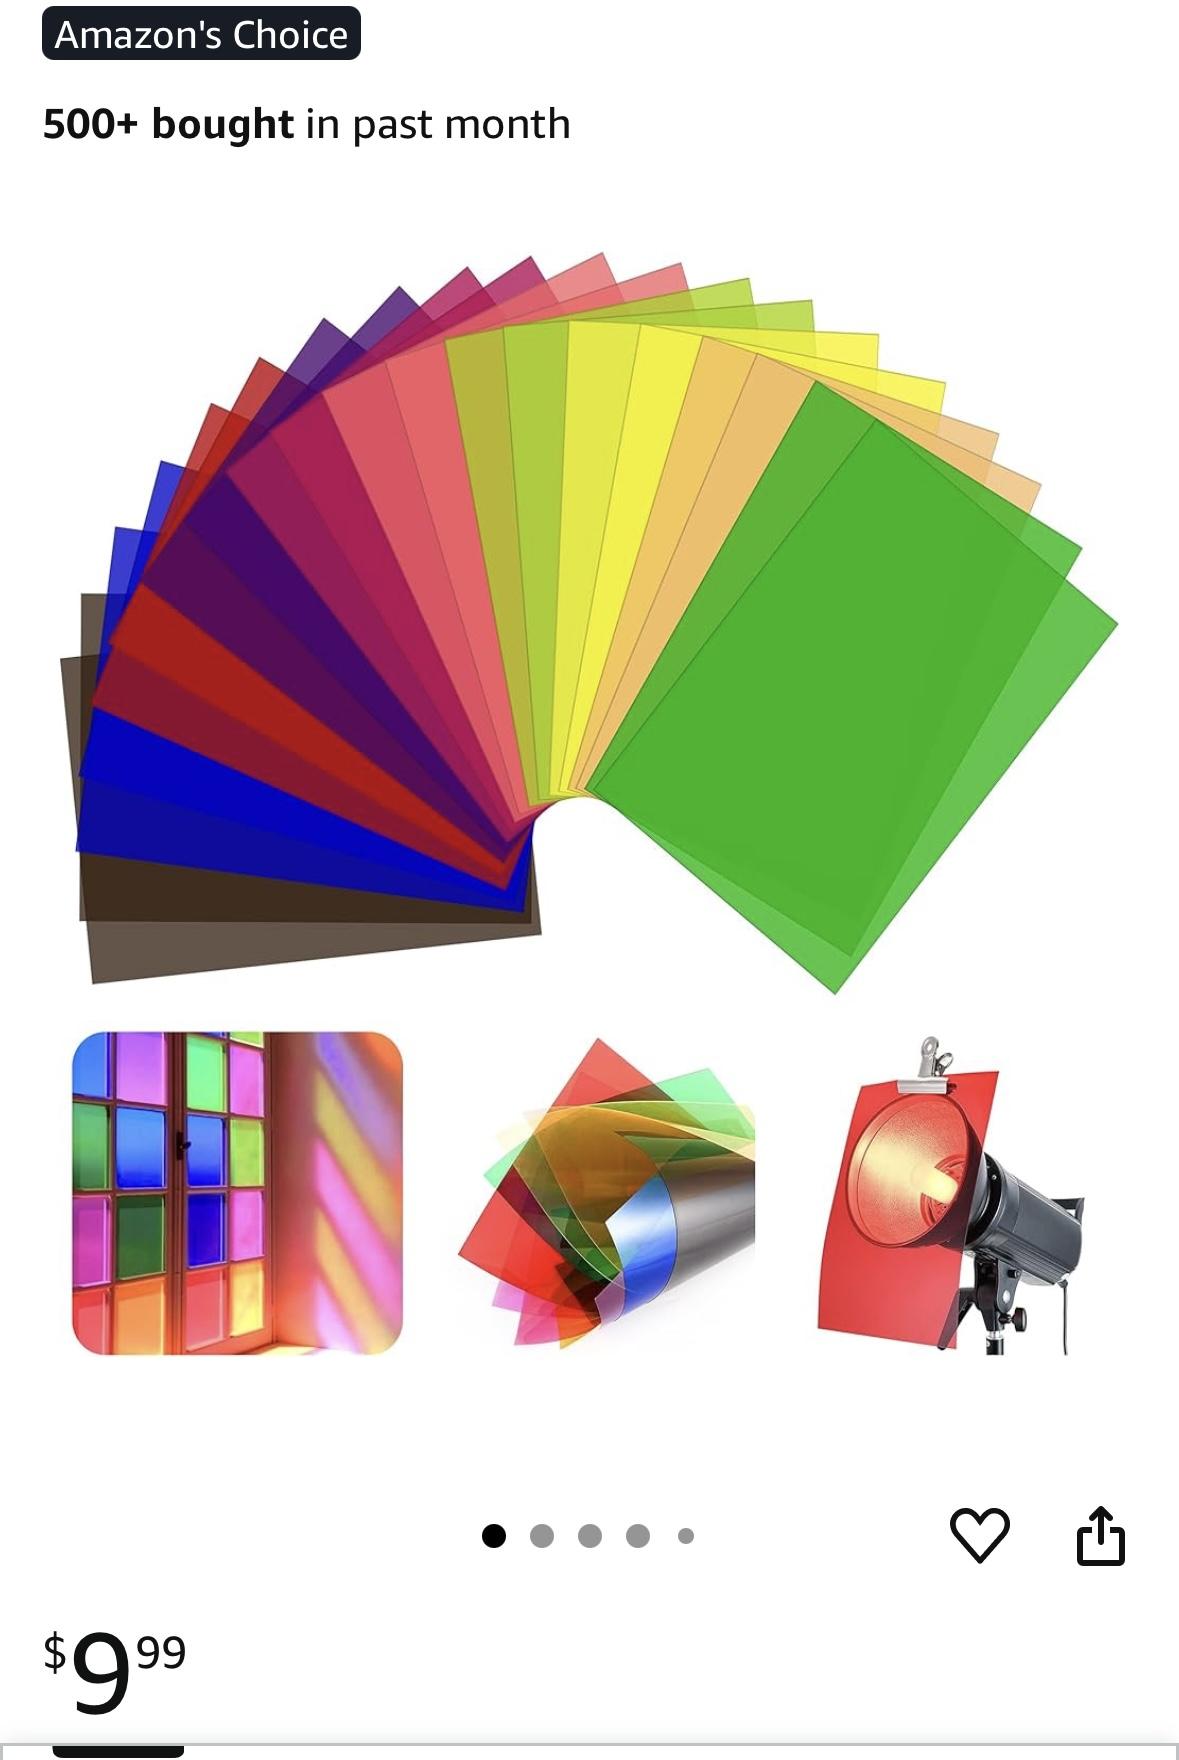
gasser window tint
StevenGuthmiller replied to gary jackson's topic in Model Building Questions and Answers
Well, it’s the “great minds” thing. 😊 Steve -
gasser window tint
StevenGuthmiller replied to gary jackson's topic in Model Building Questions and Answers
Make it easy on yourself and buy some of this. Steve
-
Dupli-color clear
StevenGuthmiller replied to afxawb2's topic in Model Building Questions and Answers
That's what I use. It's not going to give you a super shiny, "dipped" look like people seem to prefer these days with 2Ks and the like, but I regard that as a good thing. Polishing is inevitably going to give you a more realistic looking finish in my opinion anyway, so several coats of clear lacquer, followed by cutting and polishing is my technique. The Duplicolor Perfect Match "Protective Clear coat" in a rattle can is tough as nails, lays down thinly so that detail hide is virtually non-existent, and polishes out to a exemplary finish. It can be sprayed over any good quality lacquer paint. I use it over Duplicolor, MCW and Scale Finishes lacquers all of the time with zero issues. Steve -
Agreed. Most windshields are relatively easy to replace with thin plastic. It also has the added advantage of looking more realistic as it’s much thinner than kit glass, eliminating the unrealistic refraction. Steve
-
Well, I wasn’t going to express the “number of reasons” to use primer, but I suppose someone should. As has already been stated, it helps A LOT, with prep work, making it way easier to tell if additional body work needs to be performed prior to paint. Personally, even if I plan on using white primer, I’ll still use sometimes several coats of gray primer first to ensure that body work is to my satisfaction. Primer also promotes superior adhesion. Many paints need something to “bite” into to adhere properly to the surface, and believe me, if you’re paint is just a little on the hot side, it’s going to bite into the plastic, which sounds great, until you realize that biting into the plastic usually equals crazing the plastic, which isn’t cool at all. And if it’s not “biting” in, well, that means that it’s just sitting on top, which may not cause any issues, but then again, if you have any masking to do…….😖 The primer also acts as a barrier to those hot solvents that can damage the plastic, so it’s doing double duty. Just my opinion, but I find very little compelling evidence in most cases that painting bare plastic has any real advantages over using primer, other than expedience and saving a little money. The “paint thickness” theory only holds water if you’re using thick paints, such as enamels, which I rarely have much good to say about anyway, but that’s just me. I’ve said this probably hundreds of times, but if you’re using the right materials, paint thickness is pretty much a nothing burger. Using lacquers, I routinely use as many as 15 coats of primer, color and clear all together. As usual, I’ll avoid expressing the reason for that many coats, (and yes, I do have reasons) but the point is, it’s entirely possible to use that many coats with virtually zero detail hide whatsoever. I’ve seen many models with 1 or 2 coats of enamel that exhibit much more hidden detail than one of my 15 coaters. Steve
-
I’m not the type to shy away from a challenge no wonder how much 3-D printing that I need to compete against, but in some cases it certainly can give you an unfair advantage. I remember seeing a printed engine compartment being made available for I believe a mustang some time back. It was an amazing piece with every nut, bolt, hose and line represented, far outpacing anything that is ever likely to be able to be done with conventional building methods. So in the end, should it at least be something that needs to be brought to a judges attention when you have an engine bay that may have just been purchased, painted and installed, and still over shadows one that may have had to have been meticulously detailed by the modelers own hand through hours and hours of engineering, parts swapping and scratch building? I think that 3-D printing is a wonderful thing, but I also feel that as these things become more and more readily available, there should be some mechanism to insure that the individual who goes to the extremes to try to compete with assemblies that can be simply purchased and installed, is still recognized for his effort. Steve
-
I don’t think people fearing the future is necessarily the case. Some of us just see it as a matter of fairness. I’ve done quite well against 3-D printed models with traditional building materials and methods, but that’s not to say that there is not plenty of disconcertion among modelers over this subject. So why not address the situation, and end the anxiety by just simply creating a separate category for 3-D printed models? Seems like a pretty simple solution. Steve
-
Of course everybody is not at the same level. That’s why they have judging. But don’t you think that it makes sense to judge based on similar metrics used to complete competing models? Part of the reason why there are often separate categories for 1/25th 1/24th scale, large scale and small scale is because detailing larger scales is much easier than detailing smaller scales. If we’re judging based on “building” prowess, and not so much parts manufacture, it makes sense to me that advantages based on skills that aren’t traditionally required to build a model should be addressed in some manner. It makes sense to me to let 3-D printed models compete with other 3-D printed models. Don’t know what could possibly be wrong with that. Steve
-
Sounds fair. But I think you’re probably the exception rather than the rule. Steve
-
That’s exactly what took place at one of the larger IPMS functions in my area. The same guys who put on the local NNL take care of the judging at said show, and they do an exemplary job! Stand up guys who know what they’re doing. The same cannot be said about some other shows that I have attended. Steve
-
I suppose I agree, but the result is the same. Inconsistent judging, which is why I won’t return to some shows. Steve
-
Just my opinion, but I would never skip primer for a number of reasons. You could open yourself up to all kinds of problems depending on the formulation of the paint. Steve
-
Well, there’s that, and then sometimes I wonder if it’s just a case of whether or not some of the people that are judging really have any idea of what they’re looking at. I like to think that it’s more of just a case of inexperience rather than bias, but I’ve absolutely seen the results of one, or possibly both. Steve
-
My question would be, how many categories does the chapter have for their military and aviation subjects? Having just one automotive category kind of proves my point about the apparent disdain for car modelers at many IPMS events. They certainly don’t seem to have a problem with “29eleventy7” categories for those genres. Why isn’t there just one aviation category? I can’t tell you how many times I’ve seen people win a gold because they were the only “1/48 multi engine prop” entry, or the like. Steve
-
I think it might be pretty simple. Create a 3D print category. If the model has major components that are printed, (Meaning other than a few minor detail pieces such as wheels, carburetor or other small components) it can compete with other similarly constructed models. Makes sense to me. They often have separate categories for large scale, small scale, etc. One more category isn’t going to make a difference. The only problem might be that you wouldn’t really want to create separate print categories for every genre or class, so you’re printed ‘57 Mercury might have to compete with Sherman tanks, P51 Mustangs and fantasy subjects, but being as the sky is the limit with 3-D printing detail, I think that’s absolutely fair. In all honesty, it seems more fair than competing against a promo based AMT 1961 Ford. Steve
-
I agree completely. Steve
-
I see a LOT of them. Gundam and figures are becoming increasingly popular at many shows, and a good number of them are created by young modelers. My biggest gripe about some IPMS shows is their lack of seriousness with automotive modelers. There are certainly a lot of military/aviation snobs at these shows, even though some of the shows I have attended display upwards of a third of the entrants being automotive subjects. All one needs to do is observe the category lists for the shows. You might have three or four automotive categories, but there are often dozens of military and aviation subjects, sometimes with some of the weirdest distinctions. Do we really need an entire category for “post war eastern block artillery?” Steve
-
I don’t necessarily have any issues with 3-D printed parts, but I do feel that a distinction should be made in a contest between 3-D printed parts and scratch made parts. I think that that should at least be disclosed. I would want to know as a judge if a part was made from scratch, or printed. Just my opinion. Steve
-
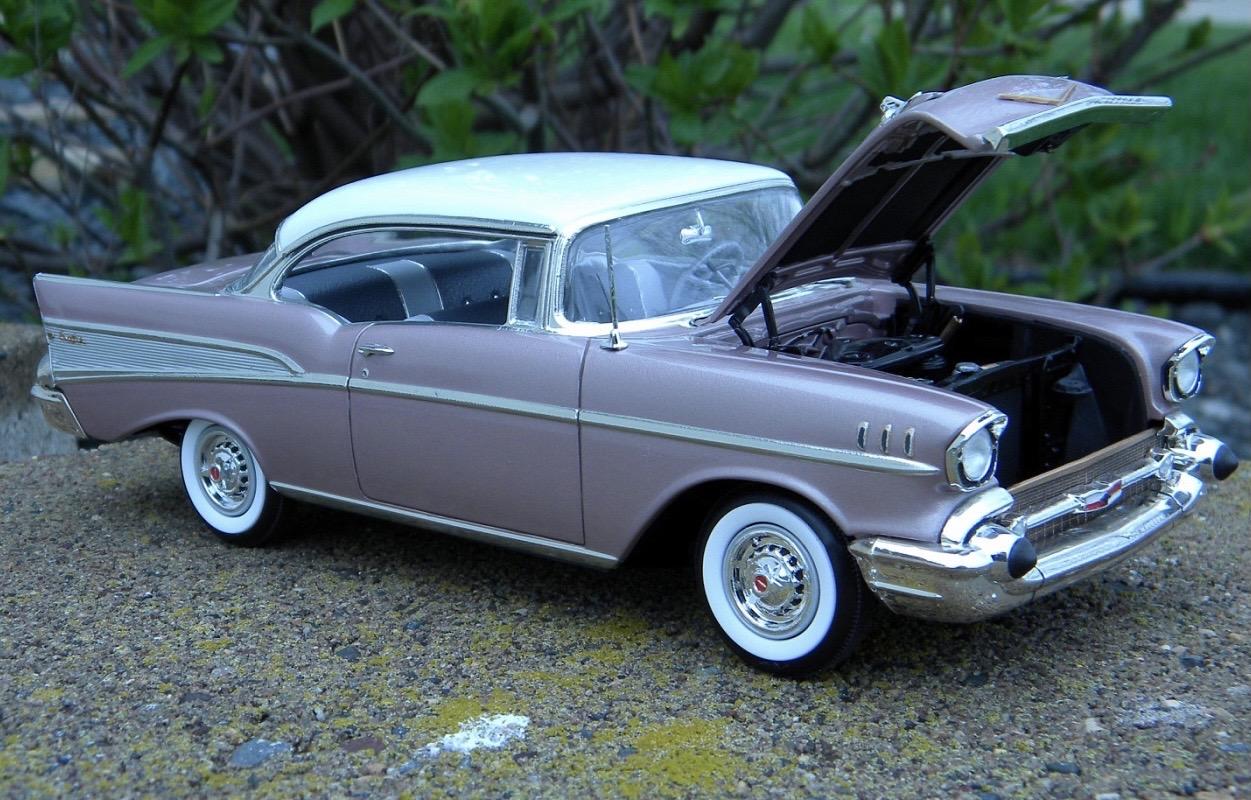
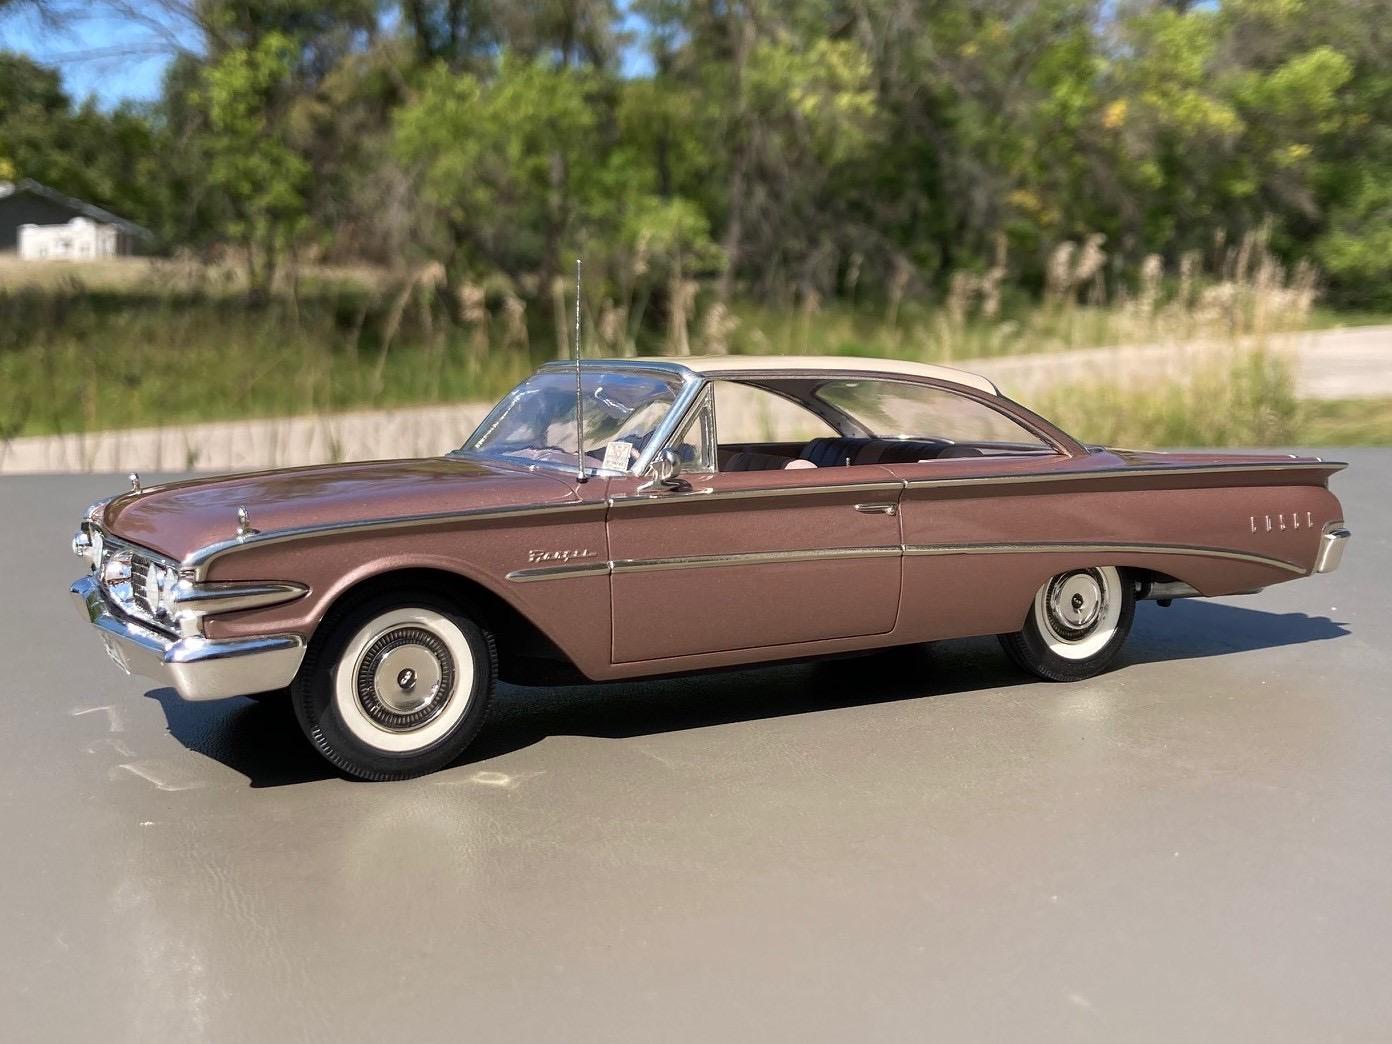
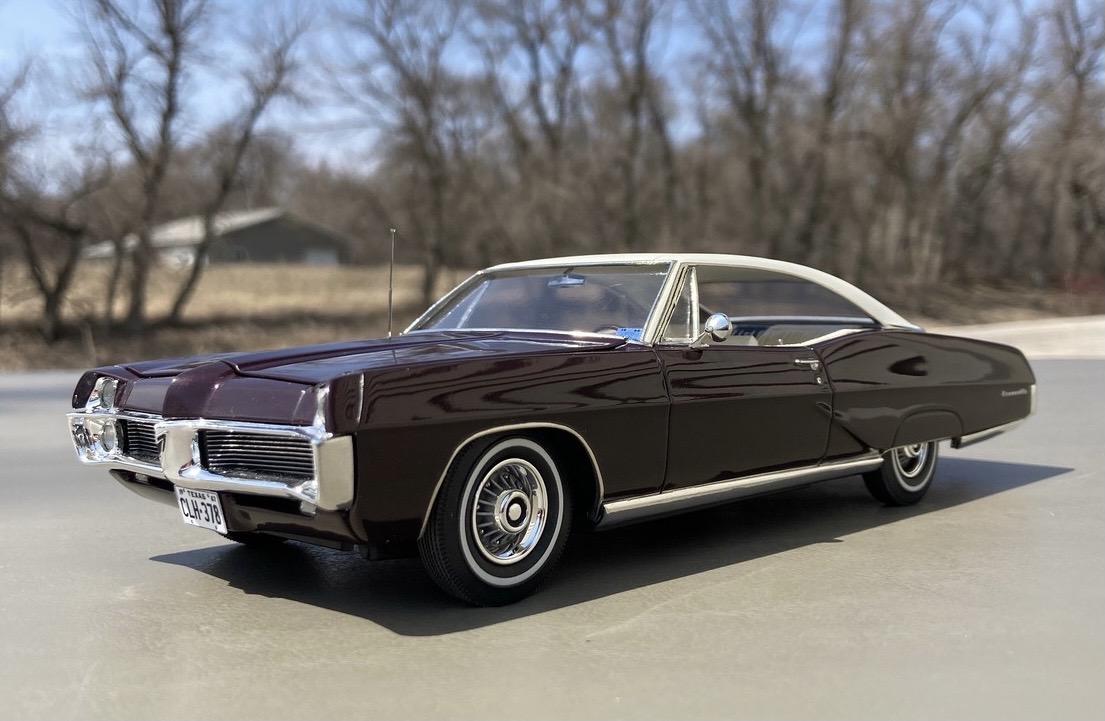
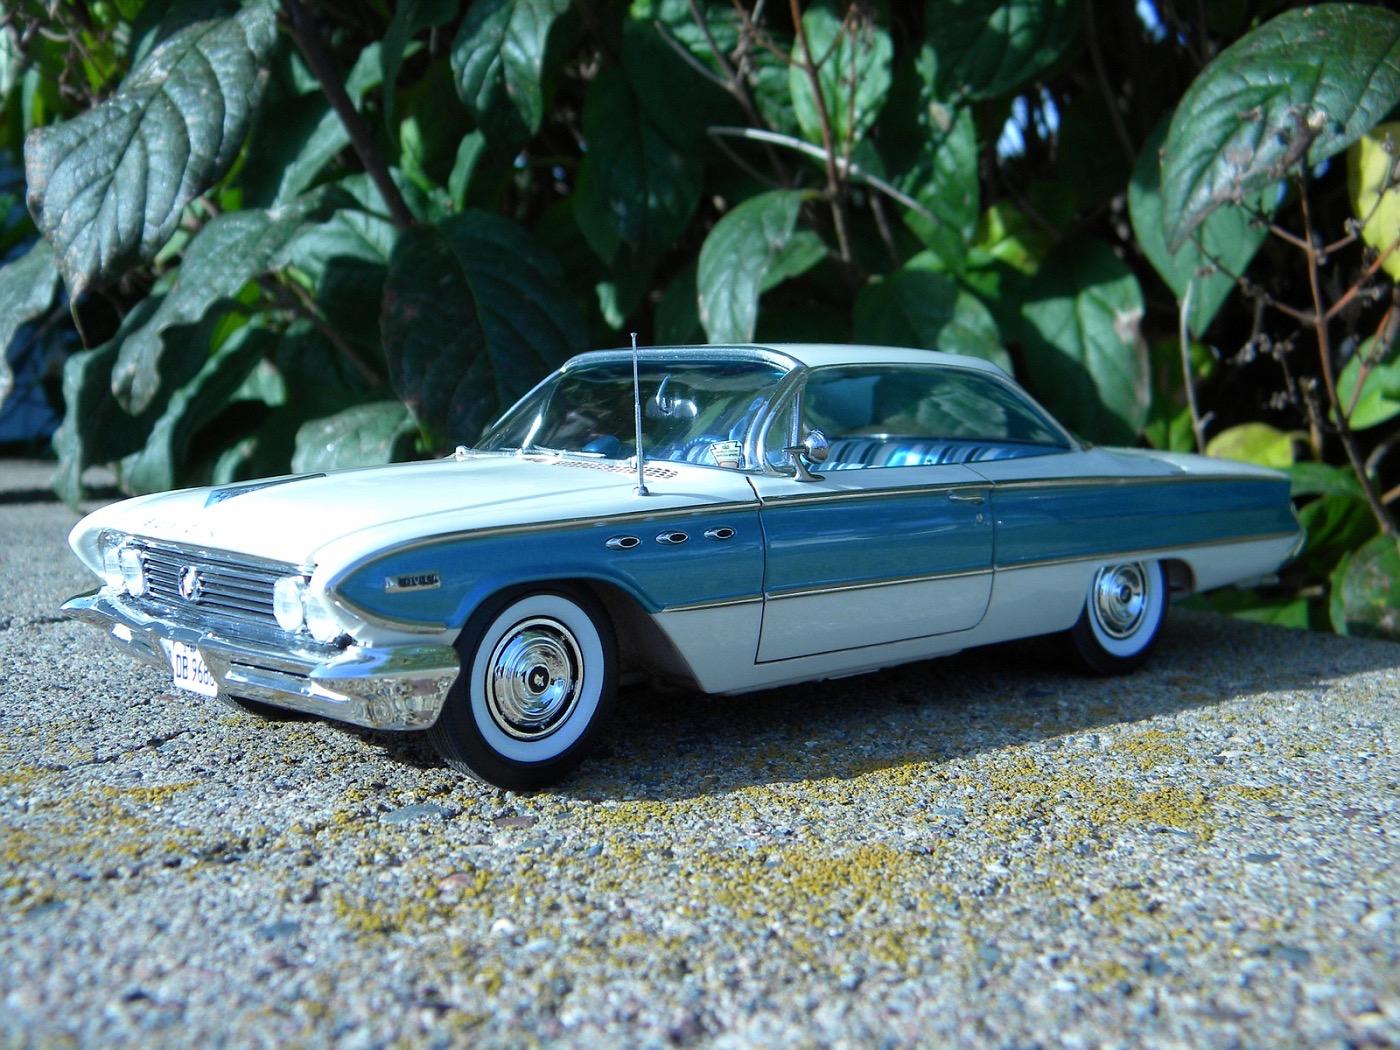
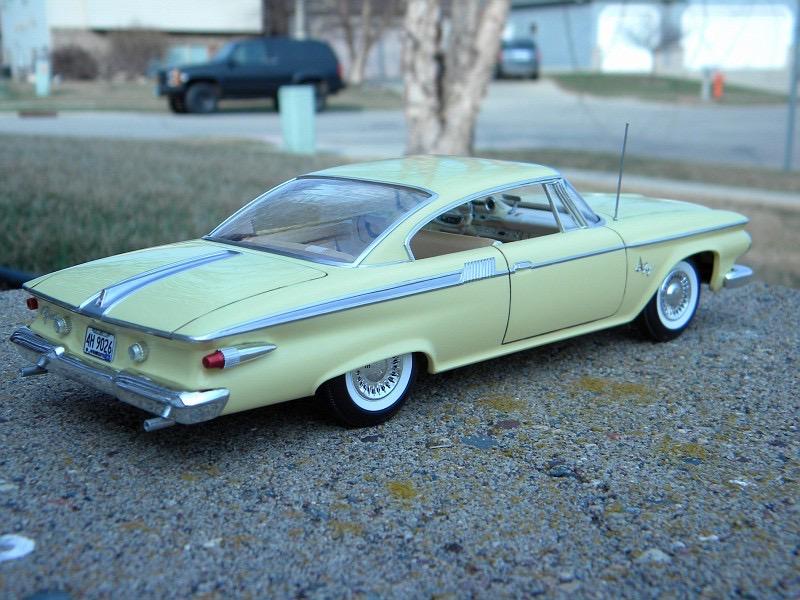
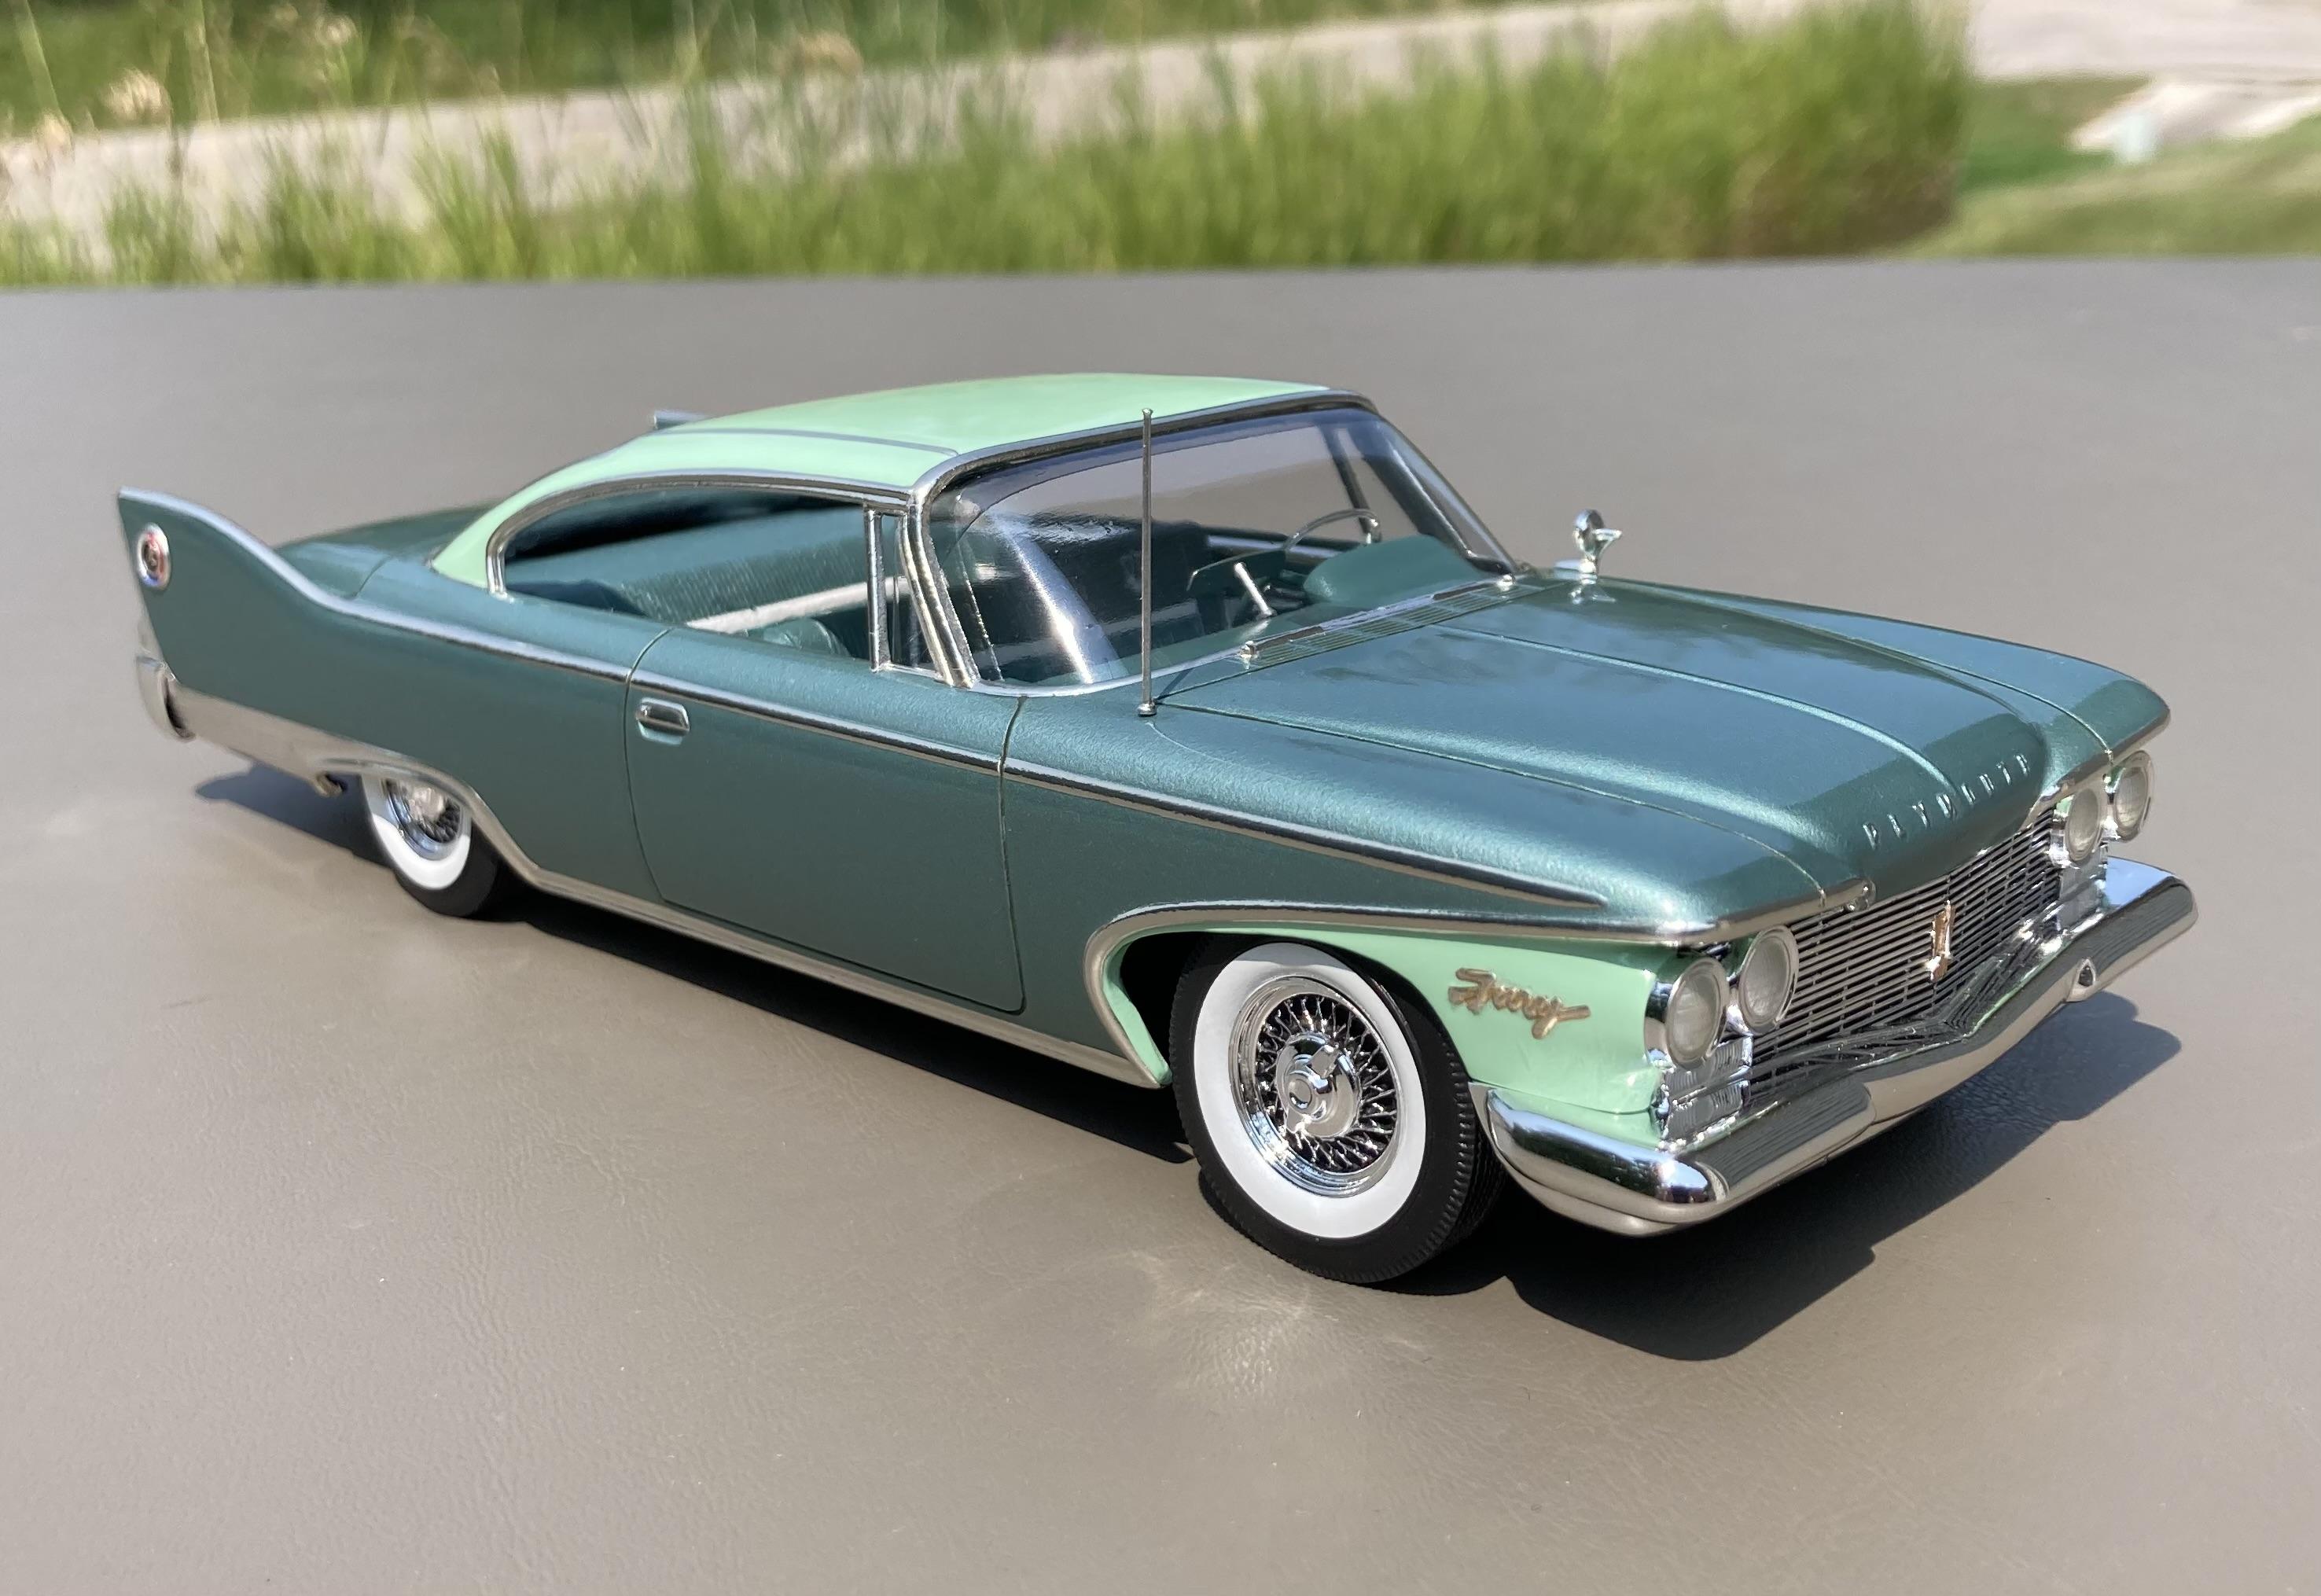
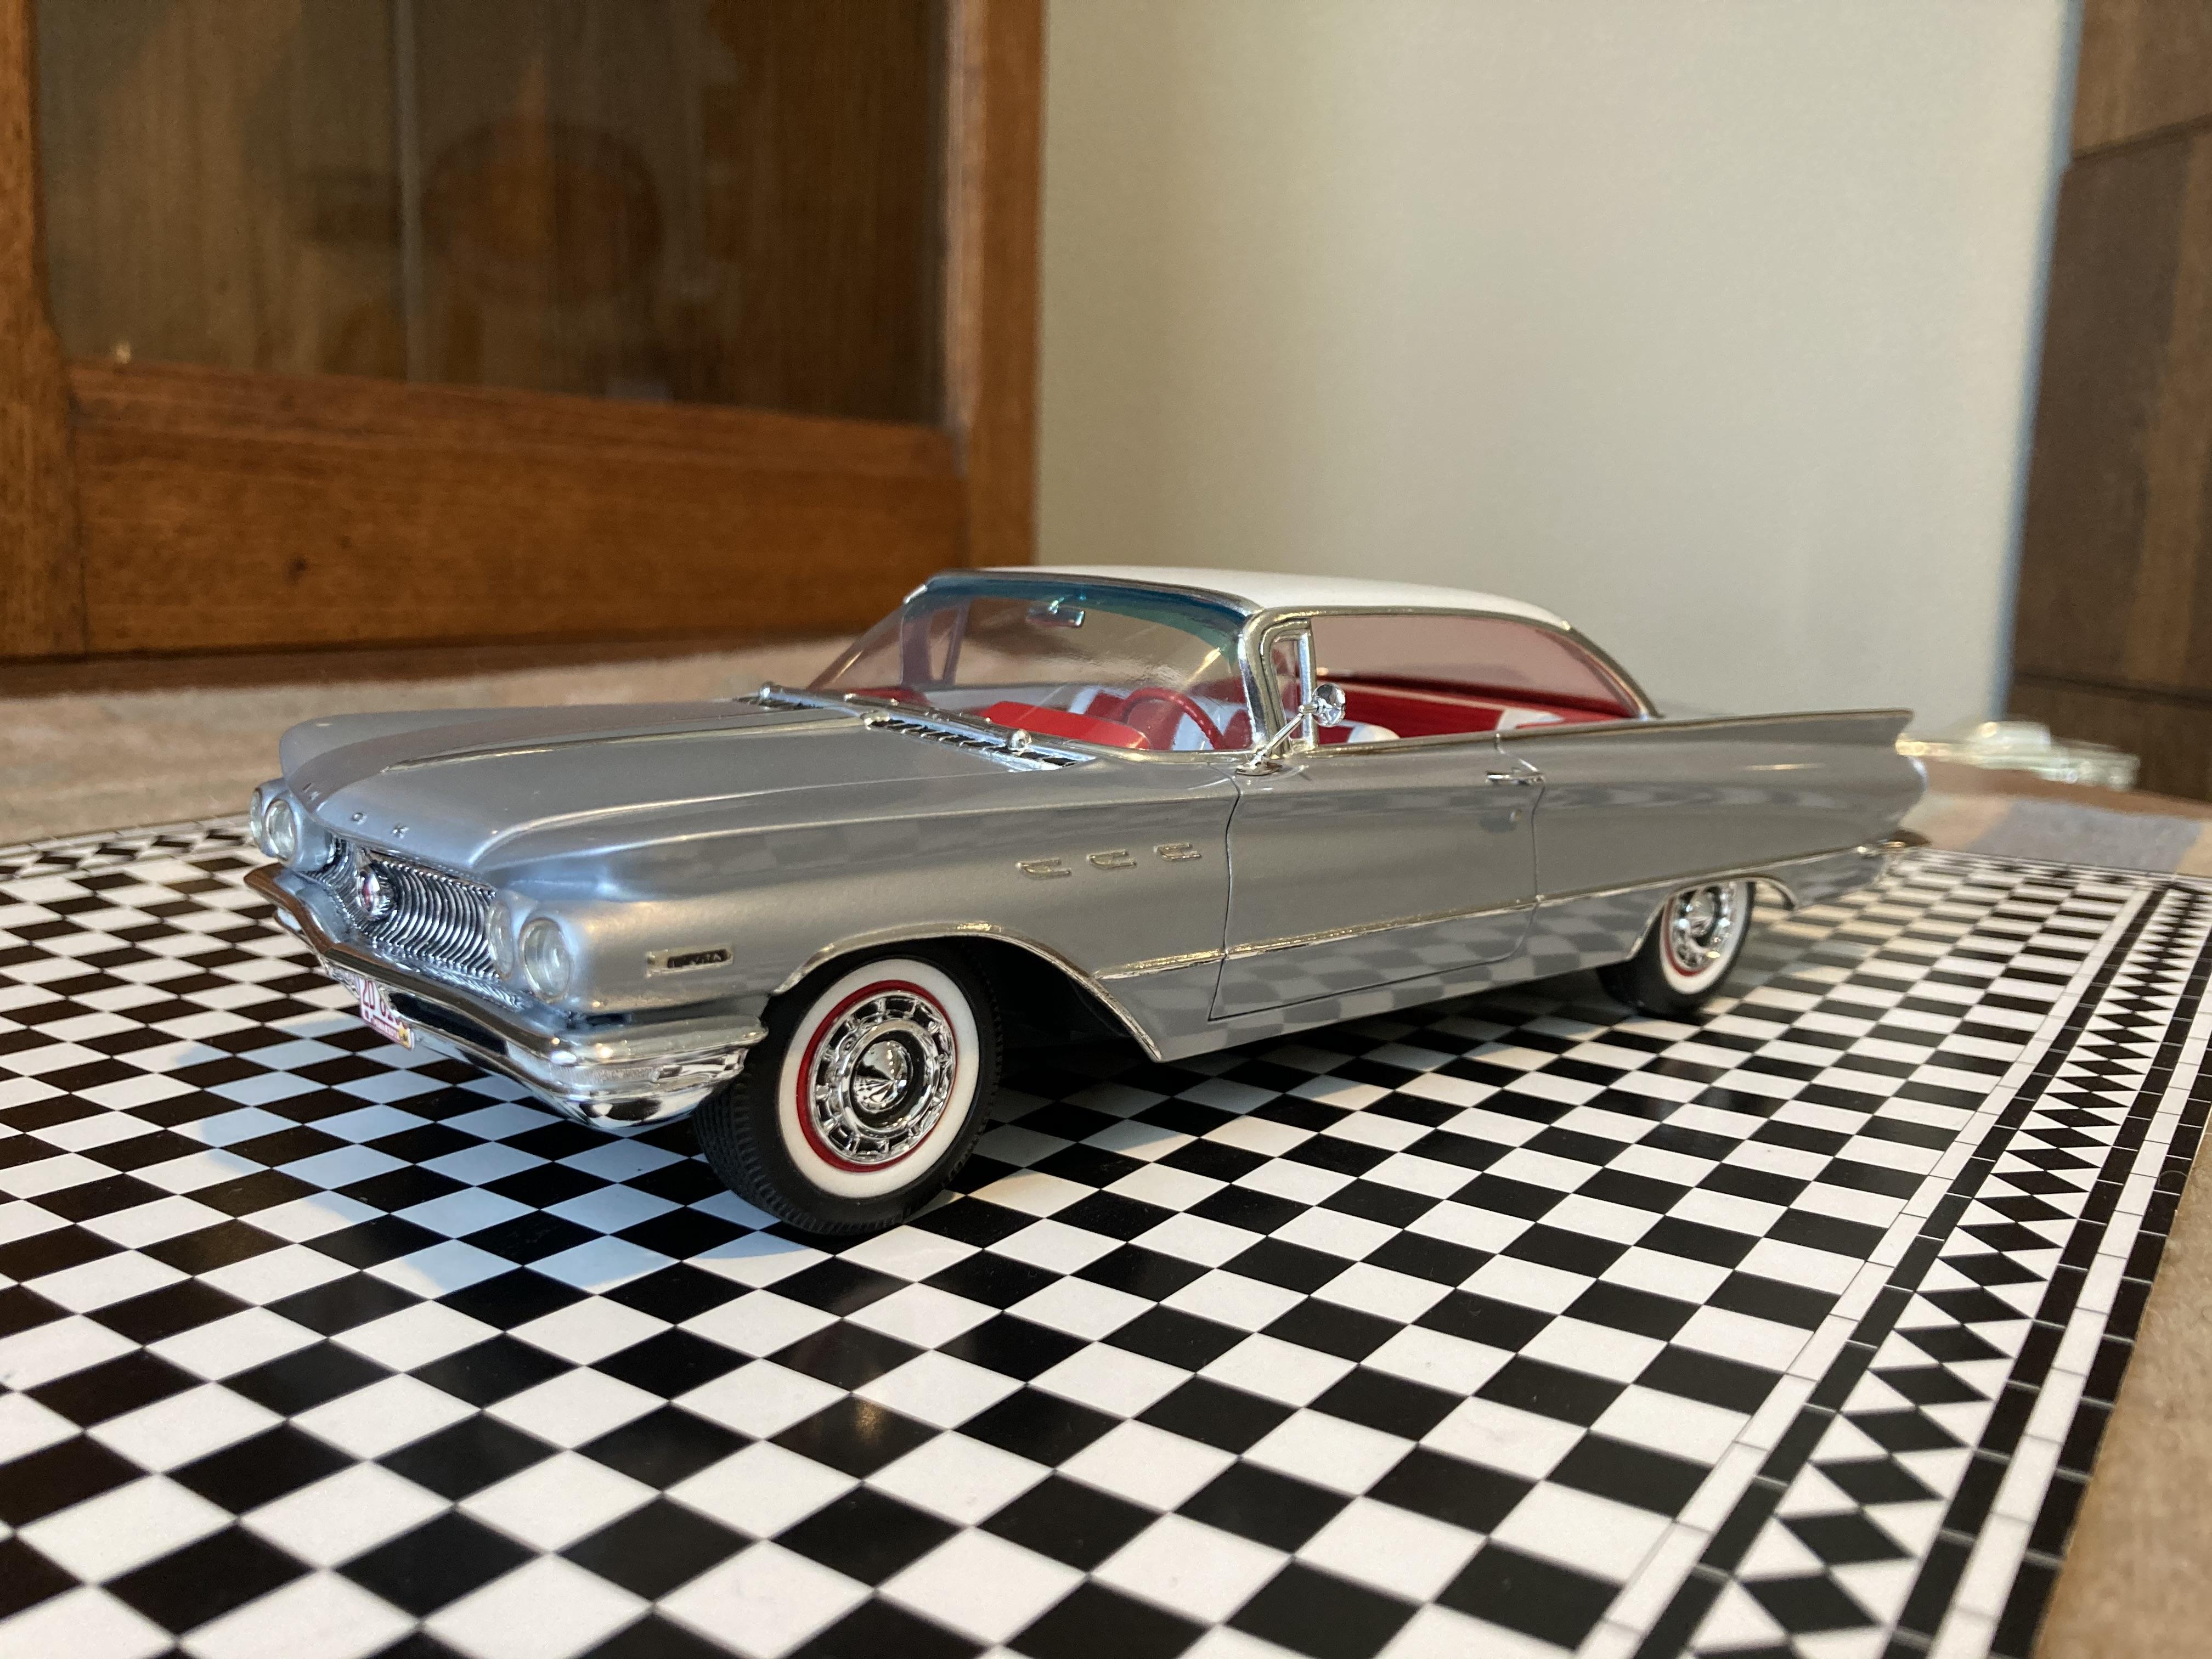
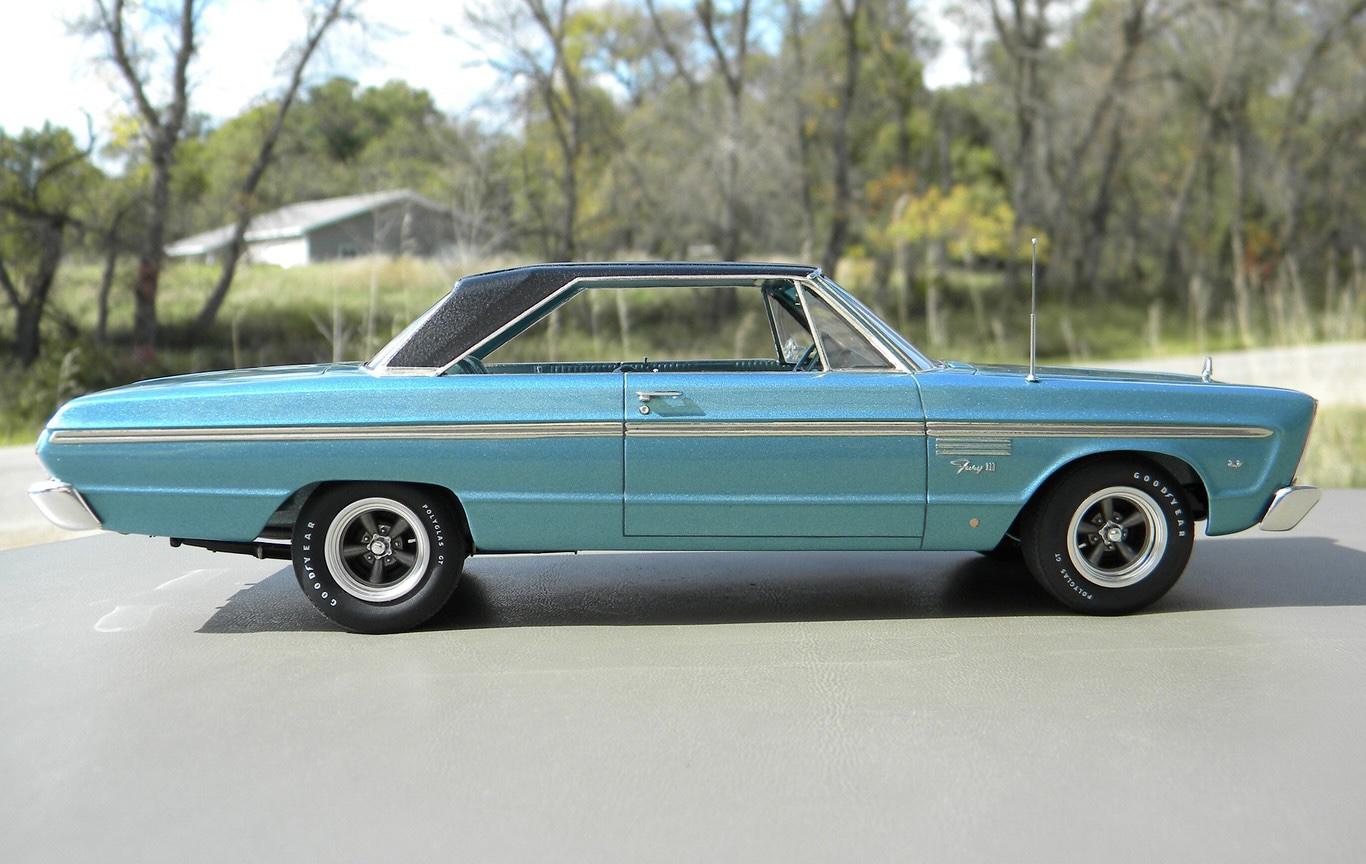
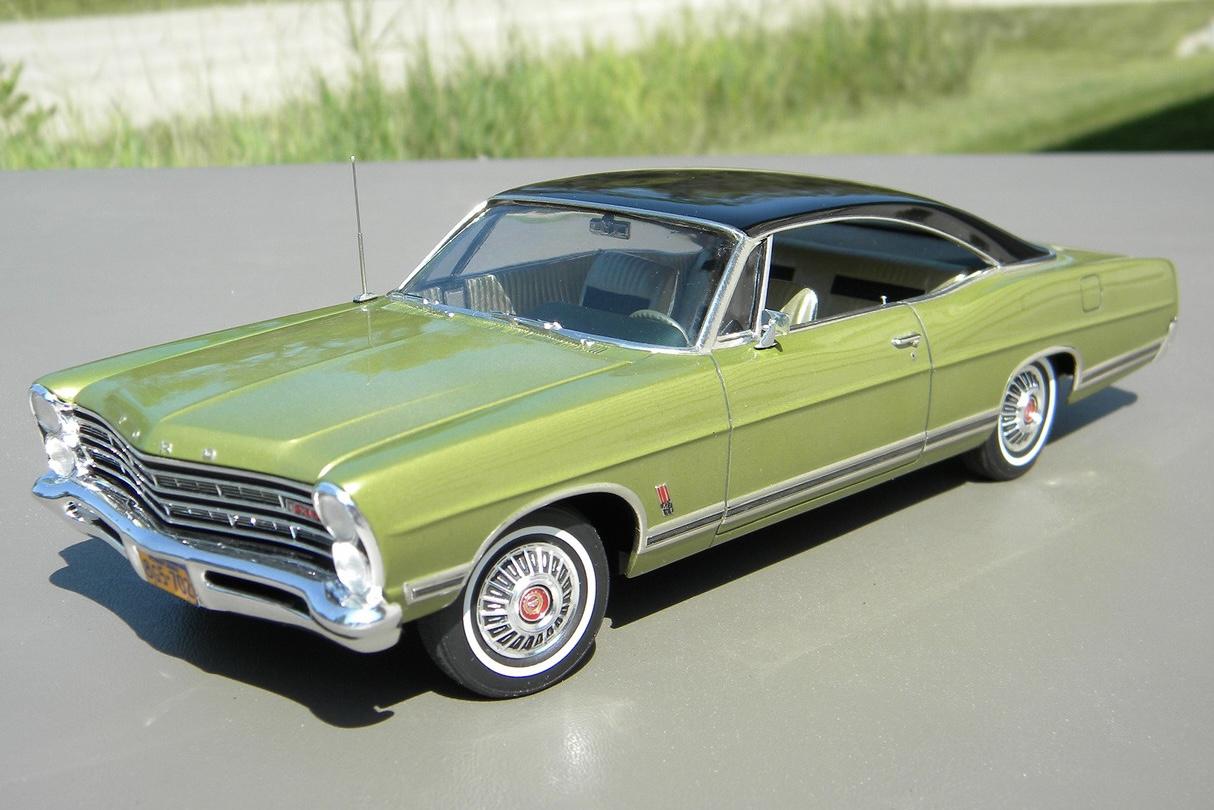
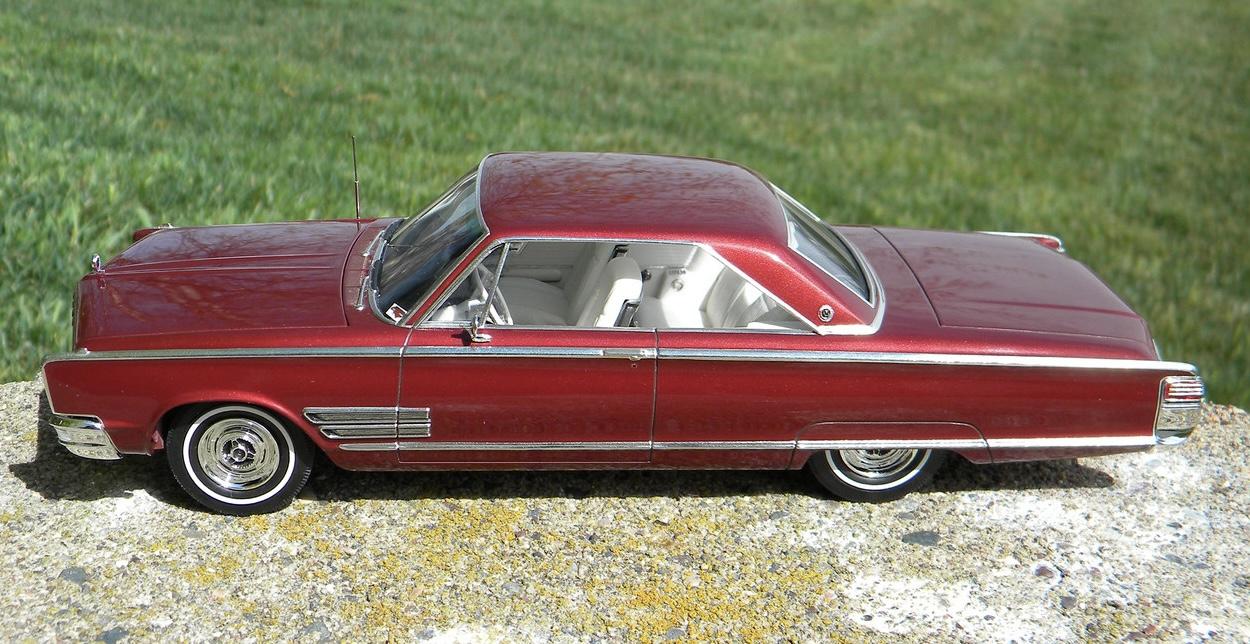
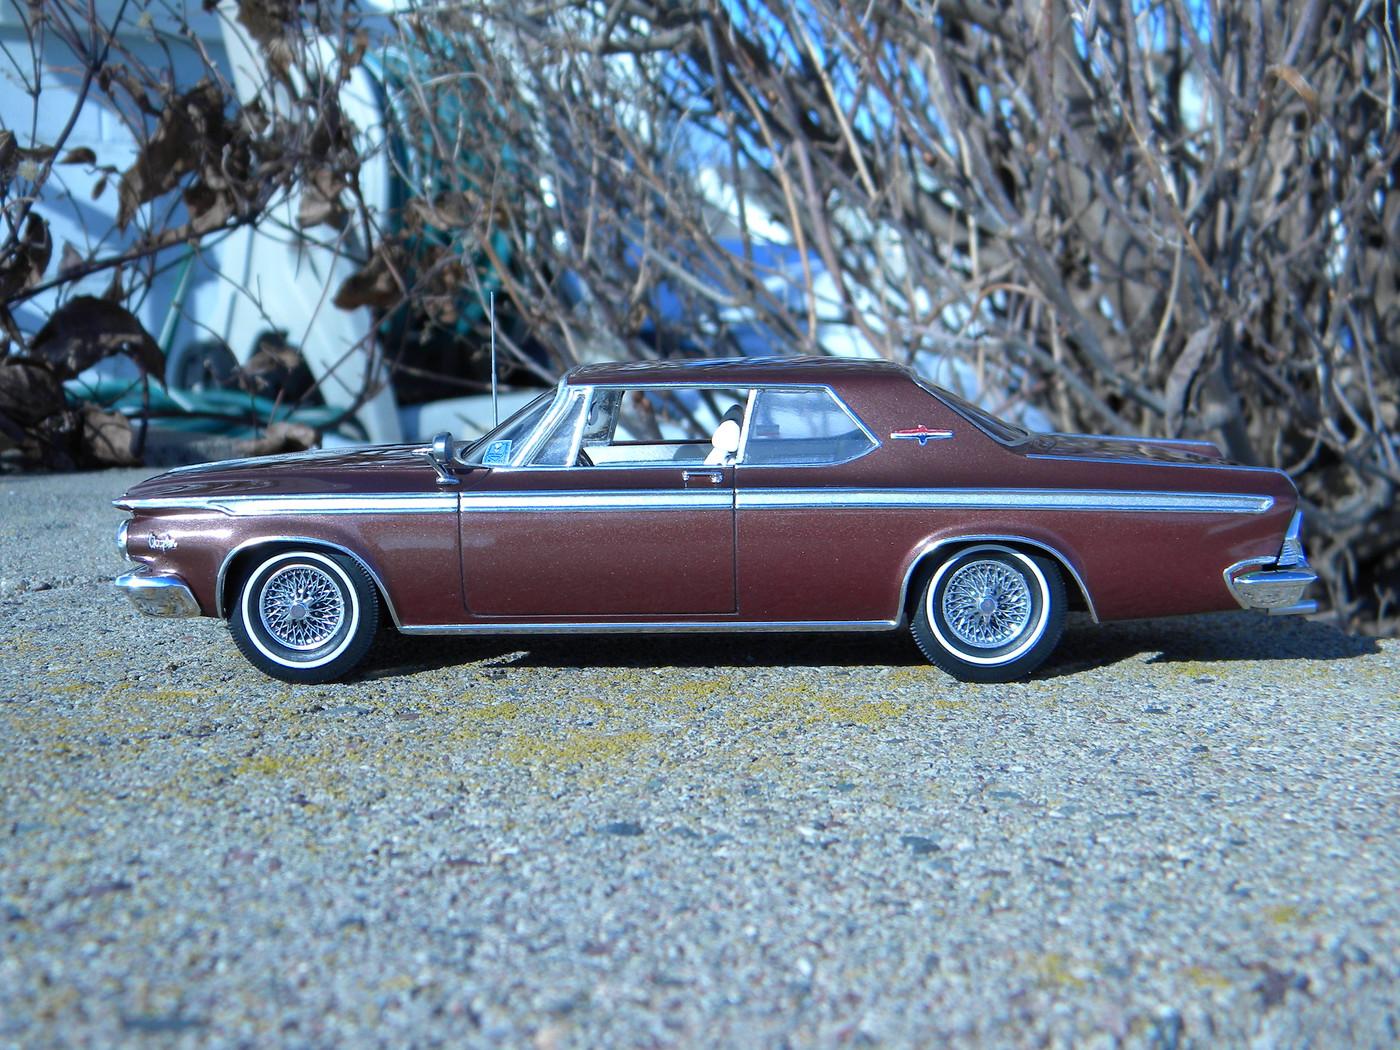
Here’s a few more of my “holy grails” that I’ve obtained and built over the years. Steve
- 398 replies
-
- 19
-

-

-
Simulate vinyl/leather look on seats
StevenGuthmiller replied to Donny's topic in Model Building Questions and Answers
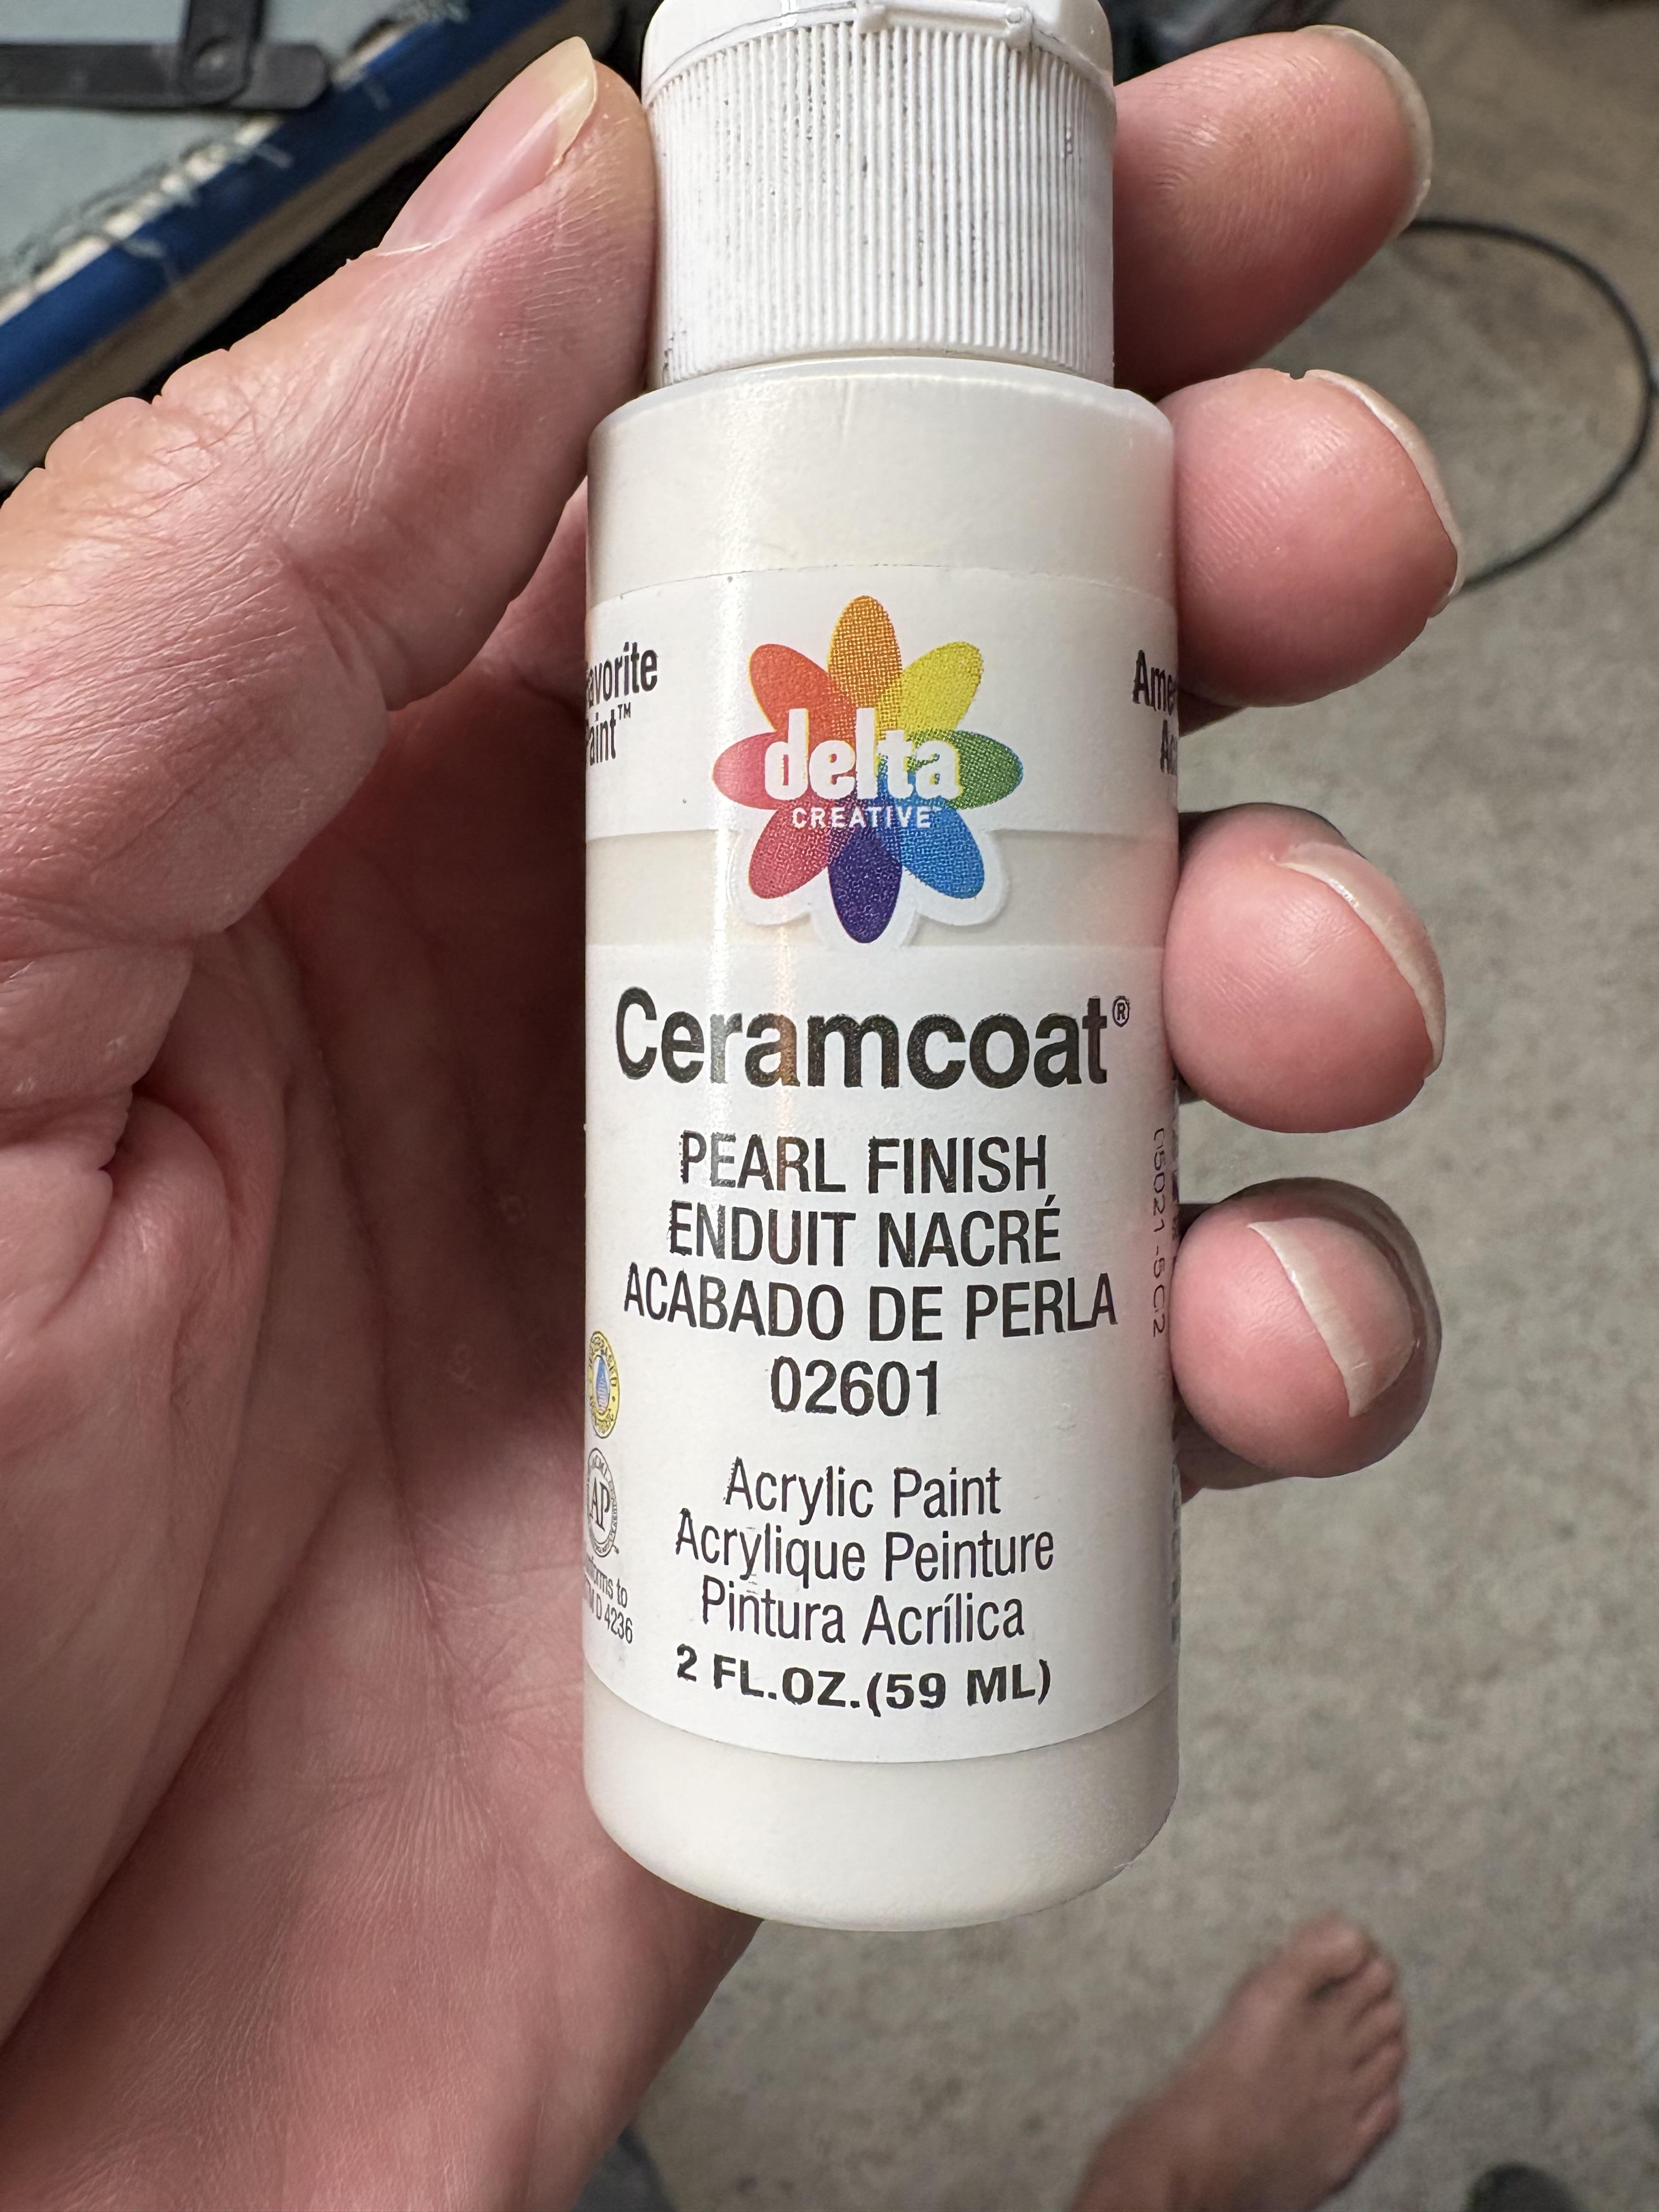
This is the pearl that I use. Steve
-
Simulate vinyl/leather look on seats
StevenGuthmiller replied to Donny's topic in Model Building Questions and Answers
A good number of cars from the 60s had metallic, or more accurately, pearl interior upholstery. In some cases, I've been able to mimic that finish using a pearl, or fine metallic paint. In others, I've used a pearl acrylic craft paint lightly dusted over the color to create a fine metallic finish. The '64 Bonneville that I posted above was finished using a custom mix of MCW metallic enamel. In these cases, the acrylic pearl was used. Steve -
Kit bumper identification please
StevenGuthmiller replied to gtx6970's topic in Model Building Questions and Answers
Must be a resin bumper from an aftermarket resin ‘60 Dodge wagon. As far as I know, a ‘60 Dodge wagon was never produced in styrene, and it’s a different bumper than the Johan ‘60 Dart. Steve