StevenGuthmiller
-
Posts
14,971 -
Joined
-
Last visited
Content Type
Profiles
Forums
Events
Gallery
Everything posted by StevenGuthmiller
-

1964 Pontiac Bonneville Convertible.
StevenGuthmiller replied to StevenGuthmiller's topic in WIP: Model Cars
Thanks Bill! Another step closer. Door panels are finished, except for the door lock buttons, which will be added at final assembly. Steve -
The convertible isn't too bad. Any inaccuracies are relatively minor. The problems come with the hard top. The top is pretty badly out of whack. It's most likely the same sort of issues that arose with some of the earlier AMT kits. The convertibles were the standard bearer, and the hard tops were somewhat of an after thought, so the tops were occasionally a little lacking. Most likely the same problem here. Trumpeter most likely just added a top to the convertible body, and just didn't get the proportions right in the end. By the way, your convertible is lovely!! Steve
-
Finger nail powder chrome works great
StevenGuthmiller replied to my66s55's topic in Tips, Tricks, and Tutorials
A large part of the problem with all of these "chrome alternative" threads is that there are a large portion of us who are not particularly thinking of the finish of most of them per say, as they can all produce at least a semi-acceptable chrome finish, but the big question in our minds is about durability. That question never seems to get a definitive answer. As a rule, just a lot of vague responses with no real concrete resolutions. Mostly just guesses. Personally, durability is ALL that I care about. Otherwise, they're basically all the same with differing methods of application. I guess what I want to see with any of these products instead of simple bumper after simple bumper, is for someone to do a chrome part that's going to require some fairly extensive detailing after chrome. Grille washes, badge detailing, etc, and see what the finish looks like after, and then I'll be able to fully assess the product and whether or not it's something that I want to investigate. Steve -
1964 Pontiac Bonneville Convertible.
StevenGuthmiller replied to StevenGuthmiller's topic in WIP: Model Cars
Thanks Greg. That's why we're all here after all. To share and learn from one and other. Steve -
1964 Pontiac Bonneville Convertible.
StevenGuthmiller replied to StevenGuthmiller's topic in WIP: Model Cars
Got the Alclad on the interior parts, as well as the remaining small exterior pieces this morning. Honestly, I still don't understand why the feverish search for alternatives still continues when Alclad has been under our noses for years. I don't see any reason at all to look for another "chrome paint". Steve -
1964 Pontiac Bonneville Convertible.
StevenGuthmiller replied to StevenGuthmiller's topic in WIP: Model Cars
Got the holes drilled in the door panels for the handles and cranks. Now I'm ready for paint! Then it's just a matter of installing them, adding the arm rests and pads, and carpeting the lower portion of the door. Steve -
1964 Pontiac Bonneville Convertible.
StevenGuthmiller replied to StevenGuthmiller's topic in WIP: Model Cars
Yes. I still have to lay out the exact location of the cranks on the door panels, and then I'll drill the holes. Steve -
Another Duplicolor Question
StevenGuthmiller replied to jacko's topic in Model Building Questions and Answers
Your sentiment is understandable. In the end, you're not likely to find very many definitive answers on this, or any other forum. But you will find lots of ideas that will help you to formulate your own processes. Steve -
1964 Pontiac Bonneville Convertible.
StevenGuthmiller replied to StevenGuthmiller's topic in WIP: Model Cars
Still working away on the little stuff, and I believe I have my last batch of parts ready for Alclad chrome. I added a little more detail to the window cranks and door handles and got them and the exterior door handles pinned, got the door lock buttons underway and the base for the radio antenna finished, and am finishing up on getting the headlight reflectors finished up. Getting closer to final assembly, albeit slowly. Summer is a lot tougher season to find time to dedicate to the shop. Steve -
Another Duplicolor Question
StevenGuthmiller replied to jacko's topic in Model Building Questions and Answers
I suppose that you can allow your curing time between coats of paint, or between sanding grits. In either case, allowing curing time is beneficial, and the time required will equal out. When I begin polishing, I will polish entire sections of the body from start to finish in one session, and then move on to the next section. I've just found in my experience that piling on too much paint in a short period has the potential to cause problems. In this case, very light coats would be required. I've had plastic craze from piling on too much paint in a short period, even late in the process, so I refrain and give the paint time to cure between coats. I've had very good luck for many years with the system that I use. I think I've only stripped a couple of paint jobs in the past 10 years or so. Steve -
Another Duplicolor Question
StevenGuthmiller replied to jacko's topic in Model Building Questions and Answers
Nope. You can wait for a year if you want. Steve -
Another Duplicolor Question
StevenGuthmiller replied to jacko's topic in Model Building Questions and Answers
It gives the paint time to cure well between coats which helps to protect what's underneath from any adverse affects from the following coats. Call me nuts, but in my opinion, several coats of paint applied a few minutes apart is more like one thick coat than it is several thin coats. With a hot paint, it's the nature of the beast that each successive coat will etch slightly into the prior coat which is desirable for proper adhesion. Allowing each coat to gas out fully, and at least partially cure, insures that the solvents are not eating their way all of the way down through the uncured layers beneath it, which in turn can affect the plastic beneath. I've found that it's beneficial to be safe rather than sorry, and allowing each coat adequate time to cure insures that there won't be any surprises. Duplicolor, as well as most other acrylic lacquer paints, have no re-coat requirements, so I've never found any benefit in rushing it. Steve -
Polishing base coat before clear?
StevenGuthmiller replied to rightrudder's topic in Model Building Questions and Answers
I agree with Chad. Never polish the raw color before clear. There can be numerous problems that can arise from this practice, especially if you're using hot acrylic lacquers. Aside from the obvious possibility of fish eyes in the clear from silicates left on the surface from polishing after a possible incomplete cleaning, sanding a raw metallic paint can "smear" the metallic particles and cause all kinds of weird blushing issues that will only be magnified by clear coats. I've also had circumstances where the lacquer clear can eat into the broken surface of the sanded areas and leave horrible striations in the paint, completely ruining the paint job. If you must sand or polish before clear, do it prior to a final color coat to seal any repairs under an even and unbroken coat of paint, and then begin clear coating. As a rule, you can lightly sand between coats of clear without issue, but there's really no need unless you experience fairly heavy orange peel, or foreign particles in the clear. Steve -
Another Duplicolor Question
StevenGuthmiller replied to jacko's topic in Model Building Questions and Answers
This is exactly what my approach would be. Be sure to give the paint ample time to cure before you start sanding, (I would wait for a day or two) and clean well when finished, and then re-coat. As a general rule, I wait an hour or two between primer coats, and several hours, at least, between color coats. As I usually use 4 or 5 coats of color, my routine is to do a couple of color coats per day, 3 or 4 hours apart. Steve -
Gotta save a little cash until the next government bailout comes around. ? Steve
-
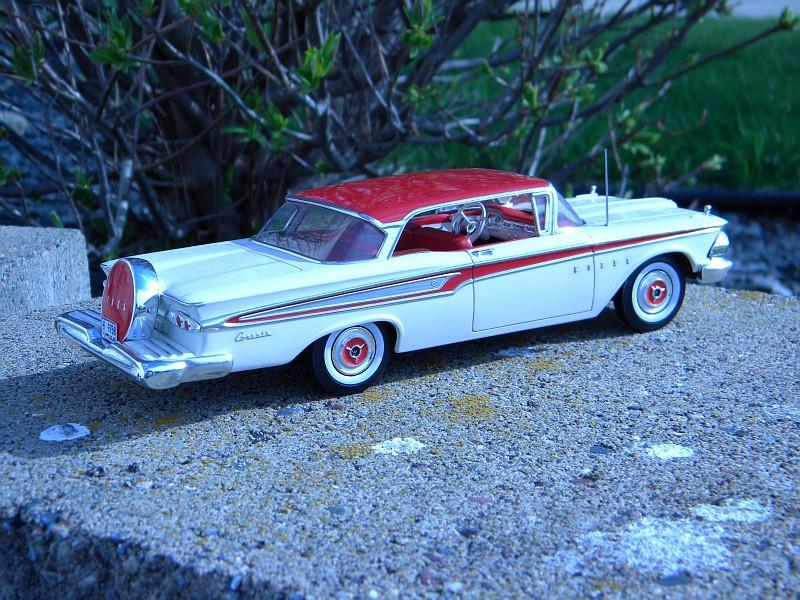
How to get a good white paint job?
StevenGuthmiller replied to Sonorandog's topic in Model Building Questions and Answers
Both of these models were painted with nothing more than Duplicolor white sandable primer, and Duplicolor white lacquer touch up paint, straight from a rattle can. The Edsel was molded in blue plastic, so good coverage was essential. Plenty of primer, and several light coats of color was all that was required. A few coats of clear will go a long way to adding depth to a “drab” paint job as well, even white. These are both painted with a “warmer” white, but you get the picture. I don’t recall either of these being any more difficult to paint than any other color. Steve
-
How to get a good white paint job?
StevenGuthmiller replied to Sonorandog's topic in Model Building Questions and Answers
I guess I don’t understand the issue, unless you’ve been using bad paint or something. White is just a paint color, and paint is paint. If you have good paint, just use a base of a good white primer, and you’re in business. My suggestion of course would be white lacquer primer and white lacquer. Steve -
Vinyl Tops - best method?
StevenGuthmiller replied to BDSchindler's topic in Tips, Tricks, and Tutorials
As I said, no disrespect, but I picked this photo purely and simply to illustrate the point. Steve -
Vinyl Tops - best method?
StevenGuthmiller replied to BDSchindler's topic in Tips, Tricks, and Tutorials
I agree. I remember a circumstance a couple of years ago when I dragged out a 1/8 scale Camaro IROC kit to look it over for a possible trade or sale. There were a few areas where I had applied some masking tape for whatever reason, probably 15 years ago or more. The tape was an absolute mess! In some areas it was so dried out that it was essentially turning to dust and flaking off, and in other areas, it was stuck down so tight and dried up so much that it had basically fused with the plastic and was all but impossible to remove. In either case, it left dried adhesive everywhere that would either have to be scraped off, or chemically removed somehow. Granted, the tape was bare, without the added protection of a couple of coats of paint, but that doesn't make me feel any better about it. On virtually every model I build, I have certain areas where masking was done for whatever reason, painted over, and inevitably the tape has lifted on the edges as the paint dried and shrank a bit. In some cases it's not a problem if the painting is finished, but in some instances, I have had to re-mask if there was more painting to be done. This seems to happen most frequently where the tape is stretched fairly tight and has some tension on it, but I would assume that in order for a simulated tape vinyl top to hold shape, there's going to have to be considerable tension in many areas. All of that uncertainty, doubled with the fact that the texture is far too out of scale for my taste, will insure that I'll never use tape to replicate a vinyl top. Heck, I won't even use most masking tapes for actual masking! I don't want to dis whomever the builder of this model is, but it exhibits exactly the concerns that have been discussed here. The texture doesn't look correct or in scale, and it's already exhibiting "lift" in several areas. It's too bad too, because other than the top, it appears to be a pretty nice model. Steve -
Vinyl Tops - best method?
StevenGuthmiller replied to BDSchindler's topic in Tips, Tricks, and Tutorials
My opinion has always been that masking tape is far too heavily textured for 1/25th scale. If you look at photos of a 1:1 vehicle, you'll see that the texture is nearly undiscernable. Far finer than what you'll get with masking tape. I agree with Daniel. After applying seams with the thinnest strip plastic that you can find, and adding the C-pillar trim, mask and spray the color of choice from a foot or so away from the subject. This is a circumstance where you want a fine orange peel tecture. Personally I find that a flat paint, shot from a distance and then rubbed with your fingers once dry gives a pretty convincing vinyl sheen. The oil from your fingers will polish the high points of the orange peel, leaving the base flat. If you want to go a step further, you can fill the top seams on the inside edges with some putty and sand to help alleviate the inside edge of the overlap. Steve -
Start with a sharp #11 blade before you jump in with the scribing tool. (3 or 4 passes) Once you get a thin cut for the scribing tool to follow, you'll have a lot fewer problems. As a matter of fact, I don't even use a scriber any more. Just a sharp #11 blade, and a dull used one, used backwards, works better for me. Steve
-
Looks splendid! And in case you weren't aware, 1965 Chevrolet "Evening Orchid" and '65 Pontiac "Iris Mist" are in fact the exact same color. General Motors "P-Code" So the color you chose doesn't just "represent", it is in fact correct. Nice job! Steve
-
Or 3 or 4 shots of tequila. Steve
-
Not that hard for me. As I build pretty much straight stock vehicles from 1950 or so, to about 1970, and my main focus is on the vintage kits in my stash, I probably have around 25 kits to choose from. It's a lot easier to make a choice when you only have to stand in front of that number of kits and ruminate. Usually, there will be 3 or 4 kits that I have in mind for the next project, and 1 or 2 that are really calling me. The deciding factor is usually something different from what I'm currently working on. I don't want to get in a rut. As an example, as I come to the finish line on my '64 Pontiac Bonneville project, I have possibly 4 kits that have my interest. A 1964 Pontiac Lemans convertible, a 1966 Pontiac Bonneville hardtop, a 1966 Plymouth Barracuda, and a '61 Dodge Dart Phoenix. The Pontiacs are too close to what I'm working on currently, so they will likely have to wait. That leaves the Barracuda, and the Dart. The Dart appears to be the most likely, as one of my "requirements" is that it always holds my interest better when I have a more interesting, or different engine configuration to consider. Nothing bores me more than small block Fords and Mopars, and pretty much every Chevy engine. The '61 Dart will be built with the 383 "Long Ram" D-500 package. I think we have a winner! Steve
-
What was your first model car?
StevenGuthmiller replied to Kit Karson's topic in General Automotive Talk (Trucks and Cars)
I remember some of my old toys too. I got a stuffed Snoopy dog when I was in the hospital with a shattered elbow for a couple of months when I was about 5. Still have it.......although it looks like it has been run over by a convoy of dump trucks. Mode kits? I've probably had several thousand of them over my life time. There's no way that I could ever pinpoint exactly which one was the first. Although I do remember buying a string of the old AMT 1/32nd scale kits from the local five and dime when I was possibly 8 or 10 years old. The name of the dime store in my little one horse town was "Pay and Take It". Affectionately known as "Cob and Keep It". Steve