Al Hoffman
-
Posts
83 -
Joined
-
Last visited
Content Type
Profiles
Forums
Events
Gallery
Everything posted by Al Hoffman
-
Thanks for all the kind words.
-
Like what I see so far, will be watching. I've started putting the engine together but can't decide whether to go stock or mild custom. Right or wrong I like to shoot the pigs with red oxide primer now & then just to add some color.
-
Revell 57 Ford Sedan - Starting corrections
Al Hoffman replied to Sledsel's topic in WIP: Model Cars
As far as I know the kit bumpers were used. -
Revell 57 Ford Sedan - Starting corrections
Al Hoffman replied to Sledsel's topic in WIP: Model Cars
I boxed it to the rear. The tire radius was my problem, not the height. I did have to create a hidden lip on the back side of the body fender flange to keep the vertical part of the well lined up with the horizontal fender flange. The spread was too wide overall so I forced it in so both sides would line up. Might want to test fit that. That is "Replicas & Miniatues of Maryland" Y-block tri-power that was designed for this kit. In addition they offer fender skirts, smooth bumpers & I think a Tuck'n'Roll interior for this kit. Don't think the skirts will work on yours though because they are insert type skirts. i have this build posted over on"Under the Glass" -
Revell 57 Ford Sedan - Starting corrections
Al Hoffman replied to Sledsel's topic in WIP: Model Cars
I followed the same approach as you. Here is a couple of shots of the end result.
-
Very nice build. A little more info on the Royals. I believe that they had Bugatti locomotive engines living under that long hood.
-
I'm not going to be much help on the tires & rims. I do know they are not from the '53 Ford. I said that they had WW inserts. They don't. The WW's are hand painted with Gesso. Also, I think they are a little taller on the diameter. They WW area has Firestone molded in. I tend to make tires fit wheels so I'm not even sure if they came as a set. When you get my age your lucky if you can remember what you're working on, let alone what you used.
-
Great finish on this Mustang. Clean build all the way around.
-
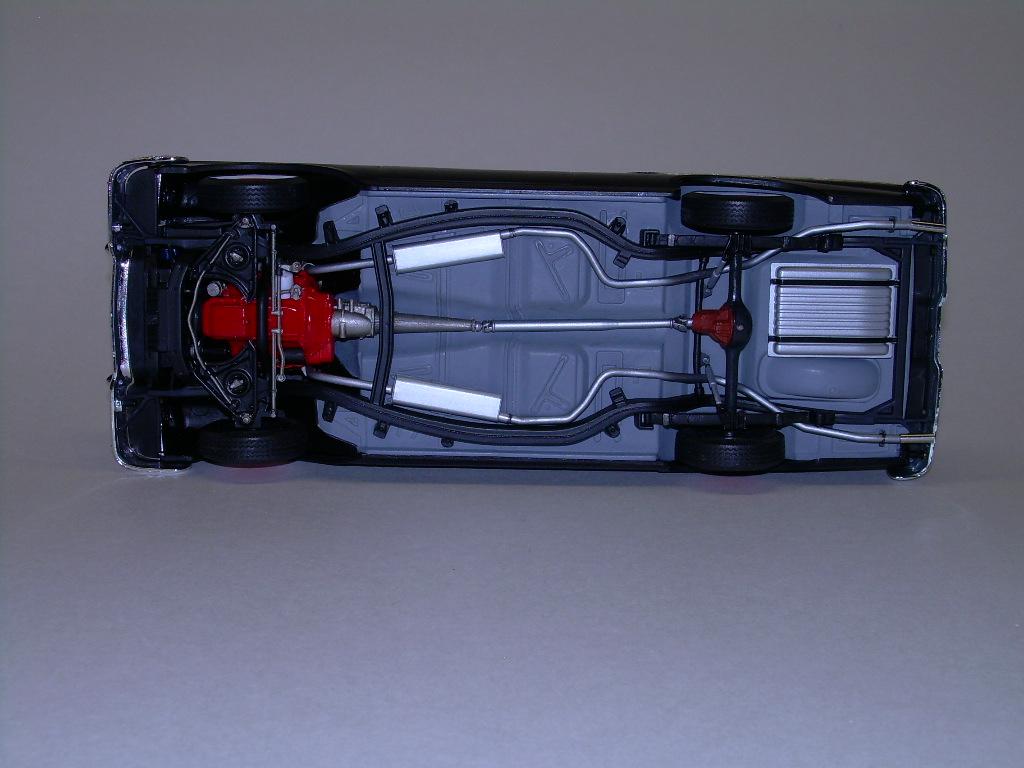
Surgery was required but I wouldn't consider it major. Had to extend the front inner wheel wells toward the firewall to clear the tire radius. Just relocated the axle on the front spindle & lowered the rear with blocks between the spring pile and axle, like on a 1:1 version. Didn't even need to relocate the shocks.
-
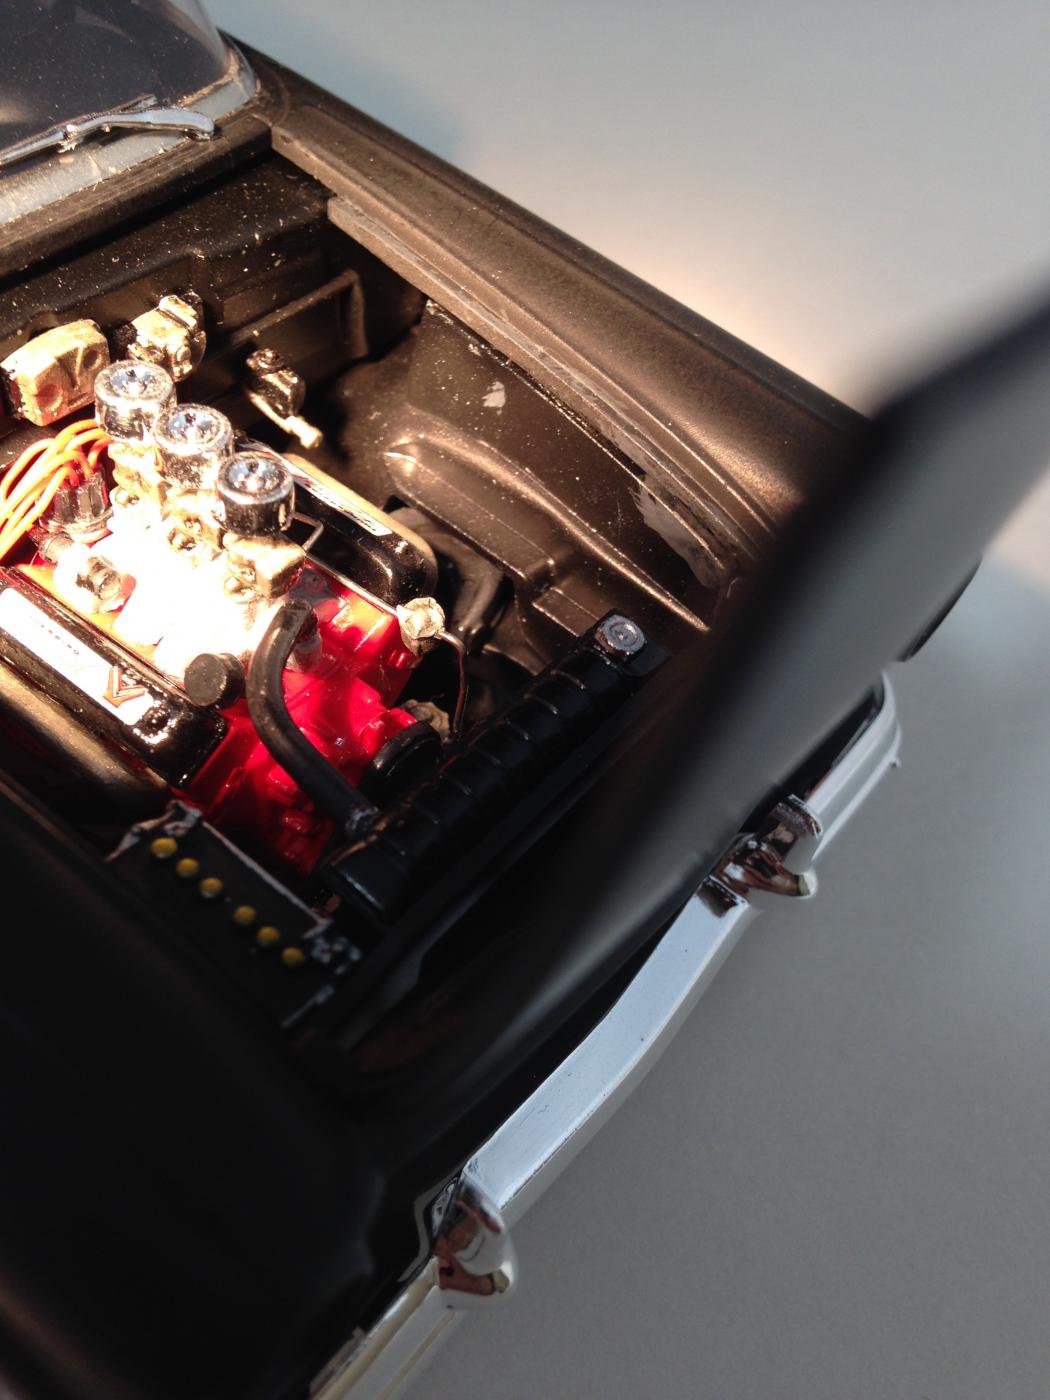
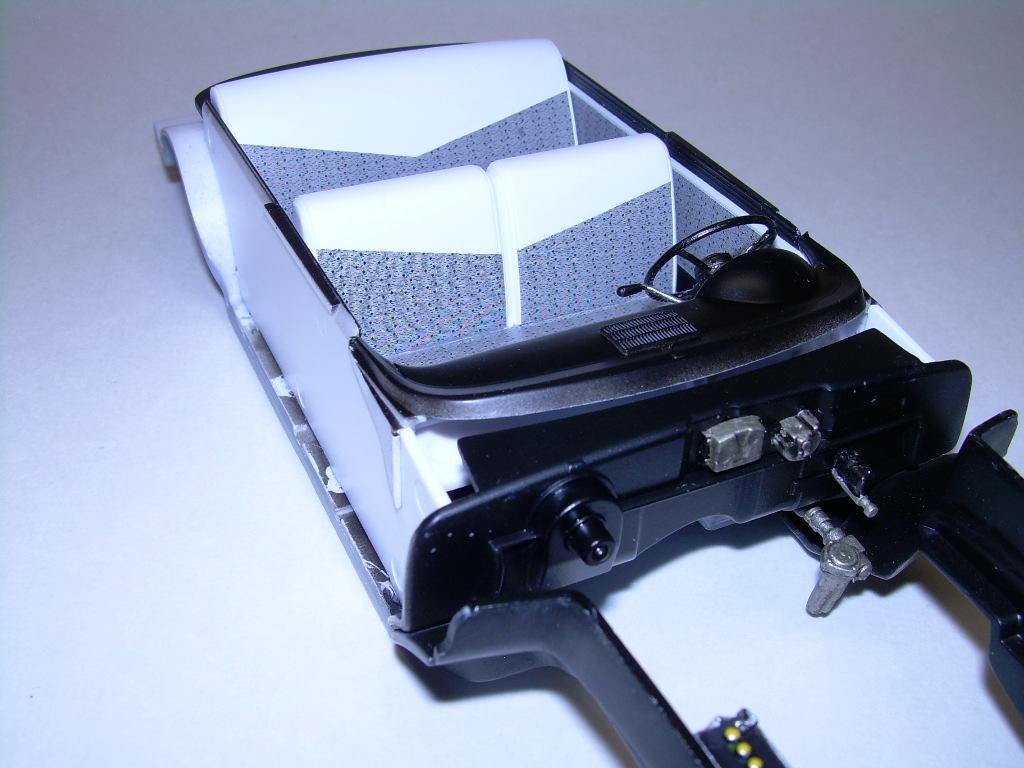
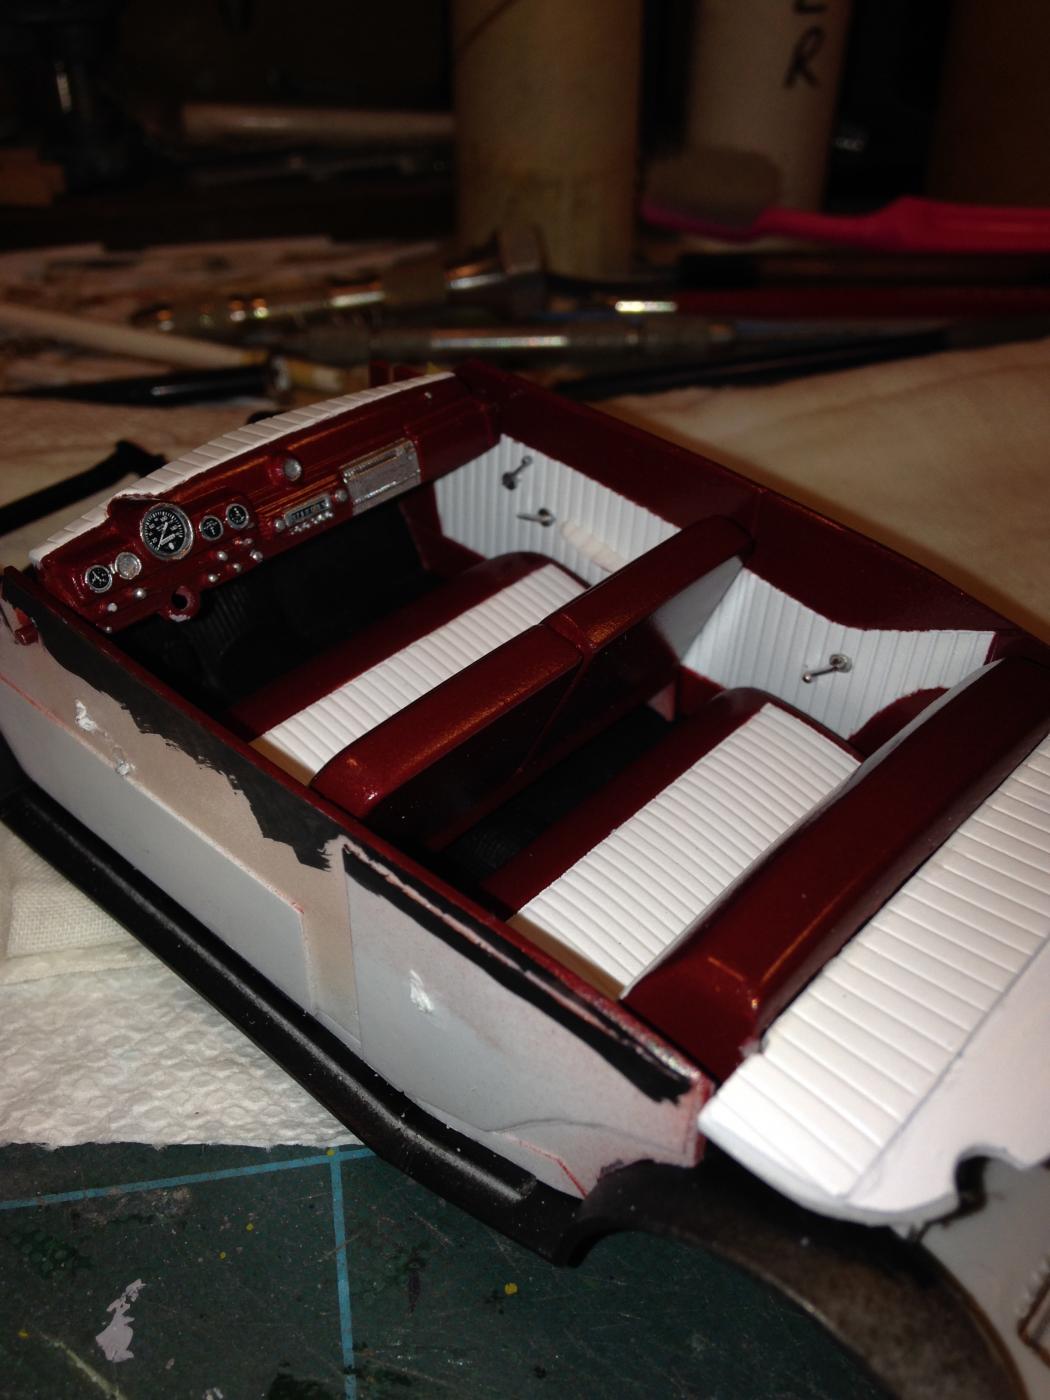
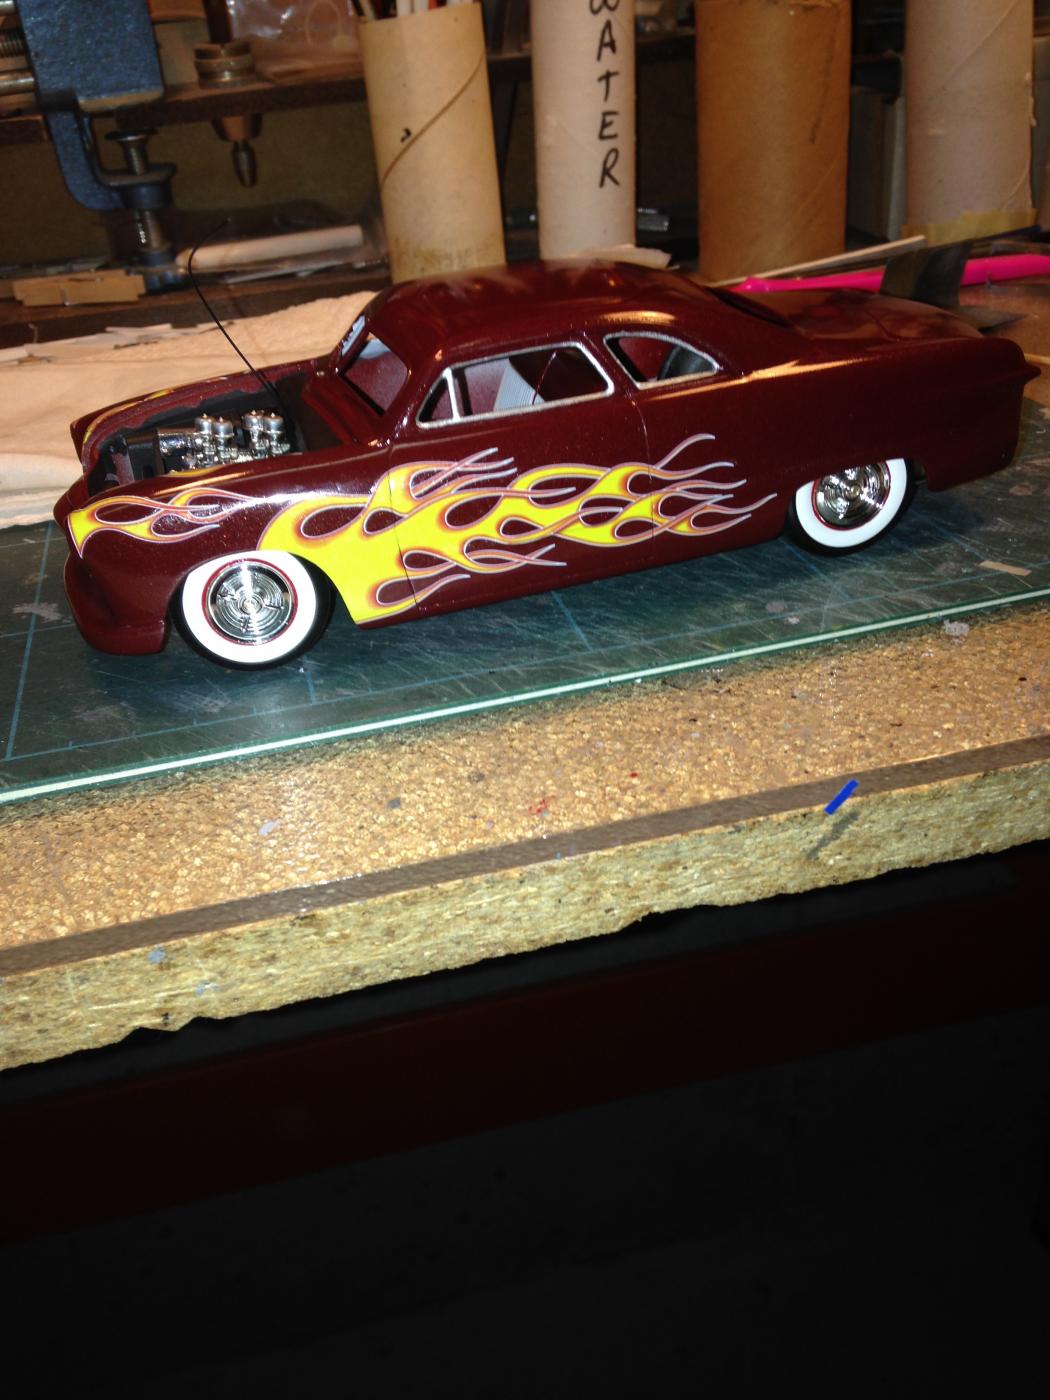
Finished this Revell Ford last year. It has been done as a mild custom. The following has been done: 1. All exterior emblems and handles removed 2. Has been lowered using blocks in the rear and modified spindles up front 3. Headlights and taillights frenched 4. Tires and wheels are from a different kit. WW inserts have been overpainted with Gesso to try to achieve a more realistic appearance 5. Kit engine used but with a "Replicas & Miniatures of Maryland" Tri-Carb set up. Wired and kit fuel lines modified for 3 carbs 6. Kit interior decals used 7. Paint is "Duplicolor" matt black shot from the can Very enjoyable kit to build. Now it is time to start on the wagon.
-
Outstanding build Jim. Really admire your attention to details. I'll ask the same question as above: what paints were used? Can't see the seats real well but it looks like you have captured the "leather look" in there. What did you use to do that?
-
Lots of talent being shown here. Looking forward to following and seeing the results.
-
Cant speak for Tom but if my memory serves me correcty I had to enlarge the inner front wells towards the firewall to clear the tire radius on the sedan version that I dropped.
-
This is going to be a nice one. I'll be watching since I need to have one done for our club's end of the year same kit contest. Haven't decided how to finish mine out yet. Can anyone say "Courier"? Keep up the good work.
-
Caught me on that one. One disappeared a long time ago so I took the other one out to look the same. Hate to rob another kit & to lazy to make replacements.
-
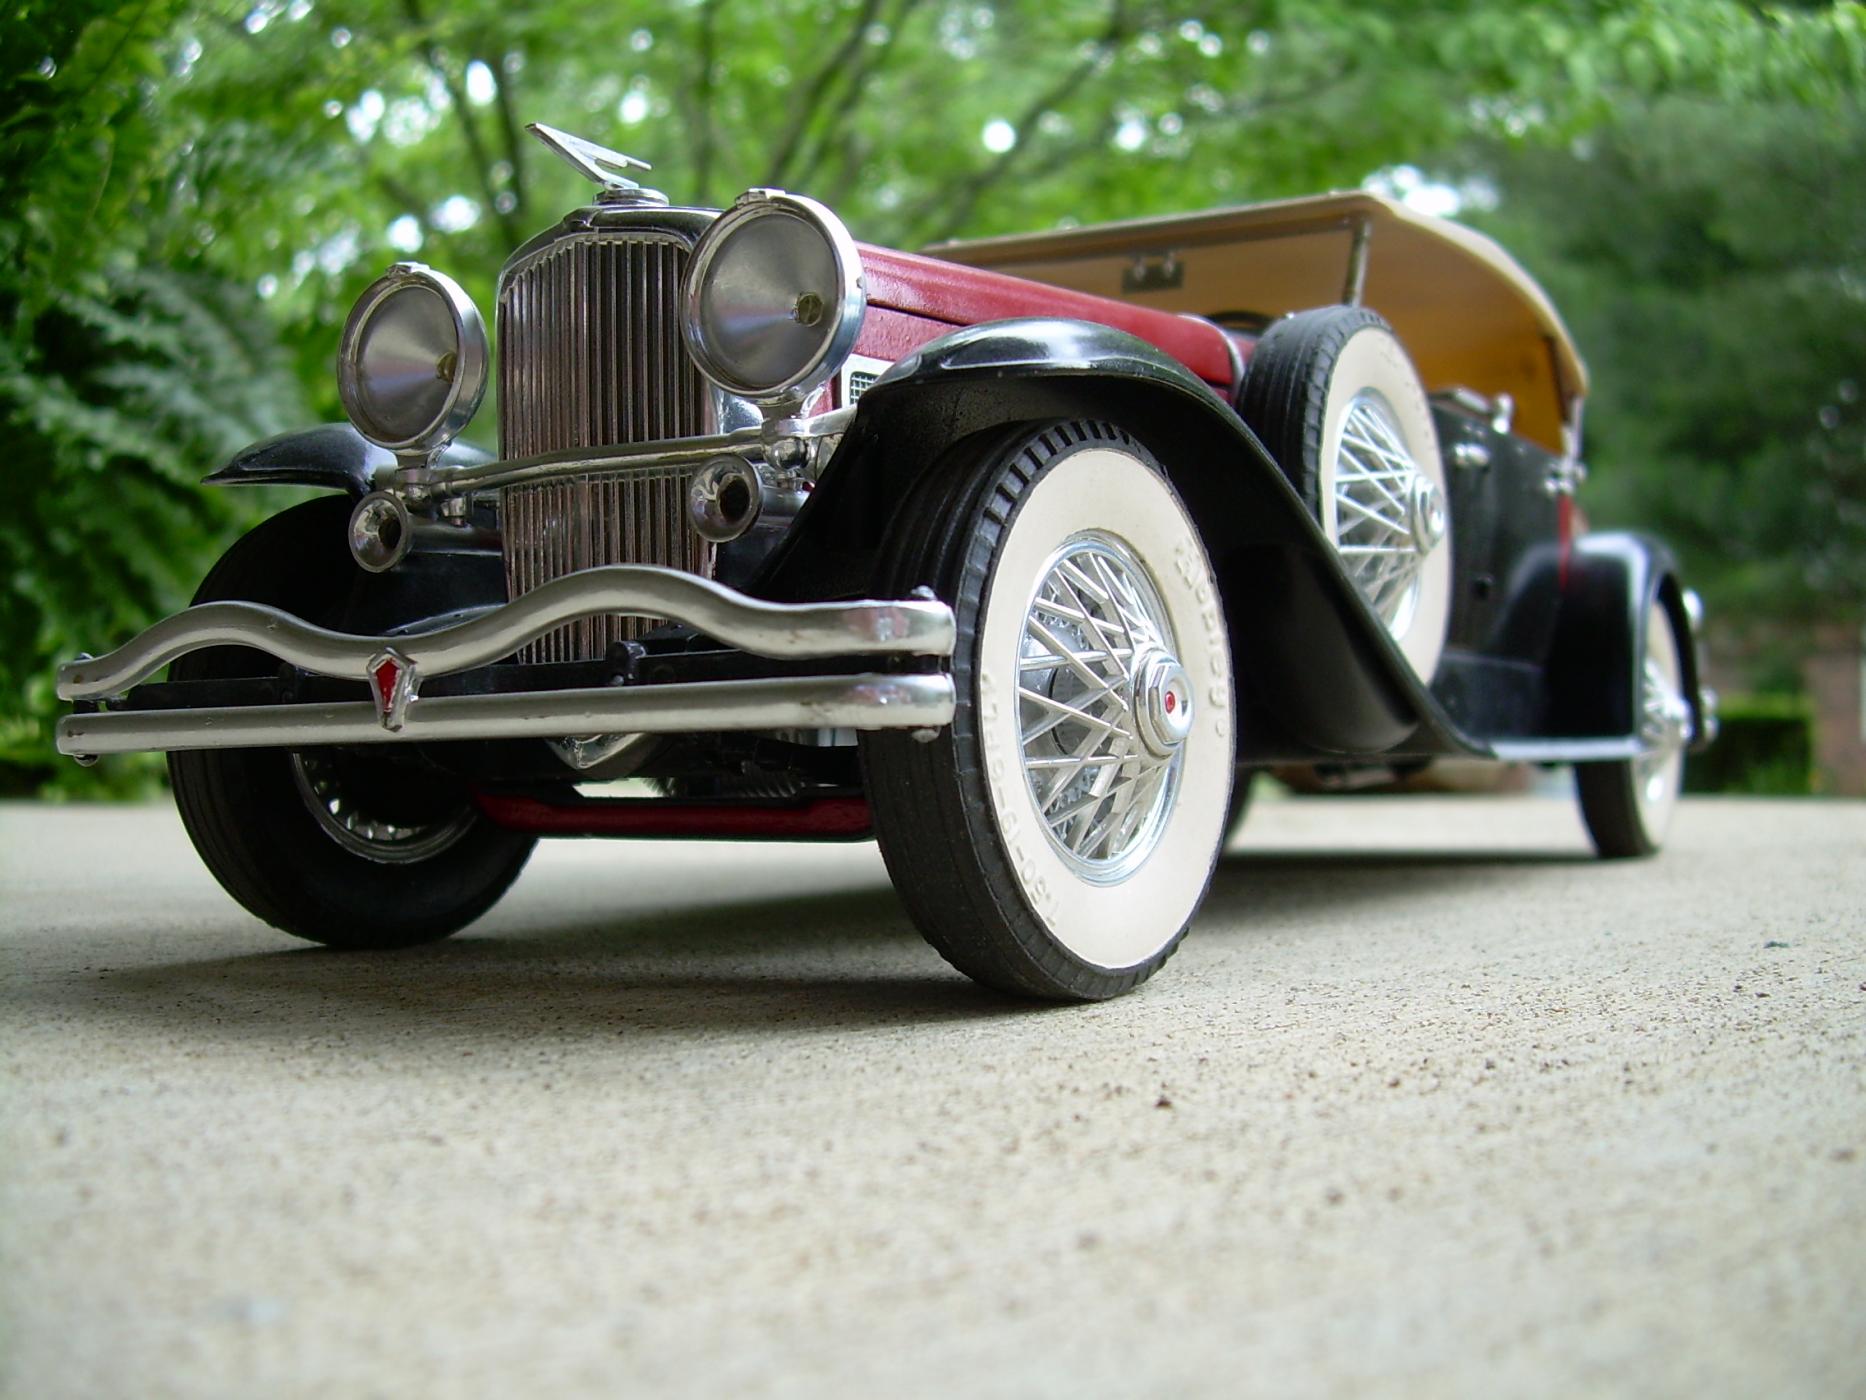
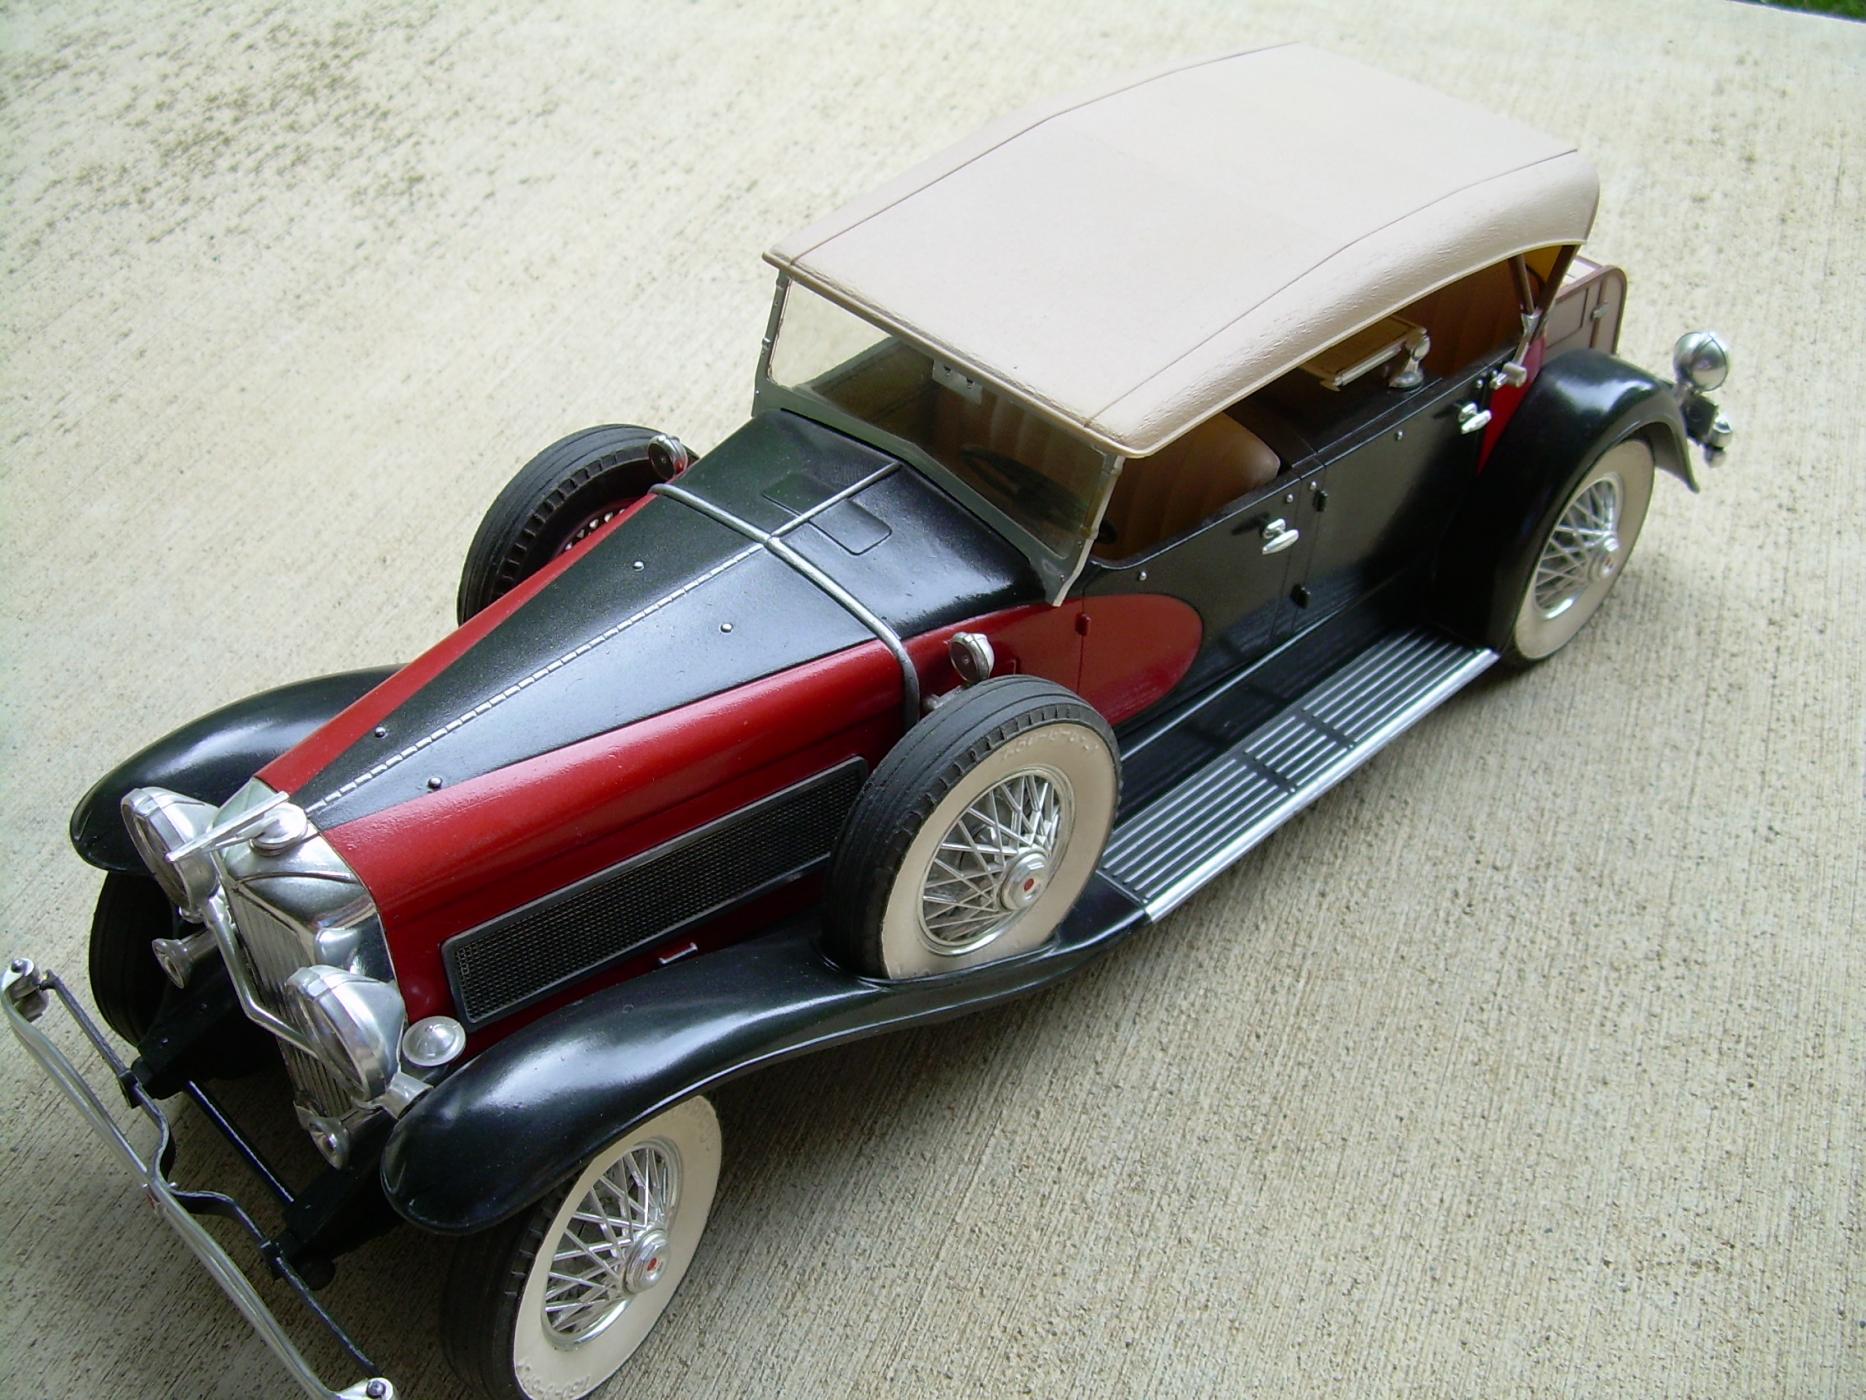
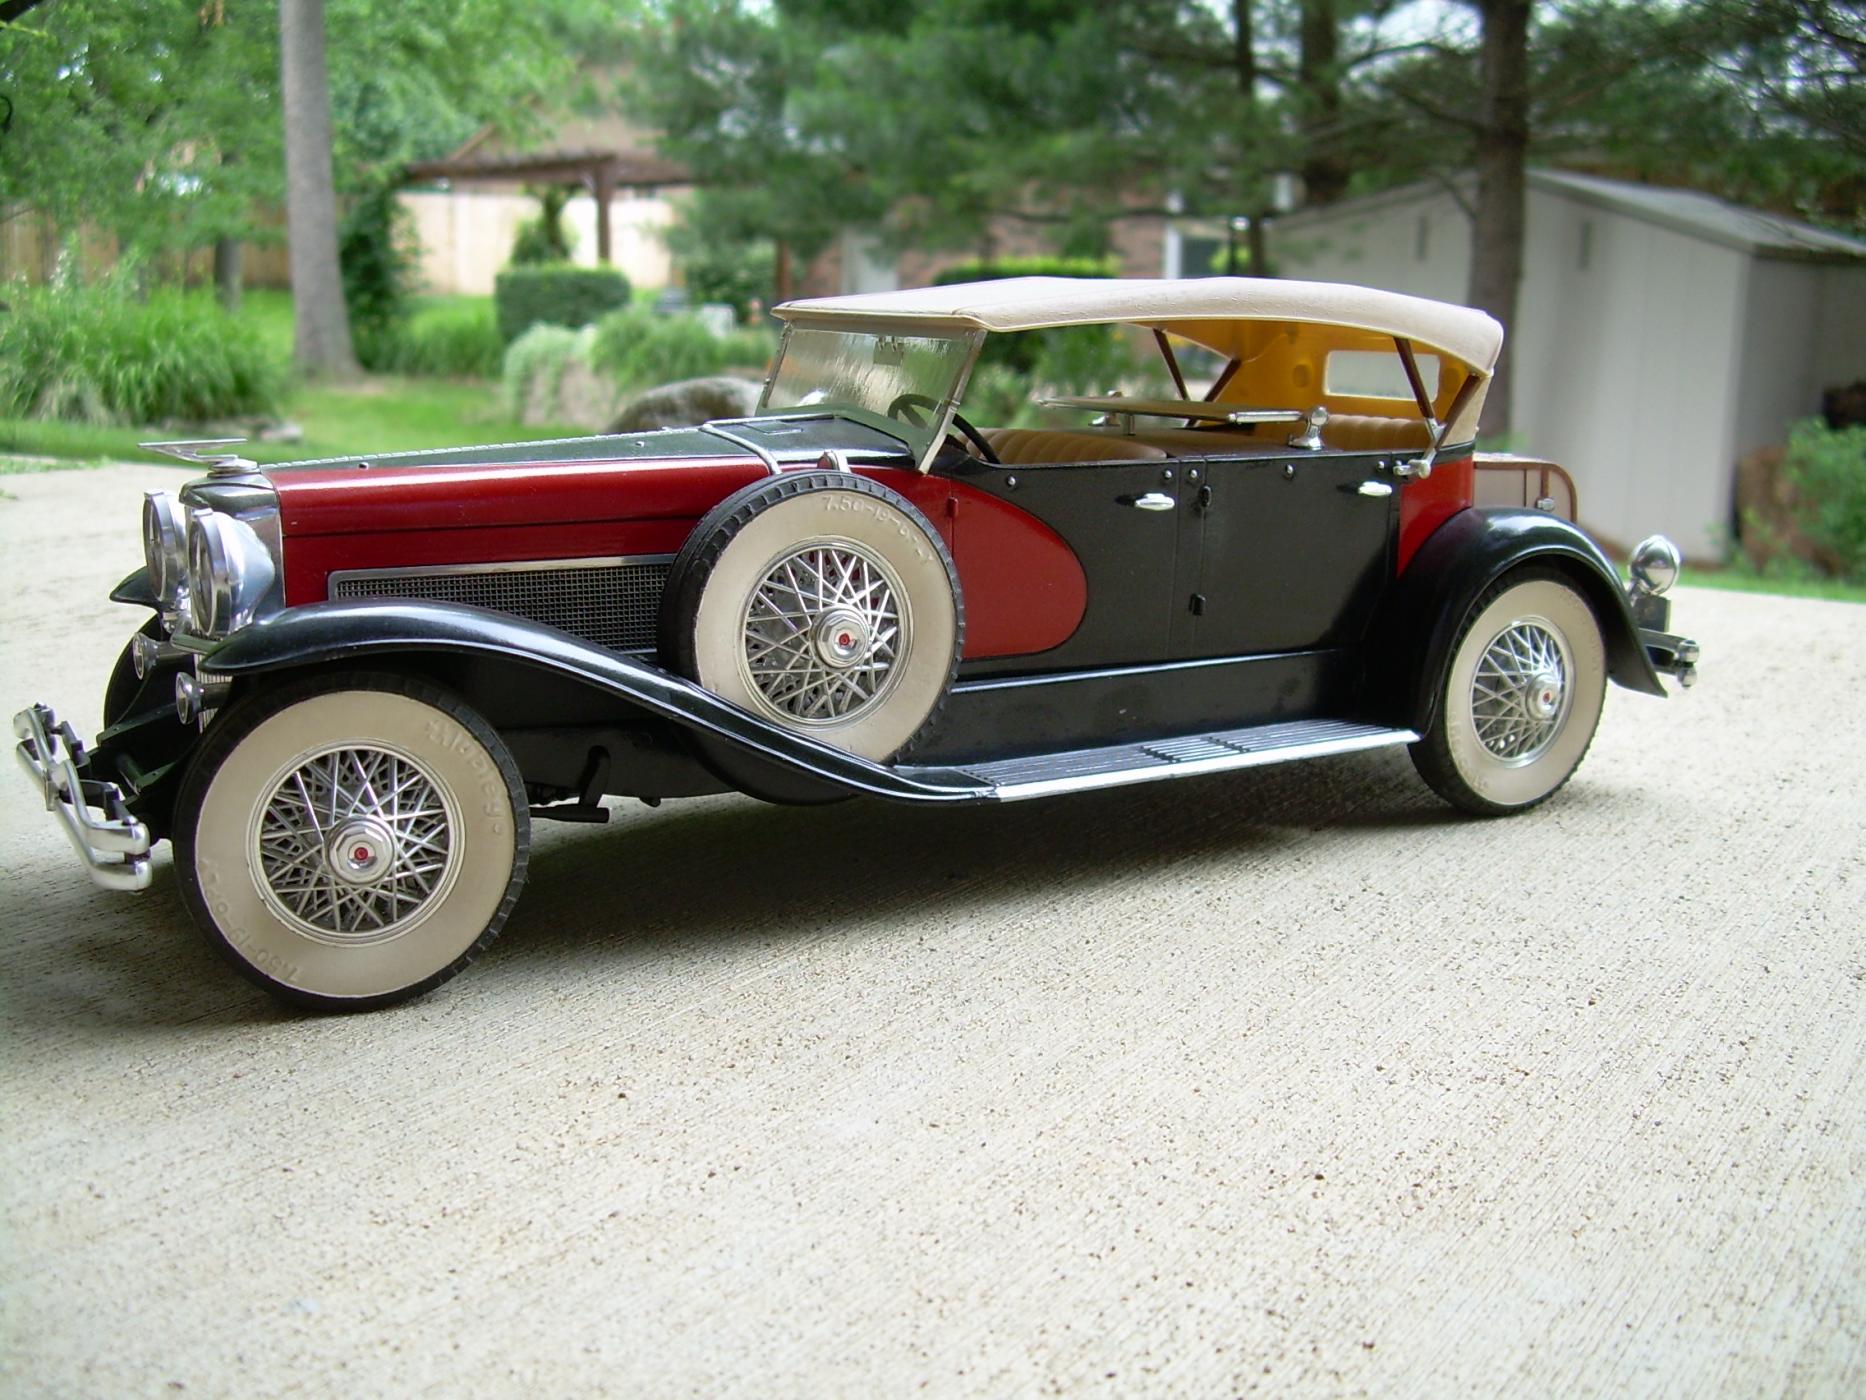
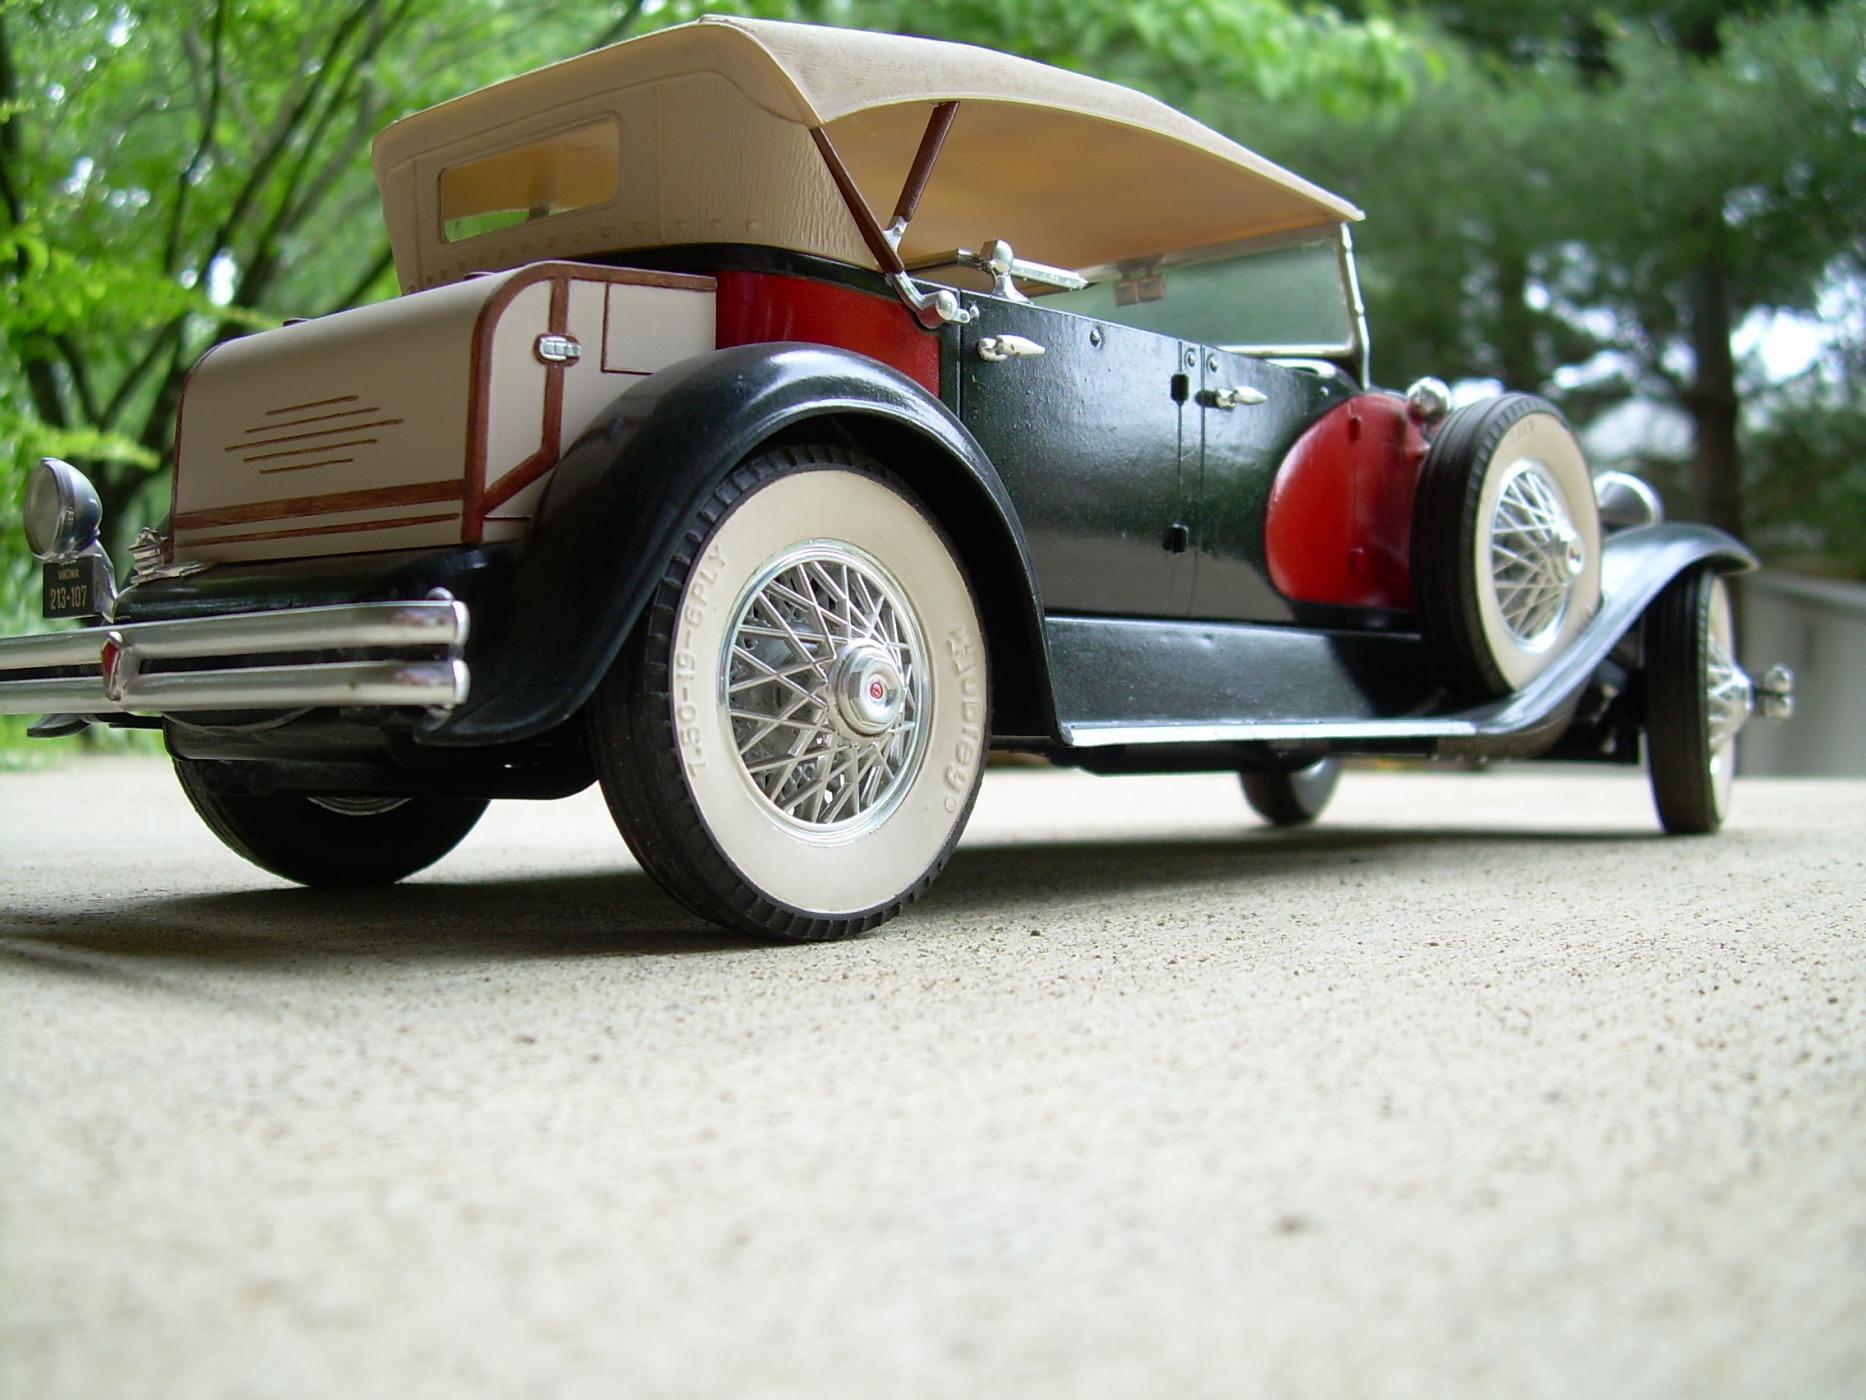
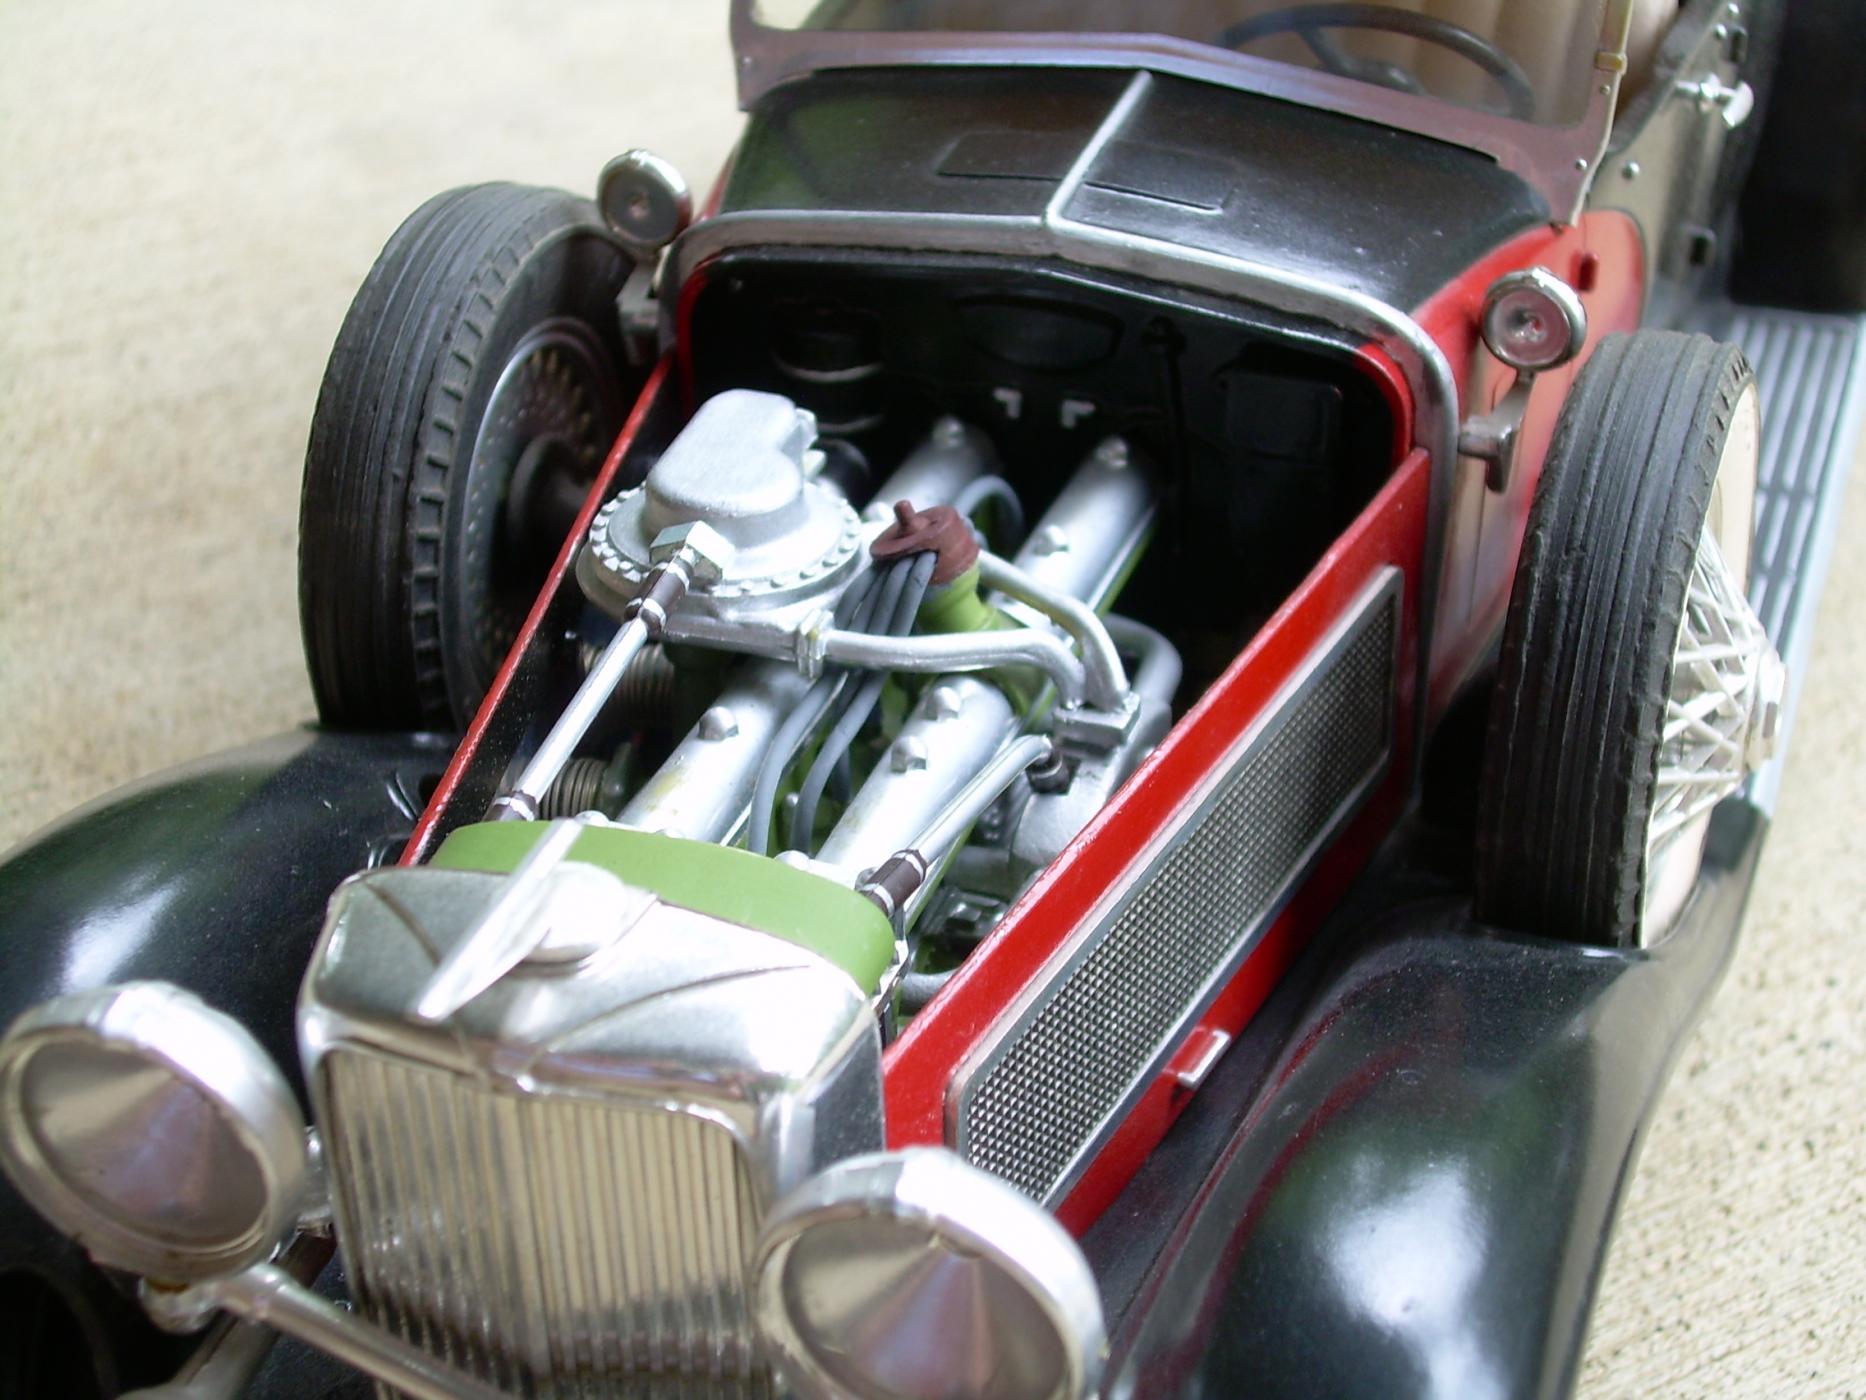
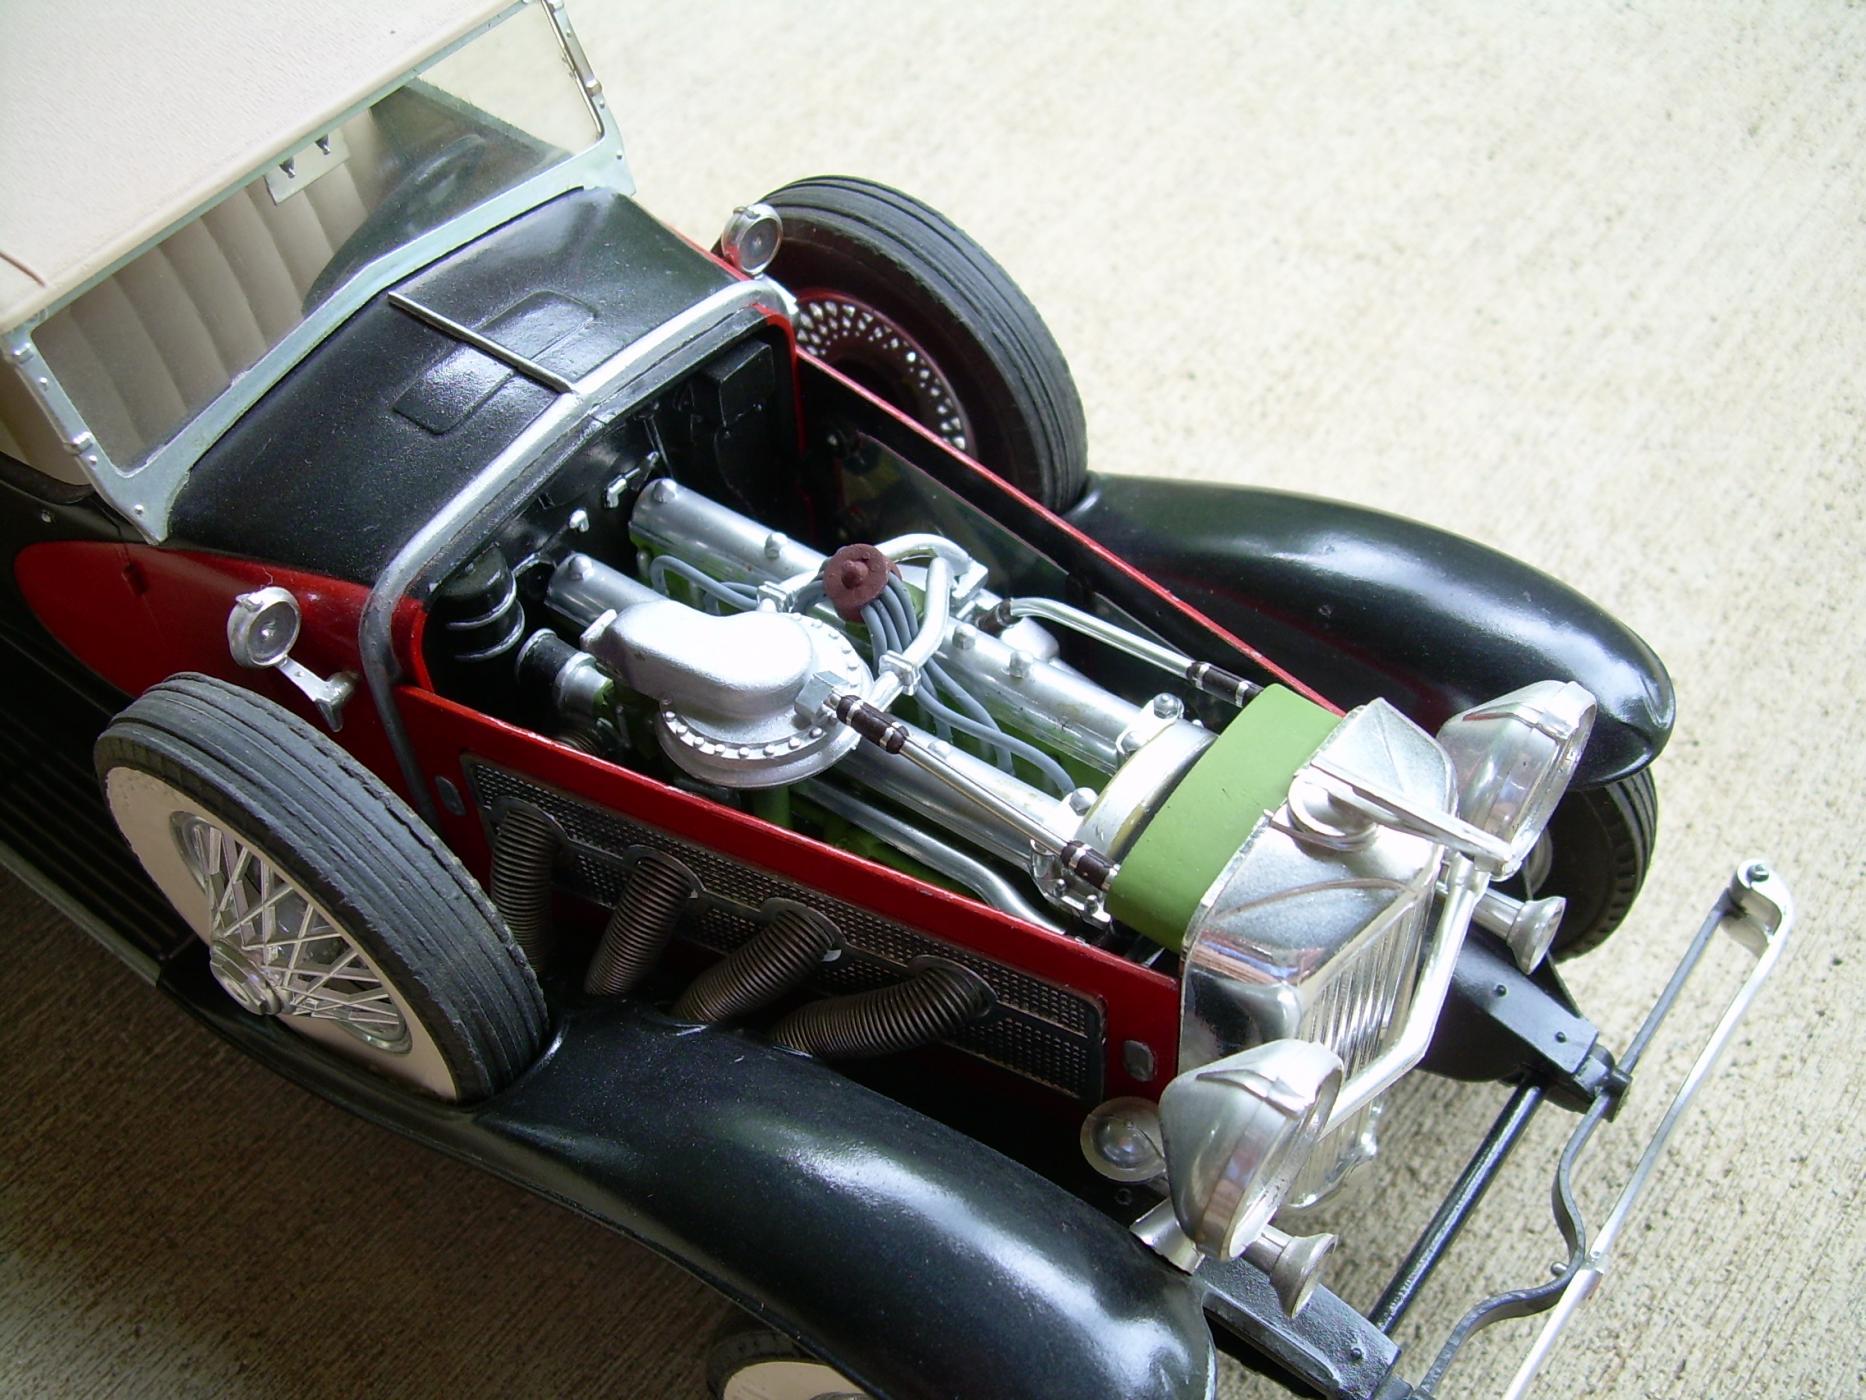
I built this back in 1980. I know this because I was traveling for work & can remember sitting in the hotel room filing away. It is a Hubley 1/18 scale metal & plastic kit. it is primarily a screw together kit. The only modification I remember was making the steering shaft a little more realistic looking. The kit is designed to steer & it still does after the changes made. The body was brush painted with I believe Scalecoat RR paint. The light tan interior, luggage trunk & top were painted with Testors from a rattle can. Whitewalls were hand brushed with a product called Gesso. It got a refresher coat of Future brushed on a couple of years ago.
-
I think the saying is "Great Minds Think Alike". Having built this kit I know what was required on your part to get it to a finished state. And well done it is. One of the few kits that I followed the instructions religiously and crossed the steps off when each was done. All your effort paid off as it is extremely well built and finished. I included a couple of shots of mine so you can see why the above saying came to mind.
-
Your going through the same things I faced when I built the one to the left. Before I decided on going with the roadster version, that piece didn't fit either, I played with the chop top. I had a roof section from the original release & it fit a lot better. I think the molds are worn out. I think I spent two days with the Dremel, files & paper cleaning up the bottom of the fenders. I ended up gluing sheets of Plastruc to the outside of the body trying to even things out. Watch the interior side walls, one side is thicker than the other. Might not be noticeable on the coupe but definitely is on the roadster. More heavy sanding. I enjoy building these reissues of these old kits but don't like paying the new money for them.
-
-
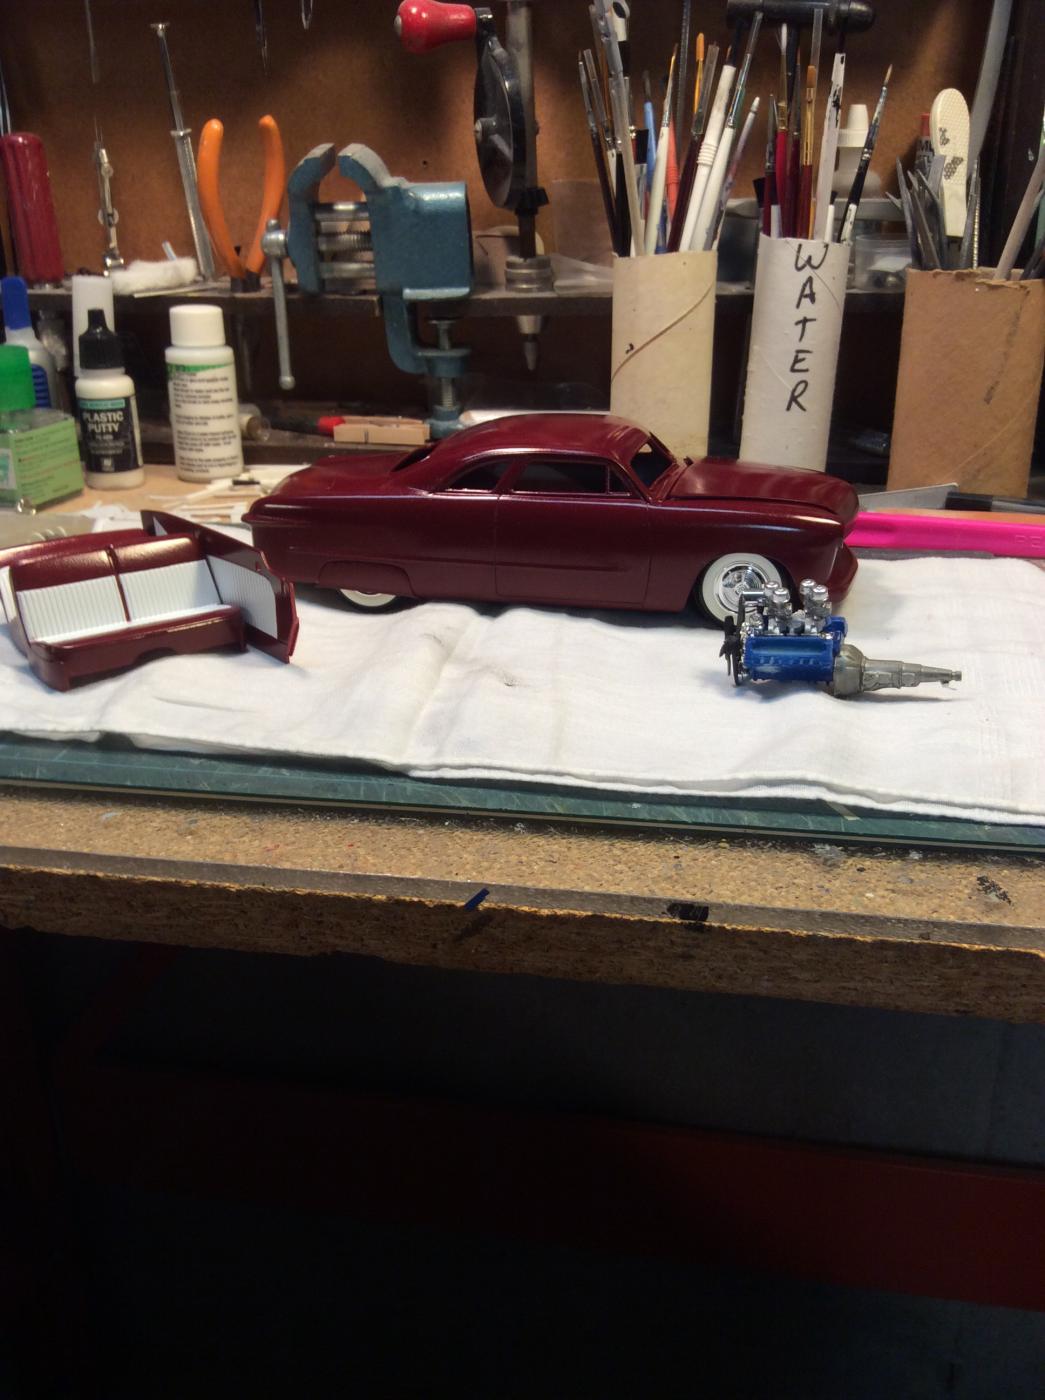
Should have this one done shortly. It's a Jimmy Flintstone resin body. AMT '49 Ford donor. From there the interior & decals are from the Revell '49 Merc. Made my on tuck & roll dash top & package shelf. It will have a Parts Pack Cadillac engine. Can't remember where I got the trans from. In the process of adapting the '49 Ford exhaust to the engine & Lake's pipes. I am to the point now where everything I'm doing is fighting me so I'm going slow to hopefully not mess up.
-
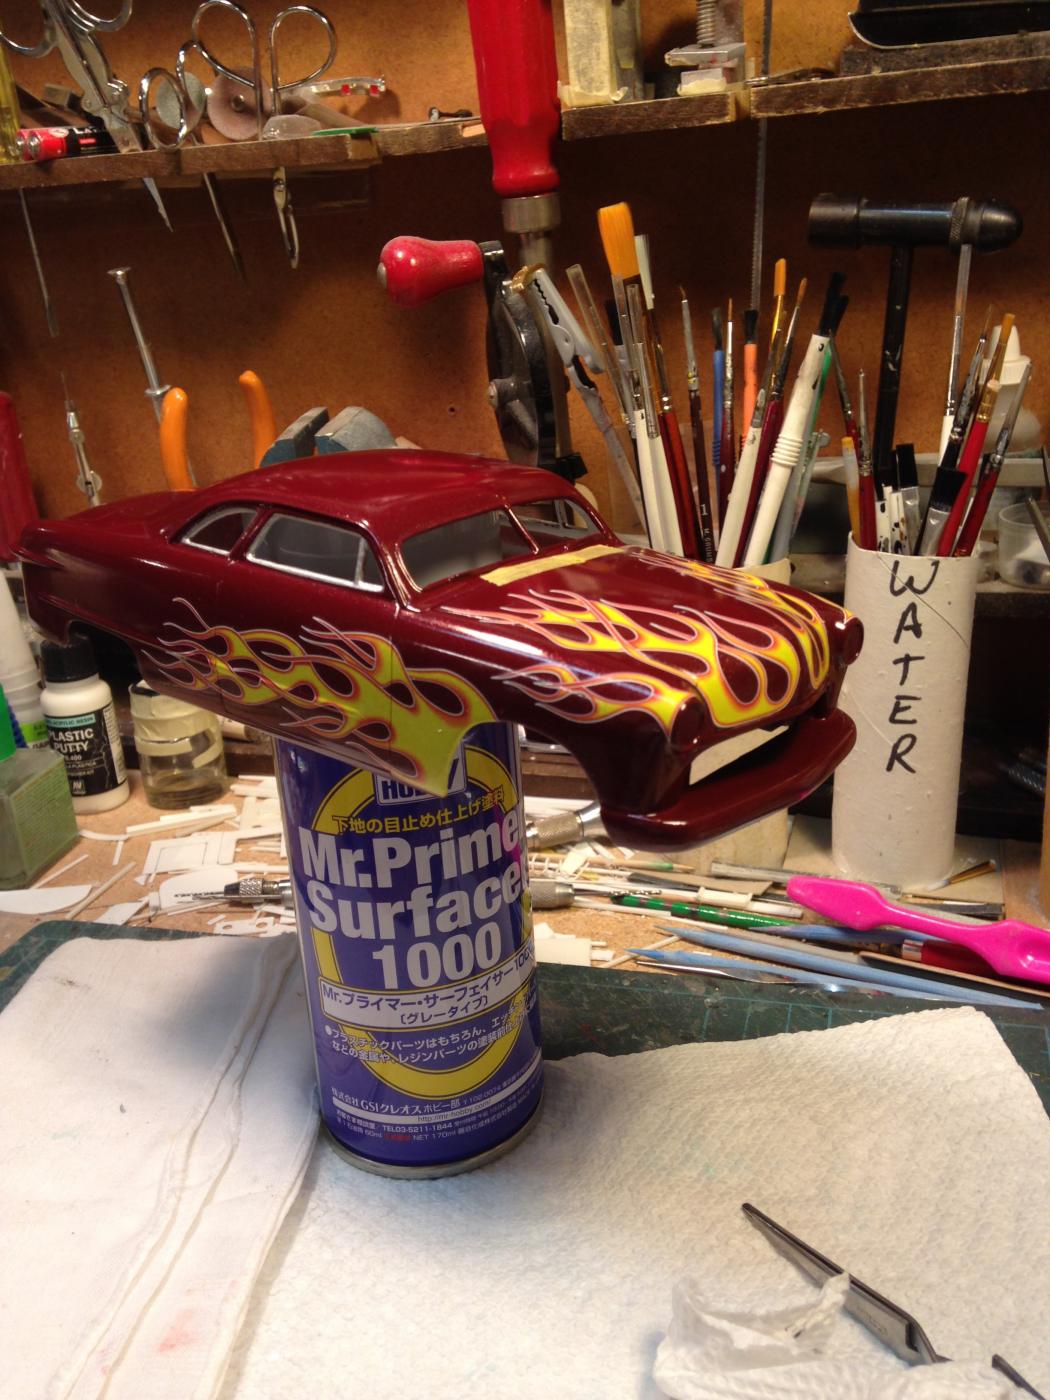
Thanks for the encouragement. Yours is pretty much the feedback I've been getting when I show it at a club meeting or ask an opinion. I'll probably go ahead & put it on the table at the Toledo NNL in October. i appreciate everyone's positive comments on the build.
-
I can see this Jag making its way around the Watkins Glen of the 50's now. Your right, it needs to be shown buttoned up & ready to go. I would have to vote to leave it uncluttered. I have both the metal & plastic kits sitting on the unbuilt shelf. Never realized they were the same mold. Did you decant the Tamiya racing white or shoot it straight from the can? Looks great no matter how you did it. You need an MG or Morgan to sit along side the Jag. Very well done.
-
Great work on this. I went back to your WIP to see what you started with. I'd say you got the most out of this old tool. Really well done.
-
www.modelhaus.com The wheels don't have a part number. They are just called '53 Hudson steel wheels & are in the Nascar section. Hope this helps.
-
Jonathan I started with the Marshall Teague 1953 Hudson. I misidentified it in the title line.