swede70
-
Posts
727 -
Joined
-
Last visited
Content Type
Profiles
Forums
Events
Gallery
Everything posted by swede70
-
Greetings, For a fast web search and equally fast search across the MCMF board I'd hoped to find a lead or leads - alas, I haven't. I'm on the hunt for some source of a waterslide decal affording was is termed an 'engine turned' surface finish whereby oil is applied to an aluminum surface in combination with a wire brush spun by drill. The resulting pattern which appears as a series of carefully controlled overlapping swirled marks is something usually seen on much older Indianapolis racers, and in a decorative sense on mid-1970's Pontiac Firebird Trans Am instrument panels which most will remember or recall. Attached below would be some material I applied to a 1:18th SCCA Trans-Am Challenger that proved very nice indeed - albeit my supplies (gifted years ago by someone quite skilled at coming up with material appearing spot-on) are running low. Might anyone provide guidance or have lead to something similar? Kind thanks for your review of this query... Mike K./Swede70

-
Swede Savage Trans Am AAR 'Cuda Hwy. 61 based project
swede70 replied to swede70's topic in Diecast Corner
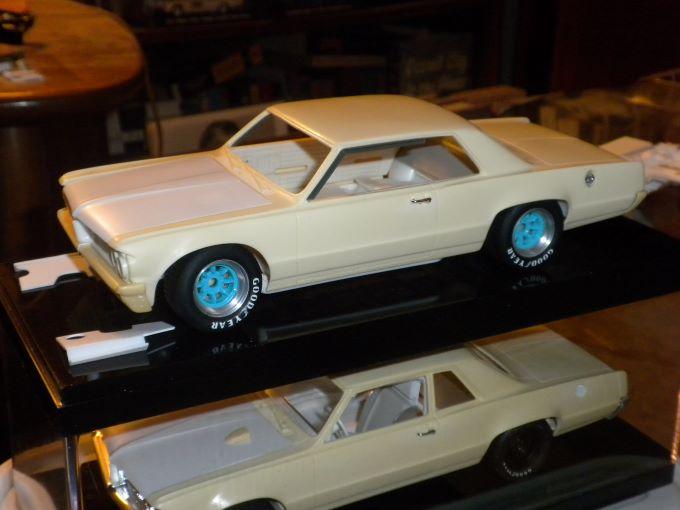
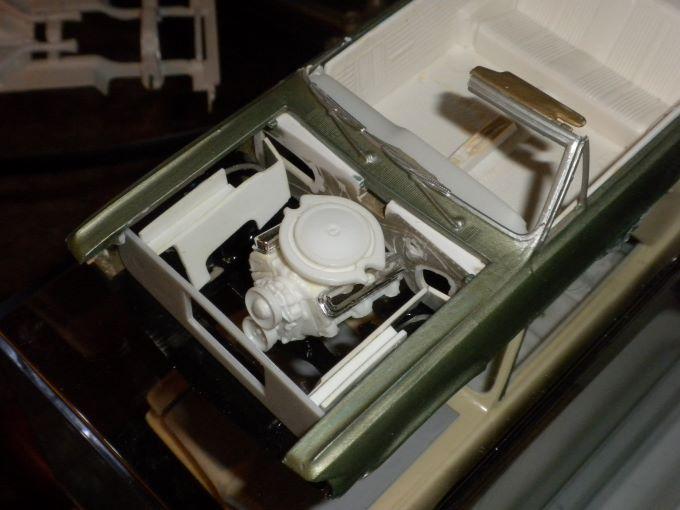
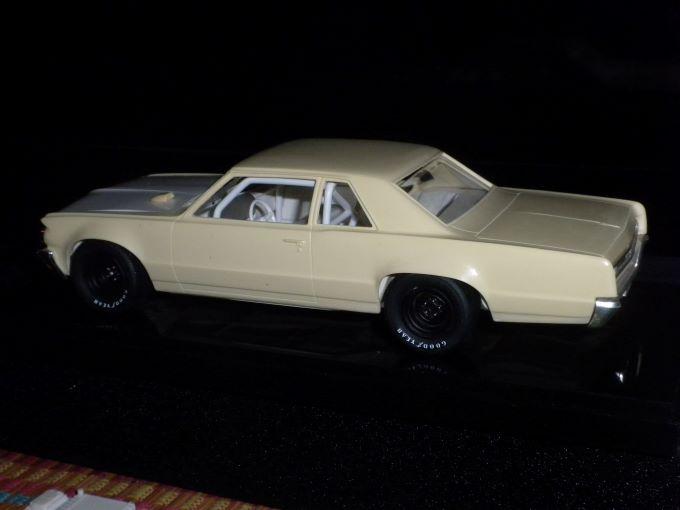
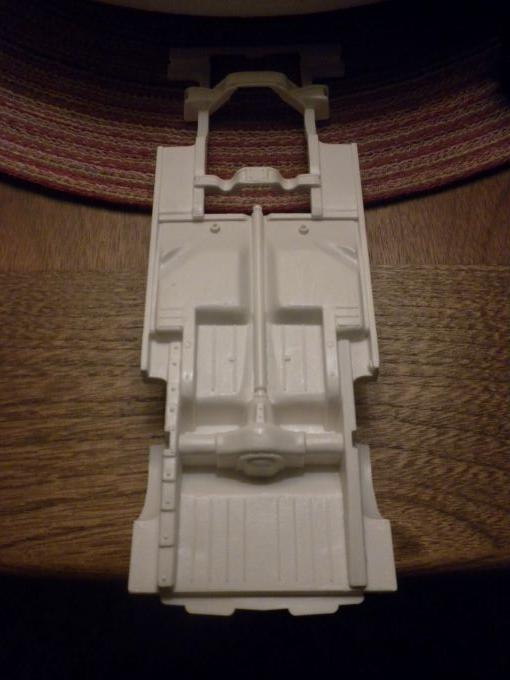
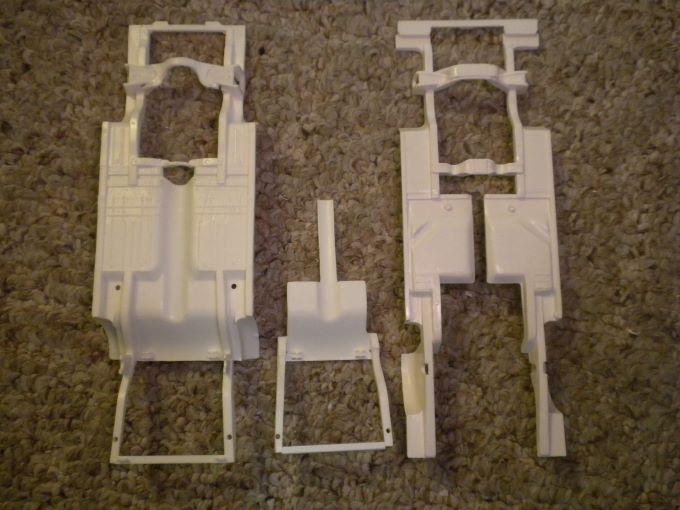
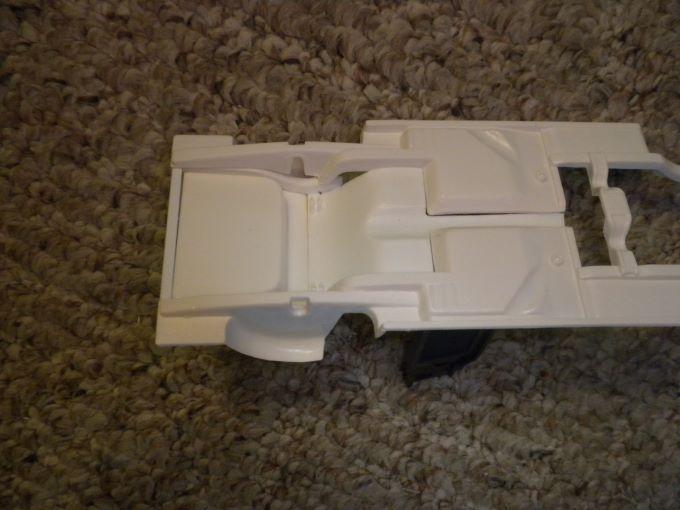
Greetings, Chassis and interior apart now, with the raised front seat mounting platforms and fuel tank drilled out (unseen here), whereas painting the rims, plus heating and subsequently remounting the tires without harming the tire lettering or scuffing the sidewalls proved possible. It's looking nice at present... Mike K./Swede70
-
Swede Savage Trans Am AAR 'Cuda Hwy. 61 based project
swede70 replied to swede70's topic in Diecast Corner
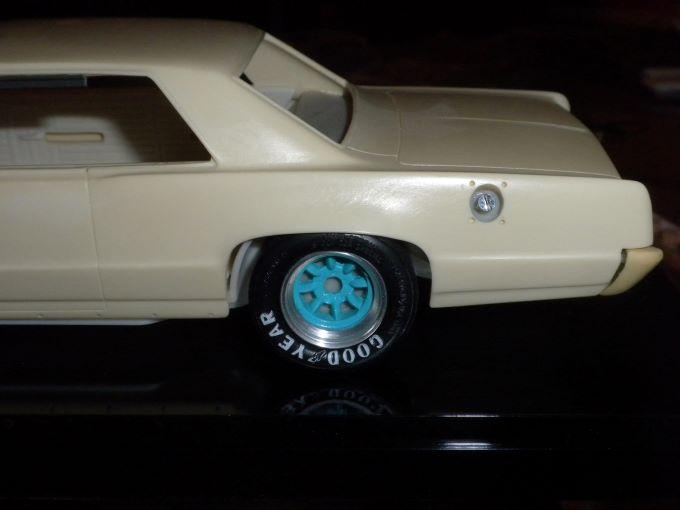
Thanks for the notice... Somehow the paintwork applied to the hood scoop top and sides of the ACME Autodynamics Challenger releases doesn't quite come as far forward and end in a point along the base of the inlet sides - something I can't help but see/fixate upon when I inspect one of these models. I had a spare T/A hood, and after applying successive layers as carefully as I could to isolate where I wished to touch matters in on this release, I transferred the mask over and buffed it with a cotton swab hoping to seal things as best I might. A nice result was registered for the effort made given it pretty much looks the part now... Yep - a hood pin is missing here, though not lost outright. Not much to see here perhaps, but I opted to drill out and remove the painted flush exterior door handles and replace the same with earlier issue or better ACME stock release examples that are chrome plated. A magnesium wash was subsequently applied, the results cleaned up a bit before being glued in place. The look conveys a bit more quality versus the as-delivered spec., hence I'm happy. Thanks for your review of this update... Mike K./Swede70
-
Swede Savage Trans Am AAR 'Cuda Hwy. 61 based project
swede70 replied to swede70's topic in Diecast Corner
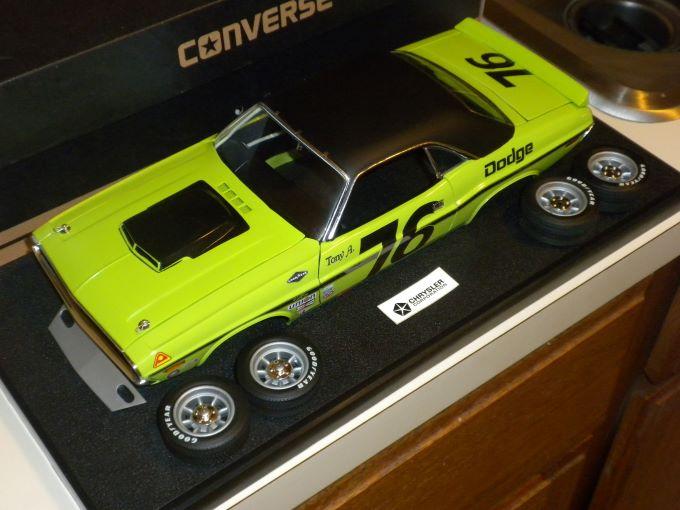
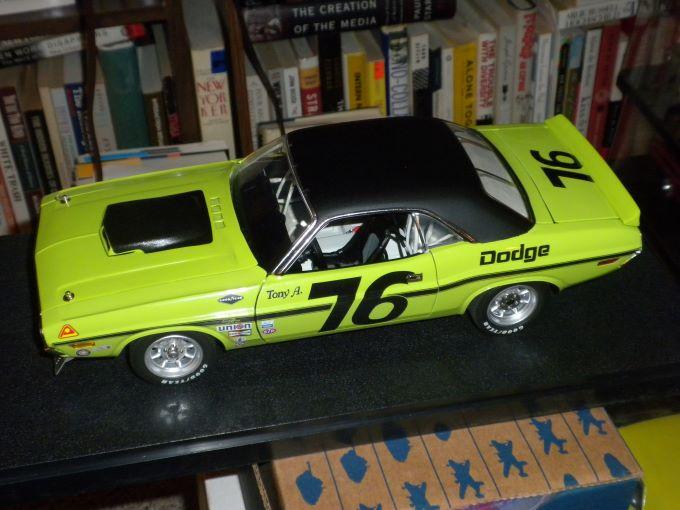
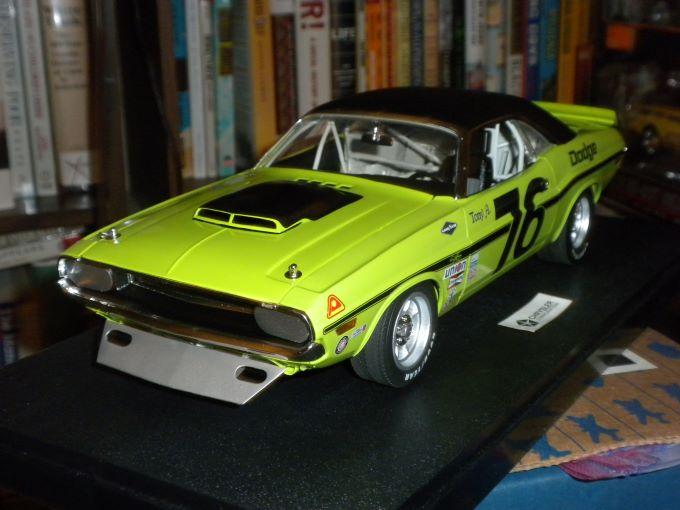
Greetings (and for the passage of several years since I've added anything to this thread)... Having picked up a 1:18th ACME #76 Autodynamics 1970 Dodge Challenger SCCA Trans-Am release after missing such when they were new and freely available, recently I was able to gather an example. To mix things up a bit it's my desire to alter the appearance of such to suggest a '70 Riverside, CA/Mission Bell 200 race spec. with Tony Adamowicz in the driver's seat of the second Autodynamics Challenger entered. T. Adamowicz would post a DNF, as would Sam Posey to draw down the Dodge factory-backed Trans-Am effort for the final race outing/date that year. Seen below would be some limited work restricted (thus far) to a roof top refinished in a particularly flat finish (TS-6 Tamiya Matte Black) after much tedious paint masking, while the accessory decals on the sides have received a bit of work even as said effort isn't complete. The 'Tony A.' driver's identification on the doors was work performed by 3 Amigos Decals and definitely looks the part, while also made out would be an abbreviated front spoiler less the Lexan clear end additions which were left off at Riverside given half-buried tires employed to mark the apex of this turn and that factored against the race-long survival of such. A decal sheet is in the mail to add the 'Dodge' lettering to the front of the spoiler, whereas wondering too the utility of the sheet with regards to other variations on the theme of the Autodynamics '70 Challenger effort suggested further up this thread. In sum, I don't know how much I'll do to this release, although the wheels will certainly be redone and other things tried. Thanks for your review of this post. Mike K.
-
1981 Dodge Diplomat Medallion Four Door Sedan
swede70 replied to RACINE ISHRAQUR RAZA's topic in Model Cars
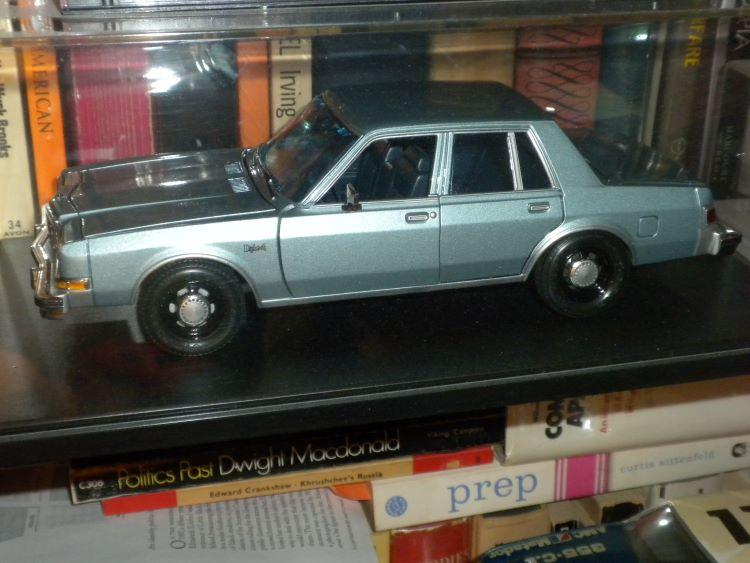
Neat work - thanks for sharing. With regards to Ray's Decals, did you opt for one of the Volare Super Coupe or R/T sheets? Neat underhood detail you've added - far better and more elaborate than what I've attempted. Attached would be some images of a Motor Max Diplomat which I tried to do as an A38 police package. Not as daring as what you've worked up, although I can share that the wheels and ventilated center caps are Fireball Modelworks items, the tires old 1:24th Monogram Goodyear GT Radials (likely from a '70 Challenger T/A release but dating back to their '78 Corvette) with an inner lip ground out, while the interior paint is SEM interior refinish aerosol. I just filed off the Motor Max wheels until the face/front was thin enough to accommodate the new rim detail set atop each, whereas grinding the outer diameter to hand fit each to the new vinyl tires was a knuckle busting adventure and the hardest aspect of what was done below. Finishing up, the bumper fill panels were painted silver as was a practice here by departments running these cars in-service long ago. I didn't try foil, not much was done with the interior but for rubber mat floors, while maybe I flooded the front turn signals with amber paint to make that detail a bit more prominent. The reverse lamps are just sections of white decal stock overlaid onto the tail light castings. The six-slot wheels might also have been from the 1:24th Monogram '70 Roadrunner - I can't remember and cannot be sure. Hoping to see your RCMP effort soon so that more might be learned. I half-wonder if the traverse torsion bar set present on the MPC Volare kit/promo could be grafted into/onto the chassis? Maybe too much work for too scant a result, but just pondering matters. Thanks... Mike K./Swede70
-
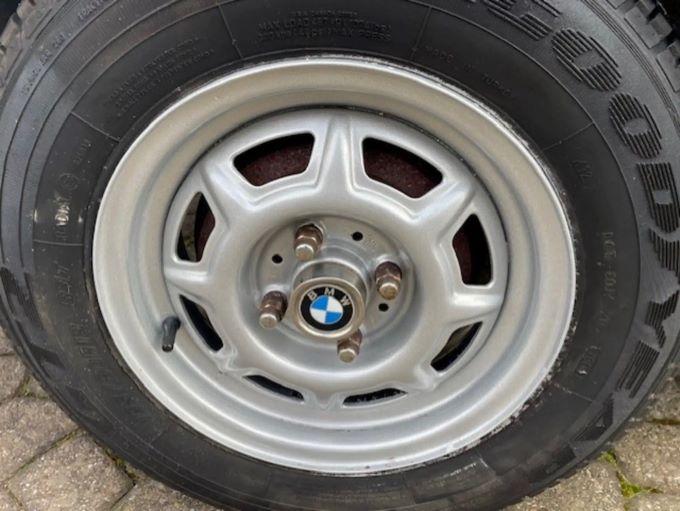
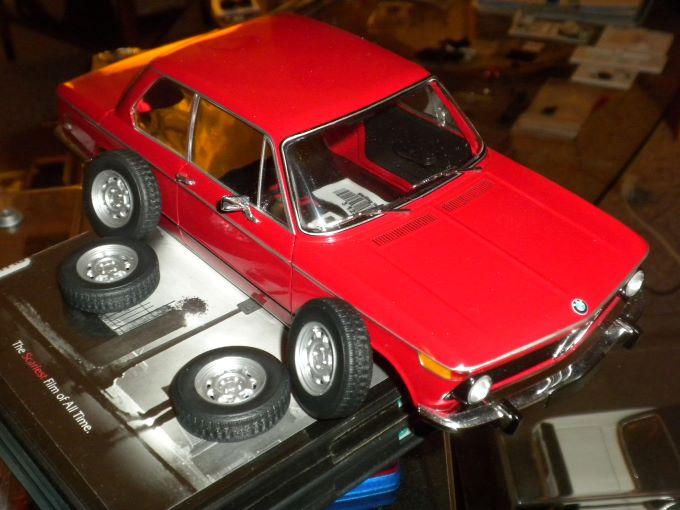
Greetings, I haven't seen many modified new-school (now made in Bangladesh!) 1:18th Solido diecast models to date, whereas here I'm trying to make changes on their spuriously identified '71 BMW 1602 which is actually a '74 and later car judging for trim changes including the taillights. The model isn't AutoART or Kyosho quality, but then it isn't priced as such and generally comes off (as does the new Solido range) as representing honest effort. In particular I do like the job made on the late styled pressed steel wheels which was the common everyday fitment to most of the '74 and later examples imported into the U.S. market, hence unlikely most AutoART and Kyosho variants, the absolute rarest and best wasn't strictly modeled here. The tires are quite good too, appearing to be appropriately-sized and treaded Michelin XZX's and far better rendered than what's found on the few KK releases featuring them. As witnessed above, the wheel arch shape/contour seems a bit off both front and rear, whereas the wheels strike me as being finished in too bright a hue even as the center trim caps should suggest aluminum stampings. At first I'd hoped to leave the wheels in place and reshoot the rims for squeezing the tires off the rims to a certain degree, but the stiffness of the tires just precluded my ambitions here. Heating the wheel/tire assemblies to render the tires pliable didn't achieve much, hence another matter to be alert to. Even with the other wheels saved to further experiment upon, taping off the center cap and refinishing them didn't come off as well as I would have hoped, while below I've included a 1:1 photograph that suggest how things ought to appear. Brake detail is minimal or wholly in error (the rears are rendered as drilled discs), hence with one broken wheel I've had to start upon rebuilding things to ensure new mounts would be strong and stable, the track front and rear reasonably accurate. Working up molds to come up with replacement rims in two parts less the trim cap has taken both time and effort. Seen below would be a very stately '74 in Verona (Red), telegraphing what would be the final aim concerning spec. and appearance less the auxiliary lighting. Words of caution are voiced - disassembly of this tool isn't without it's hazards; i.e. don't expect it to neatly fall apart in an manner akin to something like a Yat Ming/Road Legends model, whereas things broke and other parts/assemblies have just been painted in-situ given no clean way could be devised to remove this or that without risking breakage. I ruined one styled press 'steel' wheel given the weak link wasn't the hub - it was the wheel itself, whereas don't expect to remove the bumpers for grinding off the tips of the plastic mounts that pass through the metal shell for neither bumper can strictly be shifted no matter how determined I was to make this happen. The nose panel is a separate piece that seems to break off when removing the chassis, while the attachment points are a bit hidden. Mind you this isn't a terrible model - just be alert to special needs as it were on the disassembly front and be prepared to work within limits. A bit of application across the interior this. Nonstock speaker grilles otherwise found on the package shelf have been filed and sanded flat here, whereas the front seats have been removed and repainted given the hinges were finished incorrectly, the casting of the cushions and related bits somewhat rough. The rear seat cushions aren't removable, hence masking to isolate the 'salt and pepper' low-pile carpeting with matt black as a base and a deliberately sloppy dusting of matt white was required. A non-tii '02 in late spec. would typically have a fairly slick plastic steering wheel rim, hence the safety pad in the center of this example was masked before applying a coat of gloss black to those surfaces that remained exposed. Relevant areas were masked on the dashboard assembly which is removable to apply a heavier gloss, while the casting here is relatively good and well thought out. The pedal assembly otherwise expected isn't present here given it's being redone; i.e. Solido didn't tool it as floor-hinged, while it seems possible to just work up something appropriate to rectify the situation. A bottom pad contoured to fit the underside of the steering column and wrap beneath where one would insert a key to start the automobile wasn't tooled or is included, although in fairness many a 1:1 BMW '02 example is missing this bit of interior trim given large key chains tend to dig into the top surfaces of such and render it so much junk. I suppose I could pick up a scrap AutoART Spares-sourced late interior and transfer parts over, although here I think I'll just scale back ambitions and further flesh out what's seen and call it done. Seen above, the side front indicators have been filled out with amber metallic paint to suggest some other spec. than what Solido rendered, whereas the bumper guard rub strips, body paint and perimeter aluminum trim have been touched in here and there to clean up the overall appearance. I wasn't able to remove and resize the front and rear license plates, although for careful masking they've been overshot with a suitable semigloss black. The rims seen here are resin clones of two wheel faces saved out of a set of four. The third and only other survivor was cut to save the inner rim detail to basically match to the copied outer surfaces, while scratch built new center trim caps will be finished separately with a BMW emblem applied and added later. I suppose if I'd mixed the translucent red and amber paints I have with greater intent and knowledge the front indicator paint might look better still. I'd hoped to remove the wiper arms/blades to refinish them in semigloss black, although again it seems that I'll have to mask each in-place for no amount of force exerted from behind will move them. AA Spares inventory exhausted in this regard concerning their '02 stocks as it were. Last image this. The unshiftable rear license plate is witnessed refinished in semigloss black again, whereas the somewhat clumsy '1602' tampo print identification on the tail panel has been scrubbed off and replaced with a '2002' waterslide decal commissioned some time ago to 3 Amigos decals. Hoping to wrap up matters with this limited project soon. Thanks for your review of this post. Mike K./Swede 70
-
How hard is it to cleanly dis-assemble the DM 1967 GTO Convertible?
swede70 replied to Ragtop Man's topic in Diecast Corner
Perhaps consider raiding the stock of a body shop supply store consistent with turning up SEM interior refinish aerosols. At first the coverage won't seem all that good given it's fairly thin, whereas definitely take care to spray some quantity off the surface you wish to cover because some mysterious residue will come out of the can (it always does) before the paint will flow to the nozzle. Hard to explain accurately, but should you fail to heed that which I relate here, the unknown goo will end up on your work and you'll be at pains to strip and clean such prior to trying again. After about four or five seconds of spraying the aforementioned 'goo' will clear out of the can, although the initial surprise experienced is just that. Other words of warning are warranted. What's applied will at some point seem almost too thick to strictly work, threatening to erase underlying detail before gassing out, but when it finally does the sheen and finish is first rate. Thin application of Tamiya's very good primer can help ease suffering consistent with effecting a color change, hence chose carefully and match products appropriately. Very happy here with the SEM line, whereas if their catalog is judge too limited, 1:1 restoration specialists will either mix their own formulations to serve demonstrated need amongst the clientele they target. Good luck... Mike K. -
Greetings, I have the remains of two AMT stock spec. late Matador coupe models, whatever Penske Winston Cup/NASCAR racers I've purchased in the past in addition to a very nice and professionally-finished (if it can be called that) bodyshell where I hope to combine all the best to come up with a good result for cobbling matters together. The above appreciated, somehow I was having a lot of trouble turning up detailed reference materials to support my effort until the following Bring-A-Trailer post revealed what might be the ultimate (horror of horrors) late Matador with what could termed impeccable pedigree. AMC Chief Stylist Dick Teague apparently had dibs on the last Matador coupe built, while the accompanying photographs afford as detailed a look at the car and platform as the reviewer of this post is likely to discover. Helpful to me, and maybe two or three others scattered across the globe... https://bringatrailer.com/listing/1978-amc-matador-barcelona-coupe-last-matador-built-1-of-1/ Mike K.
-
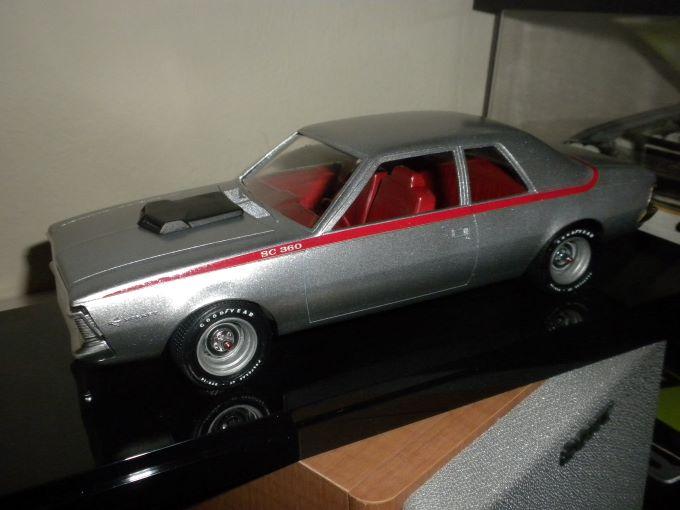
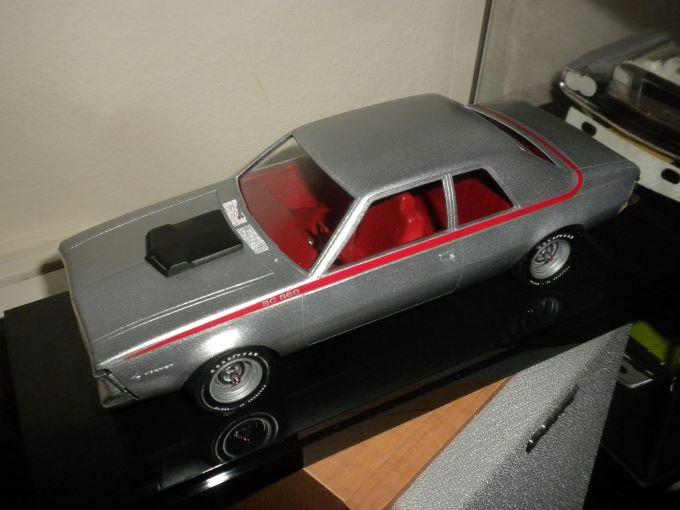
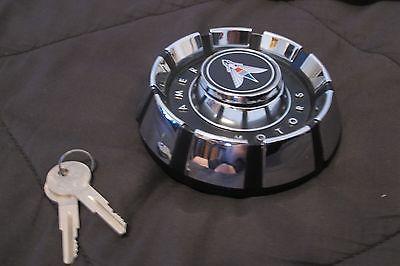
Greetings... Seen is a refurbished Jo-Han toy store/hobby store issue Jo-Han '70 American Motors Hornet refinished to suggest a '71 SC 360 Hornet for work limited to an exterior refinish, bumpers stripped and painted with Revell of Germany's 'Chrom' aerosol lacquer paint (fine stuff), application of Ray's Decals waterslide graphics, SEM interior paint (Tamiya's Pink Primer helped a lot here), and what I could work up to reproduce the wheels less trim rings complimented with Fireball Model Works sidewall tire lettering waterslides in the appropriate D70-14 size. The hood scoop and vacuformed 'glass' represent some material saved from a personal miscue for my wrecking a Missing Link transkit of the same topic years ago - hence these important bits were not gathered independently. Some short notes with regards to the wheel/tire combination and decal application to share then. Tires are old solid vinyl MPC Goodyear Polyglas GT's with the usual raised sidewall lettering carefully ground off prior to sanding the sides smooth - and no, I didn't know or suspect such could be done before. As witnessed, it isn't clear anything was strictly messed with, hence a success of sorts to register. Wheels are a composite affair, with AMT center stampings cast separate from the chrome plated lug surrounds/center caps, while the outer rim detail sans trim ring would be shapes lifted from the old Jo-Han Superbird tool with reference to the NASCAR pressed steel wheels divorced from their centers. I greatly admire how others have carefully finished these difficult to paint wheels, but had no confidence my effort might compare short of blowing everything apart and finishing stuff separately - hence the effort made. The Ray's Decal art is mostly good, with some small quibbles to report. The side 'spears' seem be a bit short stretching towards the front of the car, whereas two stripe options on the sheet exist with regards to traversing the fill panel below the rear glass/backlight, one more sharply radiused than the other. Concerning this back stripe element, neither is strictly ideal with the more sharply radiused option resting somewhat awkwardly in combination with the carefully trimmed and sized side spears/elements, while perhaps the other design comes off as almost too straight even as it was laid out as a subtle 'vee' in terms of profile. Do take the time to photocopy (a few times) the Ray's Decals artwork consistent with versing yourself on how things are going to go and what challenges might be faced before committing to cutting the actual decal sheet, dipping the art and positioning the same while they can be moved/shifted/adjusted. Strike the best compromise you may while accepting that the result will reflect a compromise - although a good one as can be made out above. Many, many extra elements consistent with feeding multiple projects are included within/upon the Ray's Decal artwork for this topic; i.e. underhood decals and markings aplenty, with similar (if not unprecedented) utility across the interior, etc. Here I've just used a few; i.e. the SC 360 glove box-situated crest, the stripes with the 'vee' element across the fill panel situated just atop the leading edge of the trunk lid, as well as the tail panel decal that also bears separately applied then-new 'AMC' identification, and the 'HORNET' nameplate less the ornamental and stylized Hornet emblem. All the cast in-place raised promo identification along the tail panel of the model had to be ground off and filed flat to accommodate the decal given softening solution will only achieve so much here, hence be thorough should you wish to follow in my steps. Hoping to (yet) turn up the appropriate fuel cap for this build. Thanks... Mike K./Swede70
-
Greetings... A long-shot request this, but seeking the fuel cap illustrated in the instructions (listed here as #60 and chromed) for the Jo-Han (although AMT-boxed iterations would likely contain the same) '72-'74 American Motors Hornet. Working on a promo-based SC 360 conversion, whereas the promo just came with the most basic of twist caps less the more elaborate presentation/trim seen below. Kind thanks for your review of this query. Mike K./Swede70
-
Past public and academic librarian here, hence gathering period magazines and books meshed to whatever was published later definitely drives what I try/attempt in-scale. Usually I become intrigued with the story of this car or that team and almost unconsciously start assessing how and what needs to be gathered to 'get there' if you will. I finish almost nothing, although I do savor the process... Vintage road racing topics - if they survive to be restored into the present day have often lived very harsh lives, hence I find it fun to imagine I'm operating a scale research/restoration/fabrication facility consistent with unearthing how this or that was configured (with reference to the rules of the day - such subject to creative interpretation), when (as in the race weekend, qualifying/race/with light damage factored in too), what systems were in-place, how such operated, the evolution of this or that racing platform (across seasons, across series, the ownership trail to the extent that the same might be unearthed), etc. The hope is that what I come up with at least be equal to the best-researched scale topics seen as such relates to the concentration I embrace. I'm almost the anthesis of the methodical and disciplined builder for finding sustained focus a challenge, although gathering material and applying whatever is discovered to a scale project to literally lend shape to all that has been learned definitely lends value to my life. Networking with others consistent with filling in perceptual gaps, whether this be a 1:1 project or some aspect of fandom in the current mold also is valued. It seems I'll labor until a mock up starts to come together consistent with convincing myself that things are beginning to gel - and then I'll lose interest temporarily. Conversely, unexpected new research discoveries (i.e. photos, textual material, etc.) or contact with others attempting a similar or similarly-themed project may prompt me to reembrace this or that project - and so things start 'anew'. Mike K./Swede70
-
Greetings... Dispensing with the old MPC hollow vinyl Goodyear Blue Streak Stock Car Specials which appeared a touch rough, substituting in some PPP tires w/sidewall decals that are both solid and a bit wider too on the late-season 1:25th scale iteration. Some further efforts to clean up the damaged hood seems to have helped, while the grille divider/'beak' is a resin clone of the original AMT part filed to fit and coexist with the Polar Lights grilles which are a bit thinner and delicate versus stock as seen below on the earlier-season '71 Lime Rock effort. Small adjustments then... Thanks... Mike K./Swede70
-
Greetings... A little crude, but initial under hood paneling temporarily affixed to some spare AMT '64 Tempest convertible with the radiator support scrubbed free of the cast-in radiator and anything else that was there. Photo reference from the period stretching into the current day chart an evolution of design, although here I'll try to match/mimic what was glimpsed in early '71. This scale rendition dates from years ago, although I've found that life is much easier after fabricating shapes that can be finessed and developed from a reasoned starting point. Underneath I've just carved out material from a bog standard AMT '65 GTO chassis/plate to support what's seen here, whereas again I'm trying not to overthink or overcomplicate matters as is my habit. Revell '66 GTO upper control arms will likely be employed to fill out the pockets cut into each side wing/panel. A heater core patch guided by the profile visible on the original AMT kit part seen here will likewise be worked up for both builds. Old partial radiator support work from before, although the radiator and paired oil coolers will make the migration to the otherwise bare AMT support (twice over) soon enough... - Seen below would be some small refinements to the wheel arch opening form and shape on the second/late-season AMT '64 Tempest Gray Ghost. The tires here aren't (yet) Plastic Performance Products items with sidewall decals, but rather prepainted MPC '72 NASCAR Monte Carlo issue and will be dispensed with soon. Further brake and hub/axle as well as lug detail stands to be added. - Further, the Pontiac arrowhead emblem on the hood of this second model needed a bit of further attention to remove the same, while damage inflicted on the hood when too much adhesive used on a hood tachometer pod tore out a section of material was more thoughtfully patched and smoothed over as seen. Lastly, the exterior side mirror hitherto witnessed on this second build was finally removed. Thanks for your review of this post. Mike K./Swede70
-
Greetings... With the floor addition and related work, it was a bit tedious to reassemble everything short of forcing matters and coming up with some mutant result. A shifter platform plus shifter was added utilizing Revell '66 GTO trim with a Revell '66 Oldsmobile 442 shifter, whereas trying to further flesh out the interior for further application. Revell '66 GTO exterior door handles are seen here, and represent a nice upgrade. Thanks... Mike K./Swede70
-
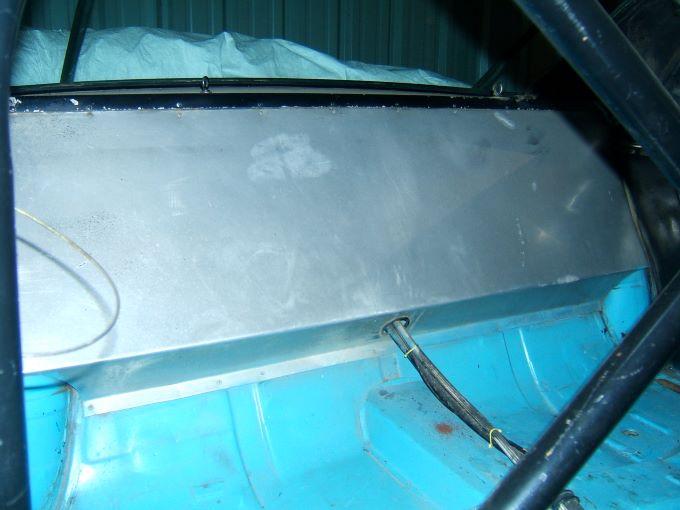
Greetings... Having picked up a $10 built up Revell 1:25th scale 1966 GTO, thought was given as to what to repurpose consistent with seeing to problems encountered with the largely AMT-based build of this topic. Pondering the interior in particular, in the wake of filing out the rear seat cushions top and bottom, nothing had really been planned to both fill the subject area and afford contours and shapes across the floor back to the rear bulkhead consistent with what would be expected in a stripped out road racing interior. Similarly, for filing out the AMT cast-in interior center console, I'd either have to plug what gap remained or identify some other driveline tunnel profile to substitute in. A strong argument can be made to substitute the Revell chassis over entire with adjustments, although here I've opted to retain the bulk of the AMT annual kit chassis below while stealing some panel contour/detail that might be effectively employed and visible topside. Not a terrifically composed photo this, but a glimpse if you will of the 1:1 topic prior to the restoration of the same several years ago. Witnessed is the sheet aluminum rear bulkhead and some floor detail... More than a bit rough, seen here would be some spare parts made up of an annual kit chassis casting as well as a glue-burned annual kit interior with cast-in center console and rear seat cushions likewise cast-in. The '64-specific door and dash trim forms the basic argument as to why to retain the same short of filleting the sides and grafting the detail to the Revell assemblies complete. Maybe too much work for this example, although I might do things differently for applying insights gleaned here on the other Scale Coachworks build configured as a mid-to-late season ride. Work of a busy afternoon then to salvage parts from the Revell 1966 GTO tool. The transmission/driveline tunnel should solve all problems forward, while the lateral crossmember hump and related detail saved from a cut up chassis meshes reasonably with the AMT chassis casting from above. Mostly together with regards to ensuring that major assemblies across the interior live together in relative harmony. Thanks for your review of this post. Mike K./Swede70
-
Greetings... This was an older thread, but a few of us chimed in: Mike K./Swede70
-
Oh - the image and insight provided Harry is most appreciated! Nothing like insight from the period by someone involved in the effort to better steer my efforts (and that of others) in addition to providing an always valued morale boost - kind thanks... - Just another tiny update here. Given the chrome plate on these period AMT annual kit parts wasn't great back then and isn't terrific having travelled through the portal of time to arrive in my hands, it didn't seem much of a barrier to cross to work over the otherwise stock castings in search of improvement. Here both the front and rear license plates typically bearing year-specific identification in the form of '1964' have been scribed and sanded flat, while the reverse lamps as well as the cast-in headlamps have been drilled and hand-filed out in anticipation of fitting either plastic or aluminum rod plugs to suggest fill panels (on the front only mind you). - ...and just a further small update of a small update, here the fuel tank on the original annual kit chassis has been filed out, the resultant hole filled with sheet plastic, and a fuel cell housing fabricated not to extend beneath the frame rails further forward. Thanks... Mike K./Swede70
-
Just a quick addition/update... Here the pair of refueling ports/inlets have been cut into each respective quarter panel of the 1:25th scale '71 Lime Rock Gray Ghost, with one outfitted with a Jo-Han '70 Donohue Javelin Trans-Am fuel cap, the other side plugged so that it would be nearly flush with the surface of the surrounding thin panel work. A quartet of small pin vise holes/dimples will surround each inlet - although such work is to come. The quarter panel trim cap seams/dividing lines were scribed onto the shell, the fender to cowl seams were likewise scribed, while repairs were made to the somewhat suspect panel line beneath the passenger's side door which might still require further attention. Out back, the trunk lid Pontiac arrowhead was carefully removed from deck lid without inadvertently scrubbing off the character line running down the center such (color this work tedious), while whatever Tempest model identification that existed towards the right back edge of the trunk lid was also scrubbed off. Lastly, the faint cast-in/on exterior door handles were removed on both sides, some block sanding performed to clean up matters here and there - thanks. Mike K./Swede70
-
Greetings, Refabricated four times over now (forward of the main hoop for judging lengths and where to bend proved difficult), seen is the roll cage inside the interior fit the chassis and body, plus trimmed AMT '65 GTO glass. Slowly working up the home brewed seat, apparently made up of an abbreviated base stock seat with aluminum side bolster supplementary structure. Concerning my own efforts, inside bolster padding plus the head rest stand to come. Thanks... Oops - the top edge of the front 'glass' has come undone here and has swung to rest atop the A-pillar to main hoop bars... I'll scrub the door handles off given they are faintly rendered and subpar at best. Revell '66 Chevelle wagon or Revell '66 GTO parts will be substituted on and in... Refueling port/inlet detail with one functional, the other plugged along the quarter panels is next, while some fuel cell vent detail worked up before for the other 1:25th effort will be duplicated and added in/here as well. Thanks... Mike K./Swede70
-
1968 RKE/JRT SCCA Trans Am Javelin
swede70 replied to swede70's topic in WIP: Other Racing: Road Racing, Land Speed Racers
Greetings... This would be a brief run through of how one might implant Jo-Han (or Testor's) '69 S/C Rambler rear suspension and chassis shapes into an otherwise unassuming '70 Javelin chassis plate/casting. Done twice before, although doubtlessly with greater finesse this time over. The example seen is intended to be an early-season '70 Penske Racing SCCA Trans-Am Javelin and perhaps configured as a Peter Revson ride given one just doesn't see his Trans-Am mounts rendered all that often. If supplies exist consistent with allowing you to do such, the cast-in leaf spring detail on the promo-style Jo-Han AMC chassis (where applicable) can be filed down so that SC/Rambler leaf springs and associated hardware may be overlaid. At worst you'll be afforded the chance to actually paint things up cleanly for applying yourself just so. A good amount of material exists to file material away rather aggressively (albeit carefully as not to chip or damage every other surface in proximity to said area), while the results literally are plain... To the left would be the remains of my long suffering SS/AMX release in the form of a scrap chassis, while situated to the right would be a two-piece SC/Rambler chassis having just arrived via helicopter from a donor... At far left would be a stock SC/Rambler chassis again less trunk pan, middle would be the carefully trimmed part that includes an effort to preserve the driveshaft/driveline tunnel, while seen right would be my '70 Javelin race chassis (note no cast-in exhaust detail to say little of a fuel tank here) awaiting further work. Some gaps around the rear subframe require plugging to clean matters up - although none of this is terribly hard in total. This is how close the subframes align; i.e. pretty close and definitely worth considering if one is contemplating a detailed AMC build utilizing leaf springs. The SC/Rambler rear subframe was trimmed a bit at the back, with a new cross member added to tidy things up. Plugs to close up the gaps atop the rear axle as well as the holes situated further forward inside the rear subframe relative to the floor were soon fabricated to result in what's made out below: While this is what resulted. Rushing ahead a bit, notice too the Model 20 AMC differential found in rather rare Jo-Han AMC funny car kits which is combined with abbreviated axle tubes and the usual SC/Rambler Dana 60 differential pig. The staggered shocks are positioned opposite of what they ought to be given this is a temporary mock up and I simply didn't have the parts to orient things correctly, while with two SC/Rambler kits or resin clones of select items, this oversight can be addressed. The fuel cell housing is scratch built, a 1:25th Revell '69 Camaro Z/28 driveshaft is employed, while a cast resin Jo-Han Javelin promotional model radiator support cross member was further added. At some point I'd found an early-tool Jo-Han AMC oil pan with mounting hardware faintly rendered and cast-in, hence it was copied and shows up here floating in space with an enlarged early-season wet sump. Modified Jo-Han '70 Rebel Machine upper control arms account for the odd shapes situated atop the axle locater perches seen forward. I'm unsure at this point what a limited take of revising matters up front across the suspension might constitute. More SC/Rambler sacrifice on-view, with another set of inner fenders/wings slowly be grafted in even as the pair just rest atop things here. Indeed - I'm wary of the extent of what I can achieve for revising the inner fender/wing detail, unwilling at this juncture to swap in Ford assemblies or contours if I might come up with something original. Approaching the end of this post, here again another radiator support has lost it's cast-in radiator, the heater blower motor has vanished from the firewall, while the lone track bar/Panhard rod is a late AMT NASCAR item soon to be repurposed. Thanks for your skim of this thread update. Mike K./Swede70
-
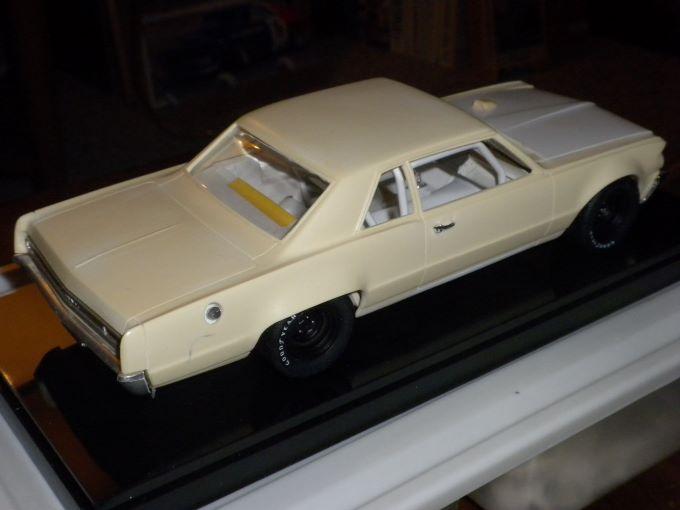
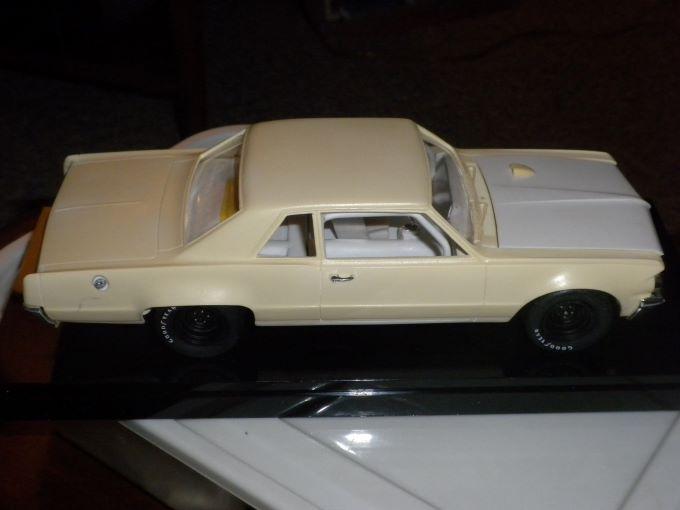
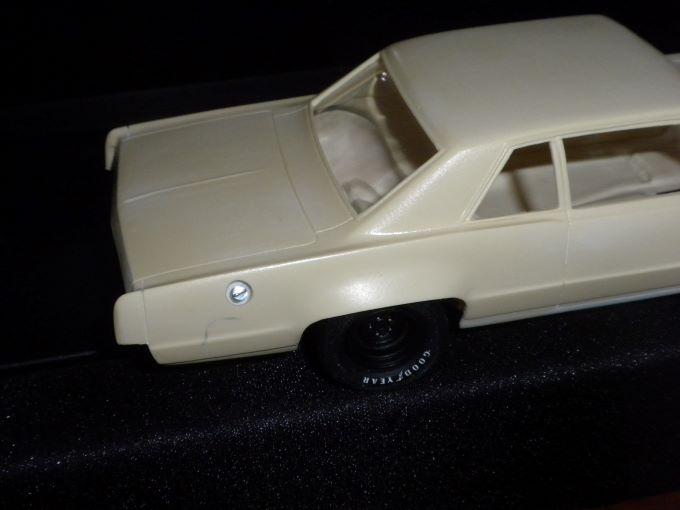
Greetings... Some interior work performed on the intended 1:25th scale AMT-based '71 Lime Rock iteration of the Gray Ghost this. The cast-in console w/tachometer was carefully filed out, as was the rear seat cushions top and bottom as well as the textured (and sadly glue burned) interior floor. An aluminum panel was carefully cut to serve as a bulkhead looking towards the trunk area, whereas after filing down the lip of the pad otherwise found atop the instrument cluster, it too received a carefully cut and shaped aluminum panel which will be subject to further work. An MPC mid-seventies Pontiac Firebird Trans Am steering wheel now appears, the somewhat odd roll cage less any tubing aft of the main hoop was fabricated (some clean up work still remains to be performed here), while scan close and the front footwell outriggers to the suspension pick up points can be made out. Lastly, the standard AMT firewall which comes through with plenty of cast-in detail in the form of a heater core and what is intended as wiring was filed flat, plugged, puttied, and generally cleaned up in anticipating of going back in and adding more than what's made out which constitutes only a wiper motor drawn from another kit I can't identify. At least at present, fair progress is being made... An application of Tamiya Matt Clear helps to tone down the sheen of the tires and disguise the sidewall lettering carrier film otherwise glaringly obvious... Although it's quite small, I might try to reproduce the checkered flag pattern across the aluminum instrument panel insert much as I did on the 1:18th scale Sun Star-based diecast effort seen further up this thread. Previous such was done for successive applications of tape to mask some areas, leaving others to be scrubbed with a pencil eraser before mixing matters up and doing other sections similarly masked and exposed - albeit scrubbed in a different direction. Sounds odd - although the technique was effective before... Plugging the console centerline hole won't be fun, but something had to be tried... Looking quite nice though, especially if one considers that the actual assembly seen here is a bit smaller than shown. The outriggers from the roll cage leading to the front suspension pick up points can be made out here... While finishing up here, nothing too exotic, but better than the mass 'o wiring and related bits very much in the style of an early AMT effort in-scale and otherwise inappropriate for this build. Thanks for your review of this post... Mike K./Swede70
-
Greetings... Work of an evening then, I tore off the glue burned period wheel backs from my intended '71 Lime Rock 1:25th AMT Pontiac Tempest Gray Ghost effort and replaced the old hollow vinyl MPC Goodyear Blue Streak Stock Car Specials with updated solid PPP 1965-1969 Goodyear Style Stock Car Tire(s) w/sidewall decals/markings clipped of their blue lines. Newer AMT wheel backs were modified to live with the tires (not a big effort), while overall the model appears far more together and reasoned as projects go. Rim faces seen are resin clone Jo-Han Superbird items, maybe a touch small for diameter then - but not awful. The interior is out receiving work, hopefully to be seen soon for ambitions realized here. Thanks... Greg Rickes photo... Mike K./Swede70
-
Greetings... Hidden out of sight for years, this would be a brief update of a 1:18th Gray Ghost '64 Tempest project reflecting some scarcely visible changes and updates for my securing another example of the Sun Star model on which it's based. The doors had been shorn of their hinges before given I didn't imagine they might coexist with the roll cage I'd worked up, while careful effort to shorten the floor insert, adjust the fit of some roll cage tubing and discreet grinding of the floor pan helped to better site the odd separate roof panel to the body - especially along the cowl panel relative to the fenders. New bumpers are seen, the wheels have been painted (less lug detail at this juncture), while the fuel cell vent area otherwise filled in with rather thick white metal behind the standard fuel inlet has been laboriously ground out in anticipation of fitting something better shaped and detailed. As projects go, it's very much still a beast, although with further contacts established with regards to whom can design and produce the decals as well as better techniques in hand to strip the body shell and blend the flares into the surrounding panel work, further progress seems possible. I'm hoping too that the discovery of 1:20th scale MPC AMX Craig Breedlove exhaust headers that can be modified for use on 1:18th scale Pontiac V8's will help on the exhaust front, and that other discreet problems might still be sorted and eliminated each in turn. Thanks for your review of this post. Mike K./Swede70
-
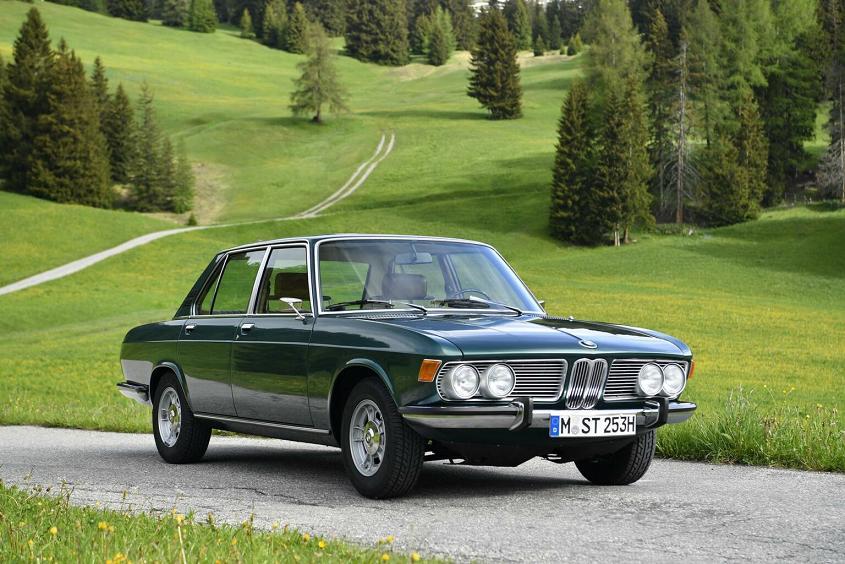
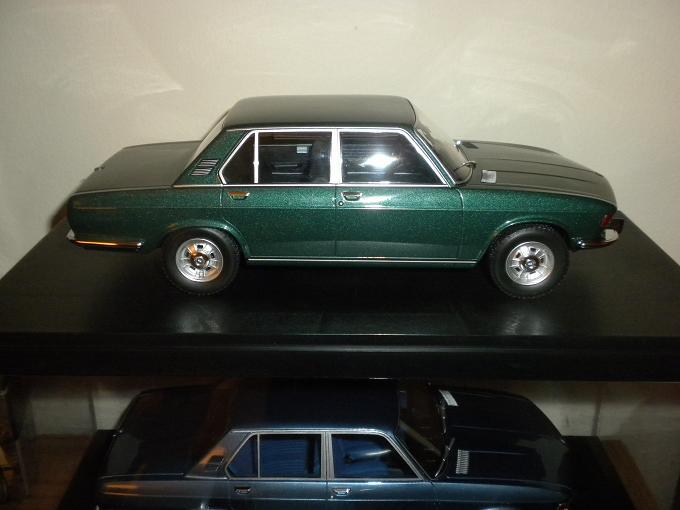
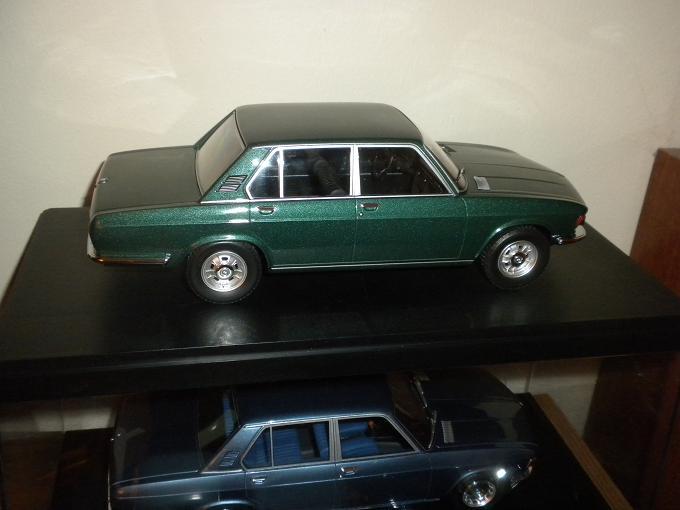
Hello, Not meriting another thread given it's largely the same topic, this would be another 1:18th scale BMW E3, this time the recent Minichamps sealed shell tool of an early 2500 sedan. Having picked up a set of early alloy wheels and tires from the eBay seller who posted bundles of KK and Minichamps sets that included the Alpina turbine wheels plus tires fit to the '74 3.0 S in Granatrot featured above, I hoped to wrap up matters for effecting another swap out/conversion as made out below. Caution is advised given it's a finicky swap at best even as the manufacturer here is the same; i.e. wheels from a sealed-body Minichamps BMW E9 CSi being fit to a sealed-body Minichamps BMW E3. The front suspension of the E3/2500 sedan isn't all that easy to remove or service, although once apart trimming the mounts of the front wheels to size and screwing each into place to match the alignment of what had been removed proved doable enough. Spacers had to be fabricated for the rear wheels, while given space didn't exist to transfer E9 brakes to the front of the E3, I didn't mount an extra effort to add anything in terms of extra detail even as room existed to mount brakes at the rear. I guess for the effort it's no worse for detail and a bit more handsome for it, hence happy enough on this side. As-delivered and quite handsome as seen, finished in what is termed Tundra Green... Intimations that it can look quite fetching when upgraded with the period factory light alloy wheels though... Performed fast but (more or less) effectively, the wheel/tire change pays dividends. Just the two models together recovering in the display/post-op. area I maintain. Further below is the BoS BMW E3 2500 from years ago, while it wears full wheel covers to round matters out. Thanks for your review of this post... Mike K./Swede70
-
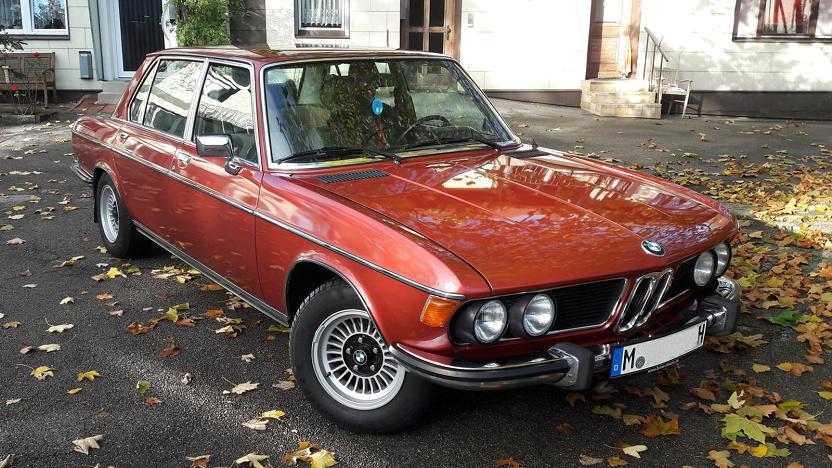
Greetings, A fairly fast project this, one long put off. A few years ago KK released a range of 1:18th scale diecast BMW E3's, whereupon I purchased an example and later gathered up some recently removed new-tool sealed Minichamps 1:18th scale BMW E9 CSi and CSL wheels and tires hoping to add these to my KK E3 purchase. Some promotional photographs depict the then new or newish Alpina-style rims without the familiar black paint finish across the centers, while so too do occasional examples turn up online depicting such as witnessed here. I view this appearance as a bit lifeless, whereas with the Minichamps scale footwear in hand, eventually I'd try something. This is how the KK sealed body BMW E3/3.0 S arrives, and pretty tidy it appears. Other colors have been done, hence some choice exists with regards to gathering an example if one is so-driven. ...while this the wheel appearance/finish I desire/desired. Quite handsome, while the exterior color appears to be Granatrot in BMW-speak. Not trying to much for this fast overhaul, nevertheless the decided to spray the interior casting floor to suggest low pile salt & pepper carpeting while also adding small squares of fluorescent red material to suggest seat belt latch releases. The seats but for the rear bottom cushions may be removed from the floor casting, hence not much was risked here. Same too for the handbrake lever; i.e. it's a separate part that can be pulled to facilitate paintwork. After trying to pull the wheels and tires off the KK model and failing in my attempt, I decided to remove the tires and laboriously hand file each rim face flat until the old rims fell away from the hubs hoping at it were that I could reuse the KK assemblies here. The effort seemed doubtful for a time, but then success! The Minichamps E9 CSi/CSL Alpina turbine wheels had to be ground out a bit to remove shafts situated behind each to otherwise accept alternately an axle or pin, but otherwise didn't require a wild amount of work. Track remains a bit wide, but I'm not sure much further effort would have yielded me a commensurate improvement with regards to appearance. Tires hardly seemed different for detail, size and material employed between the two companies, hence what's made out here are Minichamps tires on same-tool wheels, while oddly enough the KK model comes through with superior brake detail including fair brake calipers and photo-etched brake discs that show better through the Minichamps rims. Notice further that the seat belt latch release button detail can indeed be made out through the side 'glass'. Really quite nice then, with the recent sealed Minichamps BMW 2500 situated just beneath the facelifted KK iteration above. Out back one can make out new 'Bavaria' trunk lid identification even as many discreet tell tales relate this to be a later 3.0 S. The 'Bavaria' lettering was commissioned to and created by 3 Amigos Decals. Additionally, the exhaust outlet was cut a bit short here, while an AUTOart BMW 2002tii chromed exhaust tip was added to mix things up again. Thanks for your review of this brief project post. Mike K./Swede70
- 1 reply
-
- 1
-