swede70
-
Posts
727 -
Joined
-
Last visited
Content Type
Profiles
Forums
Events
Gallery
Everything posted by swede70
-
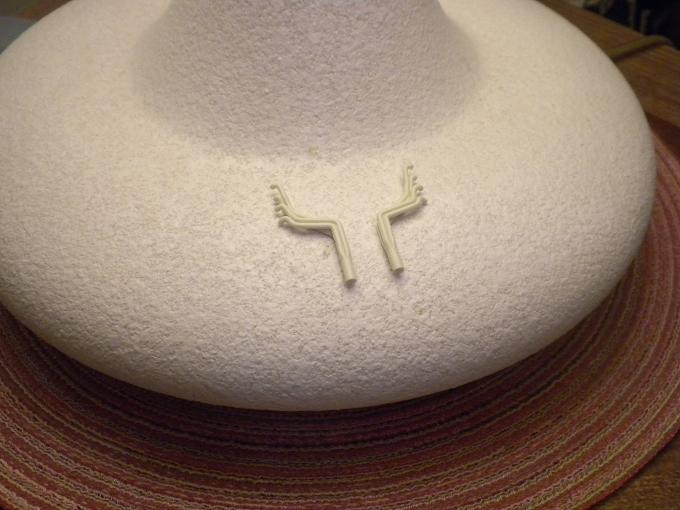
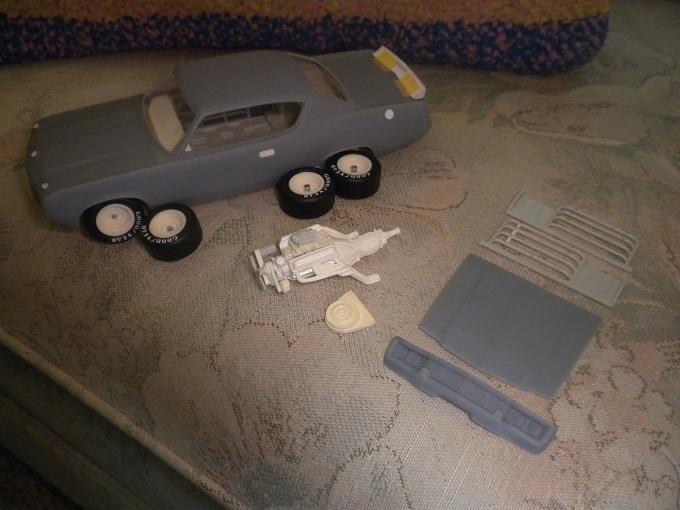
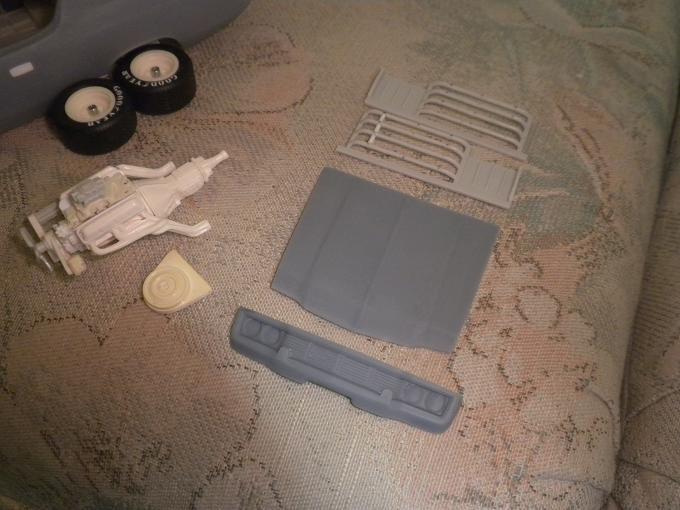
Greetings, Not too exciting, but for quick work a radiator support takes shape. With diecast models it's common to come across missing structure, and/or the need to cut material out and begin anew consistent with supporting the assertion what's on view is a proper scale model versus an out of it's depth toy. Almost impossible to discern, a GMP '70 GTO Judge radiator with scratch built upper hose neck hangs off of the other side of the aforementioned radiator support, the latter carefully hand-fit to the underside contour of the ERTL shell and not illustrated as of yet. Further details will be added and incorporated atop the assembly to break up the sea of black if nothing more, while I'm pondering ignition wiring choices and preparing an oil filter as can be guessed. Anyhow, what can be made out is all the cutting and filing necessary to ensure an 'effortless' fit of a certain radiator support otherwise based on some unsuspecting sheet plastic! Thanks... Mike K./Swede70

-
Maybe conduct a Google image search for a 1966 GTO in Reef Turquoise and in essence conduct a runoff of those restored examples outfitted with whichever color combination interiors were availed in-period. One or two examples will likely speak to you, confirming that in certain light conditions and presented in a particular way there could be no other choice! Good luck however you wish to proceed... Mike K./Swede70
-
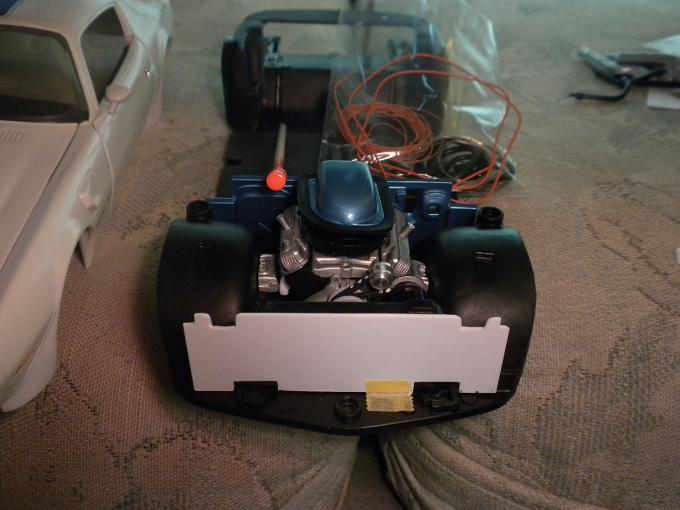
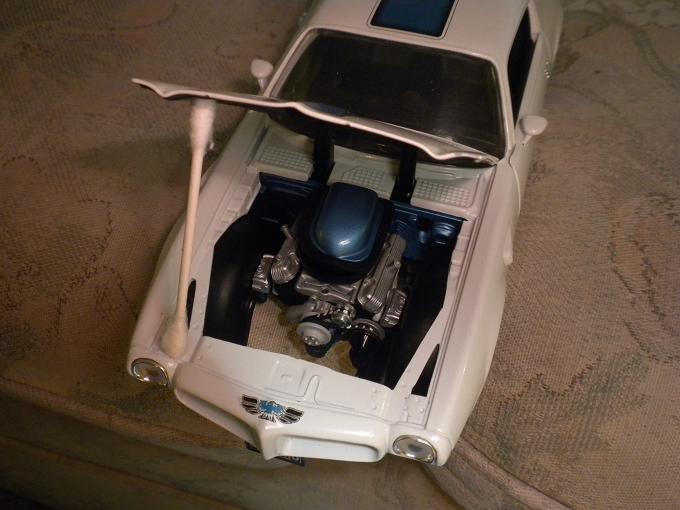
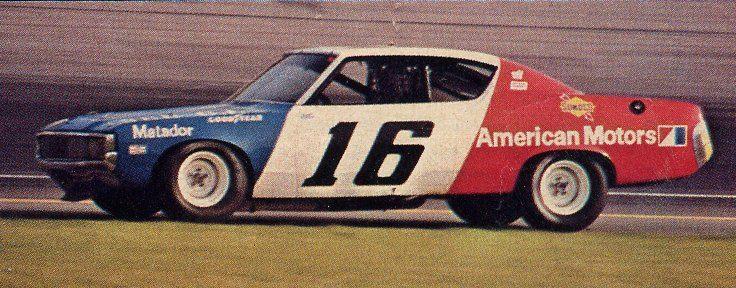
Greetings... Seen would be a little bit of the engine and transmission purposefully made up of just a few resin parts overlaid onto the decidedly so-so 1:18th Pontiac V8. The body shell is yet another spare (will I ever stop destroying otherwise innocent first-issue ERTL '70 1/2 Firebird Trans Am Firebird models?), hence it's employed here only as a mock up. Comfort for this builder is to have a mountain of spares and wide latitude to make mistake-after-mistake... What can be made out would be some resin valve covers utilizing scarce 1:18th GMP '70 GTO Judge stamped steel valve covers cut apart and wedded with the elongated finned center sections overlapping onto the ends otherwise found on and upon the 1:18th Welly '72 Firebird Trans Am tool. Much sanding and careful razor saw work helped knock down irregularities otherwise present where two distinct finned sections met at the center of the valve cover, whereas the breather tubes and oil fill site were added later and remain incomplete at this juncture. Just quickly, some Tamiya gray wash was employed to lend a bit of distinction to the fin detail short of telegraphing a weathered look. Invisible would be an opened up the reverse scoop opening, while the opportunity was taken to clean up the exterior profile of the Shaker scoop prior to refinishing the assembly entire. The front subframe rails stand to be painted aqua delineating the same from the wheel arch shrouds fitted above each. The stock air cleaner snorkel has been cut off, the 'plate' blocking it touched in with a Molotow pen. Also seen are a pair of cut down 1:18th GMP Penske Trans-Am Camaro upper control arms to lend a bit of visual interest near the base of each inner wheel arch shroud. The cast-in examples were cut and ground out to accommodate the addition of these. Moving ahead even as what's been performed equates to not so much, noticed painted in red would be a resin clone of a scratchbuilt Lakewood explosion-proof bell housing (nothing available? = no choice but to make such), while various 1:18th tools afforded pulley shapes and contours to flesh out the admittedly incorrect accessory drive still incomplete. Lest the decal work be damaged on the unflared shell, it's likely I'll just paint out the SD-455 specific fender to radiator support braces even as I cut these out on the two flared iterations seen further up the thread. Out of sight would be a resin clone of a 1:18th GMP '70 GTO Judge radiator - a surprise in a sense when one might otherwise be expecting a Harrison aluminum model derived from a then-current Corvette. - Just in passing, for pondering period photos I spied what appeared to be a black-painted firewall transitioning to what appeared an aqua finished example as the season wore on, hence one of those instances where a best estimate or best guess might well ruffle feathers. Further and just in brief, the heater core 'bubble' was removed from the firewall looking forward, a fill panel subsequently fabricated and overlaid, although modest further work including the addition of a remote oil filter installation. The intake seen is just a stock part, as is the water pump/front cover assembly. Both profited for applying aluminum paint in a stipple fashion lending necessary surface texture to each. Pressing ahead then, the Dayco D7 outer mass racing fan belts of the period had a distinct checkered black and white pattern seen on the edge of the belt facing out, while here I've tried to reproduce the look if only quickly for the use of a paint brush. Underneath a cast resin copy of a more elaborate extended capacity wet sump oil pan is seen attached to the very basic ERTL rendition, while the crude stock exhaust manifolds here are retained given I very much need to see something to completion even if not every last detail has been addressed on this basic build. 1:18th Hwy. 61 1971 Challenger 426 Hemi street machine headers suitably modified and cast will form the basis of what will be employed on my Lane/ACME 'powered' flared examples by way of contrast. Perhaps not quite an Aviaid product given the racing wet sump pan was likely fabricated in-house by T/G Racing, but worked up and painted in the style of such. Thanks for your quick survey of this project update. Mike K./Swede70
-
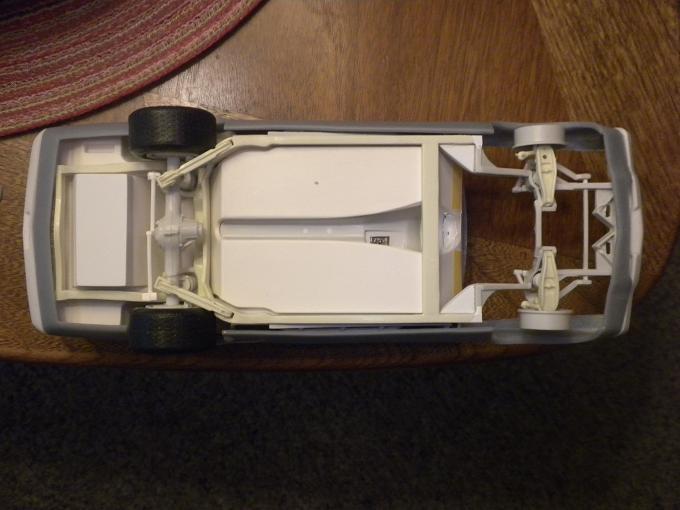
Much appreciation for the kind words... A few steps back, a few steps forward here. For opting to continue work on the model I removed the chassis and interior, but for so doing essentially wrecked the rear bumper which split in two for clumsy handling. Ugh then - although acclimating myself to the hazards of carrying something to completion and identifying what finishes will work (and importantly - those that will not) was part of the plan. That stuff disappears and/or is ruined, that spares are run through, and that expenses mount is part and parcel of any project such as this. A replacement rear bumper is in the mail... Seen forward is the first attempt at cutting the hood art (having been removed and replaced then), while I had made up a small cutting template with an outline of the shaker hood scoop opening from sheet plastic (the newer one just visible in the photo) which was overlaid onto the as-delivered artwork and cut with a #11 Xacto knife. A supply of steely nerve certainly helps here given one doesn't want to sacrifice a $17 decal sheet wily nily. The waterslide sheet was first taped to a breadboard, the cutting template subsequently aligned and held fast with additional lengths of tape, and then the cut was made. Mild revisions to the shape of the template opening resulted in less visible discrepancies around the opening, hence cutting out the hole on or inside the hood stripe art holds less horror than it previously had. Fear existed that I'd ruin many stripe images before some reasonable compromise was reached in terms of fit, although happy I am to report that the challenge can be met. Although not quite as together as previously illustrated, also noted will be the replacement and resetting of the door numerals both further back and lower, as well as greater care exercised to scrub to shape and paint the areas on the doors/door skins I'd plugged and puttied consistent with cleanly blending the effort into the as-delivered paint finish. Following these quick photographs, the hood numeral was replaced, set just a bit lower and aligned at the base to parallel the profile of the grille opening as viewed from the top. Thanks... Mike K.
-
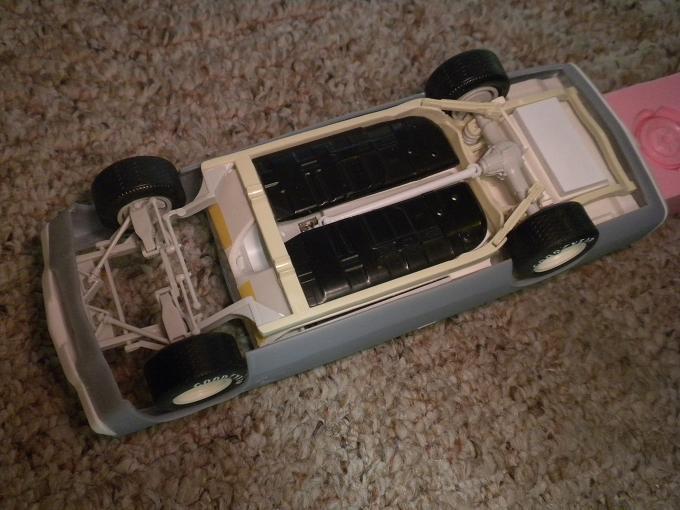
Greetings, Small scale stuff, but a few light additions to relate/report. I'd forgotten to specify that I'd like a T/G Racing emblem included on my 3 Amigos Decal decal sheet - or rather artwork commissioned for such, whereas here a 1:25th Fred Cady waterslide sheet of old was tapped to provide the same atop each front fender side indicator. It appears to me that the Cady effort may have been rendered a touch large, although here on a 1:18th rendition the images look appropriate. Another scarce set was ordered to supply myself with duplicates for the other two 'Birds (four T/G Racing emblems are provided on each sheet then), the effort setting me back about $27... Other additions would include a quartet of cast resin GMP Trans-Am Camaro hood pins, thinned as much as I dared, created in excess numbers trusting a few would be lost for painting hiccups and clumsy handling, etc. Despite worries that they'd prove useless, setting each in place and adhering each with dots of thick CA glue proved very doable and discreet for appearance. Also made out would be R/C aircraft vinyl tape employed to demarcate where pit crew ought to situate a jack prior to lifting the body, the tape proving superior to solid color waterslide material and less labor intensive versus masking and painting the same. R/C tape proved expensive at $16.95 for a roll, albeit now I have a lifetime supply. A dot of black paint inside the recess where a lock cylinder would be found on the deck lid conveys the fact that no such assembly was fit to the T/G Racing Firebird racers. Almost invisible would be some axle end detail inserted into the center of each rear wheel assembly, with dust/grease caps added to the front wheels for good measure. Extended Minilite lug nuts stand to come, albeit not quite yet! A bit tedious, but the rear bumper was removed to facilitate the careful erasure of the license plate installation with Molotow pen disguising what I hope appears untouched for the labor undertaken. Furthermore, a refueling port was added to the quarter panel top on the passenger's side reflecting the configuration of select tracks in-period (trying to mix up things then), with a Hwy. 61 '70 340 Dart affording a fuel cap here given an OEM design was called for by then-current SCCA rules. Light duty stuff in total, but generally fun... Mike K./Swede70
-
My apologies that I can't enlist a kiddo suitably attuned and equipped with better image capture technology to telegraph the finish applied to my resin wheels. Point well-made and taken though; i.e. my experience of the hobby and feedback generated would be enhanced with better gear at my side. - What I could take is seen below - although I'm not sure the very subtle metallic clear overlay would strictly be captured even with the best camera. It's almost as though nothing special is on offer; i.e. the effect more sensed then strictly noticeable for the finish being applied too heavily and risking being too obvious. I haven't yet fashioned extended lugs from hex rod stock as I have in the past, whereas depending on application, so too have I substituted in turned aluminum outer wheel rings to suggest a bare machined surface, inserted hub dust caps or axle end detail, while air valves and wheel weights are other things that can be introduced. The dust or grease cap made out here is just a repurposed cast resin oil breather which is consistent with what one often must do in 1:18th in particular; i.e. improvise, improvise and improvise again... My most current family photo then. I have a lot of models, although far from hundreds. At least with the custom work what I do have becomes personally that much more special, hence having three of what would seem to be the same car isn't really experienced as excess. Faint evidence of where the GMP metal lugs are set helps to guide where replacements can be positioned and glued, although clearly not yet. Probably discussed before (hence forgive me if I repeat), the resin wheels constitute something worked up long ago and formed the first resin casting project undertaken given I wanted many a duplicate for my 1:18th SCCA Trans-Am conversions. The 1:18th GMP 1969 Penske Trans-Am Camaro release came through with an approximation of the Minilite design painted up in yellow with metal lug inserts, although a close examination of the same reveals little in the way of a taper on the outer rim lip and poorly shaped spokes more peg-like as opposed to suggesting almost a waterfall profile to those well familiar with this design feature. Frustrated by this, I decided to hand sculpt my own spokes and substituted in or on a revised outer rim lip with an appropriate taper. The back two-thirds of the GMP wheel was retained, while the wheel spider or center pad was retained after being scrubbed of original spoke detail. Stacked plastic rectangular stock was employed to provide the bulk of each spoke, twelve were formed and the best eight of these were saved and blended into what was recycled from the GMP design. A lot of work in total! Also discernible would be two round pads or bosses that might otherwise be tapped for an air valve if these were wheels to be used on the street, although for racing applications the practice was to relocate any such valve to an area between two of the wheel spokes lest the valve be torn off in close contact with other vehicles and course obstacles. They came out pretty well even if they aren't lathe-turned or 3D-printed, hence I continue to use them. Kind thanks... Mike K./Swede70
-
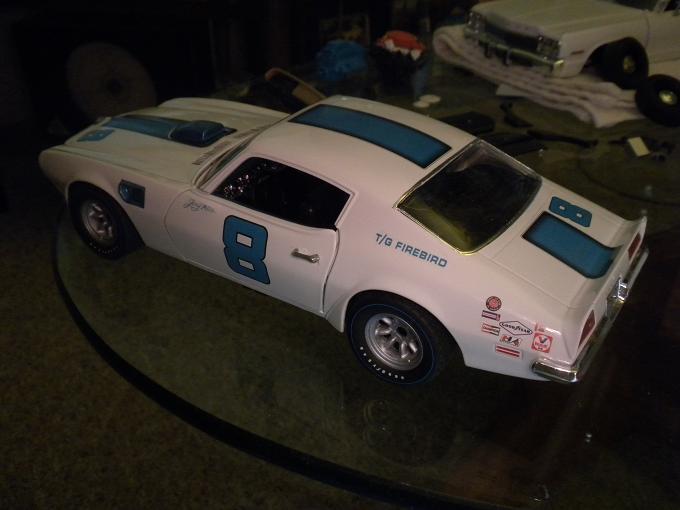
Greetings... Long stalled on this pair of 1:18th diecast-based projects, very recently I was given an example of what each of the above projects is based upon; i.e. namely a first-issue ERTL '70 1/2 Pontiac Firebird Trans Am in what is intended to be Polar White with the expected tape graphics as per stock. Some might posit that the Welly '72 Firebird constitutes a better starting point for being a more modern tool, and in truth they could build a strong case. Nevertheless, long ago I decided to start here... Worried that certain issues hadn't been addressed or strictly risked with the cumbersome and delicate flared bodies, I thought maybe I could try out certain finish choices and run through the decal application process for quickly working up a third Titus Firebird Trans-Am racer of strictly limited scope. The idea here is to build a bit of confidence for securing the visual 'pop' of applying finishes, alerting myself to certain hazards for taking some chances I'd rather not risk on the two most elaborate builds, and generally telegraph what could be done or reproduced by the reader without strictly reinventing everything. Anyhow - perhaps thin justification for a third same-year Titus Firebird project! With this you may proceed on to my rather poorly-illuminated photo uploads... Note the odd first-generation exterior door latches sometimes seen on the pre-production panel work afforded T/G Racing and employed every now and again on-track. Given the standard ERTL latches are quite terrible, the '72 Welly items both scarce and expensive, here spare GMP Penske Camaro items were substituted in. The 3 Amigos Decals didn't have much surface sheen, hence an application of Mr. Color Clear was applied to brighten things up. The graphics proved color fast, whereas setting solution didn't dissolve the artwork thank heavens. Some finer decals proved a challenge to control, hence a duplicate decal set eased felt tension for affording myself latitude to make a few mistakes. In general and to this point note that I've not removed the chassis or interior, concentrating instead on the visual elements for swapping in a set of resin Minilite wheels (finished in old Model Master Stainless Steel buffing with a light overcoat of Tamiya TS-65 Pearl Clear to suggest a light mag. alloy sparkle) mated to the usual four rear sized GMP Penske Camaro Trans-Am tires. Foil around the front windscreen as well as the rear screen was done with the model all assembled, the stock plastic 'glass' in-place. Color the practice tedious... The over-the-top standard ERTL tampo-printed 'tape' graphics were removed with about a hundred cotton swabs used in combination with a bottle of 100% acetone, with dull sections worked over with NOVUS 2 polishing compound until they looked normal. Decal work represents my first use of the 3 Amigos waterslide decal graphics commissioned long ago, while cutting material out of the hood center stripe/graphic to make room for the shaker hood scoop constituted a big 'What If', or more specifically 'How in the world will I perform THAT?'. I ended up employing a tracing of the hood hole, transferring the same to a plastic sheet template, then I scribed the shape onto the actual decal and delicately removed what needed to be removed prior to using sanding sticks and a coil of sandpaper to clean up the edge of the decal while it remained on the paper backing sheet itself. Not work for the timid! For not stripping the Zamac/white metal body certain disadvantages become apparent only for a close look. The standard ERTL finish is suitably glossy, although the white finish seems to have a touch of gray if not a faint amount of blue in it - something I tried to mix up when a limited effort was made to snap off the exterior rear view 'racing' mirrors, plug the resultant holes, contour the same and touch in what evidence remained. To strip off the paint also allows more attention to be paid to the shape and integrity of the window trim both front and back (a matter then of filing and filling with putty prior to final shaping), whereas on the other two cars I opted to file out the side window opening weather striping and ground the faint rain gutter trim flat. Seen up front are some of my usual resin additions with regards to the head lamp and front indicator fill panels, an attempt to black wash the cowl-area vents on the hood, plus in-situ fender air extractor vent paint. The '72 Welly Pontiac Firebird Trans Am tool is far superior in this regard, featuring separately rendered vents even as I'm clueless with regards to how remove such without damaging them. Yes - the Endura nosecone Firebird is part of the decal set, while the shaker scoop was cleaned up a resprayed Model Master No. 28128 Nassau Blue Metallic - obsolete and no longer available, but desired just the same! Thanks for your review of this ongoing and endless project post... Mike K./Swede70
-
Welcome... You'll be happy to discover that you have one of the better regional shows near you in the form of the Kalamazoo Toy Show. Lots of plastic promos, some pressed steel stuff, the usual diecast, etc. Also being from Michigan, besides the Detroit-area shows, hobby people here gravitate both south towards Toledo to sample the show scene there, whereas at other times area residents drive west towards Chicago to take in Chicagoland shows, a small show in Jackson, MI., as well as the Kalamazoo Toy Show hitherto identified. https://www.eventcrazy.com/Kalamazoo-MI/events/details/535379-Kalamazoo-Circus-Maximus-Toy-Show Mike K./Swede70
-
Much thanks for the kind interest displayed by many... Mostly sorting matters across the chassis with regards to ride height, wheelbase, track width, and pondering exhaust header configuration for good measure, seen is the model up on wheels with some preliminary headers in the form of AMT Pro Stock Gremlin parts employed. I think I'll find another set, section in material consistent with extending the pathway each bundle of pipes downward before turning, while hoping further to chop the fairly small header collectors part and parcel of the Jo-Han '72 NASCAR Torino exhaust headers to clean up the appearance of things down below. Easily overlooked, it seems with a touch of cleaning the Jo-Han Torino header collectors can look as nice as the larger Jo-Han Chrysler Hemi header collectors - although better for size they are relative to the comparatively tiny AMT tubes leading into such. Also noticeable would be the multi-part bumper, grille and grille surround assembly cast from before, but finally fit to the shell following some work to refine the opening and mounting surfaces on the 3D-printed shell well forward. Some stainless steel screen/mesh was purchased online, the same cut and press fit with good results suggesting this will be the way to go when matters are painted and final finished. No - I guess I didn't want to risk fouling the mesh with glue just to round out the mock up appearance of what's discerned below... ...less mesh overlay, whereas still hoping to clean and scribe the remnants of the stubborn bumper guards off from the grille elements that continue to betray the existence of such. As seen - sort of Desperation City with regards to header clearance around the frame and especially the upper control arms. Better now, still tubeless with regards to chassis and roll cage members slated to be fabricated and fit. The jacking screws were scrubbed off the top of each front spring housing for trying to reduce mass in this area, although hope exists that I can fabricate the same and flesh out what seems awfully bare at present. Kind thanks... Mike K./Swede70
-
Wanted 1/18 scale Mini Lite type wheels and tires
swede70 replied to gbtr6's topic in Diecast Corner
Greetings... If I can find reference to the same, there was a Fast and Furious Escort RS release sold at Wal-Mart that had an oddly-scaled body matched to very good Minilite wheels which in turn mate well to Hwy. 61 Goodyear Polyglas GT tires. I was going to employ such on an Under 2 Liter Alfa Romeo GTV SCCA Trans-Am racer, but short of going the Sun Star Escort route, I think you'd be satisfied and impressed by what would be on offer. Await further news then! Mike K. -
Greetings, Dispirited to notice that the front ride height was far too low with the all the late AMT NASCAR Thunderbird parts in place, this in addition to the too short wheelbase, matters needed to be addressed! Seen is a revised frame featuring an extension of the wheelbase forward of the firewall, new gussets replacing what was formerly employed, and Jo-Han '72 NASCAR Torino front spindles/uprights plus lower control arms swapped in for what previously left me uninspired. The antidive links and steering gear is necessarily separate now, although at least the major problems outlined above have been addressed. Boxing the lower control arms, splaying the front spring installation to a degree, and siting the front brake calipers while zeroing in on track and ride height comes next - or so it would seem. Thanks for your review of this project update... Mike K./Swede70
-
Greetings, This was an unexpected eBay find, while I think it was mistaken by some to be a damaged sealed iteration of the 1:18th new-tool '72 Minichamps CSL versus the older all-opening dealer promo that it is. Shredded license plate decals (almost unavoidable on this release), a missing front license plate mount and a missing wiper detract from things, although most of this I was able to address. $41 plus $9 shipping was paid, contrasting this to about $200 for the same promo or the $120-$150 sealed model. Not the best eBay auction listing write-up for this model, hence maybe less competition encountered? Also turned up in recent days would be a Kyosho BMW LMR sports prototype endurance racer also in 1:18th scale. A visit to an area BMW dealership revealed that a new Heritage Collection rerelease based on the same tool is out there to be had for $94 if one aggressively price shops, although soon after I went looking for examples on eBay and found a seriously moldy box Sebring iteration at a Buy It Now price of $18.95 - hence a deal of sorts. When new I think these retailed for $79.95 and met some customer resistance for being one of the first sealed/nonopening diecast models of note, but still a nice thing to have. Some scrubbing was needed, but obviously not horrible in sum. Thanks for your review of this post. Mike K./Swede70
-
Thanks everyone for the kind notice... Trying if you will to cram everything into place underneath, things are made a bit more difficult given the body is best described as being 1:26th scale while only so much room exists for the PPP tires, as well as the mash of Jo-Han and AMT parts being employed to come up with something reasonable. Closer now for much filing of the perimeter frame in the vicinity of each rear wheel housing, while slightly bummed to note that for poor judgment the front frame clip will have to be reset given the wheelbase is demonstrably too short. Still - pleased that the ride height is appearing as it ought, while so much of the roll cage still needs to be both fabricated and fit that the mind boggles. Thanks for the continued interest demonstrated... Seen here is as good a study as any regarding the super speedway ride height. Quite the rake in evidence... As confessed above, a bit short with regards to the wheelbase as unavoidably witnessed up front. Oh well - more plastic carnage invited given one can hardly create a scale model omelette of sorts without breaking eggs... Moving along, the Watt's linkage is just standard AMT Penske Matador issue at present and stands to mature further, while the fuel cell housing needs to 'grow' given such isn't deep enough now that the chassis has developed to the point where I can be confident the dimensions of assemblies supporting it will remain stable. Just mulling matters, the U-joints looks touch weak and will likely be supplanted with late Monogram NASCAR issue stuff, while a small divot inside the transmission tunnel begs to be filled with putty to appear somewhat tidier. The brake calipers will be reset to match period photos regarding specifically where they'll be positioned on each corner... Lastly, the Jo-Han '72 NASCAR Torino lower spring perches live in harmony with the best of the AMT late NASCAR Thunderbird 9 inch Ford rear axle assembly trimmed a bit for width with the frame rails appearing quite thin at this juncture. The shock absorber installation is still to come even as I've added the upper shock mount tubing which can't be made out here, while AMT rear springs replace the fairly tiny Jo-Han renditions I might have otherwise retained. Kind thanks for your review of this project update. Mike K./Swede70
-
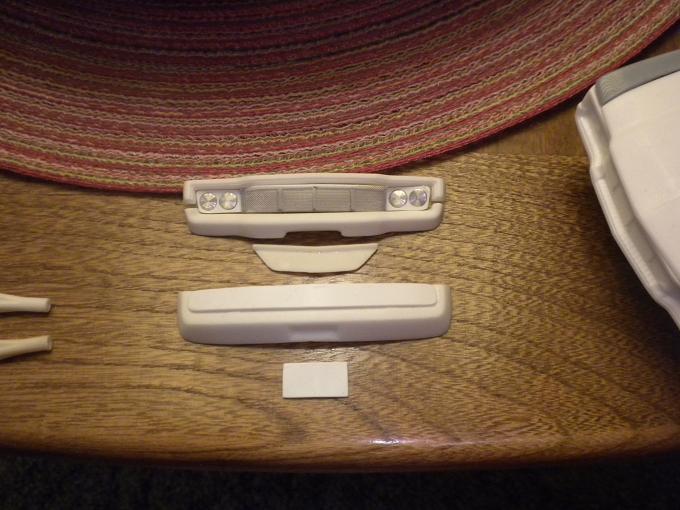
Greetings... Just quickly, noticed are better fitting resin bumpers as well as the hood and deck lid which rest flush for careful fitting. The rear spoiler was recontoured along the back to basically reflect the 'vee' profile witnessed on the front, while the awkwardness of the fit concerning the deck lid and how the rear spoiler hung out in space appears better too... Focusing mostly upon the grille, I'll have to come up with some stainless steel mesh as per the recommendation of others to overlay what's made out below. Separate headlamp mounts were cut from plastic sheet, the overlays formerly cut from aluminum rod countersunk into the same. Thanks... Mike K./Swede70
-
Admittedly a very laborious walk around, here would be the result of cutting another body apart to render parts separately consistent with cleaning them further and facilitating finish options above and beyond something done all as a piece. Not looking very good at the start, by this point the shell seems about even with the older Model Car World transkit in terms of what one might do with it. Thanks... Mike K./Swede70
-
Greetings... Here the engine assembly makes a reappearance following an effort to match the dimensions of the material added above the Jo-Han '72 Torino NASCAR floor insert. A bit raw at this point, but reasoned as-witnessed. Also made out would be a trimmed AMT late Thunderbird fuel cell insert cut to drop into the recess afforded within the space of the same Torino floor insert when viewed from above. The battery is a standard Jo-Han issue. Mike K./Swede70
-
Greetings, A friend afforded me a spare Jo-Han '72 Torino NASCAR floor insert, hence an opportunity to redo work previously undertaken consistent with working towards tighter fit of everything was had. Notice that the floor extends out just back of the AMT late Thunderbird NASCAR roll cage side bulges to better support the paneling situated below each rear three-quarter window, while effort was also made to remove the standard Jo-Han transmission/driveline tunnel and replace such with a slightly extended AMT late Thunderbird NASCAR item. Thanks... Tighter fit around the rear wheel housings as well as the trunk sides was achieved. Here the trans/driveline tunnel hasn't yet been cut out even as a new partial firewall has been added consistent with pushing up the frame rails to where they'll need to sit. A lot of work briefly touched upon, the trans/driveline tunnel vanishes from the Jo-Han floor insert... ...and just the revised AMT late Thunderbird NASCAR trans/driveline tunnel stretched forward and resting in place, while the faint seat location rails afforded by Jo-Han have here been quickly scrubbed out. Thanks for your review of this project update. Mike K./Swede70
-
Greetings... Tedious and fated to vanish under a coat of semi-gloss black paint, here I've revised the roll cage protective side bulges to feature three vertical rows versus the late AMT late Thunderbird NASCAR issue two rows. All were trimmed off, the remaining horizontal tubes cleaned to disguise the work performed, then twenty-four elements were individually fitted to round things out. Not a lot of fun in total for certain. In addition, the panel work forward of the bulges was shortened on the spare assemblies, the dash mounts revised for shape, while a good pattern for the firewall was worked up consistent with mating such to a revised transmission tunnel to include the better part of the AMT late Thunderbird NASCAR driveline tunnel that's simply overlaid here after being cut out and isolated from a parts kit. Some movement then... The small half-oval shapes help stabilize the front of the roll cage to the inside of the body, whereas it seemed best to retain the slivers of material to site the new firewall barely taking shape just forward of the dash. The bottom third of the firewall where matters would be set on an angle and blended with the transmission/driveline tunnel hasn't yet been worked up. Fairly plain at this juncture, but clean. For clearing the profile of Jo-Han '72 Torino driveline tunnel below, the AMT Thunderbird implant will come down and blend properly. In particular, I didn't want to lose the finely-rendered shifter platform. Thanks... Mike K./Swede70
-
Kind thanks for the considerate notice, hoping to maintain pace then... Wholly unnerved that I'd wreck my best 3D-printed shell (not 'mine', but rather what I'd purchased and worked over) for attempting the removal of the hood, deck lid, plus bumpers and grille, I'd avoided undertaking the effort until now. Happily after seven hours of medium drama, things are generally on the up with all the aforementioned bits hacked away. Fine fit work consistent with ensuring the same parts sourced from another shell will live in harmony with/upon what's seen is still to come, but in the main looking good. Another builder/friend has come through with a replacement Jo-Han '72 Torino NASCAR floor insert consistent with allowing me to try again, hence better on that front too. Kind thanks again... Mike K./Swede70
-
Just hacking away what threw me a day or so ago. It was a PM message post, hardly salacious, but somehow not robot-friendly. Thanks for the guidance concerning what to properly make of such. Mike K./Swede70
-
Thanks for the kind notice... Seen is the Jo-Han '72 Torino NASCAR floor insert trimmed on the sides to allow for the reuse of the AMT late Thunderbird NASCAR roll cage protective side bulges and narrowed AMT '74 Penske Matador dashboard from before. I'm hoping to source another floor insert given the trunk area was too aggressively trimmed and hence could fit tighter, although the rear wheel housing shapes arrived at seem serviceable enough. Hoping to mark the best body shell with ink spots to delineate where I'll have to drilled a tight succession of holes to remove the hood, bumpers and grille assembly. Cutting an unseen third shell to isolate the same parts proved dicey given the material frequently shattered, although modest block sanding and drilling didn't provoke any untoward behavior in full truth. If I can achieve reasoned results, then the effort should be that much more comparable to the old Model Car World transkit that pops up for sale every now and again. Thanks... Mike K./Swede70
-
Greetings... Not much to see in total, but for picking up another Starsky & Hutch chassis I was able to fashion a pair of floor pan overlays to lend greater definition to things underneath. In essence, the floors have been doubled up, with the integrity of the Jo-Han part topside maintained as I ponder how to alter it to accommodate the roll cage, firewall and rear bulkhead structure. Noticeable will be the removal of the forward third of the Jo-Han frame, with the substitution of what had simply been overlaid before. Nothing is glued on presently, while some small additions will be made to basically clean up things before I bond things securely. More work to come then... Some further floor material stands to be added forward of the transmission cross member, whereas another late AMT Thunderbird NASCAR kit will likely be sourced to afford a better firewall assembly modified to mesh well with what's made out here. Just preliminary stuff, but the header collectors are Jo-Han AMC items, while unseen is the upper rear shock mount tube structure stolen from the AMT late NASCAR Thunderbird kit tack glued in-place and happily not hitting anything on the Jo-Han '72 Torino NASCAR chassis above the rear axle. Thanks... Mike K./Swede70
-
Greetings... Having to take a step back for what now seems a bit of misdirection, seen will be the beginnings of a new chassis configuration that I hope I can carry to completion. An AMT-boxed early iteration of the Jo-Han '72 NASCAR Torino release was purchased with the aim/idea of blending the late AMT NASCAR Thunderbird half-chassis/front clip to it, whereas out back the short trailing arm design and full frame would be retained even as the best late AMT NASCAR Thunderbird parts including the 9 inch Ford rear end might be quietly substituted in. After awhile I couldn't ignore what I was seeing in the period research materials I was gathering, and at least for this topic, I believe this to be the best way forward. At some point an AMT '65 Ford Galaxie 500 XL 'Jolly Green Gasser' chassis was purchased for parts to see if that would work (not a ghastly option if one starts with a Jo-Han '70 Rebel Machine or MCW resin Penske Matador shell), whereas so too was a Revell '76 Starsky and Hutch Torino considered. I hoping that for another attempt with yet another Starsky and Hutch chassis I might attempt a floor implant of a sorts (suggested by the photo attached), although I'll have to wait on that right in the moment. Oh well; i.e. what seemed robust progress slows for what I overlooked before. Thanks... Yet another shell appears above - but welcome if only to reduce wear and tear on the first I purchased. Just overlaid onto the Jo-Han frame, this is pretty much how the later AMT NASCAR Thunderbird half-chassis/front frame clip will be grafted on and in... It was strange to find a Jo-Han Dana 60 rear end included in their NASCAR Torino tool, hence no choice afforded to retain all Jo-Han materials out back. Very preliminary here at present... ...and just a sense of what extent of material might be used for the floor pans versus retaining something undetailed and too slick for my purposes. Thanks for your review of this post. Mike K./Swede70
-
Greetings... Having taken delivery of a second 3D-printed shell, I did my best to slice the bumpers, grille, hood and trunk off of the same consistent with opening up finishing options otherwise not strictly possible. The material used to create the rendering is alternately strong but brittle; i.e. for fine shaping after cutting away bits that snap off with a certain suddenness, things become more predictable. Block sanding is required to come up with a smooth surface across the rendering, although once the major surface irregularities and almost topographic build up of material has been evened out, one can slowly forget how rough and hopeless things first appeared when a certain box arrived in the mail. Slowly taking shape would be the vertical rows of tubes within the roll cage side protective bulges, with three rows intended to supplant the two rows as-delivered. A coat of TS-80 Tamiya Flat Clear effectively saves my too glossy PPP tires w/markings in the wake of a misjudged selection of clear applied earlier. Still requiring further bumper guard reduction into the grille area in particular, but generally clean. Soon after I cut small channels between the grille surround and bumper on each end to achieve somewhat better definition here. The hood was block sanded, while I'll likely try to remove or at least reduce the texture of the 3D-print remaining on the underside of the same panel for more aggressive sanding. While seen quickly would be the rear bumper with tail light surround/cove trim. Also needing work, while the trunk lid needs some application consistent with rebuilding the bottom lip given I made something of a mess of it. Even if I don't open the trunk, nevertheless it would be nice to have panel line definition otherwise scant. Thanks for your review of this project update. Mike K./Swede70
-
Greetings... Me - contradict myself? Oh well - for further research and the help of others like-attuned on a topic level it seems that at least on the first Holman-Moody built car which was debuted to the press, contested Riverside, Daytona and Ontario, the short arm rear suspension (bottom links then) with two links atop matters equates to the appropriate setup. Following this, Penske Racing apparently separated ways from Hutcherson & Pagan in terms of sorting/maintaining the package, proceeding ahead to build another chassis with things configured more to the teams particular liking. The Michael Argetsinger book Mark Donohue: Technical Excellence at Speed has been helpful to discern how long the first chassis lasted (apparently it was first scheduled to be set aside prior to Ontario, but wasn't - probably for the best given the collision with Bobby Issac), hence some research elements are coming into view. Reference afforded within the Paul Van Valkenburgh/Mark Donohue penned racing autobiography The Unfair Advantage from 1975 suggests that for registering awe and respect towards Junior Johnson and his efforts with the Monte Carlo, apparently the Penske team wanted to fit the long Chevrolet truck trailing arms on whatever chassis they'd campaign as the partial '72 schedule they ran wore down. Poor aerodynamics and likely less than best power output was more to blame in retrospect, hence I'm not really sure how the second car or what was run in '73 was actually configured, although this much related, I suspect the long trailing arms made it into the package. Later 'frogeye' Penske Matadors fielded are said to have been outfitted with the short bottom trailing arms which muddies things, although I haven't found material (yet) to confirm. - Trying then to clean up the frame and floorboard area for filing out the residual triangular structure otherwise lingering further back along the rails as well as patching things forward to even out the profile of the oversized gussets if I have that right. Generally looking good - if I go with this particular chassis configuration! Just the other side on view then. I want the work to be clean most certainly... Basic beginnings on a spare cut apart chassis to the extent of plotting out a short four-bar late Holman-Moody rear suspension. Here the springs aren't sited below the trailing arms but situated inboard, while notice too that material has been removed from the axle hump area to afford space for spring buckets, related bracework, and upper shock mounts. Mounts for the bottom trailing arms stand to come, while the attachment points/pivots on the rear axle will likely be redone too. Thanks for your review of this project update. Mike K./Swede70