swede70
-
Posts
727 -
Joined
-
Last visited
Content Type
Profiles
Forums
Events
Gallery
Everything posted by swede70
-
Thanks for the kind continuing interest displayed... Not (yet) finding evidence that a short Holman-Moody four bar rear suspension was fitted to a comparatively early '72 to '73-season Penske Matador, thus far I'll be doing a long Chevrolet pickup truck lower arms with the top links (still a four bar setup then) with a Watt's linkage combined with single Penske shocks out back. Here I've added some kit parts, but also have added some stiffening structure as per information gleaned from a period Steve Smith Stock Car Chassis engineering title. Also spied here will be a rough test fit of the cage sides as they bulge into the door skins, as well as a quick impression of how and where the dashboard hangs. Sort of hanging in space, but I rather like the Revell '69 Camaro driveshaft for the nicely rendered U-joint detail. I might redo the shaft itself - but the joints will likely stay! Discreet, but the perforations for the fire bottle installation cutting right through to the top of the driveshaft/driveline tunnel were plugged. Still cleaning up around the chassis stretch area, with further trimming and refinements to come here. The roll cage will be complex in more ways than one; i.e. it'll likely install in two parts and not be strictly glued in-place entire when final assembled. It's just too tight a fit, while the body isn't pliable to the extent that I feel I can get away with any other approach. The dash is just narrowed recycled AMT Penske Matador issue again. And although just a blur of resin here, the flush exterior door latches were removed, set flat on a bed of clay, filled with a small amount of resin, sanded flat, and reset in a slightly countersunk orientation to suggest an unpunched door skin that might otherwise accommodate the installation of a stock latch. While here the yellow seen along the base of the front 'glass' is just Tamiya tape temporarily holding narrowed AMT Penske Matador front screen in. I had sufficient material to fill out things right across and between the A-pillars top and bottom, but was overzealous and trimmed the lower section narrower than I ought. Yes - multiple kits perished as I've gone about working through problems one-by-one here. Thanks for your review of this project update. Mike K./Swede70

-
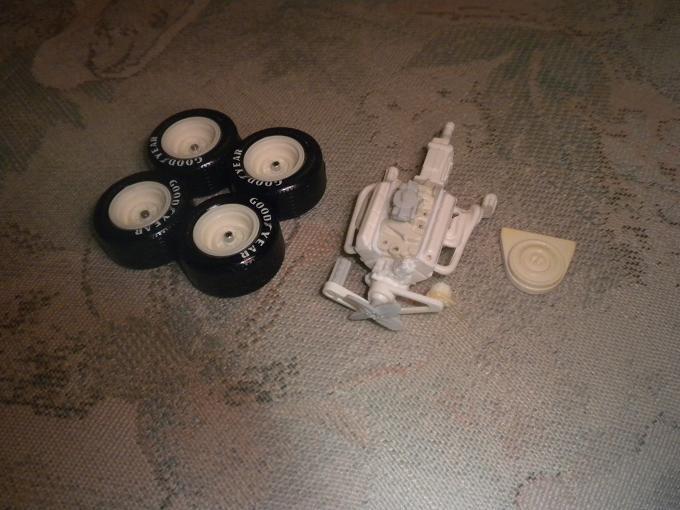
Thanks for the kind interest... Seen is the second chassis suitably stretched evidencing more careful shaping of the wheel housing 'metal' to achieve a tighter fit relative to the body. Only just learning about matters such as a late Holman-Moody short four-bar rear suspension and how it would be configured, hopefully for application things will come into view. Also witnessed would be a slightly revised engine now featuring select Jo-Han implants in the form of a timing cover/housing, a water pump, a modified intake (given the Edelbrock Torquer open plenum 'X' design came into use only later), a starter motor also Jo-Han derived with other small alterations planned. The PPP tires made out were ruined for my injudicious choice of a clear coat that proved too glossy, whereas the Holman-Moody NASCAR pressed steel rims done in resin were drilled out to afford hub detail up front, and axle retention mods out back - the latter appearing a bit tiny and thus slated to be redone. Kind thanks for your review of this project update. Mike K./Swede70
-
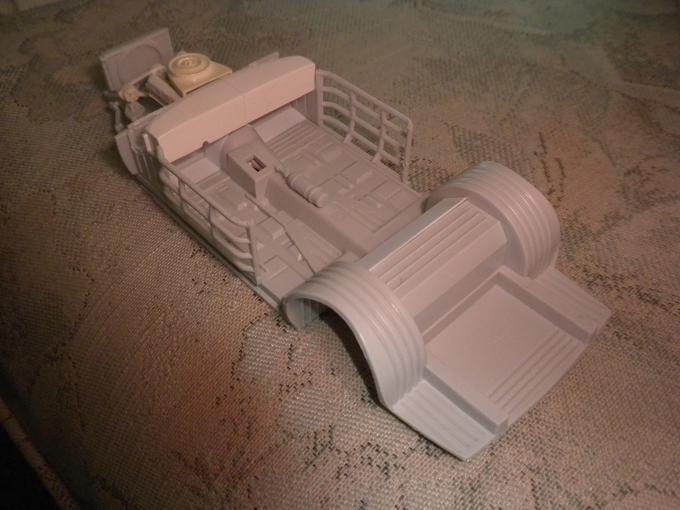
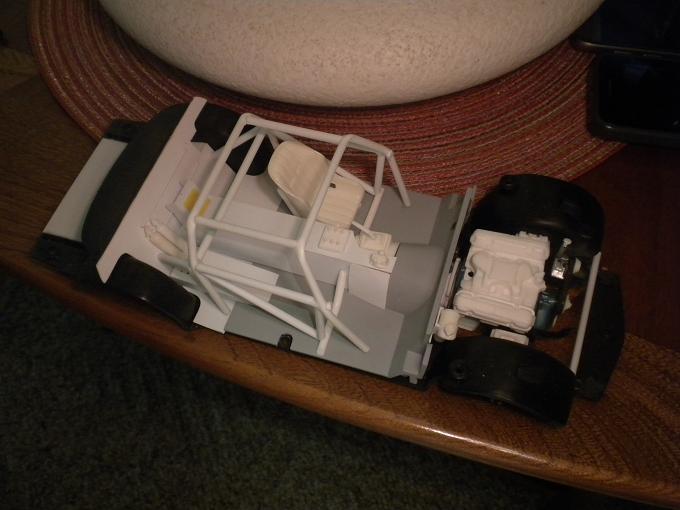
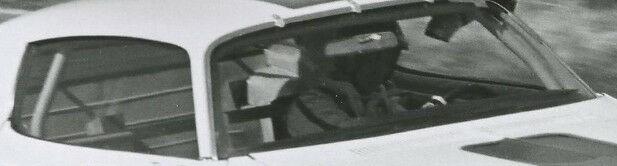
Thanks for the kind notice... Having taken delivery of another AMT NASCAR Thunderbird kit, I was able to lengthen the chassis with instructions provided by Hks Charger via Tim Stevens. A mock up AMT Matador engine was worked up to afford some understanding concerning how things might align (or not), whereas the Thunderbird Banjo Matthews roll cage was cut apart to leave only the protective side bulges. These last elements may be discarded and replaced based upon the quality of what I might work up solo off the project. Hardly an out of the box resource ready to integrate with the 3D-printed shell, here I've slid the AMT NASCAR Thunderbird roll cage structure further forward on the chassis 'rails' provided. I like doing roll cages from scratch, although I'm a novice concerning all that a period NASCAR racer will require. Some quiet research is being done consistent with filling my knowledge gap concerning such matters. Moving along, the firewall was plugged and puttied consistent with ridding the engine bay side of strengthening ribs and essentially starting anew, while soon the fresh air duct work will be cut into the cowl area to expand and improve upon things. The last image affords an oblique view of the floor pan patches/extensions blended in, while after performing such work the tape employed to tie it to the roll cage bulges was no longer necessary. Very slow work at this point, although I've never been all that quick or necessarily that focused. Thanks... Although not photographed, the side bulges fit neatly into the door recesses without much work but for grinding off the door jamb detail. Still pondering if I should assemble the cage as one piece given installing such glued to the chassis in combination with the stiff body shell likely won't be easy let alone possible; i.e. I'm thinking of developing something that would drop into place for falling into the side rail/slots. A Jo-Han water pump and distributor is coming for the engine, while the accessory drive will be revised somewhat. Hardly visible here is a stacked dry sump pump/scavenge pump setup (hardly great in terms of how it was tooled), and the fast add of a Jo-Han AMC alternator. Seen forward is an AMT Penske Matador dash narrowed and installed so that it'll align with everything above and to each side. The four bar rear suspension needs top links, while the AMT Thunderbird chassis really isn't configured to afford space for the same setup. Anticipating further surgery, notice the white sheet plastic patch just resting in place here. While tucked below the dash, here the floor and transmission tunnel patches largely blend in. So far, so sane. Thanks for your review of this project update. It might be said that I post too much, but then know that I very much appreciate the enthusiasm and interest radiated back, viewing light participation as a resource in turn. Mike K./Swede70
-
Greetings and doing my ambassadorial bit as such things go... 1. I suspect that the instructions and paint recommendations researched and recommended across plastic kit manufacturers is some of the less prestigious work within the company and oftentimes reflects a largely lame effort to promote sales of common hobby items situated next to the plastic kit section of a department/hobby/hardware store versus reflecting much in the way of accuracy. Before long a new builder will refer to the instructions regarding paint choices scarcely at all, relying instead on textual and photographic resources to inform the way. 2. Although perhaps making too much of things for a novice, usually I'll collect a great many images online and across digital image archives - to speak little of gathering period magazines and related items such as programs to best establish how a topic was configured and at what venue. Think like a restoration and fabrication facility with deep resources to establish the best informed estimate regarding how things should be - then act. A well-researched succession of choices regarding how something should be configured and finished basically defends itself from critics, whereas some better informed 'heads' won't strictly respond with important information or insight unless they feel their input will be appreciated; i.e. telegraph respect for the topic and due seriousness and those lurking in the shadows will notice and will contribute if they believe what they might afford in terms of insight won't go to waste. 3. Careful review of period reference would best relate how things are handled and done, whereas I'd guess the seams were largely correct. With a head in a book or for analysis of images one can in time come to 'own' a topic, becoming something of a lay authority given few might strictly pose a question plus pursue the matter to a logical end. 4. Indeed - if a scale topic doesn't look good on wheels; i.e. if the ride height is off, if a wheel is hanging in space, if the track is incorrect or if wheel and tire dimensions call attention to clumsy scaling or telegraph the impression that one is looking more at a toy rather than something to be taken seriously - then yes, best to alter or correct things should this be within the realm of the possible for you. Appreciate too that most builders/modifiers of plastic kits purchase more than one example, and silently if not off screen test this spare kit or kits to destruction as they learn to alter the ride height, expand or narrow the track, steal items from one kit and adapt the use of such to another, etc. Yes - multiple kits were hurt or rendered so much trash for my experimentation consistent with learning what I felt I needed to, whereas basically wrecking things for harboring ambitions too great or unestimating the difficulties to be encountered is pretty standard experiential stuff. 5. (Here I fluffed my answer for not really reading your question, although still some insights to share. M.K.) Yes - some manufacturers will develop a reputation in relation to work done on a particular tool consistent with having on offer the best rendition of whatever one strictly desires, although this is not to say that a box stock build (all parts afforded from the same tool or kit) strictly leaves one debilitated. Proceed in stages and expense looking forward. You may be in the market for a pre-wired distributor to keep matters simple at this stage. 6. Sources online vary greatly - to say the very least. Expect to take some lumps for climbing a learning curve consistent with developing an understanding of how the actual racing cars are configured, how they developed, and how the rule book evolved consistent with affording what you'll see or discover. I would suggest developing a period magazine and book collection, while I highly recommend developing familiarity with the new online digital image archives in the form of Petersen Publishing/SAE, Revs Stanford, Getty Images, etc. as soon you'll come to rely upon such heavily. Even something like a Google image search pounding away with a succession of search terms altered just a bit to conceivably capture everything (example: 'NASCAR AMC', 'NASCAR Matador', 'Donohue Matador', 'Penske NASCAR', 'Traco NASCAR', 'Marcis NASCAR', etc.) basically taps out all the possibilities and fills up a stick drive with most everything that would be free. Deeper resources typically demand deeper pockets, while actual vehicle and race series message boards can and should be identified and tapped. Good luck then... Mike K./Swede70
-
Greetings... Just quickly this, here I've altered the rear spoiler to better reflect the ducktail profile seen in period photos. I had a pair of AMT Penske Matador rear bulkheads that evidenced a curved lower profile that I thought might be isolated and blended to the front side of the AMT Thunderbird NASCAR rear spoiler, and for plugging one area and extending out the sides I was basically able to capture the shape. Some putty and subtle shape refinement is still required, but in the main a nice upgrade. Thanks... Mike K./Swede70
-
Thanks for the interest demonstrated and the advice proffered... Earlier today I ordered a second shell, thinking that if the chassis builds up in a fashion consistent with my wishing to display things underhood, then I'd cut up another consistent with having an opening hood, and freeing the bumpers and grille assembly to manipulate and finish and/or apply finishes with less risk. Worried then that I'll overstress the shell for working towards a tight fit of the rollcage, bulkheads and rear wheelhousings in particular, but if a sound mockup of the chassis can be developed that also slides reliably into the shell, then what results will alter the equation concerning what I'll deem possible for this project. - Seen briefly would be the fuel cell housing built up in recent days. Hardly visible in most period shots, but discernible to the extent of informing a guess as to the dimensions of such. Mostly an organic addition to the AMT Thunderbird Banjo Matthews chassis, and no deeper than the frame rails lest it be scrubbed and punctured. Thanks... Mike K./Swede70
-
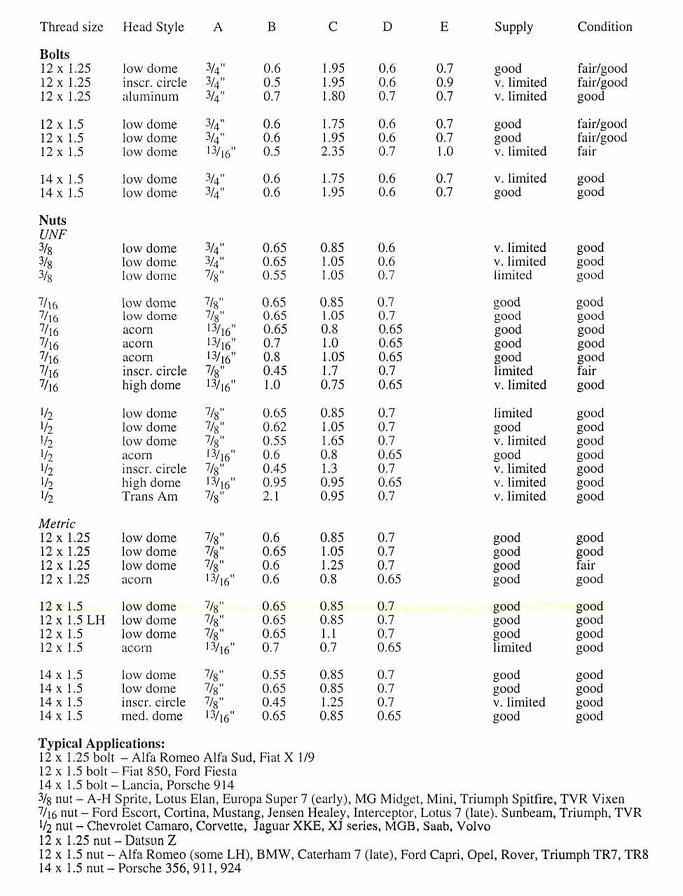
Greetings... Hoping to work up some extended Minilite wheel lug nuts from plastic hex-shaped stock (very tedious when twenty or forty are needed at a time), provided below is some reference material dating back to communication had with an Indianapolis, IN based firm that had acquired a substantial stock of spares in the wake of the Minilite bankruptcy proceedings years ago - a company and name since revived. What's nice is that illustrations as well as the actual dimensions of lugs sold and employed across series is on offer, hence save these images should they be relevant to your projects in turn. The photocopies date back to the late 1990's at least when I had a 1974 BMW 2002 which then wore period Minilite magnesium alloy wheels. Usually I calculate a loss rate when starting out with hand fabricated lugs, presuming some will fly into space, others won't be drilled accurately, still more won't be properly rounded along one end, etc. Length may be inconsistent, whereas painting each can prove tedious and affords further opportunity for fumbling matters. One can add air valve detail to the rims (situated between the spokes for an SCCA Trans-Am racer lest a valve be torn from a wheel in close contact with another competitor, this leaving the pair of dimples or bosses intended to be drilled on the rim taper uncut), while taped wheel weights secured with duct tape (silver then) is another thing to consider adding. Thanks... Mike K./Swede70
-
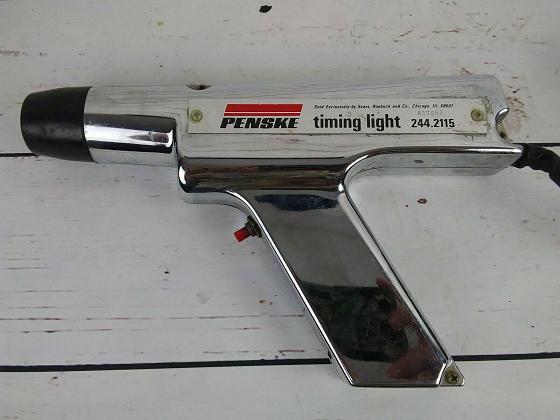
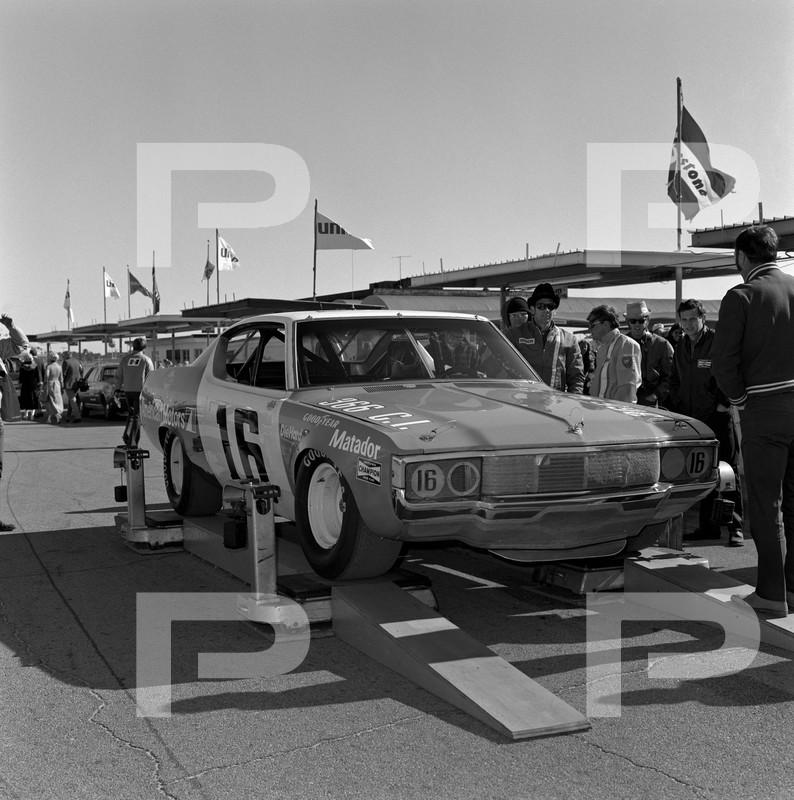
Greetings... One from the Department of Obscure Research in terms of insights gleaned, for application I finally found a means to trace the Penske logo that shows up across the air and oil filters as well as the shock absorbers employed on the early Penske NASCAR Matadors. In their racing endeavors Penske Racing had started to build their own shocks, valving each to suit, and entertained thoughts of producing other specialized wares in-house. Likely in late '70 or early '71, Penske struck up a deal with Sears & Roebuck Co. to market a limited line of tools and service items through the department store chain which was expanding to include service areas selling Die Hard batteries, Sears tires, etc. Most of the range was doubtlessly badge engineered, although there was money to be made. A search of eBay employing the words 'Sears' and 'Penske' generates a mountain of results made up mostly of grubby timing lights doubtlessly unearthed from within equally grubby garages, but careful skimming of the results also reveals the logo desired by this scale enthusiast. One small leap for man, a giant leap for early Penske NASCAR enthusiasts... Mike K./Swede70
-
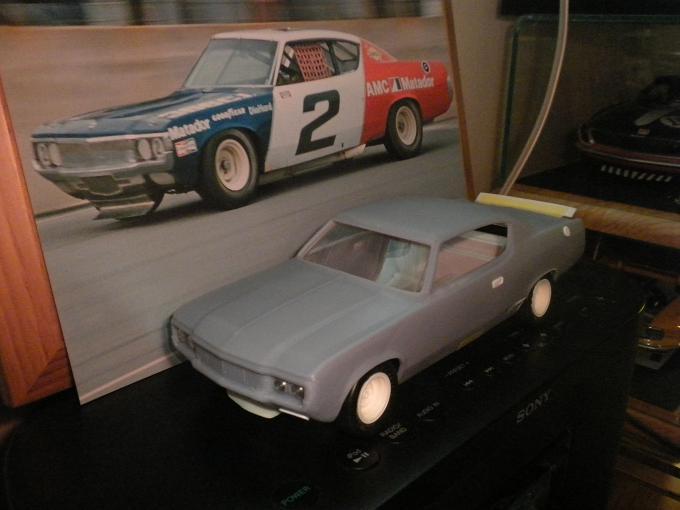
Greetings... Small stuff, but noticed would be the replacement of the headlamp fill panels with carefully trimmed aluminum rod 'wafers' with the ends spun in some sandpaper to afford a swirled finish to each, the substitution of an AMT Thunderbird rear spoiler onto the back, new cast resin Holman & Moody stamped steel NASCAR wheels (a blur of white these), and unseen for being situated below - a fuel cell housing scratchbuilt from five sheet plastic panels guided by period research materials. The $2.99 eBay-sourced David Marcis 8x10 color print really impresses and certainly inspires! Thanks... Mike K./Swede70
-
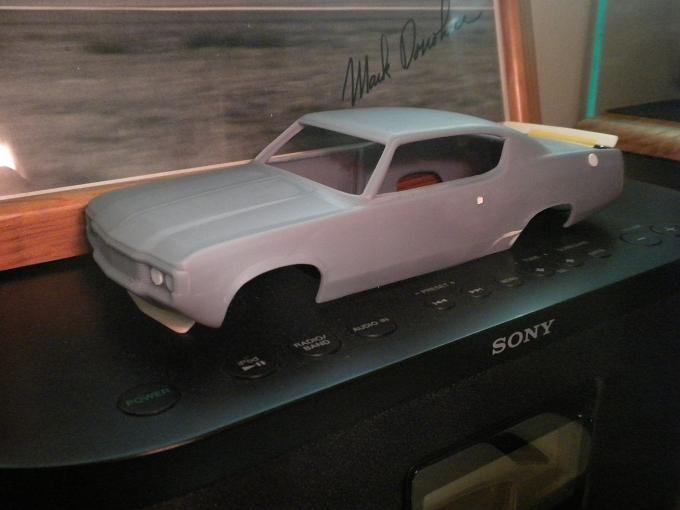
Thanks for the kind notice... Here I've ground out the fainted rendered flush AMC exterior door handles and replaced the same with cast resin Jo-Han Javelin versions that will be filled and ground flat before being sunk into the surface of each door panel/skin. I never liked building up layers of primer and paint upon otherwise nicely done Jo-Han AMC flush handles and eventually cut up a wrecked body to cast them solo, whereas here at least I have a well-shaped template to fill and countersink as required. Continuing refinement of the shape of the front valance panel opening is witnessed, while the contour of the bumper around the license plate opening too has been adjusted. Hopefully a debris screen can be fashioned and added without too much trouble. Further, first view of the project on wheels even if I'm just establishing track and ride height sans chassis. Just Jo-Han Superbird NASCAR wheels at this point, while Holman & Moody stamped steel issue have been ordered and are in the mail. Thanks... Mike K./Swede70
-
Greetings... Opting if you will to carve out the front of the shell to open up the valance area as per period photos. I inadvertently snapped the valance panel at the bottom center of the 'vee', although happily the 3D-printed material isn't hugely brittle and my error shouldn't strictly dissuade others from trying to file things to shape as I have. Also made out are some front turn signal/indicator overlays consistent with suggesting fill panels, although these might be replaced with vent detail leading to the brakes. Thanks... '72 Ontario and on the scales being weighed. Here things are fit flush consistent with one might expect at a superspeedway... ...eBay reference with regards to the shape of the turn indicator. Solo parts listings can provide reference otherwise tedious to collect at car shows, etc. The opening worked up for slow application as viewed from beneath. Pondering the purchase of a second shell to cut to shreds consistent with having an opening hood, greater flexibility with regards to finishing the bumpers and grille, etc. Viewed nose-on then and generally looking tidy. The top leftmost corner of the licence plate recess needs a touch of work to look right, but in the main it's good. Kind thanks for your review of this project update. Mike K./Swede70
-
Just in short... A trimmed rear spoiler so as not to overlap from the deck lid, and further fine adjustment performed on the rear cove insert. It would be nice if I could have done this correctly first time out, but alas - I didn't! On the other side of the shell I cut through the quarter panel and inserted a recycled AMT Allison Matador fuel inlet/cap which looks well at home. Thanks... Mike K./Swede70
-
Excellent Dave - I'll check your photo file account consistent with reviewing things... Attached would be a preliminary attempt to fit a 1:25th scale AMT Alan Kulwicki Thunderbird-sourced chassis to the shell even as I'll have to lengthen the wheelbase a bit. Not knowing specifically how these chassis were adjusted for wheelbase during initial fabrication, here I've wasted an example and subsequently was forced to order a replacement off stage. Obviously still learning, although the next try should be better! Kind thanks for the notice... Mike K./Swede70
-
Just some quick panel fabrication consistent with filling in the rear bumper/cove area as per period photos. Not much to contemplate, but clean and a small step forward. Whoops - its seems what I worked up will have to be shorter across the top. Thanks... Well - it still needs to be squarer across the top, while the spoiler element apparently shouldn't be wider than the deck lid as per the period photo. More work then... Mike K./Swede70
-
Thanks for the kind interest... Fearing that the rendered-in door jamb detail would prevent a roll cage plus interior from being fitted, I made an effort to grind out all I could intent on securing clearance for the protective roll cage bulges in particular. In practice, not that difficult to achieve much to my relief, while also seen would be resized AMT Allison frogeye Matador plastic 'glass' which works well enough. I decided to leave some material near the cowl area to help stabilize things when panel work is added, while things here are generally on the up. Thanks for your review of this project update. Mike K./Swede70
-
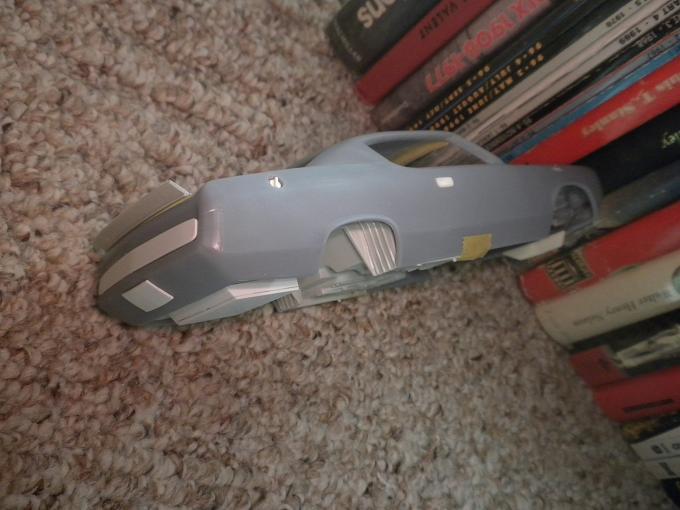
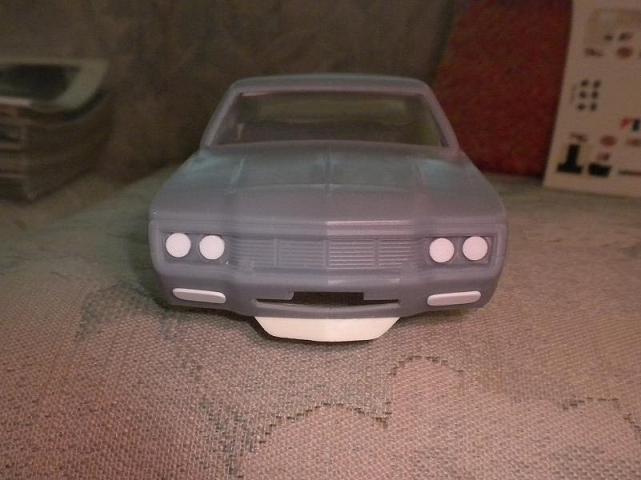
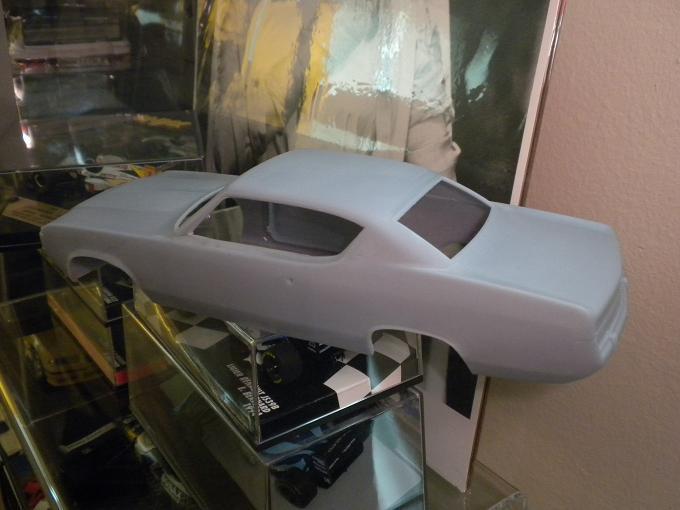
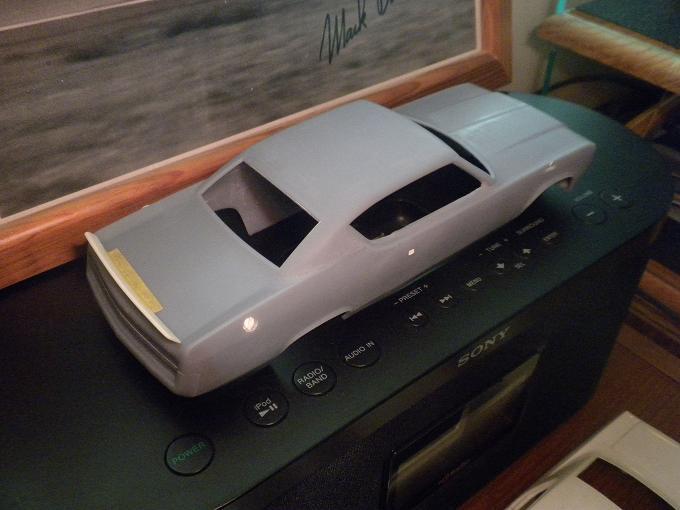
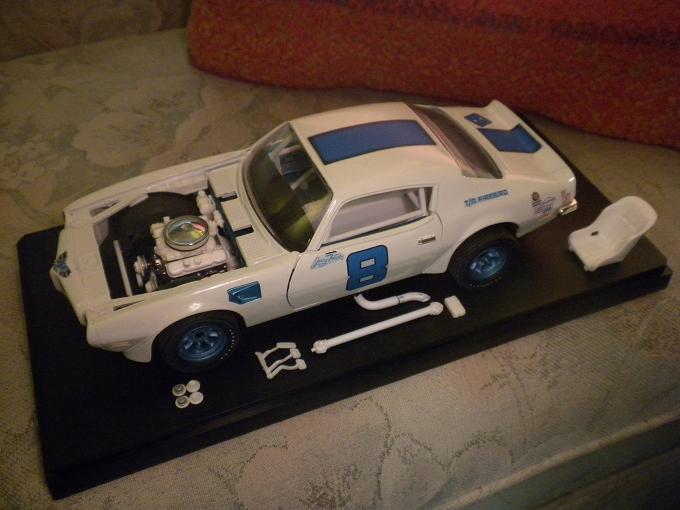
Greetings... Although there are better approaches to take in relation to the scarce/obsolete Model Car World transkit as well as the Robert Burns/Too Many Projects angle, here would be a fitful attempt at doing a '73 Penske Donohue Matador (What's a Matador?) in 1:25th employing a fairly inexpensive 3D-printed shell I took a chance on. Part of me had given up on finding the MCW modified Jo-Han '70 Rebel Machine tool shell, whereas the $125 option just doesn't seem personally practical in the near term. Concerning what this will be about, at worst, I should be able to toss off a few impressions consistent with helping others pursue the same path plus avail trace insights consistent with helping anyone who attempts the topic in-scale. Seen below are a succession of images relating how the shell can be cleaned up for removing the rendered in-place exterior rear view mirrors, all the weather stripping, the vent window frames, the side indicators, and all I could take off concerning the bumper guards extending into the grille area besides. The rear valance area was very rough indeed, although photos telegraph that with application things aren't strictly hopeless here. The wheel arch openings were filed out, the raise perimeter trim removed, while the trace vinyl top detail plus trim was likewise scrubbed off. The panel lines across the surface either don't exist or hardly exist, while the stock flush exterior door handles just didn't come through the rendering process intact. My initial impression of the body wasn't super favorable, but as can be discerned the as-delivered state isn't cursed to remain unsatisfying - especially in period Winston Cup/NASCAR form. Just made out here, notice the substantial door jam detail or thickness designed into the rendering. A lot of work will be necessary to grind the bulk of this out to work on a period stock car. Rated DNF then; i.e. Decidedly Not Fun to perform... Further work undertaken includes some fill panels for the headlamps, lightly modified AMT Penske Matador (frognose vs. bullfighter if you will) front and rear spoilers, some putty/fill effort to clean up matters here and there, and fuel inlet detail added to one side with a plug on the other specific to the Riverside configuration. Not terrible at this point. Thanks for your review of this meandering sort-of project... Mike K./Swede70
-
Greetings, Modest stuff in the main, but some reference materials have been isolated consistent with fabricating all that might be required to replicate the Watt's linkage setup, the sway bar installation and shocks/pickup points for the same across the rear suspension on my T/G Firebird projects. Provided below is a current (well - as 'current' as this post!) sale listing of the B.F. Goodrich 'Tirebird' which affords most that a few chassis photos even as it's running a Ford 9 inch rear end not featured in 1970, or rather the season that was. Even as the 1:1 vehicle is currently Chevrolet-powered, no one could doubt that the work performed upon this racer, the photographs and presentation of the topic for sale aren't done to a high standard. Something to bookmark then... https://www.americanmusclecarz.com/vehicles/458/1970-pontiac-firebird-trans-am Dumpster diving into my store of ERTL Firebird spares afforded me enough to find half of a scrap body shell as well as half of a scrap chassis so that I might have a scale engineering hack to work up the aforementioned rear suspension. A plug was fabricated to replace the cast-in pressed steel standard fuel tank detail as before, whereas the fuel cell housing just needed to be accurate enough to capture the dimensions of what I'd worked up before where material would face the rear axle looking forward and to be accurate enough for depth. At this point, I just don't want handle my work up on wheels more than I must if some other means to sort things safely can be found. I do have a 1:18th Hwy. '61 1969 Camaro chassis which reveals beautifully rendered rear shock mounts I hope to integrate here, whereas a 1:18th Yat Ming/Road Legends 1969 Firebird Trans Am was pilfered consistent with isolating it's very nicely captured air cleaner lid profile which can be used on my '70 Laguna Seca effort. Lastly and hardly of huge interest, some further application yields a hitherto missing panel for the driveline tunnel overlay structure as seen below. Thanks for your review of this project update... Mike K./Swede70
-
Greetings from Fraser, MI.
-
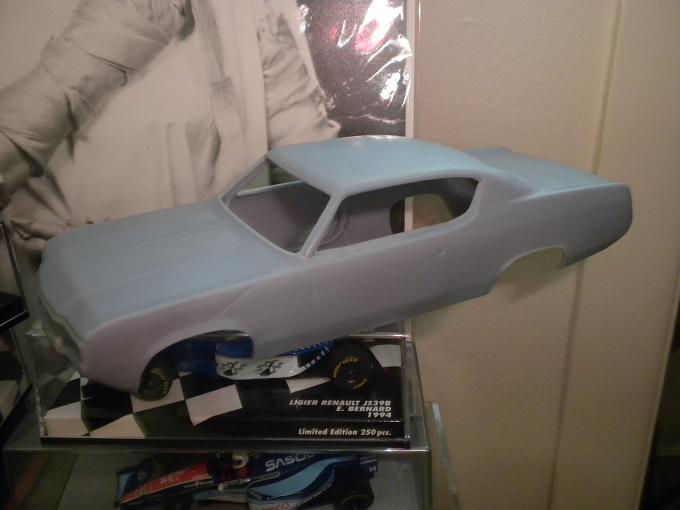
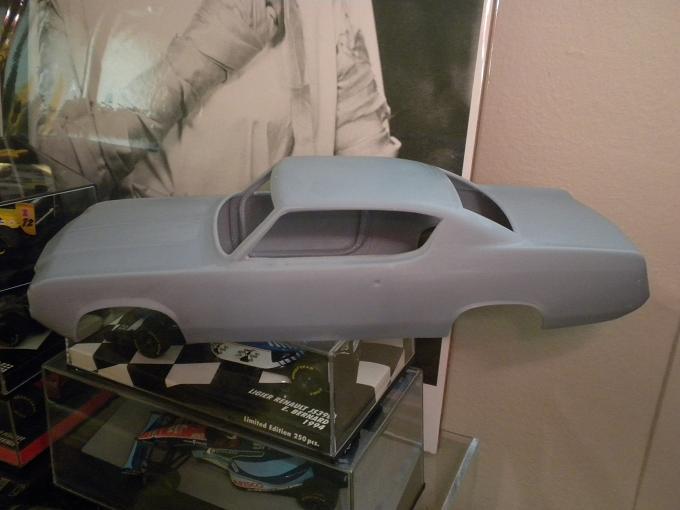
Greetings, Trying to match whatever work I've done on one iteration before proceeding to another step, here the '70 Laguna Seca sans spoilers entry is similarly up on wheels with all of the interior parts tucked inside. The front lip flares were glued on and subsequently blended in, hence this was a nice uptick in relation to exterior appearance, whereas deliberate sanding and shaping has each more or less matching the bulk of the '70 Mid-Ohio effort even as it would be good to reduce the mass of these still further. Chassis refinements with regards to working up appropriate front and rear sway bars plus links and mounts in addition to the Watt's link installation out back is next up and hopefully something not entailing much risk to what I've performed to date. Thanks for your review of this ongoing project... Certainly the topic looks quite different without all of the Firebird Trans Am-model specific bits... Homologation hiccups witnessed the Trans-Am model specific aerodynamic appendages, fender air extraction vents and shaker hood scoop disallowed at the first race of the '70-season, hence this model reflects hurried team attempts to basically run a standard Firebird at the Laguna Seca, CA event. Hard to grasp from other photos, an attempt has been made to match the opening profile of each standard wheel arch as per period SCCA rules. Mike K./Swede70
-
...just the '70 Mid-Ohio effort back on wheels with all of the interior paneling and residual stock interior trim in-place, this mated to matching flared body hitherto isolated off to one corner. Each dashboard was trimmed from below even as the dash pad remains largely untouched much like the actual racers, fitting the driveline hump overlay with the CDI voltage regulator assembly/assemblies also calling the area home. Happily, the radiator support wearing a cast resin clone GMP '70 GTO Judge radiator fits cleanly. Space is tight for the tubular front sway bar mounted atop the subframe, although nothing too serious was discovered for test fitting things as-witnessed below. Note too how the radiator support to the fender braces were cut out, the wheel liner indentations plugged to clean up matters here besides. Moving along, a pair of steering column/steering wheel assemblies were combined to isolate the soft steering wheel rim from one, while the other had its honeycomb center trim cap ground off and flat, the spokes from this same steering wheel drilled through with a pin vise before the now-separate rim was (temporarily) joined to it. Less stress on the steering wheel spokes, a cleaner finish across the hub center was made possible, while greater flexibility is afforded regarding how things may be painted. Yes - more than one ERTL Firebird has given it's life to the cause of making these modified diecast projects a reality. Given the dashboards can come into contact with the interior door trim and so prevent full closure of doors, some mild reshaping of the pad ends was likewise performed. More invisible work, but nice then to see this example up on wheels. The model is simply wearing a coat of Tamiya White Primer as seen earlier. The '70 Laguna Seca effort will be further sorted to match what's on view here, although each model requires further chassis work hitherto avoided before paint will be applied. Thanks... The door handle mounting holes as well as exterior side mirror mounts/holes were plugged long ago, with separate and distinct chromed Welly '72 Firebird exterior door latches slated to be added. Pity that the Welly rendition is so expensive to source these days... The dog leg hood hinges aren't so impressive, although much has been altered or improved in other ways. Thanks for your review of this project update... Mike K./Swede70
-
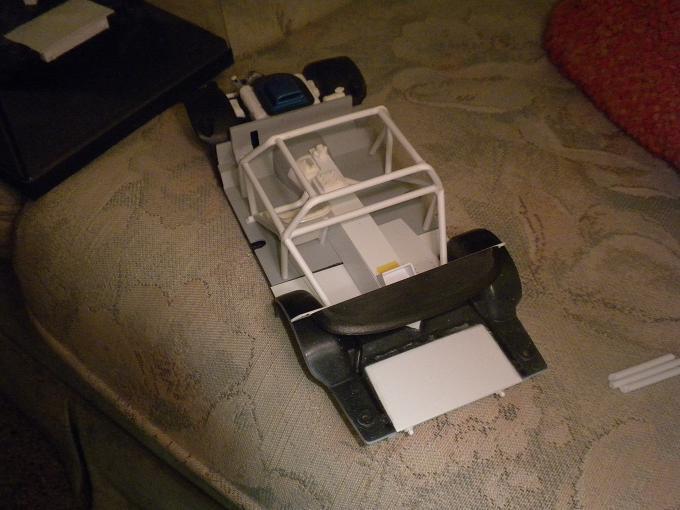
Greetings, For failure to perform due diligence with regards to fitting the bodies over each roll cage assembly plus chassis, a number of things were found to be either in need of adjustment or simply had to be redone across my T/G Firebird projects. Better now, hence the bodies, the roll cage with all extensions, the plastic 'glass' insert with the dashboard in-place and door assemblies with interior trim likewise in-place live in reasoned harmony across three assemblies. Envision what's seen here three-times over consistent with my coming closer to a final result. Witnessed is the spare shell less-flares again, hence the tight fit and goofy offset perceived in relation to the rear track in particular. First released as a '73 SD-455 Firebird Trans Am, the ERTL tool of old displays fender-to-radiator support braces that are best cut off on an earlier car. Thanks... ...while I have to prove that the doors actually close with the rather thick interior trim in-place. Mike K./Swede70
-
Ugh - for more careful review of what '70 Laguna Seca images I've isolated, it seems the strengthening ribs seen on the rear bulkhead are equal length and somewhat abbreviated for width. Trimming the ends and rounding the same wasn't huge fun, although things look cleaner. Thanks... Mike K./Swede70
-
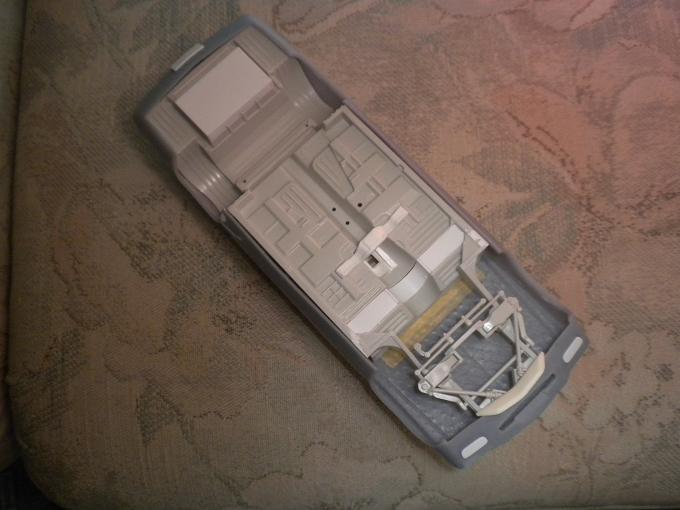
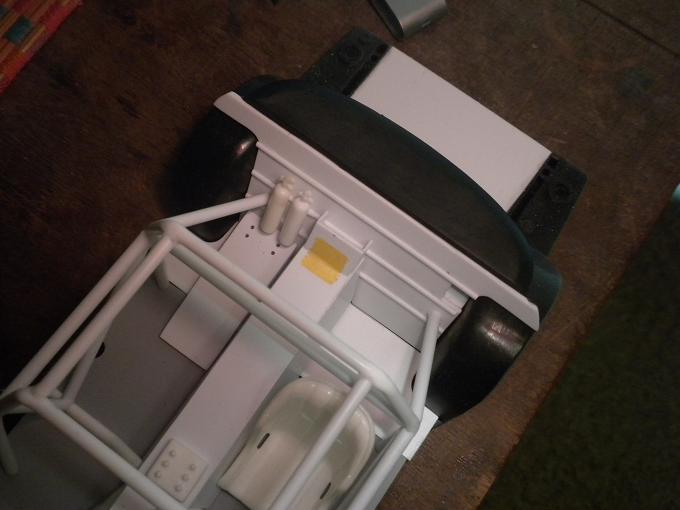
Thanks again for the kind notice... Trying if you will to sort some additional detail seen across the rear bulkhead, with a trio of strengthening ribs, a pair of fire bottles as well as a vent straight through the panel situated to the right witnessed. The vent has three walls forming a small tunnel of sorts fixed to the backside (the fourth is formed by the wheel well sheet metal), whereas a small brass screen serving presumably as a flame arrestor will be cut and added from behind to finish matters more or less cleanly. Still pondering how to configure the fire bottles relative to the roll cage members coming down and terminating near the installation, whereas the upturned sheet metal wedge seen may shift sides given different sources have it sited differently. The wedge would have had a rear differential oil cooler fit beneath it, although I'm not really sure I want to go through the trouble of adding said detail from below. When at peace with what's suggested here, I'll reproduce the work three times over. Given the restored car or cars really don't feature such, this is a snippet of a photo capturing the profile of the rear bulkhead. Happily the half-round stock I've employed seems about right for size, although again one can see that the driveline overlay fabricated from sheet aluminum is fairly narrow as contrasted to what I came up with for having to deal with a rather thick and high transmission tunnel plus hump. Not really a good view of the vent, but generally looking happy. Given the thick interior door trim, room remaining for the roll cage and especially the seat situated within the space reserved for such is revealed to be minimal. Just white craft glue is holding the new additions in place, although I'll probably go with what's made out here. Thanks for your review of this project update. Mike K./Swede70
-
Greetings from Fraser, MI. somewhat to the east of you... Mike K./Swede70
-
The sills on the ERTL tool have a pair of locating tabs with threaded bosses intruding into the interior floor, whereas it never really seemed much of an option to cut or file them out given each was weakened for twisting and straightening attempted and achieved far earlier. I had to remove evidence of the wheel arch aerodynamic 'spats' on each body, hence the structural strength of each rocker panel has already been compromised in this regard. Continuing, clearance afforded for the roll cage sides will be tight, although the hope is that I'll be able to securing glue the cage assemblies to each floor and simply rock the bodies with doors open to drop everything into position. Seen below are the U-shaped cutouts found on either sides roughly relating the dimensions of such relative to the roll cage sides. The trunk area won't be visible given opening each panel on this thick diecast shell is not something I'll try, hence a bit underwhelming beneath such. Thanks... Mike K./Swede70