swede70
-
Posts
727 -
Joined
-
Last visited
Content Type
Profiles
Forums
Events
Gallery
Everything posted by swede70
-
Greetings, For some application all three chassis now have their side roll cage members as well as the rearmost outriggers. Mostly sorted now, while smaller interior additions and rear bulkhead work in particular stand to come next. Such will include paired fire bottles, horizontal strengthening ribs (three), and at least one vent to the fuel cell/trunk compartment as per period photos. Anti-vibration Lords mounts (four then) plus a small platform should be introduced under the CDI voltage regulators seen forward of the shifters where present, although space for the same inside the interior of the old ERTL second generation Firebird tool is very tight. Moving along though. Thanks... Mike K./Swede70

-
How do YOU decide what to build next?
swede70 replied to 64SS350's topic in General Automotive Talk (Trucks and Cars)
Greetings, Usually I'm working across projects, like-themed for being old SCCA Trans-Am road racers, while when I shift direction or apply effort to one project or another, different factors come into play. A discovery of a new photograph or new photo set consistent with informing how something should be configured or look can be exciting and will stir interest, while working up a new technique to similarly reproduce something accurately may serve as a prod to further apply myself. At other times and for seeking out research online, a new contact will be made who possesses insight and enthusiasm in excess of mine in the moment, and in a manner of speaking, I'll wish to reciprocate the same consistent with maintaining the mood. By the judgment of most I'm 'slow', but appreciate that my scale model efforts relate to exploration of the history of the racing series and period I favor, hence as long as I'm learning, establishing and developing contacts, and on occasion refining out what I'm working on as a project, in essence I'm getting what I want from the hobby. Thanks... Mike K./Swede70 -
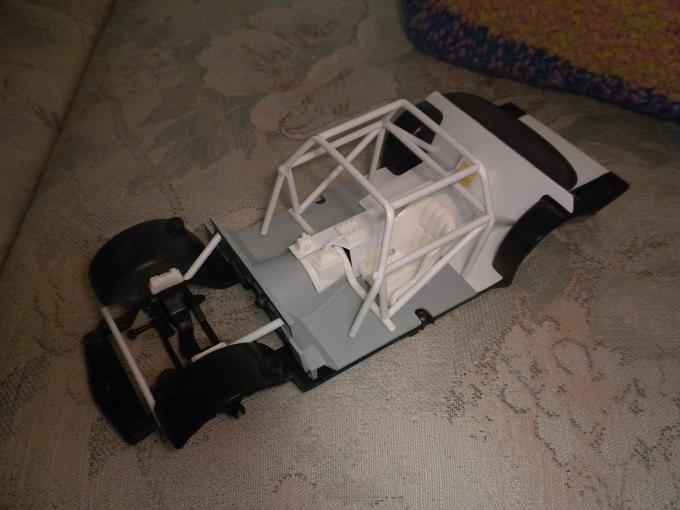
Greetings, Not shatteringly exciting this, but for test-fitting the roll cages worked up, one proved too wide up front and succumbed to breakage when I tried to disassemble the same. The brass core remained intact, although the wall of the plastic tubing used ripped off at the joins rendering one effort so much junk. Further, two interior floor panels had been cut too short at a previous stage, hence for a week or two I was down one chassis. Noticed is a new roll cage intended to match the dimensions of the best two previous efforts, complete with slightly longer floor pan inserts front to back. In sum, at least I should be able to fill in the sides of the two remaining cages for having things squared up in this regard. Also made out would be an inexpensive engine option employing GMP '70 GTO Judge cylinder heads, the same being filled with clay prior to being copied in resin. The roll cage tubes tying in the front subframe/suspension pickup points proved unworkable given the odd dimensions of the ERTL front subframe, hence these will be redone even if the positioning of the same will require a bit of smoke and mirror work to suggest alignment not quite possible with this tool. Lastly, the radiator expansion tanks and TRACO remote oil filter mount in addition to the heater core fill plate were redone and repositioned on all three chassis to match. Thanks and hoping to be back on track soon... Mike K./Swede70
-
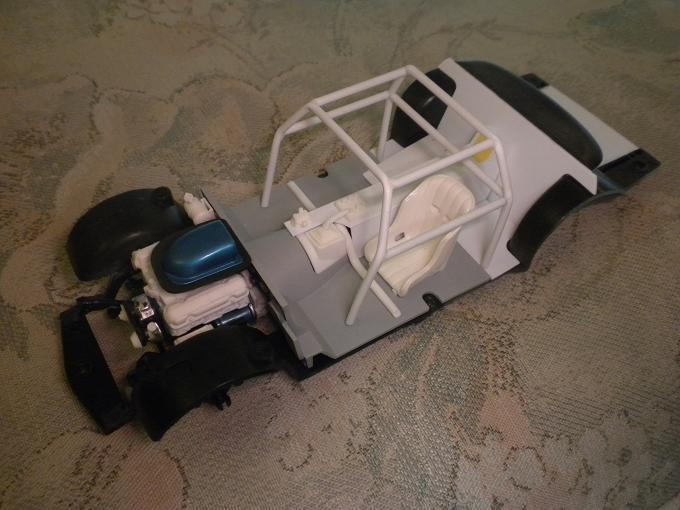
...and just some additional bars to tie-in the front suspension pick up points/subframe, with small nubs added nearest the dashboard installation that will doubtlessly be sanded away almost entire. Fitting the shell atop what's seen will involve a certain amount of stress, but if things work out well enough, then the additions made out can be duplicated and added to the other builds. Thanks... Mike K./Swede70
-
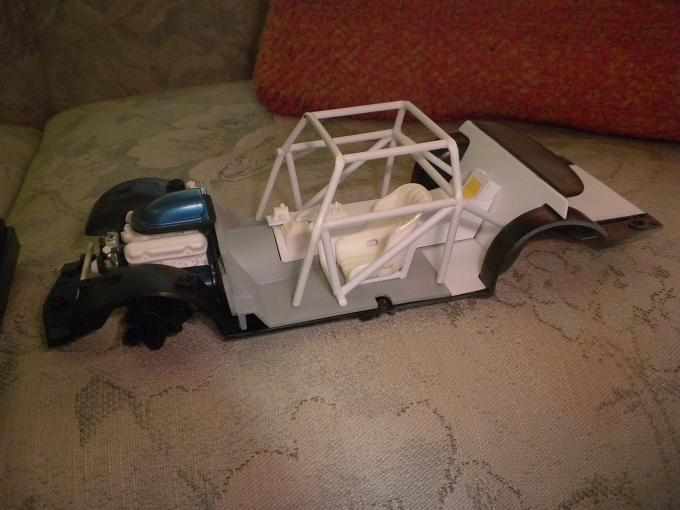
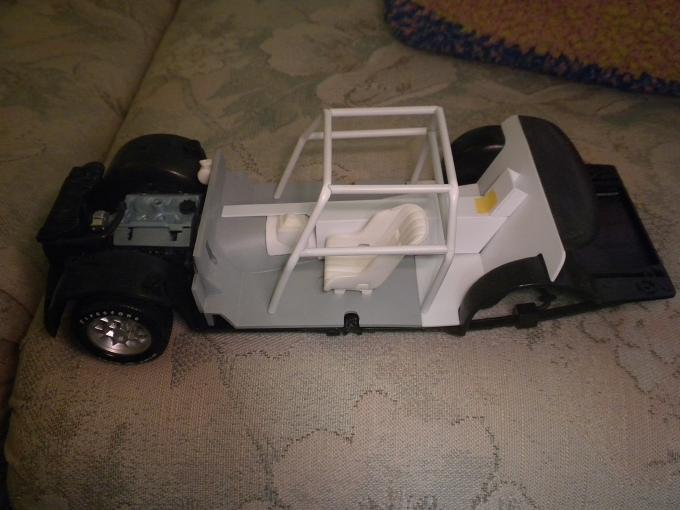
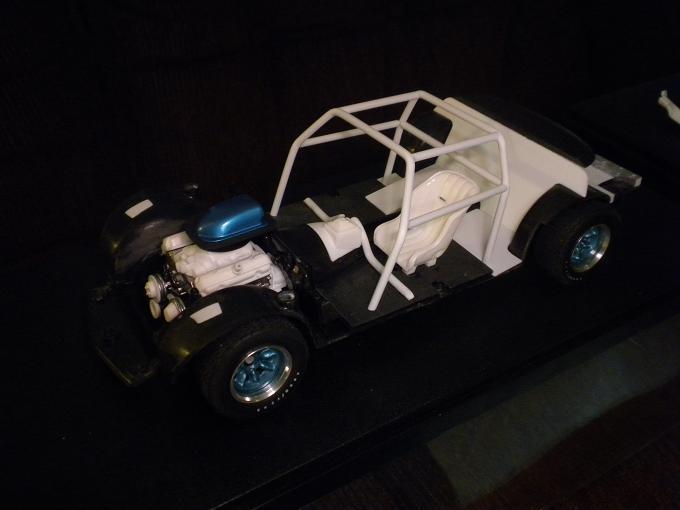
Greetings... Here some side bars have been added to the roll cage structure to flesh it out, while two bars consistent with tying in the rear subframe/Watt's linkage support structure (underneath then, and slated to be added) extend back from the main hoop towards the rear bulkhead. A partial effort to come up with bars to tie-in the front suspension pick up points is slated to follow, while barely discerned would be the addition of a floor shifter less shifter ball. A vent for the rear bulkhead, some strengthening ribs along the face of the same, plus a dual fire extinguisher installation is likely next. Interior wiring, hoses, etc., come later given I'm focused mainly on having all the parts I need reasonably sorted before applying finishes. Doubtlessly I have much to learn in relation to finishes and finish choices, hence a range of further lessons stand to be absorbed and processed each in turn. Closing out, I wish the 'vee' formed by the side roll cage members were more relaxed and closer to symmetrical looking forward, although clearance needs for the dog leg door hinges forces the compromise witnessed here. Thanks for your review of this post. Mike K./Swede70
-
Solido 1/18 Porsche 935/78 Moby Dick
swede70 replied to Beurlys's topic in WIP: Other Racing: Road Racing, Land Speed Racers
Really nice work, while it's refreshing to chance across another 1:18th diecast/resin fabricator/modifier not adverse to tearing preassembled and prepainted models apart consistent with correcting what we may. Happy to discover your thread, anticipating further progress as such is added. Thanks... Mike K./Swede70 -
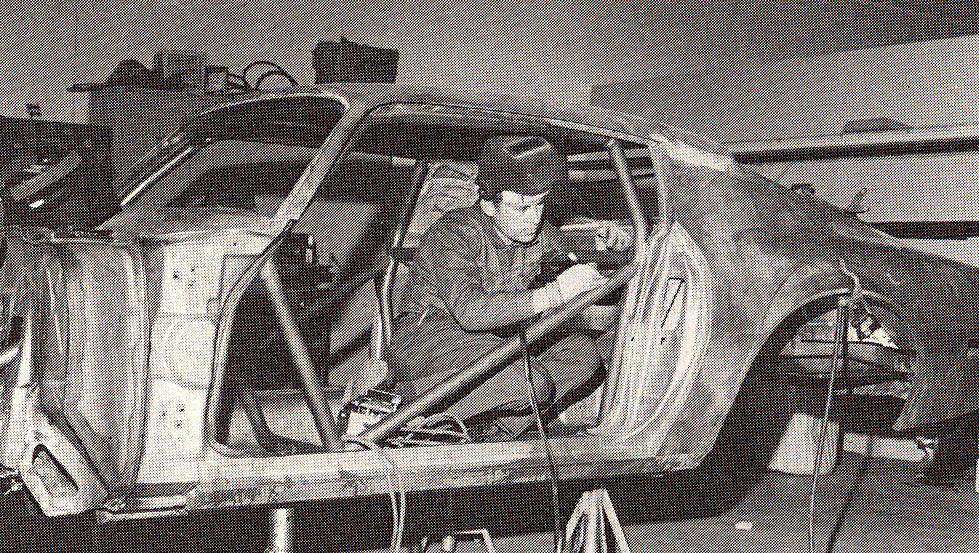
Greetings... Seen briefly is the dashboard in place, having been filed to mimic how the base of the assembly was trimmed in-period, but also to ensure that everything below it on this project may properly fit. In addition, a seat support frame melded into the fiberglass seat shell begins to take form even as I've not completed the seat mounts or rails on the floor such might be positioned atop. Rainy weather prevents my applying paint to interior door trim that I'd otherwise fit to the project consistent with testing the fit of every last major interior component, although in the main things look good. Constituting about the limits of what I can do here - especially with thickly-rendered interior door trim and heavy-handed dogleg door hinges, this is where matters stand. Mounting tabs and very faint seat mounting rail detail stands to be added. An in-period photo from the 1970 Laguna Seca race program capturing the roll cage fabrication phase of the initial 1:1 build. Notice the very thick door jamb dimensions which I'm powerless at present to reproduce. I don't know - I'm just not willing to call things to a halt on the basis of door jamb dimensions, especially given how easy the rocker panels are to twist and crack on a white metal/Zamac bodyshell. Best reasoned compromise then, with interior door trim complete with thick map pockets commanding space down low and forcing matters concerning what I can capture for shape. Thanks for your review of this post. Mike K./Swede70
-
Greetings, Slowly working up to some chassis revisions, work was undertaken to make way for the front sway bar installation. Not the usual solid bar configured in a more or less stock location in this instance, what was fit instead was a 2 inch tube situated atop the subframe back of the radiator and forward of the engine accessory drive as would be expected. Although formal mounts, sway bar 'arms' and links stand to come, each front wheel arch liner was cut out to afford clearance to the hardware outlined, guided as the work is by reference to period photos outlining such. Moving along, each bottom control arm/engine cross member/front sway bar combined casting was trimmed to remove evidence of the sway bar and mounts, while odd it is to note that ERTL basically doubled up the steering linkages on the base model I'm employing; i.e. in a sense this model is BOTH a front-steer and rear-steer configured design! Well - at least if I do away with the rear steer elements, the bottom of the engine bay opens up consistent with affording plenty of space for a tube header installation, hence I have that. Thanks for your review of this post. Just as it's delivered and viewed from below. I hope I can cast plugs that will afford some limited lower shock absorber mount detail to effectively seal off the screw access points visible here. Cleaning up residual plastic that makes up the front sway bar as it crosses the steering linkage hasn't been so fun given the softness of the plastic ERTL employed here. Hopefully I can do a better job of it, while a steering arm further needs to be fabricated given what one is witnessing here is a solitary idler arm. Just quickly tack glued into place, seen forward is the sway 'tube' atop the difficult to discern front subframe, while the cutouts of each front wheel arch liner can with difficultly be made out. Thanks for your review of this post. Mike K./Swede70
-
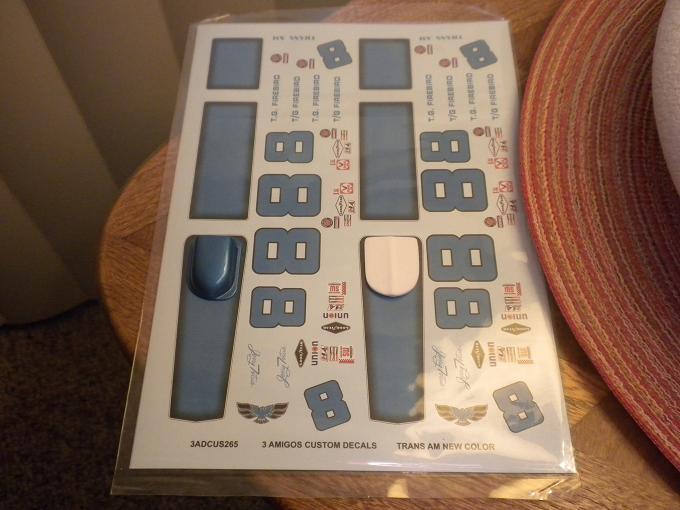
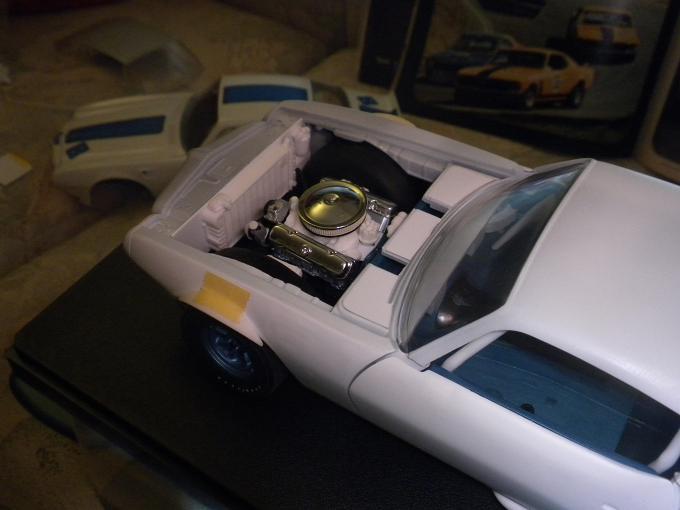
Greetings and thanks for the recent kind notice... The last iteration of the decals was finally received, commissioned as the work was to 3 Amigos Decals. Much thanks to Sam Lopez for his great patience and noted expertise, whereas hoping the aqua tone chosen from a test sheet will translate into something that'll work smoothly enough. Seen situated atop the sheets delivered one will see a shaker scoop repainted in Testor's Model Master Nassau Blue Metallic/Custom Lacquer System/No. 28128 - a product and product line since discontinued but found here or there at area hobby shows, while to the right is a resin hood plug I hope to employ in some capacity as a pattern to cut material from the hood stripe to accommodate the shaker hole underneath. Not certain how I'll quite do this, nevertheless for experimentation I hope to find a way. On the '70 1/2 Firebird Trans Am model, the stripe was decal, the shaker finished in a slightly different hue bearing a mild metallic effect that is present here complete with a gloss overlay. In the main I'm happy... The ordering code hasn't been obscured here, hence if someone would be inclined to seek a copy or copies, I really haven't set a barrier up to prevent such. What's seen is 1:18th scale again, ERTL diecast-based. My resin pedal mold performed in two-part urethane is half done, while seat mount refinements and interior rear bulkhead surface detail work stands to come next. Thanks... Mike K./Swede70
-
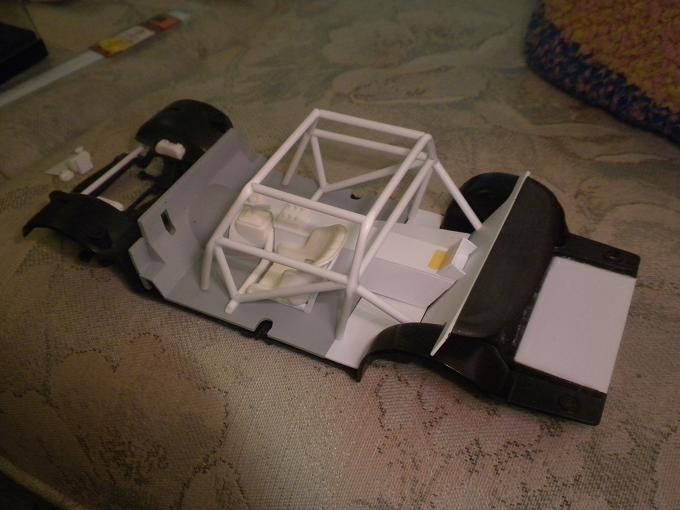
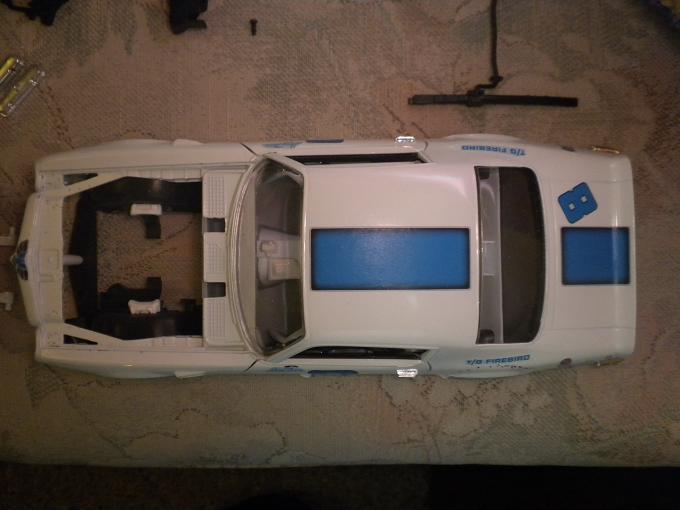
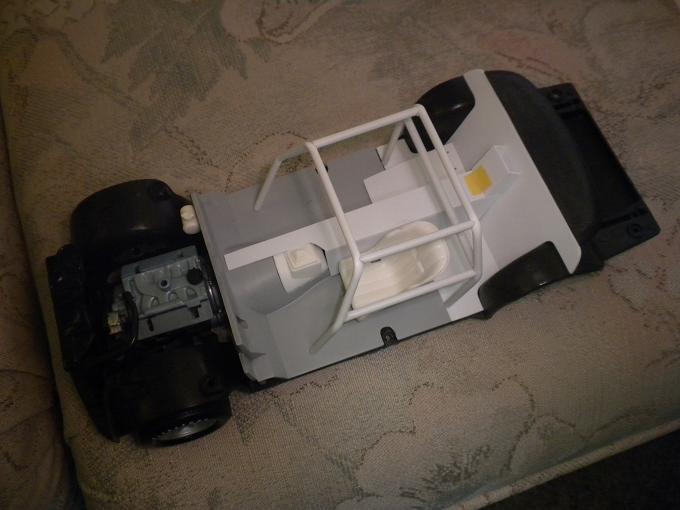
Greetings, Noticing that the diecast metal bodies weren't happily melding with my chassis mock ups for errors of judgement here and there, I had to trim the tops of each rear bulkhead, better support each package shelf, trim the floor panel inserts I'd created, and further trim the driveline hump overlay I'd worked up previously. After the aforementioned misery for sorting one chassis, I then repeated the labor twice over to bring everything into line. Better now, resting comfortably, setting the experience of momentary trauma behind me. Also noticed are new driveshaft assemblies - woo hoo! Thanks... Previous cage installation images apparently didn't include the rear bulkhead and package shelf in-place, although these do. Notice how the door top side bars of the roll cage vanish from sight when viewed from this perspective. A challenge it is and was to coax the package shelf to sit both level and straight. The seat mount seen across images stands to be redone given what is made out here seems clunky. A transmission cross member, lightly made from scratch will be next up, and with it each engine/trans. assembly will angle back a touch further than what is discerned here. Lightly revised valve covers are on view, revealing some hex rod plugs presumably screwed into the center of each stamping. Thanks for your review of this post. Mike K./Swede70
-
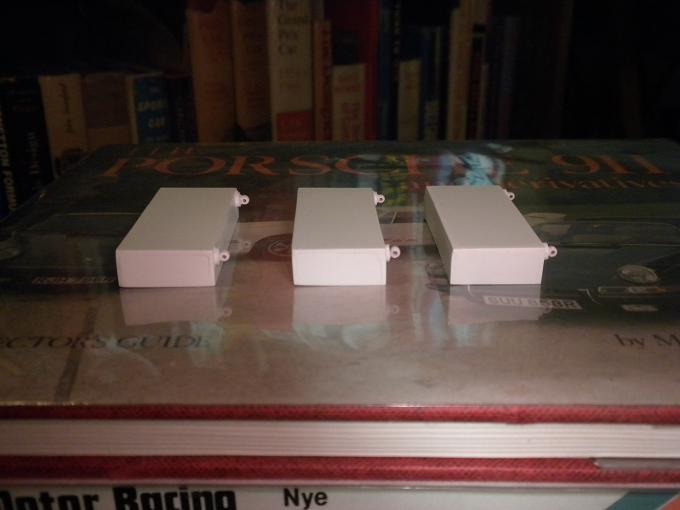
Greetings, Although likely not correct for every race outing (speaking of the tie-down points), seen would be a trio of fuel cell housings fabricated from sheet plastic with craft store beads employed as tie-down points set atop small wafers of plastic formed from rod plastic. The inner structure for each housing is basically intended to take what adhesive I'll use and keep any evidence of a join out of sight, while basically things look sound enough. Also noticed will be the fill panel substituted in where the stamped steel standard fuel tank formerly resided. Some sanding and light putty fill work was required to rebuild one subframe wall across three chassis, but in the main things appear clean with all the seams and walls reproduced where one would expect them versus just introducing in a cut blob of resin. More chassis work in particular to come... ...seen from the top, with the rough aspects basically tucked out of sight. ...viewed from below, and pretty much a match. ...while here one can see through the hard plastic beads carefully set in place upon a mound of CA glue gel six times over. ...nicely integrated, and no lower than the rear subframe as intended. ...largely straight and evidencing little interference with other assemblies. ...and generally how things will look even as much work remains to be done underneath. Thanks... Mike K./Swede70
-
...just the same with a cast resin CDI voltage regulator and electrical control switchbox atop the aluminum center console structure. The chassis strengthening tubes seen crossing the floor laterally weren't great fun to create the first time, hence what is seen are resin copies so that each set will be consistently shaped, presenting no strict surprises when dropped into place. Things are fleshed out slowly and in stages, whereas for having three interiors and feeling the need to match them closely for fit, maybe my quality is coming up a bit. Fuel cell fabrication (at least the housing as viewed from below) is underway, although cutting and shaping the soft 1:18th chassis plastic is never much fun vs. what's possible in other scales with stiffer kit plastic. Thanks... Mike K./Swede70
-
Thanks for the kind notice... Seen would be the first revised transmission hump/driveshaft tunnel overlay assembled (as in glued) and subsequently dropped into place. On the actual racers this would have been a sheet aluminum structure with a peculiar 'chimney' situated along the rear bulkhead as described before. Wider across the bottom of structure would be better, but then adjustments can be made beneath largely out of sight to tweak things. One to repair then (as seen), two more work up from fabricated bits. Thanks... For fine adjustments to the backmost interior floor panels (they dip a bit towards the front as-seen here), things should align. Thanks for your review of this project update. Mike K./Swede70
-
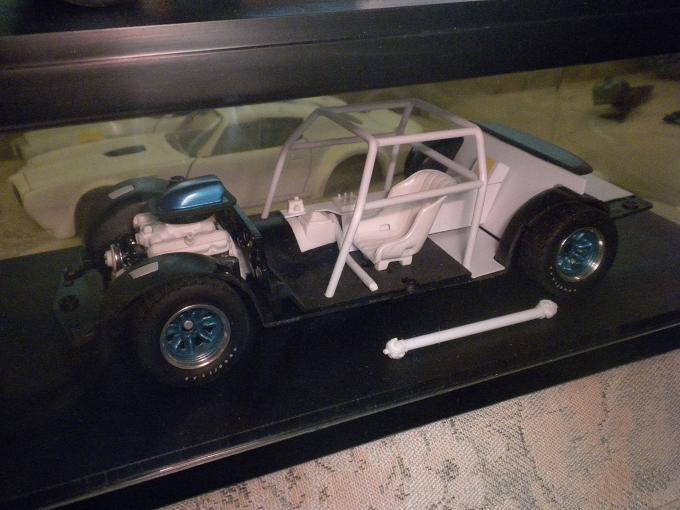
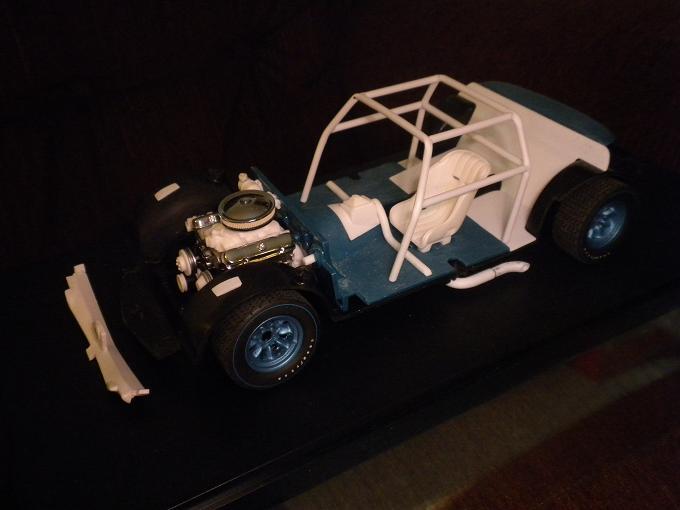
Greetings, Having obtained a second 1:18th Lane '68 Firebird 400 H.O. engine (it seems a great many upgrade diecast models to run LS-power), seen would be the effort to duplicate work undertaken before to dress each as a SCCA Trans-Am 303. Both would run Ram Air IV heads, whereas the Laguna Seca engine really ought to be a short deck iteration with adapters to allow for the fitting of same basic intake. Continuing, the extended wet sump was scratch built before, as was the intake and the explosion proof bellhousing. The transmission are GMP Penske Camaro M22 Muncie four-speeds, the pulleys are derived from the same tool with different frontal contours done in resin, while the belt material hasn't yet been determined or decided. Pressing ahead, a transmission crossmember hasn't quite been worked up, although a few choices exist and soon the engines will rest somewhat lower across the back for swapping in something more suitable. I'd like to plumb up a coherent take on the Bendix 'Hydroboost' power brake assist system, although precious little room exists underhood to accommodate anything devised along such lines. The smooth stock vinyl radiator hoses will go, to be replaced with corrugated material likely reinforced with brass wire within to retain a proper shape. Also seen will be new roll cage structure given some bends were misjudged before, with special reference to the too-narrow take on the dimensions of what would exist between the A-pillars when viewed head-on. It's expected that some of this will have to come apart to be adjusted and tweaked consistent with ensuring a tight final fit. Additional bars stand to be added, although mostly these will just flesh out the structure(s) seen and won't present surprises. Approaching the end, across the interior will be made out a cloned console plug (all ERTL Firebird Trans Am models based on this tool come through with interior consoles), further refined exhaust dumps on the '70 Laguna Seca example, a rudimentary seat installation shared across models, as well as a differential oil cooler 'wedge' visible along the floor mounted fast along the rear bulkhead. Not glamorous in sum, but a lot of work undertaken and painstakingly duplicated to ensure all fits as it ought. Thanks... Mike K./Swede70
-
Greetings... Trying if you will to identify a likely hue for review of eight colors selected and subsequently printed, seen here would be my efforts to first identify something likely under poor light conditions, cutting up the color chips and reordering the same consistent with selecting again under clear weather/daylight conditions, and finally arriving at much the same place for selecting the hue I'd first latched onto in the night. The topic again would be the center stripe decal work, influenced and impacted by the limitations of the current technology in relation to precise color reproduction. Thanks... Mike K./Swede70
-
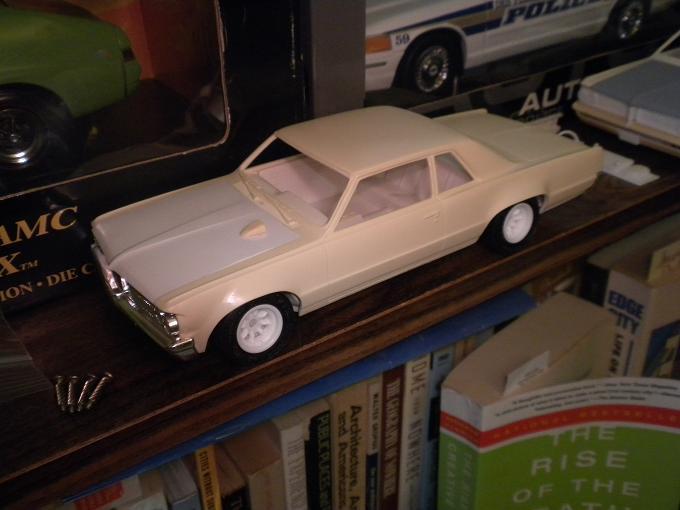
Greetings, Minor stuff, although seen below would be my AMT '64 Tempest '71 SCCA Trans-Am Gray Ghost effort w/framed windows intended to replicate how the topic appeared at Lime Rock, CT. Rain tires and pressed steel wheels would be called for... A hood, the dash, a very clean tail light cluster plus unblemished tail light lense inserts were taken from the aforementioned $20 AMT '64 Tempest convertible built up, while very recently a rear bumper was secured for just less than $15 via eBay. With expectations sharply trimmed back given I intend to keep this AMT-based build mostly AMT, perhaps this fairly simple project will be the first to receive paint. Thanks. Fairly sharp, now on the hunt for a grille divider/'beak', an MPC second generation Firebird Trans Am steering wheel, and pressed steel rims of an appropriate design. Looking trim though, while nothing special was done to arrive at a reasoned ride height given I've used the second of the existing metal axle holes to configure things as-seen. Mike K./Swede70
-
Thanks for the kind interest and support... Here the abbreviated package shelves have been sanded smooth along the top, the floor mounted differential oil cooler housings reproduced, the floor sections for each rear passenger area cut to shape and hand fit to mesh well to the bulkheads previously fabricated. Thanks... Mike K./Swede70
-
Thanks again for the kind words and interest displayed... Seen would be the rudiments of the driveline hump overlay reproduced three times - the same fabricated from sheet aluminum in-period. Also discerned would be the patch I hope to cast and copy consistent with plugging the interior floor where a cast-in front console formerly lived. Removed from my first build and cleaned up for light work, just resting inside a different interior it blends well enough to use forthwith. Thanks. Mike K./Swede70
-
Just some underhood additions in the form of a new coolant overflow/surge tank situated along the firewall, a repositioned remote oil filter installation following the removal of the heater core 'bump' roughly situated in the same area (happily it was a separate part I could remove), and the coil again. Some fill panels and mounting lips were added to the top of the radiator, hence this area appears somewhat fuller too. Thanks... Mike K./Swede70
-
Seen would be a revision of the interior driveline hump overlay; i.e. basically so many aluminum panels with a 'chimney' situated along the bulkhead formed at the rear. A bit frustrating given the transmission hump is wider than it needs to be further forward, while the interior floor is set higher than it might otherwise be given scale thickness of materials isn't something strictly on offer. A better start then, while strengthening ribs on the rear bulkhead, a twin fire extinguisher setup and roll cage refinements stand to come. Thanks... Mike K./Swede70
-
Greetings... Now working on the reproduction of the sheet aluminum structure atop the interior driveline tunnel, refining past efforts and hoping to cleanly update matters for new insight obtained. The Facebook groups specific to the old SCCA Trans-Am Series are quite active, while the contributions of others better-placed and better-informed has helped me to a considerable degree. Doug Innes and Dave Tom in particular have been very kind and forthcoming, while their input adds a lot to my experience of the hobby. - One discovery of note consistent with coming up with a better color match for the over the top stripes was made, it being a sprawling seventeen-page message board thread where a fellow articulates his plans to reproduce 1:1 early second generation Firebird Trans Am stripes and all that such entails. It's really quite helpful; i.e. he speaks of the research he's done, affords evidence of his early print tests, dimensions are revealed, color samples are afforded, the pixelation issue with regards to the blue-to-black color fade and how the same topic might be handled from the design and production front is addressed; i.e. the lot. If you find yourself stuck in this regard, pining for better information in a second gen. Trans Am sense, do consider reviewing: http://forums.maxperformanceinc.com/forums/showthread.php?t=666571 - Gleaned from the above, I tried to work up color samples that might be afforded a printer. The current state of the art cannot guarantee total fidelity to the tone or hue desired, but then technology evolves and capabilities arrive on the scene that redefine what can be afforded to people such as us. Reproduced below would be a rear stripe image, a color sample taken from such, and finally, a color chip image of 1970 Pontiac Lucerne Blue Iridescent which would constitute the finish applied to the shaker scoop on a Polar White '70 Pontiac Firebird Trans Am model. The color match between the stripes and shaker scoop was said not be the best in-period, while it's known that UV light exposure had the long term effect of fading the stripe color in a manner to suggest more of a greenish hue. - Lastly, another 1:18th diecast ACME/ex-Lane Pontiac 400 engine has been sourced, thus I should be able to work up two pretty fair engines versus being forced to 'go cheap' on one. Interior panel work and roll cage fabrication likewise continues. Hoping of course that quiet application across spheres will result in tangible quality gains. Kind thanks for your review of this project update. Mike K./Swede70
-
This was the one I remembered, although it'll take me a bit to determine if there were others. It does look like Richard topside... Mike K./Swede70
-
Looking very nice and thanks too for the historical perspective also relating to your involvement and exposure to the scene in-period. The model is really coming together, whereas I remember seeing in-shop photos within one of the digital archives depicting a Torino Cobra Petty Enterprises entry well along in the fabrication process. It seem the return to Plymouth and abandonment of the Ford deal happened late, even as Torino Cobra/GT print ads. would have us believe that the new for '70 bodies were 'shaped by the wind'! Neat topic, neat execution. Thanks for sharing... Mike K./Swede70
-
Thanks for the kind and very detailed input Peteski. Indeed - for doing things in 1:18th, I find I'm pressured to do things in-house consistent with vertically integrating matters so that all aspects of fabrication can be controlled. At present I'm not well-versed in graphics software such as Adobe Illustrator, Corel Draw, InkWorks, etc., although making the investment in both time and personal skills development in addition to seeking hardware to achieve the results desired points the way forward. Your technical knowledge and openness with regards to the specific approach plus identification of the devices employed affords me much to think about, hence know that I appreciate the time taken here. Thanks again... Mike K./Swede70
-
Kind thanks again... Urethane molds poured across the weekend yield parts to flesh out all that would be situated on the radiator support including a GMP '70 GTO Judge radiator, as well as a remote oil filter setup plus oil cooler. The '70 Mid-Ohio T/G Firebird was raided to afford masters to clone, hence just a straight duplication of matters here. Some less elegant aspects of the diecast metal shell happily vanish from sight for the creation of a sheet plastic radiator support, although some filing still needs to be done to square matters away. Other discreet radiator panel work has been performed, although it's not seen here. The coil is a Hwy. 61 '63 Pontiac Tempest item and seems to be the best thing going. Also spotted would be the beginnings of larger diameter exhaust dumps given the first attempt just appeared denatured and puny. A lot of filing and fitting will be required to ensure these tuck into the chassis and in particular, the rocker panels if they're to sit as they should. I can't compromise the strength of the metal rocker lest the body come apart, hence the plastic rod used for the dumps (less the outlets which I hope to do in brass) will be creatively filed to suggest things are more accurate than they are in fact. Plastic rod will be used to prevent wall collapse for the brass ends/outlets worked up, then I'll likely have to drop the same in gasoline or something that will effectively soften if not dissolve the plastic so that I might come away with mildly bent brass tube absent anything strictly inside prior to hand finishing the outlets. Thanks... Yep - one expects to see a svelte Corvette-issue Harrison aluminum radiator - or at least something aftermarket and lighter. Not in this instance, whereas a review of the color underhood photo captured at Lime Rock, CT seen further up this thread reveals use of what appears to be an almost-stock part. The outlet on the top of the radiator was scratch built, so too the domed outlet/inlet further right, while some plugging of holes on the cooling matrix was further required to come up with something that would be clean and readily reproducible. Thanks for checking in... Mike K./Swede70