swede70
-
Posts
727 -
Joined
-
Last visited
Content Type
Profiles
Forums
Events
Gallery
Everything posted by swede70
-
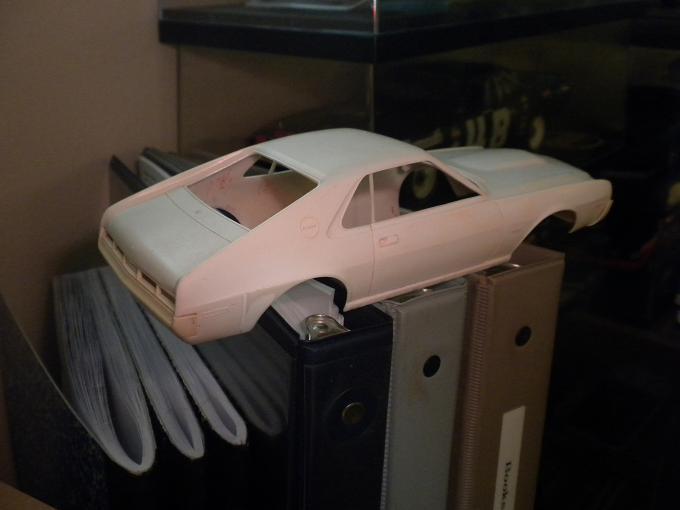
Greetings, Harboring no end of Jo-Han AMC Javelin projects (mostly SCCA Trans-Am topics across years), here would be a slow restoration of a tired AMT-issue '70 AMX. It looked pretty poor early on, to the extent that no strict 'before' images were captured to post here, although I can relate that it wore three coats of paint, and evidenced pretty awful quarter panel damage where someone had enlarged the wheel arch openings looking back on both sides amongst other issues. Easy-Off and Simple Green stocks must be up! Fortunately the rather flat profile along the top of the arch combined with the wind streak surface detail was something I could work with when I grafted in material as made out, while given this is a '70 with one year only side indicators along the flanks, I had to retain these for leaving matters untouched further back. I guess this was for the best given alignment between the additions and the surrounding panel work was made easier, hence something learned and gained both... Other matters dealt with include replacing missing fine B-pillar/window border weather strip trim from a deceased Jo-Han SS/AMX donor (the same body affording good quarter panel implants as discerned below), as well as fleshing out the grille trim surround on one corner given a section had been torn out for aggressive use of glue in-period matched to inelegant removal of the bumper/grille assembly sometime later. Moving along, an effort (the worth of such still undetermined as I write) to separate the Rebel Machine pressed styled steel wheels into component parts to finish individually was made in combination with hard vinyl MPC Goodyear Polyglas GT tires of old. I took some X-EL '69 AMC AMX parts trees (actually something commonly obtained at SE Michigan-area toy shows) to steal some promo axle wheel back detail to combine with ancient Time Machine Resin copies, while substituting in/on some Jo-Han '70 Superbird decorative trim rings which feature a small additional lip on the edge otherwise missing from the Jo-Han rendition of the wheel. I don't know if I'll seek some chrome option for the center stampings, further divide out the trim caps and raised ring part and partial of such, or just what I'll do in total. Still - looking appropriate even as this likely won't be a highly-detailed build but rather a promo-like effort with Ray's Decals tape stripes versus the application of a Shadow Mask treatment. Lastly, the chassis employed at present is a short shot (as in spoiled) X-EL issued item slated to be replaced, while some fortuitously saved plastic kit 'glass', period dash w/grab handle, shifter and high back seat interior rounds matters out less engine - at present! Thanks for your review of this post... Mike K.

-
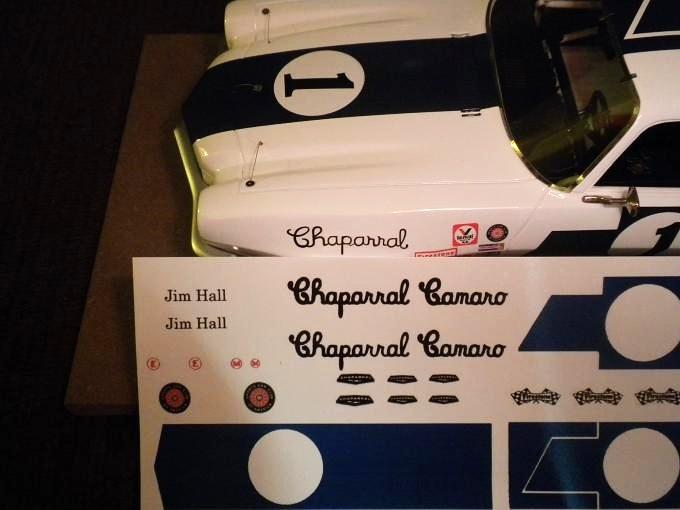
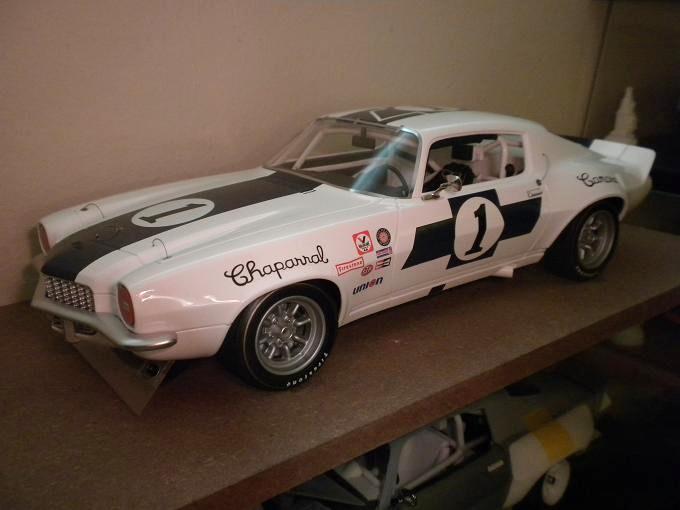
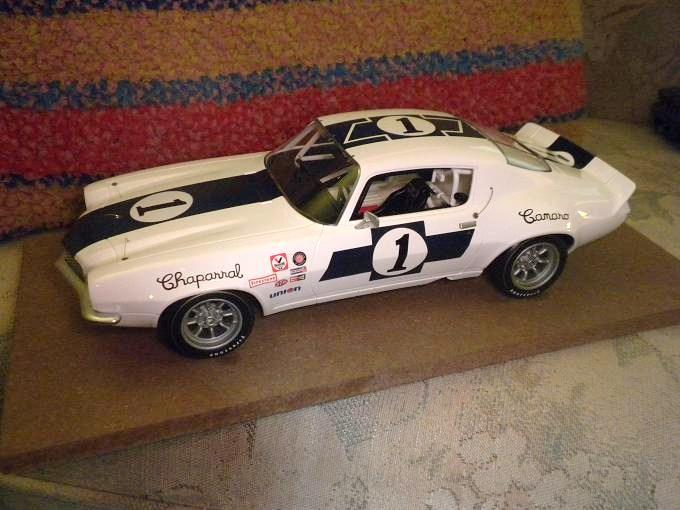
Greetings... Some alternate waterslide artwork arrived in the mail earlier today, whereas I'd hoped to replace the 'Chaparral' and 'Camaro' side lettering on the Replicarz model given it doesn't strike me as particularly convincing. Worried I'd either damage the underlying paint finish applied to the resin casting that makes up the body, or be seriously disenchanted with the aftermarket decals ordered, happily things worked out as can be witnessed below. ...certainly a fair take on the font style as found within the press release materials dating from early 1970. While seen above would be a 1:25th waterslide decal sheet first done by Fred Cady a great many years ago, whereas behind it is a 'Teresawulf' (eBay seller I.D. then) 1:18th waterslide sheet to afford a size comparison. It's entire possible that the latter was scanned from the former... As can be made out, little reason exists to strictly cling to the as-delivered state of the Replicarz side lettering given the underwhelming font employed. But could I remove the lettering safely? Whew - yes, apparently one can! No residual haze either, hence a bullet dodged... Quite decent then, and subsequently a guilt-free modification. The decals ordered via eBay prove reasonably robust, cutting the images while observing reasonable discretion concerning the integrity of the image contrasted to what would likely tear or fold certainly worked out well enough, etc. Mike K./Swede70
-
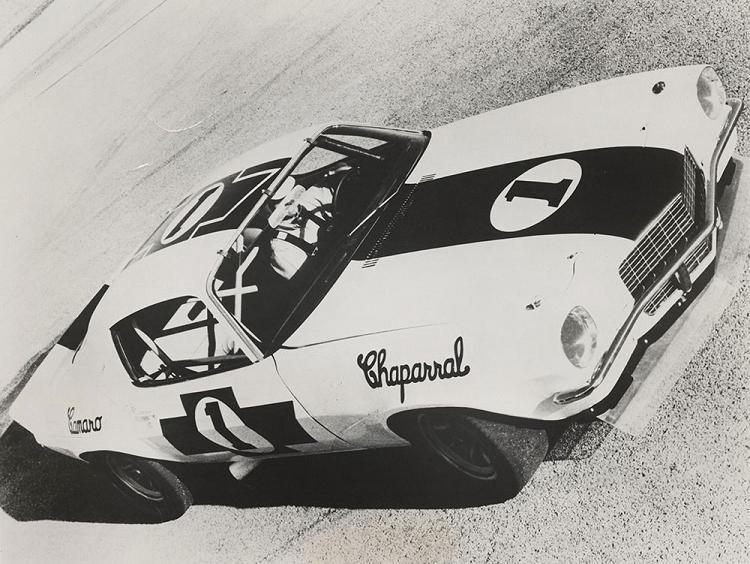
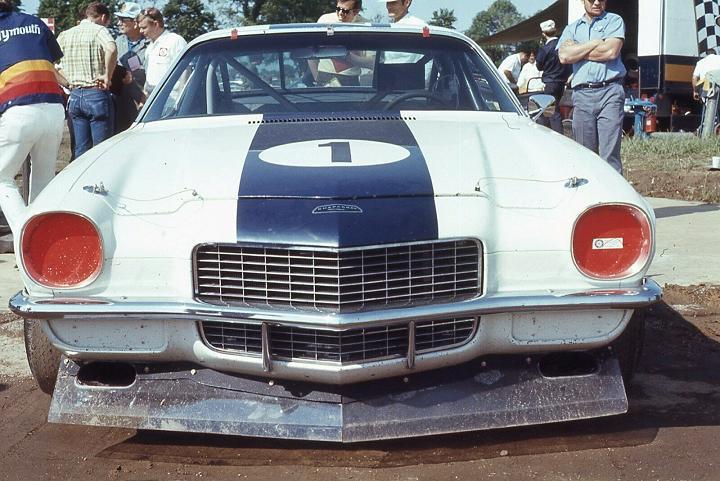
Greetings and thanks for the interest expressed... This was a shot captured at '70 Mid-Ohio which at least suggests how things might have appeared at one venue regarding the Tech Inspection Passed decal. Indeed - at '70 Laguna Seca these were applied to the other side as you've noted, with a slightly different label design/color employed reflect whomever decided such at the regional level. Hmm - those differently colored windshield retention clips attract the eye as well... Regarding other things, I did try to paint on the Lexan spoiler attachment hardware here (albeit with middling success), while the headlamp fill panels look about right even if mine aren't resting inside the bezels as deeply as I'd desire. I will attempt to add the front turn indicator fill panel hardware (perhaps done as four 'dots' of silver paint upon each), although stymied concerning how to position the model to apply such given the weight of it short of reaffixing things to the as-delivered base. Still pondering what else to try, worried for risking too much again. Thanks... Mike K.
-
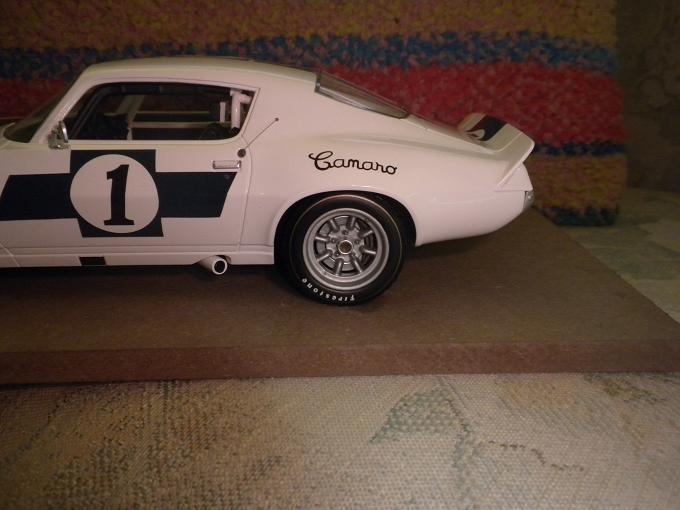
Small stuff this... Mulling other things to attempt, I became fixated on the middling quality of the exterior rear view mirror fit to the model, a plastic affair simply painted silver as can be made out below. Given I have some spares from models broken up for other projects, a rare 1:18 Lane '68 Firebird 400 side view mirror was found and cleaned up consistent with substituting one for the other. As can be made out, the chassis is back together and largely untouched. Further small stuff would be the addition of an SCCA Tech. Inspection O.K. decal to the nearside headlamp fill panel. Hardware has been painted onto the front spoiler mount, although such is hardly noticeable and certainly not discernible for review of this photo image. With the metal exterior mirror sourced from the Lane Firebird then. Here I've temporarily affixed such with white craft glue in anticipation of working up a more sophisticated fixture to hold the mirror in position when better adhesive or maybe some means to pin the item in place is devised. Another angle to be taken is that sometimes a part is so exposed to being knocked off that little justification can be made to really bond such on; i.e. choose instead to use a light-duty glue and accept the risk with the trade off being that a less toxic or 'hot' glue won't strictly damage the underlying surface if a thing is fated to be reset repeatedly. Concerning the substitution of the mirror, unquestionably better quality in appearance though - and more in keeping with the price point too! Thanks... Mike K.
-
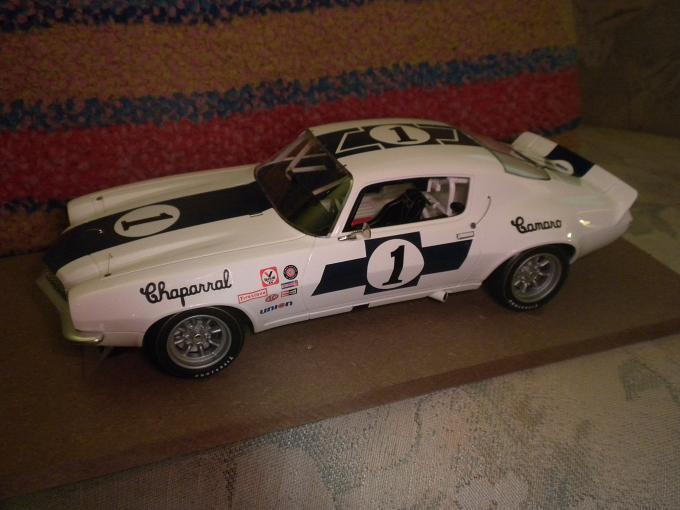
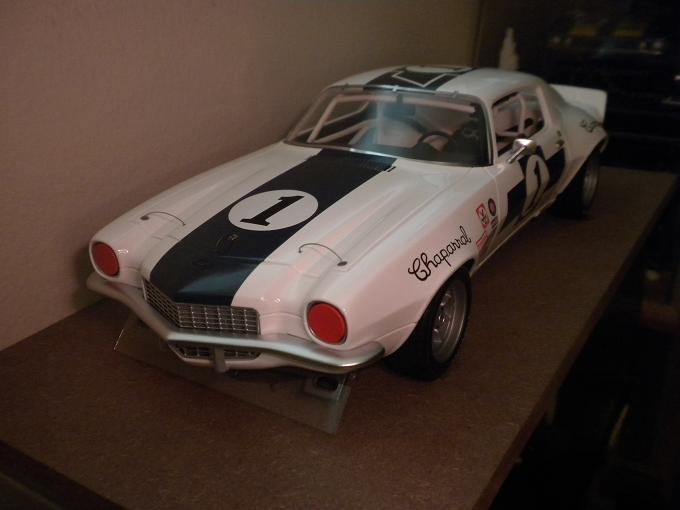
Thanks for the kind continued interest and support... With respect to the brakes on the Replicarz Chaparral Camaro, the discs and rotors are rendered as a single part uniformly finished in an iron hue. As fit they vanish from sight when viewed head-on suggesting they sport no detail at all, although given these fall clear when the wheel and tire assemblies are removed, the possibly exists to paint the discs appropriately prior to refitting. Consistent with this knowledge, here I used small mounds of Silly Putty as a masking agent, followed by an application of Rust-Oleum Mirror Effect (chrome in an aerosol can then). Simple shapes painted simply enough, but a nice improvement all the same. Looking more Hurst/Airheart vs. Delco-Moraine I do think. Oh well... The 'Chaparral' and 'Camaro' characters situated atop the wheel arches seems a bit thin, whereas the 'Camaro' lettering isn't even centered atop the rear arch. Notice too that the script seems to bend/radius a touch to more or less match the rounded arch openings and contours of the panel work even as the period topic doesn't display this characteristic. Wondering then if select decals could be commissioned to rectify what I describe, or if I should speed up work on outsourcing the labor for a full set given the ERTL conversion won't come together without such. Teresawulf and Patto's Place sheets/artwork on this topic exist and could be ordered, hence there's that. Happily the calipers are positioned as they ought to be (the rear calipers were reversed from the as-delivered spec for being situated rearward as witnessed here), whereas some tiny strips of white decal stock have been overlaid atop the small rectangular exterior door latches where the stock items would be indented and color-matched with decals to the body color. I'm not sure if Chaparral strictly bothered with this detail on the actual racers, but nevertheless the application cleans things up a bit. Thanks for your review of this project post. Mike K.
-
Small updates again, and barely rating an update as things go... Just quickly, noticed with be a black wash applied to the cowl vents situated along the back of the hood, call outs (in black then) relating to pit crew where to position a jack along each respective rocker panel, the removal of contemporary pull point/hooks (these rendered as photo-etched parts), plus some modest wheel lug paintwork hitherto neglected. If I could (somehow) extract the interior away from the body shell, such would be refinished in light gray, although at this point it doesn't seem that the glued resin castings are necessarily going to yield to my efforts to separate them. All I know is that I don't want a replica of the restored topic, rather I want the period topic! I did try applying a small length of packing tape to the headlamp bezels and what I'll term 'jeweled' headlamp/lenses set within the same (why weren't these rendered as proper flat fill panels?), but found my efforts futile when I tried to basically yank them off with force for so trying. Worried too that I'd remove white paint from the resin shell, hence chary of doing real damage to this far from cheap model. On a related point, still unenthralled by the painted bumpers and headlamp bezels; i.e. I thought the transition to production spec. would witness these items chromed... With the chassis off the car via the careful removal of four screws access to the inset bezels was no better, hence a limited effort here to fabricate and fit fill panels overlays even as such ride a bit high. I suppose I could grind the lenses down consistent with having them sit deeper, although I'm not (yet) convincing the risk is worth it. The chassis plate is off the model, hence no exhaust dumps or brake duct hoses are seen fitted further forward given these are the last items glued and reinstalled before declaring the work undertaken across days complete. Kind thanks for your review of this project update... Mike K.
-
Greetings and picking up on a long-neglected thread here... Succumbing to temptation, I picked up a sealed resin 1:18th scale Replicarz '70 Jim Hall Chaparral Camaro which recently touched down in stores. I don't know; i.e. more than a few things leave me unenthralled across the release, although 'fire in my belly' with regards to selectively and gingerly correcting what I may as has been my practice. Retailing at a cool $239.95 and not featuring opening panels (thus it's a blob affixed to a blob, glued to another blob of resin), I'm wondering how the market will respond to it. An Ed Leslie iteration is also sold, although such is not seen here. Concerning myself, I suppose too the stark absence of some details/elements will prompt reengagement with my ERTL-based, opening panel late-season Vic Elford effort, and with the change of seasons (as I write then), I'll have more to do indoors in the coming weeks. Not strictly the beginning of the end then for the ERTL-based effort - but perhaps the end of the beginning! - Fast, ill-illuminated evidence of work on the wheels (refinished then in a proper magnesium alloy hue), the removal of the tiny 'Chaparral' decals on the roof edge, plus the addition of some discreet 'Firestone' bowtie accessory decals along the fenders just back of each front wheel arch opening. A bit of progress then. Kind thanks for your review of this post. Mike K.
-
1968 RKE/JRT SCCA Trans Am Javelin
swede70 replied to swede70's topic in WIP: Other Racing: Road Racing, Land Speed Racers
Greetings and a brief return to my otherwise neglected thread... Having come up with a promo-issue Jo-Han 1969 Javelin SST shell molded in Frost White, the thought here was to refinish the forward and rear thirds of the same to suggest one of the rare tri-colored Trans-Am promo releases, these done in either red, white and blue or alternately blue, white and red from nose-to-tail. I didn't have a stock interior or chassis plate molded in white to complete the appearance of things, hence remains of a Bittersweet (Orange) metallic same-year Javelin promo were refinished to suit. Seen above would be the promo shell stripped of the metallic blue it formerly sported, while discoloration is witnessed across the surface of the body that could only be cleared up for a prolonged dip/exposure to a 3% hydrogen peroxide solution with the body situated in a glass flower vase and set in sunlight consistent with allowing a certain process to work. Also spied within the photo would be the essentially as-cast brown plastic chassis/plate, hence some imagination is required to forecast what will be the final result. Rather depressing to ponder the appearance of such at this juncture... Quite a difference then for the hydrogen peroxide dip combined with prolonged sunlight exposure. Given the original Trans-Am promo relied on the Frost White shell to basically telegraph an otherwise wholly finished white center section, it was important that the center band suggested be clean. Some putty work would be done to address other problems in terms of scratches and irregularities discovered across the stripped body shell, but all that was possible with the center band was to polish out what I could and essentially leave it be. A spoon test of the blue and red aerosol paints I hoped to employ suggests things might work out. Hoping too that the choices seen here will translate into success when the '68 and '69 RKE/JRT racers are painted in turn, whereas I believe the paints chosen look a touch better than what Jo-Han applied in the day to speak little of how company line workers faltered in relation to masking the necessary pattern. Tamiya TS-23 Light Blue and TS-68 Pure Red are made out here. Seen above would be an actual R/W/B period release of the promo, accurately telegraphing how clumsy the masking was of the body while also relating how box wear bores through the finishes applied: i.e. witness the leading edge of the hood as well as the wheel arch lips which reveal a bit of the underlying white plastic. Often these models present poorly when they do surface on the market, belying the reality that they are among the most valuable Jo-Han American Motors Javelin promotional releases. - Although hardly perfect, a pretty good end result then even as my own masking won't make headlines. I decided to paint the interior in the style of a '69 RKE/JRT Trans-Am racer without being too bold, whereas the chassis was finished in a semi-gloss white, again akin to the 1:1 period topic. I didn't want to deflect criticism of producing a fake intended to deceive, hence the choice to come up with something obviously different in a key detail. - While lastly, here I've situated the replica finished in B/W/R with an original R/W/B variant to telegraph what was achieved. The plastic glass was polished, metal promo chassis pins were set back into position for use of a soldering iron, while the wheels and tires are made up of Jo-Han '73 snap kit Javelin/AMX blackwalls combined with X-EL '69 AMX Magnum 500's and recycled period promo axles. Thanks for your review of this post. Mike K.
-
Greetings and apologies if I've posted the same basic thing previously... Something low-cost to employ (or at least experiment with) for the purposes of applying paint finishes to rims with exterior lips either machined or chromed, or less likely but still possible two-tone finishes (see below), consider grabbing a supply of scale model rocket nose cones. Seen below is a 1:18th diecast release than slightly underwhelmed for having inappropriately finished wheels (the center stamping should be painted black), whereas after much hemming and hawing, I finally gave matters a try for working up a two-part mask as illustrated. One section divides the outer pressed steel rim finished in silver from the center wheel stamping. Prepared carefully, the paint mask was thinned as much as I dared to fit as evenly and as tightly as I could manage (i.e. one simply doesn't have to 'live' with the as-delivered nose cone material thickness where it counts), whereas a relief for the air valve was carved out with a file to more or less lock the mask in-place when time came to apply a finish. Notice that the tip of the same cone was saved and trimmed to match the wheel center/lug surround trim in this instance to protect what couldn't be removed and safely tucked away off-site. I've done something similar for other 1:18th topics, carefully marking what was created for what purpose, whereas after a time the rocket nose cones (which can be purchased separately in a bundle should one look around versus being charged all-up for a whole model rocket kit) just become part of one's tool kit/bag of tricks. Thanks... Not everyone will have a hobby shop that splits the cones out separately for sale, but for looking it's possible to source such... The factory promo iterations (or at least some) didn't have the wheels finished appropriately. It was like I was ashamed to display it given people would talk! Compressing much (hey - it's a Turbo after all!), noticed will be my masking setup ready to go... Not perfect, but then the wheel masking on a silver/Polaris-painted version of the same basic release frankly isn't much better - or may rate as even a tad worse. Mike K.
-
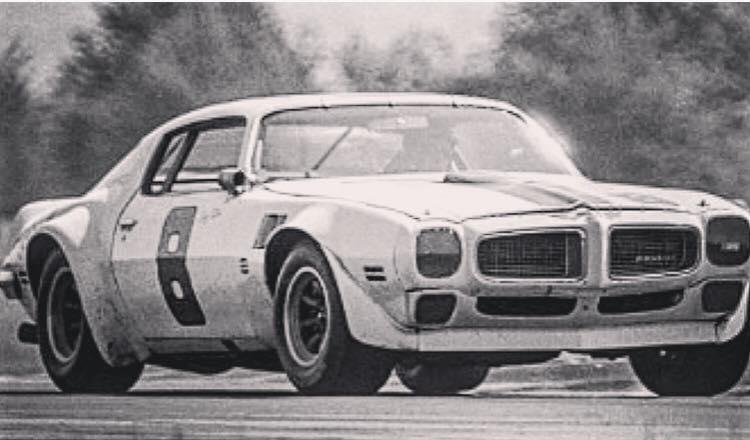
Greetings... Minor stuff, but some revisions to the outer appearance of both the '70 Laguna Seca iteration as well as the '70 Mid-Ohio iteration. Although configured differently across the race weekend depending on what session, qualifying period or extent of the race itself the photo was taken, I'd made the mistake of including some small additions to the ends of the standard front spoiler element that weren't in fact raced. Trimmed and reshaped a bit, here the model looks a touch neater... ...at speed during the running of the '70 Laguna Seca Trans-Am in the over 2.0 liter category. ...also long ignored would be the shape and lower extent of the rear flares which seem to dip below the rocker panels and subtly angle up - at least as seen at '70 Mid-Ohio. Worried I'd damage the delicate rocker panels on this version, I'd hesitated to pour yet another set of flares, cut element from the same to extend each flare downward as indicated, and basically bring things into focus. Tedious and nerve wracking, things are better now... Most images really don't telegraph how far the forward edge/profile of the rear flares extend down, while here something is clearly captured. Notice too the slight enlargement of the vents part and parcel of the front valance panel profile - something I hope to add to distinguish between these two builds. Kind thanks for your review of this brief project update... Mike K./Swede70
-
What did you see on the road today?
swede70 replied to Harry P.'s topic in General Automotive Talk (Trucks and Cars)
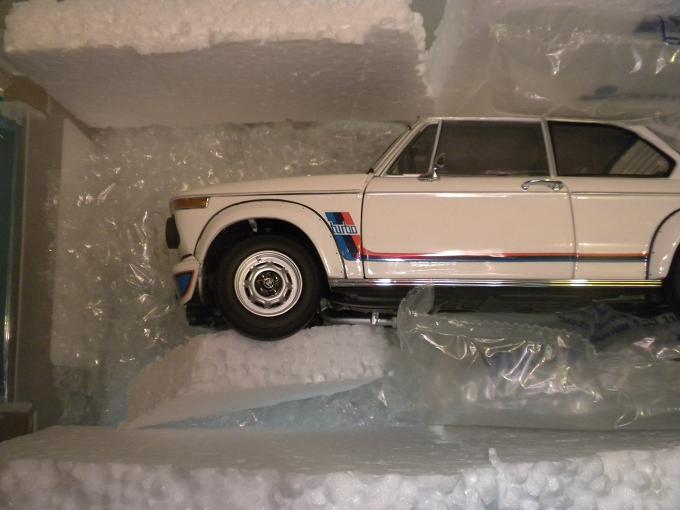
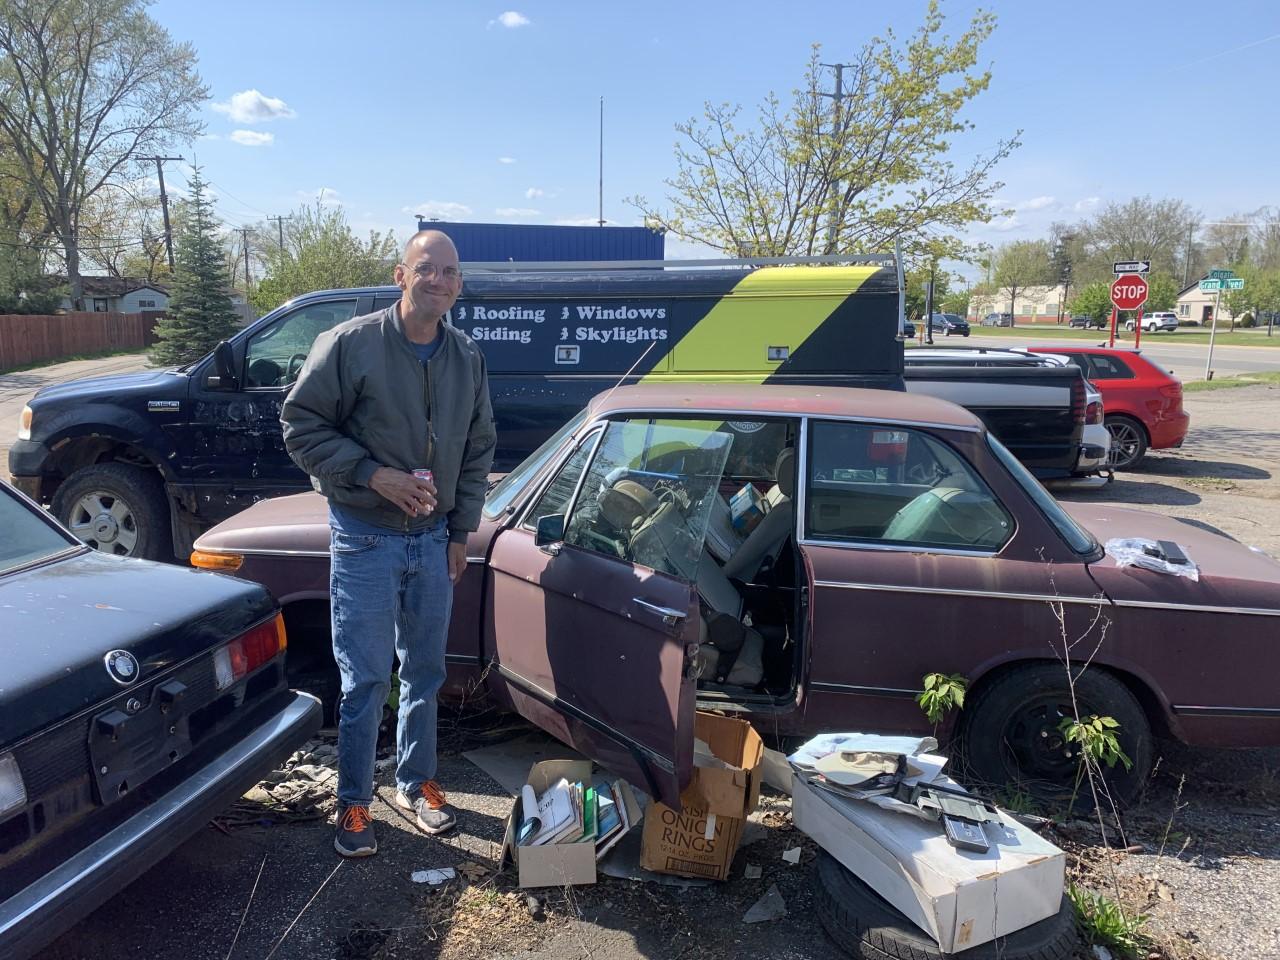
Greetings, Maybe not strictly seen on the road, but stationary and slightly off it! For an extended period the vehicular love of my life was a '74 BMW 2002 that I reluctantly sold seventeen years ago presumably never to seen again. Two days ago in northwest Detroit a friend and I spied it resting more or less inert and almost untouched since I had it. All the books and paperwork I'd included and set in boxes remained inside, whereas today I was very kindly availed much of it back for free. Seen is my bald self before the not quite shattered remains of my ride. May it live on, whereas hoping to devise someway to telegraphs thanks and appreciation for inspecting such and being afforded what I carried away. Thanks... Mike K./Swede70
-
Greetings, A local hobby store came into deal with regards to a large range of 1:43rd diecast models tied into just about every James Bond film ever done. Sold for $13.99 each, I grabbed three, with one being a 1973 Chevrolet sedan that can pass for an unmarked police cruiser. Boxed under different labels with a more mainstream spec. police iteration as well as a taxi cab featuring, it seems the James Bond/Live and Let Die version is slightly less common. My came through with mismatched wheels likely drawn from the taxi cab release and looked strange, although some work overnight for use of Tamiya Titanium Gold further coated with a dusting of Tamiya Translucent Orange followed with an final shot of Tamiya Pearlescent Clear yielded me stamped steel rims to match the body hue. The paper diorama background just fell out of the display case provided, I reversed the model on it's base so that it would look more or less normal, although the atypical scale human being still sits behind the wheel of this particular model. I don't know - it just seems that I'm being watched... Closing things out, not Minichamps quality, but not under threat of being tossed in the trash. The hubcaps were masked for applying tiny balls of Silly Putty and pressing the same in place four times over. I thought I'd wreck it for experimentation, but in essence it looks good and happy in the company of other period police cars collected to date. Thanks... Mike K./Swede70
-
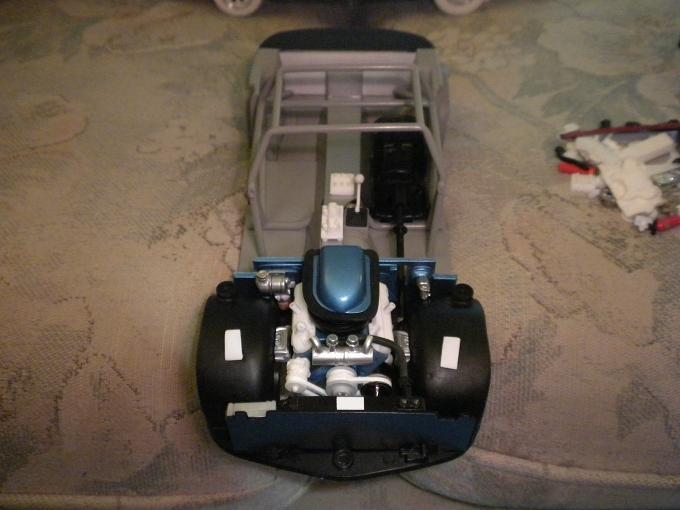
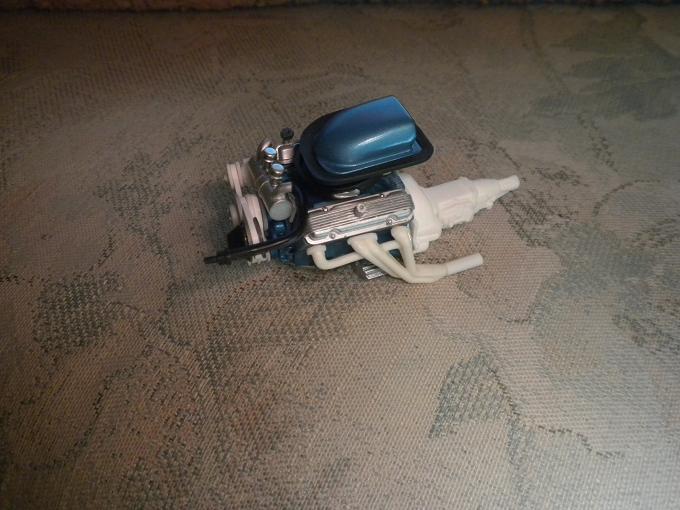
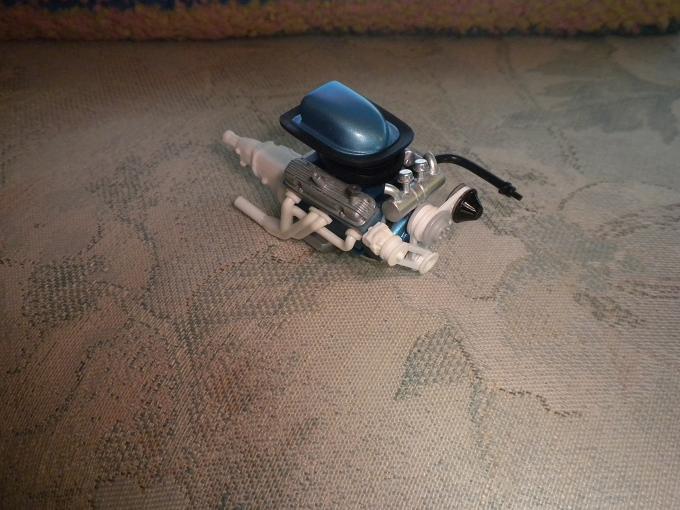
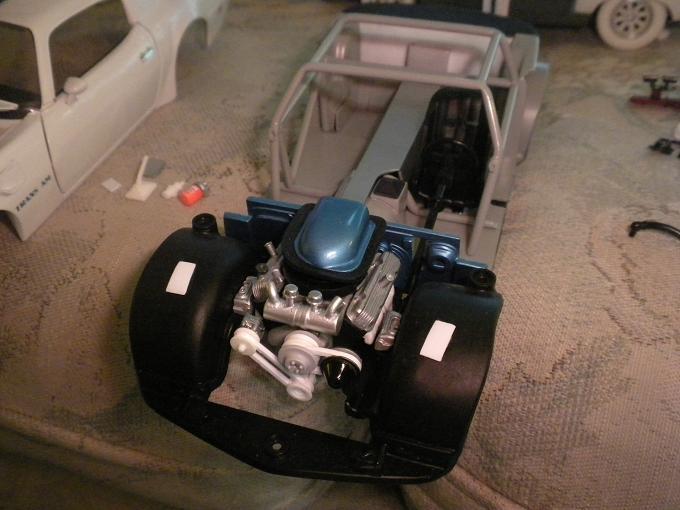
Small stuff this, but a coolant expansion tank finds a home on the firewall as well as the Traco remote oil cooler setup (largely invisible) set just below it. To the right would be found a very short master cylinder (necessitated by overly large front wheel housings/liners) still requiring further work, while a coil is spied resting along the firewall top just back of the shaker hood seal. The finned valve covers were recast given some gaps were witnessed where the fin insert indifferently mated to the GMP '70 GTO Judge 'stamped steel' iterations I'd fitfully blended the Welly '72 Firebird Trans Am detail into, while for some delicate clay application on my master the unwanted gaps should be addressed now. The top radiator hose is just a modified ERTL item, shortened a bit and very likely to be covered with thin copper wire consistent with reproducing the profile of cheap period corrugated hose. I'm not quite sure what to use in this capacity, although I'm willing to try! Additionally, along the driveline overlay may be seen a pair of CDI ignition units (one a spare then) positioned atop a tiny platform supported by Lords anti-vibration mounts (a small round 'rubber disc' situated on each corner of a sheet plastic rectangle then), while a shifter plus shifter ball has been fit besides even as it's a touch big and begs replacement. The exhaust header collectors were trimmed and adjusted to match for length and mirror each other in relation to the angle by which they exit. As witnessed, the mildly modified MPC 1:20th AMC AMX parts live happily in their unfamiliar surroundings, while it remains to be seen if room exists to fashion the atypical full-length exhaust fit to two of the T.G. Racing entries I have going even as the third represents the '70 Laguna Seca spec. with the familiar abbreviated sidepipes. And just to finish up, the orange-painted FRAM filter is barely visible here beneath the TRACO remote filter mounting, itself scarcely spied beneath the aforementioned coolant expansion tank copied from an old turned aluminum Halon fire bottle topped off with the best-rendered coolant cap I've been able to source to-date. Kind thanks for your review of this post. Mike K.
-
Greetings... Exhaust headers can be hard to find in 1:18th, whereas scratch building the same can be tedious. Here some 1:20th MPC '70 AMC AMX headers (doubtlessly old '68 Craig Breedlove-issue carried forward then) with mild collectors mods looking largely the business. The first photo telegraphs how thing fit relative to the chassis and upper control arms with what was a scrap engine assembly, whereas the photos that follow from there reflect the same engine substantially cleaned up and outfitted with the best items gathered and painted to date. Thanks... Mike K./Swede70
-
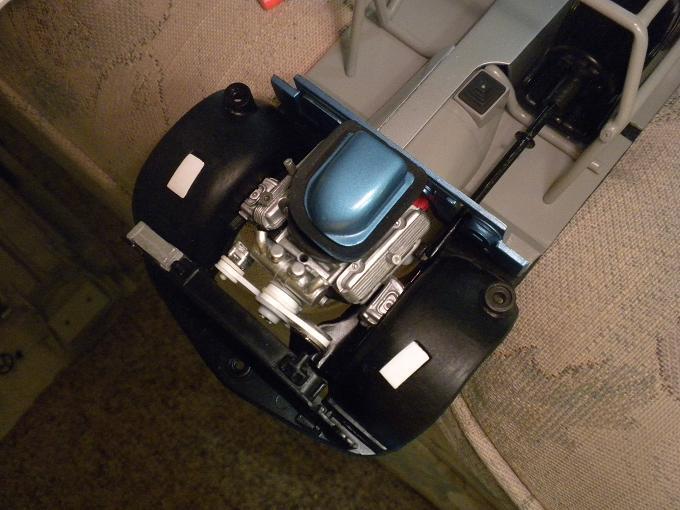
Greetings, As it should have been done from the start, here would be the accessory drive redone with pulleys fashioned from tube stock with square rod stock 'belts' situated to suit as contrasted to making do with what I'd employed before. Unpainted, but looking cleaner and more coherent now with the alternator situated higher up and the Hydroboost pump drive situated directly to the right. Thanks... Mike K./Swede70
-
Thanks for the kind interest... Small stuff this, although witnessed would be an attempt to reposition the alternator from the stock location where it would otherwise interfere with the oil 'puke' tank, while for three attempts at scratch building the same, said puke tank looks tidier and fits better. Bonding the two mounting bands cleanly while not overdoing the glued 'welds' proved a challenge, while nice to discover that an old can of Krylon Foil Metallic Silver really worked nicely on the pair of resin oil breathers made out below. With further adjustments and paint the accessory drive will soon appear normal and more or less finished, trying now to better understand the configuration of the Bendix Hydroboost combined power steering/power brake pump even as the master cylinder detail is fairly straightforward to source. Not sure really how much in the way of hoses and electrical wiring may be added, although for something in a larger scale one is at least prompted to try for more room than usual exists to experiment. The old 1:18th ERTL diecast tool still looks largely like a toy, although appreciate I'm trying to transcend the roots of such! While closing out, more attention paid to the thickness of the accessory drive pullies relative to the belts results in a cleaner appearance again, while the white plastic plugs suggest I'll cut off the fender to radiator support braces on this the third '70 T/G Racing Firebird even as the recent decal work might be placed under threat for so-doing. Hoping to order a photo-etched seat belt harness as well as some rudimentary 3D-printed exhaust headers consistent with improving things before long. Thanks for your review of this project update... Mike K./Swede70
-
Greetings... Strictly speaking not full-on diecast, but in-league with 'our' usual tales of happenstance discovery and thus shared here. Hesitating for a moment, the recent turn towards Alfa Romeo-themed topics proved the decisive influence here, and hence I was powerless not to post... A quick review of FB Marketplace revealed a built kit posted for sale locally, while for a half-mile drive and $20, a built and apparently wholly intact 1:8th scale Pocher 1931 Alfa Romeo 8C 2300 Monza was picked up. I haven't noticed anything missing, while these days people part intact kits on eBay and whatever might be revealed as absent could likely be gathered up independently without too much fuss. No clue where to put it, whereas some part of me suspects that it's grown overnight! Thanks... Mike K./Swede70
-
Just on the topic of the few diecast kits on the market, some advantage is afforded for seeking such out, although maybe less than one would first guess. For just tearing into almost any 1:25th diecast topic in particular (short of Danbury and Franklin Mint rebuilders), most are held together with a handful of screws situated in obvious places, while observance of normal caution will yield you something cleanly field stripped and largely unbroken. Sometimes screws will be hidden in wheel arch areas, situated behind glued-in front valence panels, etc. Part of reviewing build threads here is to establish how to best attack this tool and that, while even those who post infrequently usually will chime in if they have legitimate insight to share consistent with clearing a specific hurdle. With this in mind, no huge value is really on offer for holding out for fairly scarce disassembled diecast kits - at least in my view. Will the occasional model be written off for clumsy disassembly and incautious handling? Yes - most certainly. Initially an upsetting proposition, if the up front cost of a replacement is judged to be not so high, appreciate it's pretty common to silently order or gather another example in the night and revel in the availability of a comprehensive spares package to push the envelope regarding what one might try, what finishes might be applied, in addition to sorting out and isolating the best of the Best of the BEST of what you'll have inspected most closely! Within reasoned limits, modifying simpler diecast topics isn't a hugely expensive hobby, whereas for having a high-quality finish applied that looks acceptable out of the box is indeed a plus and a boon for those of us overwhelmed by more elaborate start-to-finish unassembled plastic projects. Strategic work consistent with altering an interior color or swapping in a better engine or one carefully detailed is wholly o.k.! Opportunistic collecting driven by chance and whim is o.k. too! Mike K./Swede70
-
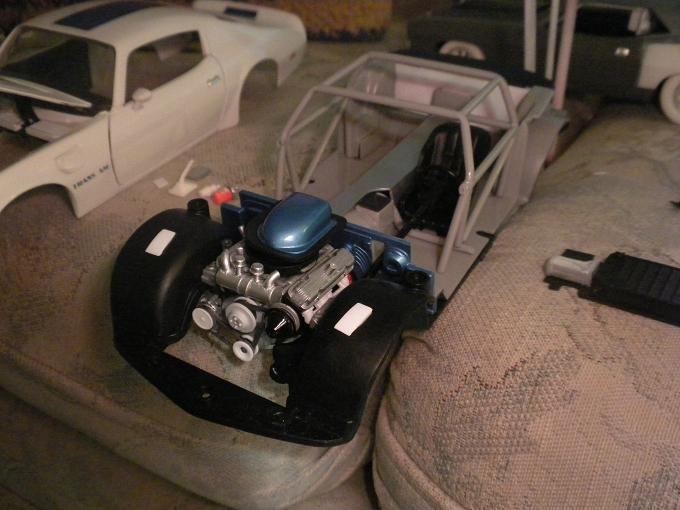
Not much to strictly see, some modest additions plus paint work to report then... Still further efforts made to refine the fill panels along the back of the interior, while the roll cage and driveline tunnel overlay were puttied and sanded again and again to eliminate evidence of irregularities, gaps, holes, etc. prior to applying finishes. Frustrating then to realize just how much work this and that requires to look reasoned; i.e. one change or alteration has a spill over effect that demands careful attention to ensure things remain in control. Hoping to have a seat belt photo-etch kit in-hand soon, with the main interior paint completed before long. Underneath the front subframe in addition to much else will be finished in aqua, while I hope to mask the subframe rails topside to visibly delineate these from the enormous wheel arch liners that otherwise blot out awareness of what's situated lower. Oh - and how exciting, a large Harrison oil cooler has been fit within the space just left of the radiator. Thanks... Mike K./Swede70
-
All that's been advanced above, with whatever further insight I and others may provide then... Just for myself, mostly I'm drawn to 1:18th renditions of period road racing topics (diecast then), with select 1:25th scale unassembled plastic kits filling in for what hasn't been tooled in a larger scale. 1:43rd and 1:18th F1 Grand Prix topics dating from the mid-1990's and later are also collected (again in diecast), whereas I'm finding myself priced out regarding new releases while I simultaneously less than impressed with the move to sealed resin afforded at an equally stiff price point. Some period 1:25th plastic promos are collected, but these too are typically expensive and not an avenue I can explore deeply. I suppose I keep in the hobby for avidly modifying older tools picked up when the price of such wasn't wholly prohibitive. Could I afford to start again from scratch with prices as they are? For what I do - certainly not! Patterns will be picked up with regards to which manufacturers have done the best justice to which topics and what price point. In a sense it would be easier to simply rely on ratings relating to the 'best' afforded (and some are routinely terrific mind you), but as time goes on most companies currently active are almost endlessly churning fully-amortized tools to keep their businesses going, while I'm not sure if things can continue apace if most everything has been done - and better - in the recent past. If a firm relates in a press release that the best of something will soon be released to market for $250.00 - well, I'm not the customer for such. Awareness of the Golden Age of Cheap China ending maybe a few years past the turn of the century is general amongst hardened and well-informed diecast collectors who, motivated by a sober awareness that things will never be so detailed and so inexpensive as availed twenty-odd years ago, super-heat the online auction market for what they missed in-period. Understand too it's common for most to cycle out one low-cost and low-detail model to gradually move up the food chain consistent with having a small but carefully governed collection of very good tools/renditions of what's most valued. Tiny, reknown museums certainly exist, while enormous and sloppy collections that take over lives and destroy relationships also exist, hence be forewarned... Locally where I work a single day at an area automobilia shop, the younger customers are shifting towards 1:64th scale releases previously the terrain of Hot Wheels and Matchbox alone, and if $20 will yield a very nice Ruf Porsche Yellow Bird, who's to say value hasn't been afforded? People are being priced out of the diecast hobby looking up to 1:18th and beyond, whereas sealed resin topics from 1:43rd to 1:12th aren't necessarily setting the world alight with regards to demand. Mostly old news here given what I'm relating has been said again and again. Quite understandably, many here reasonably restrict themselves to 1:24th/1:25th low-cost drugstore diecast fare and simply keep things light and fun. Damaged older Danbury Mint and Franklin Mint models can be had for modest sums, and more than a few posters enjoy feasting on such - again, keeping costs in-check and the fun factor high. Modifying these less expensive options is a guilt-free experience as many will attest. Whatever you should do and however you opt to approach things, we each wish you well. Identify and topic and a collection focus and people humming on a like-frequency stand ready to chime in and afford direction. Without further details it can be hard to generalize concerning where we might guide you, although I trust these are early days for you and more information may be forthcoming. Good luck then... Mike K./Swede70
-
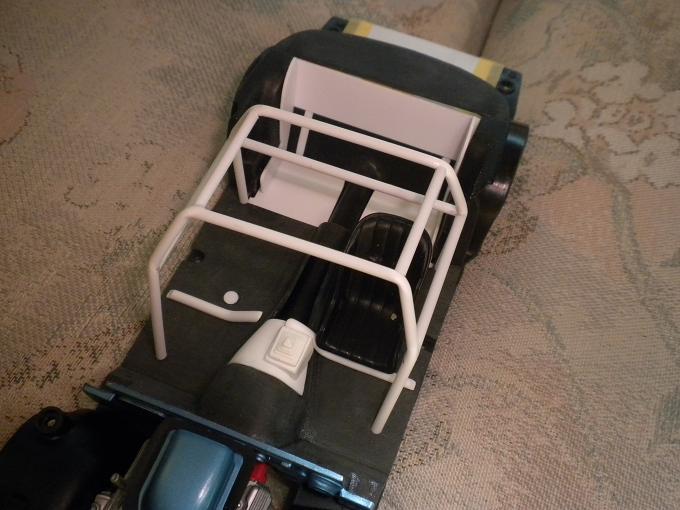
Kind thanks for the notice... Small updates include the revision of a few fill panels across the interior, an initial stab at an oil puke tank, aluminum rear axle retention structure situated through and atop the rear wheel centers, etc. The peculiar 'chimney' structure was added to the driveline tunnel overlay which in turn was glued and finish puttied and sanded prior to applying primer, while a pair of tiny roll cage stubs were added to fill the modest gap between the forward roll cage members and what would be the bars tying the structure in to the front suspension pickup points. Although the front wheel housings are rendered rather large and threaten to obscure reasoned efforts to afford detail in their proximity, I still intend to make what I can of the limited space availed to work up the roll cage outriggers leading from the interior portion of the cage nearest the dashboard as is suggested here. Kind thanks... Mike K.
-
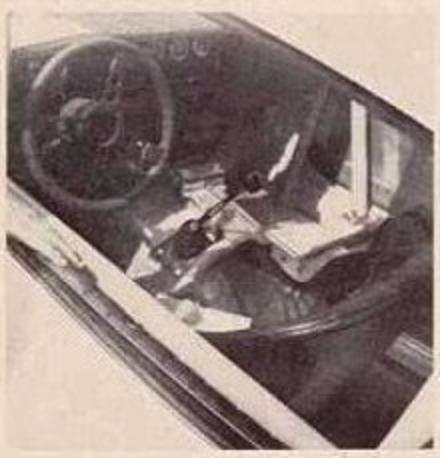
Greetings... Not too much made out here, but noticed are the protective side bars added to the roll cage, the fabrication and addition of most of the console overlay along with an electrical switchbox, plus a period Delco CDI system. The fill panels along the rear bulkhead as well as the side panels formerly occupied by the cast-in seat cushion were likewise redone to ensure all gaps formerly noticed now cease to be. Out of sight would be the steering wheel front which has been scrubbed of it's honeycomb wheel center trim, the spokes of the same opened up for use of a pin vise. Later a drill and round file was employed to open up a hole in the center of the steering wheel so it would look correct as per a rare Model Car Science period photo revealing the configuration of the interior at '70 Laguna Seca. Thanks for your review of this brief update... Mike K./Swede70
-
Just quickly this... Noticed would be some interior paneling to plug up the rear seat cushion area extending back to the bulkhead formed between the interior and trunk. A bit rough yet, although reasoned enough to create duplicates and refine from here. Pondering the conversion of the other models given everything is fitting better for approaching things in this fashion. Extending the driveshaft tunnel and raising the profile of such towards the back stands to come. Thanks... Mike K./Swede70
-
Greetings... A visit to the Detroit Autorama Toy Show turned up a slightly damaged 1:24th Danbury Mint 1969 Pontiac Firebird Trans Am for $25. The exterior rear view mirror was missing, while the rear suspension needed a small amount of sorting given the driveshaft had separated from the differential and allowed the two-piece 'functioning' shock absorbers to fall out of alignment. Carefully bending the driveshaft yoke on the back to reset the same in relation to the differential while also aligning bottom half of each shock to slide into the top half of these assemblies allowed the rear end to be reset without the use of glue. Not terrible then... A 1:25th Revell '69 Camaro Z/28 plastic kit afforded a replacement exterior rear view mirror (seen in-position and largely happy), hence it's fairly presentable after a bit of cleaning and work to darker the tires via the use of Lexol/Vinylex. The body was washed here and there, while Mequiar's Quik Wax worked it's usual wonders with the plastic 'glass'. The box, foam shell and paperwork was included. Thanks... Mike K./Swede70
-
Thanks for the kind notice... Some rapid work across the interior including the removal of the cast-in pedal assembly, plugging of the holes otherwise used to secure each front seat, plus the integration of a partial resin console plug in addition to the fast fabrication of a four-point roll cage based upon existing patterns which reduced the implied misery. Perhaps I should have checked my spares inventory for GMP footwell pedals before I ground out the cast-in detail noticing that I've run out? Again the bulky dogleg door hinges situated well forward have to be avoided, hence the forward members of the cage don't stretch as far forward as might be desired, while the dimensions side-to-side cannot exceed what space the rather cramped interior featuring thick doors and interior door trim will allow. That the floor of the model is likewise thick and situated high also complicates matters, so what finally is judged best equates to a compromise reflecting any number of very real limitations. Undertaking things somewhat differently this time, the rear seat cushion detail has been drilled and filed out, with the plastic panel work leading to the stock package shelf remaining intact. Fill panels to finish off what remains in need of plugging will likely come next. Thanks... Mike K./Swede70