swede70
-
Posts
727 -
Joined
-
Last visited
Content Type
Profiles
Forums
Events
Gallery
Everything posted by swede70
-
Neat topic - nice work on the roll cage. I hope to see further progress. Mike K.
-
Greetings, Indeed and as others have advised, do consult period magazines to confirm what shade you'll be trying to approximate. For my part, there was a time I tried different Metal Master coating combinations (speaking of clears to overcoat any base shade) aiming if you will to match the 1:1 period Mag. alloy Minilites in my possession. I had a '74 BMW 2002 and purchased real Minilites from an area Improved Touring BMW 1600 road racer, hence I had something good to compare for my usual SCCA Trans Am topics and fixation. I too viewed the MM Magnesium metal buffing shade as too dark for my needs. What seemed best was to use MM Stainless Steel with a light overcoat of Tamiya's Clear Translucent Pearl. The clear pearl overcoat gave the surface a slight metallic sheen, whereas given both the MM product and the Tamiya aerosols are both lacquers, they 'live' happily together consistent with affording us a reliable finish that will dry. If it matters, know I don't buff the base coat MM finish at all; i.e. I simply apply the designated clear atop the otherwise delicate MM aerosol. I've found too that Krylon Chrome can/should be handled the same as MM's lacquers in that it definitely needs a clear coat to stabilize the surface properties of whatever is captured. Early Indy Car and drag racing Halibrands would likely call for something darker such as the Duplicolor or MM Magnesium shades, but for other mag. alloy wheels, blowers and such, perhaps consider the MM Stainless Steel w/Tamiya Clear Translucent Pearl option. Kind regards... Mike K.
-
Swede Savage Trans Am AAR 'Cuda Hwy. 61 based project
swede70 replied to swede70's topic in Diecast Corner
Greetings, Revised impact wrench alignment fixtures have been fashioned for each wheel. Such consist of a disc of thick walled plastic tubing drilled for five lugs, plus three additional holes to allow for the passage through of plastic rod that supports and positions the disc on the face of the wheel itself. The aluminum hub guides pass clear through each disc, whereas a cast resin oil breather was used to replicate the hub end and simply fits back of the aluminum tube used. All of this will look far better when painted, but not a terrible sight now. Thanks for skimming this update. Mike K. M.K.
-
Neat topic, and welcomed too. I trust this is a sealed resin take on it? Thanks for sharing... Mike K.
-
Swede Savage Trans Am AAR 'Cuda Hwy. 61 based project
swede70 replied to swede70's topic in Diecast Corner
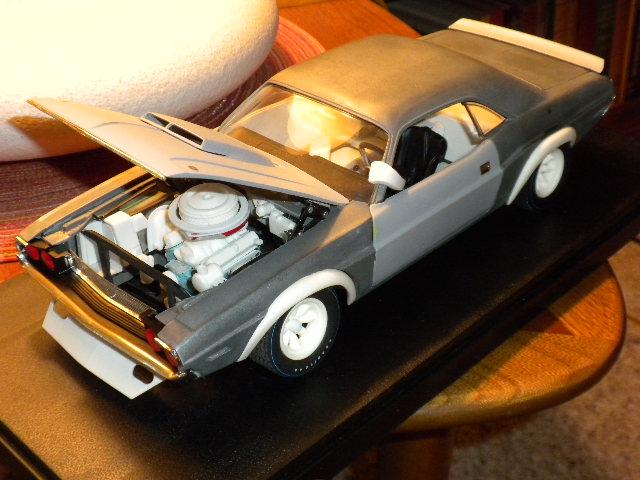
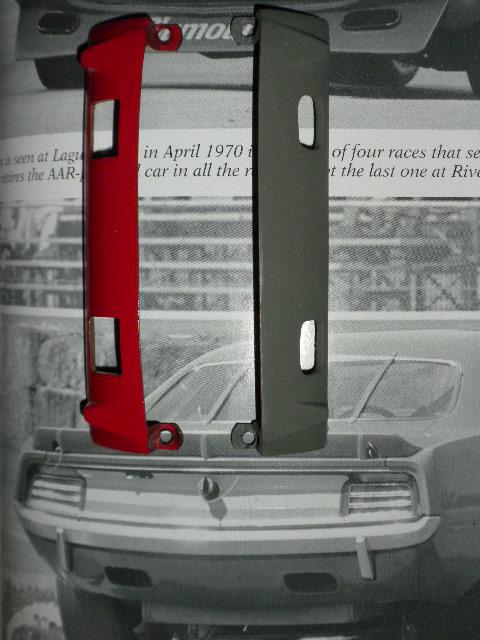
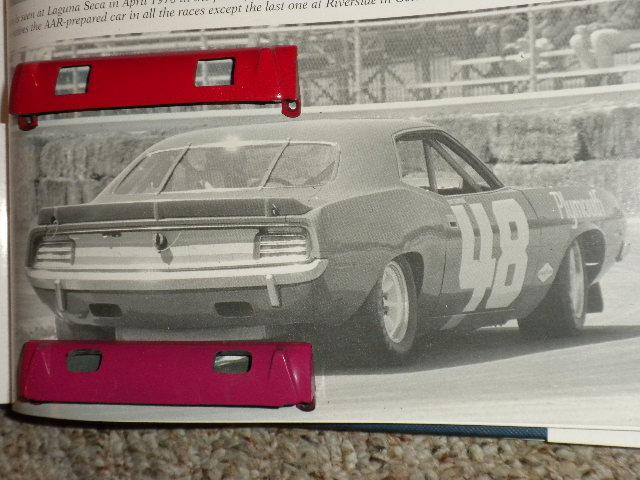
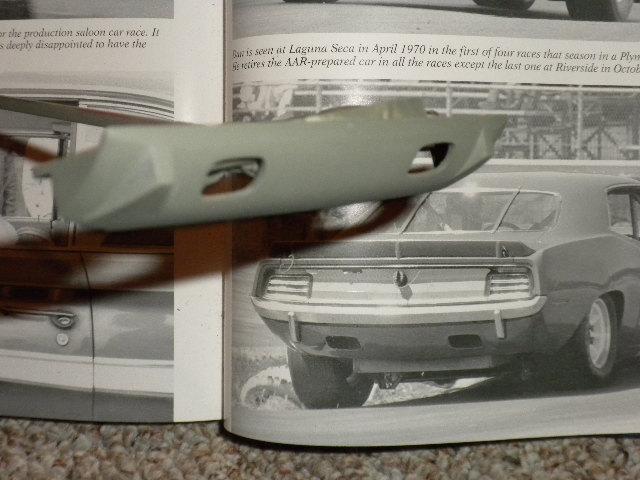
Greetings, Thanks for the kind comments and attention paid. Moving quietly along, I think I'll try to do a Bridgehampton '70 entry which seems to represent the high tide of the factory Barracuda effort during that season. Although far from a great photograph given the image split and tight binding, the specification I hope to replicate is this: ...note the attenuated front spoiler, and Swede running the 3M decaled #48 versus his own #42. Note too the lighter color of the body employed versus Swede at Laguna Seca and Lime Rock, and both remaining cars late season. At present I'm not certain I'll bother with the subtle flares discernible for close examination of this image. ...here can be seen the trimmed front spoiler with slightly enlarged brake air inlet openings. Look closely and you'll also note the hood pin lanyard stays mounted on the hood itself at about a 45 degree angle to where the pins come through the hood proper. I'll use the standard Hwy. 61 clips (which are quite nice) in combination with some light duty clear fishing line to fabricate some cables from, taking care to orient things with glue and careful positioning so they'll be as symmetrical as I might make them. The glue smear noticed on the bumper will vanish as this assembly stands to be replaced outright with a new cast item that plugs the road lamp cut outs on the base of the blade bumper and is better chromed for good measure. Yes - all this stuff takes time. ...unless greatly mistaken, for what seems the first two-thirds of the season the standard 'Cuda rear valence was employed versus the standard 'no holes' version or the same fitted to the homologation special AAR 'Cuda. The Hwy. 61 rectangularly-shaped openings seen on the Hemi 'Cuda issue valence did nothing for me, so I opted instead to cut holes and shape the same on an otherwise solid version. Small irregularities seen on the edge of the base of the valence near the attachment points of the painted valence with rectangular openings on it were further smoothed away prior to applying primer. As a short note, the photos are from Laguna Seca '70 and depict Dan Gurney making circuits during practice for the first race of the season. ...fuel tank ground out, cast resin fuel cell housing in place, revised rear valence in position. - ...and the sister Autodynamics Challenger project which will share much of the chassis work of the 'Cuda - or rather the opposite given the Challenger is in a much more advanced state! With the florescent orange individual headlamp plugs and trimmed spoiler, this model is intended to replicate the car as entered at the Mission Bell 250/Riverside contest. Thanks for skimming this post... Mike K.
-
Swede Savage Trans Am AAR 'Cuda Hwy. 61 based project
swede70 replied to swede70's topic in Diecast Corner
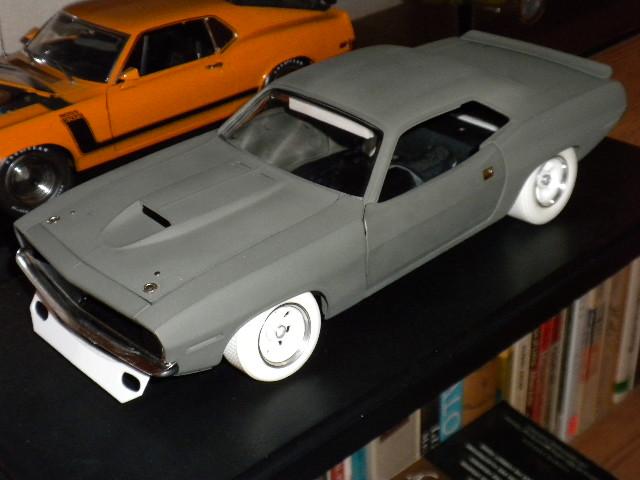
My mistake - indeed, this is a 1:18th scale model based on the Hwy. 61/Supercar Collectibles '70 AAR 'Cuda stock production model. As for the wheels, some time ago I took the plunge and bought all the supplies I'd need to hand cast stuff I'd modified or mastered. My first project was a two-piece mold of an improved GMP Trans Am Minilite wheel. I didn't like the shape of the spokes which seemed peg-like as contrasted to the almost waterfall look of the actual Minilite spoke. I saved the center of the wheel, the outer rim, and combined these with eight carefully fabricated and shaped spokes before pouring two-part urethane into what would become my first casting effort. For these wheels, I simply sanded off the cast-in outer lip and replaced the same with the aluminum rings. The turned aluminum outer rims aren't done strictly by me, but rather are cut down from Pegasus 1:25th 23 inch 'stepped sleeve' lowrider wheels that are sold with something akin to a turned aluminum barrel times four. I literally hacked down the barrels with a razor saw, then filed what remained down with a hand file given I don't have a proper hobby lathe. Fortunately these items can be fitted to 1:18th scale topics with 15 inch wheels without seeming to be too large or too small, hence I was fortunate here. I'll try to plug in product identification here so that this aspect of the project won't be a secret. See: Pegasus model car wheels - look for the 'stepped sleeve' 23 inch bubble packets seen about half way down the page. Kind thanks for the positive feedback. I'll try to include a few Challenger pictures next time I'm on. Mike K. -
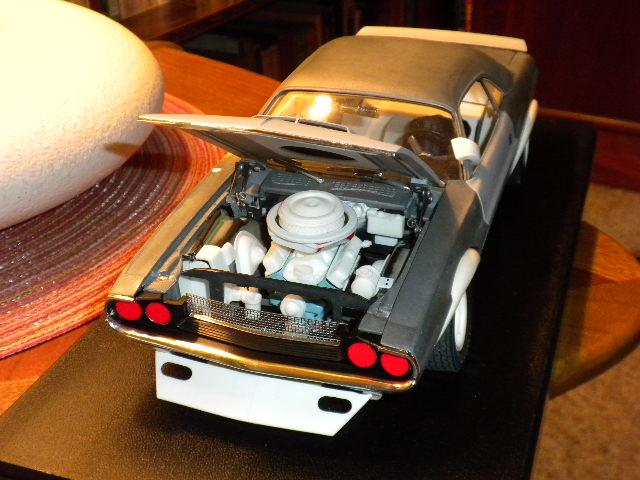
Greetings, Hoping as I've had to at least get my project up on wheels before any ACME release of the same topic, this would be a Hwy. 61 based 1970 Trans Am AAR 'Cuda with resin wheels, turned aluminum outer rim lips and prototype tires intended to be done by me. The rear wheel housings were opened up to the edge of the rear subframe rails, whereas subtle work in the form of wheel arch lip reduction or removal of the same was performed to the body. A longstanding Autodynamics Challenger exists as a sister ship project, whereas it too will likely be fitted out with the tires seen in utero here. The rectangular thingy seen inside is a Wink multiple element rear view mirror. Notice too how well Hwy. 61 glass looks when polished up with pure carnauba wax. Thanks for skimming this post. Mike K.
-
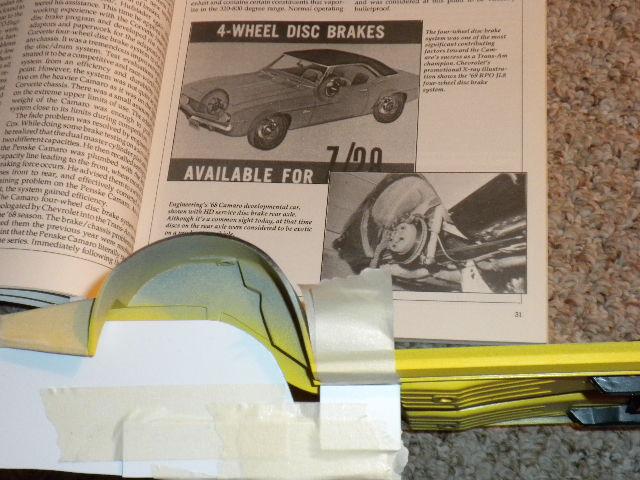
Thanks Ralph for your kind input, It's an odd time in the hobby when 3D printed stuff is coming online that seemingly threatens to carry all previous scratch built and hand cast stuff before it. On one hand I want to create everything and have a reasonably well developed backbone to do such, although on the other hand I almost fear the technical savvy and precision of future 3D printer capability that might render my eyeballed efforts laughably inept. I probably will go for the rear disc setup, conscious throughout that the technology is new and that the surfaces might require greater clean up than what might be afforded us later. Again - my thanks for your feedback. Mike K.
-
Very nice, very intelligent fabrication work on show. Thanks so much for sharing... Mike K.
-
I was wondering if anyone had purchased the TDR Innovations rear disc brake kit. No posts were seen in their comment section below the product, although if the transkit was well done such would certainly save me some time. Maybe it was about $29 U.S.? Thanks in advance. Mike K.
-
Revell 1/12 Foose Camaro
swede70 replied to kpnuts's topic in General Automotive Talk (Trucks and Cars)
Here's hoping you'll find the experience of building this kit a good one. It is interesting that the color brown is making something of a comeback on street cars, with some very appealing tints seen by this writer. The factory shade would have to be looked up, but it too is appealing. Again, have a good experience here and may we all share and compare. Kind regards... Mike K. -
1/12 Camaro Pro Street and Twin Turbo Touring 69
swede70 replied to Ralph Torres's topic in WIP: Drag Racing Models
Beautiful work so confidently handled again and again. Very much impressed, whereas how fun to notice such a variety of approaches to this most popular topic. Thanks for sharing your expertise and craft. Mike K. -
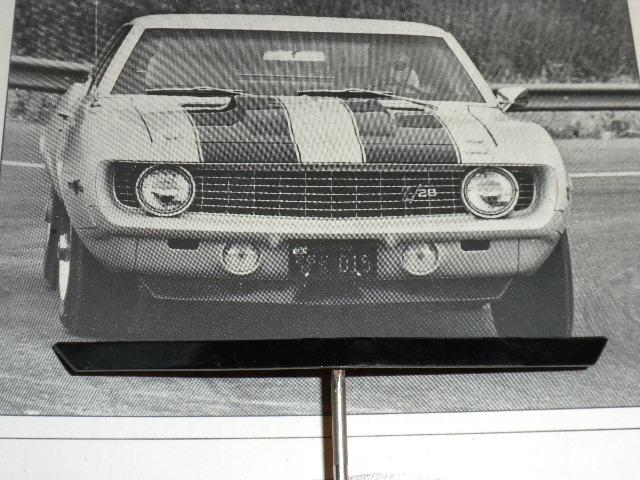
1:12 1969 Camaro Z/28 as seen in the August '69 issue of Car Life.
swede70 replied to swede70's topic in WIP: Model Cars
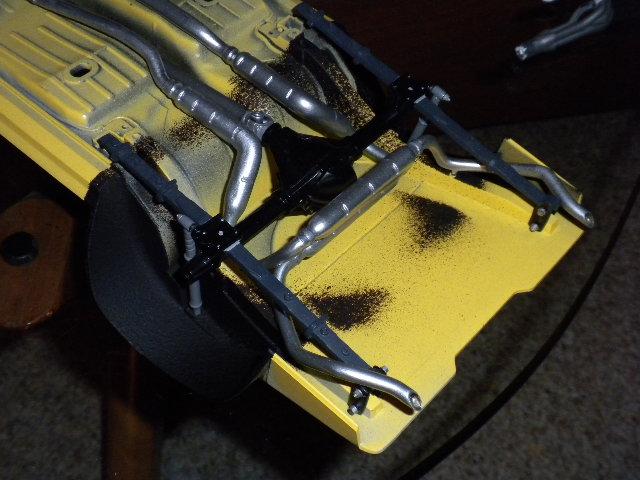
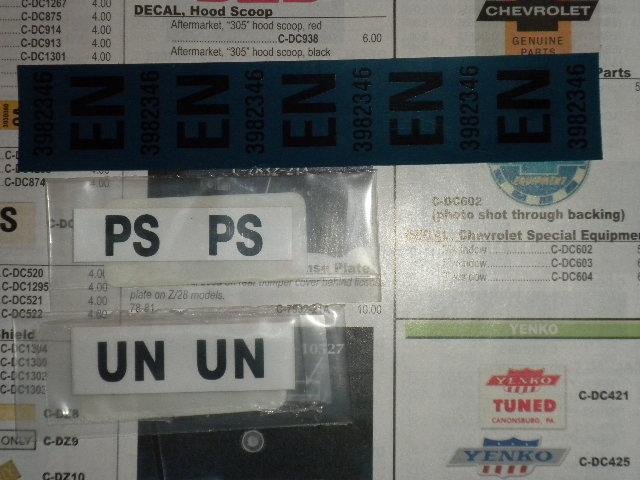
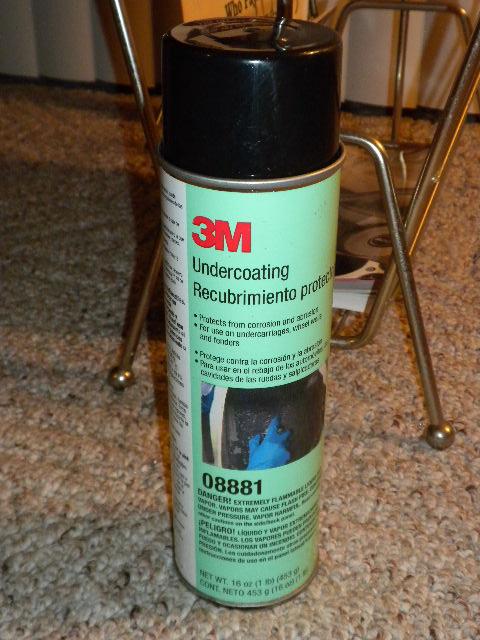
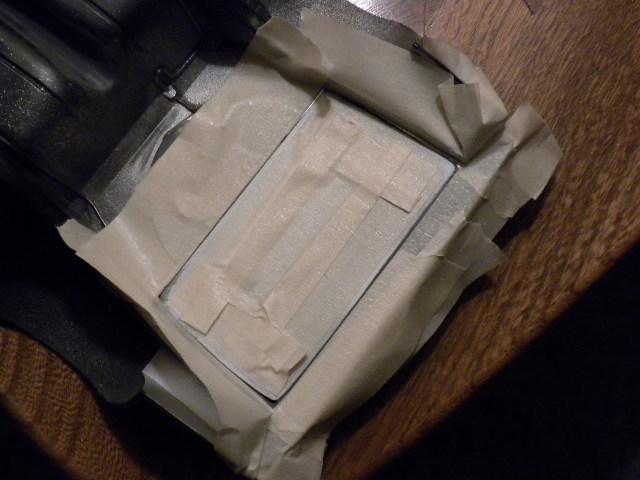
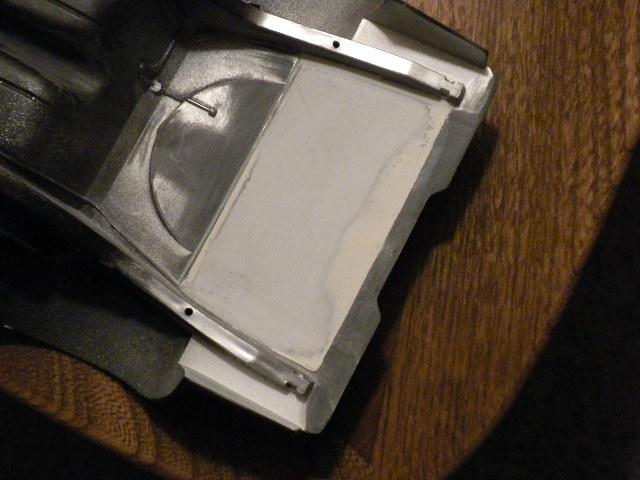
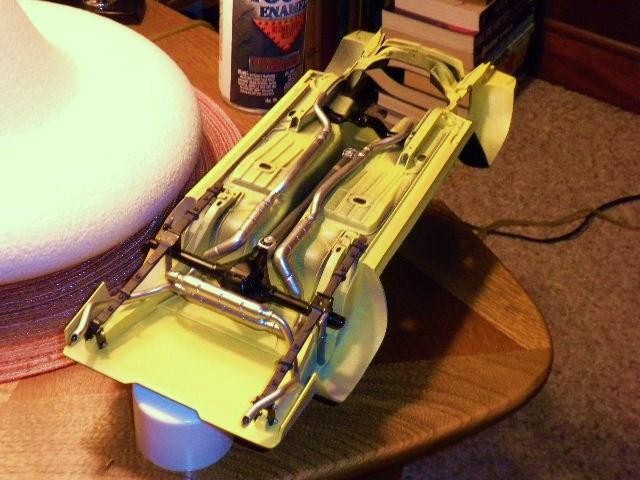
Thanks Ralph for your kind notice. Your multiple 1:12th Camaro projects evidencing all the creative things you've incorporated into them certainly impresses. With respect... Mike K. ...not having any luck finding MM Fabric Black locally and not terribly impressed with Rustoleum's Textured Black, I thought maybe I'd give some actual 'undercoating in a can' a whirl to reproduce a reasoned wheel housing/tub coating. A texture is cast-in to the tool, whereas I suppose I was in no mood to strictly sand out and erase such. ...this affords some idea as to the spray templates I fabricated for the purpose of applying the coating clean, albeit not too clean. The aim was to mask tightly around the leaf spring mounts, while being impressionistic near the subframe rails, etc. ...this would be the front stub frame painted in place (a terrible hassle this and reason alone to cut it off the bottom to meld to another chassis entirely), while note how the undercoating is dusted a bit onto the rails of said stub frame. Other chassis items await adding, hence everything will 'pop' visually a bit more for attachment hardware, the front antiroll bar, as well as the spindles and drag link. The shock bottoms were masked and sprayed - thank goodness for the utility of Tamiya tape. ...understanding that Wally and Gus handled wheel house undercoat duties in April of '69 and that Wally was more or less stoned all the time while he stumbled through his 'work', this would be a 'good enough for production' stab at said undercoat. Perhaps a bit wasteful, know that the exhaust as well as the axle assembly plus leaf springs will be replaced for errors made. I sanded off the exhaust clamp detail (why oh why?) and was too eager to glue the leaf springs in position without first mating them to the chassis. The leaf springs bow out heading towards the back of the car - something I didn't detect. Check your alignment of parts first and avoid my error! ...being situated close to a National Parts Depot warehouse situated in SE Michigan, these would be 1:1 decals to call out the front spring rate as well as shock absorber valving specific to the Z/28 model. The decals aren't shatteringly expensive at maybe $4 each, so something to consider certainly. The images will be shrunk down with a color copier, twisted around a small plastic rod if need be for shape, coated in clear and then set in place. If this was a 1:25th model I doubt I'd bother, but being so large such things can be added. Kind thanks for all who stop by for a look here. Mike K. Short update! Having inadvertently lost the 1:1 suspension decals seen above in combination with troubles encountered with my 1:1 daily driver, it seems I lost momentum which I hope to regain for repurchasing another set of said decals, etc. More to come then... M.K.
-
1:12 1969 Camaro Z/28 as seen in the August '69 issue of Car Life.
swede70 replied to swede70's topic in WIP: Model Cars
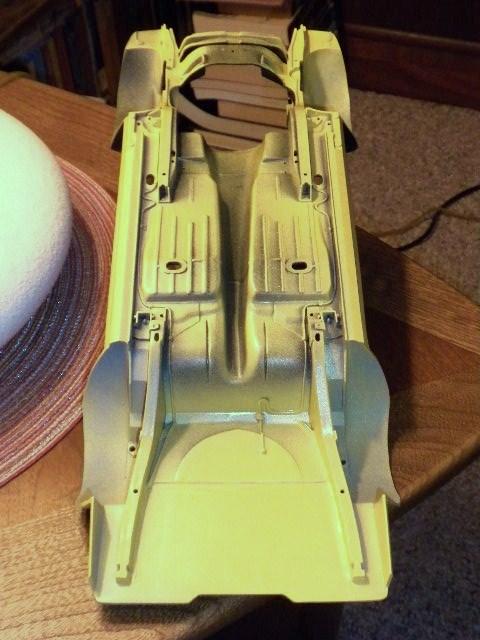
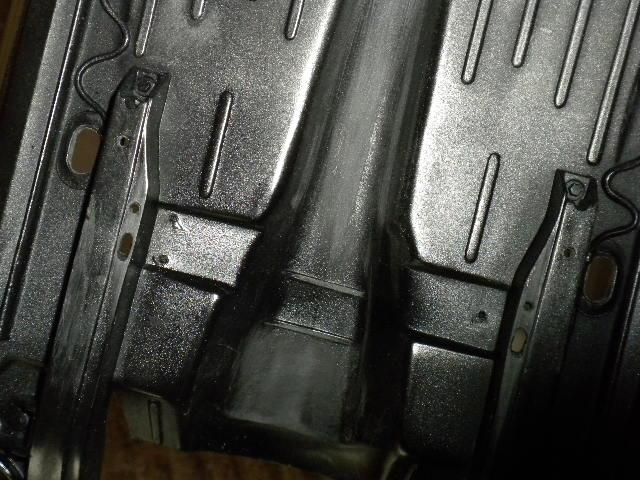
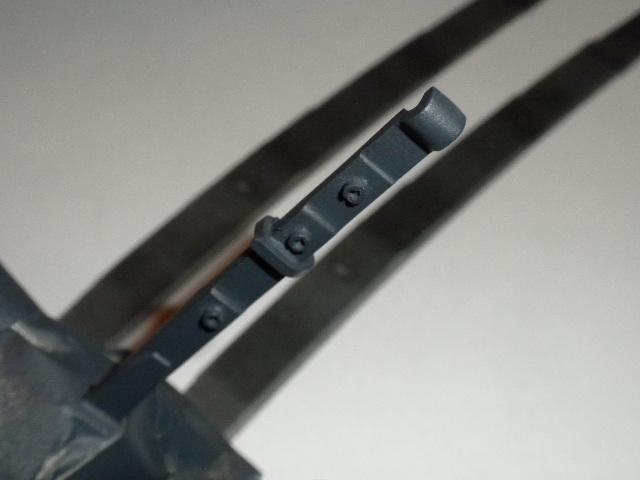
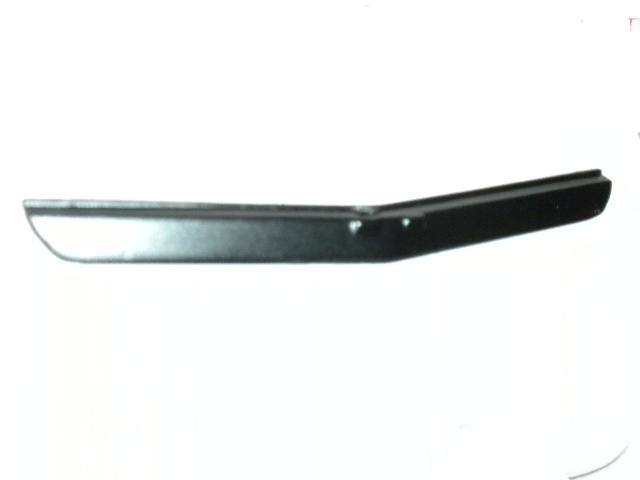
...a fast update then... ...plugged area atop the fuel tank is seen awaiting putty application. ...reinforcement of the inset panel as seen from above. ...the same addition now puttied in. ...hardware removed from the front stub frame. ...hardware removed from rear subframe. ...initial chassis paint with semigloss black paint applied to the trans. tunnel both forward and back, Tamiya Fine Gray primer from the sides and inward, and finally, some MM Daytona Yellow from the outside in. ...front stub frame paintwork to come as well as wheel arch paint - most likely MM Fabric Black for what texture is on offer. - ...revised front spoiler profile with sharper ends and slight trimming to the base. Much better I do think. Thanks for skimming this update... Mike K.
-
1:12 1969 Camaro Z/28 as seen in the August '69 issue of Car Life.
swede70 replied to swede70's topic in WIP: Model Cars
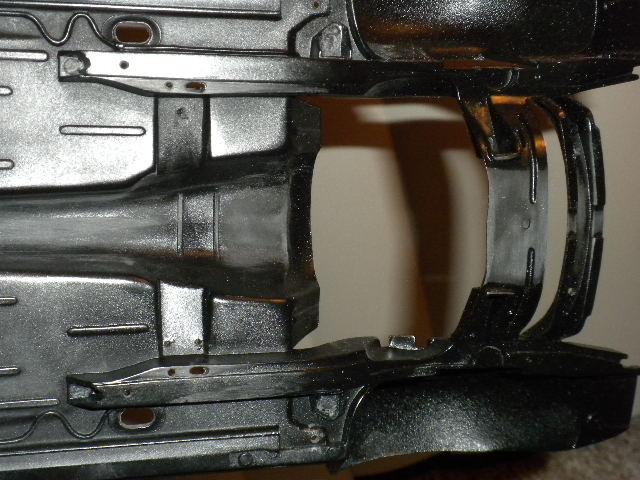
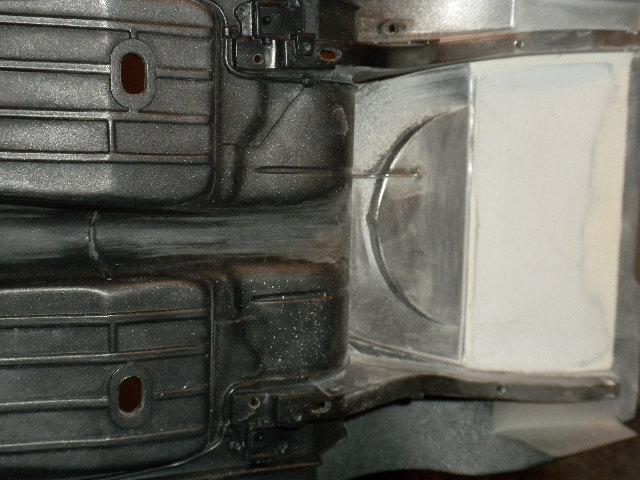
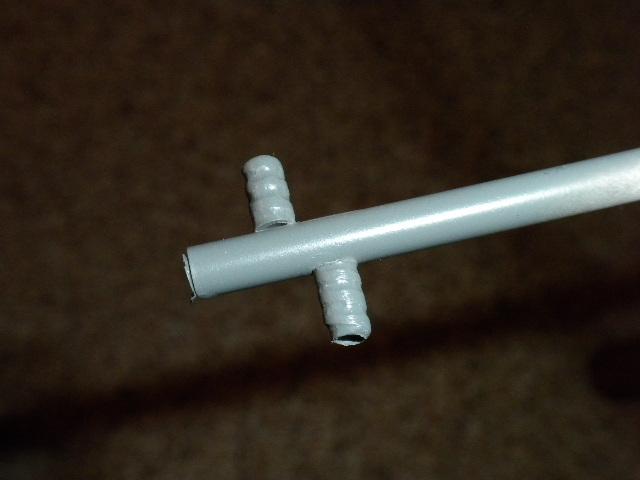
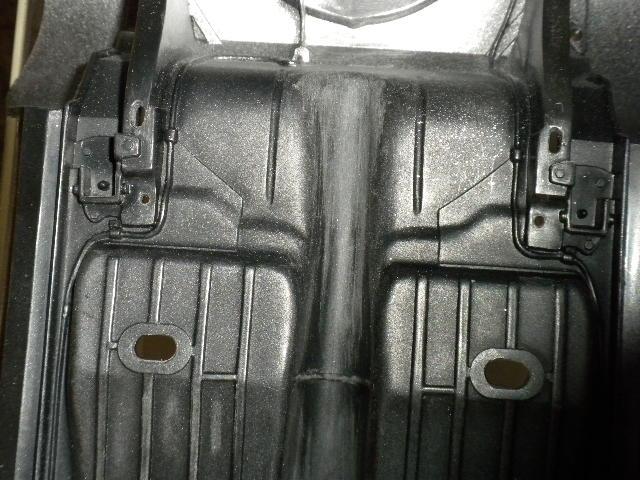
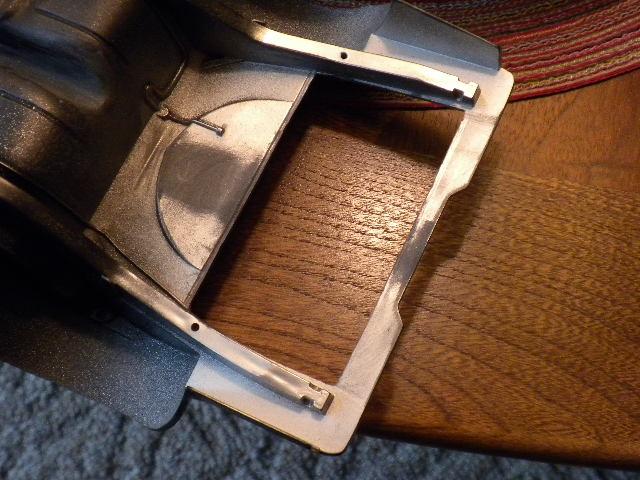
...more work, with some obvious refashioning of what at first seemed good: ...the spiral shock detail not quite well-defined enough to use front shock bodies is seen redone here. The one on the top of the rod depicts what will be visible, whereas know the bottom one is upside down. A tiny section of machined stock as per the R/C part I using should be visible, hence it ought to all come together. ...the upper shock mounts through the front stub frame have been scrubbed off in anticipation of scratch building bushings and reapplying hardware that is both shorter and better aligned for being situated straight up versus on an angle. In short, I dislike brush painting what can be rendered as individual parts... ...efforts to open up the drains on the front stub frame and rear subframe plus the usual floor pan body dip drains is noticed. The hardware for the former will be scrubbed off and added independently, mostly to facilitate mindless paint work. The plugs for the floors will be done as separate pieces, whereas I might be able to add a bit of visible seam sealer to make them look right. Being so large, such detail work is invited even if such doesn't strictly come to mind on work of a smaller scale. Also note that the seam in the middle of the casting heading from front to back has been lightly scrubbed away. Such is easy to overlook and should be seen to before applying paint. ...expecting to do the topside of the fuel tank much like a metal briefcase with contour tucking in along the perimeter, I opted to remove the tank detail outright in anticipation of plugging the resultant gap. Mounting straps may or may not be scratch built, but at least this effort frees me from the most tedious masking that would otherwise be required. Also up might be the addition of the metal work 'melted cheese' edge detail seen on the 1:1 fuel tank corners nearest the rear axle in particular. In sum, I'm effectively pushing the total parts count up on this model to comfortably finish it as I wish. Thanks for skimming this most recent update... Mike K.
-
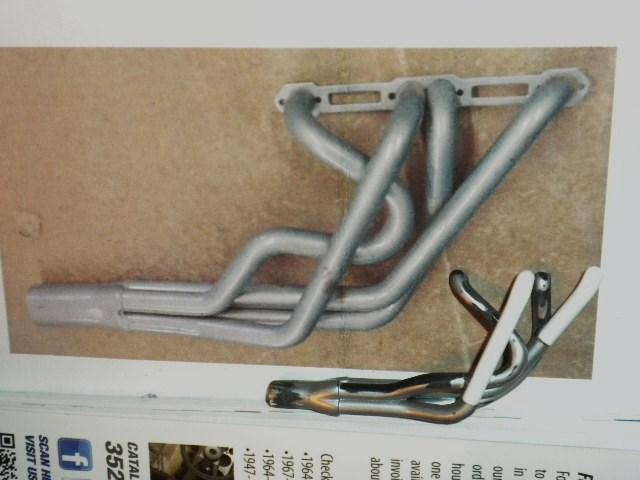
Greetings, As to impressions, mostly you'll view the kit as not really more elaborate than some 1:25th kit blown up to 1:12th for the parts count and assembly breakdowns are nothing epic. This is a very basic kit in this regard, hence some things aren't going to suddenly be dripping with detail given huge care was exercised to split this and that assembly into more component parts. Expect to be very impressed with the body which is very well rendered. Expect also to be terribly underwhelmed in relation to the wheels and tires which seem to be stop gap items designed around recycled 1967 Corvette vanilla wafer tires. I'm trying to come up with better on my build, although other build threads clearly depict that skilled builders aren't necessarily hobbled by this felt deficiency for their builds look quite nice. The headers and exhaust do require quite a bit of cleanup, so expect a time drain there, although know that the overall quality of the tool is high and absolutely merits enthusiasm registered here by various builders again and again. Know too that in addition to the photo etch set that aftermarket decals exist to afford multiple tries in relation to the over the top stripes if such is a worry for you. For myself I think I'll need to purchase another to facilitate some interior paintwork and chrome plate. I will likely have to budget for re-chroming too given that many plated parts sadly sport many plastic injection feed points and look a bit tatty if not properly trimmed, sanded and touched-in with chrome paint. None of the above should dissuade you from a potential purchase, whereas time and again you will likely be tempted to try things that are new to you given the topic is so big. For many I suspect the overall size and basic quality of the tool restores their enthusiasm for the hobby, and this is definitely a plus. Good luck... Mike K. P.S. Inaccuracies seem to be few - i.e. no fresh air seal beneath the hood is provided, the hood hinges are a bore, the inner fender lip as viewed beneath the hood is inexpertly and cheaply rendered, while the sink mark in the center of the Rally wheel trim caps isn't exactly something to cheer. Modest irregularities are noticed on the design of the headers they created, whereas the hardware on the mounting flanges isn't the best for it is either incomplete or inaccurately sited. Expect no front spring detail of note, whereas most everything short of the master cylinder and booster chamber on the firewall is simply cast-in. Interior is the custom trim level, although the cast-in bead detail is slight along the perimeter of each cushion and might be better replaced with wire. Know that the earlier orange release from '88 doesn't have the woodgrain dashboard decals, whereas the later rerelease does. Depending on your ambitions, this might be an issue for you. Kind regards... M.K.
-
1:12 1969 Camaro Z/28 as seen in the August '69 issue of Car Life.
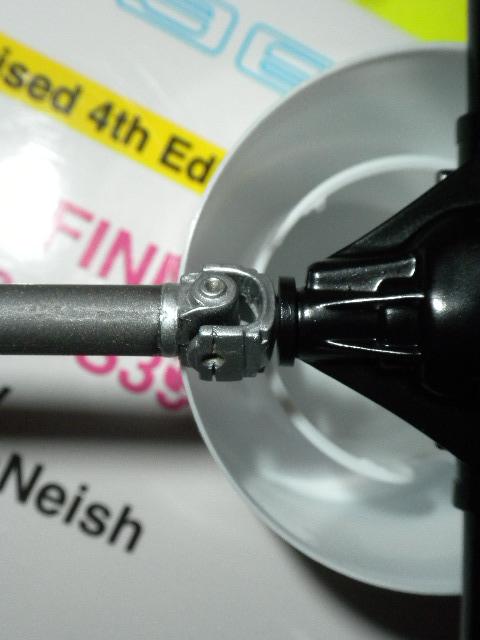
swede70 replied to swede70's topic in WIP: Model Cars
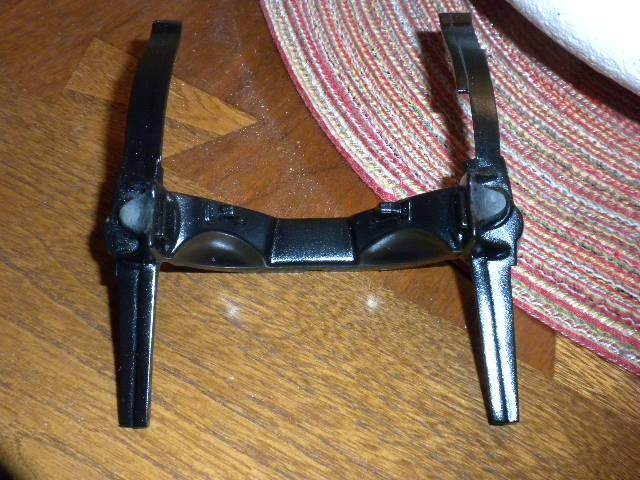
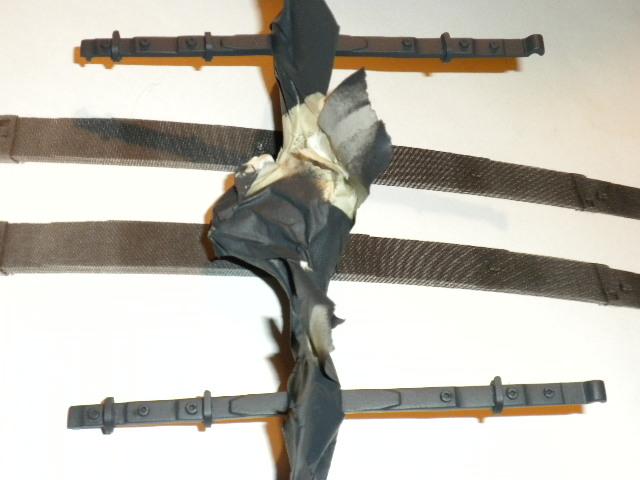
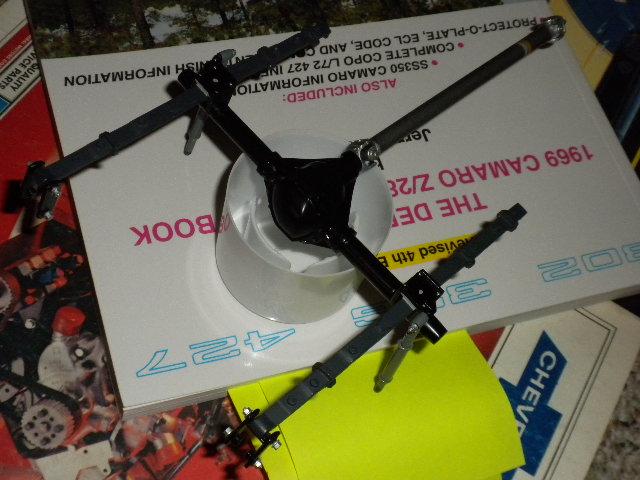
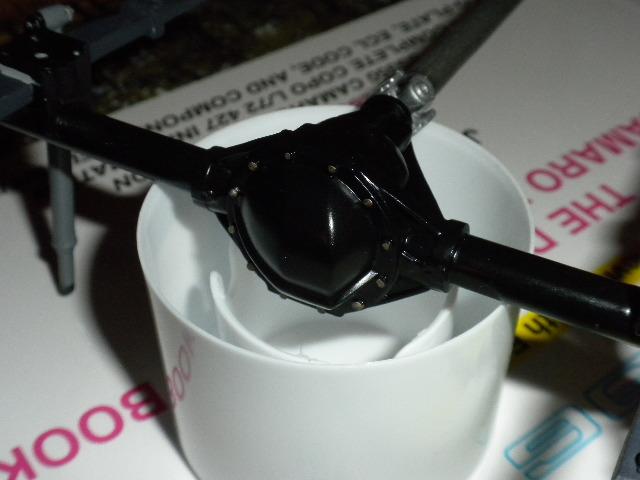
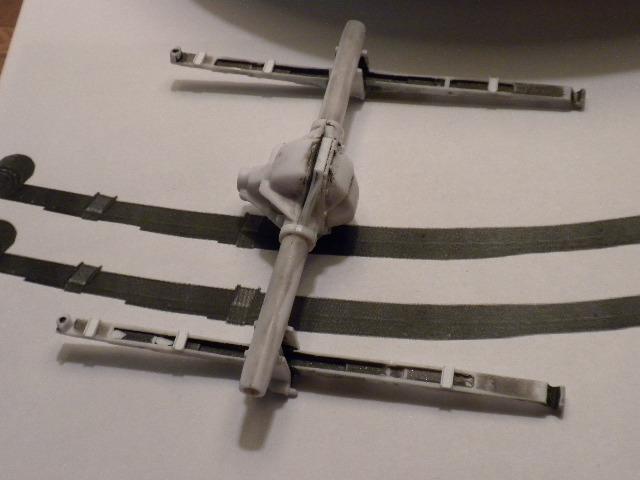
Thanks for the kind comments... Returning I suppose to the rear suspension which I judged not quite adequate and hence worthy of another attempt. Please see below: ...rather than create the leaf spring clamps/clips with four sections of plastic stock, I opted to heat up some thin rectangular stock in a glass of hot water to bend clips anew. A small gap can be seen on the sides allowing for some movement as per stock, whereas note this is a view from the top that won't be strictly seen when all is assembled. ...while this would be the view from the bottom. Very likely a bit large in sum, although I think I'll just go with it and move on to other aspects of this project whilst recording within my memory that the same work could have been done with a bit less visible bulk if my meaning is understood by the reader. ...well nigh invisible before, here is seen my effort to straighten out the ends of all but the center top leaf spring. Not terrible this... ...a puck of material has been added to the nose of the differential as per photo reference. Basically just a slice o' plastic tube, the addition also firms up the positioning of the driveshaft and is revealed to be no bad thing. ...cover hardware touched in with Testor's Jet Exhaust versus the usual silver or steel. The Jet Exhaust shade seems closer to Gray Chromate versus other options tried to date, hence all for the good. ...assembled with shocks and shackles. The isolator pads beneath the spring perches have been painted on again, whereas the small dots in the center of the perches are reduced in size for putty work, etc. ...now matched if you will to the exhaust. I still need a new exhaust system casting to start anew for clumsy efforts to revise the clamps cast-in, although most of what's here looks the business... ...seemingly a nasty shot, this would be Krylon Satin Black used on the front spoiler. It looks like the plastic 1:1 original, whereas backing off a bit and applying the coating from a distance resulted in a fine pebbled surface texture that for now appeals. Thanks for skimming this most recent update... Mike K.
-
1:12 1969 Camaro Z/28 as seen in the August '69 issue of Car Life.
swede70 replied to swede70's topic in WIP: Model Cars
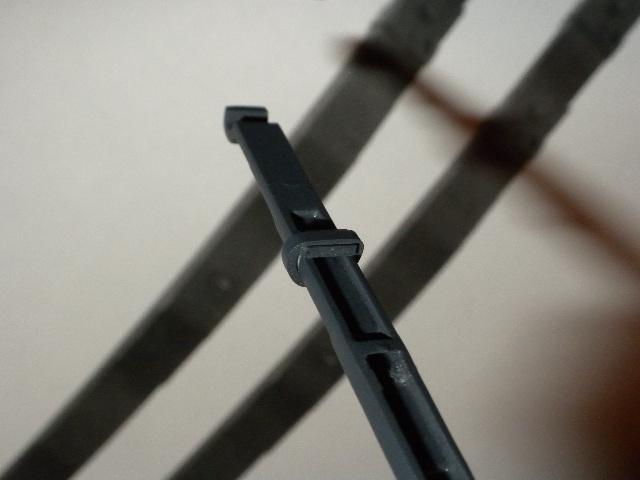
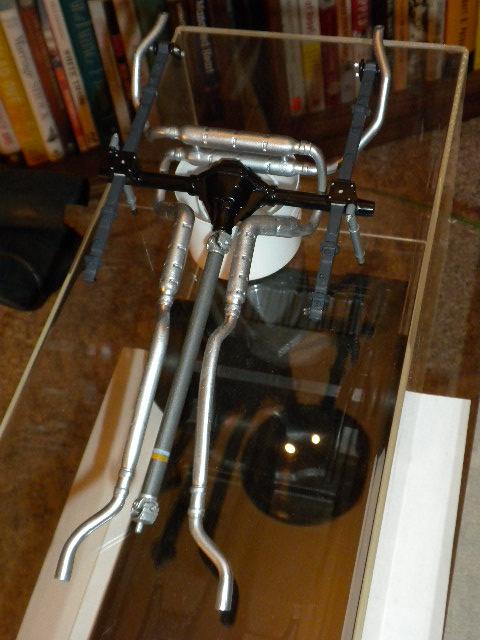
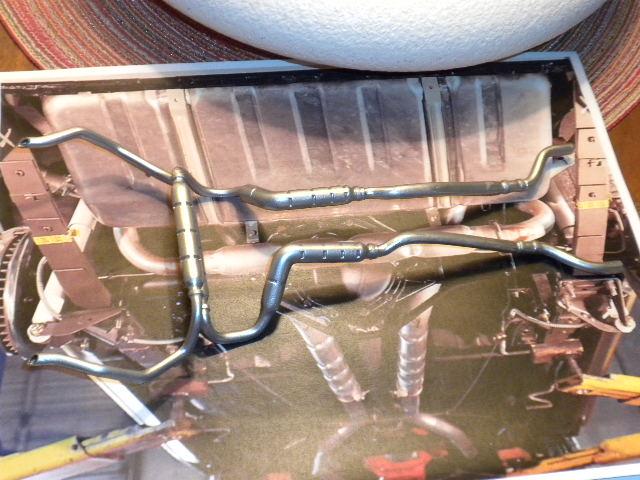
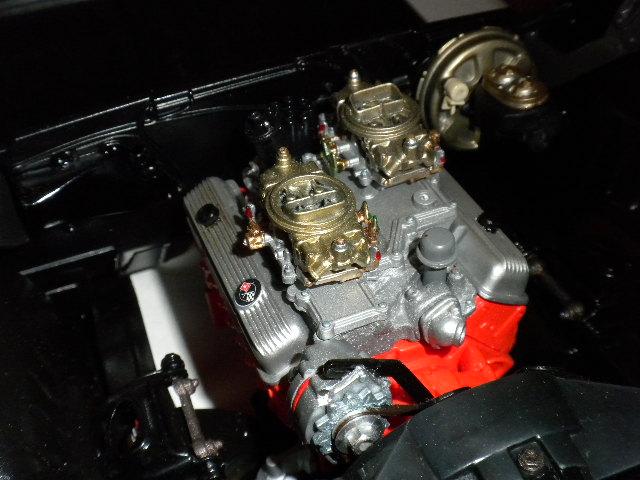
Greetings... Noticing more than a few personal errors committed across both the exhaust system as well as for my finish choices, I've decided to redo the axle assembly as well as the exhaust. The as-delivered guillotine-style exhaust clamps were correct, whereas I inadvertently sanded this detail off. Further, much more work was and is required on the leaf springs and axle before I'll be satisfied with matters. For discreet sanding five leaves are seen versus four, locating tabs to prevent leaf spring side slippage have been added, whereas the ends of four of the five leaves have been squared off even if this detail can't strictly be made out from the photo image provided. ...the clamps on the leaves weren't quite where they needed to be, while only two were provided versus three (per side) that are required. The clamps proper are yet to be added, although the welded-in locating points are seen above. Other things are soon to be added... ...albeit bereft clips, this would approximate the finish choices made on the exhaust. The chambered system on the Camaro was aluminized from front to back, whereas Krylon Chrome in an aerosol can was applied from a slight distance to add a bit of texture to the surface finish. A bit 'soft' like Testor's Metal Master range, the Krylon product proved necessary to seal coat it with MM clear before the assembly could be safely handled. MM Stainless Steel was employed to do what will eventually be clamp detail. I might be tempted to spray some Tamiya Translucent Blue on the exhaust to add a bit of further dimension, observing care if you will to mix up the application of such to differentiate between the separate elements the system is made up of. In short, I want to suggest that the finish so-applied suggests different parts mated to each other rather than one continuous pipe per bank painted in one go. ...nothing shattering here, but MM (Model Master then) Jet Exhaust in a bottle was applied to each exhaust tip recess followed by a tiny drop of black further in. It seems to look better than the standard 'pool o'black', although given the difficulties of setting up the cross ram carburetors, perhaps evidence of a chalky full-rich setting would be better? ...and a better driveshaft shade was found, this being MM Titanium in an aerosol can. Two further dustings of differing shades of brown were used to add a bit of discreet rust detail to the surface of such, whereas the orange and white bands are assembly line details arrived at for the study of a '1969 Camaro driveshaft markings' thread on the Camaro Research Group. The drive yoke requires some further marks, while the i.d. bands were painted very lightly as per design. Moving ahead slowly then. Thanks for reviewing this thread. Mike K.
-
Indeed - developing well. Thanks for sharing your efforts with us... Mike K.
-
A very beautiful and lithe topic expertly handled. Thanks so much for sharing it. Mike K.
-
Very fun and interesting topic here. The mock ups look very convincing and bring back faint memories of what I feared would be the last Chrysler Corp. NASCAR racers. The roll cage fit appears perfect too. Thanks for sharing... Mike K.
-
Very nice, very confident and assured work underway. Don't forget that all important Thrush woodpecker decal! Mike K.
-
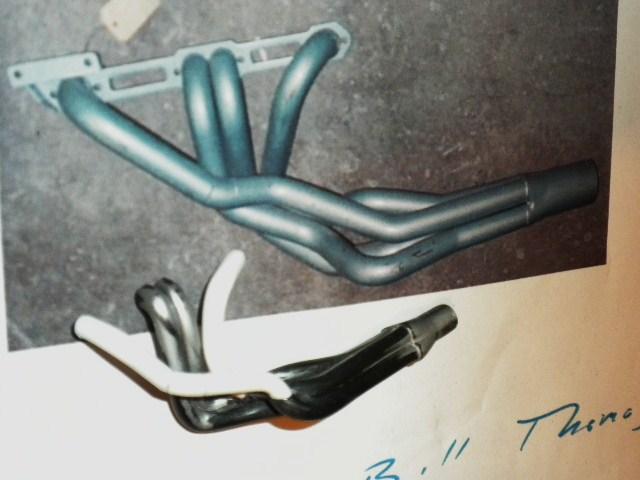
1:12 1969 Camaro Z/28 as seen in the August '69 issue of Car Life.
swede70 replied to swede70's topic in WIP: Model Cars
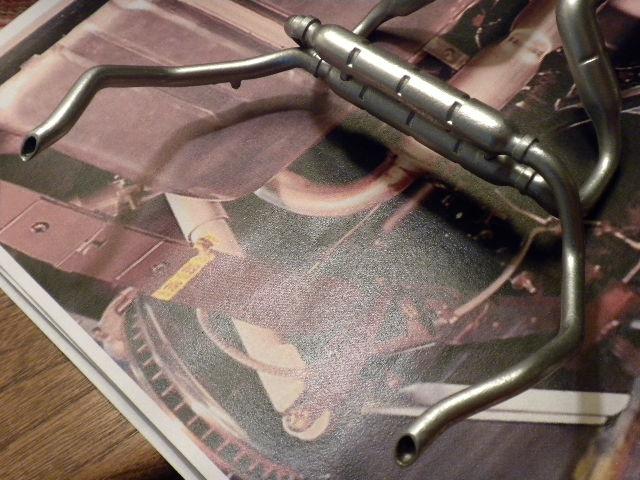
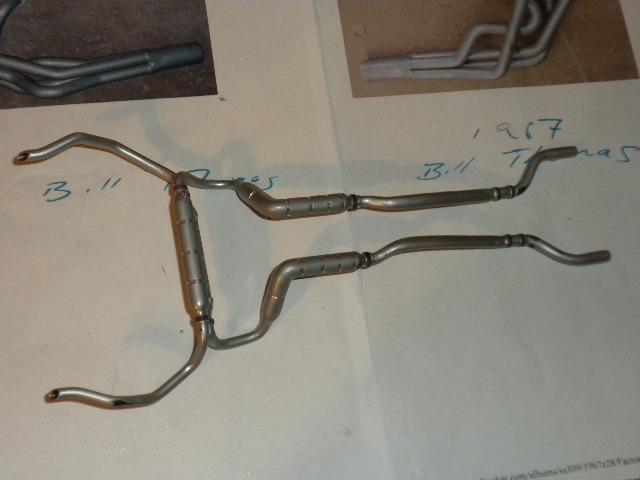
...more stuff then, ...believing that utterly clean valvecovers on something like this is akin to an anomaly, some used crankcase oil was dripped onto the fins nearest the breather/PVC opening atop each. Without direct illumination nothing is strictly seen, although adding such does add a bit of dimension to the work. A slight dusting of rust beneath the master cylinder was further added, although this too is largely invisible. ...revised exhaust system less paint. I noticed that the chambered exhaust (as well as other period systems) did not feature a balance pipe between the two banks. Having removed such, I inadvertently damaged a guillotine clamp for clumsy sanding. Since the guillotine-style is incorrect on this topic, for some concerted application off they came. Some material was left to help flesh out the correct style exhaust clamp detail, hence more to do here besides applying something akin to an aluminized finish from front to back. ...believing it possible to make some reasoned changes to the existing headers short of starting from scratch, this would be the revised passenger's side fitment less flange detail. What was unnecessarily bendy is now straight... ...whereas this would be the driver's side. They obviously aren't 100% spot-on for each tube being routed to the proper position into the four-into-one collector provided, but all the same they're better. It is my understanding that Bill Thomas as well as Kustom Headers both supplied Chevrolet with tube headers as an 'in the trunk' option for the '67-'68 Camaro Z/28. Research suggests that Bill Thomas headers were a light silvery blue, whereas the Kustom Headers were painted semi-gloss black. In '69 the headers were available over the counter, whereas I think I'll end up painting these the Kustom Header shade. The collectors look a wee bit short, hence I hope add a puck of material to each to lengthen matters out. Thanks for examining this update. Mike K.
-
Greetings, More active on other boards but nevertheless interested in networking, I thought I'd create a tiny thread here to express greetings to those looking in. I'm an avid fan of the old '66-'72 SCCA Trans-American Sedan Championship in the O2 category, while I modify models (mostly diecast although I have some plastic kits) to obtain what I desire in scale. Pleased to exchange insights and notes so-themed. What is seen below is a 1:18th Sun Star '64 Pontiac GTO-based Bob Tullius/Herb Adams Gray Ghost project that I hope to pick up on after completing a 1:12th '69 Camaro build. Thanks and kind regards... Mike K. M.K.
-
Welcome Kevin, Hoping you will find connection and validation here. Mike K.