swede70
-
Posts
727 -
Joined
-
Last visited
Content Type
Profiles
Forums
Events
Gallery
Everything posted by swede70
-
1:18 ACME/GL '68 Shelby Racing Co. Trans Am Mustang revised
swede70 replied to swede70's topic in Diecast Corner
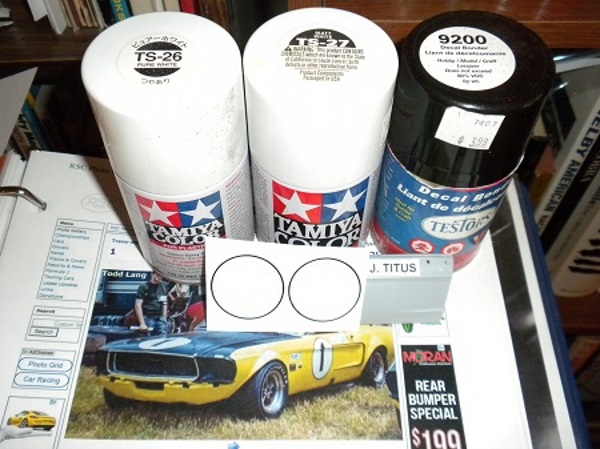
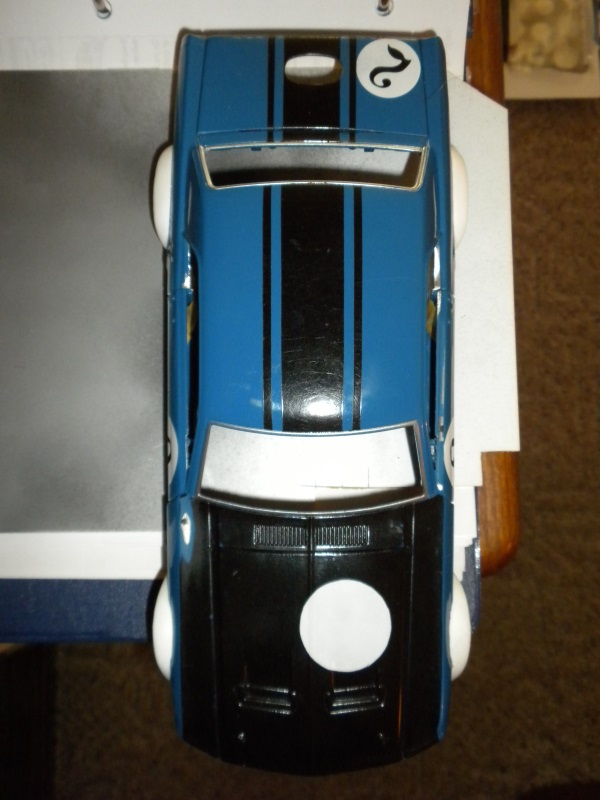
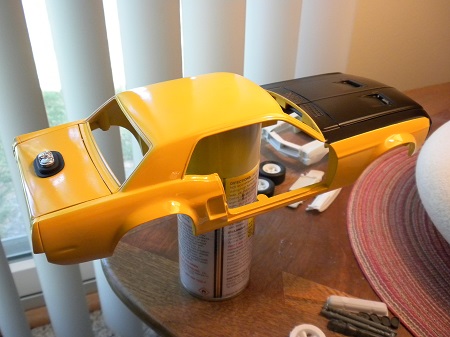
Greetings and thanks for the kind feedback... Although unpleasantly laborious, a new shell with new flares has largely been worked up - kind thanks to ibj40/Jim F. for all the valued assistance and support (i.e. I'm still using up what I have!). Other modest things to report as well: ...this would be an attempt at door roundels w/black outline border plus door driver identification (Ariel font, 14 size if I accurately recall). Believe or not, I just used a black Sharpie pen and a stencil set to get the outline, although it's best to carefully seal such with the decal bonder in a can as illustrated; i.e. apply the stuff too heavily and the marker runs. I haven't determined how to best cut the images out cleanly, whereas I'm thinking of applying different varieties of Tamiya white to insure that the resulting roundels are as vibrant as they can be prior to application onto the work much like any other waterslide decal. ...this would be the stuff of my flares in a particularly raw state. Some time ago I began upon a 1:18th scale Hwy. 61-based 1970 Autodynamics Trans Am Dodge Challenger, and had the foresight to copy what I'd worked up for the use of urethane molds to backstop my efforts. The copies seen above look a bit pudgy, although I've found it easier to remove material to arrive at a proper shape versus adding material later and struggling thus. ...much thinned here, and quite substantially recontoured and reshaped. If only the movement of your mouse reflected how much time was spent to proceed from point A to point B! ...ignore the '68 Daytona 24HR image for the front flares aren't really in the final configuration! Here is seen the heavily reworked front flares in position within filed cutouts on the body proper. Note how the fender opening contour blends easily into the flares both towards the front and terminating towards the end of flare as it blends back into the fender. And yes, the front valence has been cut out entirely - a nasty business given I did this by hand with a simple razor saw over two days. Lastly, the clumsily rendered B-pillars and associated cast-in weather sealing have been filed off complete, faintly noticeable for the clean finish of the surfaces just below the roof edges as seen here. ...the flares in place with white craft glue only. Seeking a risk-free paint test platform, the reader will notice the otherwise odd hood black out treatment as well as the stripework witnessed across the top of the vehicle. The normal rice paper Tamiya masking tape is great stuff, although I have reservations about the use of the fineline tape that they also produce that didn't quite seal as well. Notice too the removal of the raised rear side indicator detail on either side, later to be partially puttied in so that the same will appear as a soft, filled and reflector-shaped indentation on the panel work ...and finally viewed across the top. The hood roundel represents another test of material and will soon vanish as the shell is media blasted. Some room for adjustment is had for the flares can be adjusted in and out for either swinging in or out from the top prior to contour matching the outer lip to the fender surfaces. And finally, I may drill out windshield wiper mount holes for they seem to be missing on later Greenlight Trans Am releases. Thanks for examining this most recent update. Mike K.
-
A very effective mod. there - surely a great improvement. Thank you for sharing your techniques and sources too. Mike K.
-
...modest updates to report, although to this point little has been done underhood. ...the front bumperettes have been returned by the vacuum plater, after first being sanded to remove mold lines as well as the front license plate. Noticeable, though surely difficult to discern, the exterior door handle has been flooded with body color paint, while old Detail Master photo etched door lock cylinders have been added to each raised 'lock' assembly. Matter appear less toy-like in sum... ...shorn of unattractive locating pins and mold lines, the delicate chromed exhaust tips have here been reset. ...held in reserve at this point, seen are a pair of cast resin 1:18th ERTL Collectibles 1967 Impala SS 427 valve covers in combination with a 1:18th Hwy. 61 1969 Camaro COPO air cleaner lid, also cast in resin and subsequently vacuum plated. I'll likely add '396' identification to the lid from an old Fred Cady 1:25th sheet, all the more so given that the air cleaner art always struck me as a bit large for 1:25th use anyhow. Thanks for reviewing this most recent update... Mike K.
-
1:18 ACME/GL '68 Shelby Racing Co. Trans Am Mustang revised
swede70 replied to swede70's topic in Diecast Corner
(Updated on 10/15/18: The Pegasus range has the 'stepped sleeve' product back in stock, hence I ordered new parts and subsequently altered my previous build to this point) My choice of color still appears a bit too strong, hence pondering the revision of another shell plus flares given that stripping lacquer would also entail ruining what delicate resin and putty work went into capturing what is seen below. At the very least I wouldn't be tossing away the proverbial 'bird in hand' if I started anew independent of that which I've worked up. Thanks for reviewing this post... Mike K.
-
1:18 ACME/GL '68 Shelby Racing Co. Trans Am Mustang revised
swede70 replied to swede70's topic in Diecast Corner
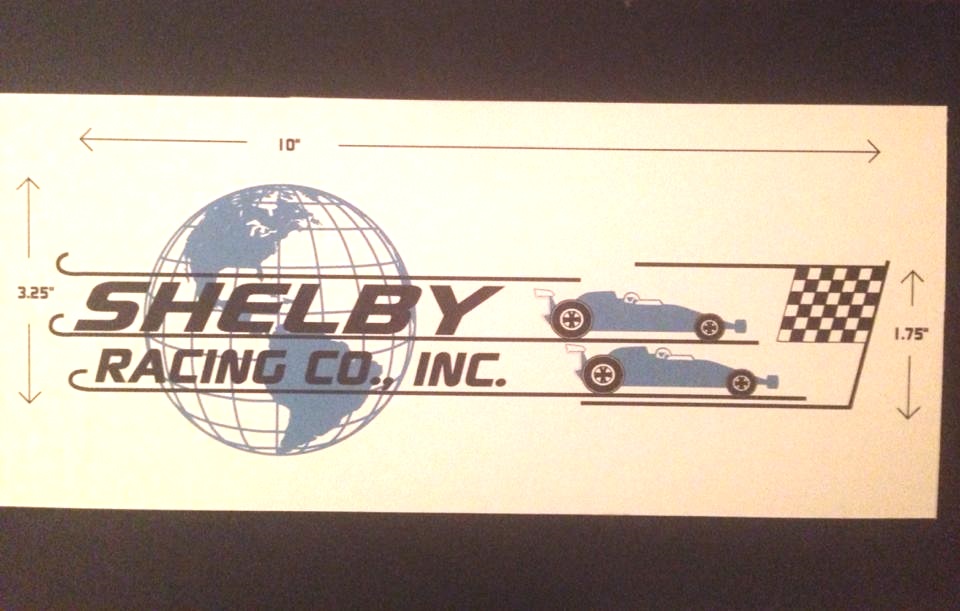
Hello again, After sanding down the finish errors present along the top surfaces of the model, I resprayed the work in a slightly lighter Tamiya lacquer aerosol as seen here. Noticed is a ride height/track mock up using standard GMP ARE Torque Thrust wheels which will be replaced with wheels almost identical to those used on the later-season blue #2 Mustang. If it might help others, included below is a scan of the '68 Shelby Racing Co. decal that appears mostly as a blur either on the quarter panel of the cars early season, or positioned on the C-pillar when the cars were painted yellow. Kind thanks to Phil Jacobs for sourcing this rare artwork. Pressing ahead again then... Mike K.
-
Nice cage - looking very assured and controlled there. Thanks for sharing... Mike K.
-
1:18 ACME/GL '68 Shelby Racing Co. Trans Am Mustang revised
swede70 replied to swede70's topic in Diecast Corner
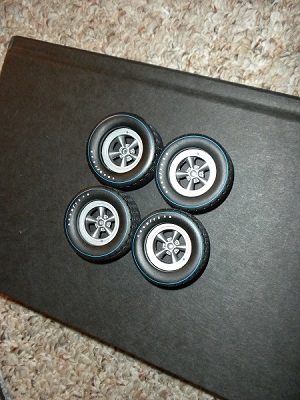
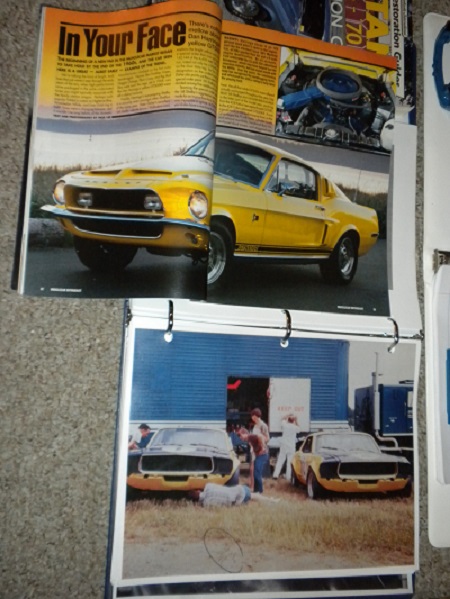
Greetings, Pretty good stuff - I envy the foresight you demonstrated for scooping up multiples of the GMP Todco '69 Camaro to facilitate such projects in particular. I remember you'd also tried a marriage between the Road Legends/Yat Ming '69 Firebird Trans Am - another unlikely pairing that also worked out unexpectedly well. Thanks for sharing. - Some scattered work then, although some reverses to report too... ...seen are all the roll cage tubes back of the main hoop taking shape. I ended up drilling through the fabricated bulkhead as well as the Welly floor section insert so that judging the length of the actual tubes as well as the angles where they touch the panels prior to gluing wasn't so critical. Though hard to see, a pair of tubes continue on into the trunk area where a cast resin fuel cell is situated. ...sorry - fuzzy as all get out this image. This would be a modified Hwy. 61 BOSS 302 oil pan with the addition of a scratch built sump in the style of the Aviaid pan visible upon a pair of Tunnel Port 302's in a pit lane photo found in the new Lipetz Trans Am Era book. Early season photos demonstrate that a cast aluminum Cobra pan was employed. A third design was said to be used employing exterior drainbacks, although this I've not seen. ...this would be the hood black out applied, while notice too how the entire headlamp bucket is painted akin to the smaller J. Titus image seen earlier in this thread. Masking proved problematic until I decided to apply Tamiya tape to another shell and cut the same with an Xacto knife smoothly across the recess formed between the bucket and the fender proper. Once I cut the masking, I simply transferred the remaining bit to the painted shell prior to spraying. Headlamp bucket fill panels are difficult to make out here, although they look nice for being well shaped. Also note the revised 'rubber' seal around the fuel cell inlet. All appeared good until this point - that is until I basically wrecked the paint on the top of the model for clumsy handling and slipshod masking of the stripe work to come. Doubts also exist as to the veracity of the shade of yellow used, hence I'm going to salvage matters best I can. At first I felt gutted for my mistake, but I suppose that the use of a rather thin primer as well as thin Tamiya color coats makes matters less dire than initially feared. ...for near endless review of exterior photos in-period, I'm still convinced that for select races that the paler '67 shade of yellow was substituted for Special Yellow WT6066 which has a slightly greater punch while also appearing a touch pale in certain light and for certain so-so period color processes. A mid-year offering hinting of more vibrant Grabber colors to come later in the era, perhaps this accounts for the variations seen in body hue that really don't factor across so many reasoned 1967 images inspected? I think I'm on my own making the WT6066 leap per se, but at present it makes sense to me. Thanks to the kindness of area authority Phil Jacobs, the identity of the shade used in '67 and beyond was learned, whereas I'll revise this post and record such here. ...and finally the next set of wheels taking shape. I failed to properly wire brush the top right example, hence distracting flash is noticed. MM magnesium with a dusting of Tamiya Pearlescent Clear seems the best way to go here. New aluminum outer rings to come. Thanks for reviewing this update... Mike K.
-
Neat project - thanks for sharing. I'm doing stuff in 1:18th along much the same lines and would be happy to exchanges notes and information should you wish. Mike K.
-
1:18 ACME/GL '68 Shelby Racing Co. Trans Am Mustang revised
swede70 replied to swede70's topic in Diecast Corner
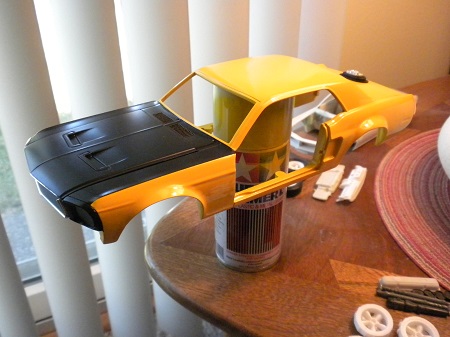
Greetings, Another small update here: ...at least two of these decals are needed per '67 car, located forward of the wheel arch on the front fender in '67. The '68 Shelby Racing Co. decal is of a different design, while someone on another board has kindly come through with information concerning the look and dimensions of such. ...here is seen a fuel inlet cutout on the deck lid of the soon-to-be yellow '68. I ended up fixing fast the panel to a few panels of cardboard with lengths of duct tape so both hands could control the drill, whereas a small segment of the same tape was used right where I'd drill through to ensure the bit wouldn't skip about and thus mar the surface. The rest was simply done with files and a coil or two of sandpaper... ...very difficult to photograph well, this is the body in paint. Yes - this model will sit lower than the blue '68. At this point it seems likely that the project will gobble up at least four or five cans of Tamiya aerosol, hence not a cheap endeavor. I later went back and subtly redid the panel line formed between the quarter panel and the rocker just behind each door, trying if you will to come up more with a welded panel line versus an inelegant razor saw cut line. Also, it was discovered that gaps existed between the blended in rocker panels and the door jams/inner rocker panels, and given applying extra paint via spraying was only so effective, I ended up applying paint via a brush prior to applying an overcoat of same work to disguise the effort. It's not terrible in sum. Thanks for skimming this update. Mike K.
-
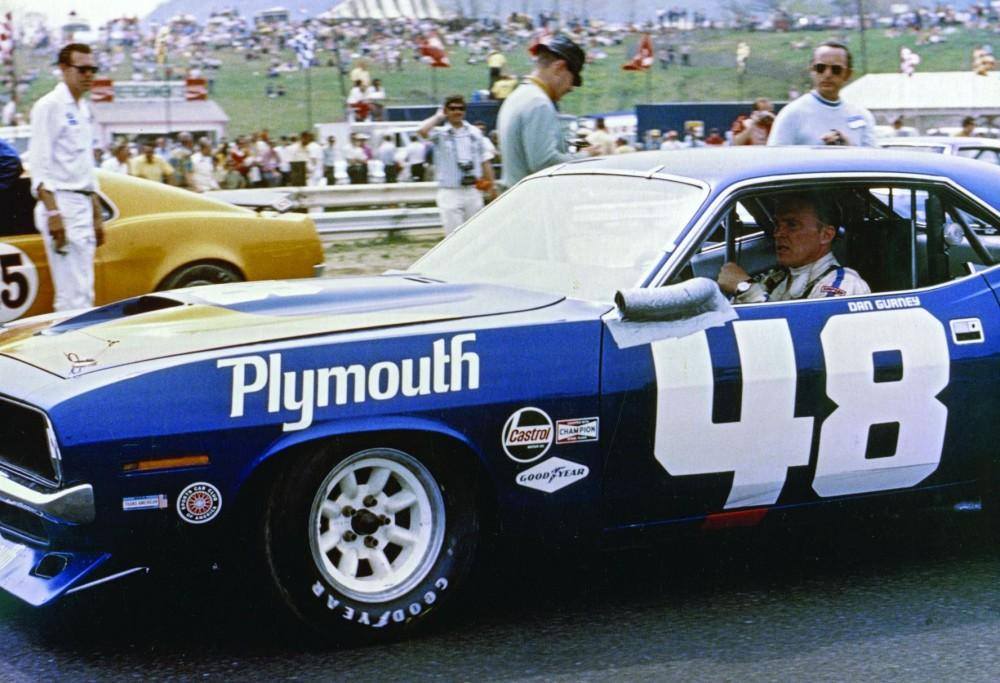
Greetings, If it helps you, I've searched a bit across both the Dan Gurney as well as the best Swede Savage pages on Facebook searching for reasonably clear images capturing the 'other color' to the best possible effect. Ponder the following with the understanding that the best is first and that things go downhill as you continue! The Speed Merchants shot of Swede Savage at St. Jovite may not be the most trustworthy for the limitations of period color process, although isn't the first Gurney shot seen below fresh and vibrant? Anyhow, ponder the following: Kind regards... Mike K.
-
1:18 ACME/GL '68 Shelby Racing Co. Trans Am Mustang revised
swede70 replied to swede70's topic in Diecast Corner
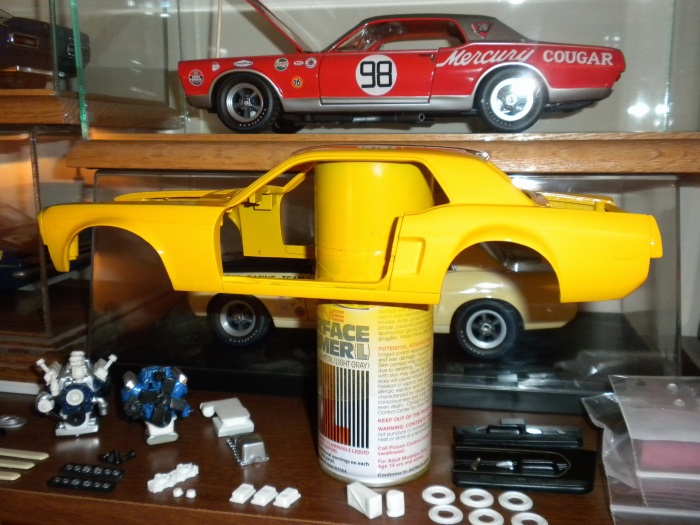
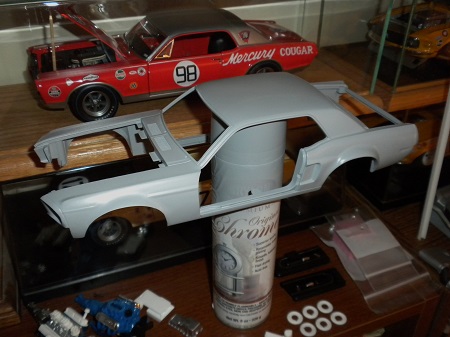
Greetings, A modest update then... ...things can look a bit better underneath for removal of the product identification back of the torque boxes on either side. A body shop sanding block was helpful here. ...first time in primer, this would be a modified 1:18th Greenlight '68 Mustang shell with appropriate flare work added front and rear. The rocker panel trim overlay was further bonded onto the shell and smoothed, panel lines were cut for the fenders looking forward, while a small line was etched between the quarter panel and the rocker panel on each side. Know that I hope to do an earlier season '68 Shelby Racing Co. entry in the more vivid of the two yellows employed that year so that in the end I'll have two '67 team cars as well as two '68 renditions. ...notice too the mildly indented rear side indicator detail, not installed but rather plugged in. ...hard to tell if this is the slightly more vibrant shade of yellow as described, but akin to what I desire to replicate. Note the roll hoop mounted signalling lamp akin to what was later used in '69 and in '70 on the AAR 'Cudas. I believe the venue here is '68 Bryar, NH. ...Titus at speed, this certainly being the shade I hint at, the venue being Bridgehampton, NY. slightly later in the season. Thanks for reviewing this update... Mike K.
-
1:18 ACME/GL '68 Shelby Racing Co. Trans Am Mustang revised
swede70 replied to swede70's topic in Diecast Corner
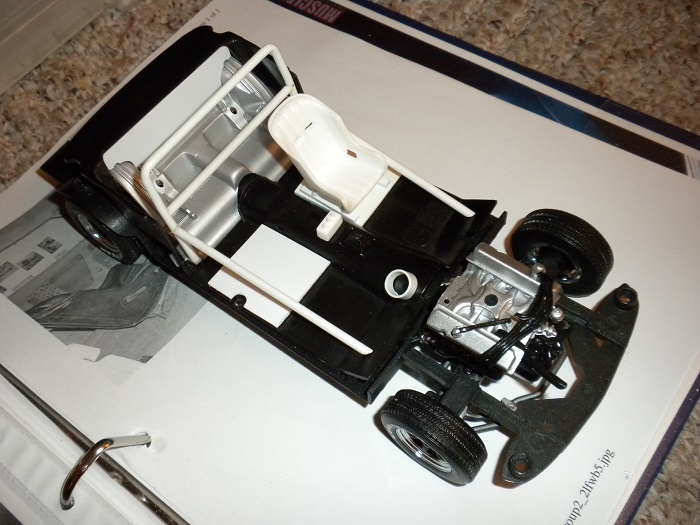
Very nice work ibj40 - I really like the discreet vent detail too... Yes, all I did was chop the standard Greenlight/ACME floor just forward of the main roll hoop mounts. Efforts to set new roll cage elements looking back met with grief last evening for the parts were so difficult to accurately size and place, so I'll likely end up drilling right through the insert to guide tubing straight through for better control of my work. The same will be done with the bars leading from the top of the main hoop through towards the trunk area; i.e. I imagine the way it should be! More model car 'mission creep' of which I am famous for. ...although mostly a white blur, this would be the chassis prior to substituting in the Welly Trans Am Mustang interior element. GIven the glass comes out of the ACME Mustang without too much trouble, here I'll use it as a guide to establish the evolving dimensions of the forward members of the roll cage with less risk of damaging it for manipulating the diecast body on and off it repeatedly. Also seen is a 1:18th Lane '68 Shelby Mustang dashboard (work here is incomplete) and a Welly Trans Am Mustang Grant steering wheel slated to go in. Hopefully I can cast the steering wheel so a ready supply will always be on call. ...this would be the support structure employed to situate the dash to the body. Setting it back isn't so hard, but rather elevating it and setting it on the right angle versus the dismal siting of the standard Greenlight/ACME panel is the chore here. More structure will be added to ensure that the dash effectively hangs off of the firewall and independently from the body proper. ...happily, no clearance issues to report. If all goes well, I'll soon have the dash suspended from the firewall and be ready to fabricate further elements of the roll cage. ...not perfection really, but note the removal of the battery and windshield washer solvent bottle otherwise cast-in to the inner fenders. Though hard to see, brackets have been fabricated to situate the strengthening brace across the suspension turrets. Perhaps I should go back and create a proper battery cut out and tray? Tamiya semi-gloss black works well as a slightly dingy chassis black as seen here. ...and finally, the definitive answer on where to display the otherwise lonely Shelby Racing Co. Toyota 2000 GT I happen to have. The models were observed chatting late into the night about opportunities lost in '68... Mike K.
-
1:18 ACME/GL '68 Shelby Racing Co. Trans Am Mustang revised
swede70 replied to swede70's topic in Diecast Corner
Greetings, Seen below will be the interior taking shape, combining the trim less rear seat pads with the bare 'stamped steel' detail otherwise found on the Welly Trans Am Mustang series noticeable here for wearing a silver finish. The main hoop of the roll cage has been fabricated, whereas after siting a Lane '68 Shelby GT350 Mustang dashboard off of the firewall, I should have the dimensions of the rest of the cage effectively locked in. The wheels and tires, to speak little of the engine and transmission seen here, simply reflect the stock 1:18th diecast offerings and stand to be replaced outright. ...also included is an old Aviaid oil pan decal useful for the purposes of reducing in scale and adding to the later-season oil pan soon to be finished. A chrome finish paint will be used to replicate the bright finish Aviaid then employed and still employs. ...thanks for skimming this most recent update. Mike K.
-
BOS Models' 1/18 "52 Dodge Coronet and Jaguar Mk8
swede70 replied to traditional's topic in Diecast Corner
Nicely done and nicely photographed both. BoS makes some neat and certainly eclectic choices with regards to what they take on, whereas I have one and find that the transition to sealed resin model manufacture hasn't left me bitter. Thanks for sharing... Mike K. -
Greetings, Although perhaps not an option for everyone given the service may not be availed everywhere, I've taken my own die cast body shells to area plastic media blasters to be afforded a service akin to sandblasting. Occasionally they can be slightly overzealous and some material loss is noted, but in the main the process is mess and chemical-free and hence something to consider. Kind regards... Mike K.
-
1:18 ACME/GL '68 Shelby Racing Co. Trans Am Mustang revised
swede70 replied to swede70's topic in Diecast Corner
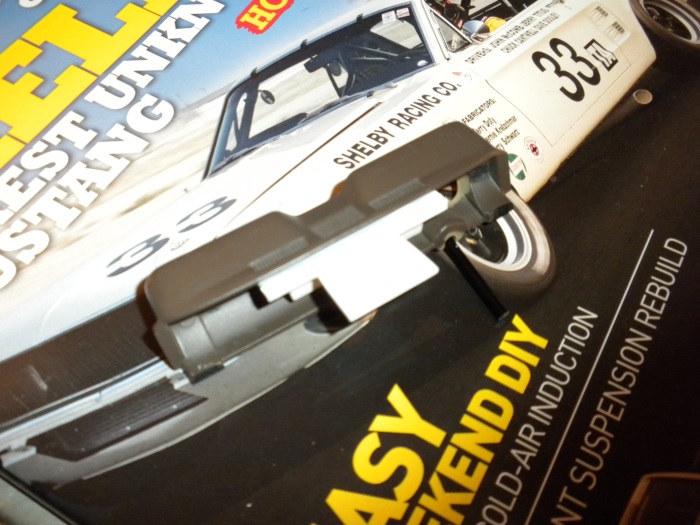
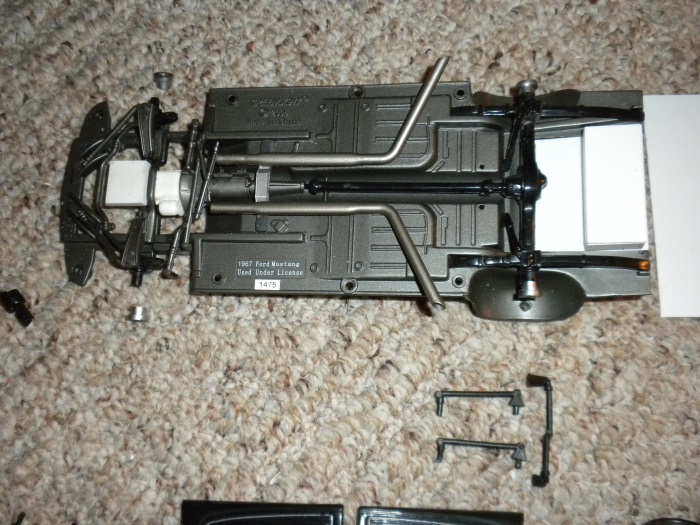
Greetings, Jim's labors will surely pass tech. at most any vintage event - have no fear in this regard! Again, my considerable thanks to you for your considerable generosity. Minor things to report in the form of my adding the unusual sun screen seen at select '68 Trans Am events on the Shelby Racing Co. Mustangs that seemed uniform for tint top-to-bottom, but only stretched about 2/3rds the way across the upmost portion of the windshield. Efforts to apply both Testor's and Tamiya aerosol black tint directly to the model windshield ended badly for inconsistent radius of the tape, puddling of the products sprayed along the masking edges, as well as seepage under what otherwise seemed to be a sound effort to mask things tightly. Eventually some Testor's clear decal film was purchased and sprayed evenly with the Tamiya product, then clear coated with Testor's decal bonder. A pattern was taken regarding the radius of the top of the windshield proper, and when dry the decal film was cut to shape before applying. Regrettably it appears that the whole effort took mere minutes when in point of fact it took much more! It looks clean though, even as the trouble to replicate the spec. isn't easily grasped just for looking at it. ...the model seen with a sheet of the black-tinted clear film, plus top windshield radius pattern. ...still hard to make out this, but the finished tint segment is in place across the top of the windshield. A slightly better fitting right side headlamp fill panel has been substituted in - whoopee this! Note that the driver's side mirror has been removed as has the antenna base otherwise present atop the passenger's side fender. Wholly invisible is an otherwise standard GT steering wheel drilled out for spoke holes and painted black to roughly mimic a Grant period racing model. So much inside is or will be painted a rather lusterless black that the ambiance of such is akin to a tomb... ...and here would be a set of earlier-issue Greenlight standard '68 door panels with the armrests filed out and fill panels fabricated and blended in. Also seen is a small square pad further noted within the reference photo seen here. ...coming soon then. This would be a largely scratch built front valence assembly that may (or may not) be used on the late '68 entry seen above, but certainly will feature on any early '68 entry with full factory flare work. I started with a sawed-off front valance plugged up for holes and reproduced in resin. The time will soon come when I'll opt to reproduce this for use across other projects besides. Thanks for examining this update... Mike K.
-
1:18 ACME/GL '68 Shelby Racing Co. Trans Am Mustang revised
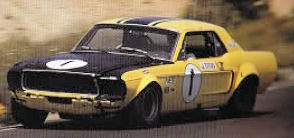
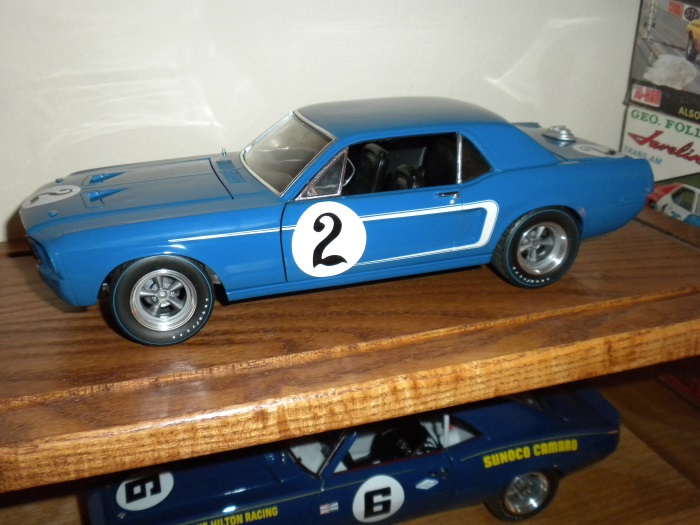
swede70 posted a topic in Diecast Corner
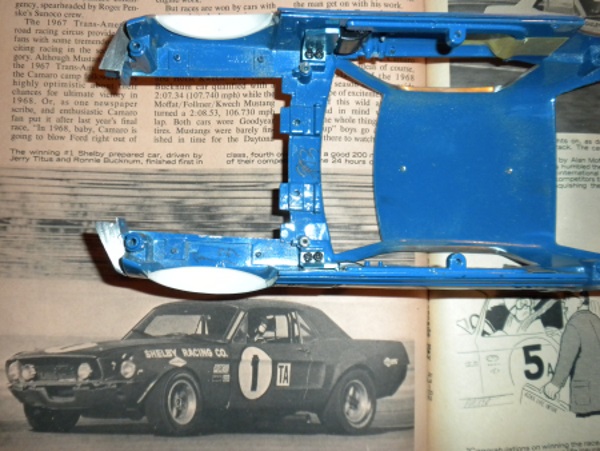
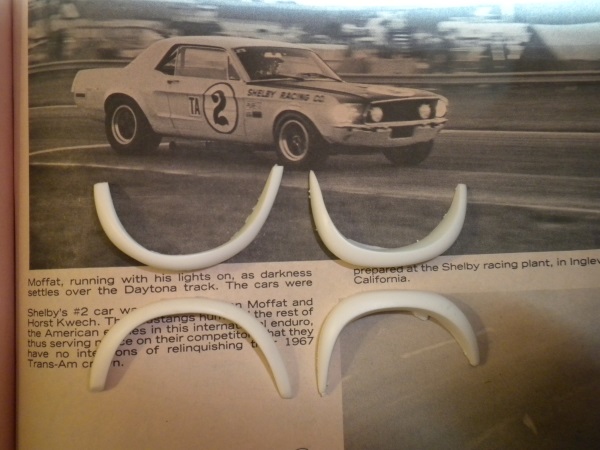
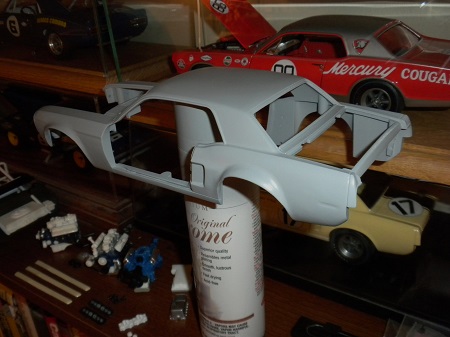
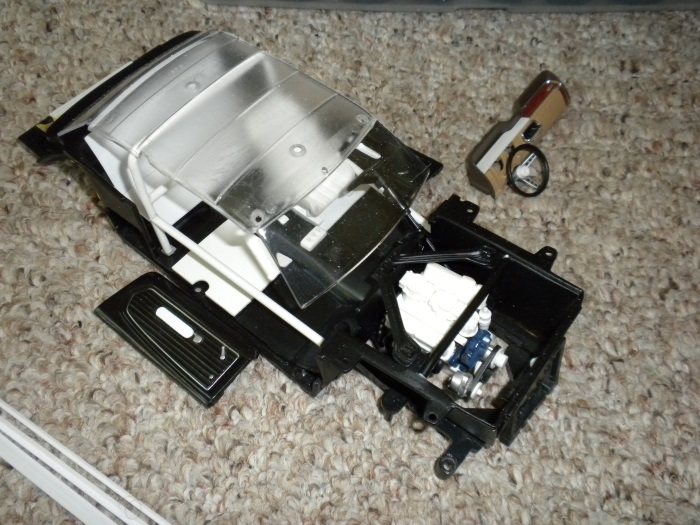
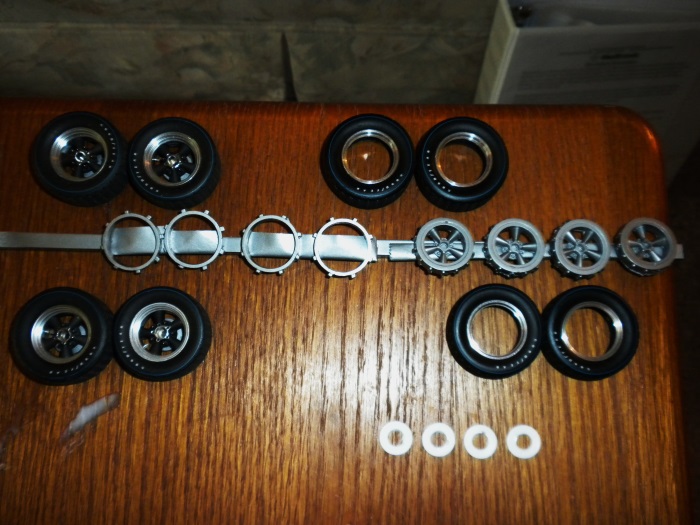
Greetings, This thread relates to possible things to do with regards to the 1:18 Greenlight 1967-68 Mustang SCCA Trans Am Mustang 'Tribute' range, containing what insights I can provide to replicate what is seen. Much thanks is expressed to 'Oldtimer' for without whom this project would not be possible. ...this would be the unmodified 'as-delivered' version, largely impressionistic for being a tribute version, although nicely finished especially for paint. ...this would be Jerry Titus motoring along sometime during the middle to late '68 SCCA Trans Am season. For Shelby Racing Co. it was an 'explosive' year... ...seen are old GMP Trans Am tires from their Penske Camaro range, combined with cast resin clones of the ACME 1:18th '65 Dodge altered wheelbase American Racing Torque Thrust rear wheels less outer lip and inner rim structure. Old GMP Trans Am Minilites were cut up to provide fodder for a mold to reproduce the inner rims seen at left, whereas Pegasus 1:25th scale turned aluminum 22 inch rim blanks were cut down by hand to afford usable turned aluminum outer wheel lips. The handcast GMP brake discs seen were not used, with chromed washers substituted in for reasoned brake disc detail. ...though far from finished, this would be the chassis less cast-in stamped fuel tank detail. The oil pan is a modified Hwy. 61 BOSS 302 item with added sump in the Aviad style, whereas the fuel cell housing is scratch built. A Welly Watts linkage assembly is seen just below, as are a pair of over rider traction bars also from the Welly tool. A Kar Kraft Watts linkage support structure will be fabricated and added soon. Know that the new ACME Mustang comes with '67 interior panels, hence '68 versions from an earlier release will be substituted. Ride height has been lowered front and rear, while old GMP Trans Am Torque Thrust wheel hubs have been cut and reemployed to attach to discreetly trimmed ACME/Greenlight hubs from an earlier release (it seems they were tooled a bit larger than what comes through on the most recent releases). ...these would be scratch built headlamp filler panels specific to the '68 factory cars. Yes - the one on the left looks a bit better for profile... ...seen is a smaller, slightly tapered fuel fill dimple situated on the tail panel as well as a hand formed overlay where the bumper would otherwise be situated. The lower valence stands to be replaced with a plugged (less GT exhaust tip cut outs) and shaved (for the licence plate in particular) version more suited to this application. Note too the fuel cell housing hanging down... ...with wheels installed and with a cast resin fuel inlet attached to the deck lid. Notice too that the 'Shelby Racing Co.' and 'TA' lettering has been removed. Although common enough on the early season cars, when the revised corporate blue liveries were debuted mid-season, such identification was left by the wayside. Thanks for reviewing this initial post - more to come. Mike K.
-
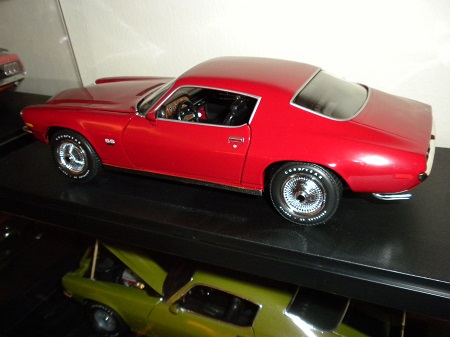
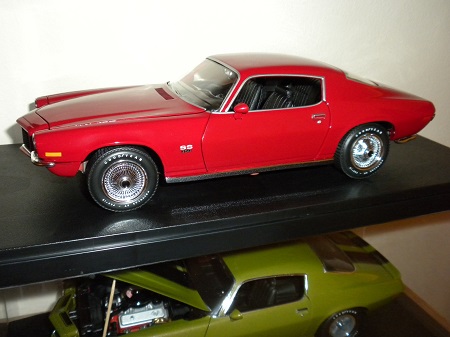
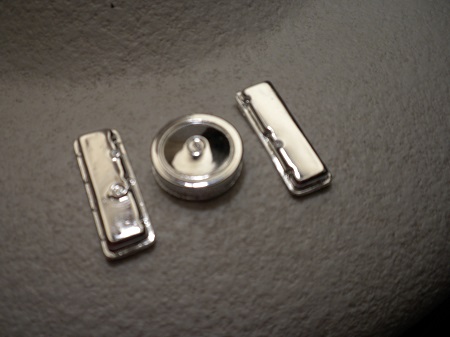
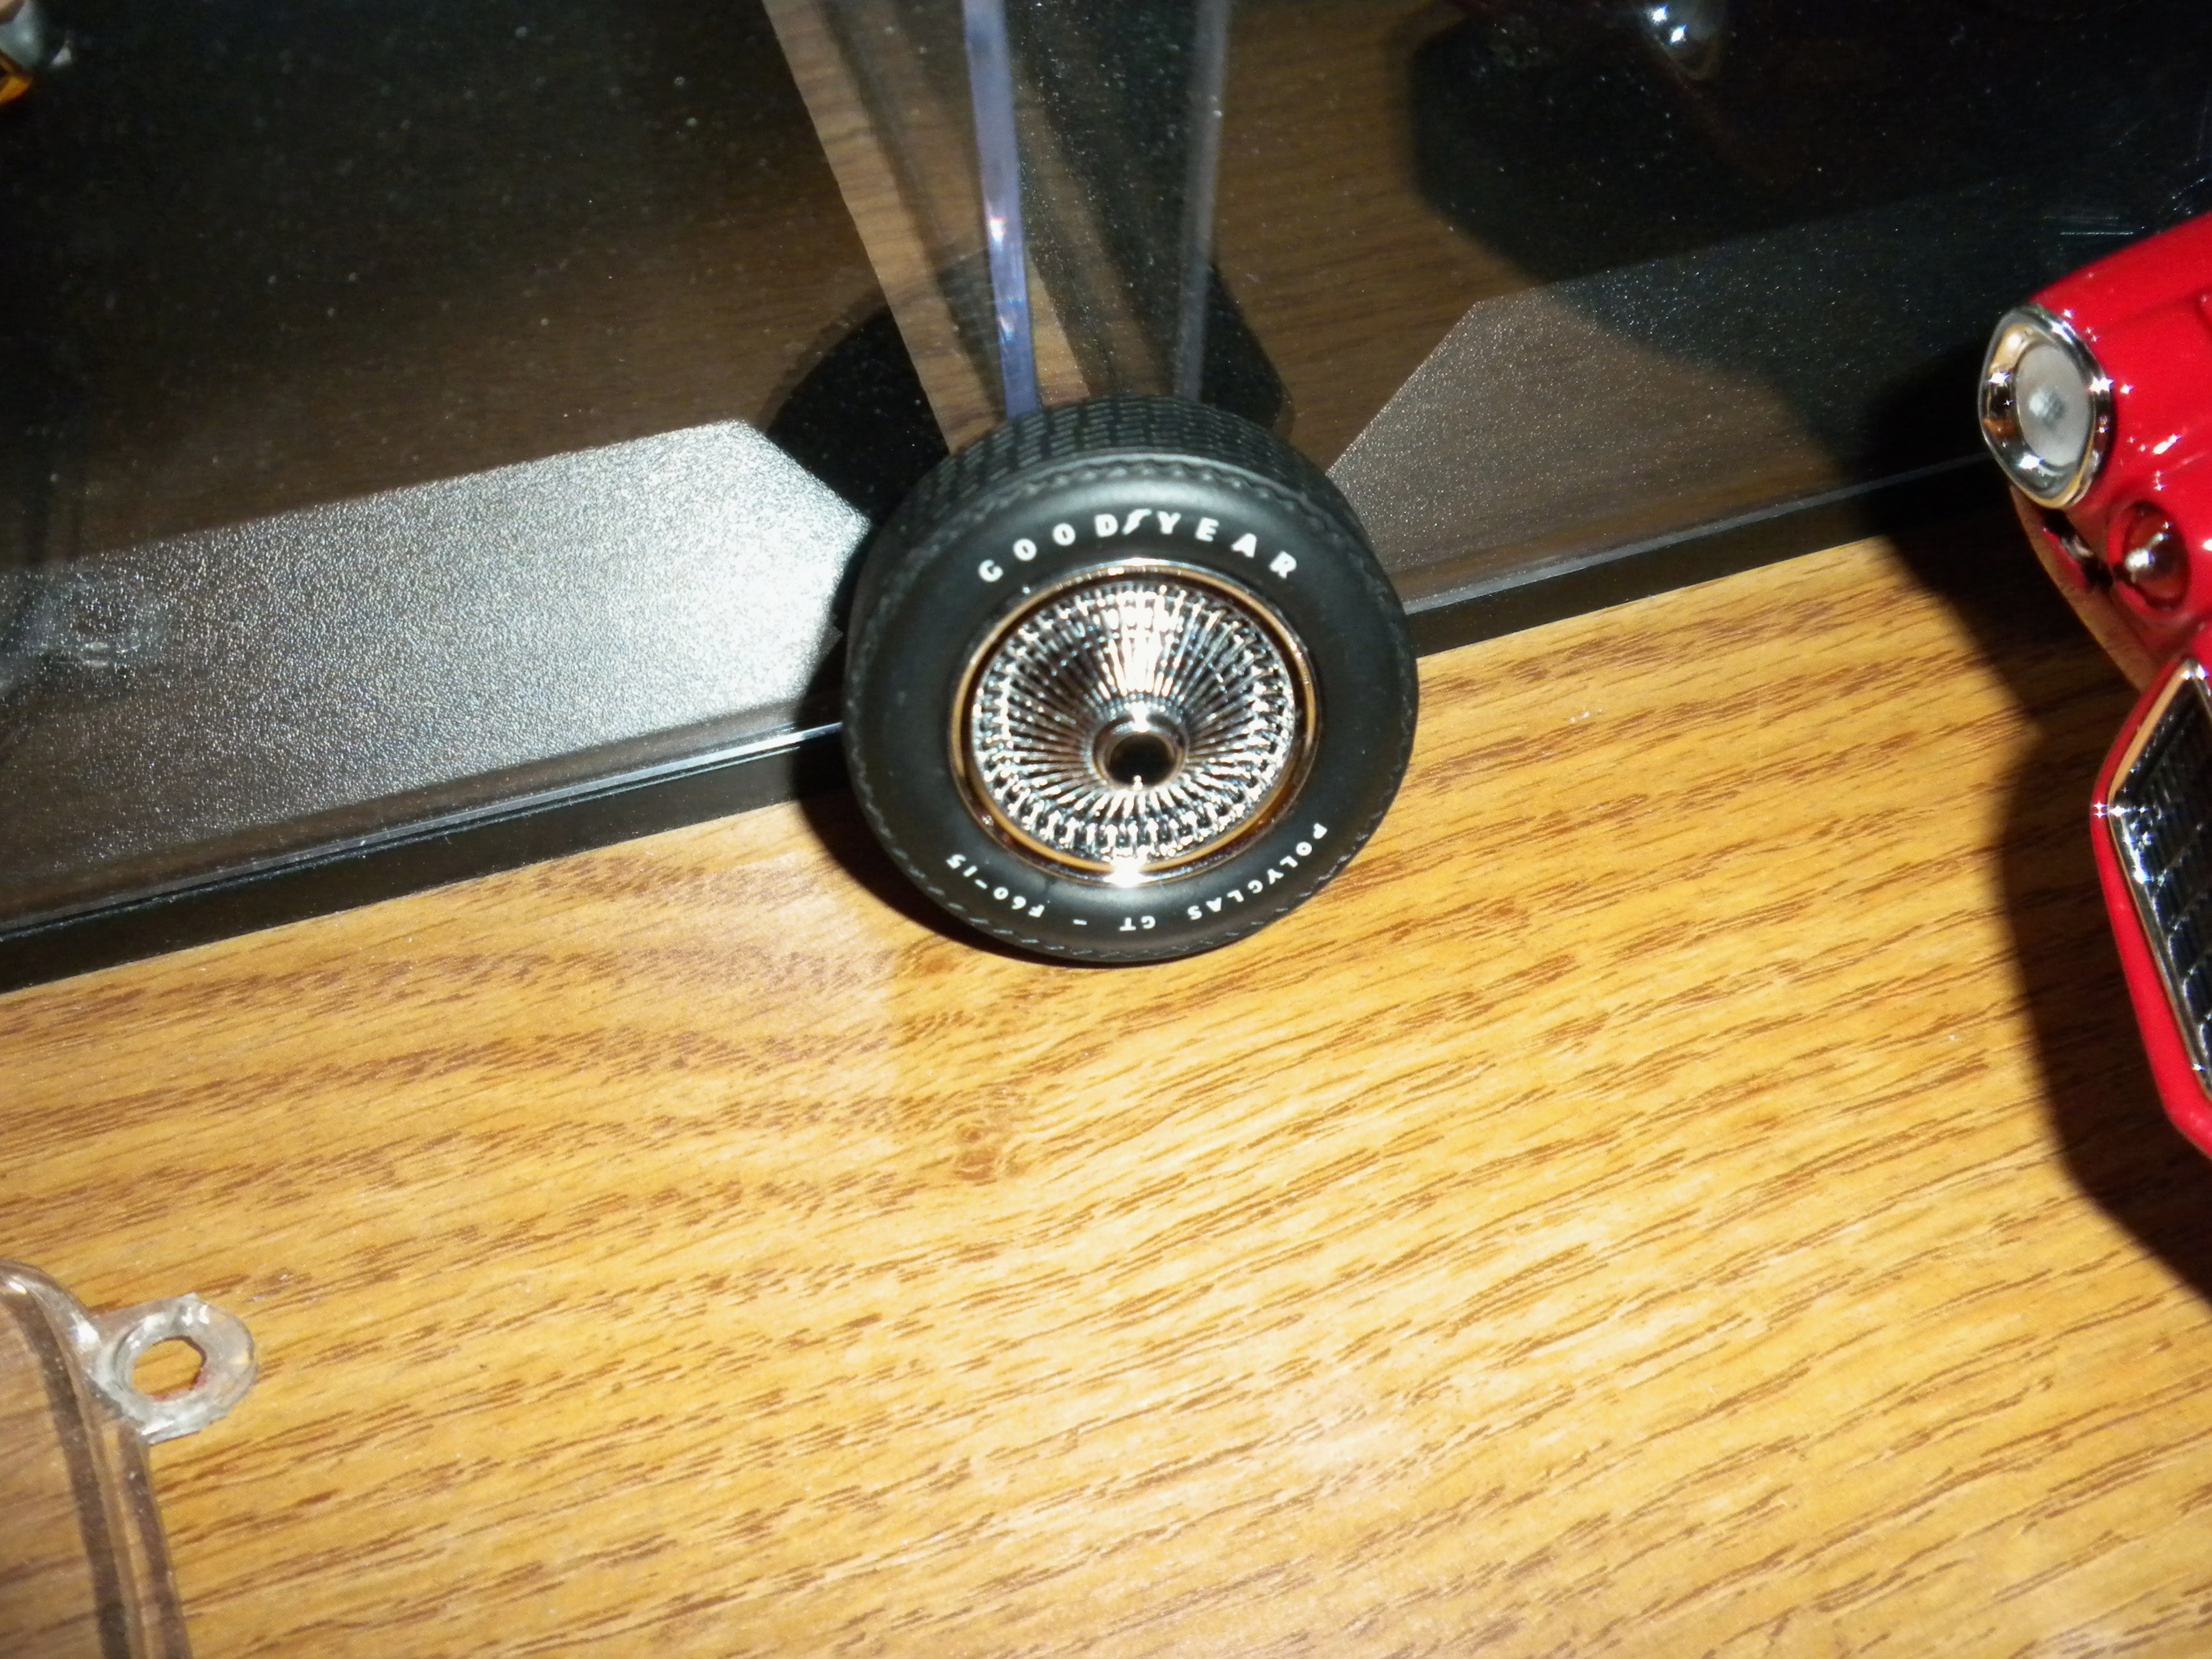
Greetings and thanks for examining this thread... Although not an elaborate mod., I nevertheless have harbored longtime ambitions to combine the old 1:18th ERTL 1970 1/2 Camaro tool with the like scaled AutoART 1969 Corvette wheels and tires - specifically to glom onto the finned turbine wheel covers that were seen often enough on full-size Impalas, Corvettes, and the odd 396-powered Camaro in period. The expense involved seemed certain to preclude my ever attempting this, but very happily a friend was able to secure a set of the AutoART wheels and tires in question recently off of one of their Corvette releases for not so very much, whereupon I copied the same in resin to afford the reader what is seen below: ...although not an SS model, this image nevertheless communicates well what I'm after regarding appearance. ...this would be a resin copy of the AutoART Corvette wheel cover, derived from a one-piece urethane mold and later vacuum plated. The black wash employed is Testor's Model Master aerosol Transparent Black Window Tint applied liberally with a brush, while the center received a small dollop of Tamiya Black aerosol. The tires used are old Hwy. 61 F60-15 Goodyear Polyglas GT's. that are slightly larger in diameter than the same basic tire the most recent ERTL release of the 1970 RS/SS 350 Camaro comes through with, but all the same the former can be swapped in and centered on the wheel backs prior to gluing with minimum effort. Heating the tires in hot water prior to swapping them onto the standard ERTL wheel backs ensures that they will be that much more pliable as less likely to resist efforts to positioning them accurately. ...with the creation of four copies, the wheel/tire assemblies are set in place. As seen, the bumpers have been removed to facilitate mold line and license plate removal, whereas the cleaned up castings will be reset soon enough. ...this being a L78 396 (402!) powered second-generation Camaro, the tail panel has been painted a semigloss black. Happily the rear valence is removable for this simplifies the necessary paintwork. Resetting the tail lamps isn't much fun, whereas the license plate was removed, sanded flat, drilled for mounting hardware and finally painted a contrasting gloss black before being reset. Note too that I've opted to remove the bumper overriders otherwise seen on the accompanying 1970 1/2 Citrus Green RS/Z/28 positioned just to the right within a display case; i.e. living dangerously then with minimal bumper protection both front and rear. Exhaust tips, some hitherto missing identification as well as modest engine mods. are still to come. Thanks for examining this post. Mike K.
-
1:25th Motor Max '86 Dodge Diplomat A38 Police Package modified diecast
swede70 replied to swede70's topic in Diecast Corner
Very neat! Thanks for the kind comments and interest displayed. Since I last posted combined the resin wheel covers with the resin wheels, although after doing so it seemed that the caps stuck out a bit more than I'd desire. Absent the hub caps, the resin pressed steel six-slot wheels are really outstanding, but maybe less so with the caps in place. I ended up removing the resin wheels and substituting in the Monogram '70 Roadrunner wheels and combining these with drilled ventilation hole Police-spec hubcaps that I sent to a vacuum chroming outfit to come up with what seemed the best compromise. I'll attach a photo or two to this post in a week or so, taking care to also include a shot of my then-prized 1983 A38 Plymouth Gran Fury with was equipped with everything but the accessory oil cooler; i.e. 4BBL 318, light blue silicone hoses, the small oil pressure gauge, the 125 mph instrument cluster, as well as what factory stereo equipment could be retrofitted from the then common Fifth Avenue iteration of the venerable M-body. Oh - and yes, it did have twin functional spotlights as well as the disc-style interior roof light! Again, flattered I am to notice this thread resurrected... Mike K./Swede70
-
Nube Question: What products/process are you using to polish diecast?
swede70 replied to tedd60's topic in Diecast Corner
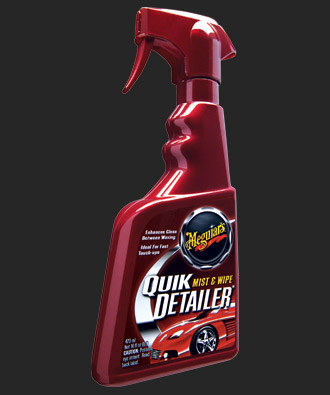
Hi Ted, If it helps, when scrubbing and/or polishing something I've picked up used or hitherto displayed out in the open, there are a few things I do and can recommend. I've found that your usual dish soap leaves spots, although if one employs actual car wash soap this tendency is greatly diminished. Sometimes I fill a large sink with the soapy solution, while even textured floors can come through o.k. as long as one doesn't foolishly try to scrub them. For light residue visible for the imperfect removal of clear tabs on any opening panels, a bit of Goo Gone helps, while always err on the side of something less hot and toxic before daring to employ something potentially damaging. As for polishing, I can recommend Mequiar's Quik Detailer (or similar car show touch up wax spray/cleaners in a bottle) which works well on both paint and die cast plastic 'glass'. Plastic 'glass' can in some instances be polished, whereas I was surprised to notice how well Hwy. 61 Chrysler E-body glass responds to careful efforts to enhance the same thus. Lastly, I'll scrub tires down with a 50/50 mix of water and Armor All, given 100% Armor All tends towards the greasy and sticky which isn't strictly desired. Kind regards... Mike K./Swede70
-
Greetings, Working part-time within an area automobilia shop, I've witnessed a fair amount of individuals opting for the sealed resin models even as prices overall have inched towards the moon. These customers are most sensitive to the stance of the topic in question, and in particular, the quality of the exterior finish. Other considerations include the usual opening features - but surprisingly not always. Locally customer traffic is oriented towards technical or styling landmarks as well as vintage racing topics that haven't strictly been done in 1:18th before. This revealed, there fewer people that will automatically purchase product based upon simple shelf appeal. I simply turn away at the $150 mark, although for a select few this hasn't strictly halted their collecting habit. I suppose too that few purchases translates as less pressure exerted upon storage capacity, while others have decided forthwith to embrace 1:43rd, sprinkling their collections with very select 1:18th and even 1:12th additions. As for myself, I register shock and awe again and again. Do these fellows have zeppelin hangers to display their stuff? Regarding U.S. topics, some residual demand exists for the Autoworld 1:18 reissues of the old ERTL tools, though it should be said that the color combination should really pop and/or represent a period promotional scheme if one is to expect a particular model to move. More pointedly, prices overall have risen to the extent that yesterday's pattern of the mass purchase of every color and every release is pretty much history. In particular, I'm not sure how some of the other producers struggling along now can clear a profit with only 20% of their new releases (or alternatively finished rereleases) finding a buyer. Another factor infrequently mentioned is the quiet flood of old material coming back onto the market at depressed prices for past owners clearing out collections or as a result of a seemingly endless wave of estate sales one atop another; i.e. more people are inclined to hunt for attractively priced used examples. Putting it all together equates to a definite strain upon the traditional lower and middle end of the market, whereas something will always remain of the bottom and top; i.e. the near-toy vs. the archival piece purchased dearly. As an aside, too much indifferently tooled and clumsily conceived product washed onto the market during the early years of the Age of Diecast. That the product sold etched away at the base of the unassembled plastic model car hobby is something I deeply regret, although as the floodtide of so-so product recedes, perhaps what will remain won't be judged so harshly in sum? Many potential purchasers of this or that aren't strictly outfitted with the comprehensive skills set to capture what they desire in-scale via the kit route, while know too that refinishing aspects of a fair to good 1:18th scale diecast model can be an appealing way to reembrace the kit building hobby for being limited in nature and not requiring mastery of all aspects of fabrication and finish work. Perhaps more reason then to modify away given that quality detail cannot be reasonably afforded 'out of the box' then? The days of 'Cheap China' are definitely done, whereas most of what I plan in scale is based upon what already exists within the marketplace. I have about forty 1:18th models, a half dozen 1:25th projects, and a few 1:32 slot cars employed as static display pieces. Any producer imagining that demand I represent will keep them in the black looking forward are destined to be deeply disappointed. Thanks... Mike K.
-
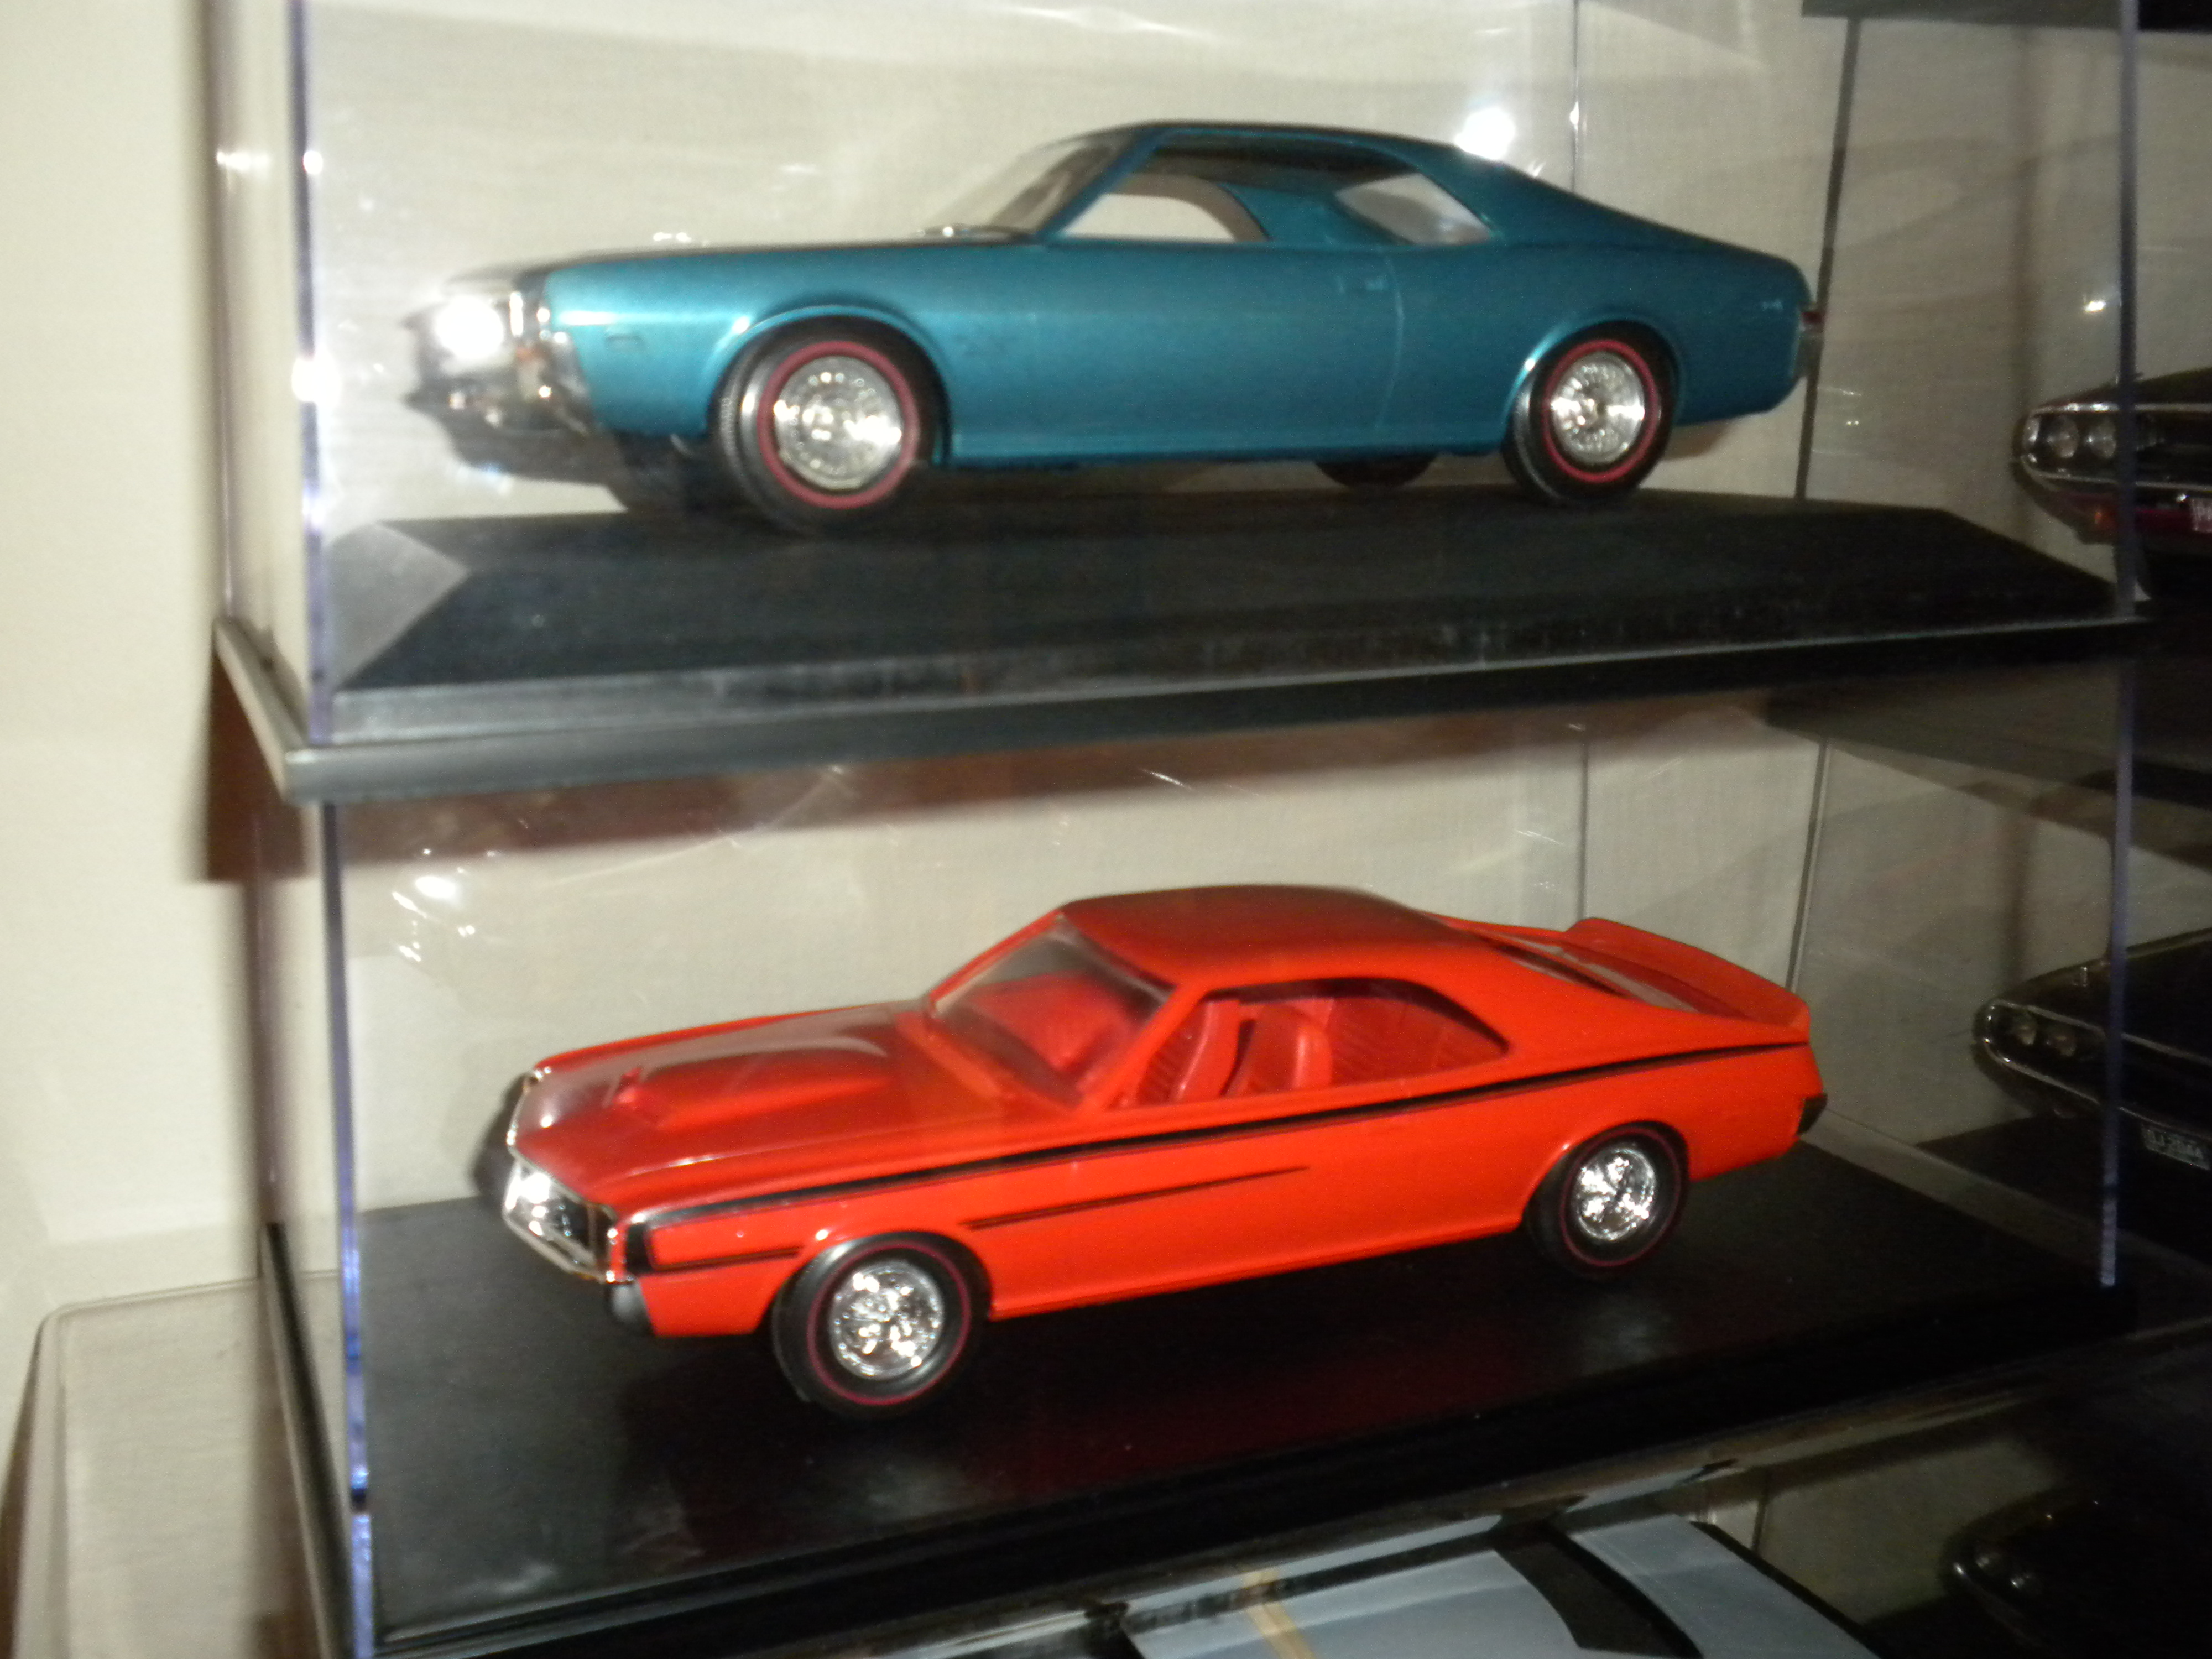
Very neat - I love early Javelins. I regret that I didn't stock up on Modelhaus replacement tail light lenses with the proper 'Javelin' script when these were briefly available, so to see another '68 with the correct tail light assembly briefly causes me pain given I didn't act when I ought to have consistent with planning for tomorrow. Thanks for sharing... Mike K.
-
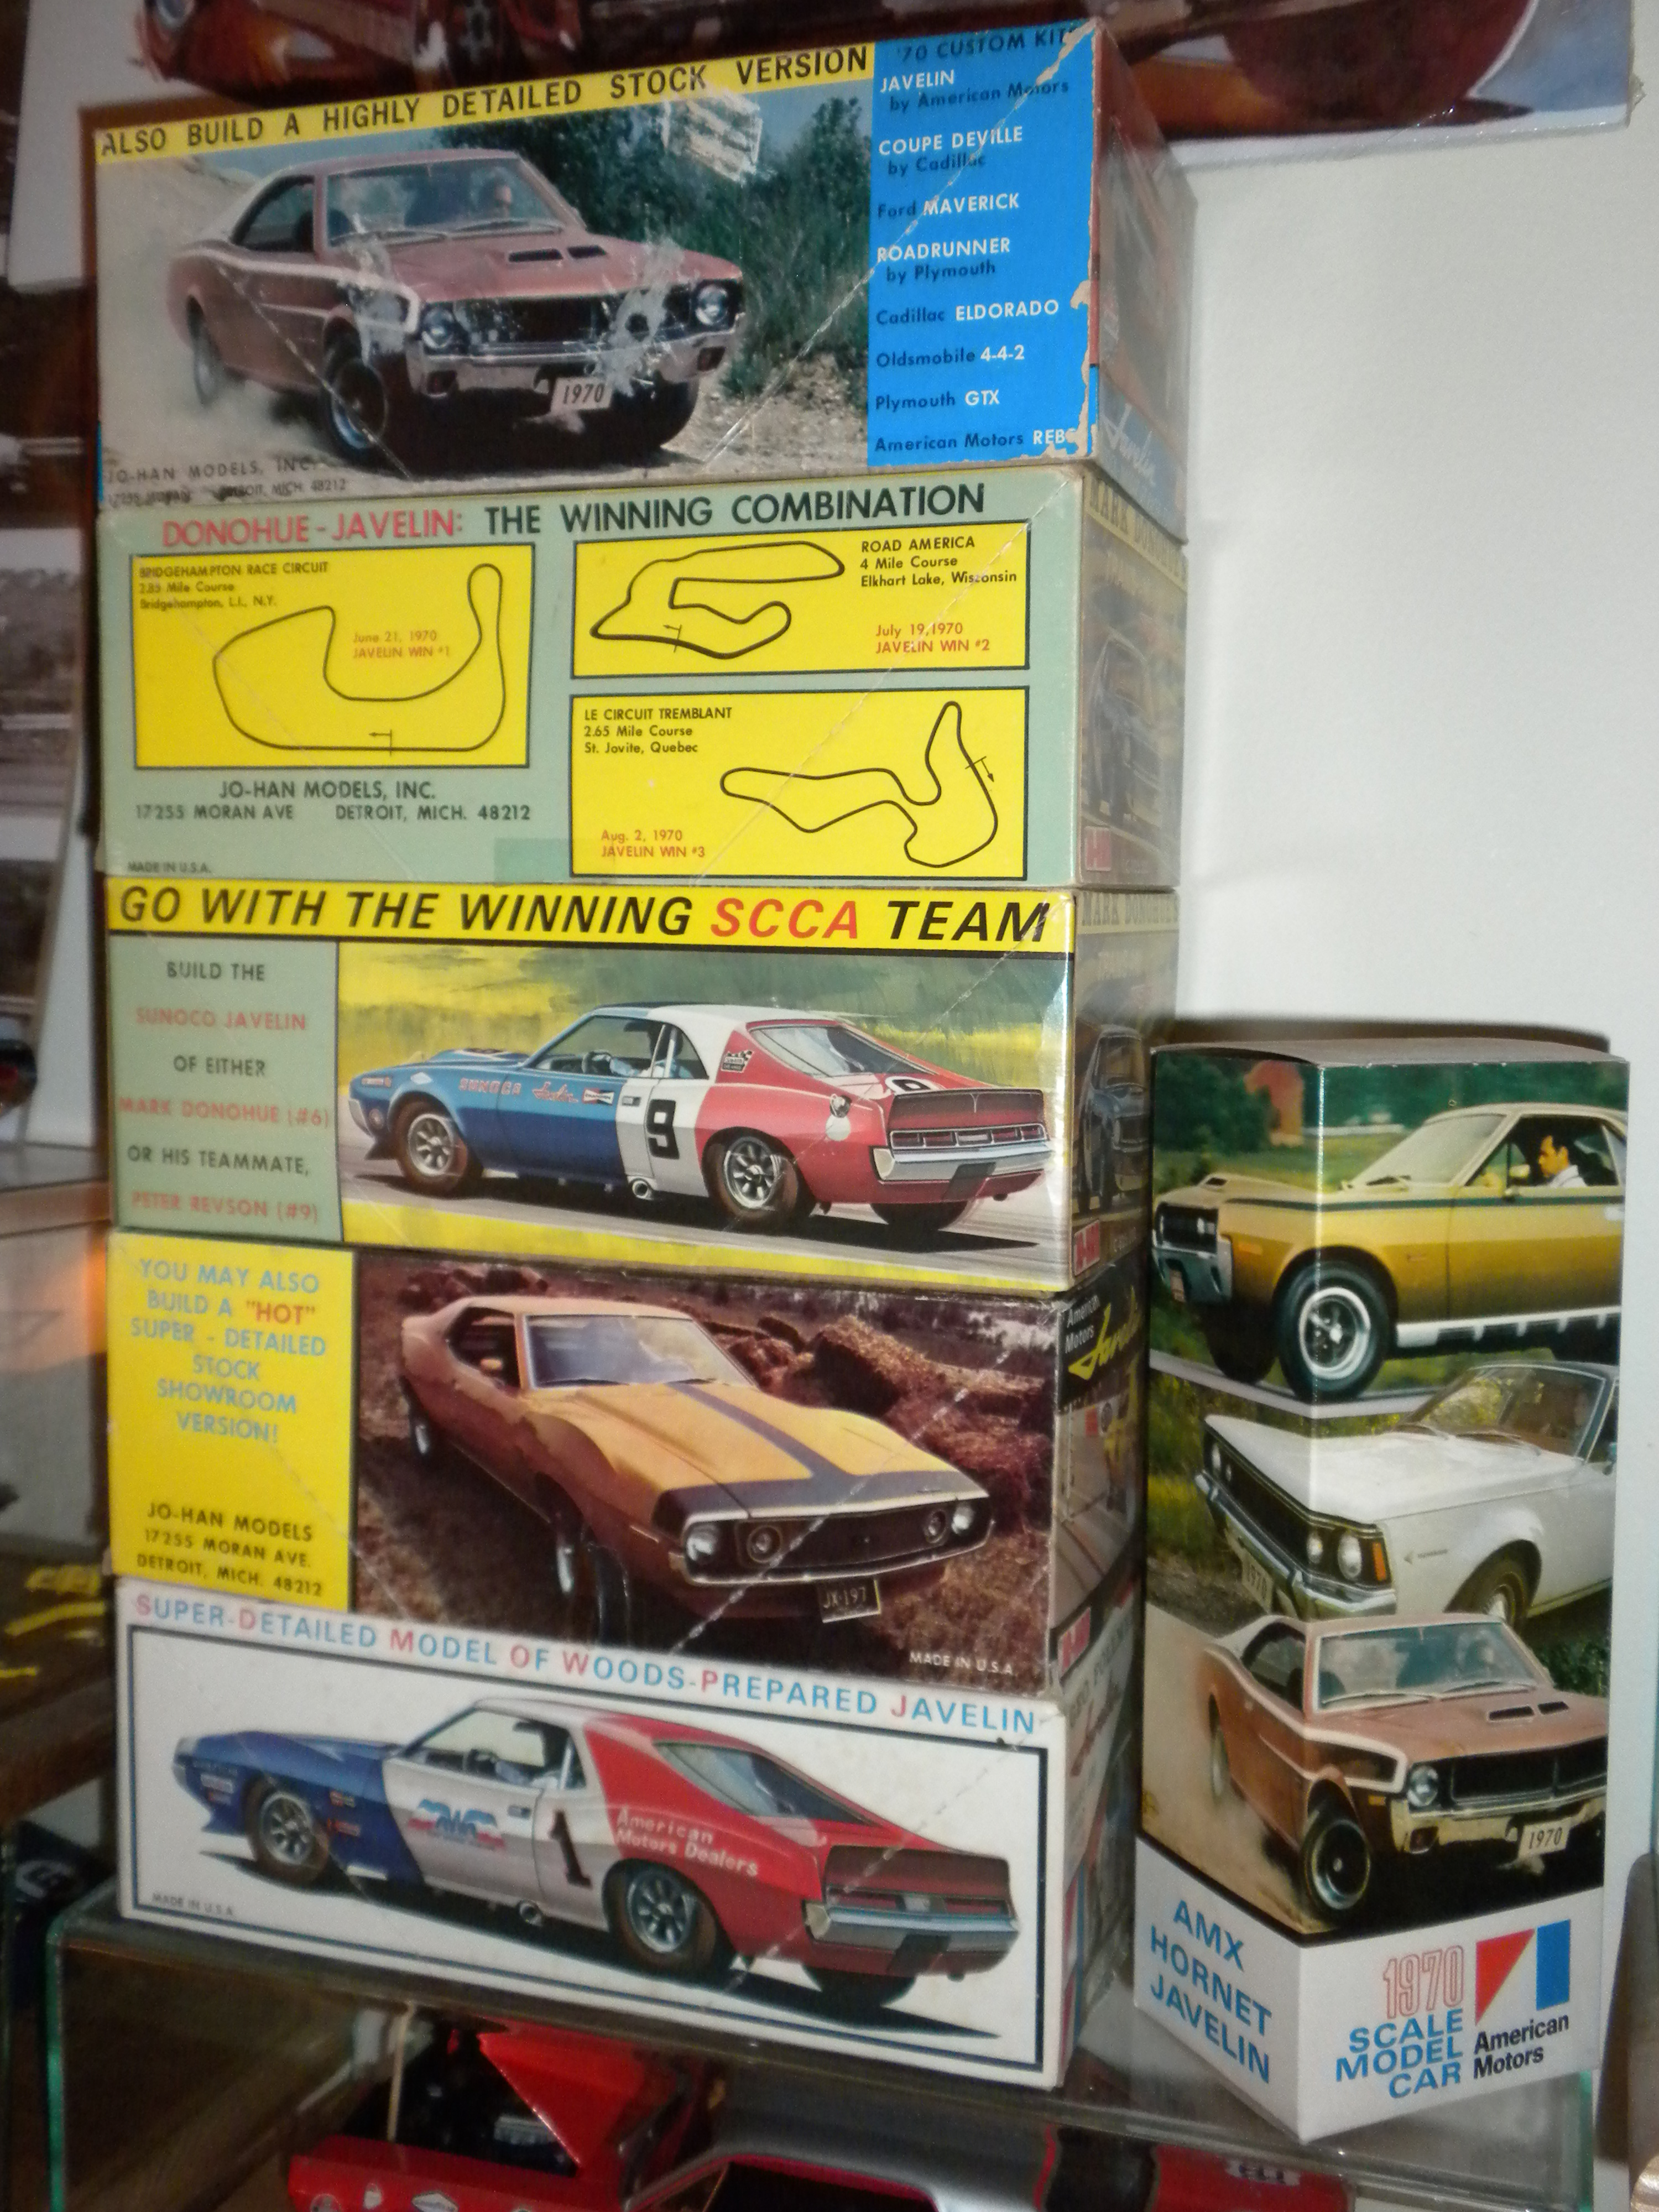
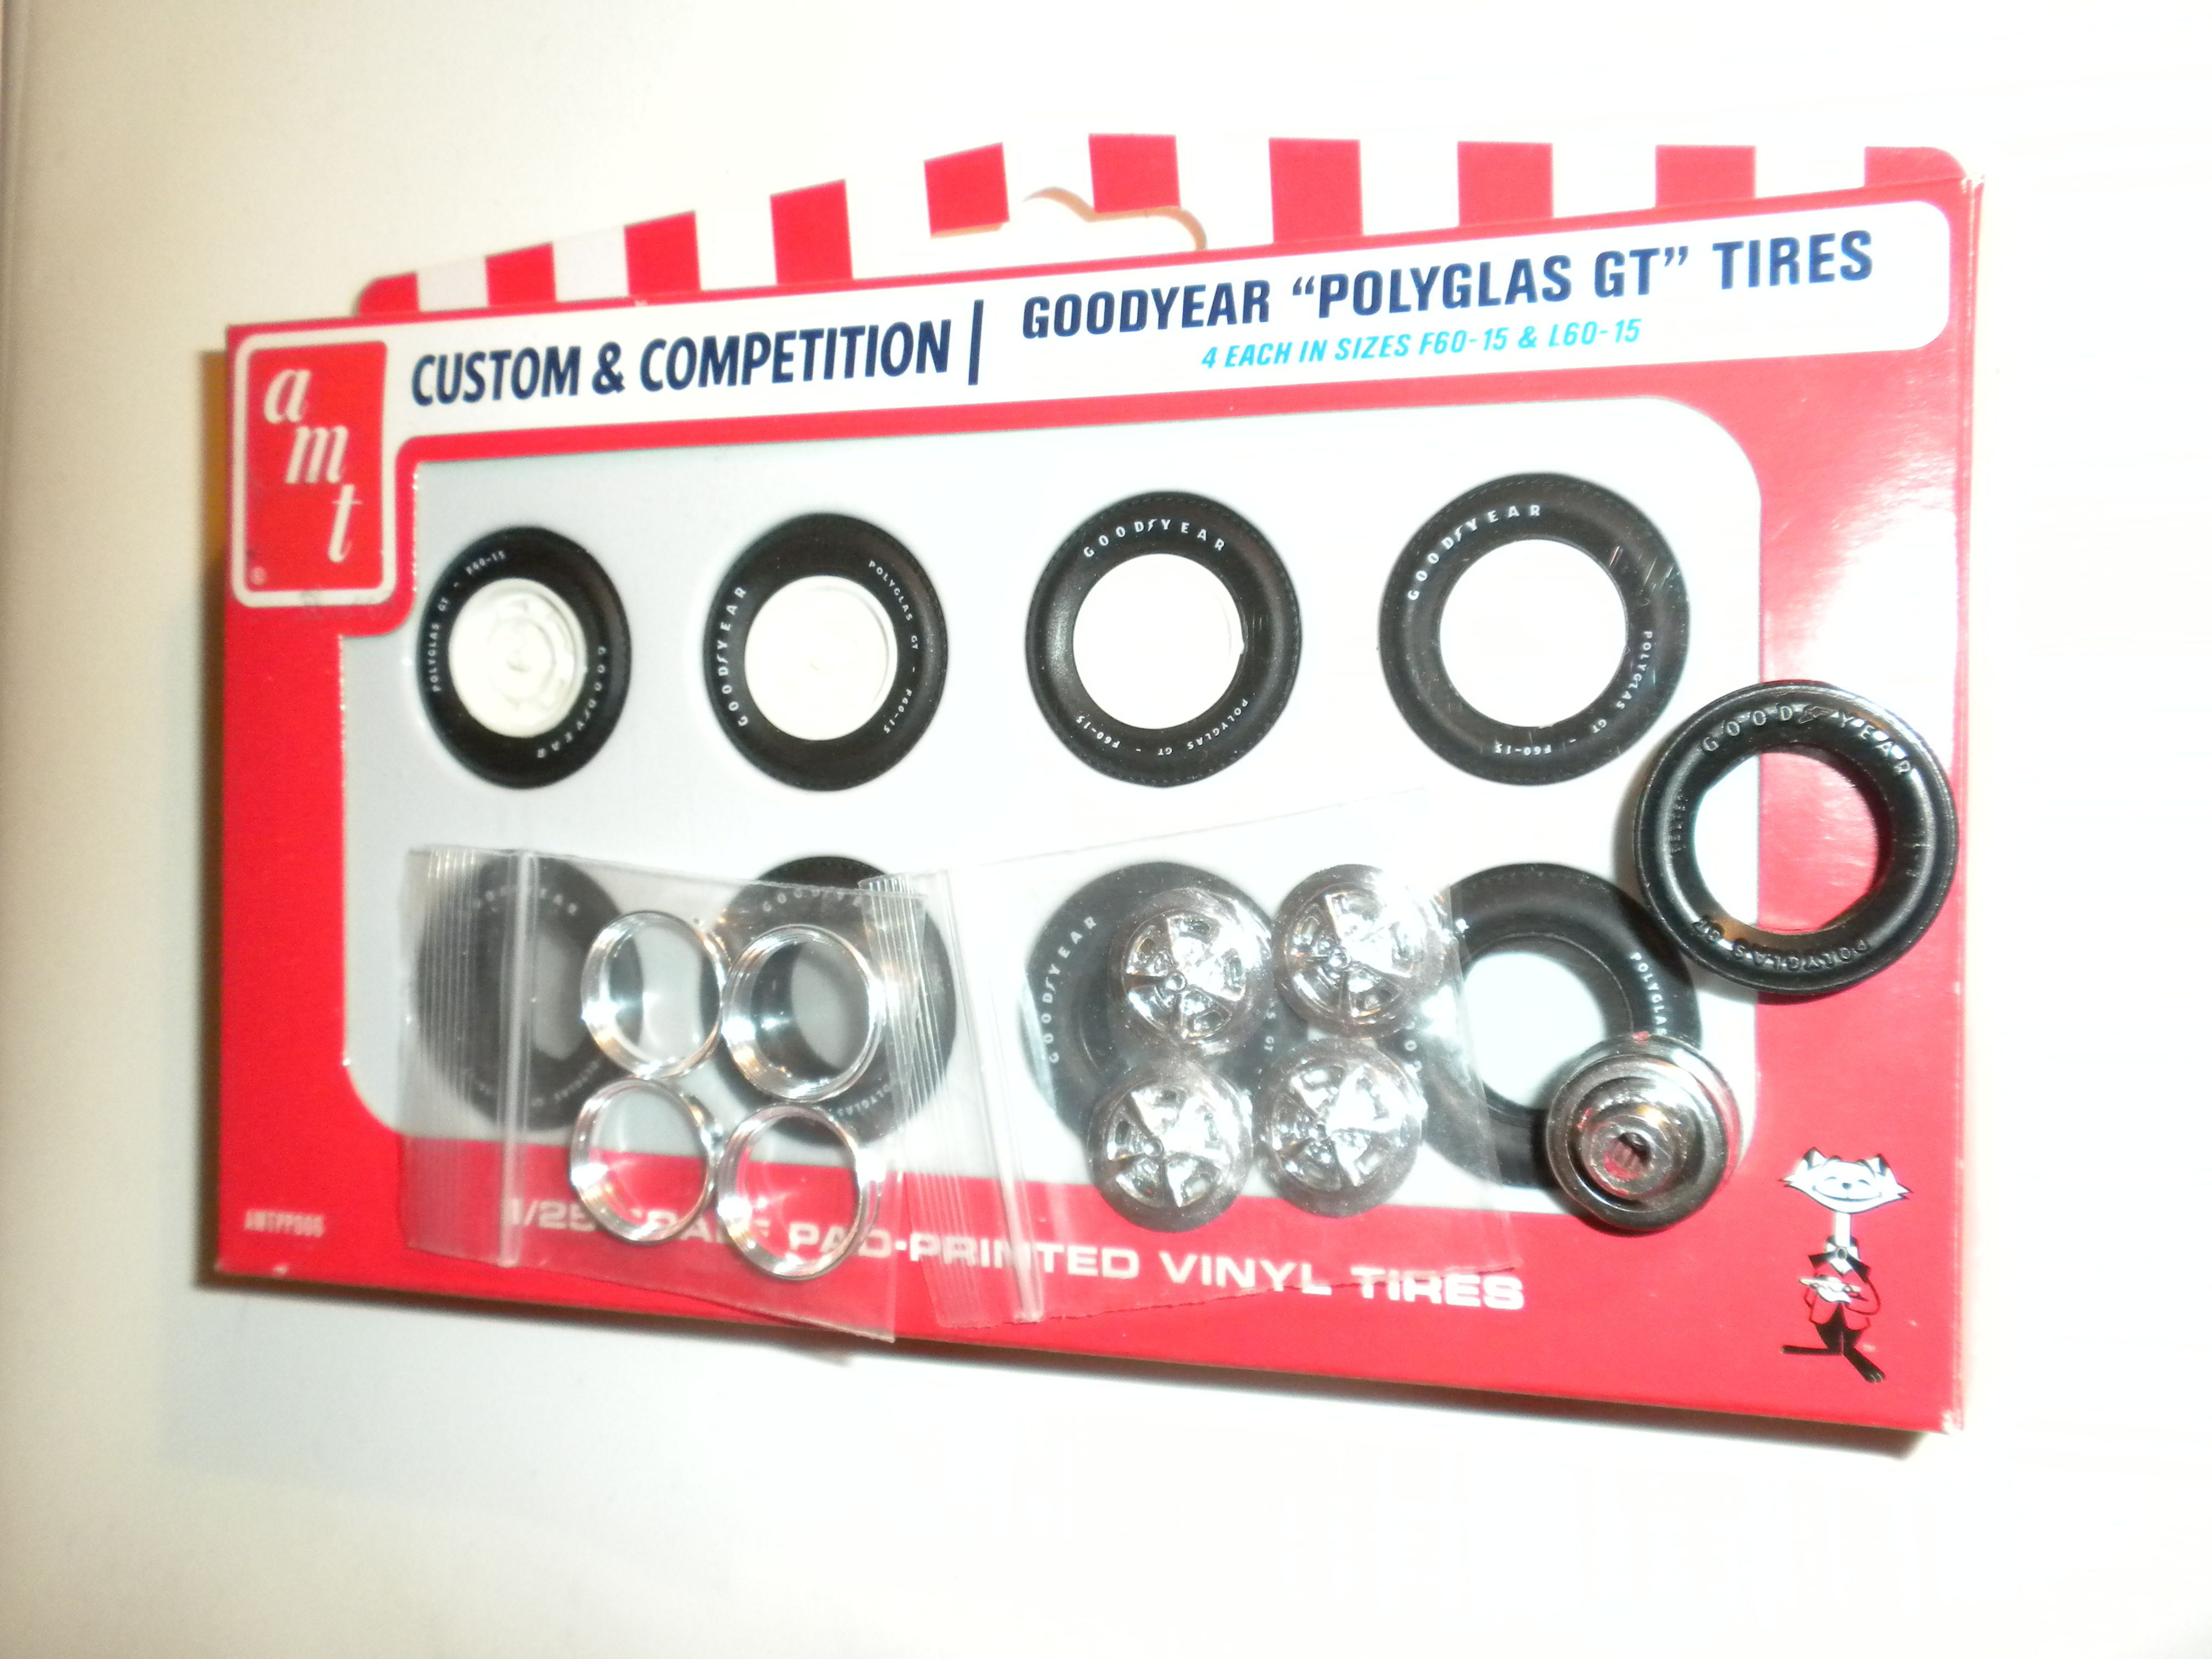
Thanks for the unexpected and kind replies all... Actually I maintain a sort of 'Home for Wayward Jo-Han American Motors Javelins', and as such one project feeds into another. Foil and elaborate grille paint masking will feature on another '70 Mark Donohue Javelin kit build, very likely to be painted Scarab Gold less stripes but with the pressed steel 'Rebel Machine' wheels. I'm also partial to the race release front and rear bumpers with live without the egregious and cast-in 'JAVELIN' identification! Both an early-season and late-season '70 Trans Am racer are 'in-development' as it were - see below for my Riverside Donohue entry sans finish. As to this 'faux-mo' effort, I have collected some parts consistent with going a step further with the wheels, although if I can't come up with something that mounts true and remains stable the parts will be set aside or rolled into a proper kit project. Seen below are a set of Missing Link Magnum 500's cast in two separate parts to better facilitate paintwork. '69-'70 (maybe later?) AMC Magnum 500's were finished a bit differently than industry standard, featuring as they did a semi-gloss black finish across the entire face of the center wheel stamping versus leaving the five raised spines exposed and chrome plated. Further, they dusted the semi-gloss black surface with what appears to be silver paint. Given masking won't be the awful trial it might otherwise be with the Missing Link product, hopefully I can go somewhere in this direction. A silver-painted raised center trim cap as well as some means to mask the raised chrome lug detail is also being pondered... Anticipated troubles revolve around firmly mating the new Magnum 500's to available tire options as well the existing Jo-Han promo wheel axle mounts per se. I resolutely don't want to cut up the promo chassis in any way, whereas if the resulting wheel/tire assemblies aren't as strong or do not roll as well as the usual promo fare, then again I'll not use what I've worked up. Tire options are as shown; i.e. the new pad-printed AMT usual, but also the old MPC vinyl renditions first seen on promotional models way back in 1971. I might take some old Jo-Han Rebel Machine wheels and apply a length of Tamiya tape to dimensionally 'take up the gap' between the radius of the wheels versus tires, create a mold and cast the results, etc. Although progress might be slow, nevertheless - watch this space. Although hardly rating as a major effort for the week that was, I did swap in the barely salvageable standard promo glass into the '70 promo shell hoping that the extra mount material cast-in to the base of the 'glass' would result in better and tighter fit all around. No luck in this regard, although doesn't it look nice parked next to my '68 promotional of the same topic? ...and lastly, a purely optional celebration of period Jo-Han Javelin box art, positioned if you will atop all my other cases. Thanks for skimming this update. Mike K. M.K.
-
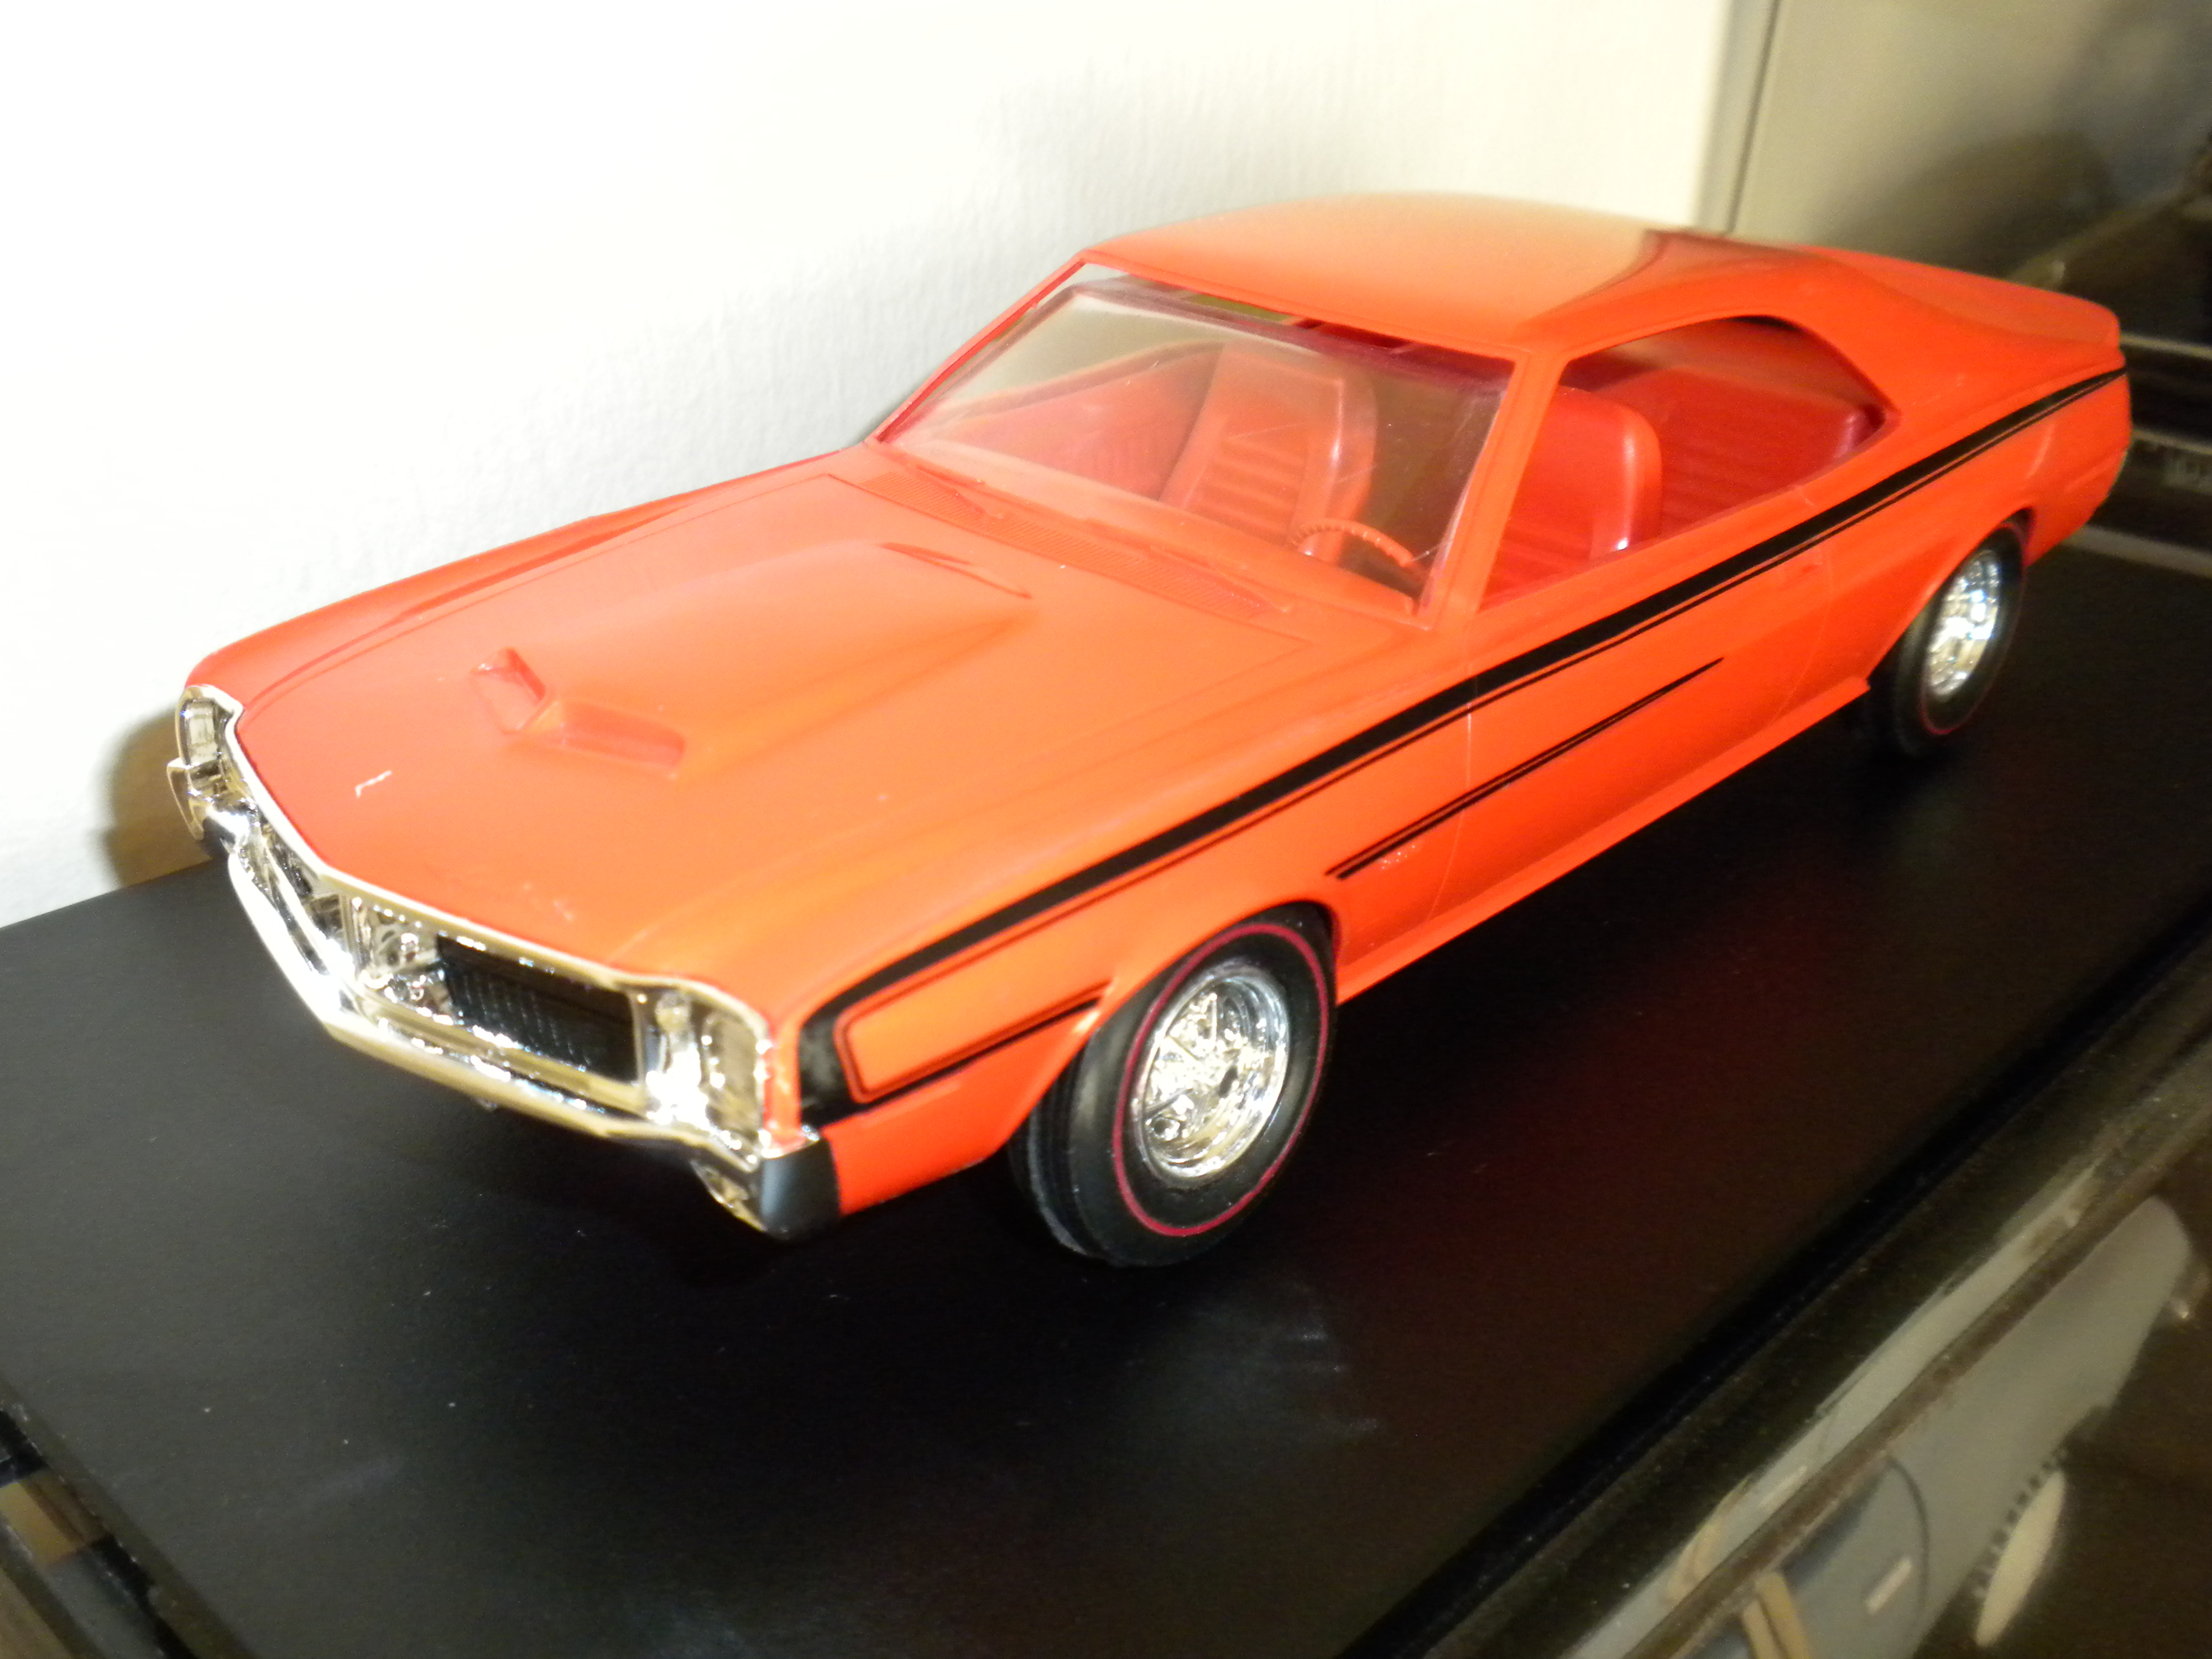
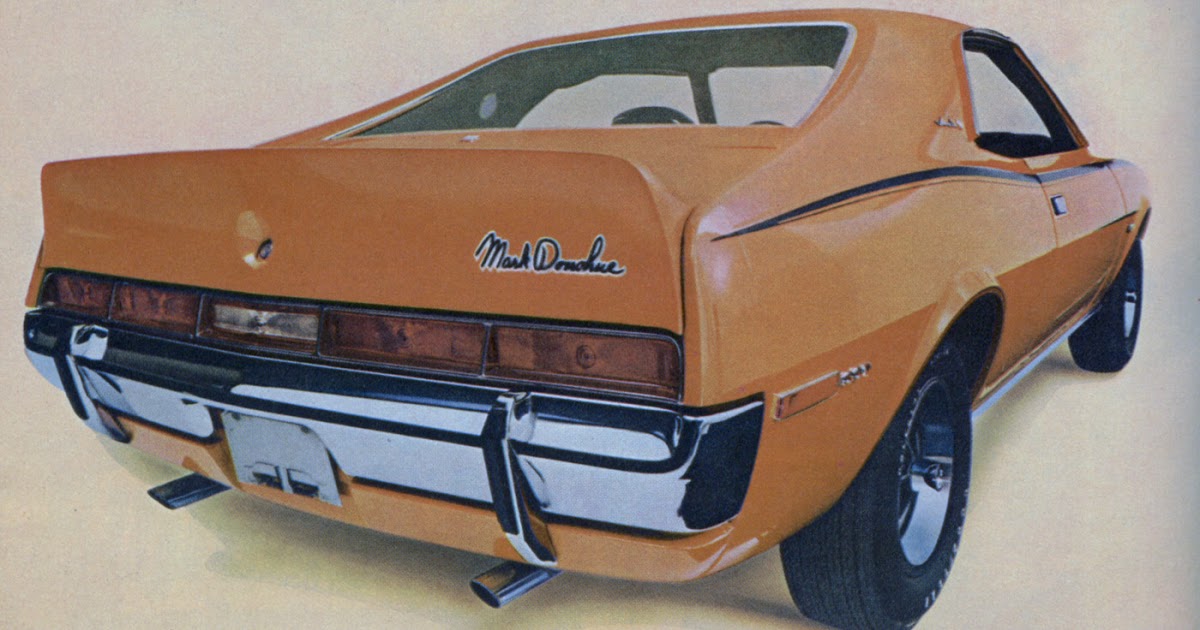
Greetings, A brief promotional model rehabilitation project this. Here is seen a recent $8 antique store purchase originally painted in some mystery black enamel finish complete with lurid decals, Jo-Han Maverick promotional model wheels, plus scale rear slicks! Happily the awful paint finish fell away for delicate efforts made to strip the same, whereas given this Big Bad Orange example remained far from perfect (i.e. both A-pillars are twinged if you will), I thought I'd make a mild effort to create an unofficial Mark Donohue edition of what remained (see the adjoining period advertising image). A spare Jo-Han 1970 Mark Donohue Trans Am spoiler was added with white glue after painting the part with Tamiya aerosol - a fair match it seems. Noticed too will be the very acceptable Fred Cady '70 Javelin SST stripe work rarely seen applied. The rims are Jo-Han Magnum 500's with promo-style axle mounting points, while more appropriate tires perhaps might otherwise have taken the form of Goodyear Polyglas GT's with the tiny raised white letters. A defense can be offered up to the extent that Javeiin SST promotional models in '70 typically featured redlines. Given this, I opted to use a set of Stevens International vinyl tires from the early 1990's I had which seemed to employ the original Jo-Han tire molds but substituting softer material and featuring much better quality control on the redline detail itself. Obsolete kit glass replaces the damaged original fitment (not fitting too well in full truth), whereas the front and rear bumpers have been rechromed. Thanks for examining this brief post... Mike K. M.K.
-
Yes - it's o.k. to inquire about the measurements, price and availability. The first foam board reflects my first effort to assemble that which I had created molds for about three years ago, whereas the second smaller board better reflects what I do now. I maintain a list relating what I've done in the past in 1:18th and specifically what this or that product offers to the enthusiast in terms of utility, albeit the same isn't matched to my current inventory of molds nor are the individual items priced per se. Perhaps a quarter of the products roughly seen on the second board are stockpiled as copies ready to go. Please appreciate that the urethane molds I create wear with use and become more or less useless after about twenty five pulls, hence what might at first appear ready to make may in fact be obsolete short of my creating a new mold to pump the same out again. Given that the creation of new molds requires the purchase of replacement two-part urethane (about $30), there will be times I'd be reluctant to create a new mold if I didn't strictly require a resupply of said part or assembly. Resin to fill the molds is also sold in about $30 increments, hence I'll alternate between pouring often and readily, and then the next week or so not pour at all. If 1:18th scale modifying constituted a bigger field with orders coming in all the time, I would have justification to increase the pace of my efforts and assume costs for part replication I don't strictly need myself, but at present I'll restrict what I do to copies drawn from existing molds and what desirable stuff might be done for cross pollinating interests with others present here.. Given my fairly narrow focus in relation to 1:18th, I try to identify and effectively copy the best of what I've seen on models of particular interest. Locally, myself and another 1:18th modifier have been privy to more than a few blown to bits models yielding up some excellent subassemblies. As an example, the best large 1:18th scale oil breather I've seen is on the Lane '68 Shelby GT500, whereas the nicest smaller round oil breather seen by this poster would be situated on the 1:18th ERTL Authentic's '71 Charger with the custom valve covers. As for Holley center float four barrel carburetors, the 1:18 GMP Trans Am Camaro seems to offer up the best example going, although I found another version which works very well indeed for inline application such as those seen on '67 to '68 Shelby Racing Co. Trans Am Mustangs. Continuing on, the Hwy. 61 '63 Pontiac Tempest seems to offer up the best coil I've seen, whereas I've found and copied two others. Once a very fine rendering of something is made available, justifying the use of something decidedly second rate becomes harder. And so it goes... Currently I maintain two large cork boards with the best and brightest examples of isolated assemblies positioned side-by-side so that I might compare each for applicability relative to my projects. Cheaper models typically offer up less in the way of well rendered parts, whereas more expensive models almost always offer up more in the way of promise. It might be best to articulate in brief what project you have in mind to best allow me to guide the inquirer to what might be on offer. In the coming days I'll buff up my old inventory list and send it to those who'd wish to inquire - thanks. Mike K.