swede70
-
Posts
727 -
Joined
-
Last visited
Content Type
Profiles
Forums
Events
Gallery
Everything posted by swede70
-
Swede Savage Trans Am AAR 'Cuda Hwy. 61 based project
swede70 replied to swede70's topic in Diecast Corner
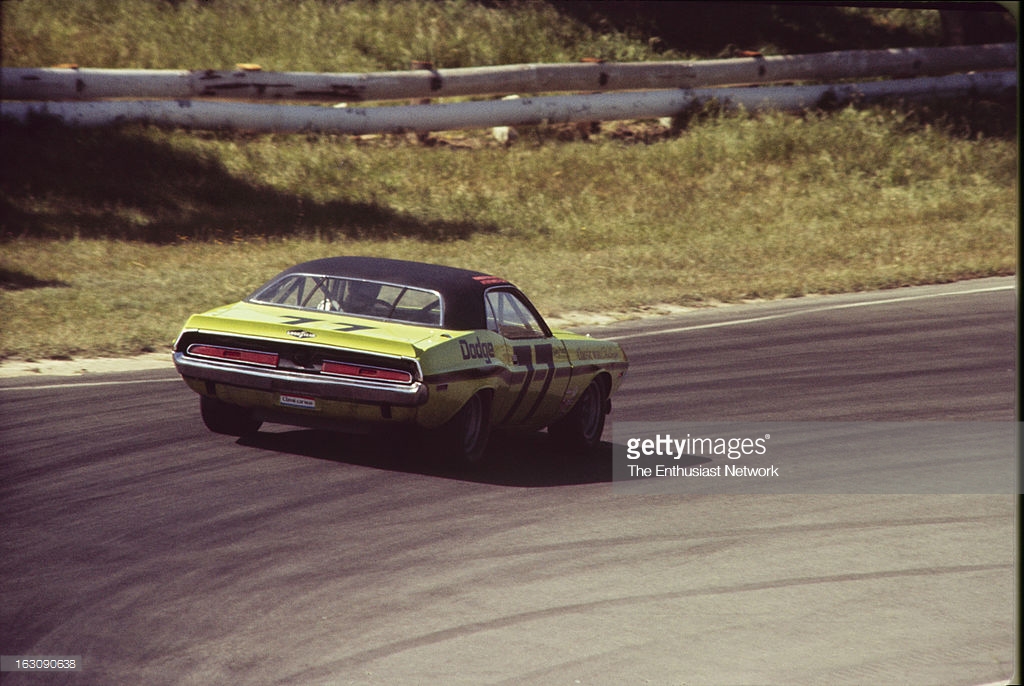
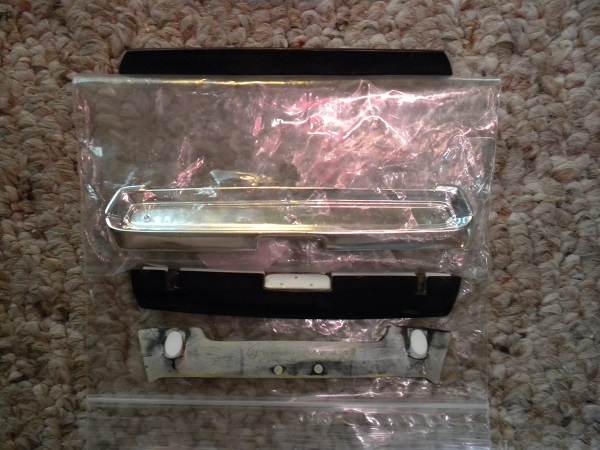
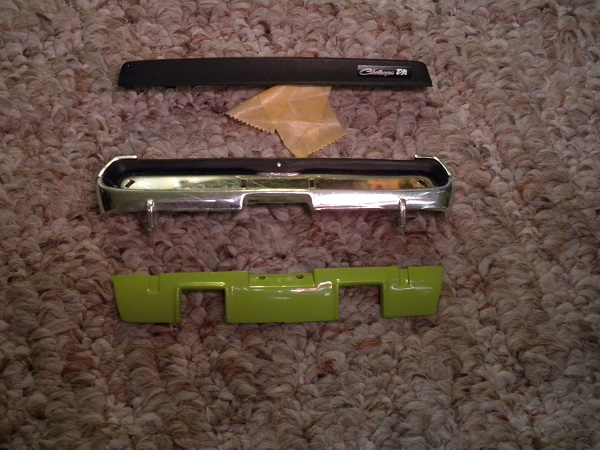
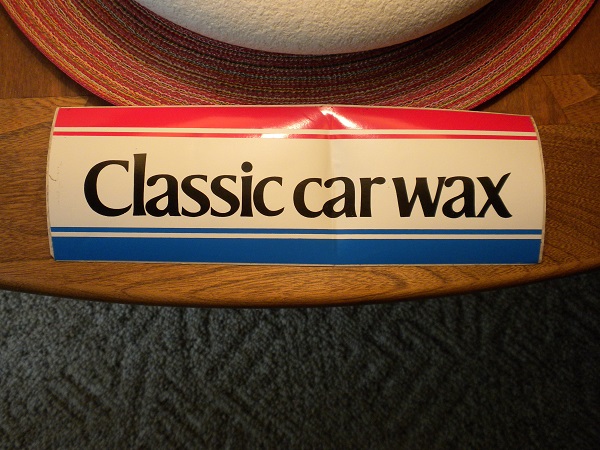
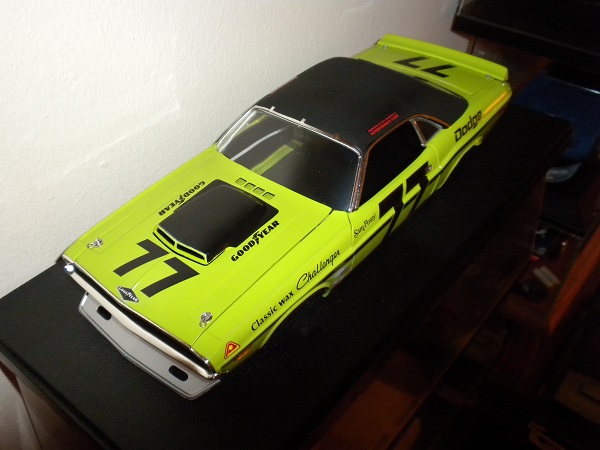
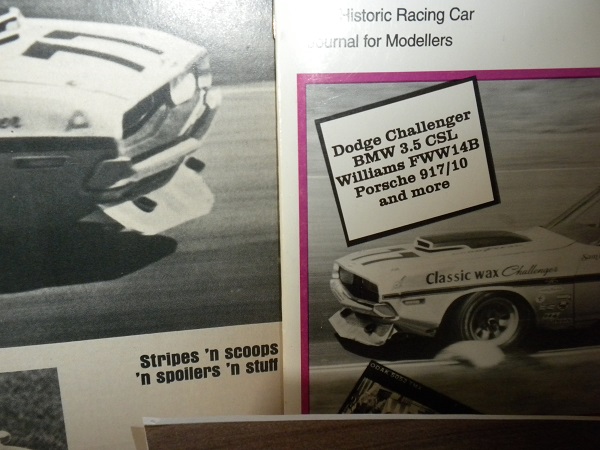
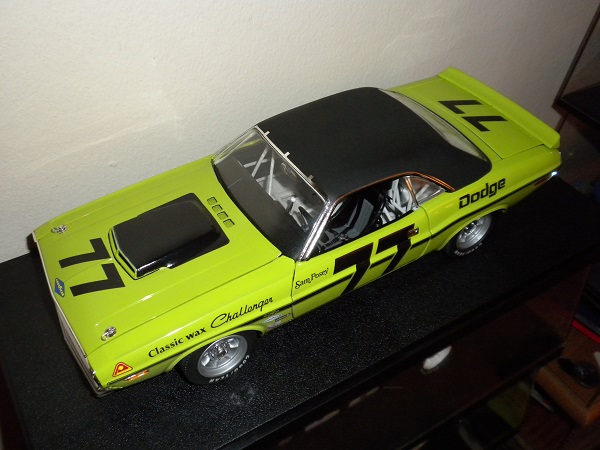
Greetings, In the realm of detail changes performed on the 1:18th ACME Sam Posey Autodynamics Challenger Trans Am entry, there are a few items I specifically wished to see to before paint and reassembly work. For reviewing the photographs attached, one will note that the rear bumper tool may be getting a bit old given irregularities show up along the bottom of the casting, whereas per photos, no overriders were fitted at the first event of the 1970 SCCA Trans Am season held at Laguna Seca. With this in mind, I stripped the bumper I had in hand, worked to clean up the part while also doing away with the overriders, and filed off the unwanted cast-in trunk latch assembly from the back of this same assembly. Further, the modest amount of casting flash could be removed from the bumper ends otherwise visible from the side, hence this too was cleaned up. The second photo effectively answers whether Hwy. 61/ACME parts can or may be rechromed, whereas I will likely cut sheet plastic masking elements in the shape of the individual turn signal lenses to help mask what requires it. Certainly the bottom edge profile is markedly cleaner. Moving on, also irksome was the inclusion of an Challenger R/T rear valance panel which translates as one that features twin exhaust tip cut outs. This had to go, while the perforated license plate platform was likewise filed out and some discreet lip detail added to the top that is in turn barely visible with the bumper assembly installed. Additionally, the rear spoiler assembly struck me as too tall and having ends that were not shaped to tuck in from bottom to top to match the profile of the styling lower down. I decided to sand the base of the spoiler to rid it of the cast in ledge while also taking time to sand the end profile so that they blend agreeably with what again is setup below. Lastly, some dedicated web searching turned up the elusive Classic Car Wax bumper sticker seen on the back of the topic from the Getty image likewise attached - hence I'll have something to start with in relation to producing a decal to mimic such. Thanks for your reviewing this update... Mike K. M.K.
-
1:18 ACME/GL '68 Shelby Racing Co. Trans Am Mustang revised
swede70 replied to swede70's topic in Diecast Corner
Greetings Jim, Not exactly reduced to a science, I guessed where the deck lid should be cut, using the GMP '68 Camaro deck lid as a guide concerning the shape and size of what I removed for material. At some races the inlet was offset to the right, whereas at other venues the inlet was centered on the panel. I still have to fabricate the funnel leading to the fuel cell proper, but added here is a photo telegraphing largely what I did. I hope this helps. I did measure back from the leading edge of the panel 15 mm if this would aid your efforts, although repeating, what I did was largely guesswork. Kind thanks... Mike K. M.K.
-
Updated - 12/06/18 - 1/18 1969 IMSA Big Block Road Racing Camaro
swede70 replied to ibj40's topic in Diecast Corner
Looking good - very daring. Thanks for sharing your unfolding updates... Mike K. -
1:18 ACME/GL '68 Shelby Racing Co. Trans Am Mustang revised
swede70 replied to swede70's topic in Diecast Corner
Greetings and thanks for reviewing this update... This would be the second modified shell with slightly better fitting flares with a bit more meat top-to-bottom on the front flares in particular. Not much is new, although some of the past sub-assemblies have been massaged to the extent that they will now live together in peace on the assembled model. The blue painted parts situated forward of the absent doors are the standard Greenlight/ACME door hinge assemblies which have to be accommodated if I'm to fashion the forward members of the roll cage in a reasoned way. The old Grant steering wheel is lifted from a 1:18th ERTL Pro Stock '70 Camaro release, while the dashboard is recycled 1:18th Lane '68 Shelby GT 500KR issue. Not strictly seen is the rear valence panel which is largely scratch built and happily sans GT exhaust cutouts. Discreetly spied is the rear license plate mount that was fabricated and added to the same assembly. Thanks... Mike K. M.K.
-
Very nice and very clean as is your hallmark. At this point you may well be ready to host your own 1:18th scale club racer Goodwood Revival given the number and variety of topics you've so deftly handled. Terrific work again... Mike K.
-
1:18 ACME/GL '68 Shelby Racing Co. Trans Am Mustang revised
swede70 replied to swede70's topic in Diecast Corner
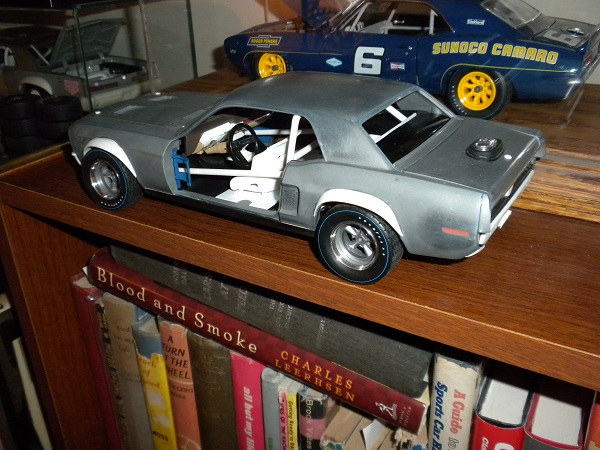
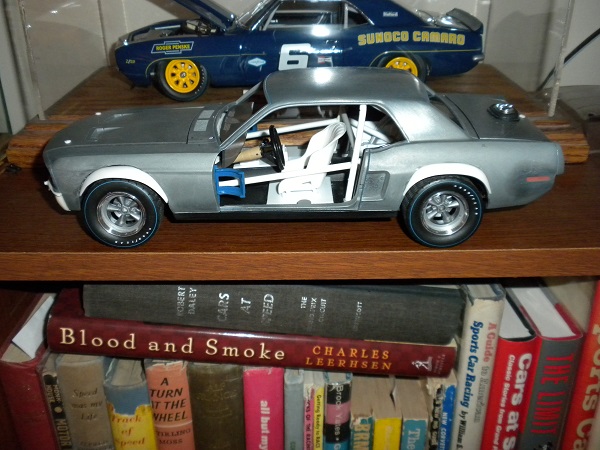
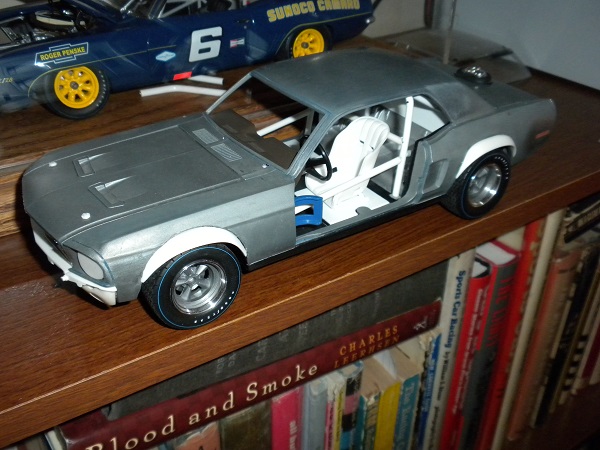
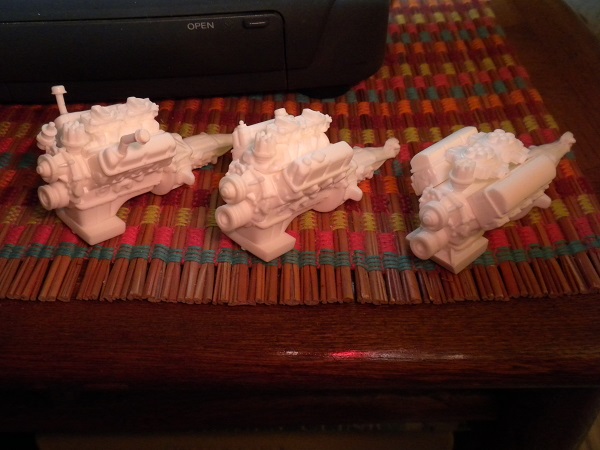
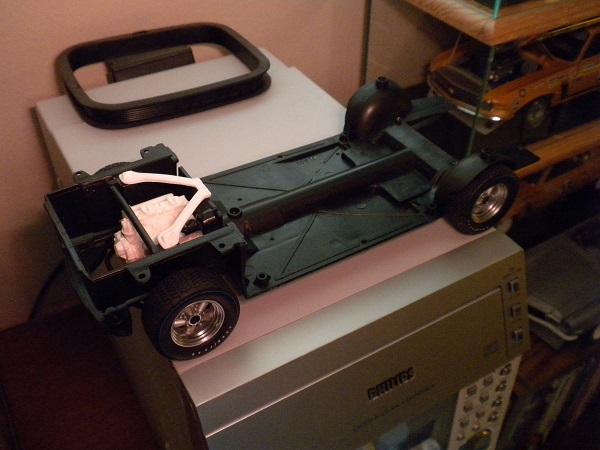
Thanks everyone for looking in and affording compliments, A little raw for not being 100% complete, I've been working up a series of urethane molds to create parts for reasoned 1:18th scale Ford small block Trans Am engines suitable for '67-'71 spec. SCCA Trans Am Mustangs. Incomplete as I write, nevertheless the work is coming along for setting aside what might be deemed 'the best' of this or that tool, while some items represent modified tools and some other bits will be scratch built. The first (fuzzy) image depicts rough '67, '68 and '69 engine assemblies taking form. The '69 hasn't an intake (yet), while I hope to redo the intakes on both the '67 and '68 assemblies. ...the '67 engine is pretty much what I desire, the '68 Tunnel Port is close, while the '69 engine would need and offset distributor and intake to match. Drive belts, alternators, etc. are to come... ...given the bellhousing and transmission are cast solid, they can be substantially ground down to mate effectively to the inaccuracies of the firewall and transmission tunnel to effect a fair fit. This would be my first test fitting on the Greenlight tool. ...and this would be the model all together less exhaust. Certainly not complete, but nevertheless promising. Thanks for your reviewing this update... Mike K.
-
Swede Savage Trans Am AAR 'Cuda Hwy. 61 based project
swede70 replied to swede70's topic in Diecast Corner
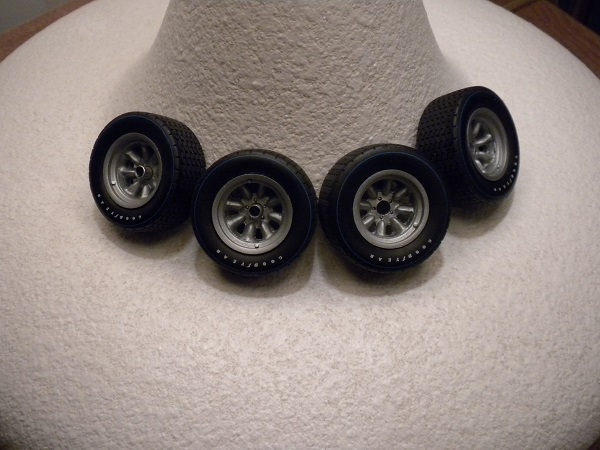
Thanks again for your good example and fine 'start-to-finish' execution regarding such projects as it too inspires. I've tried to gather up a few 'missing' Challenger images for this project given they effectively and sincerely mastered their rendition of the topic on the restored car, and have sent them to someone who intends to prepare such as quality water slide decals in turn. I restricted myself to just three images desired, namely the Scat Pack Club logo, the 'DODGE' lettering on a silver oval field with font borrowed from the older 'Dodge Fever' ad. campaign, and finally, the early Keith Black Racing Engines disc decal that went through various iterations. We'll see what transpires, whereas I really liked the sheet Mike's came up with and was delighted that the work was outsourced to Cartograf. - ...what follows is a fast succession of updates: ...although not final, these would be old GMP Trans Am Camaro tires with revised resin rims done by me some time ago. Although not all teams raced to the Goodyear truck and were afforded the 'blue line' tires uniformly, some entrants at the early 1970-season races wore such. I think the rims and tires both will compliment the early-season look of this model, and help too to differentiate it from the late-season #76 version resting in pieces on my virtual work bench. ...test fit of the cage less A-pillar bars. ...rear suspension minus all the locating links. Note I've used a Hwy. 61 '70 340 Dart 8 3/4 rear end. ...although a bit big, note the transmission linkage bulge of sorts near the firewall and extending back. It needs further work... ...less chassis, but notice the 'GOODYEAR' lettering on either side of the hood scoop, the brighter and better-registered black and white Goodyear 'diamond' forward of the same, GMP cast hood pin detail (two) forward of the rear spoiler, and the new Fred Cady lettering on the roof even if it registers a bit small on this application. ...and lastly, the model together at an earlier moment with the tampo accessory decals wiped off and replaced with better-registered water slide decals. Thanks for examining this update and great thanks for the kind words afforded. Mike K.
-
Swede Savage Trans Am AAR 'Cuda Hwy. 61 based project
swede70 replied to swede70's topic in Diecast Corner
Thanks for your kind words and notice. I ended up ordering the new Mike's Decals DG 'Cuda waterslide set and was happy indeed to note that some select images could be added to my 1:18th model even as I didn't strictly expect to discover such utility. Thanks for your efforts to ensure that sheet had all that it features on it. Mike K. -
Swede Savage Trans Am AAR 'Cuda Hwy. 61 based project
swede70 replied to swede70's topic in Diecast Corner
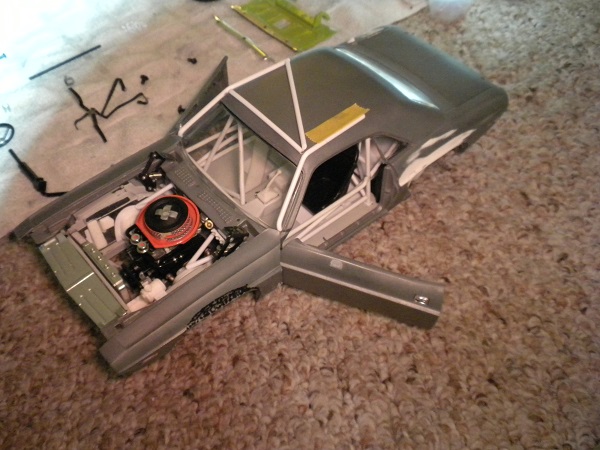
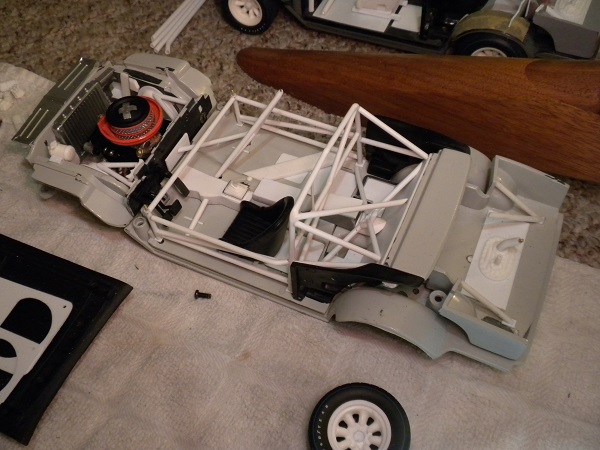
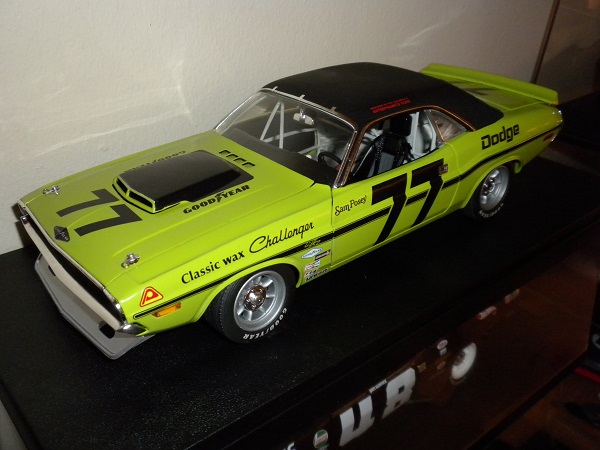
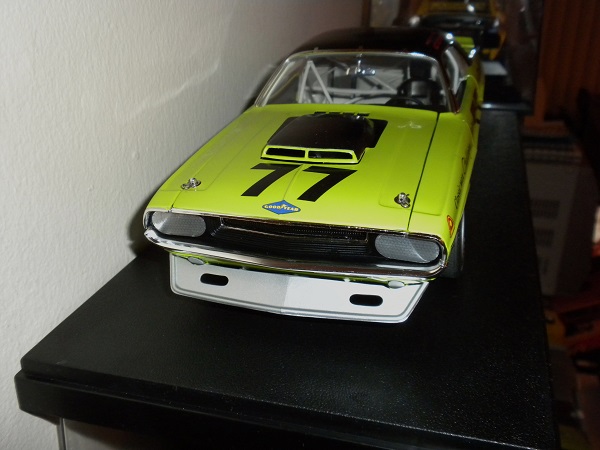
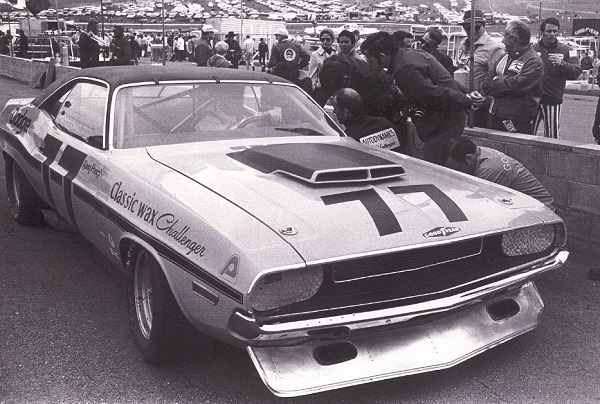
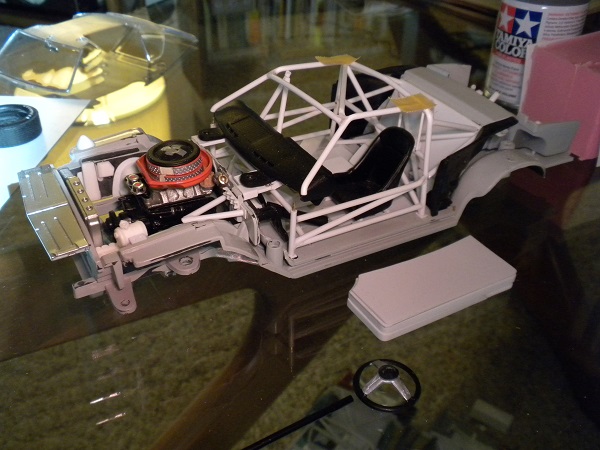
...consistent with the resuscitation of other threads I fitfully maintain, here's another... Some time ago I broke down and purchased the ACME 1:18th Dan Gurney AAR 'Cuda racer, and so soon after I purchased the ACME Sam Posey Autodynamics Challenger racer even as it too is based upon a stock shell and chassis with only modest enhancements. This said, I did decide to grab one, if only to do a low-key early season #77 with my other effort to be seen to completion as a late-season #76 as originally intended. - The Autodynamics Challenger release isn't terrible, although for reasoned intervention one can improve it. A few ideas follow: ...in the pits, likely at Laguna Seca '70. Note heavy strengthening bead on the edge of the front spoiler. The ACME model features a ungainly shovel of a front spoiler akin to what the restored #77 runs, and this I decided had to go. Somehow the pair of GOODYEAR markings otherwise present on the hood are absent here; i.e. perhaps this was in practice or before qualifying? ...more shots of the same, with the collision damage likely resulting from contact with Peter Revson who came out second-best in a braking duel also at Laguna... ...sort of a recycled and old subassembly, this was a spoiler I did up for my original Challenger Trans Am project. The bead is simply half round stock heated to cleanly reproduce the curves. The scoop entries aren't all they could be given they should be higher, but alas, this is what I'm using to date. ...the front spoiler in place, imperfect as it is. Almost impossible to see are the waterslide decals afforded by a friend who took some scanned engine-turned surface detail and rendered a very impressive and convincing pattern that is used over the headlamp fill panels on this model. The black scoop paint has also been extended a bit forward as well as contrasted to the standard ACME release. Since this photo was taken, the blue and yellow Goodyear 'diamond' was removed (a hazardous undertaking this) and replaced with a black and white version of the same which I believe to be correct. ...the topic under hood at Laguna Seca during tech. Note the modified, albeit standard pressed-steel air cleaner housing with modifications to accommodate the twin breather setup, while doubled OEM air cleaners with a slightly smaller stock lid is also seen. Given this setup was not replicated on the restored vehicle, I thought it would be nice to try to reproduce it in scale. Suitable decals for all that is missing are coming - I hope! ...the chassis then from the top, and a lot done even as most of it will vanish beneath paint. From the front, the shock absorber mounts/inner fender detail was scratch built and copied in resin so that all my E-body Trans Am models will feature such. The oil cooler pocket has been opened up, a small (perhaps marine?) battery was scratch built and set in place, an overflow/coolant reservoir has been added (also in resin), while a scratch built cage is clearly taking shape. The cage is something of a low-key compromise given that the door hinge assemblies prevent the front of the cage from extending both fully forward and as wide laterally as I'd wish, while the rear of the cage is a bit of a cheat given the racer doesn't have a package shelf fitted per se. Unlike the standard ACME release, the quarter panel interior trim will be painted black as is seen. Stripping them wasn't a lot of fun, but it is possible - so there! Moving along, one will note that I've opted to mount the dash board off of the firewall rather than attach the dash to the body as per ACME/Hwy. 61. The design of the cage with the A-pillar bars cutting through the top of the standard dash pad corners (albeit shaved a bit from below to lighten the structure) necessitated such, while I've done things in a fashion designed to hide the structure I've worked up to do the job. Note too the mount for the triple brake/clutch hydraulic systems as per the reference photo reproduced above. Gone is the velour insert painted onto the stock ACME racing seat - hence the sticky 'comfort' of all-vinyl is afforded the scale driver. Dead pedal to come, although with the screw bosses positioned where they are, doing something convincing will be tough... Finally, for reference to the air cleaner assembly made above, also seen is an aluminum wine cooler cap that cut up, set upside down and combined with a pair of cast resin 6BBL Hwy. 61 AAR 'Cuda air cleaners employed to reproduce the pair of round stock elements, these finally topped off with a Hwy. 61 340 Dart air filter lid to complete matters. Some tiny half round stock was used to form a lip on the aluminum cap, which the whole thing was cut down on the bottle itself for otherwise it proved difficult to handle. The breathers were replaced with chromed resin Lane '68 Shelby GT500KR items, while the intake is a modified Hwy. 61 340 Dart part. Happily the new ACME Trans Am headers live happily in-place and don't interfere with the new inner fender detail. Whew! ...and just in brief, I dislike the gloss finish applied to the roof, knowing the finish applied in-period was flat as all get out. I ended up taping off the foil (thanks Tamiya!) and deliberately over sprayed the standard finish. The A-pillar fresh air vent had to go given it only appeared mid-season, and hence it was removed and the mounting hole plugged before paint was applied here. Another image across a later post will telegraph the use of 1:25th scale Fred Cady images to redo the lettering across either side of the roof - something that worked unexpectedly well. Whoops - note too the refinished wheels wearing what translates best as Minilite magnesium alloy to me; i.e. namely Testor's MM Stainless Steel Buffing with a light overcoat of Tamiya Pearlescent Clear. Thanks for reading my often clumsy copy. More to come... Mike K.
-
1:18 ACME/GL '68 Shelby Racing Co. Trans Am Mustang revised
swede70 replied to swede70's topic in Diecast Corner
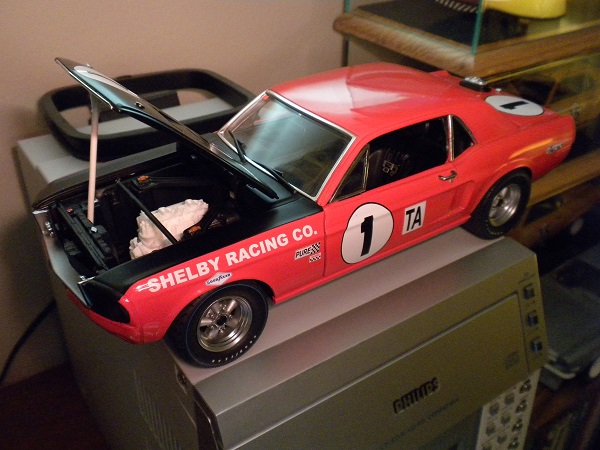
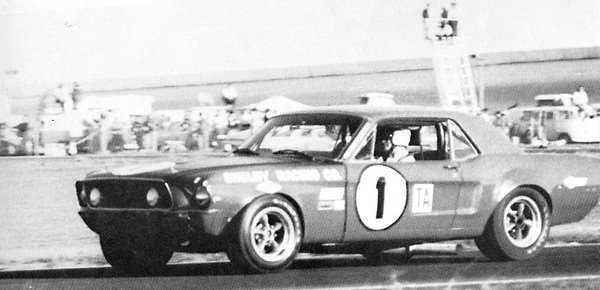
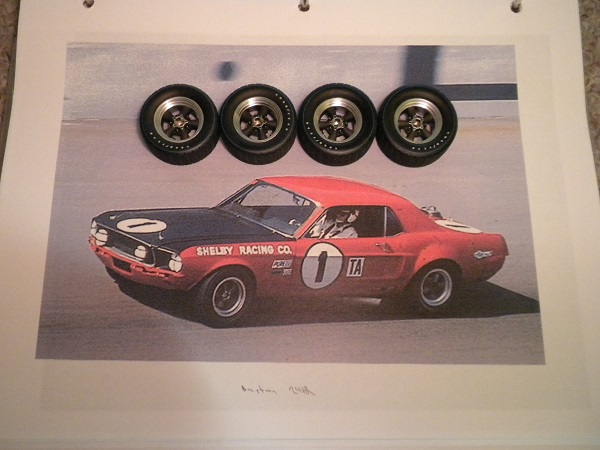
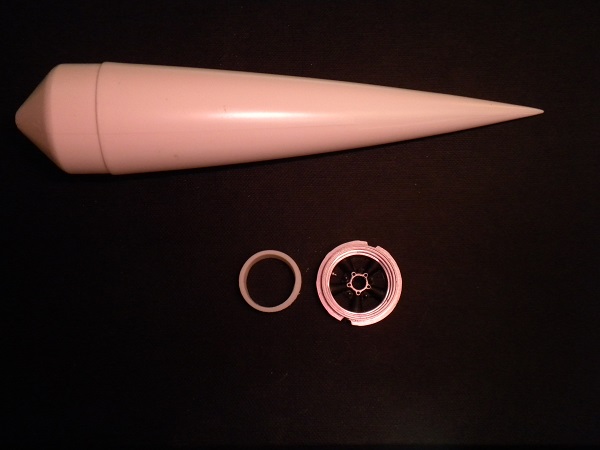
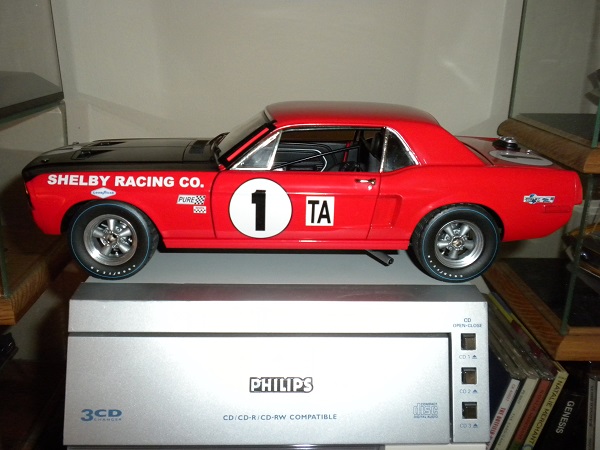
...returning to the topic of what are now ACME/Greenlight Trans Am Mustangs, This would be the new 1968 Daytona 24HR-winning Shelby Racing Co. Mustang as driven by Jerry Titus and Ron Bucknam. The main photo depicts the model pretty much as-delivered but for some accessory decals that were applied as tampos having been replaced with slightly better rendered water slide images. The second photo depicts the model wearing a set of old GMP Trans Am Camaro ARE Torque Thrust wheels that have been painted for the use of a model rocket nose cone that served to mask what was required. The ride height of the model was reduced front and rear, while the hood black out paint was extended subtlety outwards near the front fender extensions/headlamp bucket assemblies. Chrome bathroom hardware washers were employed to mimic brake discs, although I haven't worked up calipers to match as I write. More work will follow. Thanks... ...the topic on the infield of Daytona Motor Speedway. If it helps anyone, the 'missing' decal on my front fender 'stack' is a rare 'Lighting by Sylvania' accessory sticker likely reflecting the brand of road lamps fitted. The gooey tape remains are seen of what foam protection was afforded for all the lighting up front as seen in some photographs from the event, whereas so soon the left inner lamp was toast. ...the model pretty much as-delivered, with the May '68 issue of SCG to match. A refueling assembly cloned in resin was painted and is visible on the deck lid, as is a single GMP Trans Am Camaro hood pin that is centered and visible across the back. ...the old GMP Trans Am Camaro wheel and tire set less paint work, otherwise ready to go. FWIW, the period picture likely captures Jerry Titus in practice sans a certain Goodyear 'diamond' atop the front wheel arch opening... ...a plastic nose cone, with a cut down example resting alongside a wheel set to be painted. I found it helped to use a round file and open up still further the border formed between the nose cone wall and where the five individual spokes joined the outer rim proper. ...the mask in action, so to speak. Another scrap wheel was cut apart to isolate the small machined pad that a decorative hub would otherwise be mounted upon were this a street application. This isolated chunk o' wheel was matched to a length of round plastic stock which then was mated to the wheel to be painted so that the plating on the machined pad could be saved rather than lost under a layer of gray. ...the model as it now sits. A contact on FB did the very nice '68-specific Shelby Racing Co. decal seen on the rear quarter panel reflecting the work done to come up with the image seen further up this thread, while the exhaust dumps were removed, reshaped slightly, and finally repainted. Thanks for skimming this post. Mike K.
-
Hmmm, I detect a GMP Trans Am Camaro chassis, a quick-change rear of mysterious origin (looks good though!), and maybe an ERTL engine of some description calling the engine compartment home. The plot thickens... Mike K.
-
Your Favorite or Interesting Race Car Livery
swede70 replied to afx's topic in General Automotive Talk (Trucks and Cars)
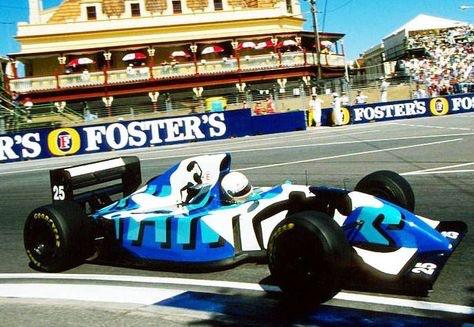
...a little over the top, but the F1 BMW/Benetton B186's as they appeared at Detroit was certainly memorable... - ...also of interest might be the Ligier JS39 Art Car livery seen at the Australian Grand Prix to close out the 1993 season. As was typical in period, the title sponsor was Gitanes, while short of viewing the car from a slight distance to make out the lettering entire, hard it was at first glance to strictly make out what was being telegraphed in a commercial sense. Mike K.
-
Your Favorite or Interesting Race Car Livery
swede70 replied to afx's topic in General Automotive Talk (Trucks and Cars)
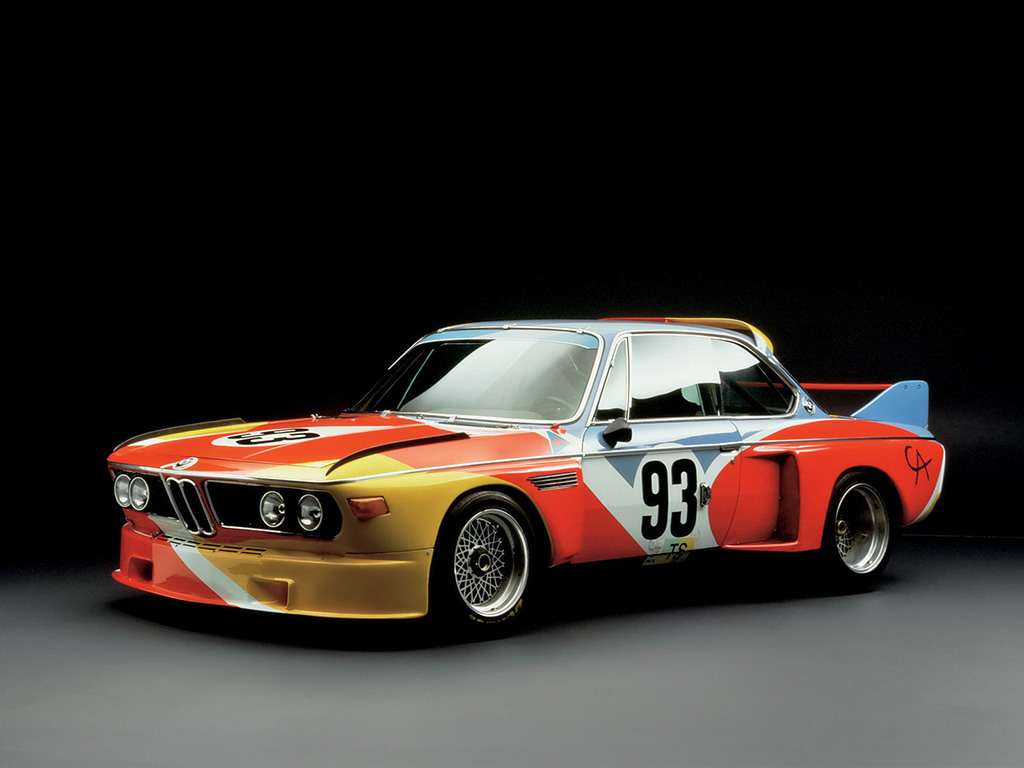
I like the early BMW Art Cars, with this being the first and best known - namely the Alexander Calder CSL. Mike K.
-
Perhaps in keeping with the theme of adding a mix of O.E.M. decals under hood that weren't period SCCA correct, looking at the contemporary image quickly, I thought maybe I was seeing a 'Magnum' air cleaner image if that helps. Mike K.
-
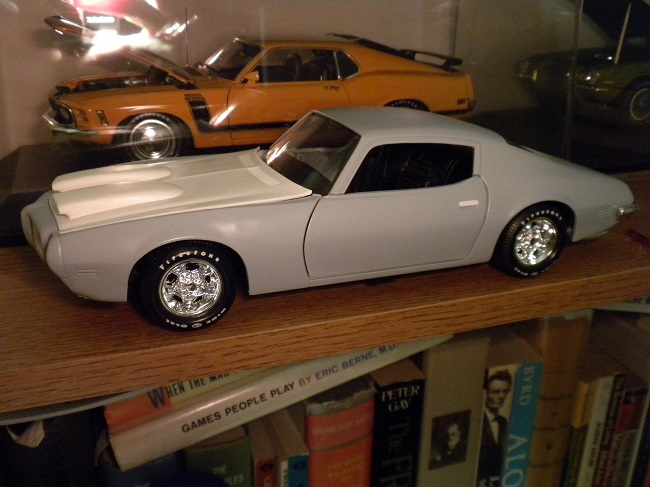
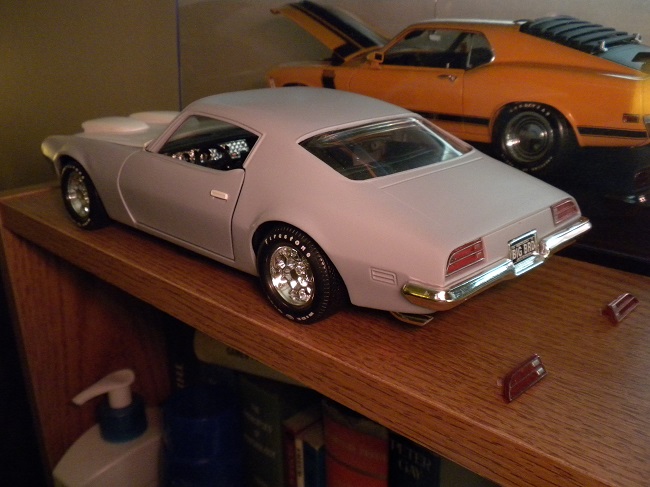
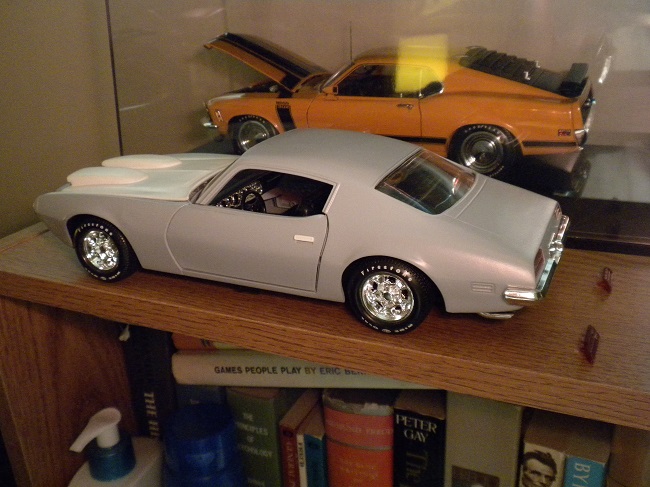
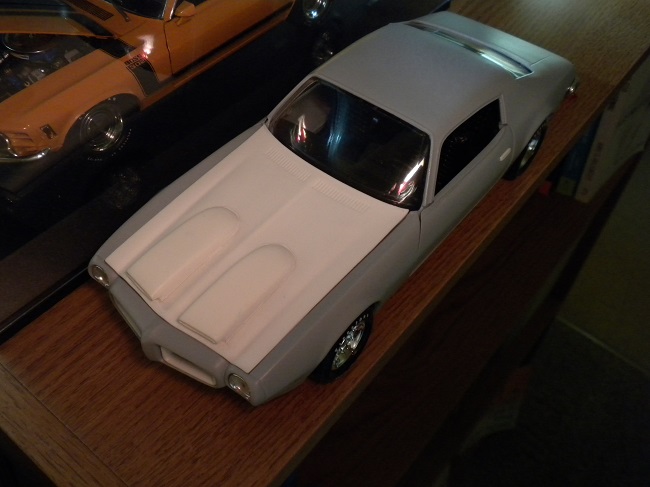
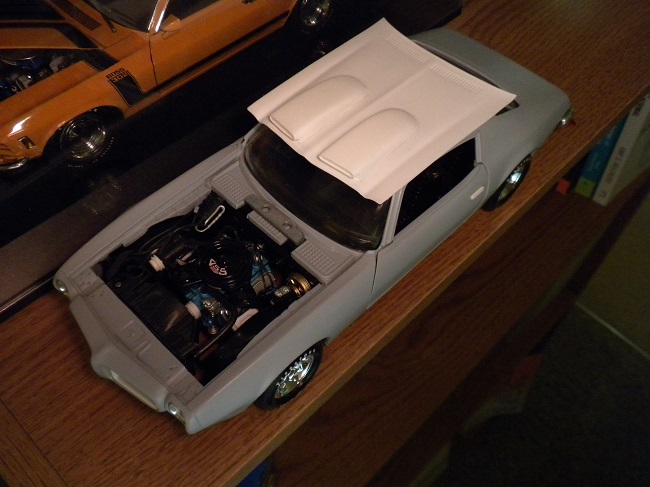
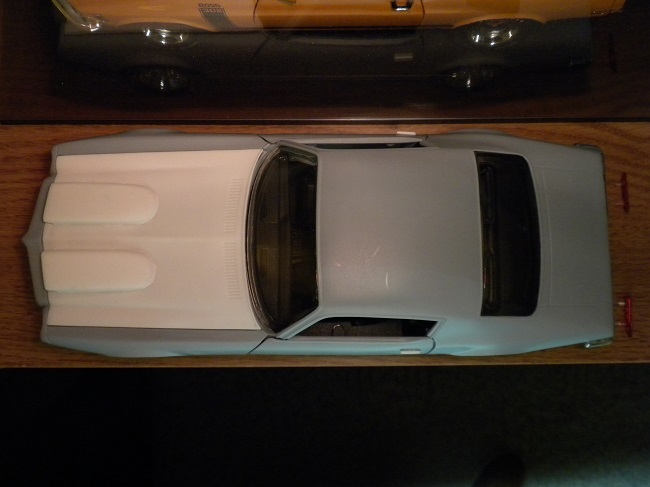
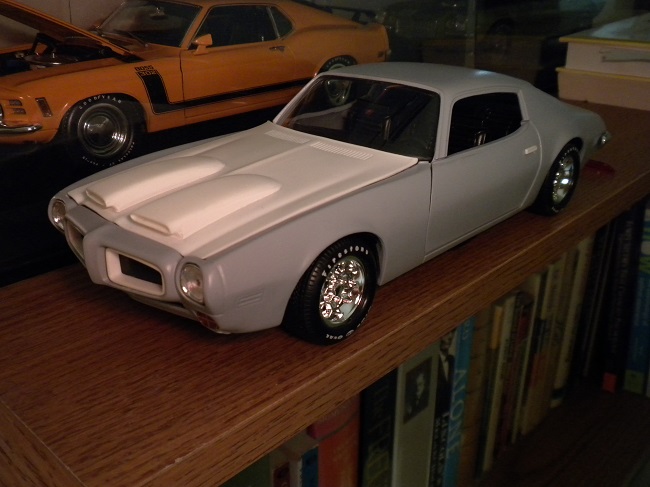
Greetings, Not exactly a speedy project arriving at any swift end, this would be a long-nursed 1:18 diecast project based upon the old ERTL American Muscle '70 Firebird Trans Am tool. In sum, all the Trans Am-specific aero aides have been either cut or filed off in a manner that renders their presence invisible. Engine is a GMP '72 GTO 455 HO less transmission which unscrews and falls away and off - a good thing this. The Formula-specific hood scoops were scratch built by me some time ago, while at nearly the same time I tried to create a full hood mold that included an attempt to plug the void otherwise occupied by the reverse-opening shaker. The hood scoop molds survive, whilst the full hood mold perished after three pulls - sigh. Note the fetching character line plus matching contour I worked so hard for across the territory the shaker would otherwise identify as home... The model is awaits my sourcing a '72 ERTL Trans Am (a few releases were done complete with mildly revised grille work as well as interior differences) to carry it to completion, while small other details still stand to be altered. The grille surrounds are '73 ERTL Trans Am issue - these being a bit thinner, whereas under hood some assemblies have been sourced from the otherwise good '72 Welly Trans Am including the fan shroud and A/C installation. The exterior door latches are '72 Welly Trans Am items (holes for locating the so-so standard ERTL fare had to be plugged just behind), while I've temporarily plugged the clunky rectangular exterior side mirror mounts in anticipation of fashioning ovalized mounts leading to the otherwise honestly rendered ERTL racing mirrors. And yes - the engine turned instrument panel detail will soon give way to a faux wood sheen. Thanks for examining this post...
-
Thanks everyone for the valued input. Replies with photographs was much more than I expected. Sorry to sow confusion if I did, surely I have enough information to work with and act on. Again, my thanks... Mike K./Swede70
-
Greetings, Sorry if this question seems a bit vain. I'm not well versed in relation to the current crop of kits to the extent of being able to readily identify where to source the best parts for this and that, hence I'm tapping the collective consciousness here to that end. I'm working up a 1:25th Scale Coachworks '64/'71-season SCCA Trans Am 'Gray Ghost' combining the resin shell based on the old AMT annual tool with what I vaguely remember as an Oldsmobile 442 chassis with whatever engine I've cobbled up. I think I've employed the Lindberg kit for the dash and interior panel work. Contrasted to other Scale Coachworks builds of this topic seen online, know that I've filed off much of the flares to the extent of raising and reshaping each wheel arch. The material is there aplenty - it just needs to be removed some... Back when this was a current project for me, I remember being disaffected with the molded-in exterior door handles, hence I scrubbed them completely from the body shell and need to replace them with something suitable. My question to those who know their contemporary tools is WHAT might be best? I'm thinking of a part or assembly that is attached separately, and that would allow a tiny 1:25th hand to grab the handle given it would be cut clear through. Again, sorry to be uninformed and a bit vain. If it helps anyone working up the same topic, I've included a paint recommendation for the late-season rims, interior and chassis - all of $3.96 - whoopee! Thanks to the community... Extra and exciting BONUS question! Are the pad-printed GOODYEAR Blue Streak Stock Car Specials in the '71 Bobby Allison Monte Carlo rerelease (maybe it's a '72?) worth grabbing? I'm thinking of employing them here. Kind thanks... Mike K./Swede70 Mike K./Swede70
-
Swede Savage Trans Am AAR 'Cuda Hwy. 61 based project
swede70 replied to swede70's topic in Diecast Corner
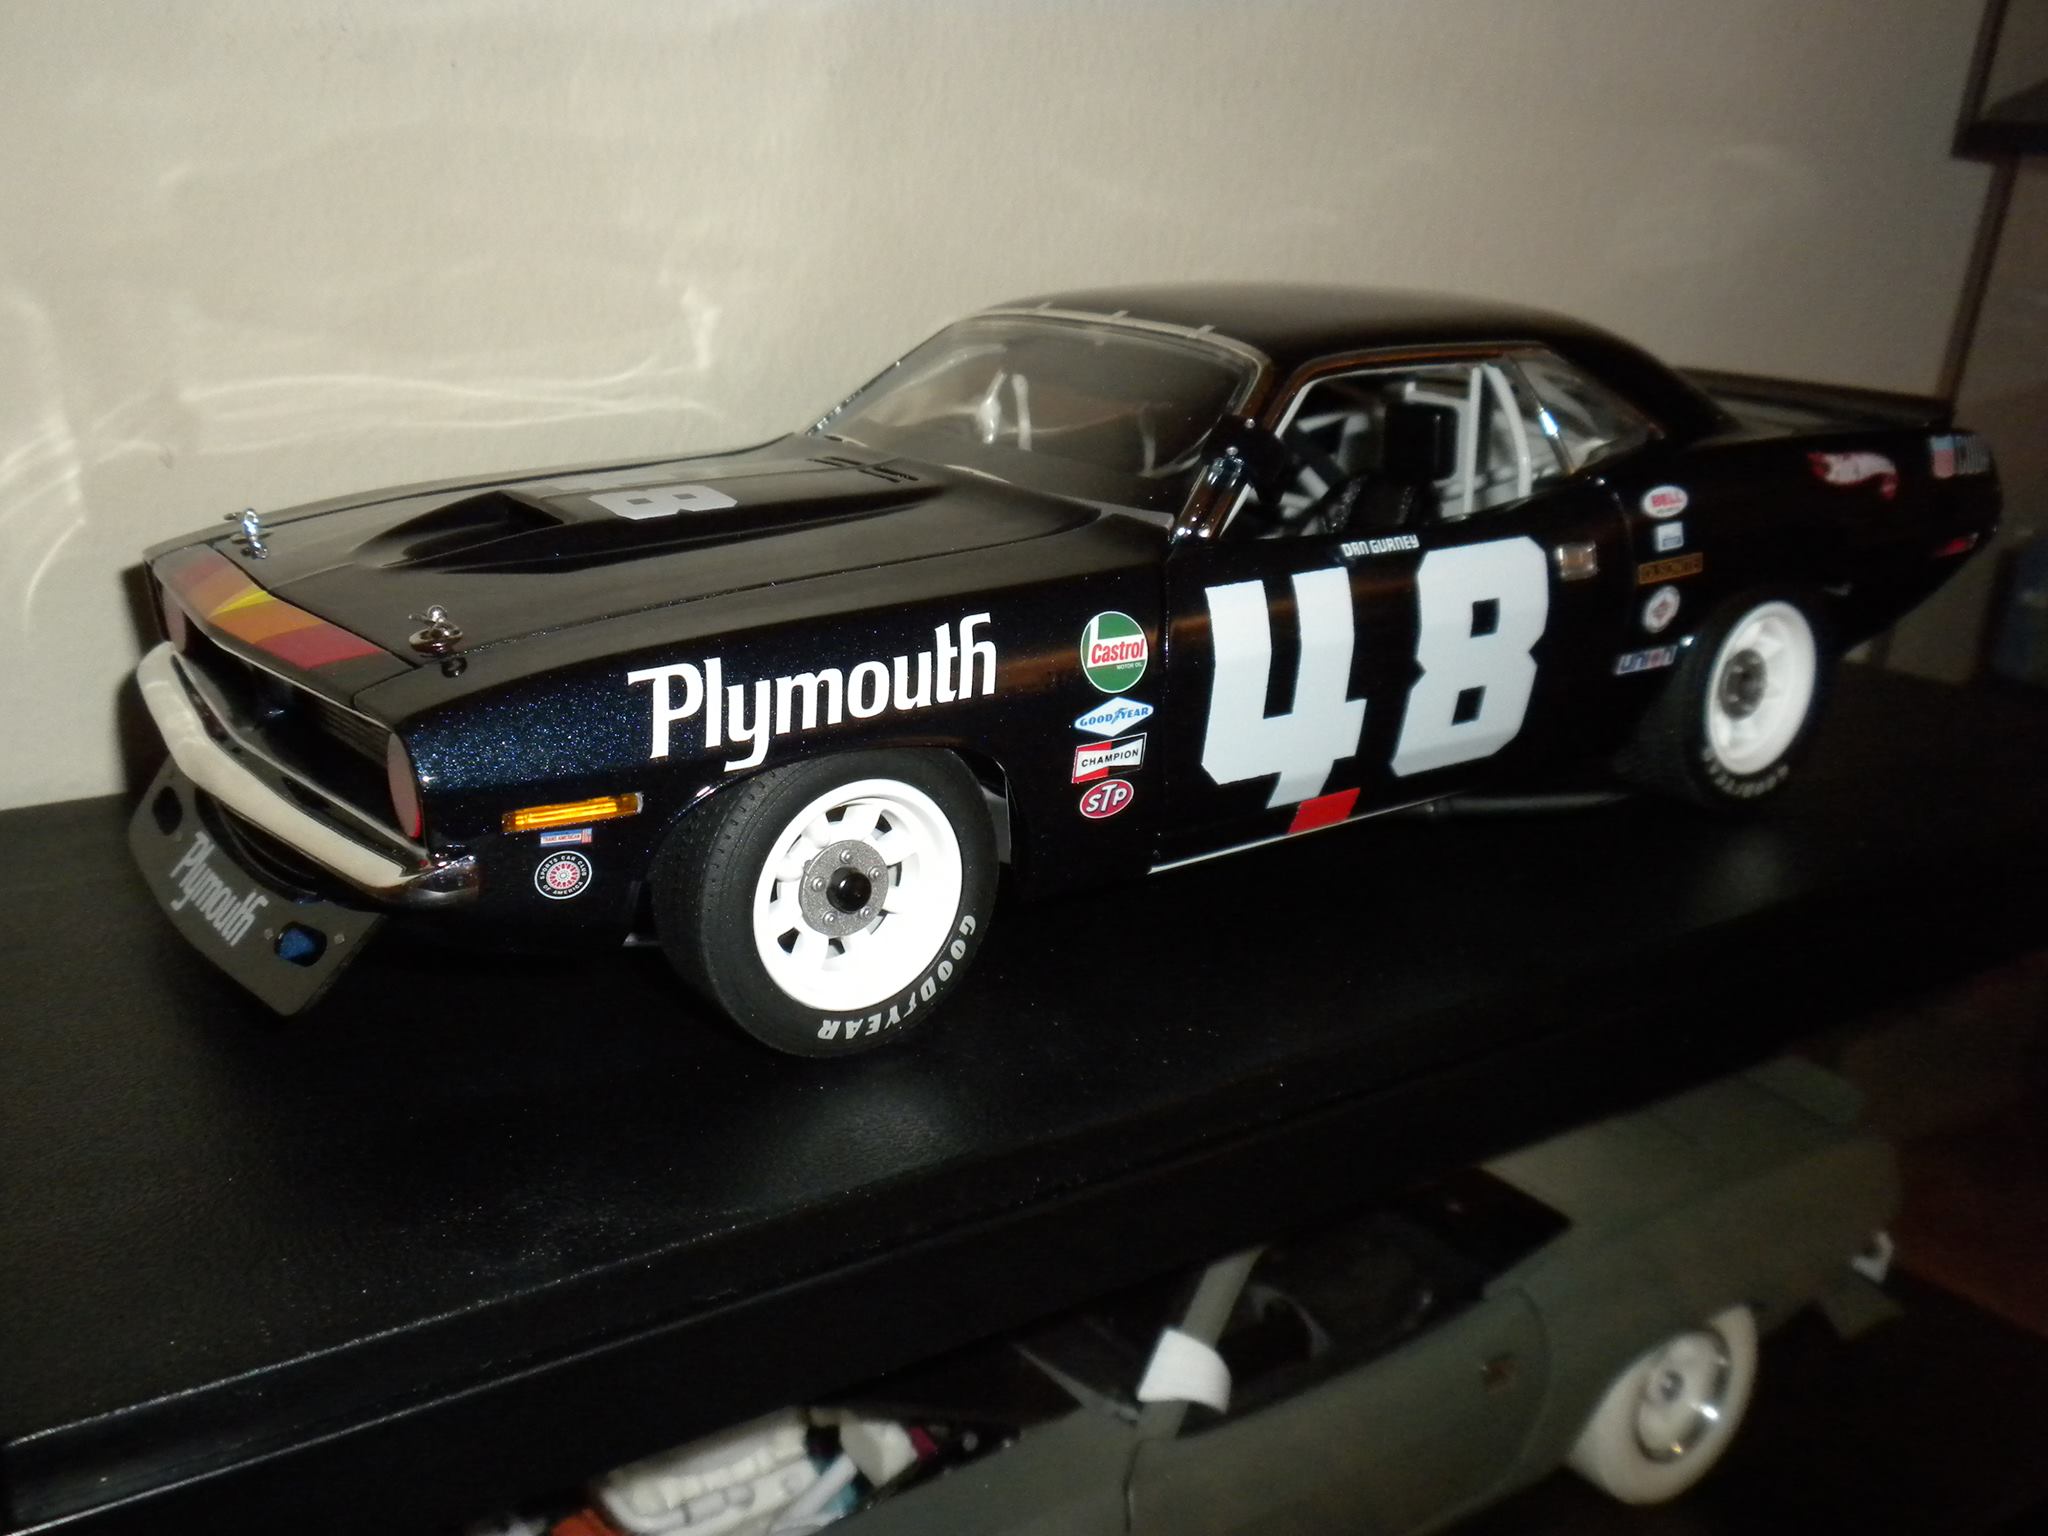
Greetings, A host of small changes made on the 1:18th Gurney 'Cuda helps matters greatly. Seen are new Patto's Place numerals moved about to suggest a late-season appearance, as well as accessory decals removed and replaced or overlaid with images a bit better registered or appropriately colored. Happily I am report that the ACME decal work came off easily for simply scratching relevant images off with only the use of a fingernail. Usually nail polish remover sans artificial coloring and cotton swabs in excess is the way to go here, but in this instance no measurable damage was done to the underlying surface for chipping off this image or that. Notice that the hood-situated #48 is positioned further forward, while the door numerals are now further apart. The PP sheet didn't include driver identification for atop the door numerals, hence now-rare Fred Cady waterslide images were employed from his Trans Am-themed 1:25th sheets of old. The driver identification decals have been positioned well forward reflecting again a late-season spec. The Champion Spark Plugs, STP, BELL Helmets and Union 76 accessory decals are 1:25th waterslide images doing extra duty here in 1:18th land. Also added has been a scratch built five-panel Wink interior rear view mirror, while mounts for the narrowed front spoiler have been fabricated so that the original ACME rendered version may be left off. The exhaust dumps have been redone in brass tubing as well. Last week I ordered an ACME '70 Autodynamics Challenger which I anticipate modifying in a like manner. Thanks...
-
2 BOS Models: 63 Studebaker GT Hawk & 58 Cadillac Fleetwood 75
swede70 replied to traditional's topic in Diecast Corner
Very beautiful - especially the Studebaker. Thanks for sharing... Mike K. -
Swede Savage Trans Am AAR 'Cuda Hwy. 61 based project
swede70 replied to swede70's topic in Diecast Corner
A small further update this...: Missing on the ACME release is any duct work guiding scale air to scale radiators just aft of the front valence. Although very tedious to do from scratch seen below is something that serves the purpose. Additionally, separate dams were fashioned to direct air alternately to the oil cooler as well as the aforementioned radiator matrix. The cut outs seen accommodate the grille which tucks in close, whereas the rearmost ends of the assembly rest solidly upon the radiator support. Done right, no glue is required to hold the assembly in place. The fuzzy photo image shows the mock up, although contrasting this to the painted and installed image, know I'll have to repaint it aluminum to match the reference image seen in the previous post seen above. ...the mock up positioned inside the valence on what I'll call an engineering hack of sorts... ...and set in place, although begging if you will to be repainted aluminum given it shows up well when one examines the Riverside Mission Bell 250 image I've pasted in within the space of my previous submission. Thanks... Mike K.
-
Swede Savage Trans Am AAR 'Cuda Hwy. 61 based project
swede70 replied to swede70's topic in Diecast Corner
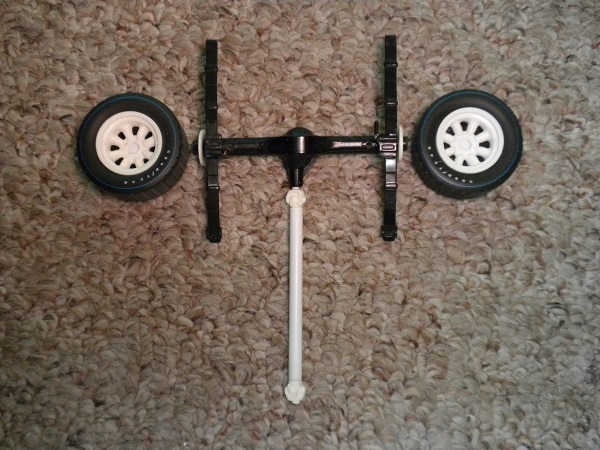
Kind thanks for the reply and Happy Holidays to everyone... Although worried that I'd wreck an otherwise nice feature of the ACME model in the form of the 'machined lip' Minilite wheels, for the last two races of the 1970 Trans Am season all-white wheel were phased in. Consistent with this knowledge, I opted to repaint my wheels with Tamiya Matt White. Do as I say and not as I do should you go this route; i.e. heat the wheels and tires in very warm water to ensure that the wheels won't scuff the tires - albeit I acted in haste and did everything 'cold'. Nevertheless, the wheel finish is virtually indistinguishable from the stock ACME issue, is resilient enough not to rub off onto the tires proper, and in total is very much in keeping with the late season look. I will at some point add small strips of sheet plastic with tiny lengths of silver duct tape to do wheel weights to lend a further bit of visual interest here. As for the revised wheels, see below: ...now mounted on the model, combined with lower ride height front and rear and still further revised exhaust dump detail, see below: ...given I want to replicate the Riverside D.G. retirement ride per se, it is important to replace the ACME front spoiler with a scratch built model of smaller dimension, paint the same matt black, and add the necessary Dzus fasteners (four then). Here would be D. Gurney pursued by Swede Savage and Mark Donohue at Riverside bearing a damaged spoiler evidencing the otherwise absent fasteners: ...constructed out of sheet plastic, painted and overlaid onto the standard ACME air dam just for reference purposes at this time, here sits the new air dam. A Fred Cady 1:25th '70 Trans Am AAR 'Cuda waterslide sheet was used for the 'Plymouth' decal which would actually be the fender top decal resited and reemployed here as a 1:18th spoiler decal. Do not use clear atop the Fred Cady decal for the decal will effectively dissolve; i.e. I had to do this twice over. Dzus fasteners are 1:25th photoetched items held in place with Tamiya clear lacquer with the individual fasteners positioned with the use of a toothpick with a bit of petroleum jelly/lip balm dabbed on the end. I suppose they could be larger, but who knows where to source 1:18th Dzus fasteners?: ...as noted above, the installation seen is temporary. I'll use a spare front valence which I'll paint and build spoiler mounts upon to ensure that I can simply switch out new for old without harming the stock ACME assembly. This way the modification will be guilt-free with the original serving as a spare to slip onto a different car if need be. Whoops! - seems that the inside Dzus fasteners were sited a bit low relative to my reference photo. I'll have to redo things, but doing such isn't a killer if you will. Kind thanks for your reviewing this update... Mike K.
-
Swede Savage Trans Am AAR 'Cuda Hwy. 61 based project
swede70 replied to swede70's topic in Diecast Corner
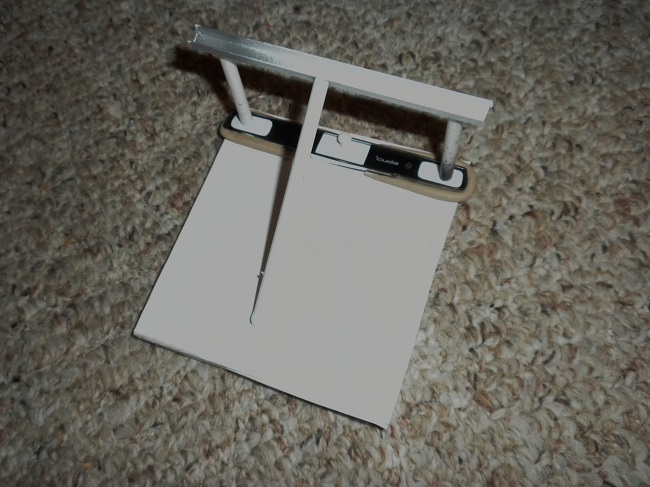
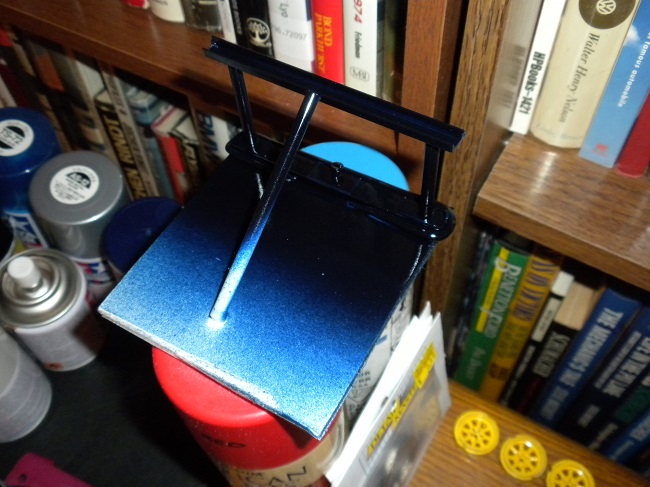
Greetings, After many months of waiting the 1:18th ACME Hwy. 61 tool-based Dan Gurney race AAR 'Cuda has arrived, and hence I can calmly go about the business of choosing the best bits and pieces to work up the best E-body road racing replicas I might. The ACME model is mostly an agreeable compromise given they had to work with a stock bodyshell and chassis casting, while sometimes it's good to take on a limited project where one is simply introducing mild revisions of this and that versus scratch building so very much. Below will be seen a few images of a revised Gurney release with encouragement of you to try the same. Alterations of note are as follows: Larger headlamp fill panels have been fabricated from sheet plastic and painted Tamiya TS-49 Bright Red to better replicate the appearance of Gurney's return to driving duty at Kent and Riverside '70. The tail panel has been replaced with a painted example less dayglo stripes - see my 'dry' paint fixture work up for the purpose. A slightly larger fuel fill pipe as well as a larger Hwy. 61 '70 340 Dart fuel cap was added at this time as well. Tamiya TS-55 Dark Blue dusted with TS-65 Pearl Clear works really well here. The 'PLYMOUTH' identification in the grille has been painted out. Correct for some races, but not for Kent or Riverside then... The jack point highlight on the rocker panels has been removed and replaced with red R/C vinyl tape which was a bit taller and happily vibrant in color. The door handles have received a Testor's Model Master magnesium wash versus the as-delivered black wash. The exhaust dumps have been trimmed, the ends worked over with a Dremel Moto-tool to appear oval and a bit dipped, and finally painted flat black. The A-pillar air duct hardware has been touched in with silver paint. A cast resin fuel cell housing has been added underneath and back. The 'DAN GURNEY' identification above the side numerals has been removed and shifted forward for use of old Fred Cady waterslides which seemed about the same size. Specific to the Riverside Mission Bell 250 appearance, a BELL helmets decal has been added to either side atop the 'stack' of accessory decals seen on the rear quarter panel well forward. A useless cast-in turn signal indicator stalk was cut off and discarded. Missing the stock front turn signal lenses typically inset into the grille on the standard Hwy. 61 'Cuda releases, a pair of the lenses were found and painted semigloss black to represent fill panels prior to being fitted. ...the aforementioned tail panel masking fixture. The lock cylinder has been mostly ground away, although I was reluctant to try to finish it smooth for fear of wrecking the whole assembly for being too greedy. I wish I'd primed the license plate recess fill panel before spraying, but otherwise a reasonably sound approach to take. Clay was used to prevent paint bleed through to the lenses left in place along the back side of what is seen... ...painted, although coverage not the best around the edges of the insert. Oh well... ...with the strange upturned exhaust dumps still unmodified here, nevertheless the fuel cell housing looks quite good hanging down just so. Tamiya AS-16 Light Gray (USAF) isn't a perfect match but will have to do... ...with most everything articulated above in place. Note the rocker 'flashes', the cut exhaust tips, and the headlamp fill panels as described. ...the view from the back, with the body-color tail panel in place and the small BELL helmets decal add shown to good effect. More little things to come, while hopefully the other E-body projects can pick up steam for the availability of scattered new tool stuff. Thanks for reviewing this update... Mike K.
-
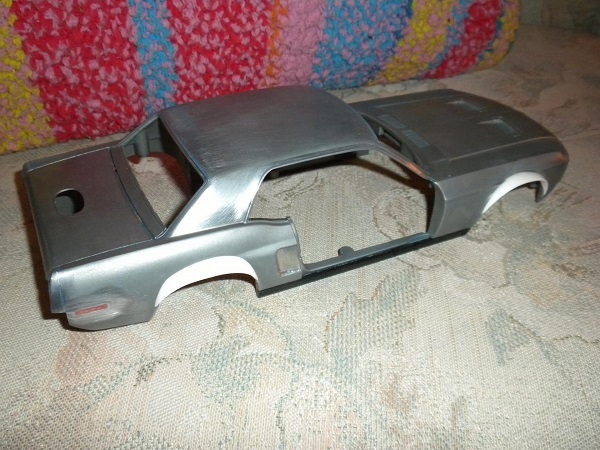
1:18 ACME/GL '68 Shelby Racing Co. Trans Am Mustang revised
swede70 replied to swede70's topic in Diecast Corner
A small update then... This would be the second shell returned from the media blaster and outfitted with the thinned flares seen above. The dimensions between the flares and the body shell cutouts up front are a bit tighter, while the rocker panel inserts stand to be blended in with greater care soon. Thanks... Mike K. M.K.
-
I'll do my best to disregard the teasing tone of the message left above. At some point people post so many messages that they claim ownership of the whole experience of the board, and I suppose if I don't adjust my presentation to suit whatever might be their expectations and standards, then I'm a target. Complaint lodged, complaint ignored. Mike K.
-
Looks wonderful - I had a '74 2002 and am greatly enamored with your build. Hope the 'carpet monster' yields up that which she has taken... Mike K.