swede70
-
Posts
727 -
Joined
-
Last visited
Content Type
Profiles
Forums
Events
Gallery
Everything posted by swede70
-
1968 RKE/JRT SCCA Trans Am Javelin
swede70 replied to swede70's topic in WIP: Other Racing: Road Racing, Land Speed Racers
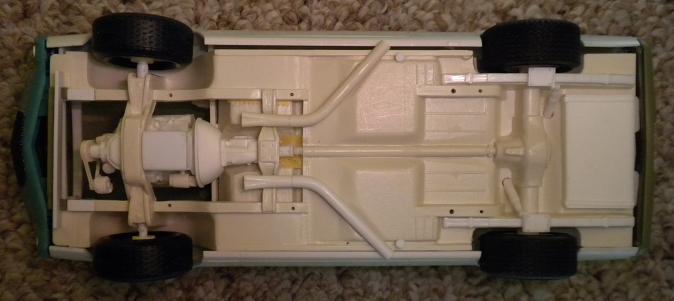
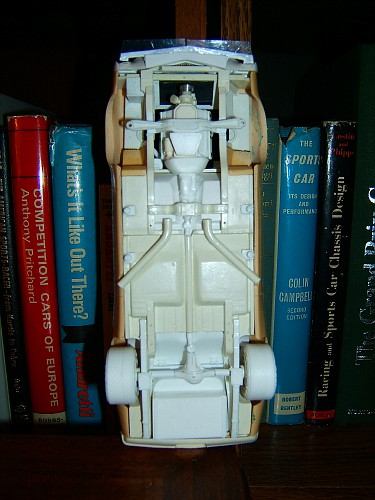
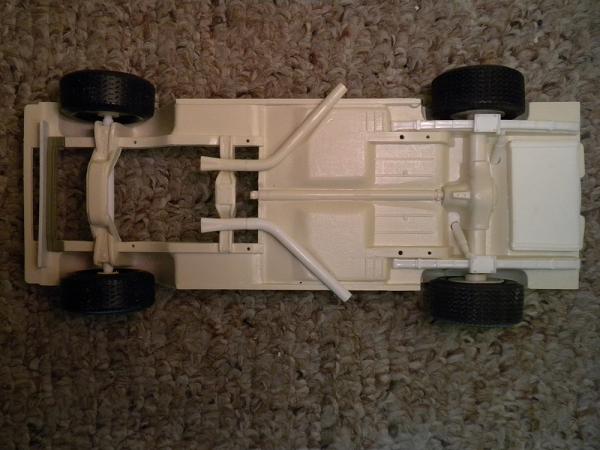
This would be a brief update then... Mostly waiting for a Testor's branded reissue of the Jo-Han SC/Rambler kit to arrive, nevertheless some work has been done as other things are contemplated. I hope to cut out the egregious rear axle and 'hump' detail and replace such with the Rambler kit parts as I've depicted in photos below. It obviously helps if one has the old Jo-Han Funny Car kit-sourced Model 20 rear end as it's nice indeed and makes the effort worthwhile. Further, if one harbors ambitions to add a Panhard rod or a sway with linkage detail, then the space freed up is invaluable. A few photos then of recent work undertaken... ...note the stamped in bumper mount profile, hitherto missing on my model. ...likely to be redone and certainly reshaped for aggressive file work, nevertheless an improvement here. Whoops - I lost the thin length of strip plastic atop the rear valence panel license plate cut out along the top here. Such has since been fixed. Small things, but the scratch built bellhousing was removed and reshaped, while a thin mounting lip was cut and shaped so that it largely matches what photos I could find. Also and just in passing, the Borg-Warner T10 transmission was trimmed a bit at the end, while the tailshaft housing was also reshaped so that it would be round versus the odd rectangular profile the Jo-Han parts sport as-delivered. Discreet stuff is the removal of the undesired Gen. I AMC V8 oil filter mount on the block that here has been ground away. Yes - Jo-Han AMC engines come through with two oil filter mounts given they opted to do a light retool of the existing Gen. I engine for later releases versus tool a Gen. II V8 from scratch. ...practicing on a spare SS/AMX chassis, here can be spied the aforementioned AMC Model 20 rear end w/axle tubes. The cast-in driveshaft is no more given it was cut out, while a new tool Revell '69 Camaro Z/28 featuring much better U-joint detail has been substituted in. Also seen is a separate transmission cross member cut free to facilitate better paint application apart and away from the chassis. For casting duplicates of the Model 20 rear end, the rear cover too can be isolated and painted with greater ease. ...a different Javelin chassis here, the image communicates how cleanly the two-piece SC/Rambler floor back of the wheel housings can be integrated once the old-school cast-in axle is cut out. ...and viewed from the topside. Again, quite clean and affording open trunk detail if one is so inclined to add such. ...and lastly, how things will likely look on the '68 - at least towards the rear. SC/Rambler spring overlays, lower shock absorber mounts from the same, and early issue Funny Car Model 20 rear end parts from a glue bomb purchased long ago. The fuel cell housing is from before, while better Revell '69 Z/28 driveshaft detail will improve upon what is seen here. Thanks for reviewing this project update... Mike K./Swede70
-
Greetings, Looking around at my period magazines and searching for stuff to call out or identify, at the very least I can call your attention to a particular title and issue if you don't already have such in hand. The May 1973 issue of Stock Car Racing apparently caught the debut of the effort even if the race report of the Winston Western 500/Riverside contest is dominated by event winner Mark Donohue in the Penske Matador. Given reference to the Grand Am effort you are doing is short, I'll relate the paragraph to you here in full: ...A new team showed up and was warmly greeted by the road racing set. Jerry Thompson of Clawson, Michigan, often suspected of fielding a backdoor General Motors entry in the Trans-Am, showed up with a Pontiac Grand-Am and a couple of Pontiac engineer types. They had the usual trouble new teams experience getting through NASCAR's very tough technical inspection, qualified fastest on the second day, and motored around to finish 15th overall. Undoubtedly the crew's inexperience held Thompson back in his NASCAR debut. On its first pit stop the crew got the back wheels up before they stopped spinning, causing considerably delay. Later they had to put out a carburetor fire during a brake-changing and engine-tuning session in the pits... As race reports go, this is a long article and hence there was much else going on that drowned out whatever further attention might have been paid to the fledgling outfit. Hope this helps! Oh - also see this color image via the new Petersen Publishing Archive. Scan down a bit and you'll see it towards the left bottom: https://archive.petersen.org/pages/search.php?search=riverside+winston+western+500+1973&k=&modal=&display=xlthumbs&order_by=relevance&offset=0&per_page=48&archive=&sort=DESC&restypes=1%2C3&recentdaylimit=&foredit=&go=next&offset=48 Mike K./Swede70
-
Greetings, I've seen them up close, and indeed they are nice. Certainly each represent eclectic fodder for the Ford enthusiast and in a sense are overdue in scale. The cost of each is rather steep, while on the other hand, who would take the time to tool them again or in a larger scale at that? If you aren't already aware of the existence of such, do follow the link to be afforded a '69 Super 8 film taken during an open house at Kar Kraft in Brighton, MI. Some Mach II material is seen, along with a wide range of all that KK was doing during in-period. Believe me when I say that it's stunning: https://www.facebook.com/BrightonAreaHistoricalSociety/videos/kar-kraft-1969-by-larry-lawrence/2461333023315/ Mike K./Swede70
-
Very beautiful; i.e. terrific paint, precisely finish application and correct choices in evidence across the chassis, etc. Thanks for sharing... Mike K./Swede70
-
Swede Savage Trans Am AAR 'Cuda Hwy. 61 based project
swede70 replied to swede70's topic in Diecast Corner
Oh, thank you so much. I really, really appreciate the interest and support! Mike K./Swede70 -
How to replace / simulate chrome trim
swede70 replied to lacquer-lover's topic in Model Building Questions and Answers
You'll likely be off to the hobby shop to gather some Plastruct half-round rod material or some such, while heating strips of the same in hot water to ensure that such is pliable prior to adding the same around each respective wheelhouse would be a good idea. I've not had much success with Plastruct glue per se, hence maybe reach for Tamiya cement (liquid in a small Octagon-shaped glass bottle with an orange cap). Discreet sanding stick work will likely clean up what you've added to suit. If you have a spare body (given you'll be new to all this), practice on it first given things will likely go amiss the first time out. Even if everything goes bogus, do not lose hope for only by taking measured chances do we improve our respective skill sets. Greetings from nearby Fraser, MI. Mike K./Swede 70 -
Swede Savage Trans Am AAR 'Cuda Hwy. 61 based project
swede70 replied to swede70's topic in Diecast Corner
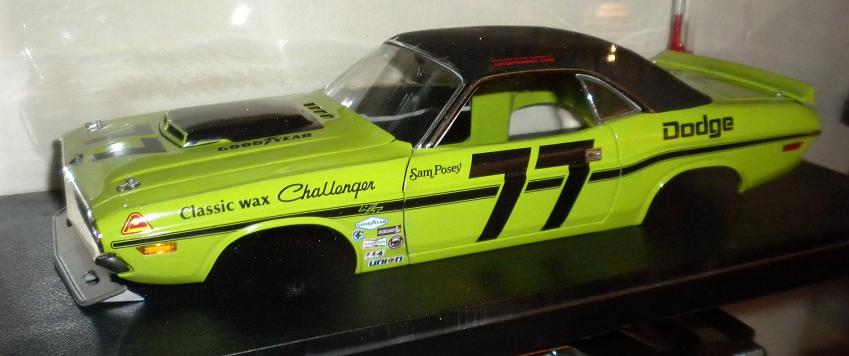
Thanks everyone for checking into my little hobby universe, A short while back I did succeed in having a pair of small decals made up to support what may in time be three Autodynamics Challenger 1:18th diecast models, with these constituting a pair of modified ACME factory releases, as well as the outstanding #76 late-season entry with flares that stands to be completed. I contacted someone by the name of Kenny Terry and did my best to work up what I needed, while he in turn did his best to afford us what we see here. Note that while he would surely have this work on file, I only had him reproduce three decal images in total, hence it would be misleading to suggest that one could wholly reproduce what is seen here for simply making a call to place an order. Above left is seen a cropped underhood image of the Autodynamics Challenger at Laguna Seca '70. sourced from a period copy of Car Life. The DODGE oval art employs font from the pre-'70 DODGE Fever advertising campaign, while from what little color period photos I've seen of the art, the lettering is black, while the field is grayish silver. A well meaning person online claims it was yellow and he'd seen an image confirming such, although this I've not (yet) discovered. Towards the rear of the valve cover is found a Keith Black Racing Engines disc decal less the sometimes seen 'Black Magic' reference, while finally, the photo to the right depicts the images stacked two deep for color and clarity on my converted ACME #77. A sharpened brass tube was used to punch out the KB decals given trimming something so small accurately otherwise proved impossible. ...and for scrambling a bit, I changed over all of the accessory markings after having first washed off the old. The reference photo is again from the Laguna Seca contest in 1970, the first of the season in fact. As would be expected, the appearance of the car altered slightly for decal placement, etc. all year long. Difficult to see, I did have the Dodge Scat Pack Club disc decal made up, while the Keith Black image is a duplicate of what is seen underhood on the rear of the valve cover face. Everything else was cobbled up from my limited store of waterslides saved for situations like this. The DSPC image was eventually cut out with a fortuitously sized hole punch, although I killed quite a few for not having the image on-center relative to the position of the punch. Notice again the GOODYEAR decals added to the hood on opposite sides of the scoop, as well as the black and white GOODYEAR diamond logo situated right forward of the #77 i.d. on the hood. The blue and yellow GOODYEAR diamond seen on the restored 1:1 vehicle is incorrect. And just in passing, the slightly muddy SCCA Trans-American Championship decal was sourced from a 1:25th AMT Warren Tope Mustang plastic kit reissue. Thanks for reviewing this update... Mike K./Swede70
-
Nice save there. The Hwy. 61 tool of this topic is very nice, and it would be a loss not to rehabilitate any that may be helped so. Thanks for sharing. Mike K./Swede70
-
Swede Savage Trans Am AAR 'Cuda Hwy. 61 based project
swede70 replied to swede70's topic in Diecast Corner
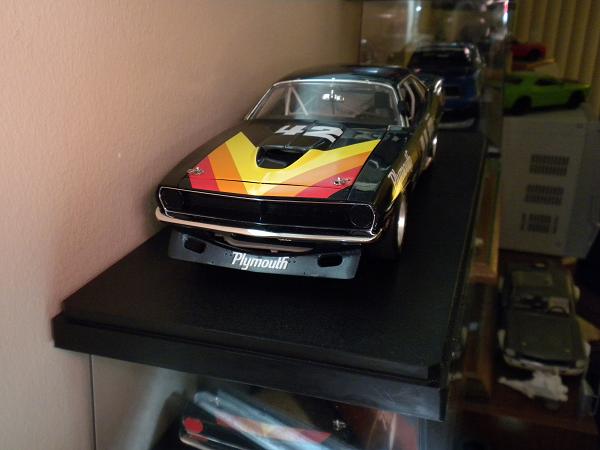
Thanks everyone for the kind words and interest displayed... I wasn't going to grab the new 1:18th ACME Swede Savage AAR 'Cuda '70 Road America (according to the decal placement seen) race release, but then it seems no one will soon do the model in the alternate color or tool up much more or better at this point. With this said, I might take up again was is intended to be a '70 Bridgehampton SCCA Trans Am Swede Savage project ; i.e. the one with the wider tires in white resin seen further up this thread. What follows here are a few very discreet mods. that can be done to help the version just released without declaring firm fidelity to 100% accuracy given I won't do much here. As Dirty Harry relates to us through time, "..a man's got to know his limitations" - or some such given so much I do doesn't strictly see an end! ...at least to the extent of matching the accessory decal markings, this would be the 1:1 car and driver doing their thing at Road America where Swede would finish a reasoned second. ...not much is really on view here, although I've scratched off the door-situated driver's identification decals (which come off cleanly, whereas a very lightly stamped down length to Tamiya tape across the numerals just below didn't damage them) were replaced with brighter, sharply registered markings from the new Mike's Decals 1:25th scale Dan Gurney/Swede Savage Trans Am AAR 'Cuda waterslide sheet now for sale. Strange as it is to report, the new waterslide images of the 'SWEDE SAVAGE' lettering is rendered larger on the 1:25th sheet than on the model as-delivered, whereas applying replacement markings by hand allows one to shift thing about to align things with greater skill. Other modest things discerned will be the flush exterior door handle detail washed with Testor's Model Master Magnesium Buffing given they'd come through done in black, while the jack point fluorescent flashes where first scrubbed out with acetone to be replaced with tiny lengths of R/C aircraft decorative vinyl tape. The tape is thin and vibrant enough of color to eliminate from consideration water slide decal options that might otherwise be tapped. ...again, not a big deal here. The ACME models come through with photo etched inner grille surround detail that is frankly unwanted. In short, one would otherwise see tiny chrome trim around each thin opening each of the two little grilles here as per-stock, although these pieces can be prying out with tweezers for little risk. Paint will chip off, although glue residue wasn't noticed by me. Tamiya bottled Semi-Gloss Black/X18 is the stuff to use to touch-in any damage, while don't worry overmuch if the application of this would seem at first to obscure detail beneath. For experience I've learned that the paint will air out and visibly thin consistent with affording you an invisible fix. Unnoticed and by design, the grille inset 'PLYMOUTH' identification other present to the right was likewise painted out. Finally as even as not everyone will have such spares, I took a set of old Hwy. 61 front indicator lenses and painted them the same shade before using the pair as fill panels. The ACME AAR 'Cuda race releases come through without these parts even as their absence is all but indiscernable. Happily I have enough spares to cover all Barracuda project in relation to some of the little trim things; i.e. I needed three sets of the front turn indicator signal lenses to cover both ACME race releases and what is being done up solo on the project that begins this thread... ...and kind of last of the little stuff (for now), I decided I didn't want the recent Goodwood Revival/DAN GURNEY FOR PRESIDENT bumpersticker on the back bumper. And yes - I have the Car & Driver issue from 1964 with an inserted copy of the actual bumpersticker available in-period, hence I hope I'm still in good standing as a card-carrying Dan Gurney enthusiast. As for the tiny bumper and the rendition of this marking in scale, now I know that it will scratch off without much effort. I regret to relate that I comprehensively wrecked mine for attempting to remove the bumper entire, otherwise I would have had something to sell on eBay to recoup costs in a sense. Thankfully I had a spare Hwy. 61 bumper to replace it, while at the same time I took the opportunity to touch in the spots atop the casting where one can see bare plastic consistent with the practice of chroming the part with it still being on a plastic tree or sprue. Nothing beats a Molotow pen in this regard (o.k. - one could replate the entire thing!) , hence this looks a touch better for all the pain endured for wasting bumper number one. Thanks for reading this update... Mike K./Swede70
-
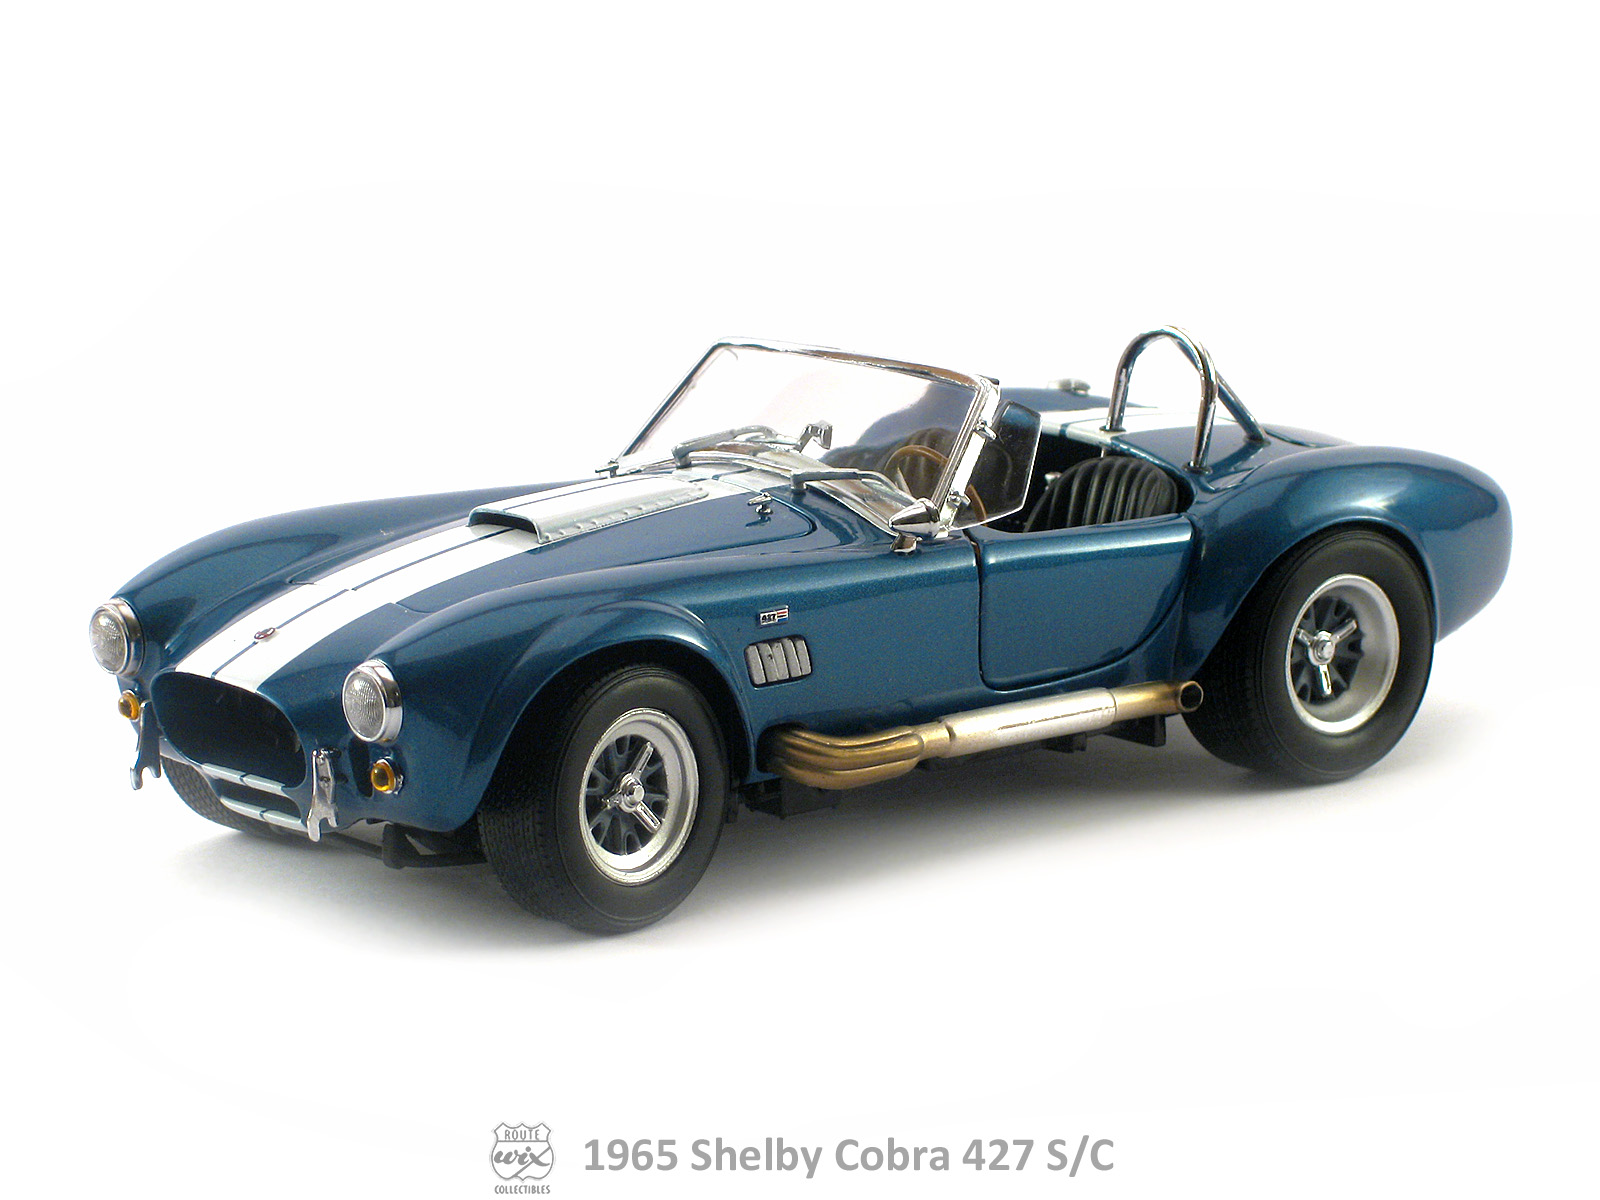
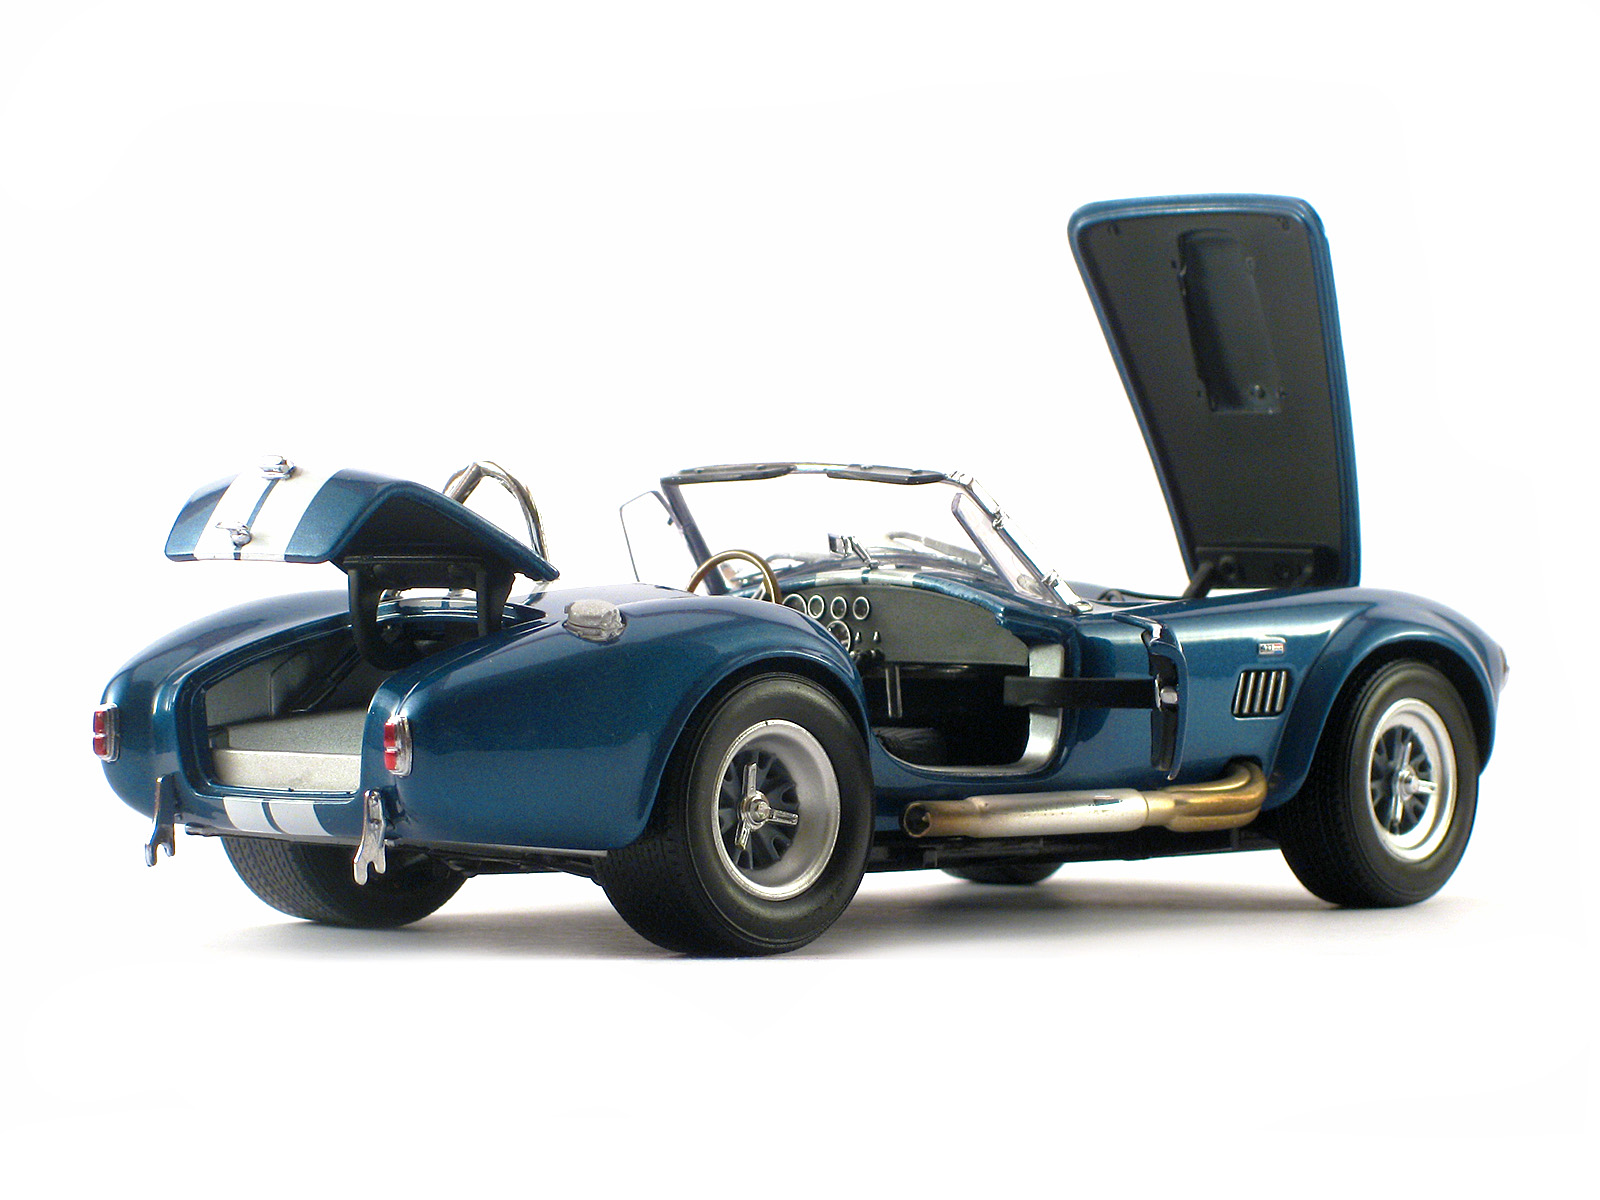
Greetings, Looking really nice both. Another thing to seek out is the WIX oil/air filter promotion 1:24th Cobra which can go for very little online. When new there would be people trying to sell them for $80 at area shows, and I was almost tempted at that. In particular, whoever tooled and designated finishes for the model opted to color stain the exhaust dumps in a very accomplished fashion. I grabbed one these for less than $30 if my memory of such is accurate, whereas if you can come up with an example for something close, do consider it. If it tells you anything, my initial ambition was simply to steal the tires for an SCCA Trans Am road racing project, but then I just couldn't kill it without regret. Thanks... Mike K./Swede70
-
1968 RKE/JRT SCCA Trans Am Javelin
swede70 replied to swede70's topic in WIP: Other Racing: Road Racing, Land Speed Racers
...some small updates then, Seen will be a new Group 19 Ronnie Kaplan Engineering wing assembly for the deck lid, inscribed front indicator recesses suggesting that the front fenders were never punched to allow standard indicators to be fitted, as well as new jacking points underneath the model just aft of the exhaust dumps. The wing material is from a Heller 1:48th scale helicopter kit, which afforded a consistently shaped profile across the length I desired twice over given I had to mate a pair of elements in a vague shape of a boomerang. Desiring down-force rather than lift, indeed - I assembled what is seen here effectively upside down. The mounts were fabricated from sheet plastic, while the end hardware is simply hex rod cut to size and located with care. Also spied even as it registers as minor stuff, the exhaust dumps have been trimmed back, while the aforementioned fender side indicator 'dimples' were etched on after first removing the raised stock detail for light sanding and scrubbing. Worried that I'd situate them incorrectly, I carefully taped off the lense detail as seen on a spare '69 AMX body taking extra care to very firmly press the edges of the mask onto the surrounding panel work to best define where things were, and then transferred the tape mask onto the '68 Javelin shell before lightly etching what is seen here. Further and lastly, a five-panel Wink rear view mirror housing was fabricated and fitted, although I'll likely redo the mounts in brass or some such given they strike me as a bit heavy. Thanks for reviewing this update. ...notice if you will the thin spoiler hanging in space on the rear of the deck lid. These had aluminum mounts with two options as to the level of the element sought, whereas I've opted to position mine on the second and thus lower option. ...hard to see given I've used a recycled promo deck lid cast in avocado-colored plastic with the new Group 19 wing being olive drab, things nevertheless look o.k. ...hardly visible again, nevertheless the size of the wing element isn't far off; i.e. I was fortunate not to have to purchase multiple helicopter kits to find something suitable. The Wink rear view mirror assembly can just be made out, while the small cylindrical jack point behind the near side exhaust dump is readily noticed. Yes - some reasoned and not too large spring shackles stand to be added. ...revealing the slight boomerang profile I spoke of, the profile from the top isn't terrible. ...and finally the view from the front three-quarter. The Wink mirror assembly is perhaps a bit too prominent, although period photographs do telegraph the size of the same. In the main, I don't have much in the way of room to tuck things in higher, whereas I trust what dimensions I was able to find and subsequently work up. The trimmed exhaust dumps look a bit better, while the fender indicator indentations spoken of are cleanly executed. Thanks for reviewing this update again... Mike K./Swede70
-
Looks great - very impressive overall.
-
1968 RKE/JRT SCCA Trans Am Javelin
swede70 replied to swede70's topic in WIP: Other Racing: Road Racing, Land Speed Racers
Greetings, Just in passing given I've found it helpful, the link provided will take one to a website where one can isolate and identify typefaces/fonts consistent with reverse-engineering graphics to understand what materials are needed to do decals in-scale. I'd been encountering difficulties given the wide range of styles and cluttered web search results, although for framing matters as a pursuit of '1960's numeral fonts'', I eventually tripped across the resource revealed here. The results are intended for use on a '68 Ronnie Kaplan Engineering Javelin, although the utility of www.identifont.com will hopefully come across to the user as plain. It seems I'll be in the market for Battista, with Carousel as a possible alternate. That one can compare finalists side-by-side really lends utility to the site, while what I've attached communicates how I've used it. Try then: http://www.identifont.com/differences?first=Battista&second=Carousel ...contrast then to the below reproduced image: Thanks... Mike K./Swede70
-
Probably already know to you, but this I found nice and agreeably detailed. See: http://www.tachrev.com/GrandAm1973Nascar.htm
-
Straight onto the bench from the mailbox! 1968 Chevelle!
swede70 replied to Superbird McMonte's topic in WIP: Model Cars
Indeed - looks like a nice tool. Thanks for photographing each tree plus decals so that we might look over your virtual shoulder. Mike K./Swede70 -
1968 RKE/JRT SCCA Trans Am Javelin
swede70 replied to swede70's topic in WIP: Other Racing: Road Racing, Land Speed Racers
That would be a neat and certain strong collection of spares to work with to create both a stock as well as suitably-modified Trans Am racer. Indeed, the flared shells were for a time sold en masse and for very little on eBay, although it seems now that the supply had ebbed. Jimmy Flintstone still sells the transkit with the old school cast white metal roll cage parts off of their website for about $70 if it might help anyone. My late-season '70 effort is based upon one of the first transkits sold from way back in 1995, while the early-season car and shell is based upon one of the fire sale $15 eBay listings that have since dried up. Although disconcerting to view just how much clean up is necessary to render the flared shell casting usable, for careful effort it's certainly possible and shouldn't form a barrier to others contemplating this pathway forward... And just in passing, know that the front bumper found on the '70 Jo-Han Mark Donohue Trans-Am release differs from the Jim Pachal NASCAR GT/annual release given it doesn't 'feature' the cast-in 'JAVELIN' license plate detail akin to what is seen on the promos. I too have a standard production '70 Mark Donohue kit taking form as a stack 'o parts, although there isn't really anything worth seeing at this point. Thanks for your reply and shared enthusiasm... Mike K./Swede70 -
Looks very nice and highly refined without question. Thanks for sharing... Mike K./Swede70
-
1968 RKE/JRT SCCA Trans Am Javelin
swede70 replied to swede70's topic in WIP: Other Racing: Road Racing, Land Speed Racers
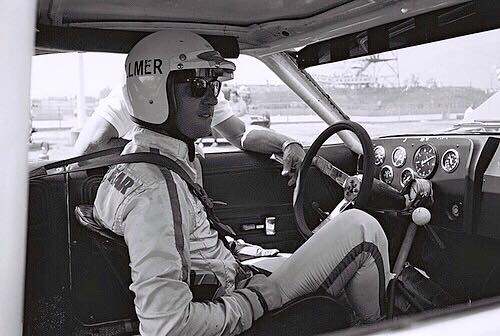
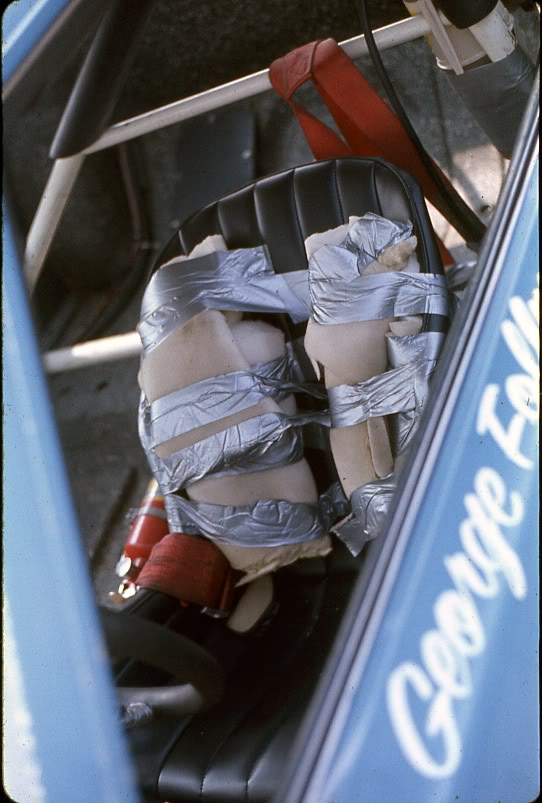
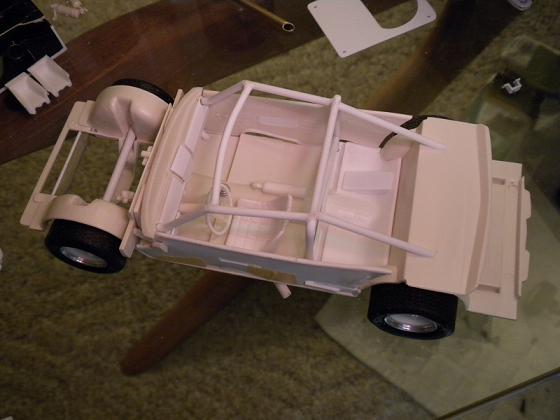
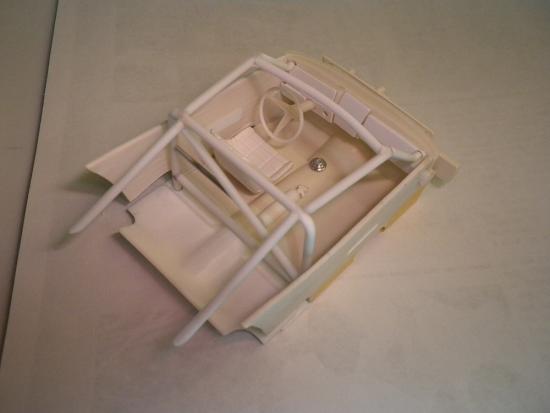
Greetings and thanks for the kind interest displayed to date... A quick series of updates this, with accompanying notes: ...this would be George Follmer, likely at Riverside '68. Note how the roll cage members stretching down from the roof line and terminating into the dash bend twist up a bit while also being visible from the floor heading upwards toward the fire wall. Also notice if you will the absence of the factory arm rest which were usually tossed in a bin on a period Trans Am topic. Geo. is obviously a dedicated Ray Ban Man... ...one of the very few full-color interior photos discovered, image by Ron Lathrop. Note what I believe to be a differential cooler access panel atop the rear seat base metal work, as well as crude supplementary padding that has my back hurting as I contemplate the discomfort suggested here. ...and my interior taking shape. The upturned bars situated behind the A-pillars have be replaced for removal of what I'd worked up, while notice that the separate interior panel detail has allowed me sufficient access to both drill out and fill what is faint arm rest detail at best on the stock tool. While the interior tub was apart, I ground off the dated cast-in pedal assembly in anticipation of replacing this with a better rendered material. To ease painting, the entire roll cage (less the bars attached to the firewall and angling down) is a one-piece affair that separates from all that is seen. Although one would expect the chassis and cage to be painted some suitable gray, instead it's blinding WHITE! ...more together now, although material remains to be added. Fill panels of varying description will be fabricated and blended in, while further dash work stands to be done. The fill panel w/contour seen behind the driver and up to the trunk bulkhead is recycled Jo-Han SC/Rambler material, while note the new differential cooler access panel/hatch. Note too the roll cage bars below the dash which were recently added. Understanding that the chassis doesn't exactly form a point of strength on this build, some things are nevertheless worth pointing out. Here the cast-in leaf springs have been partially filed down, while SC/Rambler parts have been overlaid complete with the shock absorber bottom pick up points and the shocks themselves. Two SC/Ramblers gave their lives to this effort given I wanted a staggered shock installation. The fuel cell housing is something old that was mastered and reproduced as a cast item to be, again, spread across builds... Moving on, the subframe holes have been drilled, while the radiator support/crossmember present on the promo chassis and missing on the kit releases has been introduced here. I hope to cast this given all my Javelin builds could profit from such. Lastly, plastic rod of a slightly smaller diameter was fit both into the exhaust header collectors as well as the dumps to form what would appear to be a glue-free bond that doesn't allow any day light to show through; i.e. the assemblies look admirably clean for the effort made. Thanks for reviewing this update. Mike K./Swede70
-
First - what an incredible range of thoughtfully considered topics and beautifully rendered graphics you've created... Being selfish, I too would desire certain topics and would hope you or others might ponder the following: Fred Cady did a huge range of 1:25th scale Sports Car Club of American Trans American Sedan Championship sheets, albeit he never did graphics or a sheet for the Ronnie Kaplan/Javelin Racing Team '68 or '69 Trans Am Javelins run in that series. Oh - how lovely if such were afforded! See first below is one of the '68 entries: ...and then one of the '69 entries if you will: In 1:20th scale, the MPC 1:20th American Motors AMX can either be done as a solid color, or at the discretion and for application of the owner, as a 'Shadow Mask' car. I don't know if anyone has worked up and/or sells proper stripes to do this topic in an admittedly unusual scale. ...and finally, are any select graphics available in 1:18th scale? I have some '69 AMX's that surely could use air cleaner decals after the lids are copied and cast in resin, and subsequently chrome plated. While 1:18th scale demand might be light on this message board, further afield one could make a modest business case for tackling select topics. I realize that the size of the decal sheets used would be a factor surely, but all the same, with a price adjustment for extra labor and a bit of creativity might something be possible? ...kind thanks for your consideration of this message and what few ideas it contains. Mike K./Swede70
-
1968 RKE/JRT SCCA Trans Am Javelin
swede70 replied to swede70's topic in WIP: Other Racing: Road Racing, Land Speed Racers
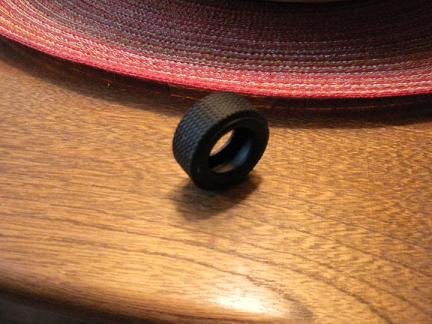
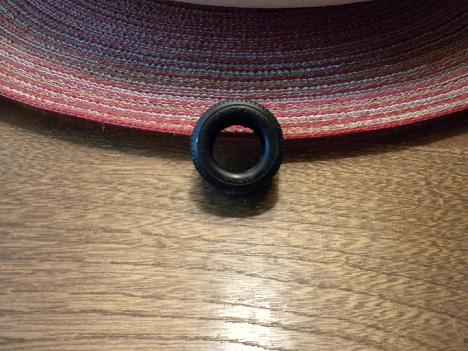
Thanks everyone for the kind interest expressed, Lest I sow further confusion, my reference to the 'pebble tread' is more a description of the shortcomings of the old MPC tire rendition of the actual Goodyear design than any specific reference to what was run in period. Gosh - if one had an example of the rear tires I currently have on the '68 RKE/JRT Javelin in hand, a person on the scene would generally afford thumbs up to the sidewall detail, think less of the harsh edge formed by the sidewall as it meets the tread proper, and finally, take a rather dim view of a wholly inaccurate pattern regarding the tread itself. Not as clear as I'd desire, I've attached a pair of images of the old MPC tire I currently have fitted on the rear of my '68. I find that the lack of really terrific scale footwear for 1:25th SCCA Trans Am topics to be disconcerting, while at the same time I've tried most everything off the shelf or sourced from a kit box. Even the fairly good Replica & Miniatures of Maryland Trans Am wheel and tire set can be improved upon - or so says I! On another front, while I like the proportions and choices made for tread and sidewall detail on the new Chief Joseph Trans Am tires, I'm not strictly a fan of the very soft and pliable material of which they are made. As for wheels, I have scale Minilites, ARE Torque Thrusts, ARE '69 CP-200's/Trans Am wheels everywhere! Wouldn't it be fun to come up with ARE '70-season Tran Am wheels which were intended to win business back from Minilite going into the '70 season but didn't? See: I'm starting to play around with molding my own tires, hence understand that I might favor the sidewall design of one, the indented and alternating indented diagonally-lined 'tread' of the traditional dry spec. Goodyear Blue Streak seen on the (again) very old MPC Winston Cup NASCAR tires of old, and even go for cutting strips of vinyl tire tread off to work up alternate diameters and heights. As a reasoned resource apart and away from period photographs, vendors of accurately-patterned racing tires plying their nylon-plyed wares can be found online and can help to clarify matters in a general sense if one wants a quick resource. Hmmm, in this instance maybe try: https://www.racegoodyear.com/tires/sports.html It's all very preliminary at this point, but (for example) if one reads about Mark Donohue playing around with super modified tires up front and rather tall profile NASCAR tires on the rear of the mid to late-season '70 Penske Javelin within the pages of the Van Valkenburgh/Mark Donohue title The Unfair Advantage, it's pretty clear that an early season entry is going to look and sit quite a bit differently than a late-season iteration of the same topic. Although mostly a blinding flash of resin, seen below is a late-season '70 Penske Racing Javelin wearing some resin masters for tires I worked up that may in turn be used to create molds for softer and black-tinted scale footwear. Consider then: ..and so quickly contrasted to an early-season rendition of the same basic car. The model seen further below features the terrific Jimmy Flintstone flared shell as employed on the project above, with Chief Joseph 3D-printed Minilite wheels (plugged so I might employ a four-lug retention system if you will), different tires, a more basic seat as well as out of the box front spoiler which generally looks right for an early-season car. The front tires are Replica & Miniatures of Maryland items up front (akin to 1:24th scale Monogram '69 L88 Corvette issue), while the rears are vinyl NASCAR stuff picked up from another cottage industry vendor. Ugh - I have too many projects! Kind thanks for the feedback and stories availed. More to come as they say... Mike K./Swede70
-
Beautiful work - charting the progression of everything plus the articulation of new techniques always fascinates me. Further, it seems we both derive a high from granulated airborne glue from old builds we carefully break apart and reconstruct! Thanks for sharing... Mike K./Swede70
-
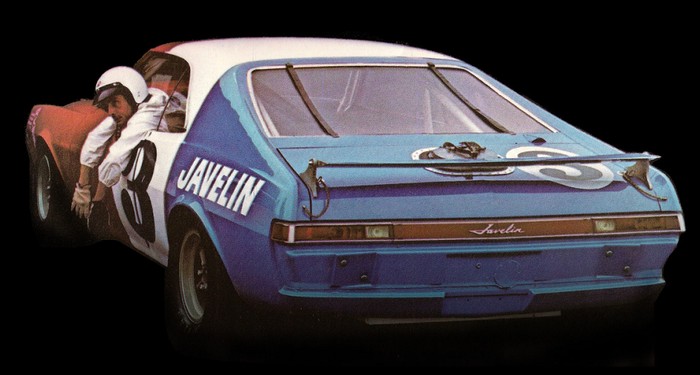
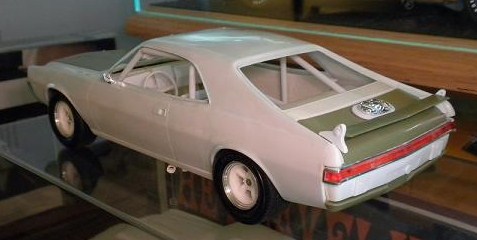
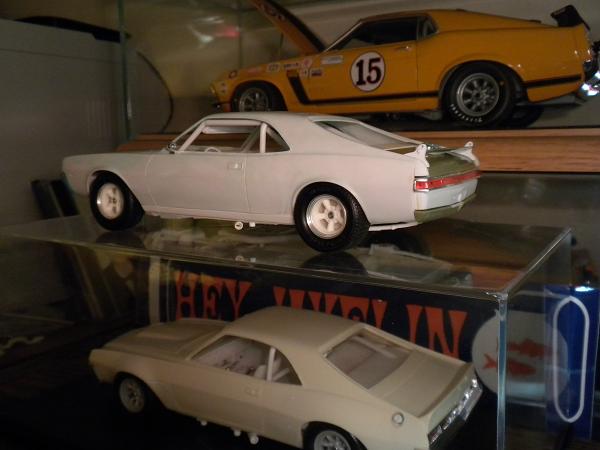
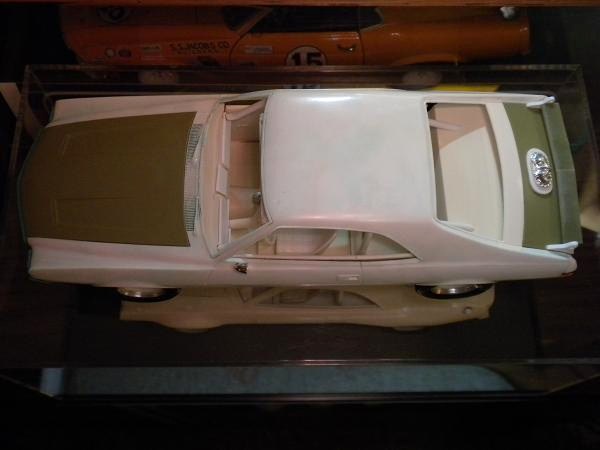
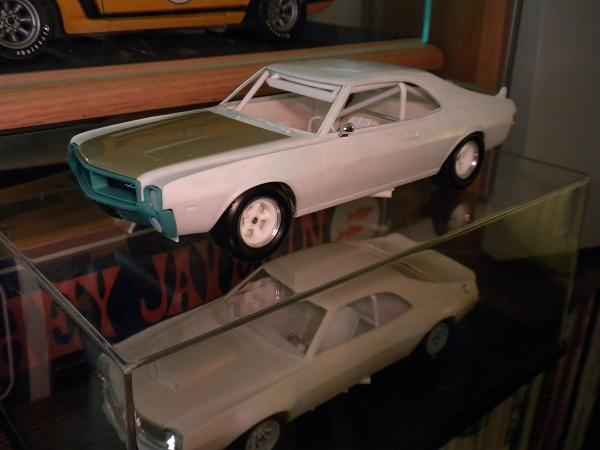
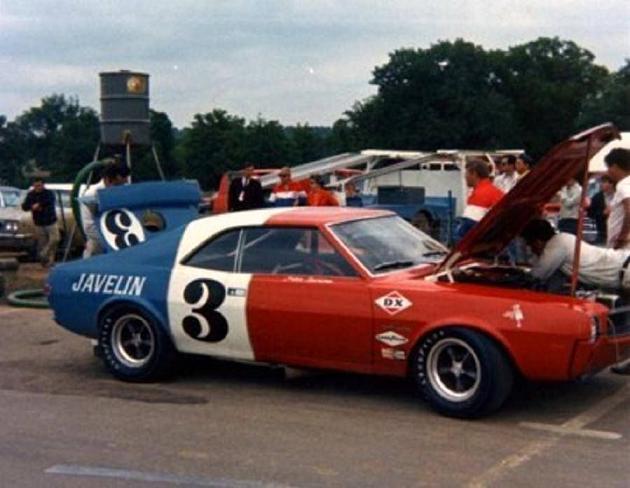
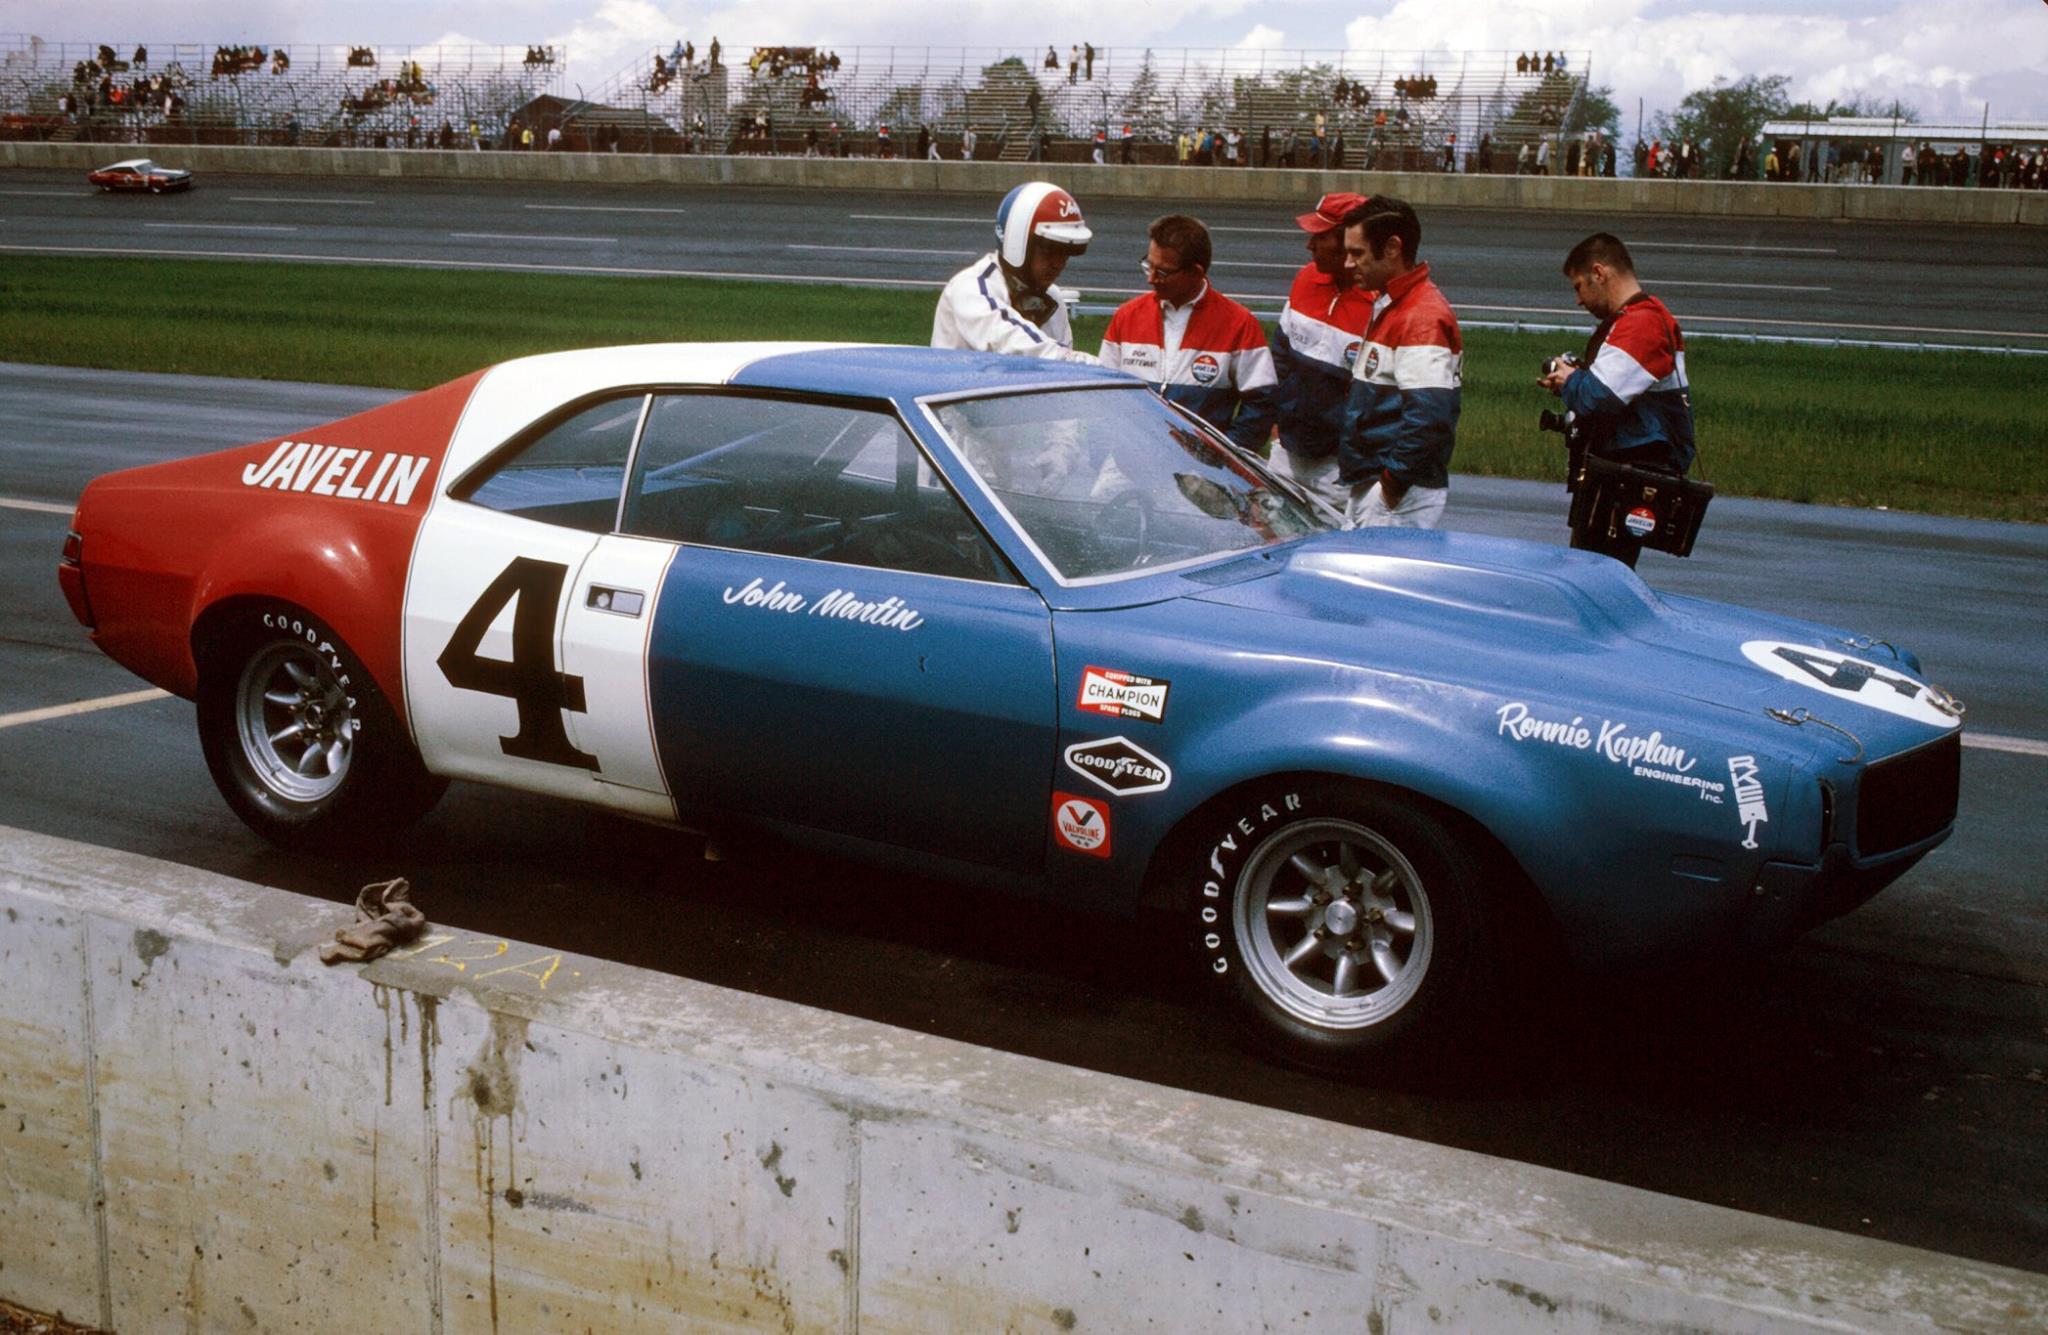
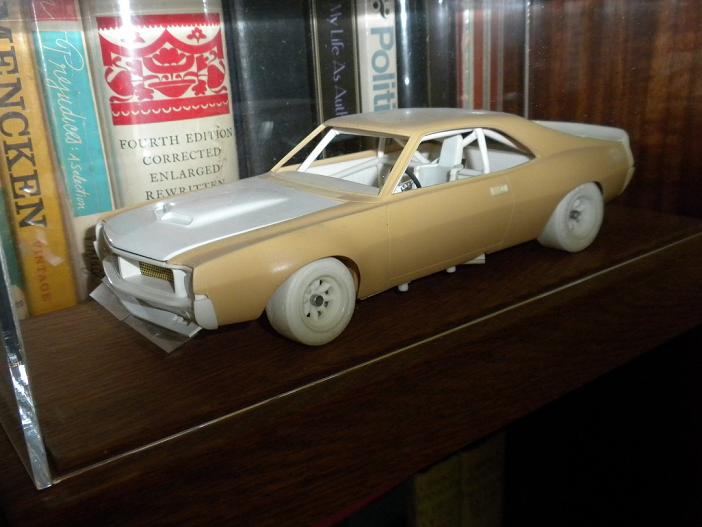
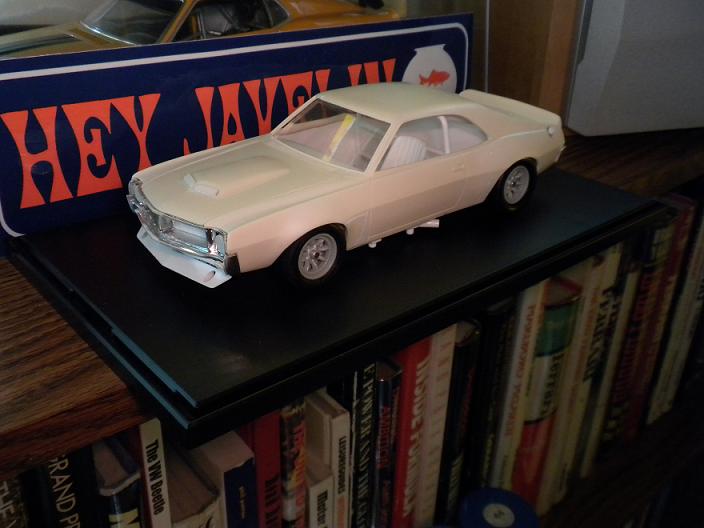
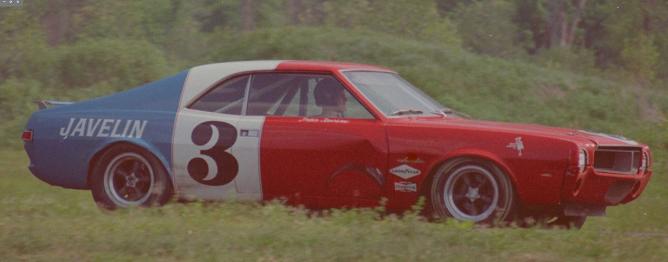
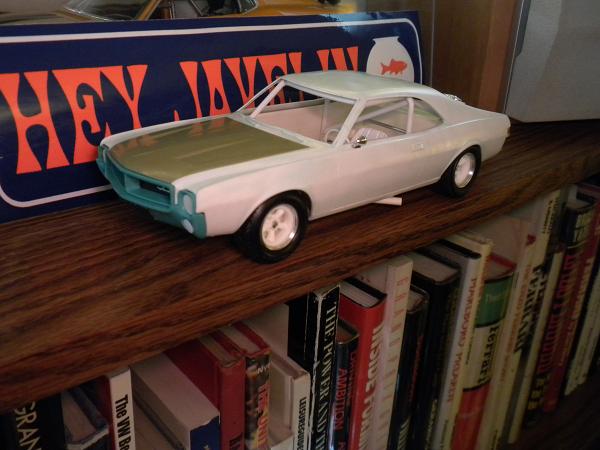
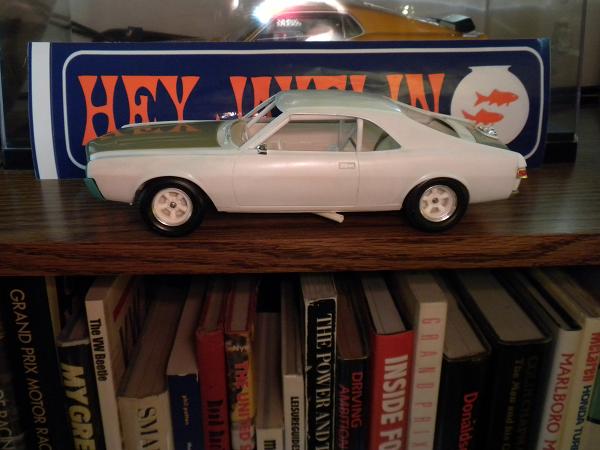
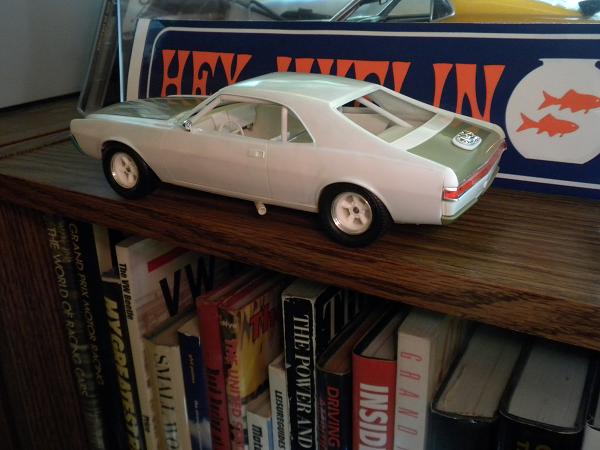
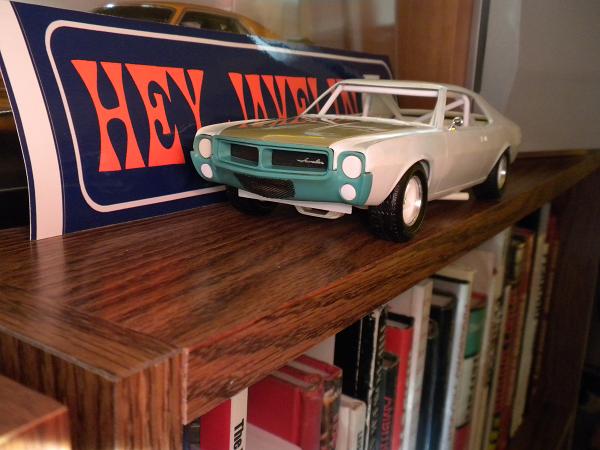
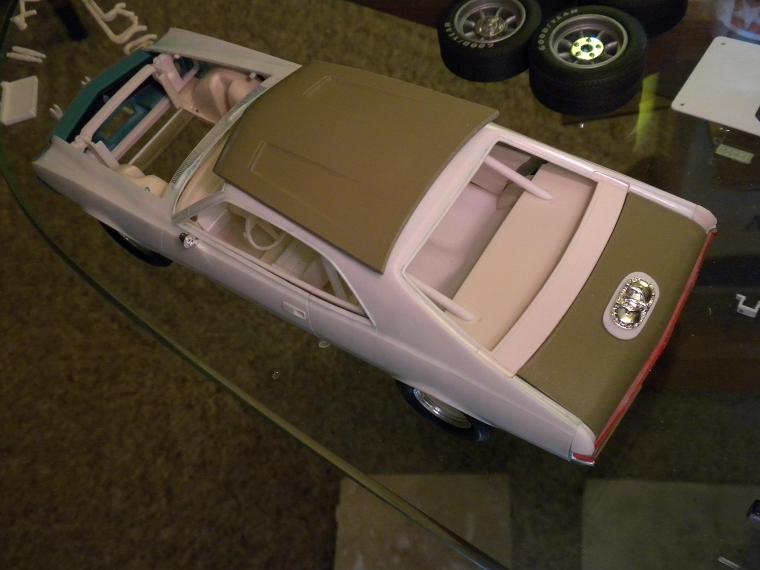
Greetings, Not that I'll soon be awarded a lifetime achievement award for the enviable number of project completions I register, nevertheless if I might network with others, absorb insights and share a few ideas, no great harm will come of it. This would be a Jo-Han annual/funny car release of their 1968 American Motors Javelin slowly being resuscitated into a coherent rendition of a Ronnie Kaplan Engineering/Javelin Racing Team SCCA Trans Am racer from that year. About decade ago I gathered up a pair of glue bomb models in the form of a ghastly 1968 and a still-worse 1969 Javelin SST, hence with the march of time, parts gathering and (I certainly would hope!) progression of a certain skill set, some things come into focus. The '68 is enough together to constitute a going thing, whereas the '69 will eventually emerge, albeit not now. On with the show then... - This would be the topic in-period and at play. Seen is Peter Revson early in the '68 season, while I don't really know if the material hanging down up front is strictly intended to be an air dam full truth be told. Also, they really didn't have any effective anti-dive built into the front suspension in '68, hence what is seen isn't the static setting if you will. ...and this would be a few project mock up images which depict the stock release with various modifications and updates. Chassis is basically standard '70 Mark Donohue Trans Am release with '69 Hurst SS/AMX power so to speak, while the stock interior has been cut up to combine the standard '68-specific interior side trim with the bare '70 racer floor. The cage is scratch built, the wheels are resin clones of 1:24th Monogram '69 L88 Corvette racer fare. Tires in the rear are ancient MPC Goodyear Blue Streak Sports Car Specials with the curious 'pebble' tread these had, whereas the front tires are vinyl repops of NASCAR tires from the early '60's purchased at an area hobby show. The turned aluminum rings employed on the wheels were like-sourced, albeit I can't remember who did them. Stuff is missing and/or incomplete at this point (i.e. the Group 19 RKE wing in the back for one), although as tides shift, now and again updates will be made to this post. ...the roll cage was largely finalized last evening, with the top tubes heading forward from the main hoop splaying out a bit as they arrive under each A-pillar. The odd avocado panels are from a deceased '68 promo picked up for less than $20. Happily it carried an organ donor card, and thus it's vitals were transferred to something living. Headlamp fill panels are '70-'71 Penske Javelin, whereas the turn signals have been filed out and plugged. The cast-in 'JAVELIN' identification on what would be a license plate platform up front has been ground out and filed to remove evidence of such, while a hole to afford scale air to a scale oil cooler (Jo-Han Superbird at this point) was likewise cut. Neat, appropriately patterned screen has been cut to protect the intake area from picking up larger debris as seen in the next image: ...looking the business then with the roll cage installation being a tight as I could make it. The side mirror is Jo-Han Superbird stuff again. Happily the special promo-issue grille with the chromed and upraised 'Javelin' script lived, hence it reappears here. The Wink multiple-element rear view mirror is coming. Obviously, all the identifying badges have been removed, although occasionally the fender script i.d. was retained by Ronnie Kaplan Engineering on their racers. ...not too bad in profile, with a 1:18th GMP Trans Am Camaro diecast fuel filler used on the deck lid. I think they rendered it too small for 1:18th, whereas it looks at home here. Noteworthy and tedious will be the rocker panels which were cut off and replaced with '71 rockers that first had the upraised trim present on them carefully sanded down and out. Sanding the same detail out on any rare shell isn't recommended for either children or adults. Again, the upper bars on the cage are splayed looking forward, hence they look a touch odd here. I keep trimming the exhaust dumps again and again for length, and some work still needs to be done here... ...noticed will be the scrubbed off dash pads with overlaid panels fitted as per photo reference gathered. The fill panel beneath the rear screen, the trunk lid, the quarter trim extensions and rear valence panel are all separate items, while the sans bumper profile is an insert that was scratch built and is not yet complete. That my old trunk lid and fill panel were glue-fried and distorted pretty much sealed matters, hence I had to do something. The resultant surgery was delicate as seen below, but largely successful... Happily I was able to save and recycle a 'Javelin' badged tail light insert for they certainly don't grow on trees. Other mild stuff would be the meshing of a '69 AMX wheel with the taped '70 Jim Paschal NASCAR GT steering wheel rim given some photos show the car with the same. Given I'm looking to mix up things, I thought this would be something to do/try. Aluminum rod hub inserts are also seen if one looks close. Thanks for reading and examining this post. GO JAVELIN! Mike K./Swede70
-
R&MCoMD - Racing Seat with Frame
swede70 replied to afx's topic in Car Aftermarket / Resin / 3D Printed
Nicely done and cheers for the inclusion of a detailed seat frame which is something that is typically skipped. Kind thanks for directing our notice to such. Mike K./Swede70 -
Beautiful and a very confident restoration surely. Thanks for sharing. Mike K./Swede70
-
Terrific project idea and happy to note the aplomb and thoroughness in evidence and you research and fabricate that which you need. Being in SE Michigan, Herb Adams is something of a local hero. Kind thanks and looking forward to each of your updates in turn... Mike K./Swede70