swede70
-
Posts
727 -
Joined
-
Last visited
Content Type
Profiles
Forums
Events
Gallery
Everything posted by swede70
-
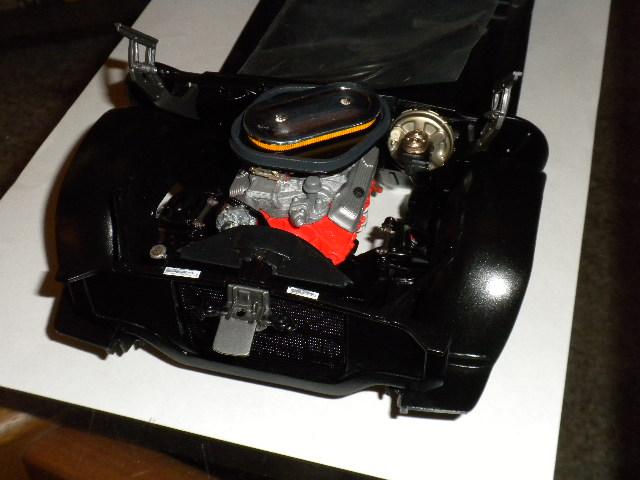
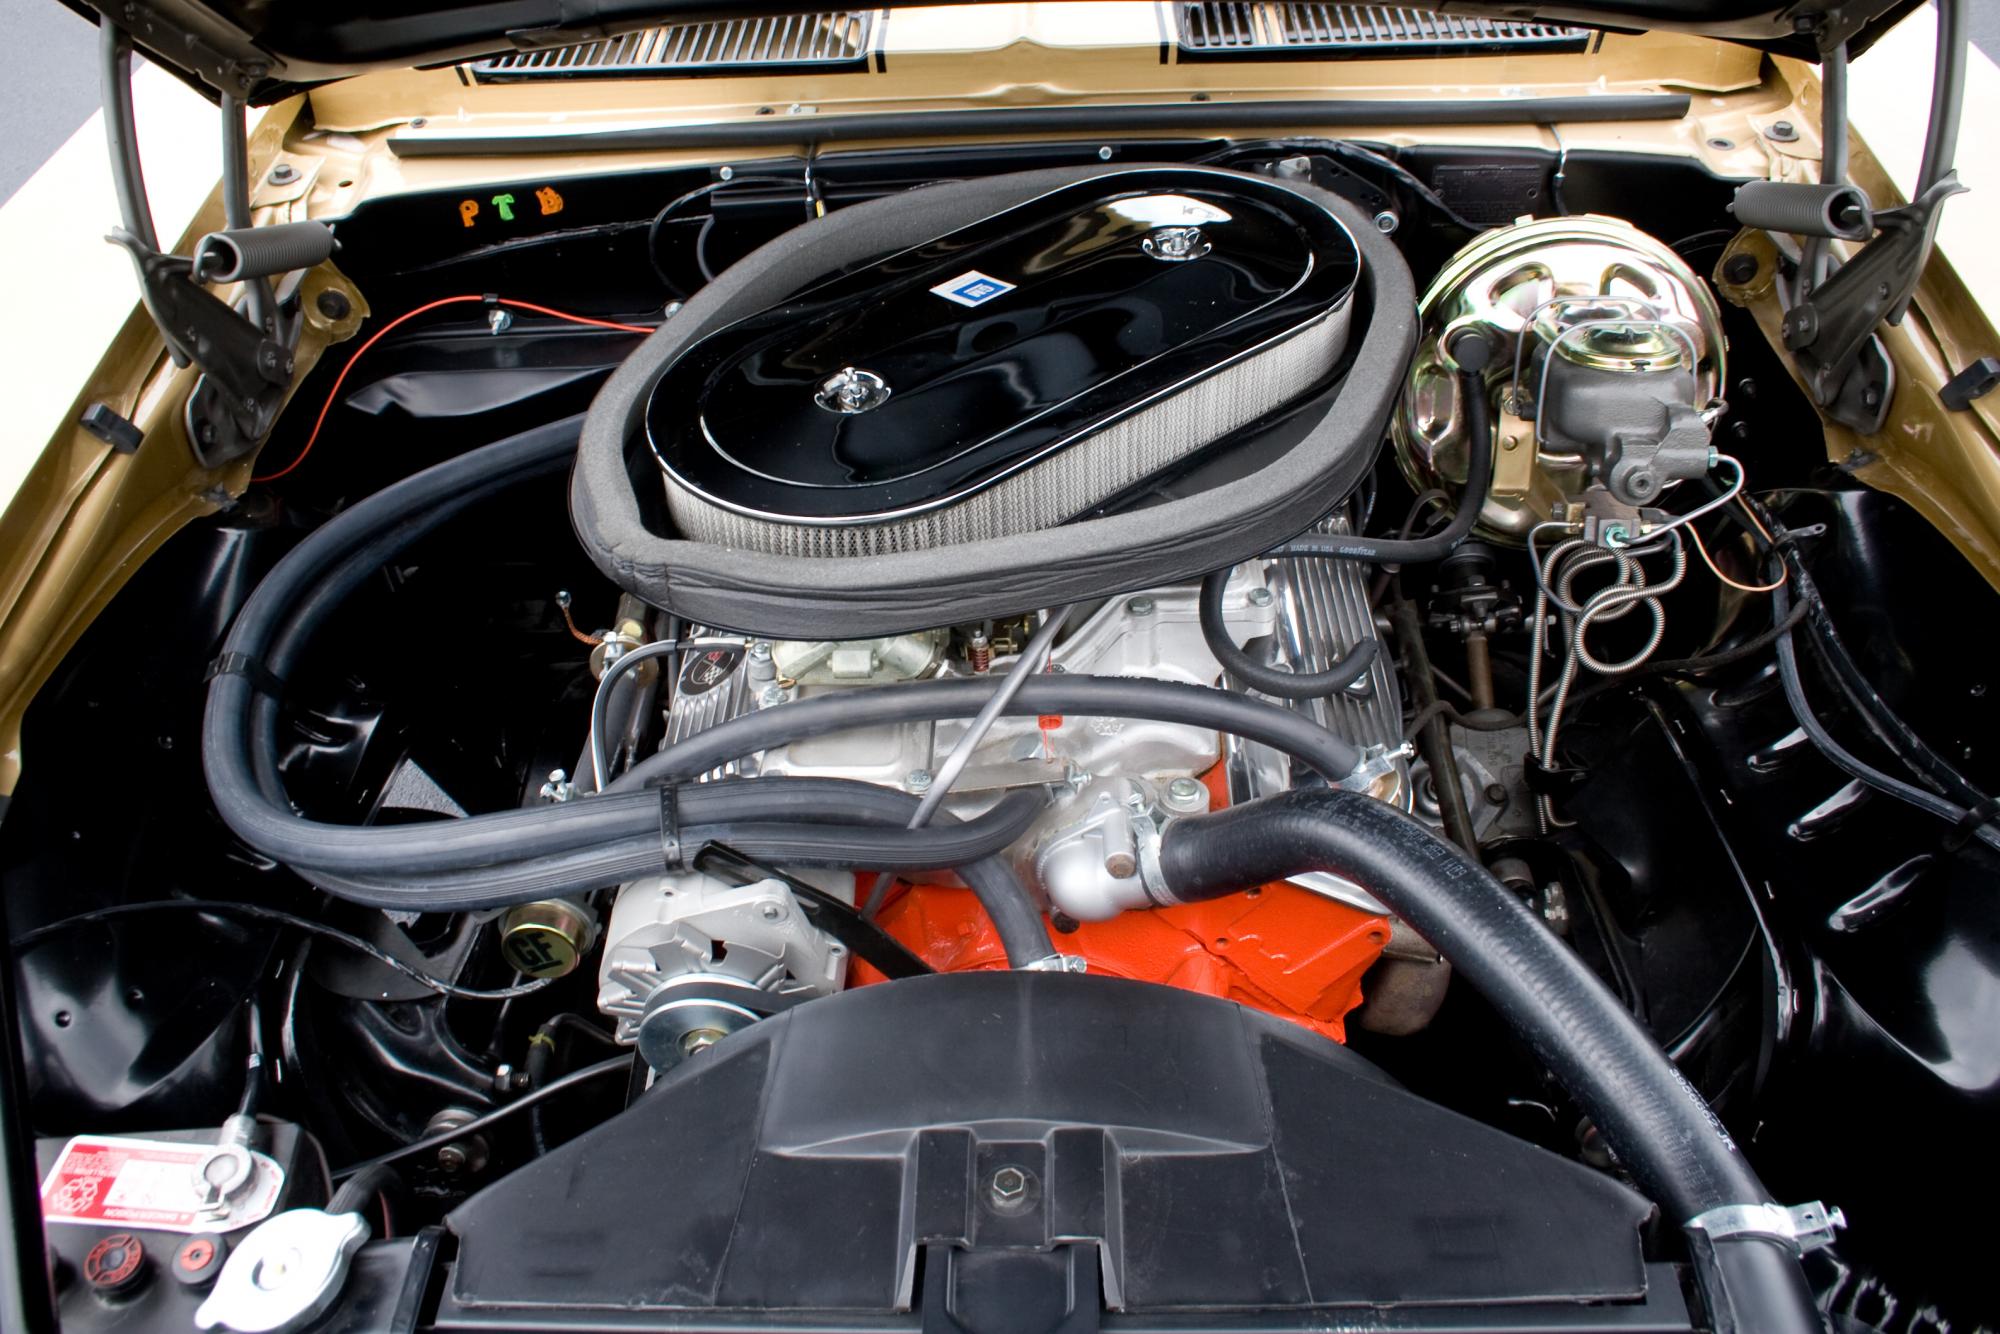
Just a brief update, ...this would be my 1:12th Camaro taking shape. MM Titanium in a rattle can was used on the sketchy hood hinges, while the hood striker plate will likely need something different yet. Notice I'm playing around with air filter colors, trying here to approximate a dried out and long neglected low mileage original. Thanks... Mike K.

-
1:12 1969 Camaro Z/28 as seen in the August '69 issue of Car Life.
swede70 replied to swede70's topic in WIP: Model Cars
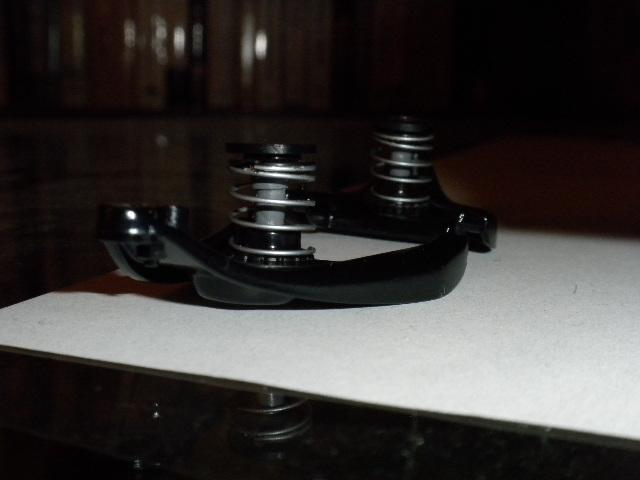
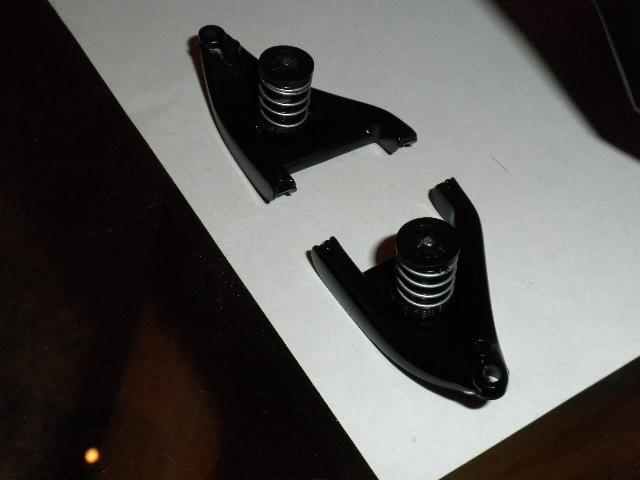
A small update this..., ...the front suspension pseudo-springs (actually just locating pegs) have been cut off and ground even, whereas the cut down R/C equipment springs and perches have been loosely sited in the wake of rudimentary paintwork applied to each. ...inside both assemblies a two-part shock absorber body has been sited with a thicker top half and an indented 'swirl' etched into the bottom half to match the exterior shock detail provided on the rear shock absorbers. Tags to call out the spring rates have yet to be purchased, although I hope to reduce each and add these to what is seen here. ...hardly breathtaking, but discreet spring isolator pads have been painted in between the leaf springs and spring perches. The dots seen directly below the mounts are a somewhat oversized and stand to be changed out. ...some refinishing of basic assemblies is detectable here. The wheel housing liners have been painted Krylon Semi-Flat Black which seems a bit less reflective, the master cylinder brake fluid reservoir top is now a bright gold cad. versus silver as before, whereas I've started to play around with air cleaner tones to suggest a well-worn as-discovered original versus a poppy 98+ point restoration. The air cleaner was first painted Testor's Light Ivory, and then coated lightly with Tamiya Translucent Orange. The effect seems a bit heavy in-camera, although know it is appears less 'in your face' when examined in person. Finally, the hood latch striker plate as well as the hood hinges (a bit dumpily rendered these) have been repainted too in the hopes of suggesting gray chromate, or what is known as palmerizing. Thanks for skimming this update. Mike K.
-
Thanks for the input - I'm heading to the nearby hobby shop to check out same. Mike K.
-
Thanks for the interest and kind responses, Indeed, there are different shades out there - and sometimes on the same topic given different suppliers contributed this assembly and that! Playing around with what I had in hand, for this GM topic it seems Testor's Metal Master Titanium sprayed from a distance followed up with Tamiya Flat Clear will likely be the way to go. I do have some MM as well as Tamiya Gunmetal, hence I will apply myself to experimenting given how very nice the 'Quick GMC's' Super Stock Hemi appears. The parts intended to be finished indeed include a hood latch striker plate and the hood hinge assemblies as rudimentary as they are on the 1:12th Camaro kit. Another thing I'm finding out is that there is no shortage of so-so quality restorations where much work bears little relation to what originally came down the line. I suppose too that I'm unduly influenced by copious study of Hemming's Muscle Machines and the like, and hence carry in standards that I couldn't hope to afford in 1:1. Well and by golly - it's MY (scale) Camaro! - ...this would be a '68 with a later '69 cross ram seal and presumed fiberglass ZL2 'Super Scoop' cowl induction hood. A bit confusing to look at, a nice restoration surely, while the image was chosen to reveal the hood latch striker plate (if my nomenclature is correct) finish. Reviewing this, I notice that the hood hinges look nice in MM Titanium, although my striker plate isn't quite happy painted identically... ...this would be a '69 with the same system, plus '69 valve covers and such. Best view of the hood hinges, although my guess is that 'his' wheel shroud black is a bit too glossy, whereas that gold cad. power brake booster chamber is blinding! It's so challenging to see to everything even as I'm not doing much more than paint. I suspect this is the Lingenfelter Collection '69 Z/28 in Olympic Gold - a lovely shade this. - I have a first generation Camaro restoration house that is situated close to where I'm based that sells some simulation of gray phosphate in a rattle can, although at $28.95 I'd hope that a lifetime supply was found within. I think I'm good, although I will attempt to shop for a well illuminated image to plug into this thread consistent with affording those looking in of that which I speak (sorry not to do this first thing). I suppose in time I ought to dive into the Alclad range and 'mix my own' so to speak, although at present I really need to tidy up and complete consistent with building my confidence back up. - If it helps, I've tried to scribble down a few other rattle can 'point and squirt' standards that seem to work without huge effort, whereas feedback as to better options or techniques is of course most welcome. 30 degree chassis black: Krylon Semi-Flat black or Duplicolor Acrylic Enamel Multipurpose Coating Semigloss Black DA 1603 60 degree engine accessory black: Currently using Tamiya Semigloss Black TS-29. It still seems a bit too glossy, hence feedback and/or impressions sought. Old Koni shock absorber Orange/Red: (material to be inserted soon) Newer Koni shock absorber Orange/Red: (material to be inserted soon) Thanks for examining this post and thread... Mike K.
-
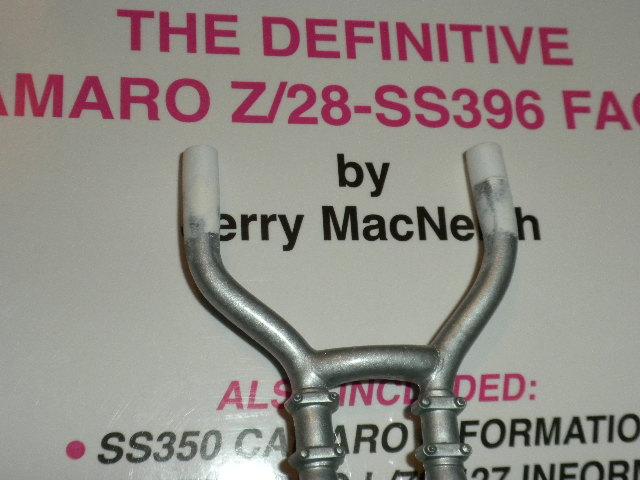
Greetings, Working on a 1:12th scale Revellogram '69 Camaro, I realize that my choice of paint for Gray (or rather gray-colored) Zinc Phosphate isn't exactly stellar. Most material online steers me towards 1:1 restoration hardware refinishing in the proper coating, or obliquely refers me to Eastwood's product range. Does someone have a favorite paint in a rattle can that reliably does the job again and again? For the Camaro, imagine the finish seen on the hood latch striker plate or the hood hinges themselves. Any help would be most appreciated. I'd also be happy to trade chassis finish recipes as I too have some favorites. Thanks for reading this post. Mike K.
-
1:12 1969 Camaro Z/28 as seen in the August '69 issue of Car Life.
swede70 replied to swede70's topic in WIP: Model Cars
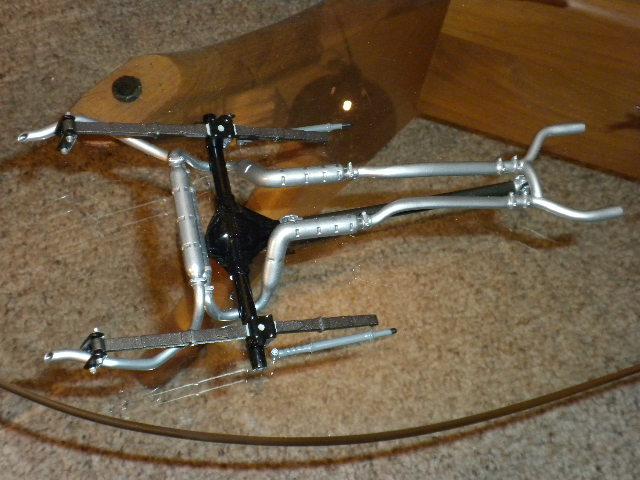
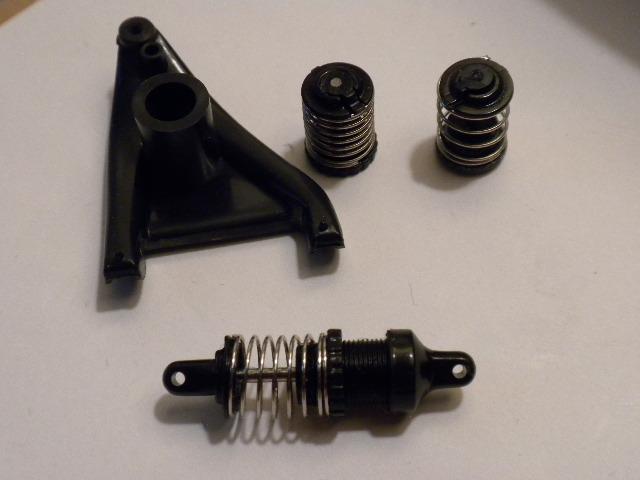
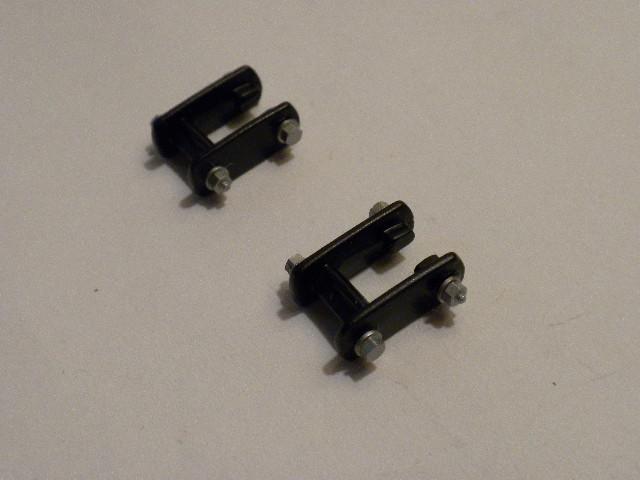
Thanks for the continued interest and encouragement, More then...: ...information obtained via The Camaro Research Group exhaust header thread indicated that no flange detail is strictly seen between the exhaust headers (an over-the-counter option on '69 Z/28's) and the exhaust system proper; i.e. everything was welded together as per instructions scanned and viewed on the CRG. Given this, I ground off the flanges and extended the pipes forward a bit anticipating that I'll have to cut them back at some point. ...the same assembly painted, less guillotine clamp paint (or possible replacement given they are the wrong thing fitted to the chambered exhaust). The actual chambered exhaust pipe clamps are simpler affairs, hence it would be good to change them out. Barely visible is a small application of glue to suggest a weld (X2 then) between the equalization pipe and the two exhaust pipes looking back. ...front shock absorber top mounting detail done in miniature brass hardware. The threads are coated with Tamiya Translucent Red less the threads beneath be wholly obscured, whereas the top is touched in with Testor's Dark Red enamel. Barely visible beneath the upper control arms this detail is, while know I'm shopping for larger hardware to effectively suggest that the upper arms are also so-secured. ...the rear shocks with painted miniature brass hardware, with painted bushing detail largely obscured. I hope to add shrunken two letter labels to denote to assembly line personnel which code (equating to stiffness) to fit to which Camaro passing by. Such decals/labels can be had by 1:1 restoration houses for about $5 each. ...some miniature brass hardware sorted for use on the rear leaf spring shackles. ...the same in place and largely happy. ...for visiting a pair of R/C shops, smaller coil over units were found to substitute into the front suspension assembly. In the foreground may be seen the unaltered R/C unit, whereas back of it looking to the right of the lower control arm may be seen a cut down unit, and finally to the far right, another cut down unit which has had some coils removed to better simulate what would be fitted as per stock. I hope to paint the coils gray, add coil spring rate tags as per stock, and possibly introduce some material over the metal center rod carved to reproduce the spiral shock detail. Thanks for examining this post and for the nice feedback left. Mike K.
-
1:12 1969 Camaro Z/28 as seen in the August '69 issue of Car Life.
swede70 replied to swede70's topic in WIP: Model Cars
Greetings, Thanks for your interest and offer. I have Wayne Guinn's Camaro: Untold Secrets 1967-1969 and have been quietly purchasing materials since April of this year in the form of textual materials to compliment this project. The Guinn title seems definitive with regards to the special Trans Am homologation pieces, but new discoveries or stuff previously overlooked is always welcome. Just a few weeks ago I gathered an old Automotive Quarterly title identified as Camaro: From Challenger to Champion which dates back to 1981, and very fine it is. I did attend the Ypsilanti, MI. Camaro show this year (my first time then), although most cars spied constituted older restorations. Happily I'm near a National Parts Depot warehouse, something called the Lingenfelter Collection isn't far away, whereas a specialist known as Heartbeat City is fairly close to me situated as it is in Shelby Township. Heartbeat City has a good website in particular, hence contemplate trying: Heartbeat City JL-8 4 wheel disc brake subpage Also very much worth visiting is something called the Camaro Research Group where I've maintained a rambling build thread across many a (incomplete) project - usually SCCA Trans-Am related in some fashion. Follow the link to my thread there, but by all means search around for there's so much to examine there. You'll quickly pick up on my habit of jumping from one project to the next, although the subassemblies and half-finished works are always good for passing a few minutes. See: Mike K's mostly 1:18th Vintage SCCA Trans Am build thread on CRG CRG has a few threads documenting 'as found' low mileage Camaros discovered as of late, hence I'm trying to honor what has been recorded and related here and there. Individual cross ram items sold via eBay with pertinent photos provided as also been a lifesaver. Kind thanks and yes - I'm always on the search for more and better stuff. Mike K. -
1:12 1969 Camaro Z/28 as seen in the August '69 issue of Car Life.
swede70 replied to swede70's topic in WIP: Model Cars
Greetings, A revised mounting flange for the fuel pump is witnessed, as is a scratch built bottom with inlet and outlet detail. Worried that the added bulk across the bottom would introduce fit problems when installed, happy I was to discover this to be a nonissue. Mounting hardware is to be added, hence the holes witnessed on the flange will come in handy to secure such. Thanks... Mike K. M.K. -
1:12 1969 Camaro Z/28 as seen in the August '69 issue of Car Life.
swede70 replied to swede70's topic in WIP: Model Cars
Beautiful and daring stuff you do! I'm more used to light fab. work in the realm of 1:18th projects where 'rolling your own' seems at times the only way to have parts and to make progress, hence I'm in awe of your more and most elaborate efforts in 1:12th. Four-piston Corvette-style calipers as well as the aforementioned described wheels and tires are about as far as I'll go here by way of modest contrast, whereas to note your kind words and attention means much. Thank you kindly... Mike K. Indeed, the base is to come. Although cheating of a sort, a second kit will soon be purchased to free up the spares situation which slowly grows acute, whereas stuff availed thus will include material for the base of the fuel pump and more too. By way of further example, I'll likely glue up a radiator support with the tiny braces up front to better site the inner fender/inner wing detail I intend to scratch build. I have quite good head-on images to use for this, whereas for playing with image reproduction sizes I'll come up with something akin to a 1:12th reproduction to guide my efforts in this regard. Oh - and a better done water pump might be good too! Worried here I do suppose, for I tend to work a bit above my head and am given to being carried away by minutiae. Mike K. -
1:12 1969 Camaro Z/28 as seen in the August '69 issue of Car Life.
swede70 replied to swede70's topic in WIP: Model Cars
Greetings and thanks for the nice feedback afforded. I do cast my own stuff in two-part resin with like urethane molds, hence a big 'we'll see' is proffered in relation to doing clones and more. All this will take time, although if I proceed apace perhaps the perceived hurdle won't prove too great? As anyone who has tried such, creating the master, developing a working approach to a mold and then making such does take time - but then it's easy! I hesitate to promise anything given step-by-step follow through is something I'm definitely working on, hence this build constitutes an effort to unblock myself and spread knowledge of right finishes across other projects that await my reengagement and (hoped for) resurgent confidence. ...note the revised paint finish on master cylinder fluid reservoir top, while a thinner silver decal (a low-rent 'mount' this) is witnessed on the bottom of the coil now mounted askew and leaning to the left. Hitherto just a hole awaiting something, I've added a tiny Walther's miniature bolt and washer to more or less secure the fan shroud in place as per stock. The Walther's bolt employed seemed a bit thick on top, hence it was sanded down and later a small dimple was drilled on the top and center of it prior to adding the washer and painting them together. The fan shroud was stripped of clear and carries no finish given cheap injected black-colored plastic looks about the same in 1:1! Oh - and I tucked in that alternator mount! Proceeding ahead then, the vacuum one-way valve on the booster chamber now points downward as per a cross ram setup. Black oxide hardware paint (of a sort!) is barely discerned on the two radiator support-to-fender inner lip braces (better than just painting everything silver which is always a temptation!), whereas thoroughgoing Silly Putty masking was used to isolate and paint the upper control arm tie bars. Touching in the mounting hardware on said control arm tie bars (whatever these darn things are called!) looked very silly, hence 'all of a color' is how they'll be. Additional hardware and paint for stuff nearby is to come. Maybe I'll cut up a bicycle inner tube in an attempt to reproduce the rubber control arm weather shrouds..? ...though not really thrilled with my 'steel' paint finish in-a-can, note the split U-joint effort, the cleaned up and slightly recessed joint ends (C-clips in-scale would be a bit too much I dare say!), as well as the lightly stippled line etched into the length of the driveshaft hopefully mimicking where such would be welded. The old magazine is one of about 1,400 period issues I have, whereas the Car Life issue relates a '68 Z/28 test within. Thanks for reading and following along... Mike K. -
1:12 1969 Camaro Z/28 as seen in the August '69 issue of Car Life.
swede70 replied to swede70's topic in WIP: Model Cars
...another update, ...given the one-piece/one-side nature of the leaf spring molds, the pair of clips on each assembly weren't strictly finished across the top. Nothing spectacular this... ...more use of Rustoleum's very good Oiled Metallic Bronze - this time dusted onto the leaf springs. ...the patched front subframe plus top contour awaiting paint. ...sliced alternator with added layer painted orangish brown if you will. It likely should be thinner, while on another topic I was happy to discover that the alternator mount provided wasn't strictly wrong as per the Car Life feature. Given alternators are often changed out and rebuilt, some show up gray in this area for three thin layers of material positioned back-to-back. I might alter this, but at present I'm at peace with the result. Some other aluminum tube as well as a machined aluminum nut finishes off the front of the alternator, while a bit of visual trickery suggests that the fan belt actually stretches around it. Given I just ground down the front of the alternator to clear away space for the turned aluminum pulley, I was worried how silly or dumb the result would be. Not so terrible in practice then. Also seen is the radiator cap which was stripped and cleaned up prior to being painted Krylon Chrome. Scarcely visible is the wire below the radiator cap poking out in anticipation of a radiator overflow hose being added and routed downward. ...what might be a check valve for the power brake vacuum hose to the booster itself in 1:1. ...as reproduced even if it's a touch large. Plastic rod filled with putty dries to a dimple in the center, plus 'L' section plastic, plus Testor's Ivory paint applied lightly to suggest the item is semi-translucent. A bit of wire was added to serve as an anchoring point for hose work to come. Lastly, the gasket between it and the booster chamber proper had been painted as per the post before... ...an unpainted distributor cap topped with gloss clear suggests Bakelite. The vacuum pot for the spark advance diaphram was spray painted for isolating the rest of the assembly with a Silly Putty mask stretched thin and thick. Further use of wire is seen - again to afford somewhere to anchor a small hose leading to it. ...frustrated with the split and faint master cylinder/brake fluid reservoir top, I scratch built a replacement. Not terrible, although handling some of the items to position such wasn't strictly fun. Eventually I applied glue with the greatest care to the cover, positioned discreet bits to add positioned upside-down on the exposed skin of my knee, and finally did my best to line up the additions to the cover for pressing the larger sub-assembly face first. Tuning the position of the additions proved easier than adding the same entire! ...most hardware in place less fuel lines, electrical wiring, etc. Power valve springs on the carburetors are dark red as per Heartbeat City's online reference material. The alternator mount will be tucked into towards the water pump, whereas the long spacer leading to the cylinder head too will be done in time on the other side. Also note that as the hardware holding the thing together routes through the back half of the alternator housing, the cast-in bolt heads should be ground off the face of the assembly looking forward to be drilled out as shown. A small dimple of steel paint disguise the lack of actual hardware across the inserted layer at four points, hence this too seems acceptable at present. Kind thanks for examining this posting... Mike K. -
1:12 1969 Camaro Z/28 as seen in the August '69 issue of Car Life.
swede70 replied to swede70's topic in WIP: Model Cars
Greetings and thanks for the kind words, Indeed, I'm situated close to the Macomb show, being about a mile and a half away from said venue. Being long out of kit fab. and kit finish practice, I'm deep in the struggle of establishing a balance between making matters complex and yet maintaining pace consistent with finishing what you see. If I'm really on pace, then what is glimpsed here might be done by November. Below are seen a few unglamorous updates... Above can be seen the bottom half of the inner fender sheetmetal/panel stiffener painted body color versus black. Tedious to mask, although I tried to use the proverbial 'Best Stuff on Earth' for employment of Tamiya tape and trash can liners cut to reveal only the areas I wished to spray. Minutes later I decided I was dissatisfied with this and acted to remove the cast-in material from the chassis casting proper... ...all targeted material on the top of each fender well liner is gone, although the much harder fender fab. work is to come. Such project aspects can slow me to a crawl, while know too that I've cut off the odd battery mount and washer fluid bottle (wrong side for a '69 perhaps?) for the cast-in rendering of these items seemed more a concession to cost than anything else. Most people would judge that the 1:12th Camaro kit is pretty much a scaled-up 1:25th kit even as they rightfully laud this as a very good tool. In modest ways I hope to address some of these things without trash talking what are discerned as shortcomings noticed here and there... ...workaday efforts to plug and fill the radiator support. ...thermostat housing with new flange detail added to the engine assembly, while the carburetor bottoms with their cast-in linkages reappear here. I tried to thoroughly dilute some Tamiya Translucent Green for pouring a tiny quantity of it into a new bottle of Tamiya Acrylic clear in the hope of coming up with a light color wash on the linkage itself. It works better in-person for all colors seem so vibrant for being photographed and posted online, so 'seen live' know the effect isn't strictly terrible. Fuel lines and linkages to come. Note how the primaries and air horns are both outboard... ...as per my reading, apparently factory headers could be ordered and were supplied loose in the trunk in '67 and '68. Come '69, the same could be bought over the counter, whereas @ $500 per set uninstalled they seemed wildly overpriced. Reviewing posts on something called the Camaro Research Group turned up a set of Bill Thomas constructed factory headers finished in a silvery blue, while I first wish to correct the routing of a few tubes before I fab. better header flanges and paint whatever I conjure. The flanges will start with a tracing of the basic shape on thick plastic, continue as I drill out the slots seen between the pipes, continue as I refine the shape of the edges of each, and finally, be thinned for sanding down the presumably inaccurate thickness of the sheet plastic employed. I typically find a good head-on shot of the flanges and size them to the scale I'm working with to simplify matters a little, then CA glue the image to whatever sheet stuff I opt to employ prior to any concerted slash and hack. All very tedious, while know they'll look a touch goofy given the alternator mount won't have much to support coming off the front of the driver's side exhaust header front as seen! ...black cad. was proving a difficult shade to find in a rattle can. This is Rustoleum Oiled Dark Bronze sourced from a Meynard's and conveniently sold in a humongous 'Lifetime Supply' size. Another near identical shade also sold there was used on the hinges, while mixing up finishes to suggest multiple parts suppliers is almost always good practice. Though not heartstoppingly interesting, I opened the ends of each horn with a Dremel in a rough fashion with the center surely drilled deepest, then inserted successive drops of CA glue to effectively burn the resultant surface to even matters out. It seems to work. Thanks for examining this post... Mike K. -
1:12 1969 Camaro Z/28 as seen in the August '69 issue of Car Life.
swede70 replied to swede70's topic in WIP: Model Cars
...and still more, The harmonic balancer has been reversed for position and thinned. Note that the pulleys and belt haven't been painted. Do see that an aluminum alternator pulley is taking form - something seen on the performance oriented Chevrolets being slightly deeper for cut and hence less likely to throw a fan belt at higher RPM's. Also seen is a breather tube and breather. The cross ram intake either had this port plugged, w/breather tube and fill cap, or with a proper breather. The Car Life test car has the breather topped tube, whereas the b&w image suggests some shade of gray was employed. The tube is just round stock, whereas the breather is a resin clone of something found on a 1:18th Lane '68 Shelby GT 500 KR with the center puddled in with additional material to fill a small divot present in the center. If anyone needs stock-appearing 1:12th oil breathers, contact me via IM. Moving on, the Delco-Moraine power brake booster chamber has been cleaned up for removal of the cast-in distribution block situated to the bottom right face of it as-tooled. As for a 'paint recipe' for gold cad., know that I painted first with Tamiya Bare Metal Silver, then dusted with Tamiya Gold from two feet distant, and finally I hit it with a rapid close-in shot of Tamiya Clear Blue to lend that gold cad. plated funkiness to the surface of it consistent with getting a bit of coating flow across the surface. Thanks for reading and for the positive feedback too. Mike K. ... the modified booster chamber. Restoring the contour beneath took work. Helping simplify matters is the fact that the JL8 4-wheel disc brakes (when factory fitted) does away with the proportioning valve situated directly below the master cylinder proper, whereas much more to come here. ...the top of the water pump has also been plugged. I didn't want anything strictly showing through on the back when hoses are fitted. The top of the two-piece carburetors are quietly resting in place sans glue just to roughly see how'll they'll look. ...a better view of the harmonic balancer is availed thus. The white will vanish when I finalize the pulley design and paint whatever I come up with. Thanks again... M.K. -
1:12 1969 Camaro Z/28 as seen in the August '69 issue of Car Life.
swede70 replied to swede70's topic in WIP: Model Cars
...an update then, Enough material was noticed on the fuel pump mounting flange to suggest that cutting it apart from the block would be feasible, while further doing such would help facilitate paintwork. Secondly, the gap beneath the oil filter cut free, also to facilitate paintwork was plugged and painted level to the bottom of the block mains girdle. It seems Revell/Monogram tooled the wrong harmonic balancer, while my reference material suggests that such should be thinner with a deeper pulley set just before it. To the extent that I am able, I'll attempt to correct matters. Tiny steps then... ...the oil filter seemed to rest too flat on the bottom of the block/mains girdle rail, hence I cut a small wafer of material to serve as a gasket of sorts. It seems to help even if it can be scarcely seen. ...more to facilitate paintwork, here the fuel pump has been cut free, painted and returned to the block. The seam in the center of the fuel pump is right, although the base needed work given it wasn't quite round enough. As the bottom of the fuel pump assembly is gold cad. plated, I decided to scrub it off and scratch build a replacement to paint off the assembly. A black wash of the center of the fan clutch was also done, although such is not visible here. Lastly, the harmonic balancer has since been pulled and narrowed for depth, with five holes partially drilled in on one side, two on the other. Thanks... Mike K. -
1:12 1969 Camaro Z/28 as seen in the August '69 issue of Car Life.
swede70 replied to swede70's topic in WIP: Model Cars
...another brief update, Discerned within the image below will be noticed a pair of drilled recesses on the front of the harmonic balancer (look in the shadow of the fan blade to the extreme left - hopefully you'll make them out), a more pronounced TDC 'slash' on the edge of the balancer brought into alignment for timing this mini mill, as well as holes drilled on the edge of the cylinder head facing the viewer. To my embarrassment it seems my harmonic balancer is installed backwards and is too thick for a Chevrolet 302. Matters to correct then... - Looking at the intake casting of the as-delivered Revell/Monogram part, I noticed that they had rendered the ends of the dual extended plenums more or less flat but for a small bump of material to accommodate the hardware coming through on the top. For examination of the part, enough material exists to sand and reshape matters without added too much material, hence I filed between the edges of each plenum end (where on either side a bolt comings through and holds the intake top in place), and then filed the top of each rectangular plenum so that I might introduce some round stock to replicate the lip facing up. Given I could sand the round stock flat from the top, using half-round or quarter-round plastic stock wasn't strictly required. The round stock was easier to control too, for is stuff is too delicate to cleanly add, what's the point? ...a temperature sensor port has been added to the manifold atop the coolant opening as seen. The rectangular plenum chambers (two then) have been reshaped, whereas a few drops of CA glue mixed with Microballoons was employed to add a little length to the edge of the plenum chambers where the hardware would route through to hold the top cover to the bottom casting given there wasn't sufficient material afforded on the stock kit here. The Winters foundry mark was scrubbed down a bit given it was too high and could be mistaken for cast-in hardware. This would be the hexagon bump seen on the first intake runner a bit right of center. ...backside and pretty much a repeat of the front. Some material was removed for distributor clearance as per stock. ...viewed upside down. The white lip constitutes the added material, whereas the small gap was eventually made up with CA glue and Microballoons again. I opted to paint the entire assembly upside down and heavily too so as to blend everything done in paint. Thanks for reading and thanks for the good cheer expressed. Mike K. -
...indeed, Fred Cady did a few all but ignored 1:18th sheets. I modified a Welly/GMP '71-season Geo. Follmer BOSS 302 Trans Am Mustang into a '70 Parnelli Jones Mid-Ohio winner employing the best bits of Cady's '70 BOSS 302 race sheet in 1:18th. Fred has formally retired, although Model Empire as well as the usual eBay suspects still stock his silk-screened sheets in quantity. ...the wheels are resin Minilites based on a modified GMP pattern done by me. Thanks... Mike K.
-
Greetings again, Though slated to vanish from the Internet come August 2015, something called the Diecast Pub maintains (for the moment!) a list of 1:18th parts sources that may be of interest. http://diecast-pub.com/community/index.php?/topic/794-list-of-websites-to-get-118-parts-for-modding/ I do some parts myself in 1:18th in terms of parts, although (and very predictably) the slate 'o stuff I do closely reflects my own interests. I'm somewhat reluctant to sell to people who collect $150 pre-assembled and pre-finished models matched to an underdeveloped plastic kit skill set (sales to such people equal trouble I fear), but otherwise I can be persuaded to do copies of that which I do. A great many diecast collectors are reluctant to modify their models convinced that they'll surely depreciate! So few do (as a percentage of all produced) that oftentimes I think the topic is moot, whereas I just want to create what I want for whatever tool I embrace. ...anyways - a samping then. Just scroll down to read what I've written below each photo image to understand what is explained in brief: ...this would be a '70 model Chrysler Rallye wheel. Hwy. 61 didn't really excel in terms of what they fitted to their many E-Body releases in this regard, hence I tried to do better for combining parts across diecast releases. ...what is seen is a Hwy. 61 wheel center stamping combined to wheel center/lug trim surround that was cut out of a separate wheel to ensure the perimeter edge would be visible after painting it. I thought the Hwy. 61 center tip too shallow, so this was built up and further, I added the tip contour sourced from an ancient and awful ERTL Challenger T/A release in 1:18th. All the associated other stuff in the photo constitutes my paint mask, whereas I used dealership-sourced Chrysler muscle car argent cap paint. Some wet urethane was used for the brass rod lug masks. ...post-paint, post-masking. Again, dealership-sourced Chrysler musclecar argent wheel paint was employed, this time for the center stampings. All seen is made using hand poured two-part resin into urethane molds. I further have a plastic vacuum plater nearby, hence the center bits received the treatment before being painted. ...backside slots opened up to disguise the thickness of what I use. ...Hwy. 61 mounts reused to render reassembly brainless. ...GMP '70 Roadrunner trim rings cast in resin and then chromed. GMP never chromed them, hence I felt the need to do so. ...ready to go. The trim rings are a bit narrow of diameter to use with the Hwy. 61 tires, although masking the same to paint the outside edge blending into each respective tire black helps matters immensely. ...installed then on a B5 Blue 'Cuda with a blue interior that was swapped in from another model. The track is increased a bit (desired this), whereas the model looks far better I do think. One of my molds has a tip that is too long - see the left rear in particular. Seems I'll have to fix that! Chrysler Corp. Shaker scoop silver (a flat pearlescent shade from what I can make out) was further employed here. Fishing line hood pin lanyards are to come. Thanks... Mike K.
-
Really beautiful and certainly an inspiration to so-plunge in relation to the larger scales. Certainly worthy of many a repeated examination. Kind thanks for the sharing of your lovely work. Mike K.
-
Beautiful builds and very inspirational to us all. All I can do is work on my own and hope that such will compare. Thanks for sharing... Mike K.
-
1/12 '69 Camaro Z/28 (New Foose Kit) BMF Done 6/2
swede70 replied to ImpalaBoy's topic in WIP: Model Cars
Greetings, Maybe relating what I'm planning will indeed kick start your efforts to complete here. If funds allow, maybe just quickly assembly a hack chassis painted all in black to put your expertly finished shell on wheels, and then in a low key and low stress sense attack a duplicate chassis for buying another kit? As many people tell me, it's supposed to be fun. Perhaps I'm just revealing more of my own makeup than I am yours, but all the same we're all extremely impressed with the work you did on the stripes in particular. I don't know - it just seems that I'm also given to making things so complex and literal that I dare not mate some very nice assembly with something I fear won't match the quality of finish or fabrication seen elsewhere. In short, my Daytona Yellow Z/28 will be done almost box stock but for wheels and tires. A second Olympic Gold Z/28 might be done with thing simply not on the planning cards for the simpler predecessor in the form of things most of us could identify as matters crying out for addition on the very good 1:12 Revell/Monogram 1969 Camaro tool. Kind regards... Mike K. -
Very beautiful!
-
Greetings, In the larger scales one obviously must be creative. Here I'll try to articulate how I do it, whereas in practice it just becomes an outlook when viewing materials online and at shows. I mostly work on 1:18th period road racing conversions, hence maybe I can lend value to the board for so replying. Mostly I'm forced to do my own graphics or rely on a firm known as Patto's Place situated in Australia. Slixx has some 1:18th sheets in a drag racing vein, whereas I like their 1:25th vintage drag racing tire sheet given that some of the larger slicks have lettering that can work on 1:18th topics if cut up and spaced appropriately. The R/C hobby affords some things, but given my vintage focus their isn't that much overlap. I shop avidly for items registered too large on the usual 1:25th waterslide sheets (usually in person at regional scale hobby shows), while I also collect 1:1 period vinyl decals in the hope that I might scan and reproduce what I require either for sharing data with someone more technically capable. Sometimes I'll go 'low tech' and simply printing such on the highest quality paper I can find. Rough prototypes of this and that factory-produced diecast model seen online are often decorated such, hence 'no shame in my game' so to speak. Exterior make and model identification is typically hard. Some Fred Cady 1:25th silk screened waterslide sheets bear such markings and are available for little even given the fact that he is now retired, whereas for artful reemployment of where this or that marking is placed and how large such has been rendered, some modest hope exists. If your budget will stretch, consider ordering all relevant 1:25th (presuming such is all that can be found) plastic kit photoetch kits to determine what might be recycled and added to your project. As an example, the interior door panel identification on their 1:18th 1970-71 Hwy. 61 'Cuda range is abysmal, being halfheartedly reproduced with a decal displaying prominent carrier film. For analysis of a 1:25th photo etch kit of the same topic, it was noticed that the Shaker scoop identification (provided multiple times in the form of 'Hemicuda', ' 'Cuda 340', 'Cuda 440+6, etc.) provided on the product was correct for scale on the door panels in 1:18th and cost effective too. Prior to examining the photo etch sheet in question, I thought only the single tail panel identification would work, and yet maybe four pairs of markings could be had from each sheet. In short, without application and examination of the goods, it's impossible to strictly tell what's on offer. More on the conservation front, there are times too that I'll do almost anything to mask a tampo print to do paintwork given how tough it is to find replacement stuff. I recently picked up some odd semi-gloss metallic oyster/pearl spray paint to refinish a Hemi 'Cuda Shaker hood scoop, and discretely taping out the 'Hemicuda' i.d. seemed the only way to go. Further, some time ago I did my best to respray the top surfaces of a Yat Ming/Road Legends 1970 Rebel Machine in some color-matched blue, while taping out the 'REBEL' identification done as a tampo print was my only hope. Moving on, it's proven good practice to visit multiple boards in search of build threads consistent with your interests. Some builders and modifiers have deep pockets and are incredibly capable in terms of what they not only can do on a skills basis, but what hardware backs their efforts. Some have very large script and font libraries as well as ALPS printers and the like to supply what they require, whereas duplicates can sometimes be had when a build thread is being actively elaborated upon and the bloke is smiling his broadest if the reader understands my meaning. Most serious builders and modifiers won't prioritize something they have little direct interest in, hence sending a flattering note with a discrete inquiry as to whether duplicates of this or that can be had (presumably for a fee) when a project is 'hot' can yield nice results and be the stuff of friendship formation too! Keep careful notes on all that you see, for in the end it may be you who learns the technique, invests in the hardware, and eventually produces the goods. As older builders and suppliers retire or withdraw from the hobby, some of us must step up to provide what many might treasure. Best of luck and be adaptable as you dare. I hope this reply helps someone! Mike K.
-
1:12 1969 Camaro Z/28 as seen in the August '69 issue of Car Life.
swede70 replied to swede70's topic in WIP: Model Cars
...a small succession of ideas then: My first experiment with gel pens is seen above. I noticed that when viewing a '69 Camaro close-in that the tailights are quite dark nearest the tail panel. Hoping to 'get the toy' out of the scale replica, I thought it might be a good idea to try to mask off the edge of each taillight lense casting from the outside to effectively reproduce this look. I only noticed this detail on a '69 Camaro inspected this past weekend as I write this, but it seemed a sound idea. I hope to add headlamp bulbs too for as nice as the headlamp assemblies were designed they look a bit dead in the center. Material to add then... ...not every Z/28 had full exterior chrome decollage. The Car Life '69 Z/28 in particular has no drip rail chrome or wheel arch chrome trim for that matter; i.e. something like a base Nova or maybe a C.O.P.O. then. I really didn't want to bother sanding the raised wheel arch trim down on the body, hence I cheated a bit and simply radiused each opening until they effectively disappeared. The contour hardly changed, hence I think I got away with it. ...the crossram lid provided did not have the correct carburetor linkage clearance 'pockets' across the top - hence I tried to add them. Just free hand etching, and so not perfect this. Maybe notice that I opted to pour a considerable quantity of Tamiya Transluscent Blue into my Tamiya Chrome Silver in an attempt to mimic Silver Cadium Dichromate for the attachment hardware. Silver with a touch of blue then; i.e. subtle and nice to have. ...the model as it come has a 'steel' hood without the underhood ducting - although we get the fresh air seal beneath. I suppose one could just fabricate the base of the filter as seen here (a bit oversized - yes), try variants in the form of a taller Purolater filter element (a common period mod.), or introduce wafers of material to replicate the top and bottom of the filter. Sort of like the large Liberty musclecar engines, painting the filter element ivory works better than employing off white. ...the base of the as-delivered kit fresh air seal is a mess of ejector pin marks and holes in uncomfortable places. Here I cheated and fabricated a fill panel to overlay what lurks beneath. ...riding a bit high, although I could substitute thinner material to bring it all down a bit. Floquil Grimy Black was used on the seal, although efforts seen online in this regard look very nice indeed and in the main. Thanks for reading... Mike K. -
1:12 1969 Camaro Z/28 as seen in the August '69 issue of Car Life.
swede70 replied to swede70's topic in WIP: Model Cars
More then... Though I don't own a hobby lathe, happily I was able to lend time on that owned by a friend. Here will be seen the back half of my Rally wheel taking shape. A '67 Corvette wheel has been scrubbed of the cooling fins and recycled, while two of the very handy '57 Chevrolet wide whitewall tire inserts have been cut apart to yield two spacers to more or less afford me a zero offset wheel. The 'center stamping' is simply the base of the standard '69 Camaro wheel sanded down along the perimeter to 'finish' the shape of what was already there in terms of material. O.K. - look down! ...looking fairly good, with the cleaned up item seen right. ...where and how to get the 'spacer' material. Look for chewed up glue bombs to source same. ...one spacer atop the center stamping and one situated below. ...back side of wheel less center, to speak little of hub and brake detail to come. ...still requiring finish work to thin the five individual slots consistent with disguising the material to appear a bit thinner, but largely good to go. All items to be cast in resin and subsequently vacuum plated if and as required. Thanks... Mike K. -
1:12 1969 Camaro Z/28 as seen in the August '69 issue of Car Life.
swede70 replied to swede70's topic in WIP: Model Cars
More haphazard updates all in a row... I wished to create a soft mask between the bellhousing and the engine block proper to replicate the factory finish, hence what is seen below is what I came up with. Cheap and simple, and no airbrush is required. I employed a pair of cocktail sauce containers and connected them end to end, whereas one side was opened to permit the placement of the transmission more or less inside with a single toothpick employed to center the assembly prior to painting. It seems to have worked well enough, so perhaps something for the reader to try. Thanks... ...the setup post effort. The plastic rod is positioned simply to demonstrate that the bottom has been opened to allow the engine/transmission assembly to be squeezed into it. Note the strange and severely tapered oil filter has been cut free here and straightened top to bottom with a modest additional lip added to the bottom to good measure. For later placing the AC oil filter decal in place, it seems the shape of the decal is reliant on the filter being 'straightened up' for sanding if the image is going to line up from top to bottom. The instructions call out that the filter ought to be painted blue, whereas for my reference it is revealed that white is the correct finish. I used Tamiya Matte White and can relate that the finish is a very good match for the white employed on the decal provided; i.e. one can't sense that Revell/Monogram used anything but a clear decal with the AC markings. If my meaning is muddled, know that the pair of discrete double lines in blue on the decal won't line up where they meet up on the backside if you don't reshape the filter entire. Given the AC logo wouldn't by chance be perfectly positioned to scream out it's identification on an actual vehicle, I'll align the same a bit to the right or left. I should relate that the bottom of the block nearest the oil filter position should be patched and trued up before applying paint, although I'll have to fabricate something and blend it in post-paint for my oversight of such here. Be alert and do it better than I! M.K.