swede70
-
Posts
727 -
Joined
-
Last visited
Content Type
Profiles
Forums
Events
Gallery
Everything posted by swede70
-
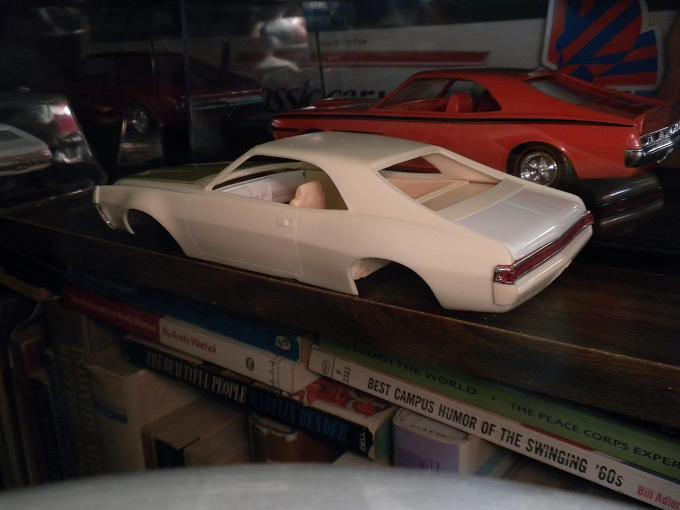
1968 RKE/JRT SCCA Trans Am Javelin
swede70 replied to swede70's topic in WIP: Other Racing: Road Racing, Land Speed Racers
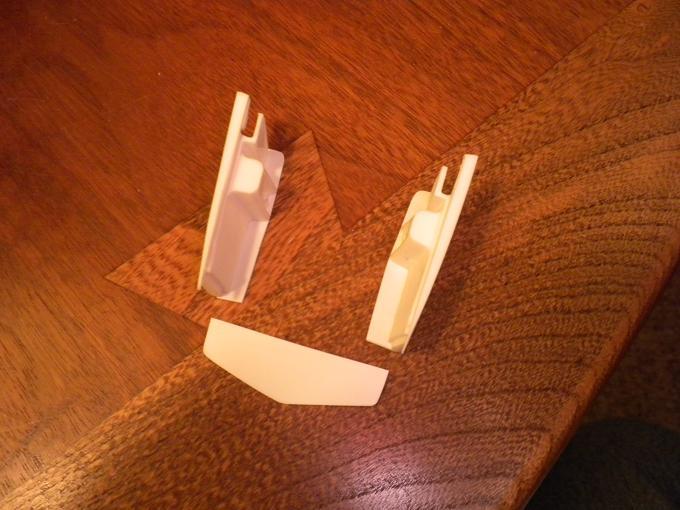
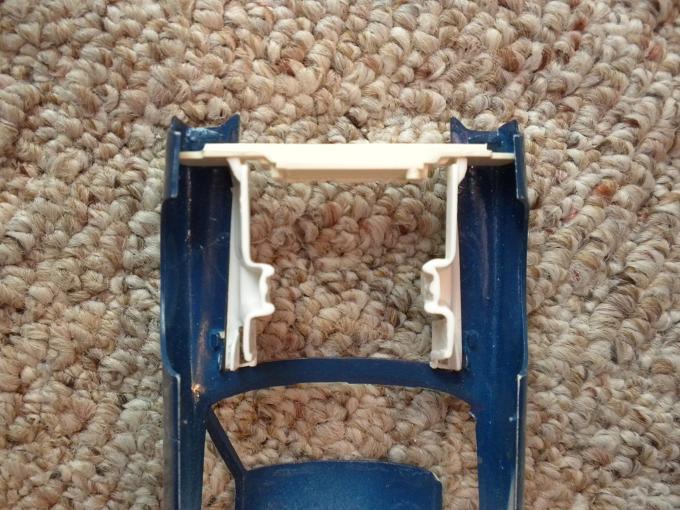
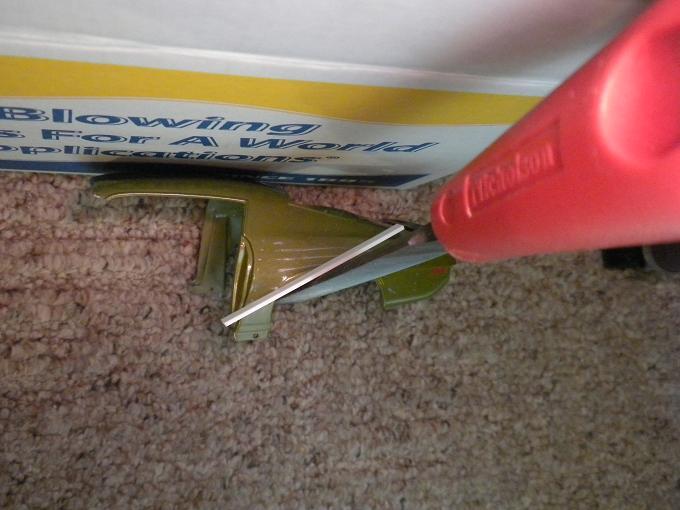
Thanks for the kind interest... Indeed the struggle to clarify the identity of American Motor's products and product range continues, while more than few have fallen victim to those who would insensitively modify them - or gasp - toss many a good subassembly aside to fit an example with LS power to 'make a real car of it'. Whatever else I might be, I would never do such a thing... Here in SE Michigan happily we have a pretty vibrant AMC scene with the old headquarters as well as the later American Center in nearby Southfield, MI. featuring as local landmarks. Each fall a AMC-themed gathering known as the Greenmead show is hosted by a local marque club, while Facebook AMC groups as well as Vintage SCCA Trans-Am groups flesh out my intake of scenes to tap outside of independent application to inform what I attempt in-scale. If matters are proceeding swimmingly, on occasion contact might be established with those with some relation to the actual topic; i.e people involved in-period, owners past and present, as well as restoration and service personnel of surviving vehicles. While the actual automobiles are scarce, networking with those so-aligned and intrigued is better than it was in the past. Digital archive access in particular has never been so wide, while this teamed to material collection consistent with answering questions that are raised helps to tie in much that otherwise was suspended in air in a research sense. With all said and done, projects such as these I'd typically avoid can be brought into focus and labored upon with reasoned hope of coming up with something reasonably sound bordering on accurate for spec. and finishes employed. Thanks... - Seen below will be some additional inner fender/inner wing work consistent with adding a top layer to front subframe rails affixed as they are to the base of my SC/Rambler panels. The first photo telegraphs how matters appear from the top apart and away from the model, the second image depicts how the bottom ledge was trimmed close to shape of the inside of each suspension turret, while the third and final image relates how things appear when assembled. Surely it's better versus looking into the half-open frame rails which suggested hack work. And lastly, an adjustment has been made to the fill panel atop the grille mating with the radiator support so that it'll not strictly dip where it meets the support proper. Thanks for reviewing this project update... Mike K./Swede70
-
Thanks for your effort and insight shared on my behalf. Some period shots of the car reveal quite a bit of oil residue spread about under hood, while with a strictly sealed system incorporating a vent system with a stand alone 'puke tank' as was (almost) standard in the series, I doubt this would have been an issue. I'll have to cut apart my intake consistent with clearing space between and beneath the intake runners and likely scratch build flanges, but if the design of the breathers is distinct enough and chrome-plated besides, then maybe it's worth the time and trouble to reproduce the detail. I appreciate the help, while again it seems how it is I write draws in the trolls... Mike K./Swede70
-
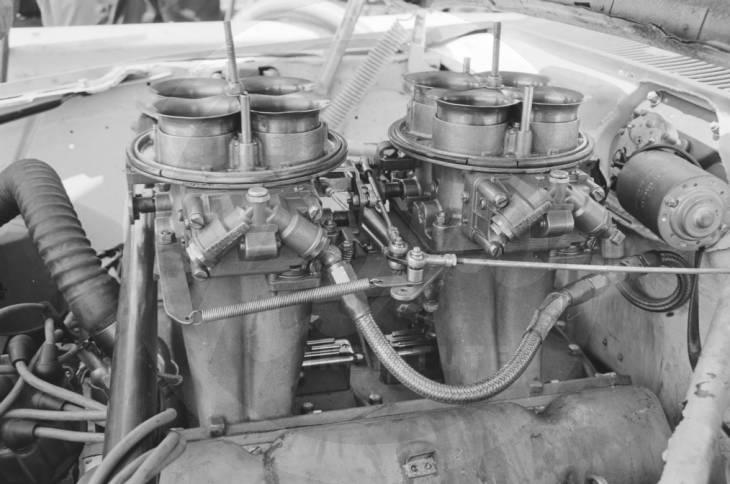
Greetings and thanks for the interest expressed in questions posed in the past... Isolating assemblies and subassemblies for a project, does anyone recognize the oil breathers in use on this particular topic, and do they exist on a tool I can reach for? I'm thinking that they might be something done by Mickey Thompson, and that some drag racing or land speed record car in 1:25th would offer up such. My knowledge of period speed equipment is limited, hence the guiding influence of others is sought! O.K. - look not so much at the valve covers or near the water inlet for the breathers, but rather atop the intake across the lifter valley to see two of the breathers of which I speak. Whaddya think? The image was captured by Karl Ludvigsen at Bridgehampton, NY in '69, the topic a same-year RKE/JRT Trans-Am Javelin again... Kind thanks for reading this post... Mike K./Swede70
-
1968 RKE/JRT SCCA Trans Am Javelin
swede70 replied to swede70's topic in WIP: Other Racing: Road Racing, Land Speed Racers
Sorry - almost overkill this... After a bit of trimming near the firewall then. I'll try to do the frame rail overlays/plugs next to help clean things up. Thanks... Mike K./Swede70
-
1968 RKE/JRT SCCA Trans Am Javelin
swede70 replied to swede70's topic in WIP: Other Racing: Road Racing, Land Speed Racers
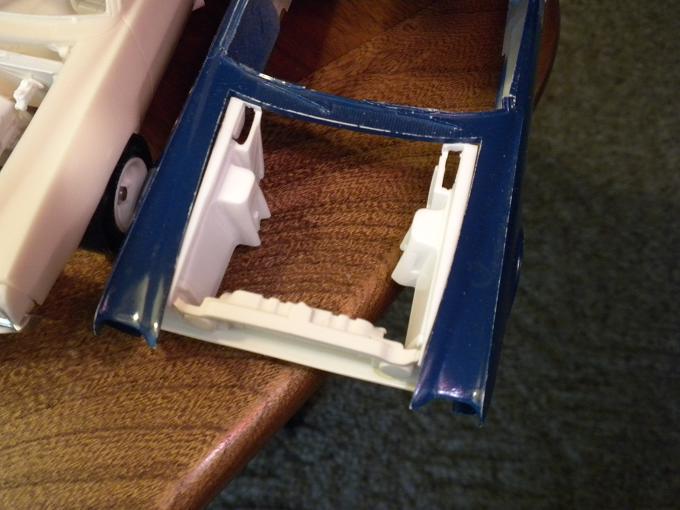
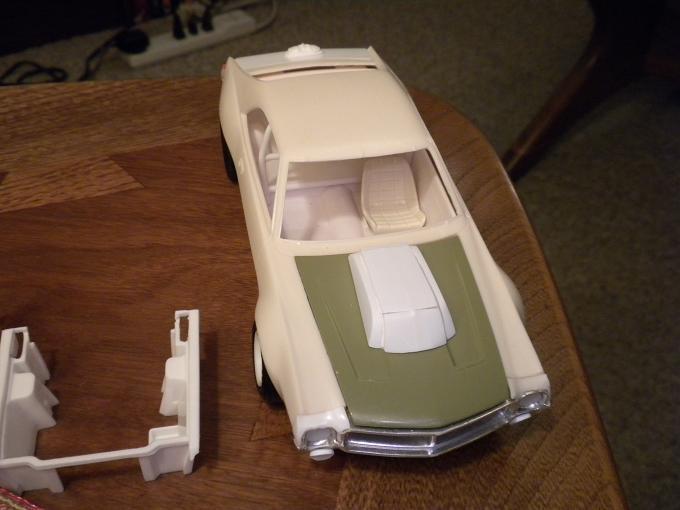
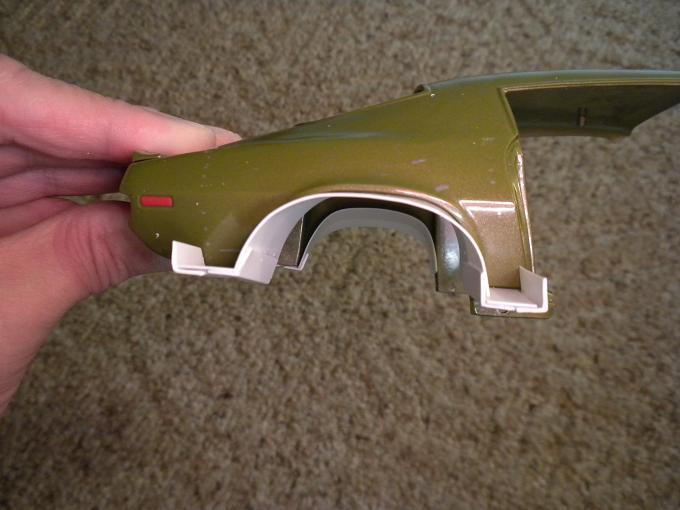
Thanks for the kind comments and notice... Seen are some initial steps to transplant in Jo-Han SC/Rambler inner wings/fenders. I've failed at this before for cutting things too short, but here I've opted to save as much length from the Rambler parts even to the point of blending where both the radiator support and firewall connect with the panels to be recycled. Notice too I've saved material which stretches forward of the radiator support to better suggest fender stamping detail and to basically have something that will hook positively into place. Work to flesh out and seal the front subframe rails constitutes work to come. Moving along, I'm thinking of doing away with the Rambler hood hinge pockets given they serve no constructive purpose, although it was neat to notice that I could make everything hang together in-place without glue on what I'll term my engineering hack. The last image depicts the '69 sans any work to really integrate the new additions to the firewall profile proper, hence nothing really sits down as it ought. Thanks... ...what wiring harness detail I could remove I did, while the battery mount was cut off entire and matters cleaned up to the degree I could. Latitude exists to file down the tops and reshape them consistent with ensuring the hood fits level and well. ...note the suspension turrets align with the center of each wheel arch. ...clean from below too, without massive work demanded to clean things up underneath each fender top. Yes - I soon reshaped the right suspension turret wall seen forward so that it would match the one on the left... ...with a new seal forward of the radiator support, and the inner fenders/wings quickly set in place sans fine fit work - hence it sticks up in the back. Thanks... Mike K./Swede70
-
Fishing line for use as pin stripe material?
swede70 replied to swede70's topic in Model Building Questions and Answers
Thanks everyone for looking in and contributing to a solution to what I hope to achieve. I really appreciate it and will be diligent in following up leads availed here. Again - thank you... Mike K./Swede70 -
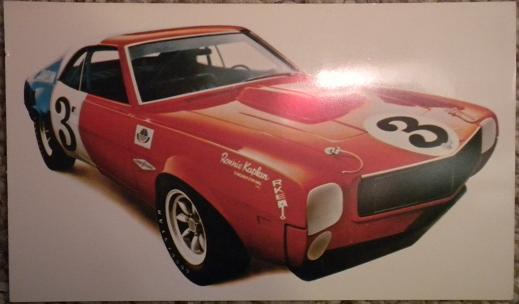
Greetings, Pondering how to do what would be exceedingly thin pin stripes bordering the alternating red/white/blue livery seen on '68 and '68 Ronnie Kaplan Engineering Trans-Am Javelins, has anyone tried color-keyed fishing line to reproduce something like this? I simply need a straight line not quite on the border of each colored element, while perhaps this is the best way to get there? Efforts to turn up decal sheets with straight pinstripes of various widths for tapping Japanese sources almost got me what was required, but now I'm thinking another path will need to be explored... Look closely at the photo and one can make out the blue pinstripe just before the red painted rear third of the car comes into view. Were we looking at the transition to the front third in blue, a pinstripe would be seen again, this time in red. Advice or ideas how to lay down or control such would be appreciated. Kind thanks for reading this post.... Mike K./Swede70
-
1968 RKE/JRT SCCA Trans Am Javelin
swede70 replied to swede70's topic in WIP: Other Racing: Road Racing, Land Speed Racers
Greetings and thanks for the kind notice... Some indication of how I'll do the '69-specific rear flares. Traced four times over per-side, I'll carve out the resultant pucks from below to match the wheel opening contour, then sculpt the exterior profile before matching the side profile shape to the body itself. Seen is the remains of a junked Flintstone flared '70 Penske Javelin shell which will be carved out to accommodate whatever I work up. If I fail in my efforts, the folly of my attempt will be restricted to what is seen versus risking my evolving work. Thanks... Mike K./Swede70
-
1968 RKE/JRT SCCA Trans Am Javelin
swede70 replied to swede70's topic in WIP: Other Racing: Road Racing, Land Speed Racers
In the realm of the SC/Rambler, what would you need? I tend to go after the chassis - especially the rear suspension entire, etc. I'll 'double up' on the rear shock mounts to do a staggered installation on Javelin race projects, etc., while the rare funny car releases have a Model 20 rear end that can be substituted in versus the Dana iteration to help things again. In a manner of speaking, I'm trying to keep the model as 'Jo-Han' specific as possible in terms of tools and parts reached for. Oh - and the SC/Rambler cylinder heads are quite a bit better than the usual incorrect earlier Jo-Han AMC V8 issue even if the valve covers were updated and look the business... On another message board I responded to an SC/Rambler inquiry and sent along most of my Rambler-specific spares, while these days no Jo-Han parts or subassemblies however bad are strictly thrown away. At present I'm worked with glue burned and enamel paint-encrusted junk to square away what will emerge as reasoned inner fender/suspension turret detail better than the usual Rebel Machine implant - at least from the topside. I want something I can reproduce and spread across all my intended '68-'72 Trans-Am Javelin builds that isn't too reliant on rare spares. Thanks... Mike K./Swede70 -
1968 RKE/JRT SCCA Trans Am Javelin
swede70 replied to swede70's topic in WIP: Other Racing: Road Racing, Land Speed Racers
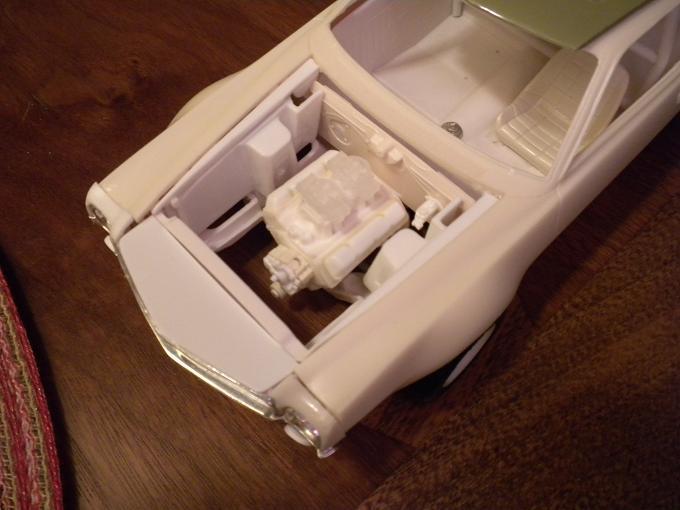
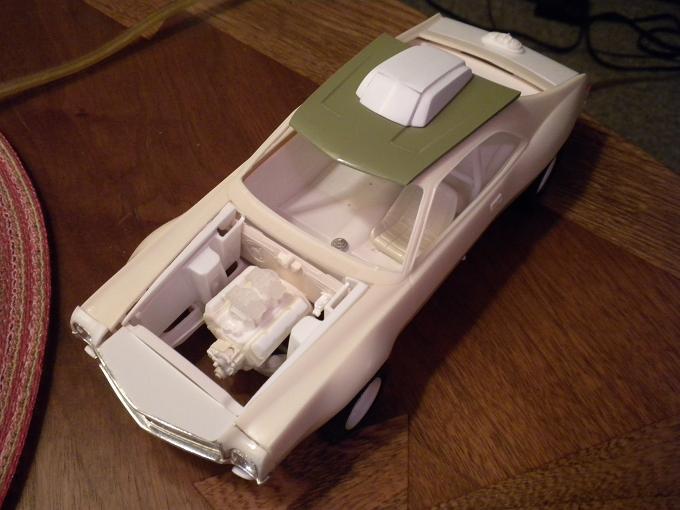
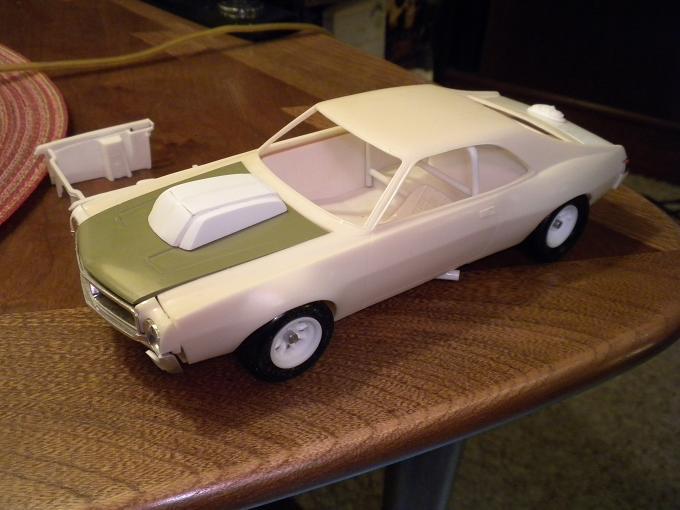
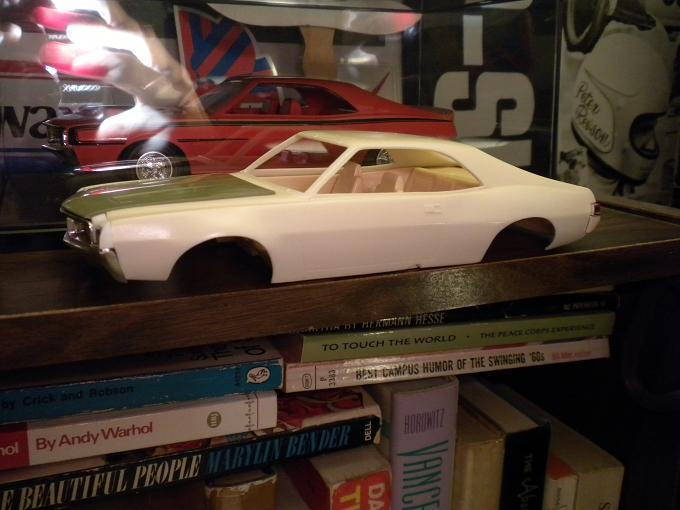
...and just a indication of the engine and underhood work intended to be performed, Seen is an AMT Gremlin Pro Stock tunnel ram with difficult to discern 3D-printed Holley 4500 carburetors, cut out front wheel arch shrouds, and a Jo-Han SC/Rambler shell waiting to go under the knife to help matters along. Thanks... Mike K./Swede70
-
1968 RKE/JRT SCCA Trans Am Javelin
swede70 replied to swede70's topic in WIP: Other Racing: Road Racing, Land Speed Racers
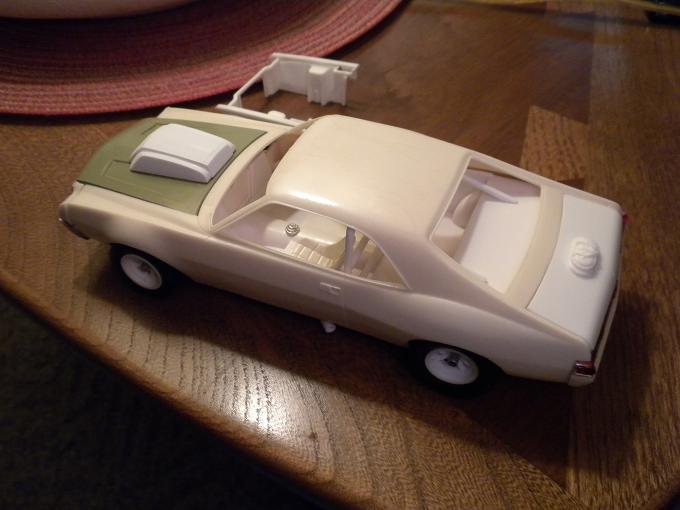
Greetings, Needing a '69 RKE/JRT hood to clear the twin Holley 4500's beneath the blister, I was forced to make my own. Seen is a five-panel assemblage consistent with creating what was needed. It will have to be shrunk a bit for sanding, but better this versus having to add material. Notice too that the project is up on wheels. Thanks... Mike K./Swede70
-
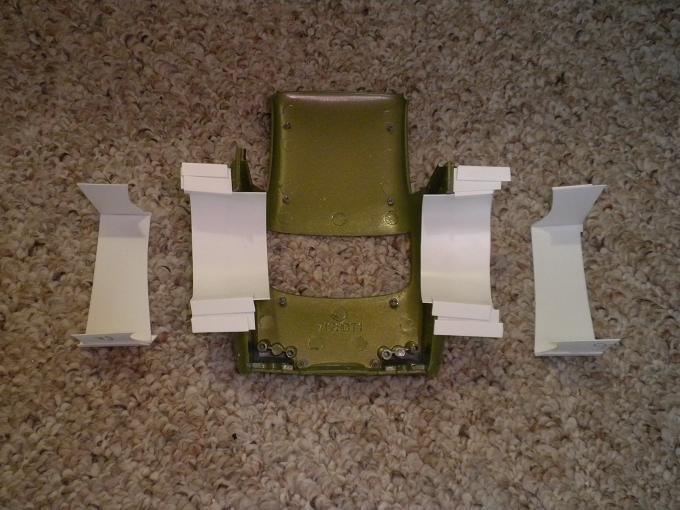
Greetings, Just some further fabrication of the rear wheel arch resin dams, with care taken to keep all the joins and glue on the outside. I hope the fabrication of the walls for these proves the most tedious aspect of creating what I want. The bottom borders for the front wheel arches stands to be done next. Thanks... Mike K./Swede70
-
Thanks for the kind input... Oh goodness - I too have Audi Fox tales to tell, but rather in the iteration of the later Brazilian-made VW Fox which came from the same '72-'73 Audi 80 gene pool. Such a fragile front suspension with service items having to be replaced with mind bending regularity; i.e. strut bearings, brake pads, CV joints, etc. Heavy steering, although it shifted nicely given the atypical north to south engine and transaxle installation. I had two, while the styling (such as it was) suggested a self-propelled collapsible trailer that might go forwards or backwards at a moment's notice much like an armored car. Wildlife stood no chance against that profile either; i.e. anything unfortunate enough to be in my path would soon be rendered dead. I guess I was intent on having almost no vehicular fun for a period of years given I put 200K on each in succession. Oh - and did I mention the time resident skateboarders caved in the hood of my first example given it appeared to be a fetching hard-edged raised platform to slide across? True story this... And just on a related point, along with typing in 'Audi 80' as a diecast search term (excepting maybe a 1:43rd dealer promo from Schuco - perhaps?), I've found that some semi-promotional pieces can be turned up for chasing down items from VW do Brasil. Even just typing in 'VW diecast Brazil' will unearth some fun oddities otherwise lost within the ocean of eBay listings harboring such, while as can be seen, I now have my VW Fox shrine to worship at. This and repeated viewing of the film 'Blame it on Rio' which is aswim with Brazilian-made VW's is the secret of my enviably even temperament. Thanks... Mike K./Swede70
-
Excellent. The closest I came to experiencing a CS was to test drive a car that was listed for sale locally some years back. It was a '73 Bavaria in Ceylon Gold with a 4-speed, lost in you will in the back lot of a new car dealership. I remember driving in traffic and being side-by-side with other people driving contemporary iterations of the marque and wondering why on earth didn't they take notice of this rare car! Oh, if only I owned a Zeppelin hanger to buy and safeguard all of the on-edge and too frequently unloved old BMW's I've seen. How can one fall out of love with such, although frequently restoration costs exceed value, effectively undercutting the prospect of doing as much as we'd wish. It's nice to read that a Bavaria will be saved, while note that the Fjord Blue model seen in the stacks is a sealed resin 1:18 Best of Show (BoS) release and about the only thing going if one much have such. They've released a '68 2500 sedan in this hue as well as Ceylon Gold, while in time we'll likely get visually indistinguishable 2800's in different colors. I got this example as something bouncing around Hong Kong likely as an early sample for a bit less than $100 w/$24.95 shipping, although they go for more now. Everything is just so nicely detailed on the older BMW's; i.e. remove this or that and one has a piece of mechanical artwork ready to inspect. I remember jewel-like four-piston front calipers, a carefully laid out wiring harness underhood, plastic caps on the back of machine screws also found underhood lest one catch a wrist on such, etc. A festival of mechanical noises too with whirling this, humming that. Fun too to make out all the suppliers involved given their identities weren't strictly played down looking across the car; i.e. Bosch, VDO, Hirsh, Blaupunkt, BOGE, etc. Even the owner's manual was an experience in itself; i.e. the assumption was that you'd service it as-new and effectively own it forevermore. It was just wonderful. The half-hearted effort to federalize my '02 was charming in itself. Front indicators not visible from the straight on? No problem - we'll bulge out the indicators and add internal reflectors mounted just-so. The controls and gauges bore the original German abbreviations for their functions, while consistent with most foreign cars of the period, to operate one was to literally absorb the values and sensibilities of not only the exterior trappings of the make in terms of styling, but to literally live the accretion of judgments and decisions that culminated in automobile one was operating given they couldn't be hidden. Gosh - it was anything but a thrice-boiled world car rendered anonymous for purposes of marketing it anywhere. I miss it dearly, and hope I might acquire another given it was really so nice. Thanks... Mike K./Swede70
-
1968 RKE/JRT SCCA Trans Am Javelin
swede70 replied to swede70's topic in WIP: Other Racing: Road Racing, Land Speed Racers
Greetings, A thread scraped from the bottom of the sea this - but a new development! I'd wanted to gather another Jimmy Flintstone flared resin shell of the '70 Penske Trans-Am Javelin harboring the intent of backdating an example to create a matching '69 Ronnie Kaplan/Javelin Racing Team entry parallel to my '68 effort. Happily I was able to purchase a $15 shell in recent days, and seen are a few photos consistent with telegraphing modest work performed to come up with the visual rudiments of the thing. Bubble flares would be needed for the back, while the hood bubble would likewise need to be fabricated from scratch. Nevertheless, not hateful as the basis of something: ...the '69 postcard image of a RKE/JRT team car looking into the new season. Soon the flush headlamp fill panels would be disallowed and vanish from the racers. ...seen is the '70 Flintstone shell with new '69 AMX front fender end caps, '71 Trans-Am Javelin headlamp fill panels, a '69 annual kit bumper/grille surround/grille assembly, with further work hidden towards the back. The interior is just a stock '69 annual release part - identifiable from a '68 for having headrests. Some dimensional weirdness is noticeable around the trim end caps, although I hope I can bring the irregularities discerned under control. Mostly the shell is about those nice front flares as well as the discreet and nicely captured panel separation detail seen atop each fender toward the base of the windscreen. For a '69-season project, the rear quarter panels will need work. Hey, it's just me forcing my imperative upon an otherwise fine resin casting intended to create a terrific '70-season rendition. ...not bad at all in profile. The rear quarter panel end cap trim has been carved out to allow fitment of a '69 AMX tail light cluster which itself has been cut free of the '69 annual kit issue bumper given it must be painted body color. Thankfully the 'Javelin' script tail light insert has recently been reproduced, otherwise I'd be toast in this regard. Doing the hood bubble to accommodate the twin Holley Dominator installation will be tedious, but hopefully rewarding. I'm happy to have many photos of it to guide future efforts. Not super obvious for work performed here, but the flared '70 Penske Trans-Am resin shell done by Jimmy Flintstone features the Donohue ducktail spoiler cast as one with the bodyshell, unlike the period kit issue where said spoiler was done as a separate part. For 99% of humanity this would be great, but here it had to be cut out, a new deck lid substituted in, and the quarter panel end caps reshaped to suggest nothing is amiss topside. Thanks... Mike K./Swede70
-
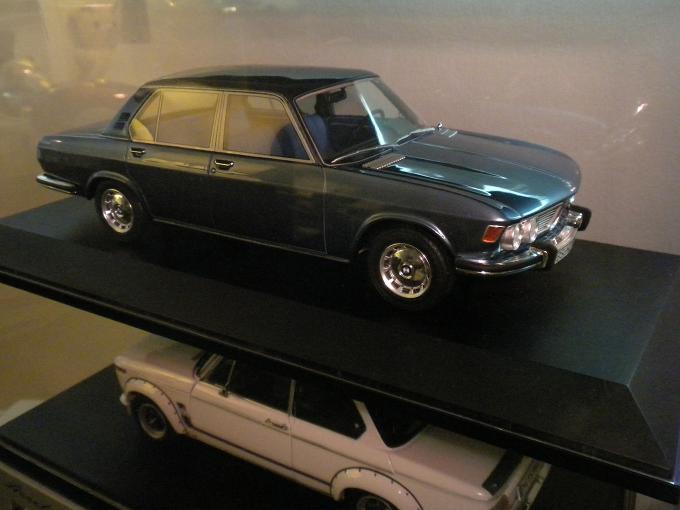
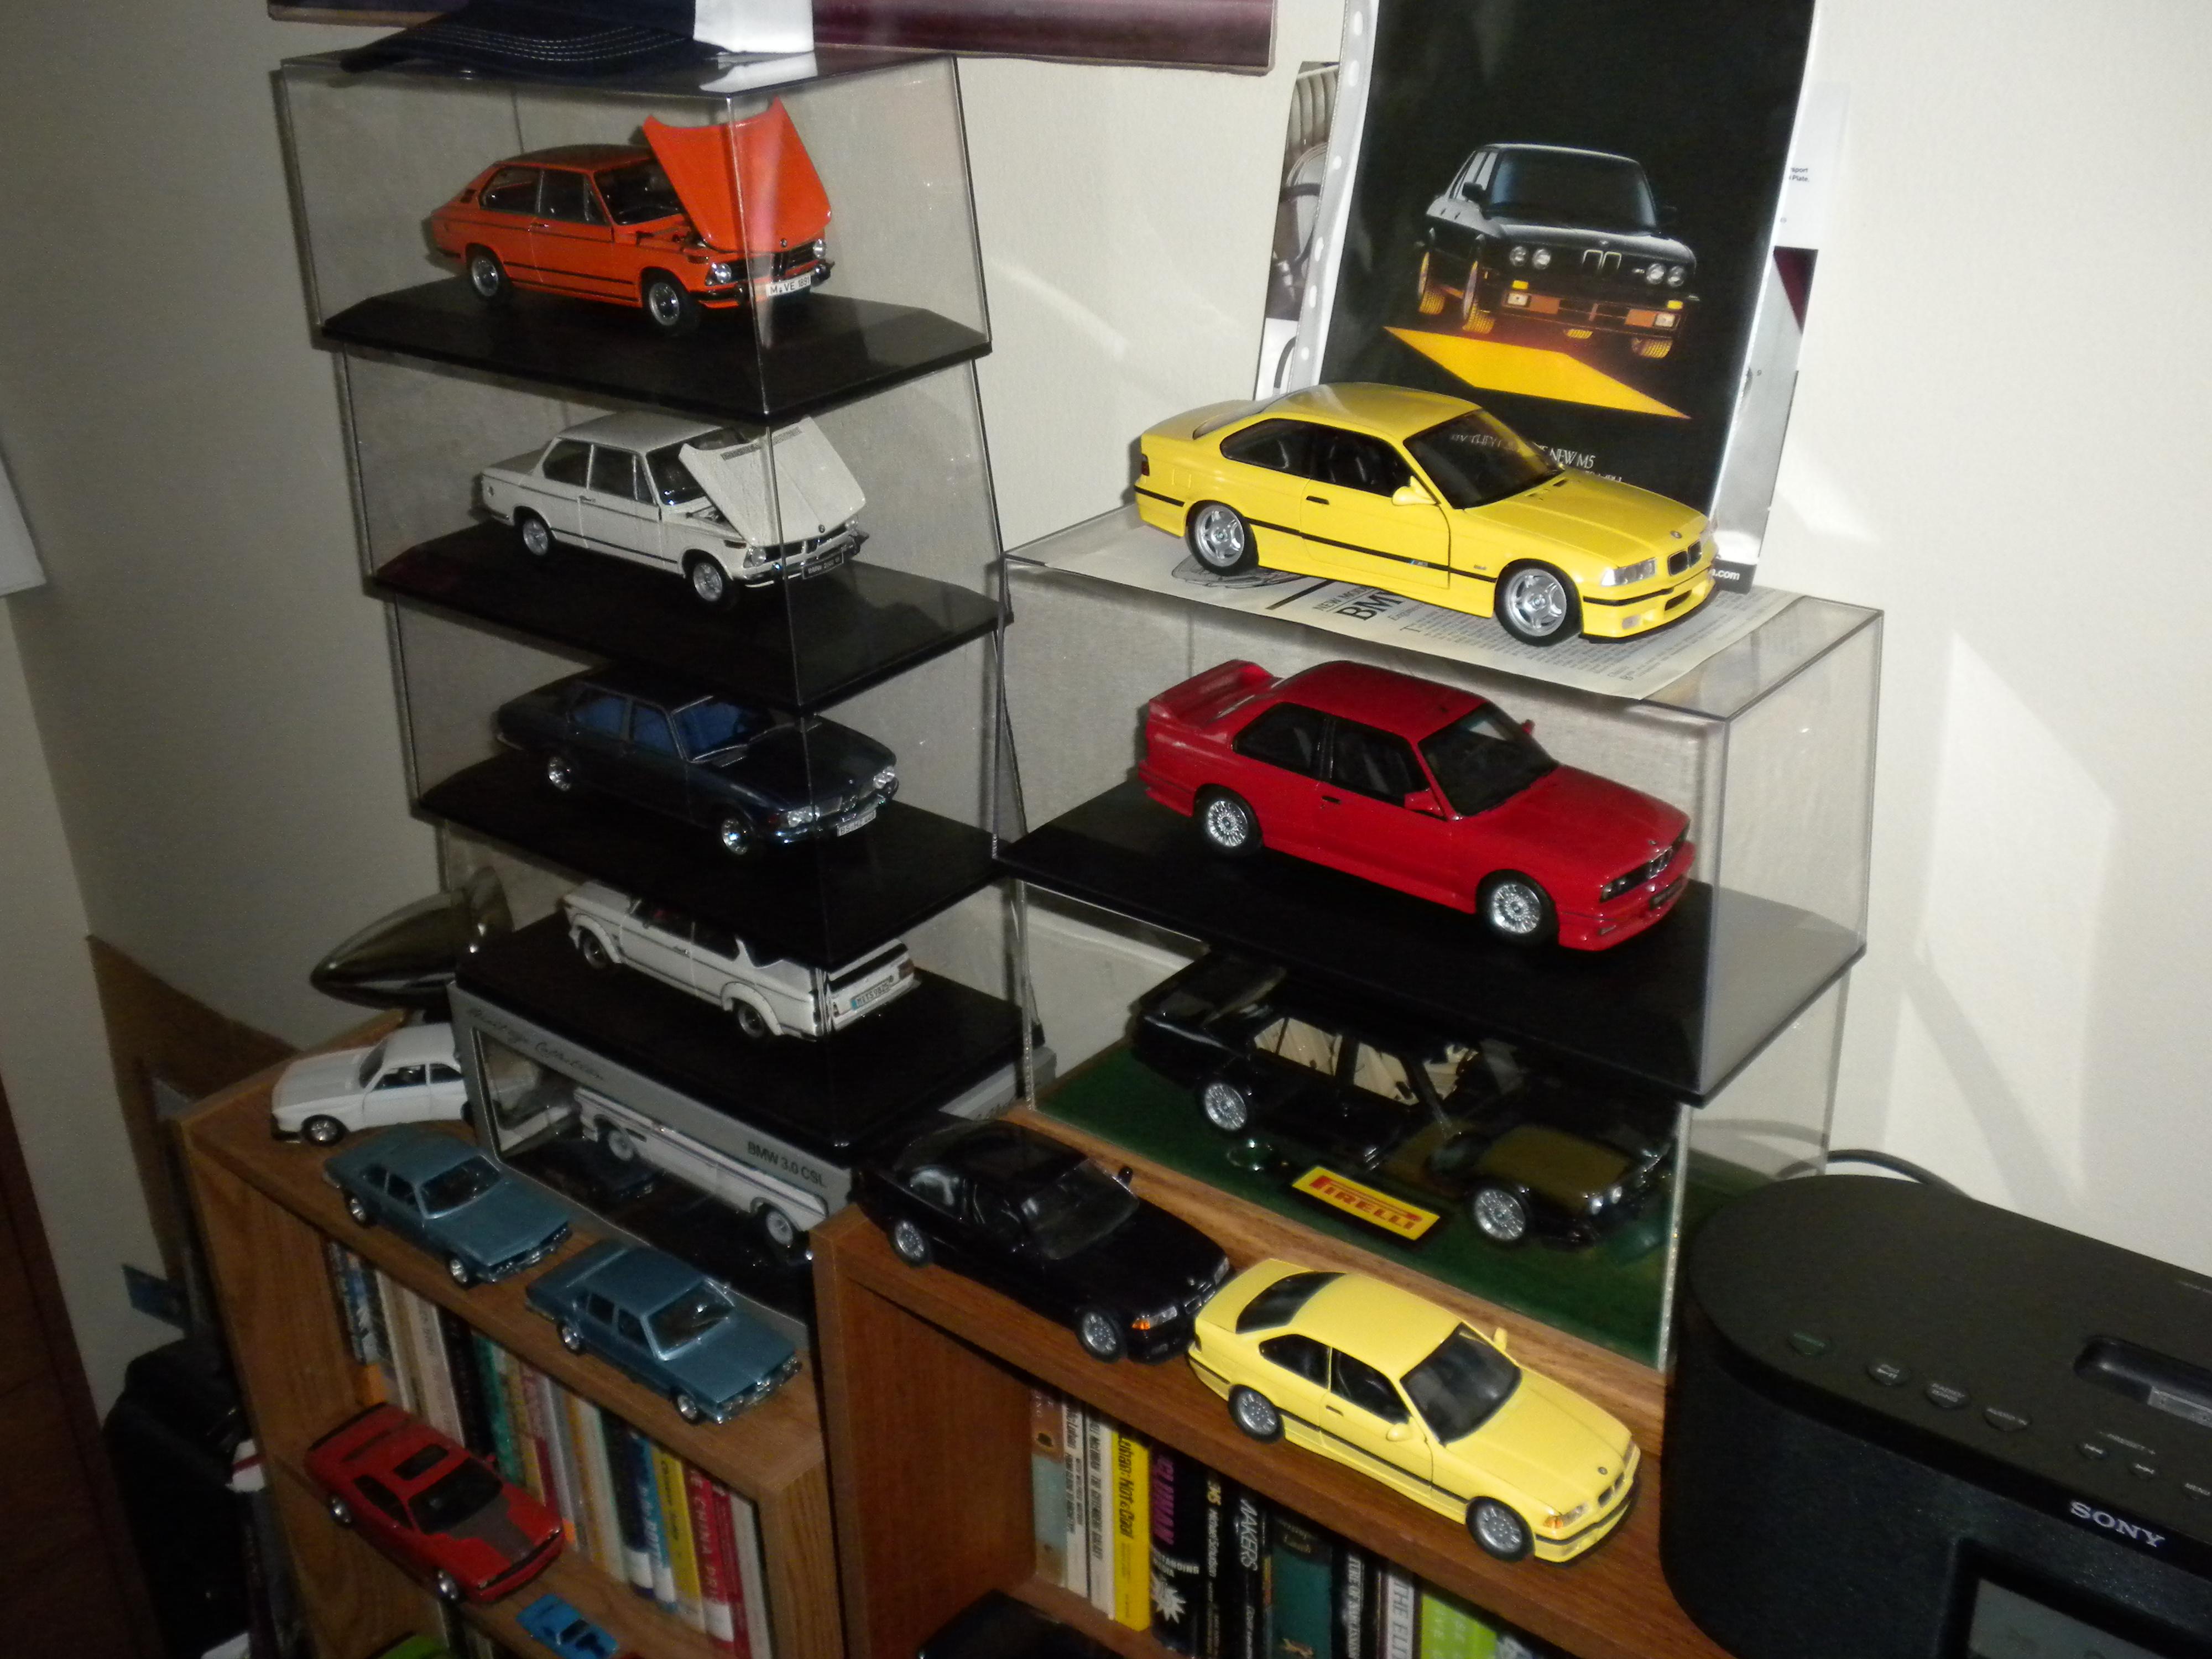
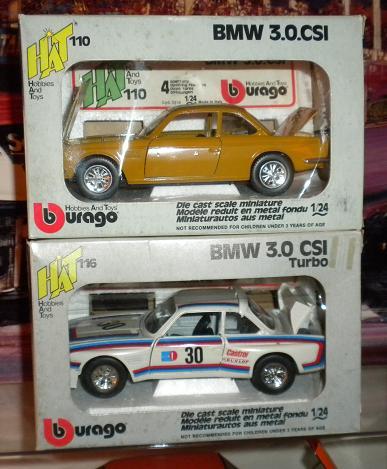
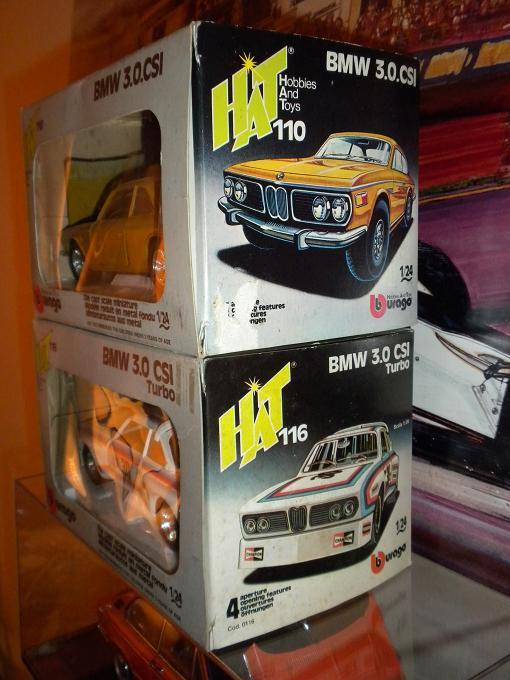
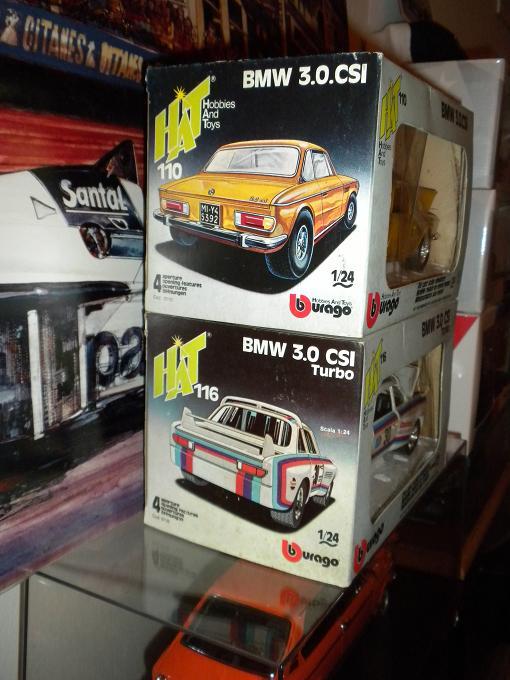
Thanks Randy C. for your reply (while I'm trying to economize bandwidth for not hitting 'reply' and copying content mind you)... The old Burago BMW's reflect a longstanding interest I have in BMW E9 and E10 'Neu Klasse' automobiles, better known to all as early CS's and the beloved '02 range. I had a '74 2002 and loved it dearly, while a CS coupe was always an aspirational thing. Seen is a small stack of BMW models, mostly picked up second hand for discovering misidentified online auctions that permitted me to obtain them for somewhat less than list. Thanks... Mike K./Swede70
-
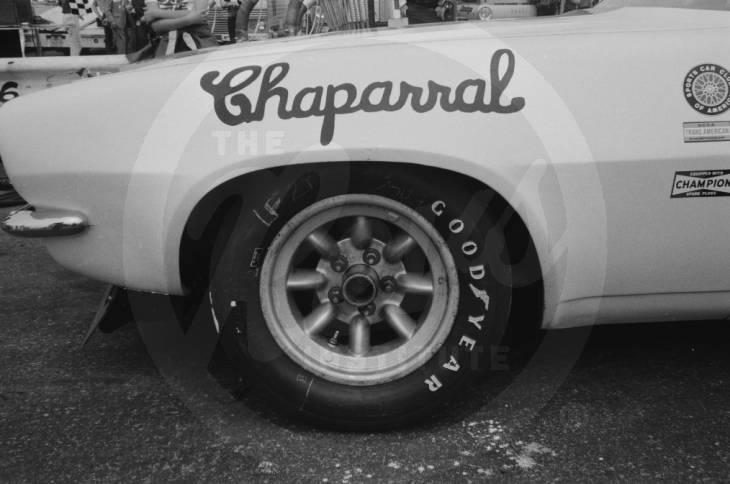
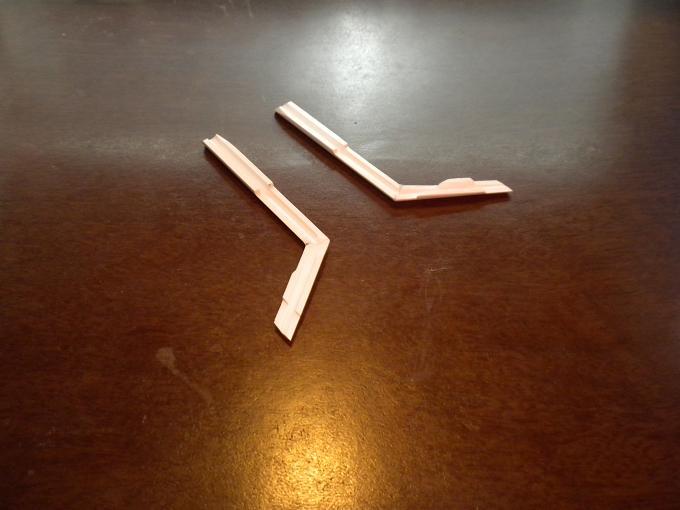
Thanks for the kind notice, and neat indeed to see the ijb40 '80's iteration of a Trans-Am Camaro in 1:1... Seen will be some structural elements consistent with pouring resin directly onto the panel work of a spare diecast shell to work up the rudiments of panel flares. A great deal of the work of creating flares is to have material where you want it, possess enough working room to consistently shape what's there, and finally, ensuring everything fits tight to the underlying structure. Although a little odd to behold in total, this is the direction I've chosen to take. Given the relevant sections of the body must be positioned sideways and yet fit within my paint pressure pot (necessary for bubble reduction and control mind you), I decided to cut the spare shell in two. Next up are seen a pair of photos relating the extent of the wall work performed to keep the resin in-place akin to creating a small lake of the material 4X. Lastly may be seen what I intend to create the wheel arch lip out of; i.e. a length of plastic rectangular stock introduced inside of each hand-sculpted puck. The FIA has homologation papers available to view online that captures the rough dimensions of the flares used by Chaparral. The photo images so-sourced guide matters concerning how large each is and how much surface area should be factored in consistent with blending them effectively. If intrigued concerning what kind of discoveries may be revealed for looking at homologation papers, see: https://historicdb.fia.com/car/chevrolet-camaro-350 I expect to sand down each puck to the appropriate shape after first popping each poured element off of whatever body shell segment it would be attached to. The lip dimensions will pop out a bit regardless, and then I'll blend the pucks with the lips with putty to make up what I hope is a discreet distance. Slowly onward... ...seen above is an idea of what I'm after. A clean panel-length flare with a stock-appearing, squared-off outer lip. I just don't have faith I could reproduce these for simply shaping a heap 'o putty four times over... ...the individual halves will likely be kept upright for being situated on respective mounds of clay. Baggies will be set in place under each half to prevent damage to the pot lest anything spill. Noticed on the base of the pot is a linoleum-topped circle of material, with the linoleum providing a surface that can be cleaned of spilled and hardened casting resin given spillage can be popped off without too much trouble. Tight-fitting templates were fabricated to keep thing more or less sane even before white glue or silicone application on the walls. This work is actually further along given all four wheel arches now have dams, while the structure noticed missing here (i.e. the wheel arch inserts as well as the bottom most extent of each assembly) is being worked up. ...the rear then. ...and some rough guidance as to what material will be used to create the wheel arch lips even as I haven't carved out the imaginary flares to mate to such. Thanks again. Mike K./Swede70
-
Thanks Randy... I understand that liquidating a collection can be difficult work. Indeed - I'd ask for a copy of the inventory on hand in whatever format seems best for you. Mike K./Swede70
-
Greetings, Not that I'm a wild fan of old 1:24th Burago diecast models, but I do have a thing for BMW CS coupes, plus a weakness for cool period box art. Spied at an area hobby show, I gingerly inquired about the two models seen in their original packaging, expecting to be quoted maybe $30-$50 each given the boxes rarely live. Instead the price quoted was $5 each, hence the funny box art and neat contents followed me home. Thanks... Mike K./Swede70
-
Blending Two 1/18 Scale Trucks to Make Two 1/18 Scale Trucks
swede70 replied to ibj40's topic in Diecast Corner
They both look very tight and polished. Congratulations on your most efficacious swap... Mike K./Swede70 -
Greetings and thanks for the kind notice... Tedious to fabricate and fated to be invisible, here would be a pair of exhaust dump floor 'bumps' taking shape and being fitted. Hollow round stock was cut in half and carefully filed and fit to match the irregular contour of the interior floor. Happily everything fits sans interference. Thanks... Mike K./Swede70
-
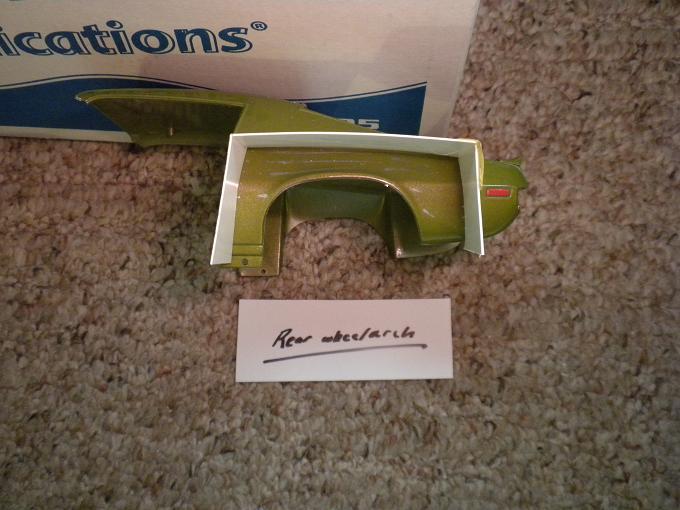
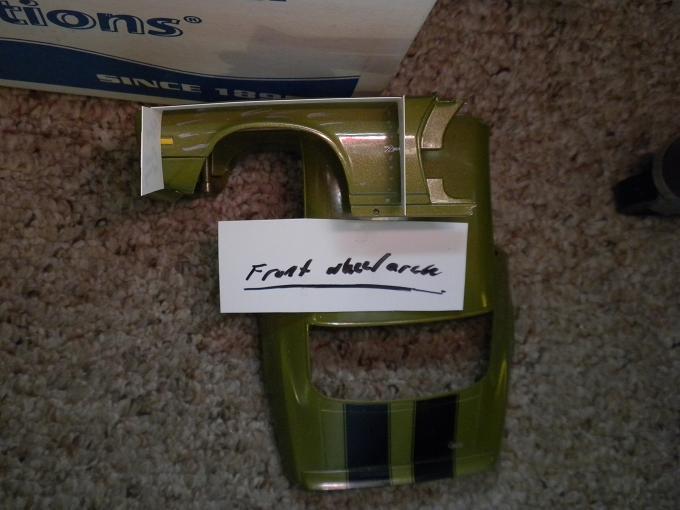
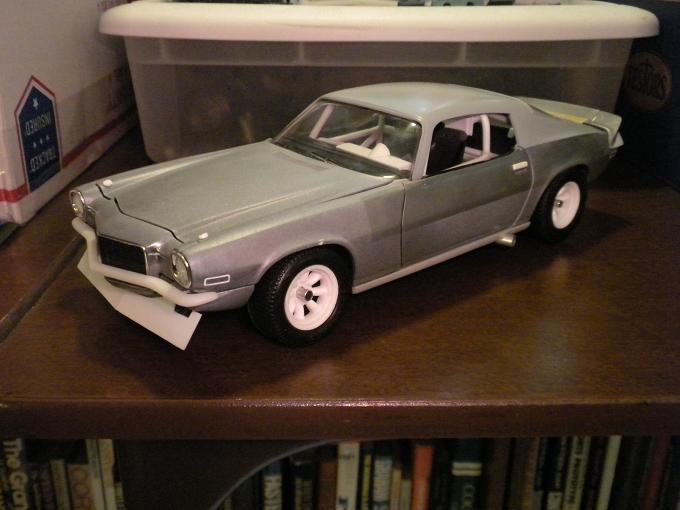
Greetings, ...and back together - sometimes a source of drama given new inclusions parts-wise may bring with it surprises. Another ERTL '70 1/2 Z/28 in Citrus Green was picked up as a low-cost dust bunny across the weekend that was for $23, and hence some latitude to play with and/or fabricate flares off the project as-seen has been afforded. Fresh hardware, 'glass' and various new chrome bits are always appreciated, hence a small victory of sorts was registered. Thanks... Mike K./Swede70
-
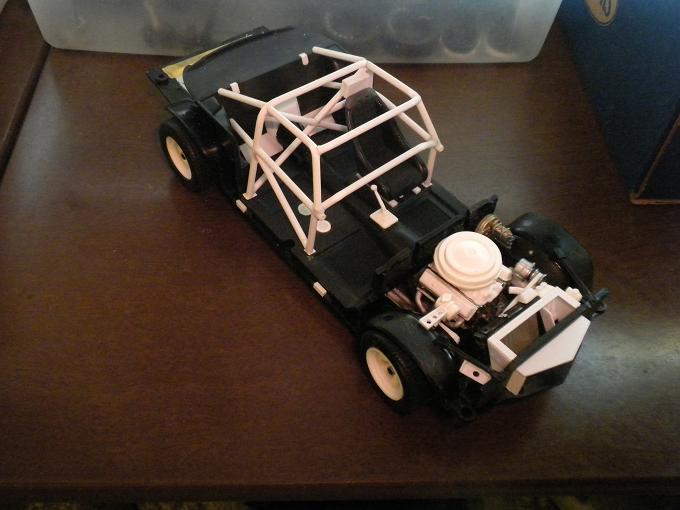
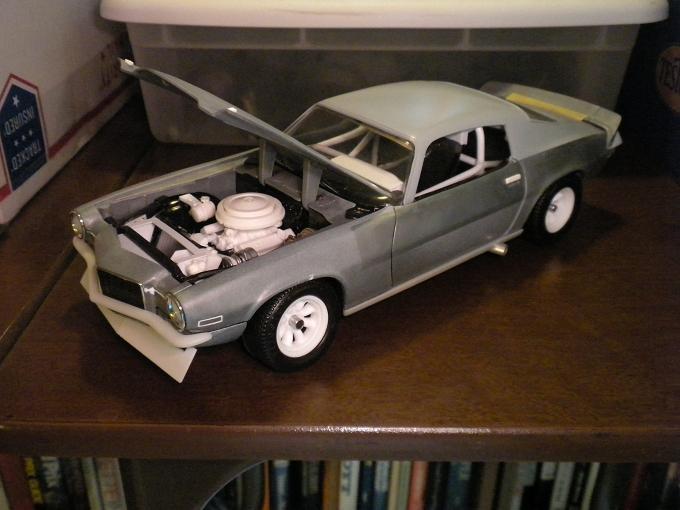
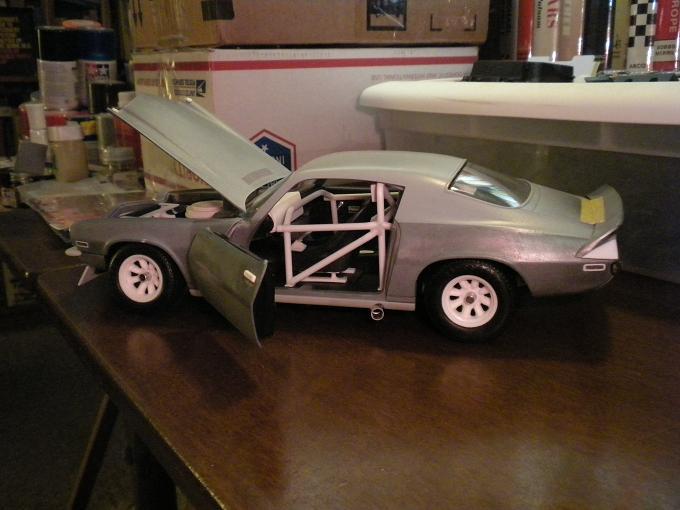
Greetings and thanks for the kind notice everyone... Fleshing out the roll cage structure, noted will be the A-pillar bars and the bar furthest across the front tying these together. Fit and symmetry is very important, while know that I opted to cut out the plastic headliner and further chose to grind off the mounting pegs to locate the stock glass/headliner assembly to afford myself a bit more clearance. The odd camera angles chosen are intended to show off the fit achieved to the best effect. Thanks... ...hard to see, but I've built up some structure and fabricated some fill panels where the stock rear seat pad(s) would otherwise be seen. It isn't complete, while it's better than some inexplicable gap remaining for all to see. Unfortunately the dog leg hinges used for the doors are going to prevent the creation of roll cage extensions intended to tie the interior structure into the front suspension pickup points, although I will come up with something partial to afford a semi-complete look in this regard. Thanks... Mike K./Swede70
-
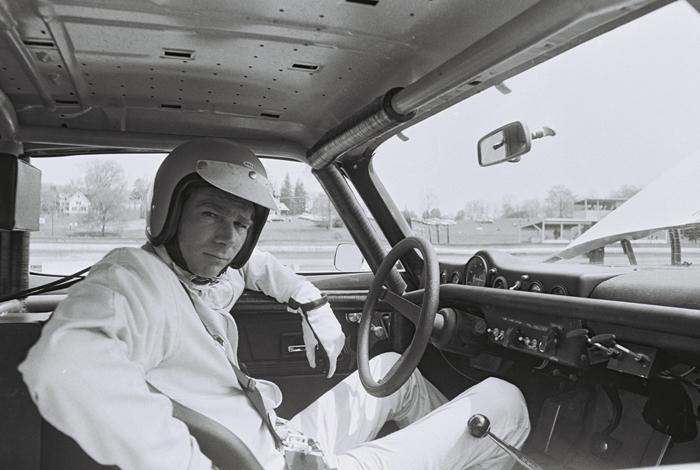
Greetings, A small update this, with work related to fuller elaboration of the roll cage in view. Side bars angling down slightly as they move forward from the main hoop are witnessed, as well as a cross brace just forward of the dash board which has been shaved again just below in anticipation of adding further extensions to tie in the front suspension to the chassis stiffening cage structure. A preview of what I'm attempting to capture in-scale. Note the gauge pod/instrument binnacle on a largely stock dash profile, the side bars of the roll cage angling slightly down as-described above, as well as the cross bar positioned just forward of the dash as-installed. A Karl Ludvigsen image from Lime Rock, CT. '70 then, with Jim Hall wondering if I can in fact pull all this together... Me making a go of it then! The front bumper on the standard nose ERTL second generation Camaro is pretty rough, and given this reality, I've opted to sand and shape every surface consistent with cleaning matters up. The profile of the ends needed help in particular, and here they've been massaged to look considerably better. Moving on, the small bumper overriders will be added separately at a later point, while some surface mounting hardware in the form of pin heads will be added to lend some interest where it might not be expected. In addition to the roll cage taking shape, seen will be a revised seat mount and a discreet head rest pad to flesh out the mount it sits upon. Thanks for reviewing this project update... Mike K./Swede70
-
Those look nice indeed. Thanks for sharing... Mike K./Swede70