swede70
-
Posts
727 -
Joined
-
Last visited
Content Type
Profiles
Forums
Events
Gallery
Everything posted by swede70
-
1968 RKE/JRT SCCA Trans Am Javelin
swede70 replied to swede70's topic in WIP: Other Racing: Road Racing, Land Speed Racers
Thanks for the kind words... Not glamorous, but these would be the four-layer 'pucks' intended to be the basis for the '69 RKE/JRT Trans-Am Javelin rear flares with material sufficient to allow for as much mass and I'd desire topside, as well as what would be required in the tumblehome area. Sculpting and final shaping these will likely prove to be easier! Mike K./Swede70
-
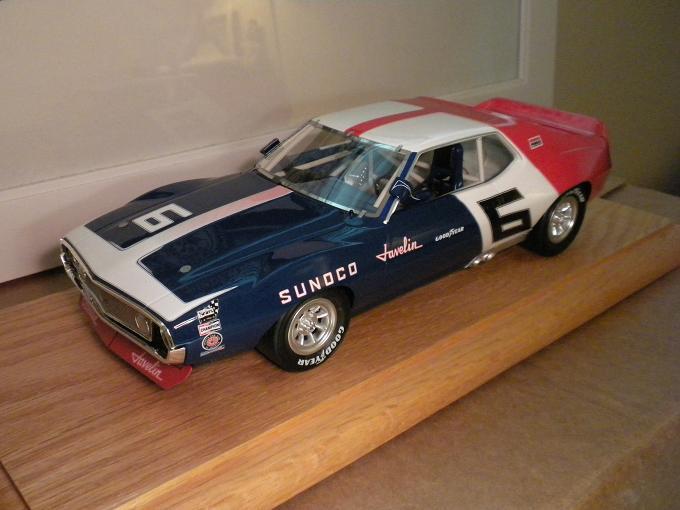
1:18 Replicarz '71 Penske Donohue Trans-Am Javelin sealed resin mods.
swede70 replied to swede70's topic in Diecast Corner
Thanks... Although almost tedious beyond words at this point, the wheels will be refinished again - this time in a rather muddy low-gloss white. With this topic it's a challenge to put what images may be found in event order, while it seems that as the season progressed a more vibrant finish was applied to the wheel consistent with better matching the white employed on the body proper. In particular, the exterior spec. and accessory decals hardly alter after the season-opener at Lime Rock, CT. Given the competition and series itself was in a healthier state earlier in the season, the slightly mismatched white body section relative to the wheel finish then-run will be what I aim to capture. Pity I didn't reach for the right stuff and/or test finish combinations prior to spraying this last time... See - even Mark's growing a bit weary of my vacillation in relation to finishing what it is I intended to do... - Earlier today I ordered new wheels, set aside all materials to create new assemblies, and tested an application of Tamiya AS-20 Insignia White which is a variant which just stumbles across the line for being identified as a white and not a gray. My previous effort in AS-16 Light Gray (USAF) is simply too dark. It might be a month, although matters will be set right. Mike K./Swede70
-
Looks beautiful... For long there was a low-cost 1:18th scale diecast TR6 out there done by Britains Collectibles that was reasonably good, although not standard-setting. The Minichamps release depicted here looks far better. It's nice to know some firm has finally stepped up and done honor to the topic. Thanks for sharing... Mike K./Swede70
-
1:18 Replicarz '71 Penske Donohue Trans-Am Javelin sealed resin mods.
swede70 replied to swede70's topic in Diecast Corner
Happily the wheels/tires/axles worked up dropped right on. Pondering if I should try again given the gray chosen could have been lighter still. Anyhow, this is how matters stand at present. Tiny cylindrical jacking points have been added along the rocker panels on either side directly below the GOODYEAR identification on the doors, painted to match the interior and what might also be used on the chassis should I devise some means to mask cast-in detail for use of Silly Putty or some such. Thanks... Mike K./Swede70
-
1:18 Replicarz '71 Penske Donohue Trans-Am Javelin sealed resin mods.
swede70 replied to swede70's topic in Diecast Corner
Greetings, Hopefully good to fit, here would be the wheels and tires awaiting installation. Note some effort was made to add a bit of negative camber as well as a measure of toe-out up front. Thanks... Mike K./Swede70
-
Quite an effort. When diecast enthusiasts want to traverse the country with their respective favorites for view or for participation at select events, they need only call you! Mike K./Swede70
-
1:18 Replicarz '71 Penske Donohue Trans-Am Javelin sealed resin mods.
swede70 replied to swede70's topic in Diecast Corner
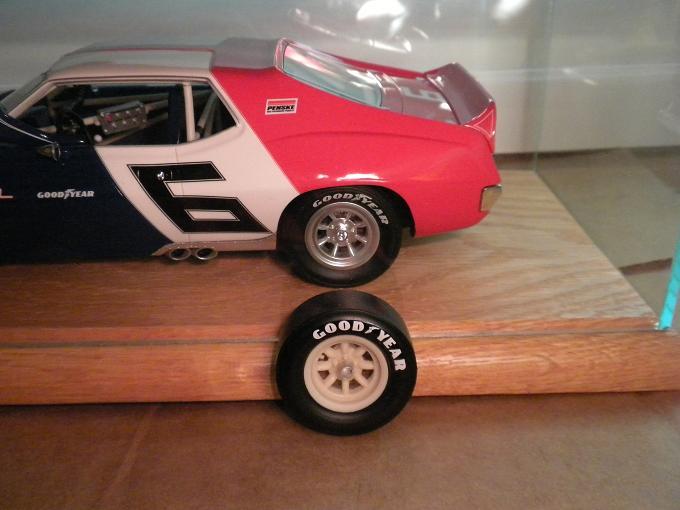
Greetings, Indeed - it's a bit of a shock to open one of these resin models only to discover all the expense and bother is restricted to the surface. Coming from a kit background where it's a point of honor to finish aspects of the model that are fated to be out of sight, looking at a sealed resin model broken down is akin to viewing what might be the product of prison labor. I don't see much romance in it, while if I can may a light overhaul of things for simply putting resin wheels on fabricated brass wire axles, so be it... - Pondering a final finish to apply to the Legende Miniatures resin Minilites I intend to use, I've decided to apply a light gray that might almost be mistaken for white. Magnesium decays for exposure to oxygen, while in-period it wasn't unusual to see bare Minilites or those with an exposed and machined bright outer lip painted over either at the end of the season ('69 and '70), or fairly early in ('71). Notable examples include the '69 Ronnie Kaplan Engineering/Javelin Racing Team Javelins (Riverside at least), the '70 Gurney AAR 'Cudas (solid white at Kent and Riverside), and soon enough the '71-season '70 Bud Moore Engineering BOSS 302's. Review of photos by many attuned eyes lean towards wheels painted white, although for a bit of recent discussion and for reviews of images like the one seen below, my impression is that a very light gray akin to Traco engine gray was used on the wheels after the season opener at Lime Rock, CT. The image pasted in is from a series of photos captured at '71 Mid-Ohio presumably during technical inspection for being on the scales... ...certainly darker than the white used on the body, darker than the sidewall tire lettering, and almost akin to the finish applied to the bare interior. Some believe the wheels should be finished in white, while the restored car is outfitted in such a fashion. As for me, I'm not quite a believer... - With the above in mind, seen are my replacement wheels and tires after applying Tamiya AS-16 Light Gray (USAF) paint, Testor's flat clear lacquer to the sidewalls of the tires to knock down the gloss on the fronts in particular, but also to blend the carrier film to the sidewalls, etc. The lug surfaces have been cleaned up, while the lugs soon to be painted are missing here. Tape weights and duct tape to safeguard them from shifting may also be applied. Thanks... Mike K./Swede70
-
Neat project; i.e. I'll be looking on with interest... Mike K./Swede70
-
Neat project focus - thanks for sharing... Mike K./Swede70
-
1:18 Replicarz '71 Penske Donohue Trans-Am Javelin sealed resin mods.
swede70 replied to swede70's topic in Diecast Corner
Thanks for the understanding and the kind words... A beautifully-prepared GT 1 racer your friend had and certainly a neat experience to be involved with the effort that must have been. I'm somewhat close to Waterford Hills, MI. as road racing venues go, although I've never been directly involved with a team. Like others I suppose I read the Van Valkenburgh/Donohue racing autobiography The Unfair Advantage and quite suddenly that was the standard; i.e. ignore everyone and simply work out the best thing going with a formula and it should perform... - Given this was going to be a pricey model, I ended up shuffling a few things onto eBay to protect the budget, while for working at an area automobilia store a day a week helped on the price front. Most of the parts gathered weren't hugely expensive, although it would be silly to suggest that such don't add up when honestly tallied. If this wasn't the only 1:18th Trans-Am Javelin on the market, it likely would have been skipped. As things stand, on this board subpage one will find a 1:18th Chaparral Camaro thread evolving sort of as a reply to the Repilcarz announcement that a sealed resin version is coming. I wouldn't be surprised if the announced price of $239.95 doesn't creep further upward, and frankly I can't justify a purchase if I can come up with a feature-laden alternative even if it too would be expensive if itemized in detail. Thanks... - Oh - and now a few photos of my Javelin with the newly-refinished original wheels and tires. Further down one will find some information which will guide my efforts to create alternative stuff to substitute in when it's wholly justifiable to do so. Dimensions helpful to understand just what I'll work up to slid in off the model are as follows: Axle diameter: 2.7 mm Approximate axle width: 85 mm Track front and rear: 150 mm Track from inside tire sidewall-to-sidewall : Front/69 mm & Rear/70 mm Width of cast-in resin pedestal-to-pedestal inside the shell itself: 65 mm - Thanks... Mike K./Swede70
-
1:18 Replicarz '71 Penske Donohue Trans-Am Javelin sealed resin mods.
swede70 replied to swede70's topic in Diecast Corner
Oh - and I have a friend who will inquire about my project progress to the effect: "...is what you did obvious, or is it something invisible that just looks like how the model ought to have been finished from the start?" He might also say: "...so, you've taken a $70 model, and now it's worth $30?" Such is my plight then... Mike K./Swede70 -
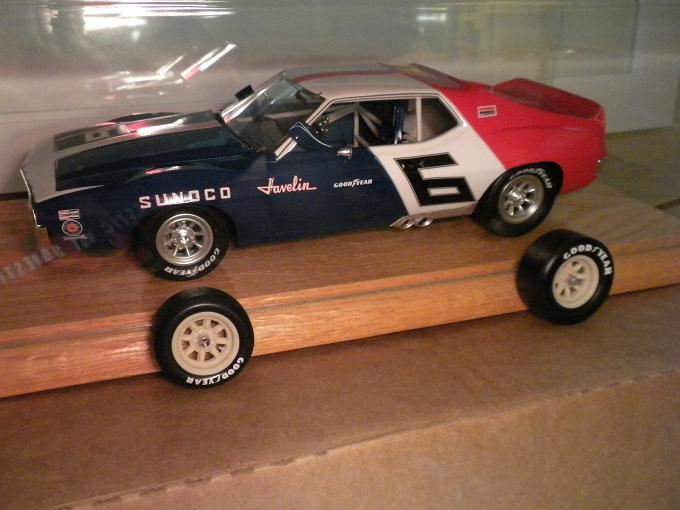
1:18 Replicarz '71 Penske Donohue Trans-Am Javelin sealed resin mods.
swede70 replied to swede70's topic in Diecast Corner
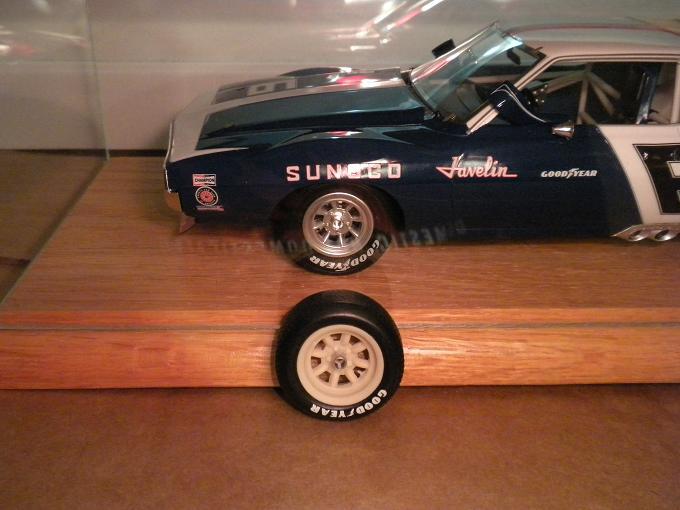
Thanks for the kind continued interest... Sort of a test run as-described above, seen are the refinished original wheels and tires. Controversy surrounds the appearance of the '71 Penske Javelin wheels, with early shots and some mid-season photos suggesting bare mag. alloy, while later shots may be reasonably interpreted as being either white or light gray. Light levels, contrasting the tone of the wheels to the tone of the light gray-painted interior (which itself can appear white), etc. seems to muddle things further for no one photo clears matters up. Odd too given the '72-season spec. looks consistently white and no one questions that! For starters I've tried my best recipe for Minilite magnesium alloy which is Testor's Model Master Stainless Steel Buffing (a now-deleted product range - act quick) with a light overcoat of Tamiya TS-65 Pearl Clear to afford a light surface dazzle. I had a 1:1 period set for a '74 BMW 2002 I owned that was sent to an area media blaster, and for trying every possible combination one might attempt for scale projects, what is presented below was the clear winner. Moving along, the sidewall markings only shift for use of 100% acetone which threatens to turn the vinyl tires to goo at any moment, while the hub guides were masked off with coils of Tamiya hobby tape first formed over round stock of about the same diameter; i.e. by design, they fit tight. Water heated just short of boiling was required to render the tires pliable enough to remove to facilitate the refinish of the wheels. Oh, and if it need be said, tire decals are the same IndyCals markings as tried out on the replacement tires seen further up this thread. Whew - thanks... Mike K./Swede70
-
1:18 Replicarz '71 Penske Donohue Trans-Am Javelin sealed resin mods.
swede70 replied to swede70's topic in Diecast Corner
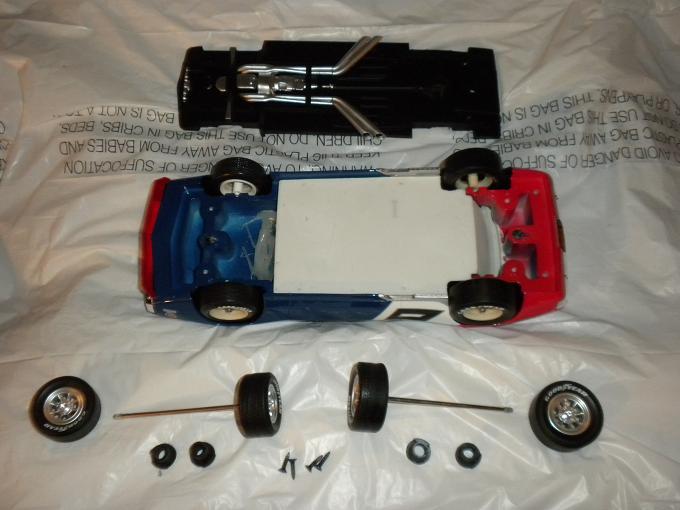
Greetings, For some application and the removal of four machine screws, the chassis come off clean and the axles lift straight up and out. Worries that the brake discs and calipers would be glued fast were misplaced given they slid right off of the wheels and onto the axles. Notice too that the new wheels and tires seemingly drop right on without clearance issues, while the chassis can be painted, again without huge risk entailed. I'll likely refinish the stock wheels as practice to final finish the new set with new axles entire. I suspect I'll leave the interior alone given removal of the glue and prying this and that to break it apart probably doesn't merit the risk run. Consistent with protecting everything, the model was handled only with gloves, while as-seen it's been set down on a thin white plastic trash bag spread out atop a bathroom towel folded just-so lest the paint, sheet acetate glass or photo-etched parts pick up damage. One must be careful! Thanks... ...and although I cannot guess if anyone 'in corporate' is aware of what I do here, some stories trickle back in relation to how matters are researched prior to tooling anything. What is thought very good indeed by them quite often isn't standard setting upon reflection and for pouring over period materials in particular. Thanks... Mike K./Swede70
-
Seen earlier today. I didn't have huge expectations, felt it would under perform, but also I made a point of not taking notes to tear it down later. Given the bundle of plot points the people involved had to work with going in and all the hot criticism heard about troubles in-production, I think J.J. Abrams did a very good job. I was happy to note that the cutting style wasn't as rapid as many action pictures seen of late, while even if the product was market research/focus grouped to death, it was clear to me that people directly involved tried to make adjustments with regards to addressing much. Not everything is resolved, they rush, rush, rush through one scene after another, but in the main quite an accomplishment. The light saber fights had the intensity of actual fights and weren't the expected passionless and overly choreographed nothingness, the effects were as fluid as ever seen, while much material is tossed to the audience in the hope they'll recognize stuff from past films, or cluck in recognition of what thoughts and behaviors are characteristic of this person or that. It moves along under it's own speed, certainly doesn't drag, and isn't painful to take in. The production design and special effects are very clean, the humor tossed in is a nice contrast to the dour and serious tone of some of the other films of late and all the prequels, and all the money is seen on-screen; i.e. a pure big-screen spectacle in a very good way. Most of the plot is serviceable enough, the PC-content really wasn't so heavy or obvious as might be feared, while the resolution achieved with regards to the lead character's identity and sense of peace established for the journey made worked I think. The Kylo Ren story arch is likewise good, although one can tell that other characters struggle a bit for material having been left on the cutting room floor. Just go see it as a big screen special effects show and harbor modest ambition as to plot. In the right frame of mind and imagining one is fourteen years of age or so, it's terrific. Yes - it's o.k. to like this film!
-
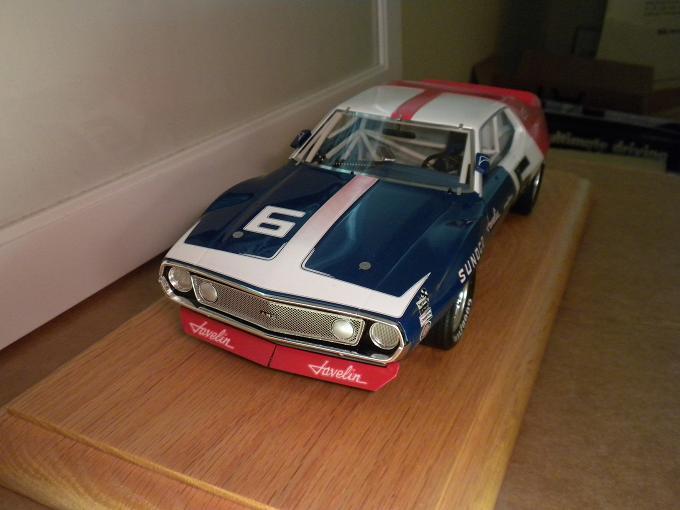
1:18 Replicarz '71 Penske Donohue Trans-Am Javelin sealed resin mods.
swede70 replied to swede70's topic in Diecast Corner
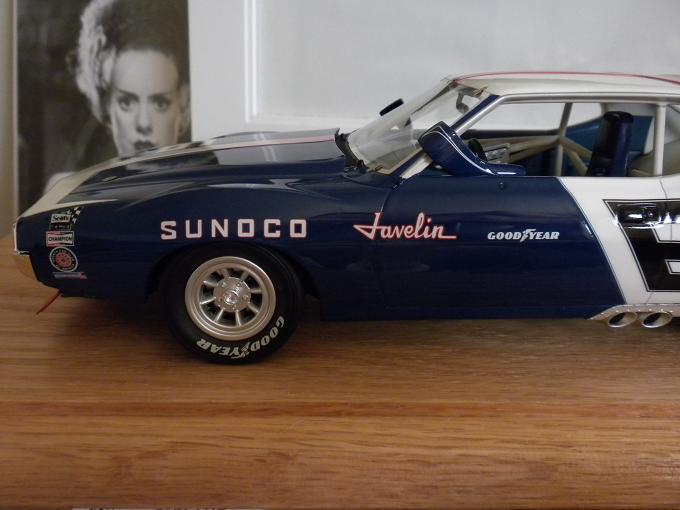
Thanks so much for the kind attention ibj40... Given I couldn't trim back the A-pillar chrome trim as it floods down over the fender, all I could do was paint out what I could and hope for the best. Some of the silliness is hence disguised. Thanks... ...Tamiya X-4 Blue acrylic again. Mike K./Swede70
-
1:18 Replicarz '71 Penske Donohue Trans-Am Javelin sealed resin mods.
swede70 replied to swede70's topic in Diecast Corner
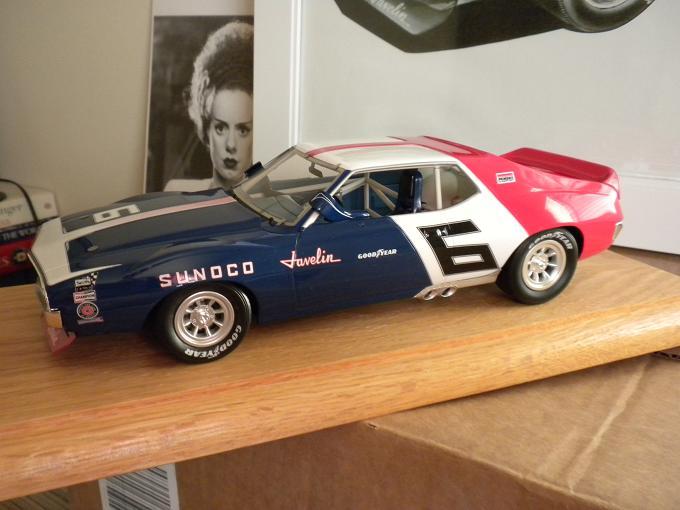
Greetings, On this topic the A-pillars ought be be SUNOCO Blue to match and line up with the rest of the livery versus displaying in white. Given the windscreen is surrounded with delicate photo-etch, and the 'screen itself cut from clear acetate and delicate beyond belief, here I've opted to cut color-matching decal stock and effectively fill in color where it is needed. The shapes required certainly aren't complex, while the surface to cover is nearly flat. The approach generally works. Thanks... Mike K./Swede70
-
1:18 Replicarz '71 Penske Donohue Trans-Am Javelin sealed resin mods.
swede70 replied to swede70's topic in Diecast Corner
Just a brief update this. Seen is the second attempt at a front spoiler, looking tighter where the two elements meet, while the ends are a bit fatter and feature a radius around the top corners. The contemporary towing hook done as a photo etched part visible in earlier photos had to go, while for examining the installation of the same it seemed to be glued in place without strictly connecting to anything associated with the bumper or grille. Given this, I tied a length of fishing line around it and pulled it off with one quick jerk; i.e. success! Thanks... Mike K./Swede70
-
1:18 Replicarz '71 Penske Donohue Trans-Am Javelin sealed resin mods.
swede70 replied to swede70's topic in Diecast Corner
Oh - and if it helps to reproduce what I'm trying here, the rear tires are from a 1:18th Action NASCAR diecast model likely from about 2000. Only acetone proven strong enough to remove the tire markings, while a real risk of frying the vinyl used to make these is run for working too slowly, too aggressively - or both. Like everything NASCAR and diecast, shop carefully and you shouldn't have to spend much at all to gather one up. Thanks... Mike K./Swede70 -
1:18 Replicarz '71 Penske Donohue Trans-Am Javelin sealed resin mods.
swede70 replied to swede70's topic in Diecast Corner
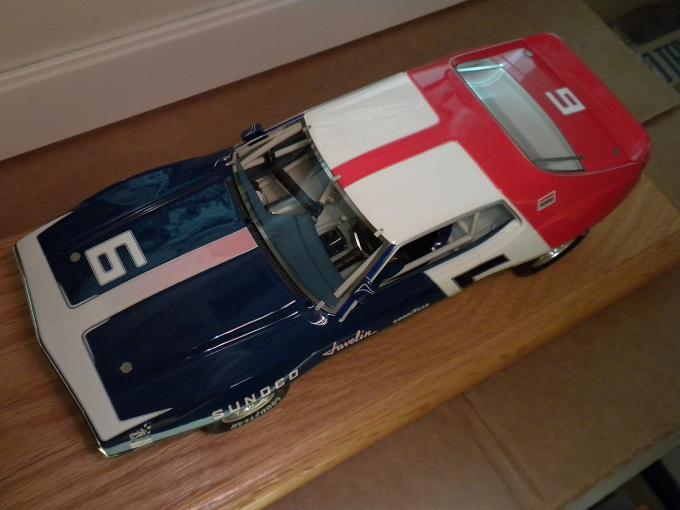
Oh - no trouble. The Replicarz Trans-Am Javelins were promised for a long time, and much-delayed. Replicarz has them showcased on their website, although other outlets as well as the usual suspects on eBay similarly have them. No opening panels - just a huge blob of resin, although a lot of care has gone into the paint work in particular. Know that most of it is pretty good. Should you run into messages indicating that the release is sold out at different vendors, I'd suggest going back to Replicarz and purchasing there given they'd be sitting on the largest quantities having commissioned these. A George Follmer '72-season Championship car was released at the same moment (this past Thanksgiving '19 then), while a sister car in the form of the Roy Woods '72 ride was recently cancelled owing to poor demand. Expect to pay $200-$229.95 depending on holiday coupons and applicable discounts if such can be had. - I wouldn't be surprised if a small series of stock '71-'74 releases are eventually done from the tool given what the chassis looks like and given the body shell is about identical but for the wheel arch contour. We could wait forever for an old-school all opening panels Javelin but are very unlikely to ever get one, while here would be the newfangled and admittedly pricey sealed option that will likely only become more expensive as time passes. On this basis, if one has an interest plus resources to gather one or two up, I'd suggest acting more or less soon. - I'm just making discreet changes given enhancing little things on 1:18th prefinished models is more my speed given my iffy capacity to focus on anything for long. Seen below are fabricated front spoiler element overlays given they should either be clear Lexan or painted red versus red-tinted Lexan. Decals are Fred Cady waterslide and happily are pretty good for size. I miscalculated the gap between the elements and will have to make these again , although generally I got about 90% there for not overlapping the mounting system either atop the elements while still having material wrap around the ends. It's all held in with white craft glue, hence nothing hot or damaging was employed to affix what's seen. Looking at my last photo, notice the small Sears DieHard battery decal (race version with the checkered flag then) set atop the accessory decal stack forward of the front wheel arch. And finally, the latter day vintage racing accessory rear view mirrors, discreet as they are, have been carefully removed with the exterior rear view mirror mount being touched in with Tamiya acrylic Blue X-4. My fear of this sealed resin topic is lessening as I'm registering a few successes, while soon the wheels will be final finished and incorporated into what is seen. Thanks... Mike K./Swede70
-
1:18 Replicarz '71 Penske Donohue Trans-Am Javelin sealed resin mods.
swede70 replied to swede70's topic in Diecast Corner
Thanks... Now seen with the addition of brass lugs and nuts, with chrome bathroom fixture washers used as brake discs. Sounding crude, but the washers are cleanly plated on both sides and aren't crudely stamped out like the typical corner hardware store fare. Also, given these wheels will be mounted on the as-delivered metal axles, I've mounted the pegs on the back of each front wheel at a slight angle to suggest negative camber and toe-out. The Replicarz wheels don't roll, hence nothing is really being given away here for doing things in such a fashion. I might also cheat and just drill the holes for the metal axle in the rear in an offset fashion for I want to increase the ride height out back. Thanks... Mike K./Swede70
-
It's really beautiful with intelligent upgrades subtly worked in and fine finish choices incorporated throughout. Thanks so much for sharing... Mike K./Swede70
-
1968 RKE/JRT SCCA Trans Am Javelin
swede70 replied to swede70's topic in WIP: Other Racing: Road Racing, Land Speed Racers
Greetings and thanks for the kind input and research help besides... Although a little tedious, here would be some effort to shore up the '68 RKE/JRT Javelin Trans-Am project so that it might match the '69 iteration for chassis detail up front and underhood. Barely discernible on the '69 situated forward, the tunnel ram has been filed down between the twin stacks of inlet runners to open things up, while the carburetors have been cut apart from each other (no big issue this) and better positioned besides. Both models are Frankenstein specials for utilizing spares sourced from wherever, with many a shade and/or curious color plastic witnessed across each project. Oh - I did add some material to flesh out the fenders of the '69 effort and continue to struggle to square away the end cap trim to my satisfaction. I'm 'not there' yet, while blending everything and coming back to rescribe the end caps at the proper length and depth will be a pain. Thanks for your review of this dual project update... Mike K./Swede70
-
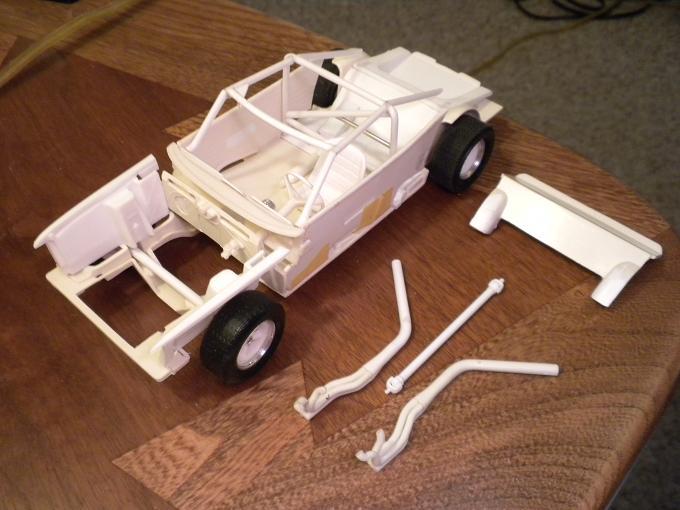
Greetings... Sort of heart-stopping for being the $200-$229.95 sealed resin topic most wouldn't dare modify, here would be some initial project lay ups consistent with tossing caution aside and attacking one nevertheless. Four enormous screws hold the resin chassis to the resin body, while I'm told the wheel/tires/axles simply rest in place and can be pulled out for tugging each assembly straight up. With this in mind, seen below is a combination of parts and accessories consistent with revising things. Exchanging note with others online, the impression gleaned concerning the new Replicarz effort is that the Minilites they tooled are a bit shallow, while the diameter of the front wheels is noticeably smaller than what is fitted out back. Further, the fairly modern powder coated finish applied to the wheels isn't quite desired, while corporate insistence on promoting the brand resulted in very contemporary for font style tire identification witnessed on the sidewalls. Something has to be done I tell you! Legende Miniatures out of France was tapped for the resin Minilites seen, with the cast-in wheel hub detail ground off, the outer wheel lip sanded to remove an unwanted raised contour given I desire a nice uniform taper across said surface. The hub guides are aluminum tube, the front tires ancient 1:18th ERTL '70 1/2 Firebird Trans Am issue, while the rear tires are from a presently unidentified NASCAR release I'll try to clarify for communicating with those who'd know such things. The non-tilted tire markings are sourced from IndyCals and really impress for being clear and bright, while they betray little visible carrier film even sans application of a semi-gloss clear to disguise matters. The historical record relates that about halfway through the '70 season (and looking forward into the next) that Goodyear Super Modified tires were determined to be best for the front, while ungainly and rather tall of profile NASCAR tires worked best on the rear. Consistent with this knowledge, the somewhat odd look of the tires I've reached for can be appreciated. Thanks... Mike K./Swede70
-
1968 RKE/JRT SCCA Trans Am Javelin
swede70 replied to swede70's topic in WIP: Other Racing: Road Racing, Land Speed Racers
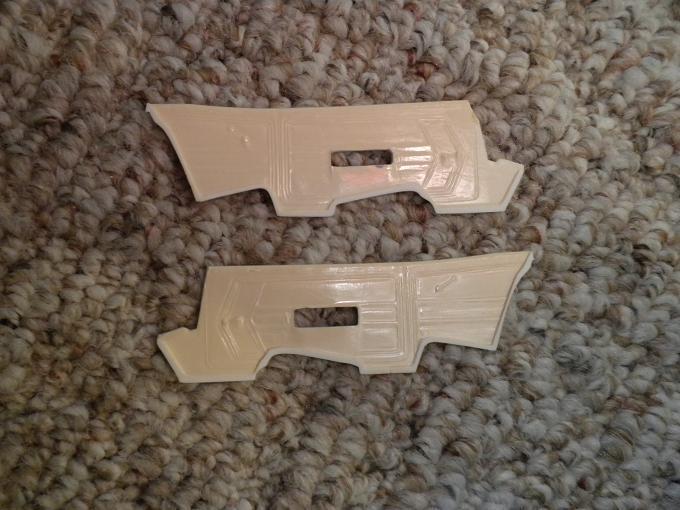
Greetings, Going back briefly to the '68 RKE/JRT Javelin, it was decided to reproduce the inner fender/wing project work on the '69 for cutting off the promo-style round wheel arch detail. Happily the cutting of said arch detail can be achieved without running great risk, hence no great skill is required. Further, the '69 Javelin interior has been 'filleted' to the extent of trimming off the faintly detailed interior side panels so that they might be mated to the unfinished/bare race interior floor otherwise sporting '70-specific trim which in this instance is undesired. When finally wrapped up, these may be glued in place or simply taped into position (as seen below) given there isn't anything truly structural about what they lend to these builds. Given masking the floor off from the cast-in interior side panels to reflect alternating finishes, it's something of a gift to split these items apart. Some fill panel work will be required two times over to complete the profile of each side relative to the other panel work present, although in essence it's clean. The driveshaft and shifter are or will be Revell '69 Camaro items. And just in passing, the cut outs seen along the top of the firewall on this '68 iteration are for the fresh air system worked out by Ronnie Kaplan when the cross ram twin four barrel intake came into use. ...while here would be the '69 interior side panels. A slight cut will be made to distinguish the door panel from the rear passengers compartment interior panel trim, while note that the armrest detail (faint though it was) has been ground out in anticipation of the fabrication and insertion of additional fill panels consistent with what was run in-period. Thanks... Mike K./Swede70
-
Thanks - I have kits and/or incomplete kit targets to seek out. In particular, I really appreciate the steadying influence for kind thoughts expressed and good will evidenced. The topics I choose tend to be peculiar, but as a positive the chance is afforded to make them my own, ably assisted by those with greater knowledge and experience than I can bring to bear upon matters. Although often hard pressed to afford value in turn, it would leave me appalled to come back to a thread and notice anything that could be construed as snark if you will penned by my own hand. While all are not demonstrably capable of such, we each must try to model what is right and dignified about that which we hold dear. Again - know that I appreciate was has been availed to me past and present. I value the scene and the friendships formed here very much... Mike K./Swede70