

swede70
-
Posts
727 -
Joined
-
Last visited
Content Type
Profiles
Forums
Events
Gallery
Everything posted by swede70
-
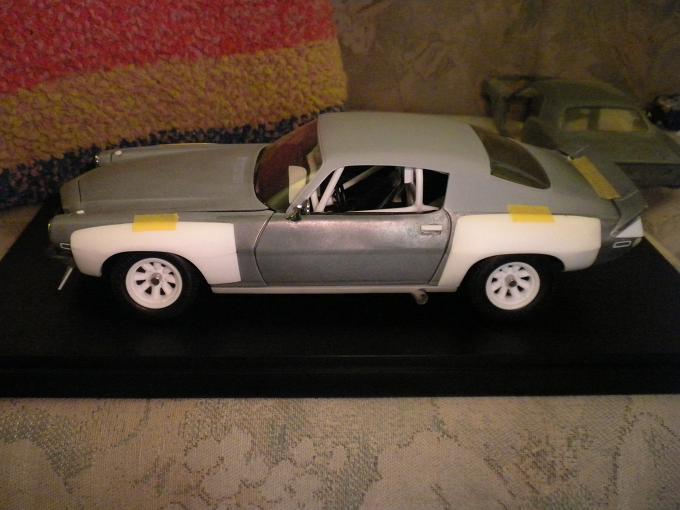
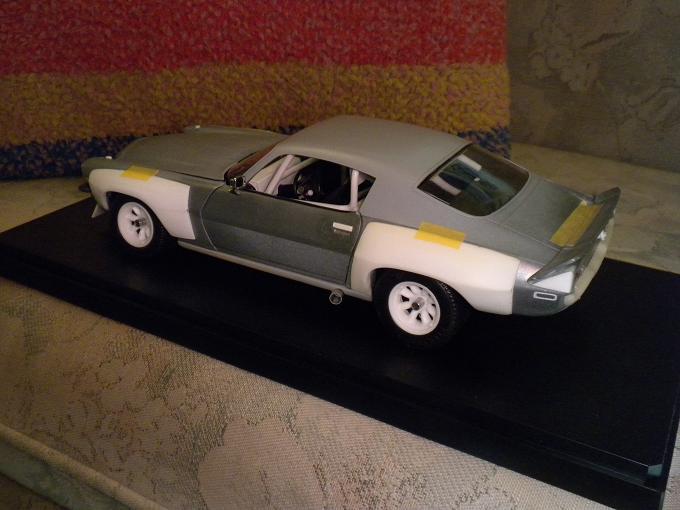
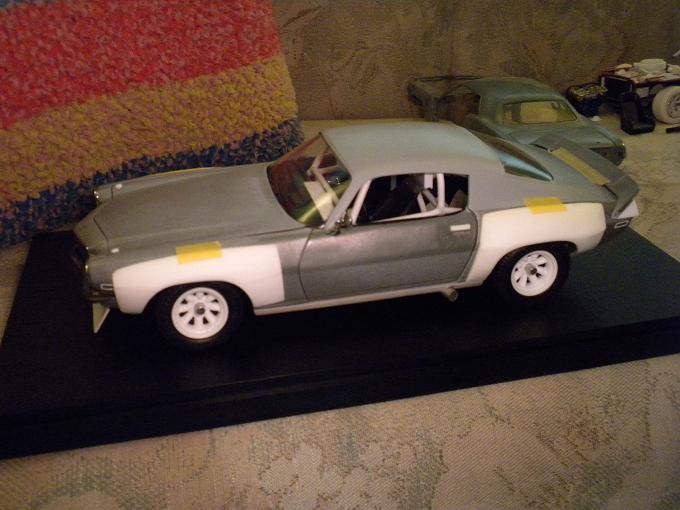
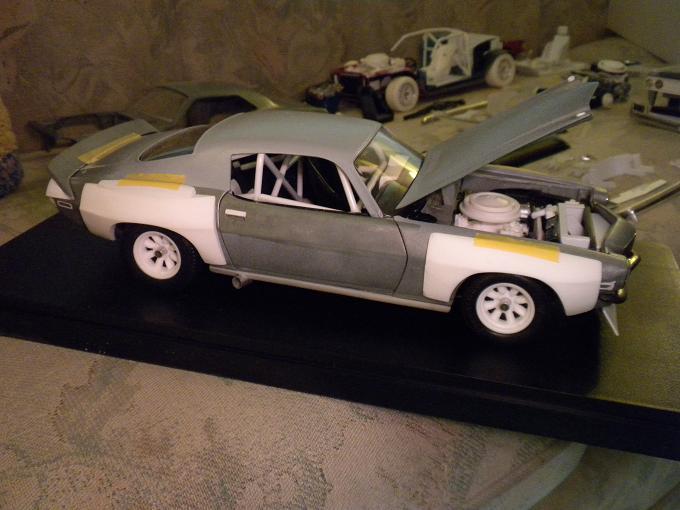
Thank you so much for the kind compliments... Rather than consume bandwidth for updating with near-identical photos, here I'm just erasing and replacing images. The metal wheel arches have been filed out a bit, the front and rear track is wider now, mirrors have sprouted both inside and out, while the mass and shape of each flare continues to be refined. Further, the inside of each flare is now being partially hollowed out and thinned, helping to accommodate the tires that are situated further out. I can put a lot of time in, although stage-by-stages changes are difficult to discern for being subtle. ...the top of each flare is being worked upon to ensure a smooth transition without calling for an enormous application of spot putty. Hard to make out, but each wheel arch opening/lip has been squared off for sanding stick work alone. I'll likely have to file and sand things further so the lips will 'pop' by comparison to the flare bodies themselves, although in sum things look better. Saggy before given the fit over the locating dimples wasn't first rate, for adjustment the rear 'glass' fits flush as it ought. Thanks... Mike K./Swede70

-
Thanks for the kind words... Modest stuff this, but I had to patch the corners of the rear flare where I'd misjudged how much material would be needed along the top. Small sections of Plastruct square stock were introduced in, sanded, puttied, and hopefully good to go now. Strange to relate that this took hours - but it did. Sigh... Mike K./Swede70
-
Looking really nice. Great job on the flares and the finish choice on the top in particular. Mike K./Swede70
-
Thanks for the kind words and interest... Working up the opposite side, with the top of the rear flare having to be built up with some glued on plastic stock given the mold ought to have been bigger here. Notice how the mass of the rear flare is visibly less, with the character line more pronounced as I gradually learn how to do this. Now I'm moving from flare to flare, removing one, refining the shape to a degree, and then repeating. Thanks... Mike K./Swede70
-
1/18 Bburago Jaguar E-type Lightweights conversions
swede70 replied to wardsmodelbuilder's topic in Diecast Corner
Proceeding apace. Thanks for sharing... Mike K./Swede70 -
Bye-bye dog leg door hinges. What glue to attach doors to body?
swede70 replied to Jon Cole's topic in Diecast Corner
A heavy bead of thick variant CA glue might also suffice. Mike K./Swede70 -
Thanks for the kind sustained interest... Actually ibj40, I have to work up a clear 'Lexan' bottom lip front spoiler, hence what is seen is preliminary and fated to be replaced. My first attempt with material I felt was in scale pretty much failed, although I'll likely try again with a thicker option hopefully more amenable to shaping. Kind thanks for your offer... - Noticed will be the first rear flare I've shaped, while the opportunity was taken to reduce the mass of the front flare to more or less match. Still pondering how I'll do the flat lip of each wheel arch opening, but somehow I'll get it. I want a 'no excuses' result. Thanks... Mike K./Swede70
-
Beautiful period photographs - very nice. Kind thanks... Mike K./Swede70
-
Thanks for the kind words... Seen are the four raw flares all together after a few further missteps. In a manner of speaking, creating these was a soulless exercise, while sculpting what has been worked up will be considerably more rewarding. ...followed if you will be the first round of reduction in size less the character line and squared off wheel arch opening lip to come. Good enough to register progress even as the shapes seen are bulbous and far from final. The rear flares will be roughed up in a similar fashion before I return to what's made out here. Thanks... Mike K./Swede70
-
1:18 ACME/GL '68 Shelby Racing Co. Trans Am Mustang revised
swede70 replied to swede70's topic in Diecast Corner
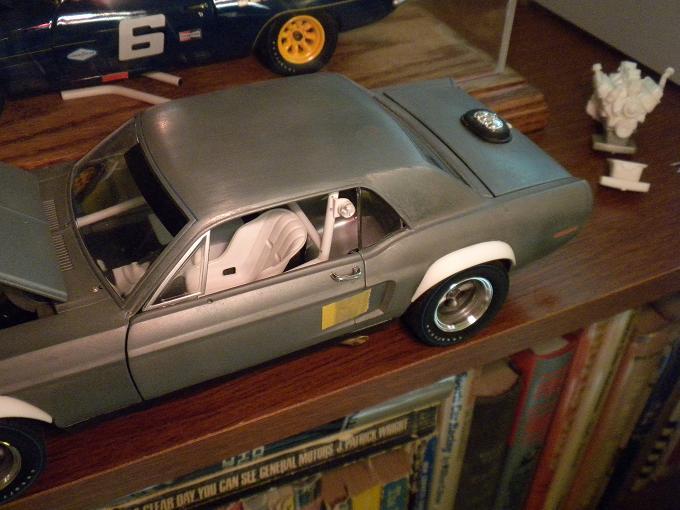
Some quick work performed then... Seen on the main roll hoop looking back will be a pit signalling lamp characteristic of projects Shelby and AAR had a hand in from '68 through '70. At some point I stumbled across a built up 1:25th scale AMT (I think) '69 Corvette kit that had tail lights that seemed appropriate for use as 1:18th scale lamps, while eventually a friend was kind enough to employ my mold to cast examples in clear resin. A long time coming, but what was worked up looks trim. One per side then. Thanks... Mike K./Swede70
-
Looks nice Jim. I wonder how the Duster/Demon would have compared with regards to weight distribution compared to the E-bodies run across the '70 season, while I'd think having the turning wheels situated further forward might also have helped with regards to handling. Your conversion appears very clean... Mike K./Swede70
-
Looking nice ibj40. If you need alternate export brace options to tweak to fit, know that I have them. The Welly '70 Cougar looks pretty good - certainly I like what they did with the dashboard detail. Thanks for sharing... Mike K./Swede70
-
1:18 ACME/GL '68 Shelby Racing Co. Trans Am Mustang revised
swede70 replied to swede70's topic in Diecast Corner
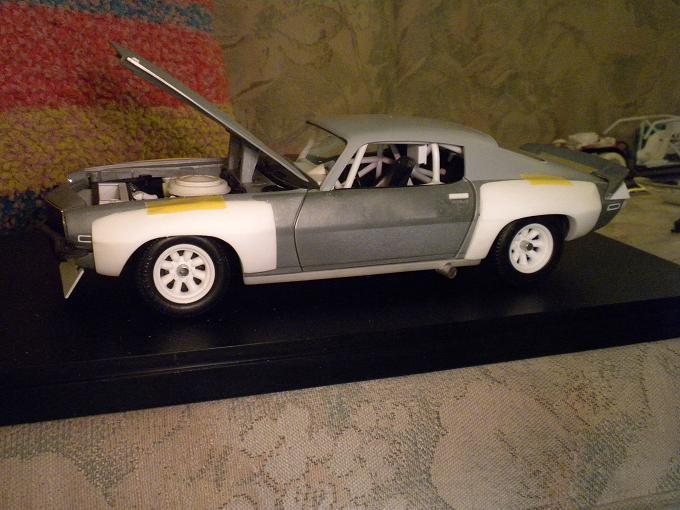
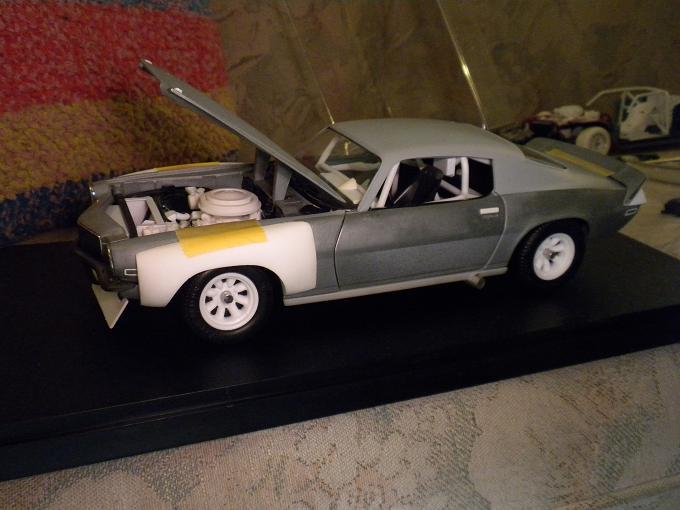
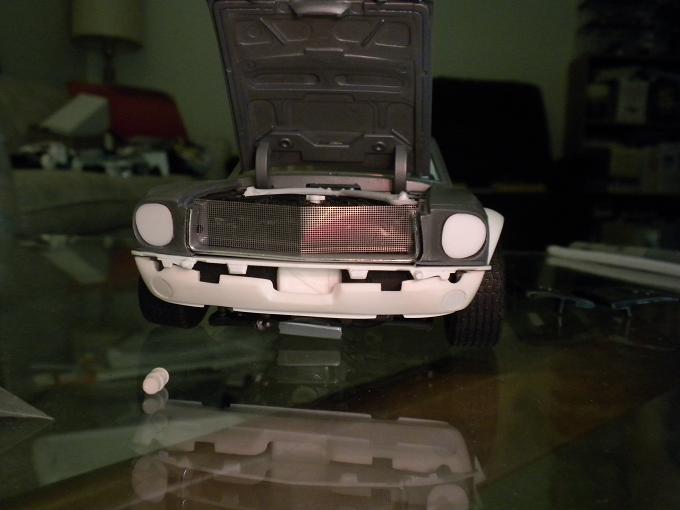
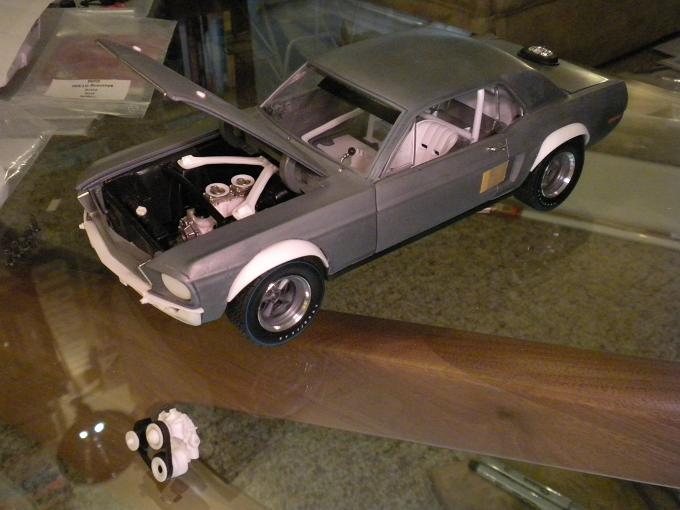
Greetings, Also receiving a bit of attention, this would be the second body worked up to better replicate a flared '68-season Shelby Racing Co. Trans-Am Mustang resting a bit easier. The rear suspension has been cut apart to reduce the ride height, a Studio 27 photo etched mesh sheet has been employed to do a grille, while the seat and seat mount has been worked over to ensure it sits lower - especially towards the rear. The roll cage main hoop was tossed aside and redone for needing to be both taller and a bit narrower along the top, while notice how it tucks in better. Additionally, Greenlight plastic 'glass' polishes up well enough as can be seen. If nothing else is strictly at risk of damage, definitely give things a literal whirl in this respect... Further work (some of it unseen) includes a reasoned accessory drive up front (simple though it may be), a stress bar added forward of the front suspension turrets, and a Kar Kraft Watt's Link center pivot box structure fabricated to fit between the rear subframe rails. I had two rear suspension castings, hence I cut the springs from one, and the axle clear away from the other in anticipation of adding lowering blocks, locating links, etc. For the work done the standard springs aren't stressed too much for forcing the ride height down, while as can be seen, the ride height reduction in the back helps the model quite a bit. The exhaust dumps are formed from brass tube and could actually be bent without huge risk of wall collapse. Now if only I could do the same thing in 1:25th scale for my other projects! The short carburetor velocity stacks are modified 1:25th Jo-Han '69 S/S AMX parts, hopefully to be cast in clear resin. An air box stands to be fabricated to overlay much in this respect. Notice too the the pulleys have both front and rear lips apart and away from the belt used, while I hope to reproduce the Dayco D7 checkered pattern on the edge of the belt itself when finishes are finally applied. The carburetors mounted inline are ERTL '64 Fairlane Thunderbolt issue and are very nicely rendered... ...and just the front again, this time with a the aforementioned new grille. I had a spare grille assembly, traced it onto some thin sheet plastic, and then used the template to cut out the photo etched mesh. Given the grille surround is lightly glued in, the grille drops in from the top. Seen further below is an intended Aviaid extended sump oil pan based upon the Hwy. 61 '70 BOSS 302 tool, while the coil situated to the left is a Hwy. 61 '63 Pontiac LeMans item. Thanks for your review of this brief project update... Mike K./Swede70
-
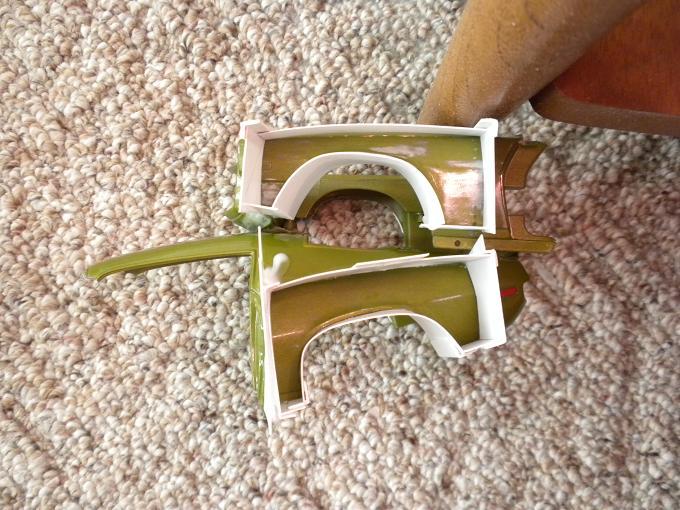
Greetings, Having an unconscionable amount of time on my hands, I've had opportunity to pour resin into what was worked up earlier. The rear half proved resin tight, although the front less so! For liberal use of mold release the two chunks 'o resin were removed intact from the panel work, while spied below may be seen the wall work necessary to reproduce the effort on the other side. ...in essence, all the value is manifest on the back side of these given they literally mirror the profile of the surfaces upon which they will rest. ...while given the resin spillage from below (i.e. leaky walls on the reverse side front half), some unpleasant chipping and sanding was required to clean up the surfaces walled in here. Thanks for your review of this spotty update! Mike K./Swede70
-
Looks really great - fine work. Mike K./Swede70
-
1968 RKE/JRT SCCA Trans Am Javelin
swede70 replied to swede70's topic in WIP: Other Racing: Road Racing, Land Speed Racers
Minimal stuff - although work just the same... For cutting up my first AMT Gremlin tunnel ram intake and mating the remains to the scratch built intake flanges as they rest along the cylinder heads, it was noticed that I didn't have enough material along the ends of the individual intake runners for matters to join up cleanly. Happily someone on a FB AMT group page afforded me another AMT Gremlin Pro Stock intake which was handled differently for employing the stock flange material to extend each runner just a bit along the bottom, resulting in an overall tighter assembly. Further, more material was removed from upside down 'vee' formed beneath each intake runner stack consistent with affording room for the pair of oil breathers situated in-line, although these have yet to be sourced. Lastly, having ruined the outer profile of one of the fender end caps for too aggressive sanding and shaping, one was replaced. Somewhat slow as of late... Thanks... Mike K./Swede70
-
Thanks - I'll explore the possibilities suggested. I could be saving work thus from the impressions gleaned here. Mike K./Swede70
-
1/18 Bburago Jaguar E-type Lightweights conversions
swede70 replied to wardsmodelbuilder's topic in Diecast Corner
Greetings, Neat project these will be. If it helps there's a diecast subpage on this same message board, while many a FB group page option exists even if vintage road racing topics (especially as they relate to diecast-based topics in 1:18th) are scarce everywhere. For doing the same, it will seem only a half-dozen enthusiasts active across boards are so-committed. I'll be looking on with interest... Mike K./Swede70 -
Just short notes consistent with suggestion minor alternate directions, with the appropriate technique being that which for any potential builder discovers best... Not absolutely necessary this, but a spare body and chassis to establish the tightest fit with the dash and plastic 'glass' installed helps a lot. I realize this isn't an option for all and that resources can sharply restrain ambitions in this regard - but it helps! A good supply of file cards and scissors to come up with initial shapes is advised - sort of what 1:1 fabricators would call CAD, or rather Cardboard Aided Design. Sometimes too I'll take fuzzy pipe cleaners to establish the rudiments of what will be required for multiple bends and angles I'll need to reproduce. If something is a scale replica of a period racer, definitely pile on the research. Some problems will 'go away' for careful analysis of why this team or that opted to do things in a particular fashion. This said, plastic model cars have thick floors and thick roofs, and this reality will impact how much carries over. Concerning materials, I don't use rod plastic, but rather employ plastic tube with a brass wire core inserted and glued within. Tubing collapse isn't a terrible problem if the wire chosen is appropriately sized, while sharp bends won't strictly disturb the shape of material both 'upstream' and 'downstream' of the bend. Ideally, the brass wire will be stiff enough to resist distortion along the lengths of material you'll wish to keep straight. Moving along, sometimes a brass 'core' can be used to site a particularly tough bar relative to another; i.e. drill a discreet hole in one, and factor in the reality that the brass core may have to be a bit longer to plug into it from the tube to be attached to it after properly filing and preparing a fishmouth contour or contours as required. As for bending, I have a small bread board that has a nail tapped into it; i.e. a mandrel bend in miniature. If a softer or rounder bend is called for, on occasion I may press some plastic rod into service in keeping with replicating the radius desired. Just to be consistent, even the tiniest bars will have a brass core on my efforts. Happily none of my scale drivers has thus far been hurt... For the use of a pointed tip Sharpie marker, I'll try to ink mark where the bend has to begin. It's an approximate process given it's all too easy to place a bend too high or low, while the angle and factoring in having extra material to trim to size both 'upstream' and 'downstream' again is important. With regards to matters related to symmetry and the battle to secure this quality, I always endeavor to do bars in matching pairs. Go in expecting to waste a fair amount of material for misjudging much; i.e. it's too short, it's too tall, it's asymmetrical, etc. When something is 91% of what you need but doubts linger, part of the satisfaction of scratch building is knowing that you can toss matters aside and start again without suffering huge guilt. I pretty much expect to fabricate each bar twice or three times over, while if I'm any better or more accurate, personally surprise is registered. Alignment of materials as they attach and as the glue sets can be a challenge, with the creation of a rudimentary fixture to hold this or that bar 'just so' sometimes required. Although basic, stacked audio cassette boxes and small scrap sheets of plastic with quickly made extensions of rectangular stock can serve very well, stabilized for the use of a discreet length of two of Tamiya tape holding everything securely to the table the total setup rests upon. Do allow things to properly setup and dry. No need then to court bitterness for trying to achieve too much, too soon. Concerning glue, again - nothing set in stone, but I like thick CA glue and typically touch in bends with additional applications combined with a dusting of a filler known as MicroBalloons. Residue removal and final shaping follows this. Your mileage may vary. Tax, title and license extra! Mike K./Swede70
-
-
until
Word is filtering out that the March show has been cancelled over concerns of public gatherings in excess of a hundred people being ill-advised given the spread of COVID-19. An official update to this thread by parties directly involved will surely follow, while all the same I thought it best to afford a head's up to those who would need to alter and/or cancel their plans related to such. Certainly I'm not happy to be the bearer of bad news, but all the same we must adjust as necessary concerning an unfolding situation which is about safeguarding the collective 'us'. Thanks... Mike K./Swede70 -
1968 RKE/JRT SCCA Trans Am Javelin
swede70 replied to swede70's topic in WIP: Other Racing: Road Racing, Land Speed Racers
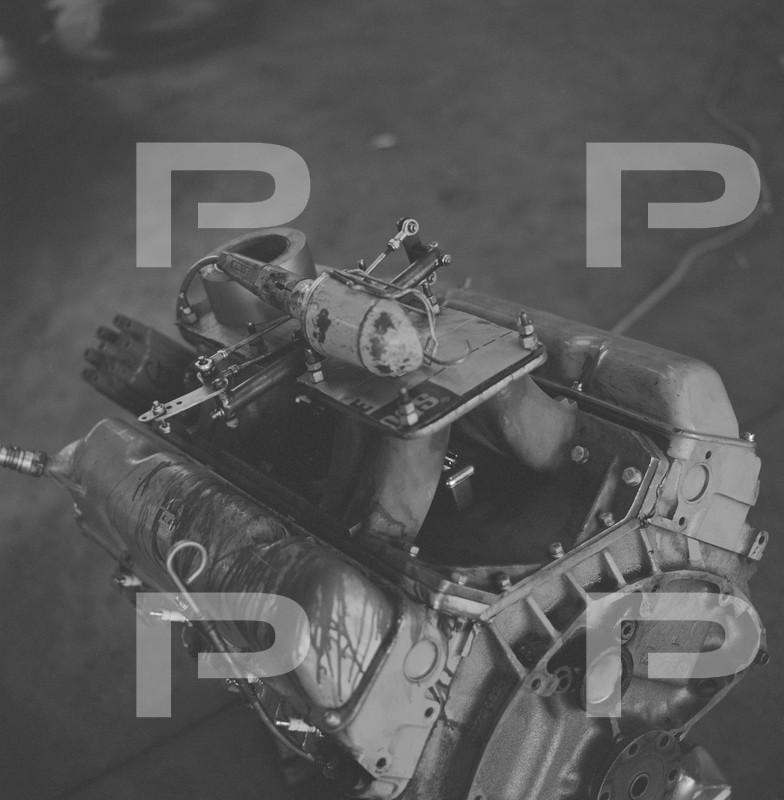
Greetings and thanks for the interest... A little tedious, but I'm working up a proper intake given the IR or Independent Runner 'shorty' tunnel ram employed by Ronnie Kaplan Engineering on the team cars for most of the '69 season isn't an 'off the sprue' thing. Working with an AMT Gremlin Pro Stock tunnel ram (actually two examples in point of fact), each bundle of intake runners have been cut free of the bottom and side cylinder head flanges to open up and refine the shape these, while the flanges had to be scratch built and still require refinement to be complete. Mounting hardware should be within the realm of the possible to add with plastic hex rod, and faint stiffening structure may yet be added atop it. Altogether it's been a bit of drag to do. Thanks... ...this would be the FIA homologation image submitted to secure the legality of the intake the team ran in competition for most of the season. At other venues they'd revert back to the '68 spec. cross ram not unlike that seen run by Penske Racing on their ubiquitous Camaro entries. The pair of factory-blessed independents running the slightly revised '68 team cars ran the older cross ram manifolds throughout the '69 season. ...while this would be an actual '69 spec. RKE/JRT engine - out and likely expired at that. Note how the carburetor mounting platform has been milled down substantially, replaced if you will with a thinner metal platform with studs poking upward and through it. Oil venting on the design was primitive, with a pair of Cal Custom breathers situated inline atop the lifter galley area. John Dianna photograph. ...and my initial attempt to reproduce it. Other than the flanges below, nothing has been strictly glued in place. The complex carburetor linkage seen in the second photo may well be beyond me to replicate. And although just a spare mock up engine, notice the use of '69 SC/Rambler heads which are good to include given the inaccuracy of fitting the Gen. 1 heads to any intended Gen. 2 or 3 AMC build. An explosion proof bell housing is coming, already seen on my '68 but likely incorrect for use on the earlier project given a partial scattershield was fitted atop the transmission tunnel and is plainly visible from the interior. I have a mold for the same, although the flange detail will need to be added for attaching a thin and carefully shaped layer to the end of such. Thanks... Mike K./Swede70
-
Greetings, Although not a GT Spirit model, seen below is a Replicarz sealed resin 1:18th scale AMC Javelin Trans-Am car that would be very close in spirit to what you'd have in hand. Sealed resin models tend to have very thick material throughout which lends a sense of heft to them while also permitting the use of oftentimes ungainly and oversized screws (or perhaps just a screw) to hold the basic floor to the body shell. I suspect what you have in hand may just have the one screw, with the rest of the floor/chassis being held fast by unseen locating tabs further in. In my photo(s) notice that I took care not to damage the photo etch parts glued to the surface of the body and isolated the 'glass' the best I could. I wrapped a towel to support the hood and decklid ends and tried to maintain a small recess or dip in the material to drop the model into lest it shift when a screwdriver was used to remove those intimidating screws. Further, a very thin trash bag was overlaid onto the towel lest the towel tear away at the photo etch; i.e. this worked nicely, although a more modern topic taken up by GT Spirit many not strictly warrant this extra step. Back to construction philosophies and servicing something like this, other experiences can be shared. Know that within the space of an area automobilia store where I sometimes work, it's a fairly regular thing for use to be forced to disassemble almost the entire sweep of scales of modern sealed resin models to effect repairs given this or that has broken off or fallen away; i.e. the seat that rattles in the interior, the dashboard that has (literally) come unglued, etc. The impression is further gleaned that irrespective of box badging that would suggest otherwise, we feel we're looking at the work of the same company (or one of maybe three) again and again. In short, few surprises are discovered across this tool and that company with regards to how things are set up or attached beneath. And finally, just a brief note about windows on sealed resin models. A real weakness of many of the sealed resin topics are the windows; i.e. the wavy sheet acetate approximations of such that often look something less than convincing. They are easily marred, people will cover such with fingerprints, and polishing them up to disguise such mars proves difficult if not impossible. I suggest steering clear of ambitions to mask that which you see unless you've secured a damaged model for a very low price and are accepting of mistakes in exchange for developing a reliable technique. It's possible too that experimentation may be done on sealed resin topics in 1:43rd given the hurdles would largely be the same. Good luck! Mike K./Swede70
-
Nice photo choices/contributions AFX/J.C. One can set up quite a neat contrast between finishes for careful paint selection here. Although really hard to do, the vinyl tape stripes contrast a little with the flatter finish seen on the door numerals (topside too!) as well. As for the top, it seems the team had a dreadful time keeping the finish neat looking as it often appears blotchy in period photos. Little wonder the restored vehicle has an easier to care for semigloss finish applied to it. Mike K./Swede70
-
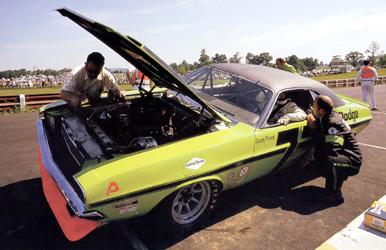
Looking very nice, with special reference to your flares which certainly impress. If it would save you a step or steps, go for a very flat finish on the top. I'll try to attach a period photo that might telegraph that the topic looked duller in period versus how the car appears at present. The spec. seen in the photo is from the '70 Mid-Ohio race date. Thanks... Mike K./Swede70


until