John Clutch
-
Posts
364 -
Joined
-
Last visited
Content Type
Profiles
Forums
Events
Gallery
Everything posted by John Clutch
-
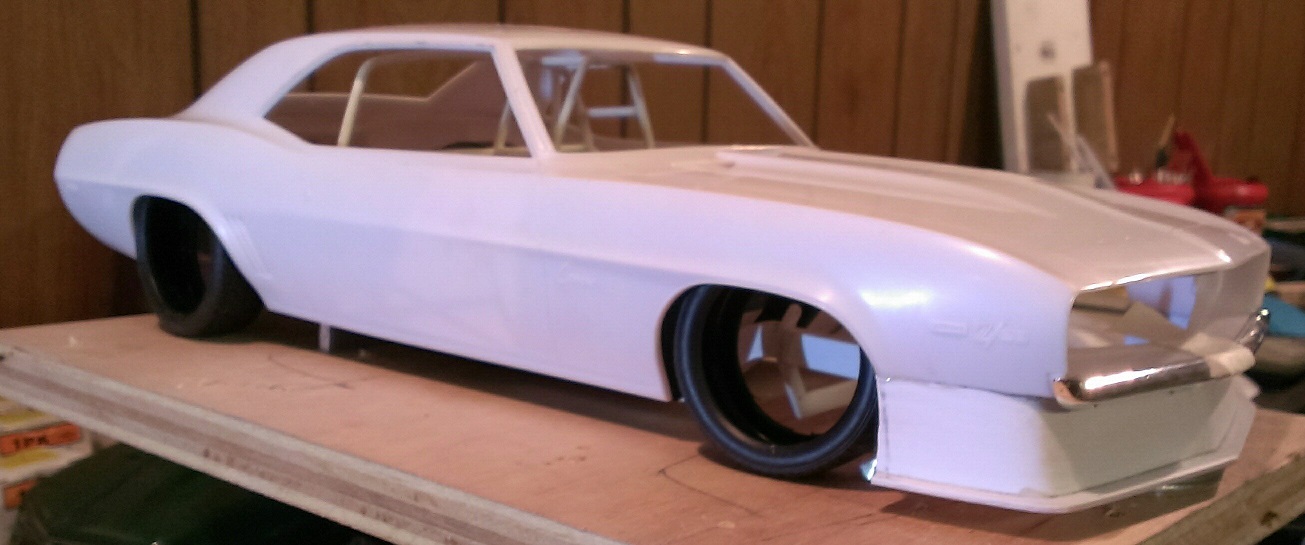
 I finished the basic shape of the front spoiler. Sorry for the horrible pics once again. I really need to start taking photography a little bit more seriously. Still not 100% sure how I am going to detail it, maybe add the factory cut outs and fog lamps, maybe a single port for the turbo, we will see. But it will have more shape to it than you see. Looks like a cow catcher on a car from Road Warriors right now and that will not do. This was a fun build. x275 Rules state that the front spoiler can not be forward of the bumper. I spent Tuesday making a wooden form. I wasnt sure how tall I wanted it, so I made the total height of the form 1". (3/4" plywood plus a 1/4" styrene sheet that was removable at the bottom) I pulled out my heat gun and remembered that the gun broke years ago LOL oh well. So I used a lighter to shape the 1/16" styrene sheet over the form. Of course I messed up the first piece and what you see here is my second attempted so Im ahead of schedule (3rd time is a charm seems to be my pace lol) Decided that I wanted the spoiler 1/8" lower than the rest of the fender, so I took off 1/8" off the piece just like how I sectioned the body before. Once it was the correct height, I removed the 1/4" styrene from the form and added 1/8" worth of shims to make up the height difference. Laid a small 1/16" styrene sheet down as the diffuser, used gorilla tape to hold spoiler to the form (never again), added glue to the bottom edge of the spoiler and screwed right through styrene sheet, creating the bottom section of the spoiler. That went nice and smooth, except trying to get rid of the glue from the gorilla tape later. Thats some serious tape !!!. I trimmed up the diffuser a bit. What you see is oversized. There will be a radius made with epoxy or body filler later. To mount the spoiler to the body, I used the form to center it to the body by raising the form 1/16". Applied glue to the spoiler and lowered the body onto it. This is where I missed ever so slightly. You cant really see it but one side is set further back than the other side. This isnt a issue because there was be a lot of contouring detail later and will be hardly noticable (I hope) Thanks for looking.
-
Thanks guys. Yesterday I was having internet issues so some pics went through my email, some did not. So tomorrow I post them plus I have a day off tomorrow from work and hopefully Ill have even more pics. Received a bunch of brass tubing today so I hope to have some suspension components started (atleast lol)
-
1/16 Scale Army Vega Funny Car - Finished 10/14/2018
John Clutch replied to Mooneyzs's topic in WIP: Drag Racing Models
I just realized that your blower is a 3d printed part and not a polished aluminum unit. Now Im really jealous LOL -
Of all the front engine dragsters Ive seen, this is the one that has inspired me to build one. Very very nice.
-
Looks great !
-
Here is another pic. The rack n pinion will mount in this location. The rear control arm support will be cut away at the bottom for motor clearance, as soon as I figure out the rest of the tubing and motor pan.
-
I have more pictures but it looks like I lost them somewhere lol.
-
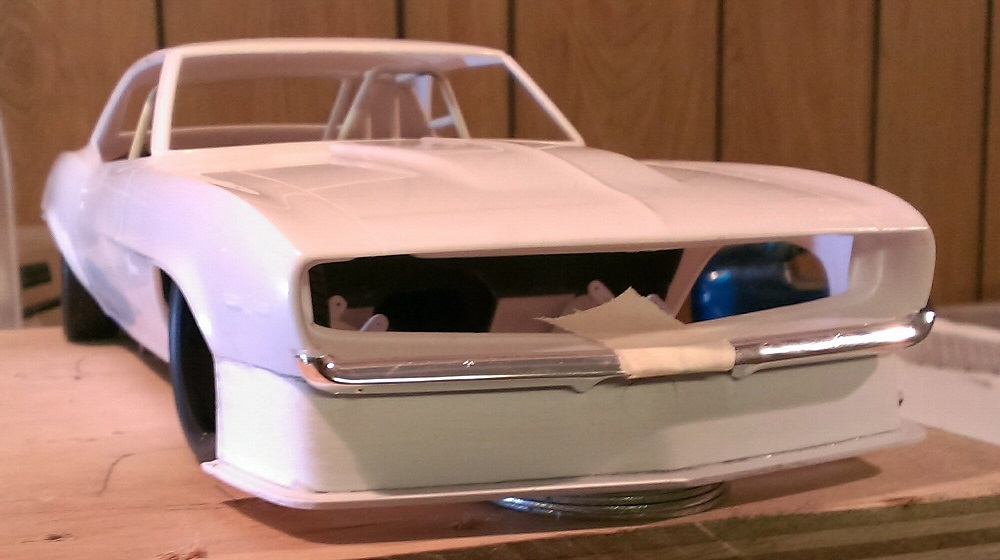
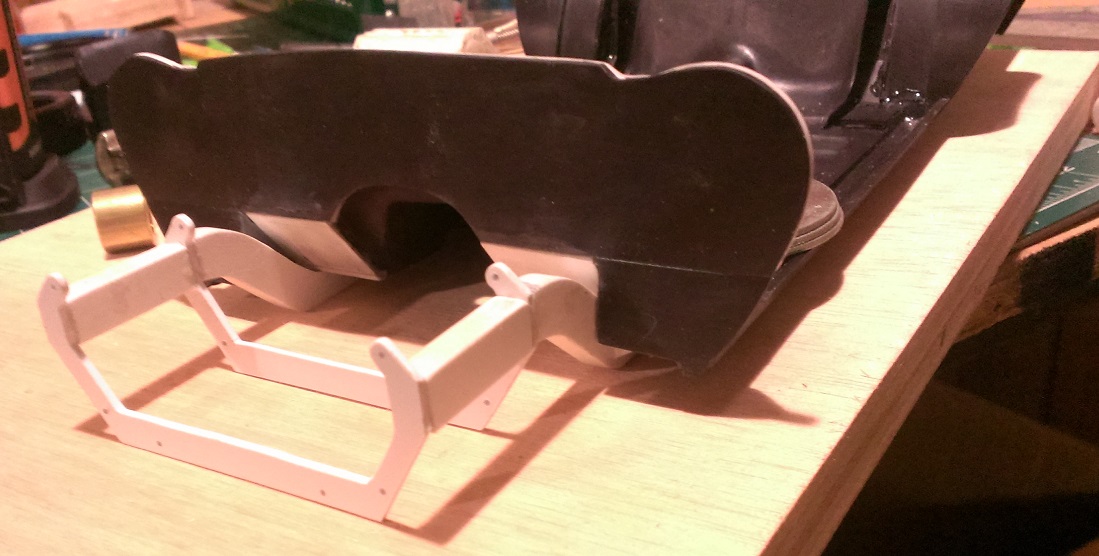
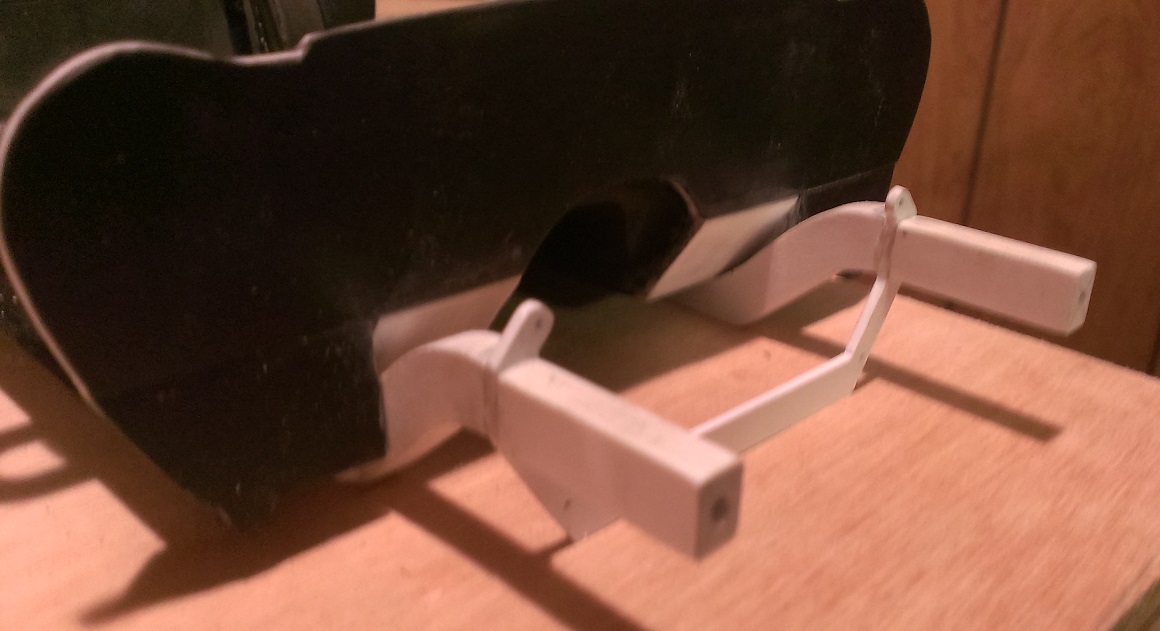
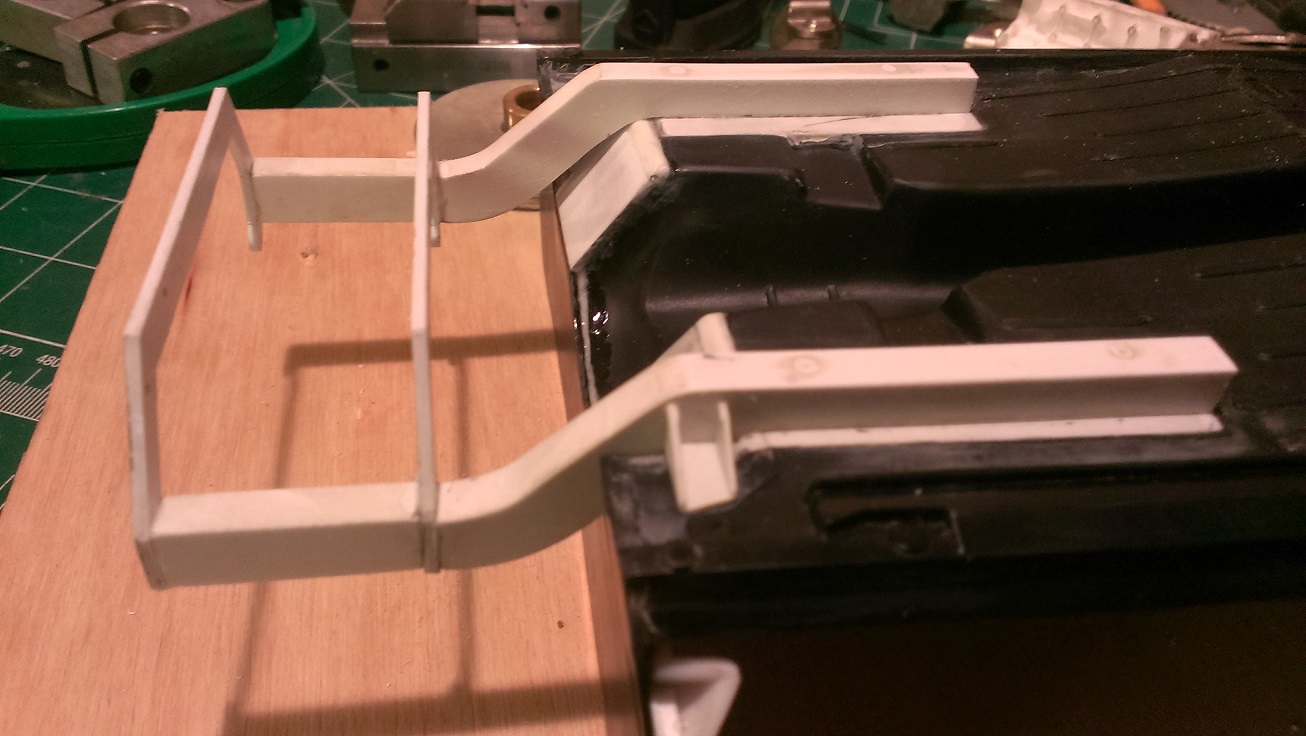
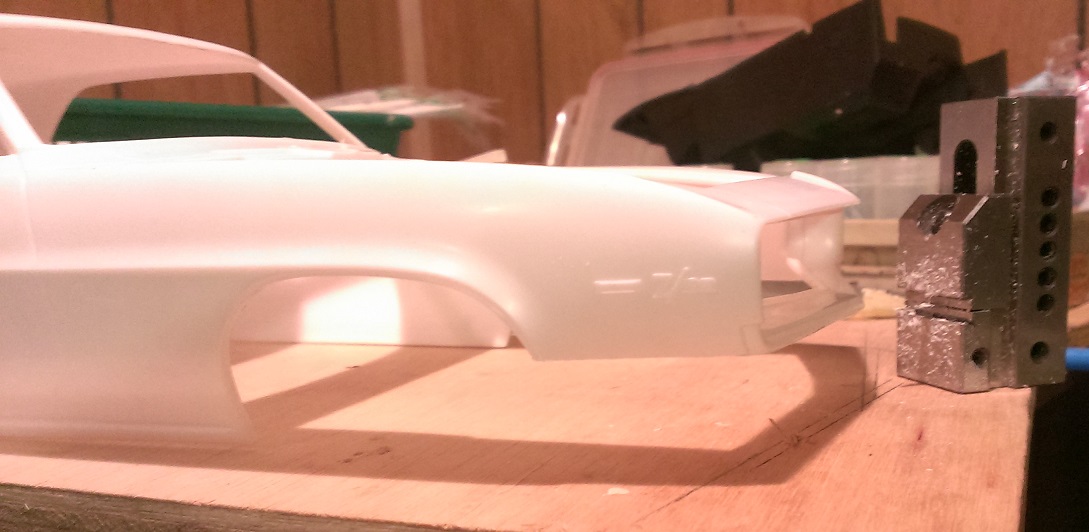
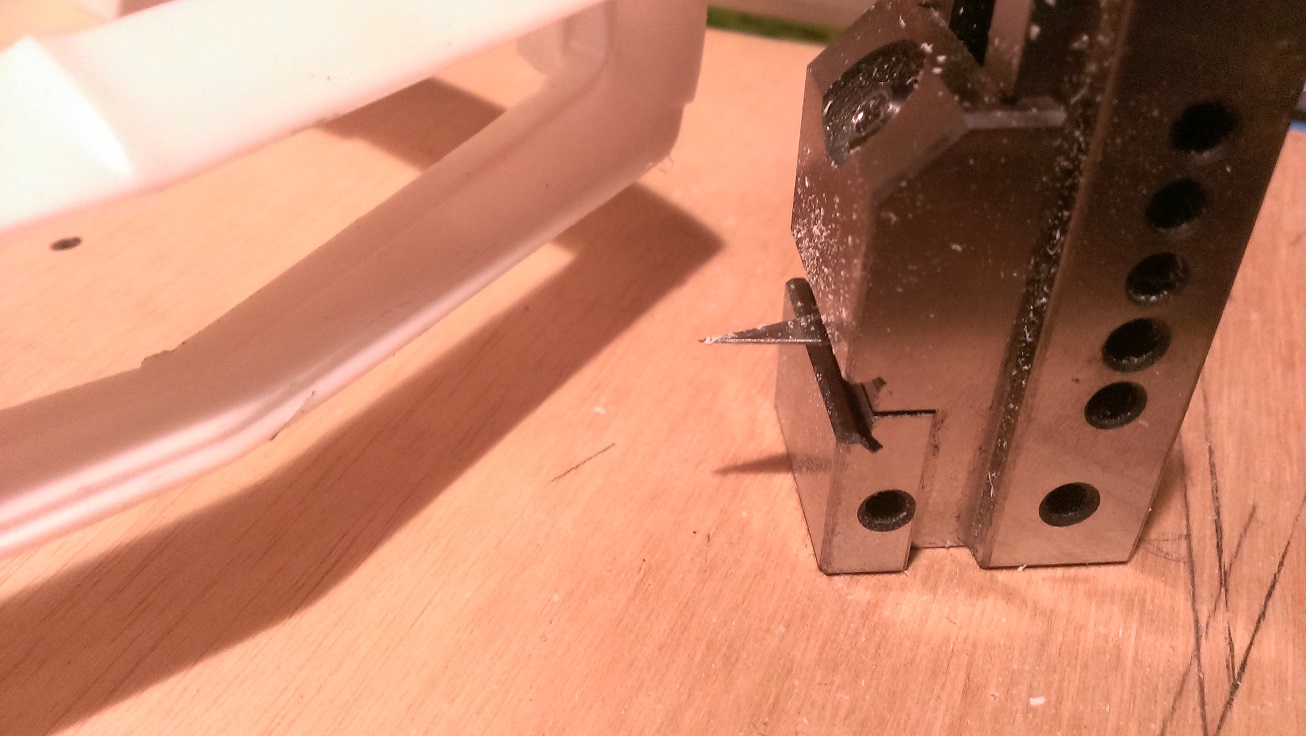
Small Update. Sorry for the bad pictures. After massaging the original subframe, I decided to just cut it off and build a "aftermarket" unit. The X275 rules state that the original frame must be retained from the center of the front axle to the rear wheel opening. It also states that any bolt in aftermarket sub frame can be use, as long as the shocks are in the stock location and that the original suspension design is retained. I chopped off the original subframe from the undercarriage and filled in the area with styrene sheet. I also reinforced the area with an additional sheet of styrene as the plan was to bolt the main canals in place, wihich is done (sorry, no pics) I used four 4-40 countersunk screws. The interior bucket needs to be sanded off in that area, BUT Im considering to eliminate the interior bucket all together now. We will see. What you see here is the subframe section up to the control arms. There will be a round tube frame attached to it which will support the front end, turbo, possibly the intercooler, etc..... I build this are by layers. First I glued the rear conrol arm support to the sub frame rails. Next I cut the sub frame rail section that will go between the control arm supports and drilled a 3/32" drill through it and glued that in place. Then I drilled into the rear section of the subframe and cut two broken 3/32" drill bits and pressed them in place for added support, leaving enough space to cap the end with some 3/32" styrene, to lock it in place. There will be a lot more tubing added to the subframe as soon as Im happy with a lay out. At this point, I realized that I needs to get the front spoiler on the body to finalize the round tube section. Determined that I would need to cut 3/4" (from the bottom of the fenders @ the rear) which was nearly perfect for my mini vise. The solid jaw is .730 think, plus the thickness of the hobby blade of .030, it came out to be .760. Close enough!!! I shimmed the nose .150" and go to chopping. Went very well with very little sanding. SUGGESTION: If you decided to section a body in this manner, I suggest you spend the time cutting through the corners first, like where the front and side of each fender meets. Then start cutting through the rest a little at a time. You can see how close you are to cutting through by holding the body up to the light and look at it through the inside. I left the front center and the edges of the wheelwells for last. You dont want to cut one side off because you will not having anything to support the body and the cut will go crooked. I hope to have the spoiler mounted, the body pinned to the undercarriage and the front section on the next update. Thanks for looking
-
Very nice!!!
-
1/16 Scale Army Vega Funny Car - Finished 10/14/2018
John Clutch replied to Mooneyzs's topic in WIP: Drag Racing Models
I have never built anything that didnt have set backs. "Third time is a charm" is usually my progress pace lol I know you frustrations very well and so do the others. If this was easy than it wouldn't be as rewarding. Just look at all the good thats in it!!!! You have PLENTY. Look at Codi for inspiration. He lost an entire project with a single mishap. He licked his wounds and moved forward. I honestly dont think I could have done the same. -
They shoot horses, don't they?
John Clutch replied to STYRENE-SURFER's topic in WIP: Drag Racing Models
They sure look like the picture. Same clearance around the mounting screws and all. -
Lookin great!
-
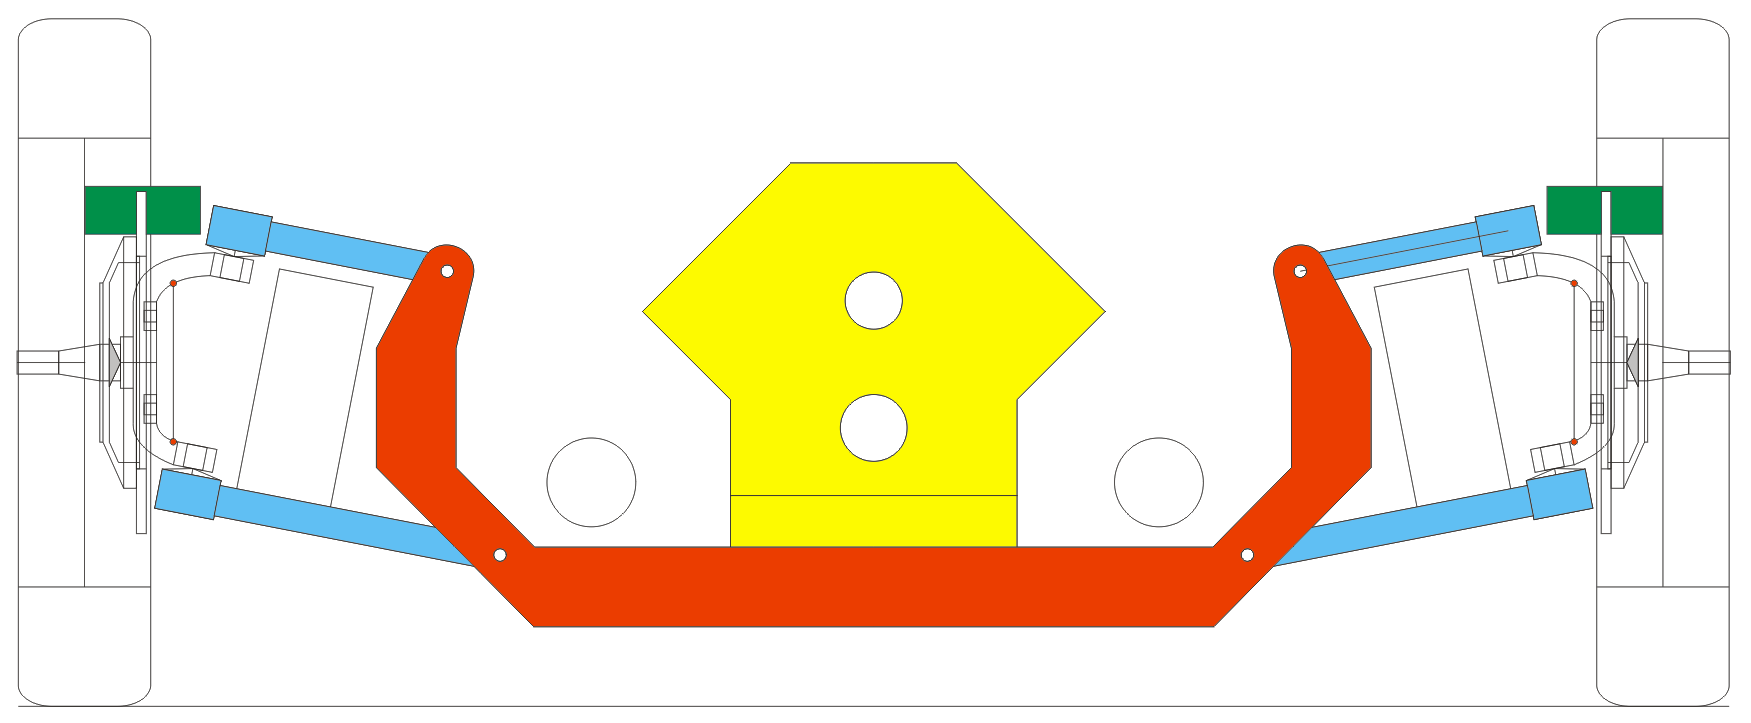
Hello everyone!! Im back on the computer laying out the components for the past month and its been time well spent. Lots and lots of tweeking. Ill save more details for later once I have some actual work to show you, but here is a drawing for the final specs on the front suspension. The plain rectangular shapes between the spindle and chassis will be the coil over shock locations. The green represent the brake calipers, which will be located at the front of the wheel but drawn on top to just work out clearances. If you notice the two small red dots on the face of the spindle, that will be the actual location for the caliper mounts. I LOVE hot rods, particularly open wheel rods that use flat control arms, but have alot of rake to them. That stance just makes the car look like its going an extra 100 mph. It might not be the ideal position for a actual X275 car,as some of you know Im being very critical on building a spec car, but Im going with form over function on these components. Thanks for looking.
-
Very cool!
-
1/16 Scale Army Vega Funny Car - Finished 10/14/2018
John Clutch replied to Mooneyzs's topic in WIP: Drag Racing Models
Top notch work. The length of this thread alone speaks volumes for your dedication to this and all your hard work and engineering did not go in vain. One of the greatest models of our time. -
Codi, I must say, I have a lot of fun tricking my friends with your work. I show them some pictures with nothing to scale the parts from and then later in I show them parts next to a pencil tip or cent. I should have taken pictures of their faces when they realize what they are actually looking at lol
-
Workable Plastics Other Than Styrene?
John Clutch replied to John Clutch's topic in General Automotive Talk (Trucks and Cars)
Thank you all for your responses, its appreciated. -
Workable Plastics Other Than Styrene?
John Clutch replied to John Clutch's topic in General Automotive Talk (Trucks and Cars)
Maybe Im not looking through the website properly. Ill take another lookie at it later. Thanks again! -
Workable Plastics Other Than Styrene?
John Clutch replied to John Clutch's topic in General Automotive Talk (Trucks and Cars)
Yes Dann, I see they have 5/16" clear Acrylic rods but wasnt sure about the material or if there was a better substitute or not. Thank you sir -
Workable Plastics Other Than Styrene?
John Clutch replied to John Clutch's topic in General Automotive Talk (Trucks and Cars)
Carl, thats brilliant. That you very much! -
Looking for a solid rod with a diameter of 5/16" (.3125) and polystyrene seems to be only offered in tubes. Looking to make a few components such as turbos, air bottles, etc (nothing structural) and was wondering if any of these materials would be a good subsitute for polystyrene. Im looking not to turn down 3/8" rod if I dont really need to in this case. These items are available at McMaster Carr. It looks like some materials can be bonded with Gorilla Glue but Im not sure about paint. ABS is not available in that diameter. Nylon, Acetal, Delrin, PVC, Teflon, Recycled PTFE, Polycarbonate (lexan), Acrylic or Clear PETG Thanks in advance, Clutch
-
1/10 scratch built Holden HX Overlander Panel Van
John Clutch replied to prestonlal's topic in WIP: Model Cars
Beautiful work!! -
Datsun 510 Pro/Stock "SWEET PAIN" COMPLETED BUILD
John Clutch replied to LeadFred's topic in WIP: Drag Racing Models
Top notch LeadFred!!! You nailed every aspect. The stance, colors and detail. Whats next? -
Datsun 510 Pro/Stock "SWEET PAIN" COMPLETED BUILD
John Clutch replied to LeadFred's topic in WIP: Drag Racing Models
Top notch LeadFred!!! You nailed every aspect. The stance, colors and detail. Whats next? -
Datsun 510 Pro/Stock "SWEET PAIN" COMPLETED BUILD
John Clutch replied to LeadFred's topic in WIP: Drag Racing Models
Fantastic planning LeadFred. You really did your homework on this one. Never in a million years did I think you could fit a belt driven fan in the engine bay with that engine. Cant wait to see the nose on it.