John Clutch
-
Posts
364 -
Joined
-
Last visited
Content Type
Profiles
Forums
Events
Gallery
Everything posted by John Clutch
-
Great color!
-
 Thank you phantom1! A bit more about the hole pattern pictures. The front and mid motor plates are for a small block chevy. My ultimate plan is to build a LS motor, but I figure I would make plates for the kit's motor, even if I dont use it. I have a drawing for the front of the LS motor, but nothing else at this point. The X275 class requires a motor diaper or pan. Im planning to build a pan, that will tie into the front and mid motor plates. Once I figure out the motor location in the chassis, I will build a pan that would accommodate both SBC and LS motors. At that point, I can build the chassis k member around the motor pan and start finalizing the front suspension. The last picture is the bolt pattern for a 9" ford third member. My plan has changed to make the unit out of aluminum. Thanks for looking and comments are always welcomed. Clutch
 -
Datsun 510 Pro/Stock "SWEET PAIN" COMPLETED BUILD
John Clutch replied to LeadFred's topic in WIP: Drag Racing Models
Lookin great. Thats also my approach to the dashboard. -
Sorry. Ran out of patience and time this morning. SBC mid & front plate, and 9" third member. My plan with to make the third member out of sytrene, and all those extra holes are pin locations so i can glue up the stiffening ribs. I got home and decided to make the whole thing out of aluminum now. Working on fixtures now.
-
By the way, your model looks fantastic !
-

-
Nice choice on tires. Proline tires is a great product also.
-
Thank you Red rocket 10 !!! This is my third attempt at posting on this thread, as I keep getting error pop ups, as soon as I hit SUBMIT REPLY, so here is the really short version as my patience does not exist any longer. A few hole patterns.
-
Mini Lathe & Mini Drill Set Up
John Clutch replied to John Clutch's topic in Tips, Tricks, and Tutorials
Thanks kitbash1. Its a very comfortable set up. -
1924 Fiat Mefistofele
John Clutch replied to Harry P.'s topic in WIP: Other Racing: Road Racing, Land Speed Racers
Harry, everything looks fantastic. -
Hi everyone. Im having a bit of trouble tracking down dimensions (or good pictures) of certain components I would like to make. If anyone could help, I would appreciate it. Here is a list of items Im looking for. Thanks. Clutch Fab9 sheetmetal rear end housing - Not the center section Powerglide Transmission - Stock would be great but ultimately it will be based upon the Superglide4. I can only find overall dimensions at this point. LS engine block and heads - I only have a good front view of the engine block.
-
oh I love new toys. Looks like christmas came early for ya
-
Mini Lathe & Mini Drill Set Up
John Clutch replied to John Clutch's topic in Tips, Tricks, and Tutorials
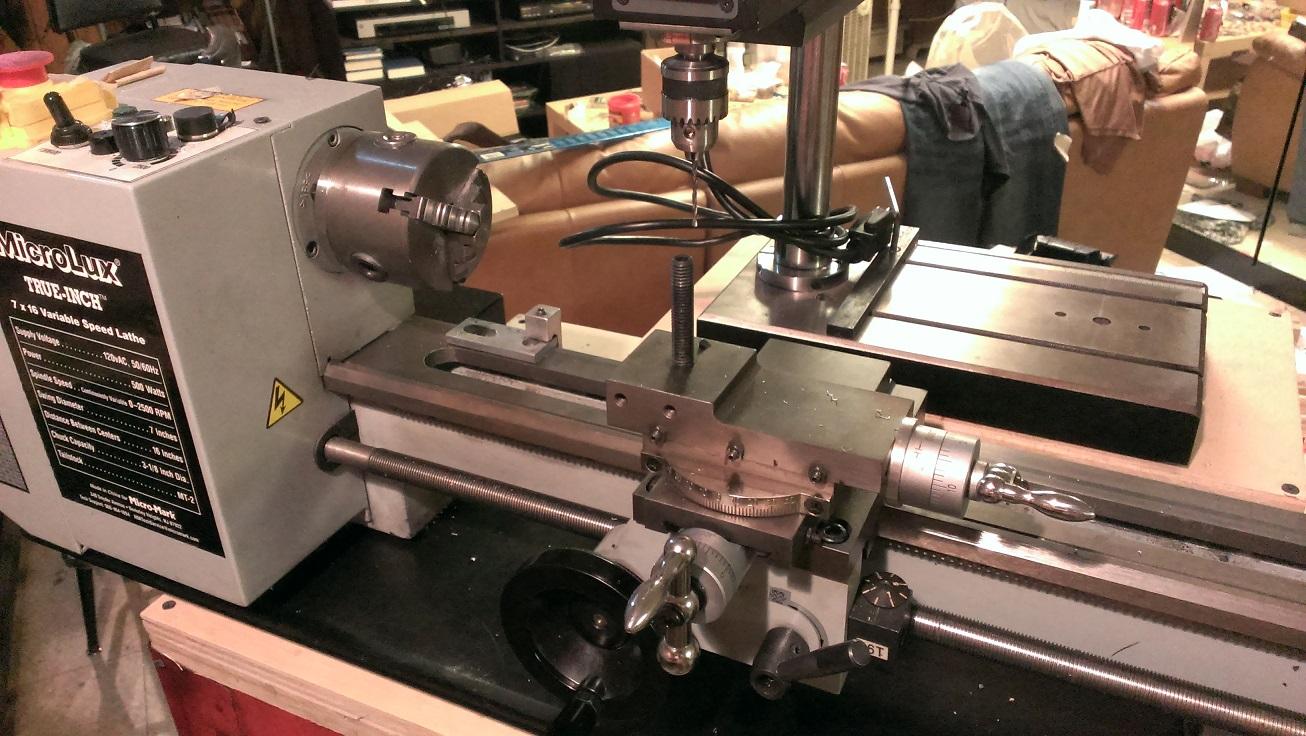
Here is a pic of how the drill is mounted. Boxed in on three sides with two screws through the base, close to the column.
-
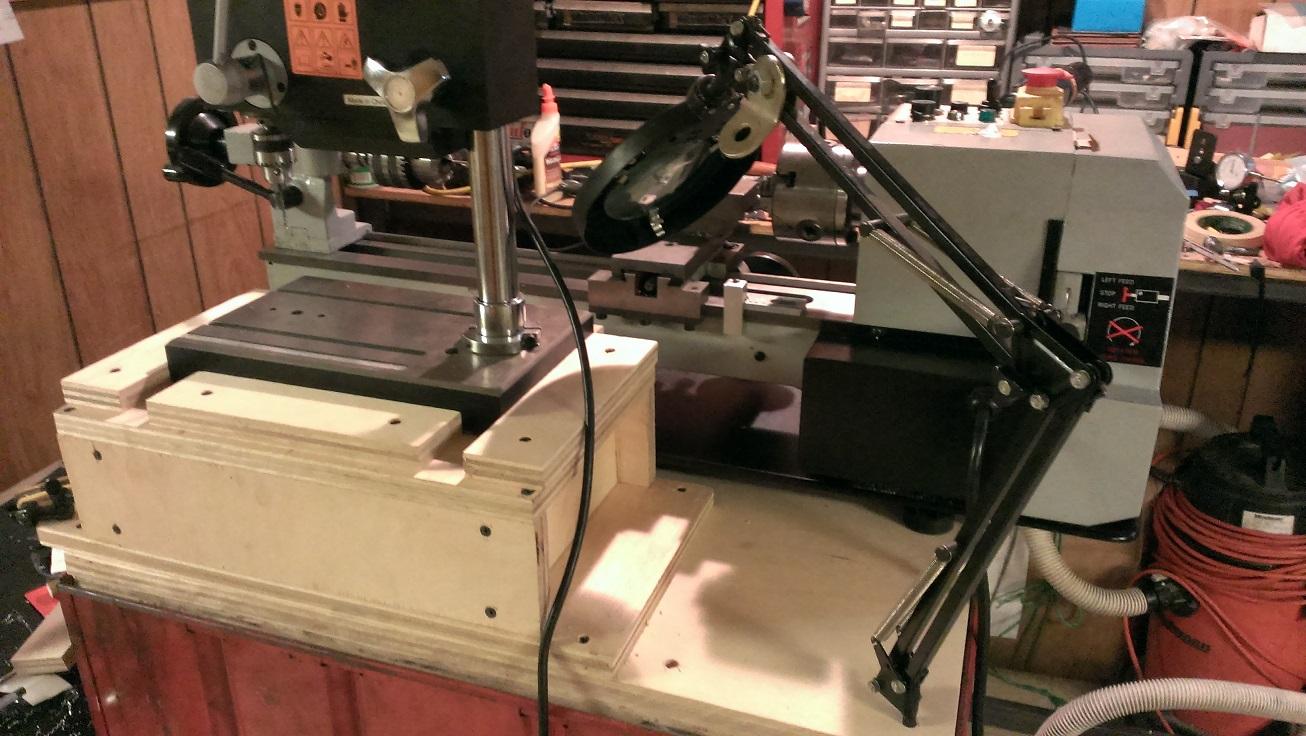
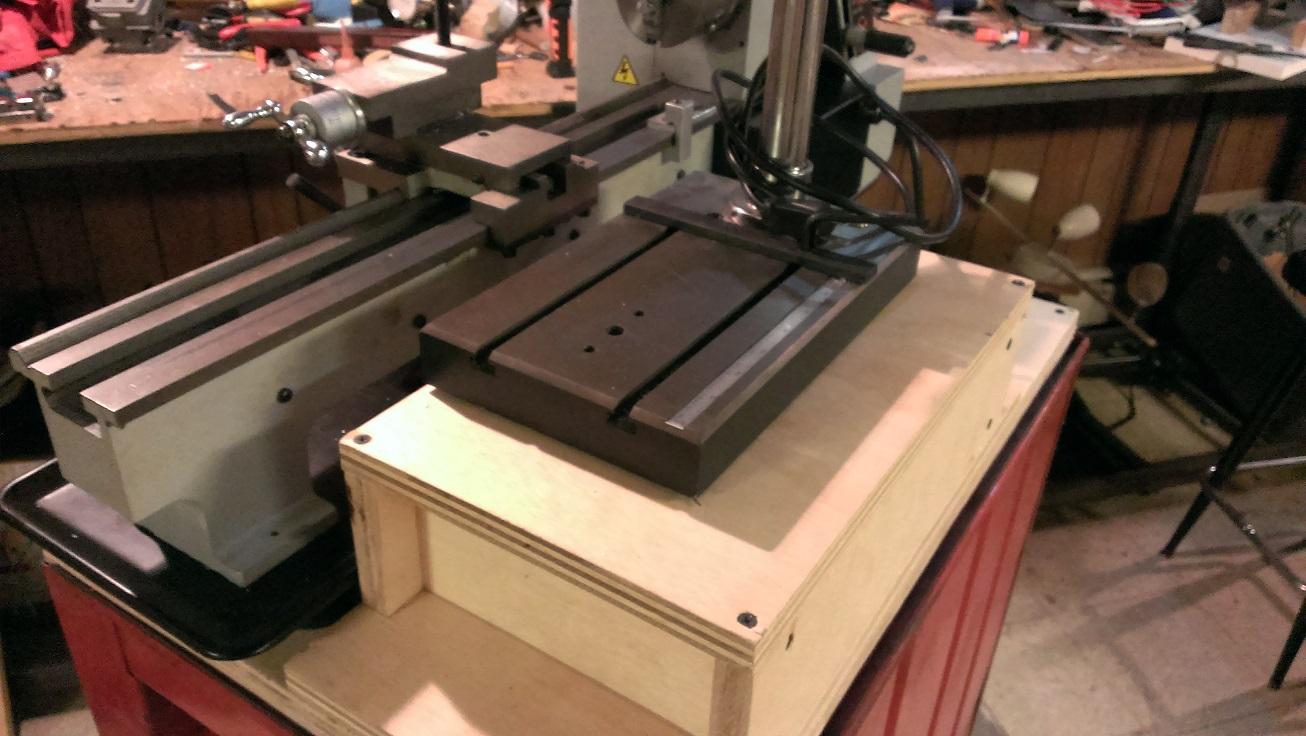
Been meaning to post this for awhile. I set up my mini drill next to my lathe so I can drill hole patterns. I have the 7 x 16 lathe and mini drill from Micromark. This drill is NOT for milling. There is no gibbs/gibb plates on the cylinder, just a slot in the cylinder with a extended point set screws. Im sure I could mill plastics and alloys but I dont want to get into that practice with this unit. Being 6'1", this set up is perfect for me when sitting on my bar stool. The set up is mounted on top of my cheap craftsmen rolling cabinet, with 1-1/2" worth of birch plywood top (2 layers), glued and screws to the cabinet. The drill is mounted to a platform that is 9x15, overall height is 5". The platform base is 9x19, which gives me room to mount it and I have 1" of it over hanging the cabinet, to hang the common tools I use ( chuck keys, center drills, etc...) At some point, Im planning on building a A-frame for this set up, but since I have plenty of birch scraps at work, this was a fast and cheap set up for me. And since I only machine plastics and alloys with no coolant, this should last awhile. Thanks for looking and comments are always welcomed. * Also, the drill press base is mounted to the platform ( not shown here)
-
Thank you phantom1
-
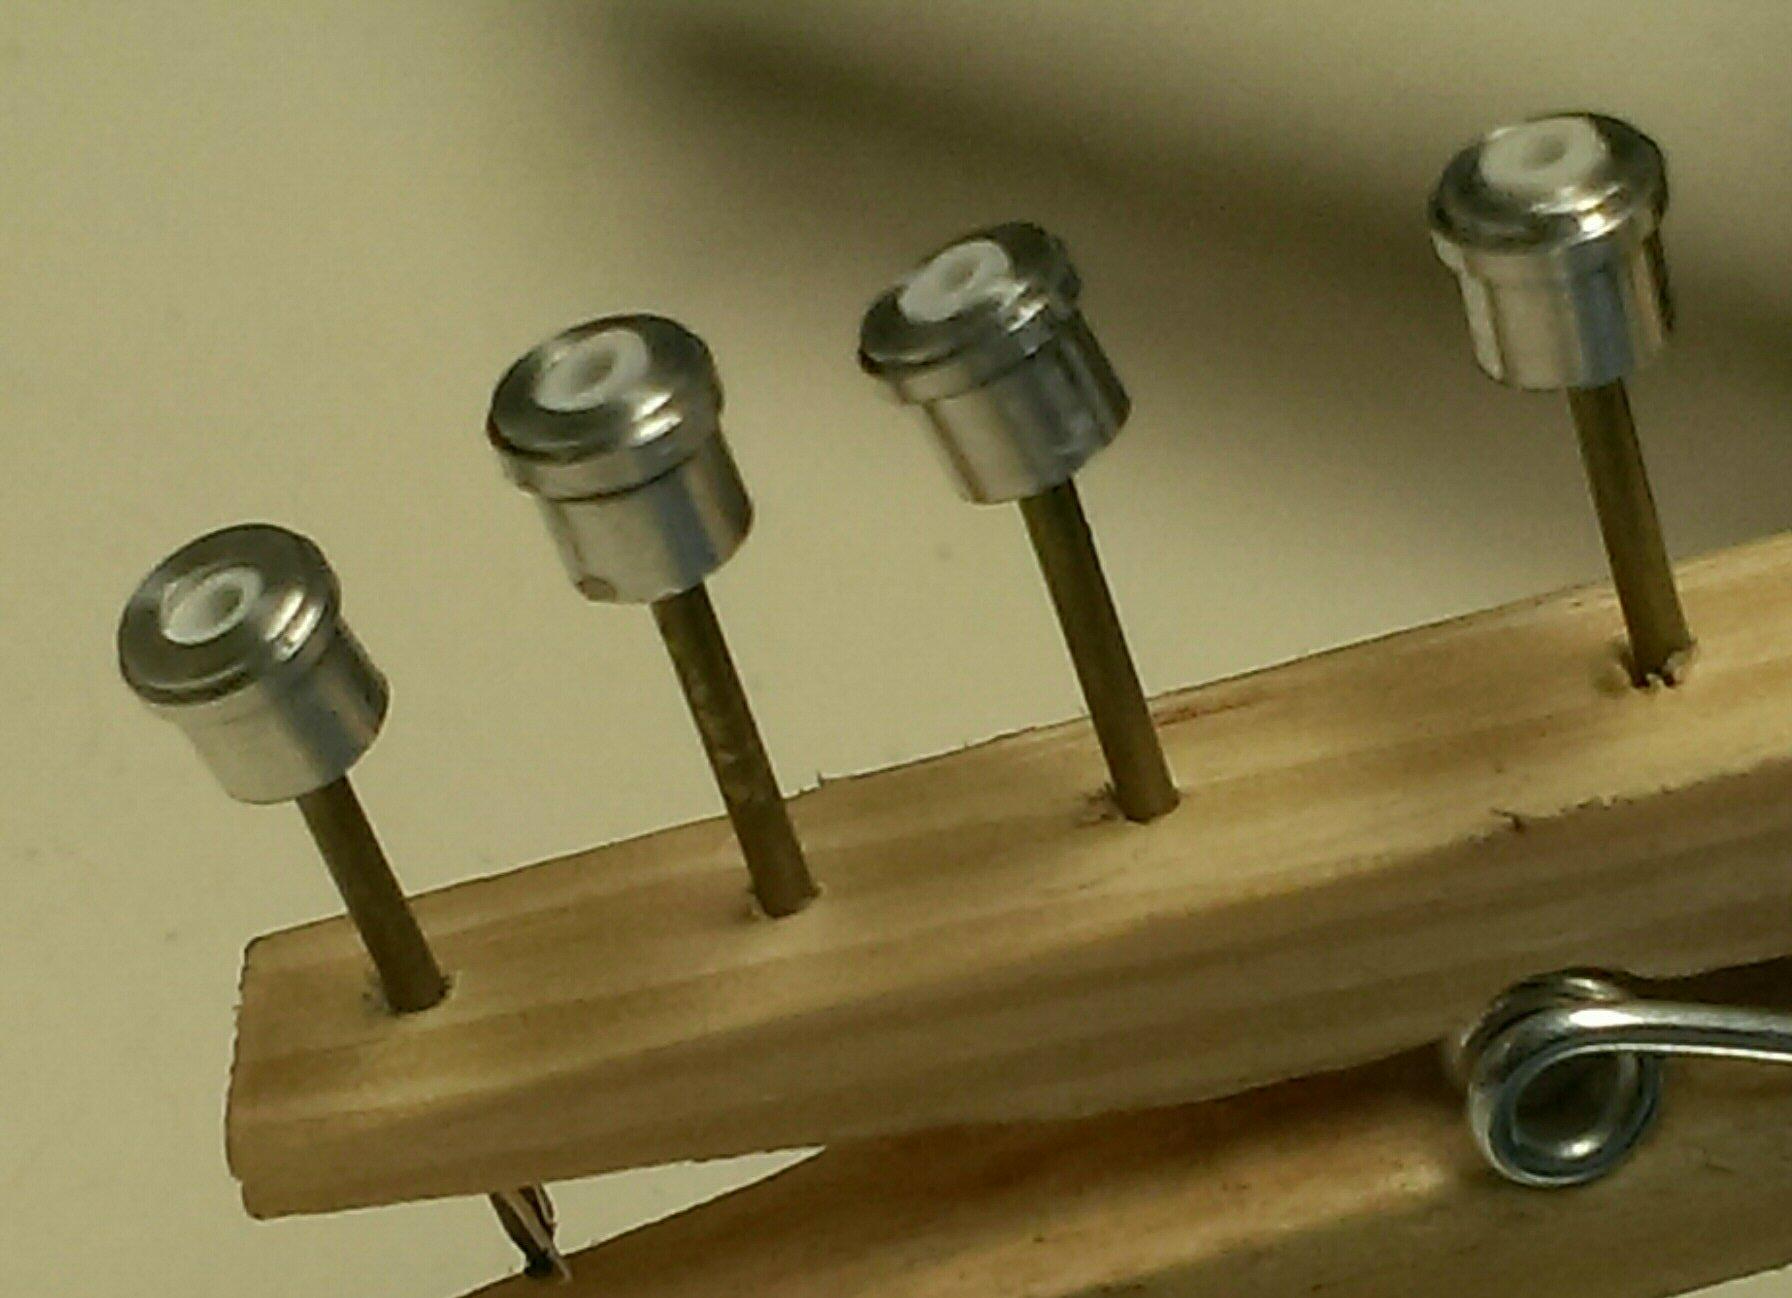
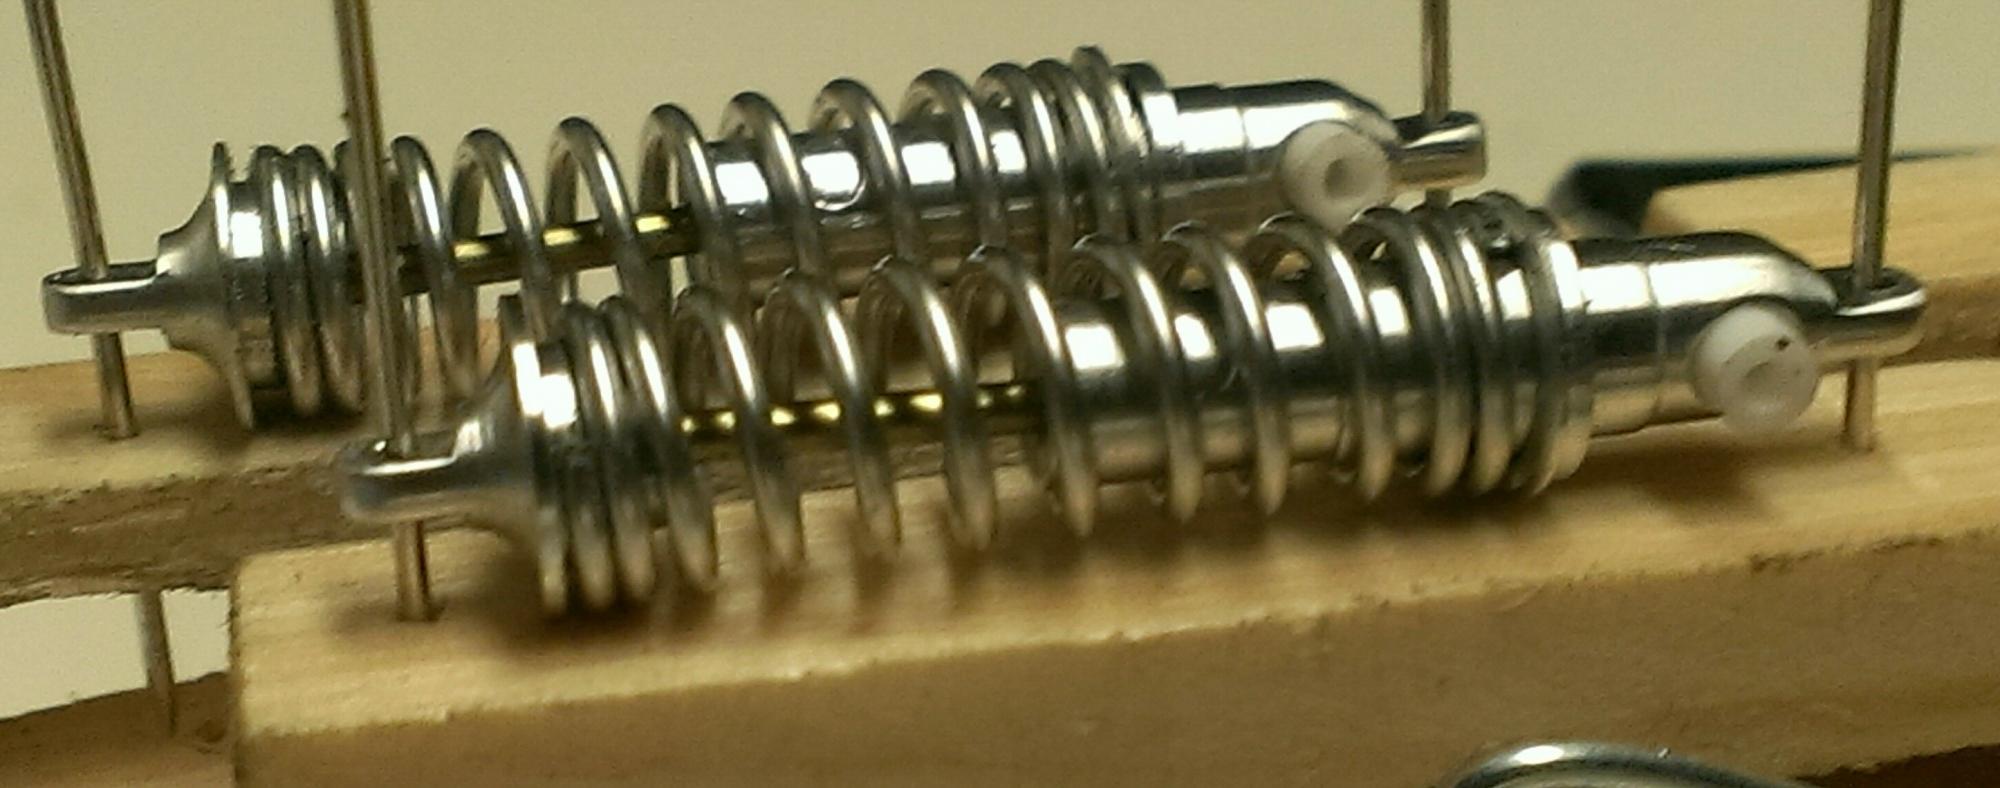
Small update. I didnt get much time this weekend to work on it. I made some functional ball joints for the control arms. I bought .050 brass finishing nails and 1/8" brass balls. I turned down the head of the nail to .055 and drilled the balls to .052 and drove the nail in with a hammer. I had push pins with a round head on them, but the were oversized for my 1/8" ball mill and would have created a lot of work to get them to run smooth. They are based upon QA1's screw in style ball joints . I think Im going to redesigned them as I made the top section as a cap. Now that I think about it, I should make a plug for the bottom instead so I dont have to worry about the ball stud topping off the cap down the road. The white styrene tubing plugs with be replaced with black tubing. I also did a little bit of work on the shocks, adding the adjuster dial on the bottom of the shock body. This part with be made of black tubing instead of the white, but I didnt have any black and wanted to see how it looked. And I figured out a simple way of making the adjuster screw itself (no pics here). I cut a piece of brass nail with a pair of dykes, and was planning on sanding it smooth and with a chisel, punch in a line. I dont have to do that. The dykes themselves left a nice line. Its raised instead of recessed but it still looked great to me. Thanks for looking and comments are always welcomed.
-
I would use the biggest endmills I can fit for whatever part im.going. Im sure 1/8, 3/16 and 1/4 both in flat and radius will be required. And if you plan on turning the outside of the wheel on a rotary table also, for the entire width of the rim, a 1/2 will be required otherwise it will chatter.
-
Datsun 510 Pro/Stock "SWEET PAIN" COMPLETED BUILD
John Clutch replied to LeadFred's topic in WIP: Drag Racing Models
Lookin great. Now you can see just how narrow that rear end is gonna be. The 4 link plates are nearly on top of the pumpkin!!! -
i believe the hardware shop is on vacation. Ill be sure to pick up a few products from.TDR but tires will not be one of them. I really want rubber tires
-
Stump, thank you. And yes, i will contact Joseph again soon.
-
Datsun 510 Pro/Stock "SWEET PAIN" COMPLETED BUILD
John Clutch replied to LeadFred's topic in WIP: Drag Racing Models
Thats great you have another body. Maybe thats what i should do. Thanks for mentioning it. -
Datsun 510 Pro/Stock "SWEET PAIN" COMPLETED BUILD
John Clutch replied to LeadFred's topic in WIP: Drag Racing Models
LeadFred, this is EXACTLY ehat happened to me with my 1/16 69' Charger pro touring project. I chopped it up and then nothing was symetrical. And it been in the box for a year so far, til I have the patience to make proper jigs to get everything to work. DONT CUT THE FRONT OFF NOW!!!! Wait til you have everything else mocked up, then chop the fenders off. Youll be happy that way. It looks great so far! The concept is a great one. Good luck with it bro -
Maynard Rupp Chevoom 7-29-16 Finished and Final Photos
John Clutch replied to Marlowe's topic in WIP: Drag Racing Models
Oops lol sorry. I didnt know that word wasnt accepted -
Maynard Rupp Chevoom 7-29-16 Finished and Final Photos
John Clutch replied to Marlowe's topic in WIP: Drag Racing Models
You completely nailed it. It strikes me as if you put it together 50 years ago and I think its because you nailed the color and its finish. Congrats bro, you should be BLAH_BLAH_BLAH_BLAH proud. -
Awesome job! It came out 10X cooler than even I thought